When you click on links to various merchants on this site and make a purchase, this can result in this site earning a commission. Affiliate programs and affiliations include, but are not limited to, the eBay Partner Network.
IMHO the stock carbs are always suspect. A weber 32/36 is a much simpler carb and far more reliable.
Umm yah, IF you have the $300 or so for the Weber (the REAL ones, not the cheap copies), plus more $ for the regulator. Don't have the income or the cash, which is why I am fixing this one up. And can't find a decent rebuildable used one either; I've looked. I'm forceably retired w/no job & no gubbamint checks comin in, & use the truck to find & grab scrap metal on trash nights to make my little bit o' $. So about $350 for the Weber setup might as well be $3500 to me. Just no way to get that much in hand all at once and stay legal. :^)
Checking receipts, I've got less than $300 into all of this so far over the last 4 months. Not bad for an all new ignition system, fuel pump relay, new fuel system & well sealed tank, after I get the new hard lines in of course. Even with buying a tube bender the new lines will cost me less than $40 and last a long, trouble-free length of time; not too bad sez me.
So, I managed to bend up some brand new fuel hardlines to match the originals and got them installed. A bit of a PITA job, but got it done OK nonetheless. Doing the bending wasn't bad; the Harbor Freight tube bender plus some thot & time & it all worked out well. Also double checked all rubber fuel lines; still new & firmly attached, no leaks. I also got the gas can & got 2 gallons of Chevron gas w/Techron (fuel system cleaner in the gas) plus a bottle of Techron (on sale at IdjitZone, $2 off, whoohoo). Only had about a gallon & 1/2 of gas left in the tank so added the 2 gallons of Chevron plus 6 ounces of Techron cleaner. Figured running it thru the carb & fuel system wouldn't hurt, & could possibly solve any carb blockage issues. (Even tho I did clean it before, see prev. post.)
Fuel flow is now good, full fuel filter on engine bay, good fuel level on carb sightglass. Set Idle Mixture two turns out (stock setting). Give it two pedal pumps, turn the key and she starts right up in high idle (1600 RPM). Check for fuel leaks while running; none. Recheck fuel level in carb; still right. Recheck fuel filter level; still full & can see good flow coming in. High idle quality good but not enitrely smooth (I'd say 85% good). Let truck warm up without touching gas pedal. Idle slowly comes down by itself as it warms to full temp, stopping @ 1200 RPM. Kick off high Idle cam with pedal; immediate stall out. Crank engine w/no pedal; won't start. Kick gas pedal halfway & release, turn key, starts up, runs for 3 seconds then stalls again. Restart & will continue to run ONLY if gas pedal is held down at least 1/8 of travel. Give it some revs up to 2000, 2500 & 3000 & hold; runs great, seems to have gobs of power. Let the pedal fall back to low idle position & she stalls out.
Truck just refuses to run @ low idle.
Adjusted idle speed screw in 3/4 turn, crank and she starts & idles @ 1100. Readjust idle speed & it doesn't want to keep idling below 1000, wants to stall below that, & idle quality @ 1000 isn't good; it's half rough. Leave it @ 1000 & turn out mixture screw to give it more gas. NO CHANGE AT ALL IN ENGINE SPEED, even at 6 turns out!
So fiddle some more & decide to put my hand over the air cleaner inlet for funsies. Idle smooths out & goes up to 1600 RPM. This is repeatable & doesn't change. Sounds like a vac leak doesn't it?
WELL, it ain't. As previously posted, I've been over this engine with a fine toothed comb (as well as 3 to 4 cans of carb cleaner AND propane) and can find NO, ZERO, AS IN NONE vacuum leaks on the intake side, ANYWHERE. This includes several spray tests of the carb body itself, just to rule out cracked metal carb body parts or bad gaskets. (Newly professionally rebuilt, but could happen). All ports capped w/new caps except vac advance (triple checked). Distributor is new & testing w/vac pump & gauge show diaphragm is good, no leakdowns. I've even rechecked every nut & bolt on the intake side for tightness; all good.
One significant thing to report. When reving the engine to 2000 RPM or above and allowing it to come back to the 1000 (as mentioned above), there is a VERY distinct backfire "POP" right at the tailpipe. There has been backfire popping during all of this fixin & testing, but it seemed to be more inside the exhaust pipe, never right at the end of the pipe. That's why it got my attention, due to the different sound & location. Doesn't do it every time. Does do it coming off the steady 1000 RPM idle to revs & then down; POP. If you double rev it (vroom, vroom), it either doesn't happen (3 out of 10 times) or if it does (7 times out of 10), it's not as loud, but it's there.
So, where does this leave me? Hand over intake test tells me it's lean; but WHY exactly? Pop at tailpipe tells me unburned fuel is getting out of the cylinders & into the exhaust. How can there be a lean condition but still have unburned fuel? Confusing, to say the least. Compression is good, there is no unusual valve noise at all. She's not running hot, which would indicate lean condition, temp gauge is normal. Temp sender is new too.
Only clue I have so far is that it if ain't the intake side, it's the exhaust side. However, there are no exhaust leaks I can find. Manifold nuts tight to spec, no ticking noises, no puffing at pipe joints, no holes in pipes or muffler. Running @ 1000 RPM idle exhaust at the tailpipe is pulsating. I don't think that's normal. There is the occasional skip in pulses. like maybe 1 in 25 or 30, so I think that rules out a stuck exhaust valve. Other thing is that the exhaust seems to be coming out VERY strong. When you rev it, it will blow leaves laying on the ground 6 feet away from the tailpipe, a distance of a foot or more from where they were.
So that's got me thinking, muffler internal baffles blown out? Not enuff backpressure? The system is 15 years old, but I have never gone more than 8000 miles a year since I've owned the truck. Mebbe it's due? She's always had a low rumble to her so sound wise it's hard to say. However I have heard the decel "popping" before on bikes, cars & trucks running straight pipes or glasspacks. Like I said, runs fab above 1500 RPM & last time I could get a road test in, it seemed to have LOTS more power in the upper RPM range; more than I ever remember in 18 years. Actually scared me how fast she was.
From what I'm reading, free flowing exhaust systems are great for upper end torque, but not so much for lower end or for idle speed. Baffles in muffler restrict flow by design. Mufflers rust from the inside out, so mebbe the baffles were weak, the muffler baffles blew out during the previous backfiring sessions, leaving the muffler close to an empty shell? That would affect exhaust gas flow which would affect cylinder scavenging. To much to explain here but basically, lack of exhaust scavenging leaves exhaust gases in the cylinder, in effect displacing oxygen in the incoming mixture, so all of the gas can't burn off (not enuff O2, which you need to burn stuff). So hot, unburned gas goes to exhaust pipe, flows to end, hits open air where it gets O2 and "POP". Makes sense to me.
So I guess next is to pull the muffler & see what's going on with it. Might have no baffles left, might be clogged up (which would also be a problem).
I'd like to thank Yotatech for allowing me to post all of this. Just having to think it thru & write it all out is a major help. I just hope some of this helps someone else out there sometime. Hopefully they won't have as many problems as I do! More to come...
You certainly have a lean mixture problem. Lean fuel mixture(s) can and do cause backfiring, so that's probably where your backfiring issue stems from. Keep in mind that backfires out the carb can blow diaphragms in the carb, generally the power valves.
Distributor vacuum advance diaphragms should be fine if the dist is new. Have you checked and pulled a vacuum on the brake booster? It should hold perfect vacuum indefinitely. Blown boosters is a common failure with vehicles of this age and a large source of a vacuum leak.
Have you checked valve lash? Tight valves will cause the engine to idle very rough or not at all, yet run fine at higher RPM's.
Thanks for your comments on this; it is greatly appreciated!
It sounds like it's lean to me too. Fortunately she's only backfiring ("afterfiring"?) at the tailpipe, not out the carb, thank goodness. I too have heard about the ruptured diaphragms & blown out power valves from that but thankfully it's not popping in that direction.
Distributor is new, advance diaphragm tested w/a vacuum pump & gauge & working fine.
I did think of the brake booster. Haven't gotten around to testing it yet BUT, since I was just trying to get her to run at idle, I pulled off the booster vac line & capped the port with a new rubber vac cap of the proper size. No vac leak there; propane tested. I did that just to get it out of the system & not be any factor in diagnosis.
Valve lash was set by the book (and what it says on hood sticker, it's still there!) & triple checked by me. All adjusted dead on, no slop to either side of the spec. Oddly, on first check before adjustment, only 2 of the intake valves were slightly on the tight side (.007" instead of .008"), and the rest were right on. First time I'd ever touched 'em in 18 years ownership. (Go ahead, you can flame me for that ) Not that I didn't know how, it just didn't seem to need it before, so I didn't bother.
Went ahead & got a muffler on order, since it could use it anyway & is cheap enuff (Walker 17864, under $36 delivered from Rock Auto, gotta love it!) Hoping it restores the proper backpressure & solves the problem; not much else left to try (see prev. posts, esp. 1st post). At least my pipes look good & aren't leaking!
Got the new muffler installed; not too much of a headache, worse taking old one off than putting new one on. It did solve the tailpipe popping, which is now gone. Less flow than before coming out but good volume. New muffler weighed half a pound less than old one. Carbon plugging up the little baffle holes in the pipe? Dunno.
in any case, it still didn't solve the idle problem. Still inconsistent & will NOT idle decent below 1000 RPM. If you try to set it lower than that (850-900 as specified by Toyota) it will hold for a few seconds, then drop & try to stall out. Otherwise idle speed slowly bounces & varies between 1000 & 1200. Fully warmed up motor, choke open. Fresh pro rebuilt stock Aisin carb (correct model verified) w/less than 400 miles on it, brand new base gasket at time of install; verified it is on the right way too; only fits one way & was sent with the new carb by rebuilder. Carb base nuts & bolts torqued to spec. Base spacer shows no cracks. See no cracks in intake either.
Again, adjusting mixture screw doesn't seem to change much of anything. Engine will speed up quite a bit if you place your hand mostly over the carb throat; still acting like a vac leak (too much air), but still can't find any leaks anywhere (6th time doing a complete check w/whole can of carb cleaner, no joints missed.) Carb only has the distributor vac advance line on it; all other ports capped off with new & tight proper rubber vac caps. Again, PCV valve, grommet & hose are brand new & tight. BTW, valve cover gasket, half-moon plugs & grommets under hold-down nuts are also new. Nuts torqued to spec, 9/ft#.
Still will also try to stall @ idle for no reason, and on no regular time schedule. Might be 30 seconds after start, sometimes 10 minutes. All with idle variation as described above during those times. VERY inconsistent, which is what's really frustrating the crap outta me. Off-idle throttle response is very good, no stumble or hesitation.
Was thinking mebbe the throttle rod linkage; checked, cleaned, lubed, reinstalled, no binding noticed. Same idle as before, no change. Also checked gas pedal & cleaned/lubed linkage, checked for binding, nothing. Return springs all seem to work well & have good tension.
For the record compression is great, & she runs like a scalded dog at anything over 1500 RPM, so I do NOT think it's a head gasket. power is really good over 1500.
Timing checked while running @ 1000 RPM; 8 degrees BTDC as per spec, no wandering mark. Mark advances as it should when you rev it up.
Again, NEW fuel pump, rubber fuel lines, hard fuel lines, fuel filter, bowl cleaned out, float level correct, no fuel leaks. All smog equipment gone.
So the plan of action for tomorrow morning is this: massively inclusive vacuum leak testing. Will be using, in order, propane, water in spray bottle and length of heater hose for a stethoscope so mebbe I can find it audibly (by ear). Beyond that I have no clue where to go next with this, if I don't find something to fix. I'm hoping I can find it. Given that it doesn't want to idle below 1000 tells me the leak should be reasonably constant, so at least one of the above approaches should locate it for me. More to come.
So the plan of action for tomorrow morning is this: massively inclusive vacuum leak testing. Will be using, in order, propane, water in spray bottle and length of heater hose for a stethoscope so mebbe I can find it audibly (by ear). Beyond that I have no clue where to go next with this, if I don't find something to fix. I'm hoping I can find it. Given that it doesn't want to idle below 1000 tells me the leak should be reasonably constant, so at least one of the above approaches should locate it for me. More to come.
So, vacuum leak testing done as described above. Found absolutely NOTHING leaking vacuum. Took my sweet time with it so as to not miss anything; none of the usual culprits reared their ugly heads.
Heard from someone that a good test for a leaking intake manifold gasket was to take your oil filler cap off & put your hand over the hole. If it had strong vacuum, that would indicate a intake gasket leak. It does have very strong vacuum there, but all 3 tests I ran show no leaks at any of the intake manifold ports, so it has to be something else acting like a massive vac leak.
I even 3 way tested the PCV valve, grommet & hose, all of which were put on NEW less than 400 miles ago. No rev changes, no change in rev quality, no hissing or other sounds from there. I then tried pinching off the PCV hose going to the carb with my fingers; this got a result! Revs dropped about 150 & idle smoothed out some. I then took the hose off of the valve & the engine immediately wanted to die out. Interesting sez me. Got my finger over the end of the hose just in time to keep her running. Idle revs were then at 1000 & idle quality was MUCH better. I even turned the idle speed screw down some while plugging the PCV hose & was able to get it down to about 900, and without any noticeable surging. Keep going that way for 5 minutes & never went lower or threatened to stall on me, like it has been doing.
Shut the truck off, removed PCV valve from grommet & taped over the end that goes into the valve cover, basically plugging that line to the carb, & left it hanging. Truck restarted right up with no gas pedal input & was still idling @ 900 RPM with no variance. Checked PCV port, felt very slight pulsing. Did the same with oil fill port; again very slight pulsing. So my rings & guides aren't letting a bunch of blow-by get thru. Also revved it some & only got a few very mild pops from the tailpipe. Opened mixture screw from 2 turns out to 4 & retried rev test. No popping at all from tailpipe. This is an improvement!
Got bold enuff to test drive it around the neighborhood; she didn't stall even once. No hesitation taking off in 1st, no jumping or popping on decel in gear. It did drop RPM's on a few turns while in neutral but never stumbled close to stalling; didn't even have to "save" it by getting into the gas, it rebounded by itself.
So new theory is this. When I was having the muffler problem, combined with others, and she was running VERY lean, it did sometimes pop back thru the carb. I didn't know this but the PCV valve also acts as a "flame arrester" for carb backfiring. It "senses" the positive pressure in the intake manifold & slams shut, preventing any flame from getting into your crankcase, & possibly setting off a crankcase explosion. Because there is always some blow-by of unburned fuel getting by the rings (even in brand new engines, nature of the beast) any flame getting to the crankcase could set them off. When the system pops back like that, the first thing the pressure wave "sees" are the 2 big ports on the carb; the brake booster port & the PCV port. That may have saved my diaphragms & power piston!
What I think has happened is that a previous carb backfire (due to timing & exhaust problems, mostly) has broken the PCV valve internally, either breaking the spring or something else, and now it's basically stuck open. Stuck open, too much air, massive vacuum leak, way too lean a mixture; simple as that. At idle it's SUPPOSED TO BE NEARLY CLOSED, so as to not upset the idle mixture. High vacuum at idle pulls it nearly closed against spring pressure. As you open the throttle, intake vacuum drops & the spring pushes it back open progressively, according to differing vacuum levels. It's a progressive air metering device! This I never knew, until I started looking around on the interwebs for how the darn thing actually worked.
So, getting a new PCV valve on order to solve this. Unfortunately it might not solve it all, as I also found another exhaust leak at the manifold while doing my heater-hose-to-ear stethoscope testing. Crack in the center of the manifold is still leaking some (light ticking), even after I brazed it up with bronze rod & MAAP Gas Torch (rather poorly done by me, apparently). No access to an Oxy setup. So I either will have to find someone with one to let me use it, have them do it to melt the bronze in properly & seal it up, or find a junkyard manifold with no cracks. And don't even mention headers to me; no way I can get that kind of money together.
Anywho, she's gettin closer to being a reliable running truck again. Will keep pluggin & will throw an update when I have it. Hope this is helping someone else out there.....
New PCV valve did seem to help the idle problem, at first, but then the problems returned after getting the engine up to full temp. Back to square one. Still doesn't want to idle below 1000 RPM without wanting to stall out on me. Mixture screw makes little to no difference, even at 8 turns out.
Noticed that fuel bowl level wasn't as high as it should be; was near the bottom tab of the sight glass; should be right in the middle or a touch higher. Gas coming into fuel filter seems to be at a dribble, and it's not completely full, more like 3/4 full. This really stumped me for a while; new fuel pump relay, new fuel pump, new fuel filter, new supply & return hard lines, new rubber lines & clamps. So more digging around. Found that the truck has a fuel pump resistor! This supposedly drops the voltage down for quieter pump operation. Bleeeah. Test resistor with Ohm meter, reads 2 ohms. Spec is 1.4 ohms, so it's almost 50% too high, choking off voltage & amps to the pump. Would account for low fuel pressure & volume, ya think?
Of course you can't find this piece anymore, even from Toyota, and getting a boneyard one would be a bonehead move IMO. Resistors that are failing gain resistance as you run current through them & aren't stable. So I rebuilt it instead. Got a comparable power resistor (1.4 Ohm, 20 Watt, 10% Tolerance) from a local electronic surplus supply house for $2.50. The thing even has it's own aluminum casing heat sink on it and is rated for environmental exposure. Great. Get it soldered in & remounted, tested good. Tested old resistor hooked to ohm meter & shooting it with a hairdryer on high. It got up to 4.2 ohms. Bad. Tried same test on new one and it's rock steady.
Get it back in the truck, looking forward to her actually running great again. NOPE. Didn't solve the problem at all! In fact, it warmed up OK but as soon as it got near op temp, it shut right down, like someone literally pulled the plug on the ignition system. Was watching the tach when this (repeatedly) happened & the tach needle just went straight to the bottom, fast. Doesn't want to restart from "key left on position" after the stall, but restarts right away if you turn the key off then back on to start, every time. Runs for 30 seconds to 2 minutes then, bang, shut off again. All of this is repeatable. Bowl fuel level still not where it should be.
Gave up for 5 minutes & then came back & tried again, Started right up & ran for 5 minutes then fast stalled on me again. Then back to the 30 second to 2 minute thing.
Can't be the ignition; the whole system is completely new. Checked fuses; all good, all clean, including the clamps. Decided to remove fuel pump resistor from the circuit and just put in a jumper wire (yes I know, I should have done this before) for testing. Same results, no changes at all, even in bowl fuel level. The maddening thing is that when I got the new fuel pump into the tank (with new strainer BTW), it was running OK for a day, then the problems came back, so the new pump is probably fine. Just Seems that something is not allowing it to give what it needs to give.
So dig around some more & find something else; this is a weird one. Back at the gas tank there is what appears to me to be a capacitor connected to a wire coming from the connector for the fuel pump & fuel sender. Pic below:
From what I can tell, it's a polyester film capacitor rated at 1uF 250 Volts 10% Tolerance. The tab on it was mounted to one of the screws holding down the round flange of the fuel pump mounting stem. The single wire is black with red stripe, same as one of the wires going into the connector. Is it a pigtail for that wire? The other wire on the connector is yellow with red stripe. My wiring diagram agrees on these colors for the fuel pump & sender. This capacitor may be original, so it could be almost 39 years old.
Searching online I learn that capacitors do age, & over time & use tend to lose capacitance (electrical storage & regulation) & gain resistance. They can also get intermittent instead of just completely going out (of course, can't have it the easy way!). Hmmm. Higher resistance due to age & use causing not enough amps to get to the fuel pump, so pump isn't running up to full spec? Would explain fuel delivery problem & lean condition problem. Would also explain why some days it comes close to idling OK, other days not so much. I would just eliminate it completely but it has to be there for a reason. It's been there for the 18 years I've had the truck & it ran fine before.
No way to really test the capacitor with the meter so it's getting replaced with a new one. For the life of me I can't figure out why this is even there, but I do have a new capacitor on order, $5.89 delivered, not too bad. Had to go with a ceiling fan capacitor with the same rating, should be as near a direct replacement as possible. Will just install it the same way the old one was in there & see what happens. Sure am wishing right now that I had a mechanical fuel pump on this thing, so I didn't have to mess with all this electric stuff. Double bleeeeah.
Last thot, new info: Also have a brand new fuel sender installed. Since installation it doesn't seem to be working right. I put 6 gallons of gas in the tank & was expecting it to read at least 1/4 (17 gallon tank) but it only reads a little above the E mark. Needle does move from dead empty to this mark when you turn the key on, so it's getting signal from the sender. Sender Ohm range triple verified before I bought it, as well as correct orientation for arm swing, making sure 0 Ohms was full & 90 Ohms empty, etc., it was quite a trial! Also verified that the float arm wouldn't get hung up in the tank; no problems there. After more study I learn that most gas gauge systems use an in-line capacitor to "smooth out" the signal, so the gauge needle doesn't fly around in real time with the arm moving up & down with gas sloshing around. It's supposed to give you a more steady needle reading, like a "signal buffer" in the circuit.
The fuel pump & sender share a ground. The capacitor I show above appears to be inline with the tab mounted to ground. All descriptions I read say this "signal buffer" capacitor is always installed between the sender & ground. Maybe the idle & sender problems are both due to this capacitor going bad???
Anyone with any knowledge on this PLEASE DO POST. I'm learning plenty by doing all of this, but would dearly love (and prefer actually!) someone who knows about all of this to let me know what they know. ANY help would be appreciated. More to come...
Got the new capacitor in the mail, made up wires/connectors for it and got it installed. Did not immediately test to see if this solved the problem or not, because I have given up on the idea that one thing could be causing all of this. So, if you've been reading all of this hoping to find out what THE cure was, don't hold your breath. I've decided for the sake of my mental health that it probably isn't going to be just one thing, but am continuing to do rehab on systems that need it. To wit...
The ground point on the capacitor got me thinking; how is the overall ground system? While the truck was still running, I noticed dash lights at night were kinda dim (old bulbs?) and that heater & wiper motors ran OK while cruising, but slowed down when the truck was running but stopped. Given the age of the truck I decided to check on this. After all, a corroded grounding point could be the cause of all this too.
Can't tell if the ground wire is original or not but suspect that it is. It's 8 gauge copper with three different tabs on it. Tabs are inline with the cable and go to, top to bottom, Air Pump Bracket, Motor Mount above rubber cushion, & Motor Mount below rubber cushion. This last part attaches directly to the engine block.
Looks like someone melted some solder into the stripped end that goes into the battery clamp, but can't be sure. Wire seems pretty stiff. Of course all of the tabs are covered in oil, grease, dirt & gunk. There is also a second ground wire, about 14 gauge. going from the back of the cylinder head to the firewall, attached to the stud holding the park brake cable housing. Those tabs were fairly clean but the wire was way stiff & I found a cut in the insulation.
So no more futzing around: off to Ace hardware to get new 8 gauge cable & new terminals/tabs. I did check wire gauge amperage ratings and the 8 gauge should handle what I've got going on OK, with a safety margin. Fabbed up the 2 new ground cables (no solder, crimp only, my choice) & resistance tested them with the voltmeter; no voltage drop or resistance. I did also check the old cables and did not find extra resistance. However, since my problem seems to happen after 5 minutes run time, there could be corrosion on the wire under the insulation that I can't see, causing resistance that gets worse with heat.
Cables installed.
Also went ahead & pulled the fuse box. Not hard to do, just 2 10mm bolts at the ends & three wiring clips on the back. No broken wires, no signs of arcing or burning anywhere. Terminals on back of fuse box had mostly minor red or brown oxidation, with a few of them having a bit of green corrosion at their bases. I pulled the fuse box because I know this truck used to leak a bit of rainwater near that location in the past (since fixed) so maybe that caused a corrosion problem? Cleaned all terminals & fuse clamps. It was a tedious 2 hours with sandpaper & steel wool, but everything is now shiny brass again.
Noticed that a few of the fuses had black spots on the fuse metal, inside the glass! Maybe water/moisture somehow got into them? Whatever, all fuses replaced with new. No more excuses. Also resistance checked the whole fuse box with the meter; all good. Solid contacts throughout.
Female spade lug connectors in the wiring clips also cleaned, with very small tools. Another hour. Bleeah. Fuse box reinstalled.
Also spent another hour crawling under the dashboard, looking for any ground connections or common grounds (wired type). Found none.
While I was at it, took apart the ground connections at the voltage regulator mounting bolts. Two tabs get mounted there: one stock from the wiring harness, other one the ground connection for my GM HEI Ignition Module mod. Decided to go full bore, take everything off, sand down around the bolt hole in the fender to bare metal, steel wool the tabs back to bright brass & then put it all back together. Checked with meter when I got done; good ground with no added resistance. Again, no more excuses.
Tested all of this by turning on the headlights & 4 way flashers. Headlights are bright & I see no dimming down in time with the flashers going. Checked taillights for the same. All bright, noticed a tiny bit of dim-down in running lights. Prolly nothing; I see the tiniest friggin things.
Haven't tried to start & run it yet after these fixes. Still have to get another new fuel filter on (third one so far) & want to clean out the float bowl again, just to be sure there isn't any junk hiding in there. I doubt it but never hurts to make sure. Second fuel filter had some tiny black specks in it. Still flows OK and do not find any specks coming out the carb side, but taking no chances.
Hopefully some results will follow next, more to come...
Got the fuel bowl cleaned out (no junk found) & buttoned back up. Reset idle mixture to baseline 2 turns out. Hooked up tach & timing light & tried a run test.
Truck started right up & high idled fairly smooth @ 1800 RPM. Let the engine warm up to full temp, watching to see if the high idle would come down on it's own, like it used to; it didn't, had to kick it down. On kickdown, she came down to about 1200 RPM, still fairly smooth if a little fast. Adjust idle speed down, was able to get it to 900 but it still didn't like it too much. At least it didn't threaten to stall out like before. Did some rev-ups & the tailpipe popping seems to be gone. Also revs settled back down to 900-1000 everytime without hanging up at 1300 like before.
Reset idle to 1000 & backed out idle mixture screw. Was able to get it up to about 1200 with just this adjustment; before it did nothing. Seemed pretty good at 3 turns out, tried 4 turns out, no difference in idle speed & slightly more lumpy, so put it back to 3 turns. Adjusted idle speed down to 900; was more solid this time, more consistant. There is still a bit of wandering between 900 & 1000, but this is far better than the 300 to 400 RPM swings I was seeing at idle. Still think part of my throttle linkage may be bent, but will leave that for another time. It's idling OK & not threatening to stall on me!
Took it around the block & all seems to be working OK, with one exception. It still doesn't like quick stops. Throw the clutch pedal in and hit the brake pedal & the idle drops down to about (I'n guessing) 500-600 & acts like it wants to quit on me, but doesn't. After you stop, the idle comes back up to "normal" after about 2 or 3 seconds. Low float level? I don't think so, level in glass sight is exactly where it should be, if not a hair high.
The truck used to stall on me when making turns, with the trans in neutral. This problem is now gone; I tried a bunch to make it happen & it didn't. Idle stayed good thru every turn with no variation that I could hear or feel.
All other driving OK with no complaints; power is good, rev is smooth. I even did some downshifting to try to get the tailpipe to pop like it used to (this used to be a sure fire way to get that to happen before);
NO popping.
Took the truck to the corner store and got 7 gallons of gas in her. Thot mebbe gas level in tank was getting low, & quick stop was mebbe starving the pump. No dice, no change on the quick stop problem. One positive is that the gas gauge finally budged off of the "E" mark, so my replacement sender IS working. Only prob tho is that even with 8 gallons or so in the tank (17 gal tank), it reads under 1/4. I think I'm going to have to live with this. likely a calibration problem in how the sender is made. When I was researching fuel senders, I learned that it is common for them to drop slower from FULL, but drop faster when getting towards empty. it has to do with how the resistance wire in them is wound (less space between windings on the "FULL" side). Since my replacement 0-90 Ohm sender had to be mounted upside down so that the gauge needle moved in the correct directions, that's what's causing it. Couldn't move the float arm to the other side to take care of this; no room in the tank, so upside down it went. Will just have to get used to it.
So, out for a rip with half a tank of gas. Truck started up hot with key turn & me not touching the gas pedal. That's better than before; I used to have to hold the pedal down a bit to get it to start quickly when hot. Quick stop problem was still there but she never did stall on me; I did nothing to try to "rescue" it with the gas pedal. All else good; power, smooth rev, good to decent idle (except stopping), pulls well. I forgot how well this truck drove. I even had it up to 60 on one of the back roads around here. Rides great, and was still wanting to pull even faster than that in 5th gear!
Got back home & parked, did a few revs sitting still. Noticed a VERY mild popping coming from tailpipe on decel (no load). I think this is due to the mildly leaking/cracked/badly repaired by me exhaust manifold drawing some extra air in on decel. It does still leak a bit around the crappy brazing job I did on the cracks. Only noticed the popping then prolly because I had just flogged it some & the manifold heated up more, making the leak a lil bigger. Never did pop when I was out driving it, even on downshifting, which used to be guaranteed popping before.
Current plan is to get a good boneyard manifold on it; can't afford headers, even the Pacesetter ones (cheapest I've found). Plus there would be extra expense downstream in the piping due to mods to fit the headers. Just no $ to get that done.
So with that, I'm at present going to call this 90% good for daily use. I've been 5 months without my own vehicle & I'm hoping all my work will now let me drive her when needs be. Sux being stuck at home all day.
So there you go for now. I'll post up a pic of the truck when I can so you can at least see what it looks like. I hope this tread helps someone out in the future with some similar problems.
After doing yet MORE research , I decided to have at the truck today & try to figure out the remaining problems; i.e. the stalling under braking. Be forewarned, this is gonna get weird, but at least I think I now am getting very close to a final, driveable, reliable solution.
She started right up for me, got it up to full temp. Started moving around every wire & wire bundle under the hood I could find, looking for broken wires or shorts. Started with fuel cut-off solenoid wire; considered that maybe the crimp connector wasn't tight or something; nope. Solenoid itself is new, came with the carb.
I did get a few results on wires near the battery though. While moving around the two smaller wires that come off of the positive battery clamp, she stalled on me. Would not restart from "stalled position" with key still on. Cycled key off then on to start, restarted immediately & ran ok. This is one thing that's been a constant through all of this, which is why I'm looking at electrical. Went back underhood to move those wires again, but this time it kept running! Nothing I did in yanking on them made it stall. Started moving around the 4 gauge wire to the starter and it stalled out. Keep in mind, battery clamp is uber-clean, as is the ring terminals to the 4 gauge & two smaller wires. Battery is new, as is alt & volt regulator. All been checked with meter, all working OK.
Back to cab to restart as described above. Tried moving around all three wires again, but no stall-out. Continued to check wires on passenger side. I found 1 smog solenoid very hot. Disconnected & removed from the truck, as it wasn't bolted down to anything. Found other smog solenoid warm; disconnected wiring to solenoid. I had previously disconnected the smog computer at the driver's side kickpanel, so no idea how these were still getting voltage/power. It's enuff to make you wanna
Did some rev-ups, noticed mild popping at tailpipe. Checked timing, found to be 9 degrees baseline is 8 degrees BTDC). Increased idle mixture to 5 turns out (Baseline should be 2 & 1/4, NOT 1 & 3/4! I derped on this the whole time, duh me. ) More rev-ups, and the popping is GONE, just disappeared. Increasing the idle mixture raised the idle to 1200. Lowered idle speed to 900, seems much better than before. Settles back to 900 almost everytime after rev-up. No dip below 900 on settling. Reset to 850; good, smooth quiet idle. Almost scary slow & quiet!
Rechecked timing; reset to 8 degrees BTDC. Throttle response good, still no popping @ tailpipe.
So out for a drive test. Extensive stop-&-go to check for brake stalling problem: THE PROBLEM IS GONE. Could not replicate the problem, even going down hills. This confirms that the carb is GOOD.
No fuel starvation due to gas sloshing away from the jets. Also reconfirmed fuel bowl level; dead on exactly half-way up the sightglass.
Continued my drive test. Throttle response is good, power is good, still no brake stalling. Checked tailpipe in rear view mirror for smoke under acceleration; nothing seen. Putting in clutch & putting trans in neutral at speed, idle settles back to 850 idle speed without any stumble. Now, @ 15 minutes of run time & 15 minutes of drive time, and it's working all fine. By now I'm thinking I've finally hit upon what needed fixing and am now done with repairs for a long while.
But not so fast Wilbur.......
I have a stretch of backroad going back to the house where I can get above 40, and I have been using it to check for harder use; accel, high speed cruise, etc. I got into the throttle aggressively for about 1000 feet leading up to this road, but then it was wanting to try to stall a bit when I dropped it in neutral. Made a right turn on the backroad, got in the throttle again. Stalled on me after 1000 feet while turning right into a subdivision, again in neutral. More popping @ tailpipe noticed before the stall while downshifting. Had to get on the gas some to keep it running in neutral. Foot off gas, it stalls. Recrank, cranks but doesn't want to start. Cycle key off then on to start, engine starts but did not want to keep running without giving it some gas.
Back to the backroad. Got into throttle aggressively. Runs up thru gears fine, no stumble, hesitation, misses or pops, has good power & pull, even in 5th gear.
Downshifted thru the gears approaching a reduced speed zone (goes from 50 to 25, classic southern speed trap), yet more popping/burbling from tailpipe. It wanted to stall in neutral approaching a stop sign but didn't. Had been about 5 minutes from higher speeds to my driveway Stalled again when pulling up to backup into my driveway. Did not want to turn over. Cycled key, was VERY slow turn over*, but started, then all seemed fine running wise.* Couldn't even get it to pop @ tailpipe from revs, & it was idling great after that. Go figure.
* This is why I suspect it still has an electrical problem as noted above. Faster/harder use draws more Amps. Corroded, weak, broken wire could be overheating. Doesn't seem to do this at lighter usage levels, only when you 'get on it". Maybe it was fine after restart because it cooled down some? Higher resistance from heat causing less electric power to reach ignition system, weaker spark, therefore causing a lean condition? But not enuff heat to actually burn up the fusible link? Maybe some strands in the link are fried & some still intact?
I am suspecting something wrong with the fusible link on the positive battery side. I did find a few examples on the web where cars still had power & would start, but weird electrical things would happen after it was warmed up. Could also be some broken wire strands in those wires. Fine for low demand, but higher demand heats 'em up, causing higher resistance. Apparently, the two smaller wires @ the positive terminal are for main power feed to fuse box, the other is the wire from the alternator for charging the battery. Both go into fusible links, that go to one ring terminal on the positive battery clamp. Since the battery seems to be charging OK, I'm almost willing to bet it's the main power side link that's going crappy.
In any case, I think I'm down to a wire problem @ battery positive, which would be nice. It's even possible a previous owner cut off some of the fusible link wire when they fixed battery terminal corrosion, and that's not good. I'm reading that you should have at least 6 inches of fusible link wire there. I have maybe three inches of wire going to a black plug in the harness. I am assuming the black plug is factory stock, so the fusible link could be easily replaced. No such luck now, as factory fusible link for this truck is NLA (no longer available.) Looks like I'll have to scrape around some more for a suitable replacement. AND fab up a new positive 4 gauge cable for the starter while I'm at it.
One of these days I'm going to get it all fixed, it's gonna run sweeter than I ever remember, and then we are going off to Valhalla together.
Well, turned out I was right AND wrong about the fusible links. Lemme explain.
I was right about some P.O. cutting the fusible link wires short during terminal replacement in the past; I just didn't know HOW short. And yes, this is how it's been for the last 18 years I've owned it; scary.
Here's a pic:
See those two little wires between the black plug and the yellow crimp insulator? YEP, that's all that's left of my fusible link wires! Barely 1 inches worth! Not much protection eh? The ring terminal obviously isn't Toyota factory, & who know how many times these wires were cut back? Like I said, scary!
So here is the beginnings of the fix:
As you can see, the price is right. The fusible link is from Dorman (#85620) 14 gauge with ring terminal & butt connector included. This will go to the 10 gauge wire coming from the alternator. Rule of thumb learned: fusible link wire should be 4 gauge sizes smaller than the wire it is supposed to protect. It's like a slow-blowing fuse that will take the occasional amperage spikes & continue to work. They only melt & break the circuit when the amps get too high for a slightly longer period of time. This protects your devices and wiring harnesses. I don't think I have any problems in the harness that are causing my troubles. After all, it was working for 18 years this way, with no problems, with that lil bit of fusible link wire, and those didn't melt.
AND it was idling & running good on the last drive test, so I don't think those are the trouble. But they are getting replaced anyway. Better electrical connection and better safe than sorry!
Am still looking for the other fusible link wire for the 12 gauge power feed to the fuse block. Apparently the store I bought the above from doesn't stock the 16 gauge wire, just the 14 gauge. They wanted to special order it AND charge me $13 shipping on top! $13 shipping for a $4.49 part? No thanks. Off to a different parts store to get it. (Dorman #85621).
So I was right about the fusible links, but wrong elsewhere. This was the battery to starter cable. I looked it over and even ohm'ed it out with the meter on the truck & didn't find a problem. Went ahead and removed it anyway, with a view to getting a new one, since I already put all new ground cabling in the truck. Why not complete the job? @ $6.69 + tax for a 4 gauge, pre-made cable, I couldn't say no! Besides, it's now looking like this cable is the very root of my problems. More 'splainin.....
After I get the cable off the truck, I ohm'ed it out again with the meter, just to double check myself. Again, ohm'ed out OK. I even flexed the whole length of it with the meter hooked up, looking for evidence of breaks or jumps in the meter; nothing. But then I started thinking (dangerous, I know!) This whole thing seems tied to it getting worse with heat & higher demand. Once it cools off a bit, it gets better, if not normal, as my last drive test showed. What if that cable has internal corrosion, metal fatigue to the copper, oxidation, broken wire ends in the cable? All of which can act as a resistor, AND get worse with heat or amperage load? It's like I was thinking earlier with my fuel pump resistor (see previous posts in this thread), just worn out, & causing more resistance to current flow as it heats up. Could be.
So, checked the cable again for resistance, comparing it to the new battery cable. I noticed something a little less than obvious. Baseline the meter, test leads have a solid 1.2 ohms resistance (don't have an auto-zeroing meter). Hook 'em up to the new cable & meter goes to 1.2 ohms fairly quickly. Try the old cable & it also goes to 1.2 ohms, but it took longer to get there. Like, less than 2 seconds for the new cable, but 5 to 6 seconds for the old cable. Don't know about you, but to me that shows there is some resistance in the cable that isn't supposed to be there. No telling how old it is, or how many use/heat cycles it's seen.
So how to test for "heat soak" related variable resistance in the old cable? Into the oven it goes, set on about 175 degrees, for a good 10 minute warm up. Don't tell the wife please!
From what I find on the Google average underhood temps are 170 to 200 degrees F. The truck didn't want to crank when it was hot on my drive test, but starts great cold.
Wanna guess what I found out?
Hooked up the meter leads and it took 22 seconds for the reading to get back to 1.2 ohms. 4 times longer to get to base reading that should indicate no extra resistance in the cable. Cranked the oven up to 200 degrees & gave it another 5 minutes to heat soak. Measured the cable again and this time it took 47 seconds to come down, but it stalled out @ a low of 1.6 ohms, and actually fluctuated between 1.6 & 1.7 ohms. It never did go lower than 1.6 even 1 minute later. Took the cable out and let it air cool for 5 minutes (to match the cooldown time from my last drive test. Measured 1.3 ohms after 7 seconds.
So using Ohm's Law to (roughly) calculate, and extra 0.4 ohms resistance in the cable (@ 200 degrees F) equals a 50% voltage drop!!! I am only getting 6 volts instead of 12.
So basically, the cable is acting as a variable resistor, changing with ambient engine compartment heat AND heat generated by current flow. As the heat resistance climbs, this makes the current heating worse exponentially. This means the lean condition I have been chasing is actually an electrically caused lean condition, and has NOTHING to do with fuel supply at all. Put that one in your pipe and smoke it! Who knew this one?
To make matters worse, looking at the wiring diagram, all of the positive side stuff is connected together & working with the ignition switch on. This includes being connected to the power feed for the ignition circuit. Apparently, when I have been cycling the key after stalls, off then back on, this is causing some sort of "reset". It may be resetting the HEI module. HEI modules are notorious for not liking voltage fluctuations or voltage drops. Apparently it's a "safety feature" built into the modules, to keep them from blowing up under such conditions.
How am I so unfortunate to have all of these intermittent problems that aren't so obvious. No clue, but the positive thing is I am that much closer to getting her back on the road, and I never let it beat me. Sure there have been times when I just wanted to say **** it all, but somehow I keep going. Once I get the other fusible link in & test again I will update. Keep your eyes crossed for me!
Also, on the side, I took out my instrument cluster. Cleaned up the whole thing, inside & out. Also cleaned up all of the pins, contacts, etc. Will also be replacing all of the light bulbs, some of which look to be original! Many of them are marked "YAZAKI 158".
It takes 9 bulbs. I got a deal @ Autozone on these. 158 & 194 bulbs are interchangable, with 194's being a little brighter. A box of ten bulbs WITH the mounting bases (black parts on back of unit shown below) for $14.99 + tax. Part # PC194-10. And they are the long life type too, not "regulars". Beats the hell outta paying the stealership (IF they even have 'em) or $14.99 for a pack of 2 bulbs WITHOUT new bases. Saved $10.
Pics of the instrument cluster below, front & back.
Turns out my friendly neighborhood parts people (who shall go unnamed here) gave me the WRONG ALTERNATOR! Apparently Toyota did some strangeness with their charging systems between 75 & 84. The different alts look the same, with some minor exceptions. I found a post by kawazx636 on Yotatech explaining the differences:
I have the 6 pin voltage regulator, previously replaced with new, verified with the old one that it was the correct one for the truck. My parts house ordered in my alt & I should have known something wasn't going to go right when they handed it to me. It looked new & had an installation guide attached to it, BUT IT DIDN'T COME IN A BOX. Should have been a clue. The sticker on it was the correct part number (theirs) so I installed it and then all what you may have read above happened. Toyota never bothered to change the plug style between these two styles of alts, so the same harness connector would fit either one. Bad news.
I had the 12 volt power reversed. Not gonna work that way!
Odd thing is that it did run, just not too well. I did test for charging when I put it on and it read 13.8 volts at the battery. After my last run test I kept the meter hooked up & realized that it wasn't working any more; truck was running off battery alone. FEH.
So more research & back to the parts house. What happened with them is that they put the correct part number on the wrong part! Oyyyyy, why me?
Got it swapped out for the correct alt and got it installed.
Truck fired right up and seemed happier. Immediately put a meter on the battery to check voltage; it's charging correctly. That also means that screw-up didn't fry my brand new voltage regulator. Even if it had, the parts people would be giving me a new one, as it's lifetime warranty.
But so far so good. I did all of the load tests shown in the FSM and all numbers are in spec.
Off for another drive test. Wanted to stall again at every stop sign as soon as I put on the brakes. Brake booster is disconnected & the port for it on the carb is tightly capped. No idea why this problem came back but the odd thing is, the longer I drove it, the more the problem went away. To the point that I couldn't make it try to stall under braking again, no matter what I did. Weird.
Drove it for over 40 minutes, around neighborhood & getting on it hard on a backroad up to 60. No popping from tailpipe on downshifts, no stalling when dropping it into neutral, no stalling on braking; not even a hint of these. Not a single hiccup in the last 30 or so minutes of drive testing.
Is it fixed? I don't know. The voltage regulator seems to be working OK but maybe the alt wiring screw-up caused a problem with it? Same thot on the HEI module; gawd knows what that thing went thru with the backwards alt hookup. Mebbe it's partially cooked? Mebbe it had to "relearn" what to do with proper signals & voltages in phase for a change? Dunno. Will drive it some more to see what it does & go from there. At least I can get myself to the grocery store now.
Whatever happens, I'll be back to call it fixed or update what's going on with it. Sure am tired of fixin'.....
Got a new HEI module in just to be sure the old one wasn't cooked by the alternator problem mentioned above. Fired right up & high idled fine, as always, but as soon as it was up to temp & I could get it down to low idle, it's running worse than before!
Can't get the idle to settle in at anything below 1000. Trying to go lower and she wants to stall out on me, like before. Tailpipe "popping" still there at 2 & 1/2 turns out on mixture screw (baseline for this carb), but goes away at 4 turns out or more. Even with the richer mixture tho, the "brake stalling" problem is still there. I also now have some moderate hesitation from idle to midrange, and it's NOT consistent.
In drive testing, almost NOTHING about the running qualities are consistent, EXCEPT for anything above 1500 rpms @ speed.
Now, considering that everything else is new or properly fixed, I think that leaves only one suspect. The exhaust manifold with my badly botched brazing repair. I know I didn't get the greatest seal on it with the bronze; I used a heater hose to listen around the "repaired" area while it was running, and it's got a lot of noise. Couldn't hear anything on any other part of the manifold.
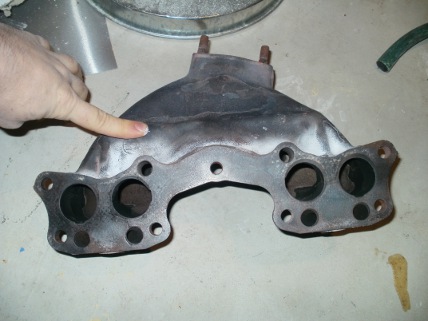
The crack is T shaped & I tried my best to fill it in with bronze brazing rod & MAAP gas torch; I'm thinking I just didn't get it hot enough. No access to an oxy/acetylene torch set-up for the proper heat. Here's some pics of the cracks before I tried to braze em up:
Toyota 20R Exhaust Manifold - Cracked
Toyota 20R Exhaust Manifold - Cracked
Toyota 20R Exhaust Manifold - Cracked
What I guess is happening is that my attempt to fix it made it worse, actually. From what I can tell the exhaust leak is causing it to lean out, but the infuriating thing is that the leak is changing sizes all thru a run cycle. This would account for it being great for easy use, but worse after being run harder. more heat, metal expands, more leaking. Would also explain why richening up the idle mixture makes the "popping" go away. The exhaust leak is leaning it out, so richer idle mixture compensates, but not enough at high heat levels.
Ugh. Where's my medicine?
So, best option is a used replacement manifold; direct bolt-in with no mods or fabbing. Good news is that I got a hold of Yoda Jim's Used Toyota Parts in Denver & they say they have what I need, AND they guarantee what they sell! When's the last time you got a guarantee on a boneyard part, anywhere? They are also apparently REAL Toyota people; Jim said he'd check the part over thoroughly before shipping to make sure there were no cracks or warped flange. Awesome.
They say $50 for the manifold plus about $20 shipping UPS Ground, give or take. Not bad. Have been checking carpart.com, which is a boneyard part lookup service, and they offer nothing below $75 for a Grade A part, NOT including any ship charges. AND I can't get any of them to answer the phone; guess they didn't want the business.
Gonna havta wait a week or so to get this going tho, as I have to beg the wife to pay for it. I still don't have any of my own cash on hand to do that much. No truck, no scrapping, no $, simple as that. I did get a new manifold gasket on it when I tried the brazing repair; just hoping it will work when I get the "new" manifold on & not leak @ the flange. Will post up more when I get to it.
You've been really tearing into that truck, great job BTW.
Good deal on that exhaust manifold. But just curious- how would the exhaust affect the mixture on a carb engine? I'm familiar with injected engines being affected by exhaust leaks and making the o2 read wrong, but I've ran around with exahust leaks on carb'd engines and never had any issues like you're experiencing. Then again, I've never had that bad of a leak either
Keep us posted
Thanks for the words of encouragement Rowdy, it helps a bunch.
Yep, it is a bad leak, which apparently my "fix" made worse. I too have run around on exhaust leaks, including cracked manifold(s) and never had a problem like this before either. From research and semi-educated guesses, here's what I found out. There are several things going on with this:
- A carb'ed engine doesn't usually have the engine management computer like a more modern injected vehicle has. The exhaust leak doesn't make the O2 sensor read wrong; in fact it is reading correctly, that the exhaust is lean, so the comp tries to compensate by adding more gas on the injector side of things. A carb doesn't compensate that way; in fact, it doesn't really compensate that much at all.
This can get complicated but I'll try to keep it simple. The cracked exhaust manifold lets in outside air into the exhaust stream; this is just like a vacuum leak on the intake side. It's even worse in a way because the exhaust stream is not steady, but "pulsed", due to the action of the pistons, especially since the crack is so physically close to the exhaust ports in the head. Hence the tick tick tick noise from a cracked manifold.
The exhaust pulse pushes gases out the crack, but as the pulse passes the crack (on the inside of the manifold), it pulls in fresh air, due to vacuum (low pressure) behind the pulse. This fresh air can be sucked back into the cylinder(s) before the exhaust valve closes, causing a dilution of the incoming fuel/air mixture; therefore, it leans the mixture out by adding extra air. Almost all 4 cycle engines have some valve overlap, where both valves are open at the same time, at the end of the exhaust cycle & beginning of the intake cycle. This is part of "scavenging" that you may have heard of.
The theory is, that the low pressure of exhaust rushing out at the end of the exhaust cycle helps pull the fresh charge in, so that the cylinder gets filled completely. if you upset or change the valve timing or the timing of the air/exhaust flow, then things get wonky in a hurry. I had to do a LOT of online research just to understand what is really going on inside a functional exhaust system, before I could even start to theorize what happens when there are leaks, and what they would do.
- It seems to be a bigger problem for me for several reasons:
A. There are fewer "pulses" over a given time for a 4 cylinder than for a 6 or 8 cylinder. More cylinders, more pulses, more of a "smoothing" effect, so the "lean miss" isn't as severe or noticeable. On a 6 cylinder, one cylinder misfiring is a 17% drop in output; on a 4, it's a 25% drop in output. Eeek. This is also apparently why idle speeds for 4's are usually 800 to 1000 rpm, while V8's have idle speeds of 550 to 700. More pulses, more momentum, less rotational speed needed to keep it going at idle.
B. "Plenum" style exhaust manifold. The 20R & 22R exhaust manifolds don't really have any exhaust port "runners". The exhaust goes nearly directly into the plenum of the manifold. The plenum is the space where the "pulses" mix together, kind of like a collector on a header. Even stock iron V8 manifolds have at least short runners; ours don't. The runners help prevent the unwanted pulsing effect. This is basically how headers seem to work. With the exhaust pulse going into the plenum, and the plenum right next to the exhaust ports, it's no wonder to me that the flow is all messed up because of the leak.
Toyota didn't put runners on 4 cylinder manifolds until the 2RZ & 3RZ in 1996. Here's a pic:
Compare to 20R/22R Plenum style. No runners, just a big empty space inside:
C. Because I've cleaned up all of the vac leaks, put on a really good, pro rebuilt carb that flows properly & has no vac leaks, and fixed the ignition and charging so I have max spark, the engine now doesn't want to tolerate anything else being wrong or out of balance. Don't know why but there it is.
Guessing that sealing up the intake side raised vac back close to spec, while the exhaust side, due to the leak, is below spec. Almost no one measures exhaust pressure, but they sure do measure the heck out of intake vacuum. Two halves of the same coin, so to speak, and they are out of balance on mine. Can't expect it to be happy that way!
So, that's my understanding of it all. there's tons of info on the web about exhaust & how it works, just not all in one place. Figures.
Should get the exhaust manifold ordered from Yoda Jim today; been waiting for the wife to toss me her credit card so I can do it.
Will post up more when I have something. Thanks for the response.
You've been really tearing into that truck, great job BTW.
Good deal on that exhaust manifold. But just curious- how would the exhaust affect the mixture on a carb engine? I'm familiar with injected engines being affected by exhaust leaks and making the o2 read wrong, but I've ran around with exahust leaks on carb'd engines and never had any issues like you're experiencing. Then again, I've never had that bad of a leak either
Keep us posted
BTW, sorry for being too wrapped up in my own problems with my truck. Neglected to tell you that I have been watching your progress with your truck and your progress is OUTSTANDING!
The flatbed came out fab on yours; nice work bro. Wish I could do that but it wouldn't work too well for me hauling scrap metal. Big fines for road littering here. Bed rebuild is on the to-do list.
Wow lots of information to process lol, guess I never really thought about it that way but it makes sense. Hope that solves your issue!
Also thank you. Honestly I searched far and wide for a bed to put on but these older toyota beds are getting harder to find. I went and looked at two, One was $200 and was one $300 and I think both of them had more rust than solid metal.
I figured a flatbed would be more useful (for my purposes) and a heck of a lot cheaper
WOW,I can honestly say I've never had a problem that puzzling at home or work. I think I'd be spending more effort on the PVC valve because from what I've read here you seem to have got the best results with that. Is the baffle and gasket inside the valve cover good? What is the manifold vacuum at idle? I think it should be about 18" or so. Ignition wires/cap/rotor O/K? If you tried this sorry for re-suggesting it but there is a lot of reading in you thread!
Your manifold may be repairable but welding cast iron you must preheat and peen between passes. You want to pre-heat to about 800F (or whatever the welding rod advises) I would usually go by eye and get it to a dull red before welding. Weld only one pass and keep the beads about 3" long, then peen between. You can use a needle scaler or even the pointed end of a chipping hammer...GENTLY. Peen the entire weld and even the area next to it. You need to do this to remove stress. Don't quench after, if you do throw it into the scrap pile unless you take it to a heat treating place. Cool it slowly, bury it in the ground/pack fibre glass around it, etc. Use only Ni-rod or any nickel/cast iron rod. 7018, 7014, 6013, 6011, the common rods we have to arc weld will not do it. MIG wont either. Or a weld shop can do it for a lot less hassle!
Oh...nice to see someone who knows their fundamental electronics stuff!
Last edited by Old83@pincher; 10-02-2016 at 12:06 PM.
 07-22-2016, 08:04 PM


 ) Not that I didn't know how, it just didn't seem to need it before, so I didn't bother.


 Fuse box reinstalled.


 , I decided to have at the truck today & try to figure out the remaining problems; i.e. the stalling under braking. Be forewarned, this is gonna get weird, but at least I think I now am getting very close to a final, driveable, reliable solution.
 Continued to check wires on passenger side. I found 1 smog solenoid very hot. Disconnected & removed from the truck, as it wasn't bolted down to anything. Found other smog solenoid warm; disconnected wiring to solenoid. I had previously disconnected the smog computer at the driver's side kickpanel, so no idea how these were still getting voltage/power. It's enuff to make you wanna
 ) More rev-ups, and the popping is GONE, just disappeared. Increasing the idle mixture raised the idle to 1200. Lowered idle speed to 900, seems much better than before. Settles back to 900 almost everytime after rev-up. No dip below 900 on settling. Reset to 850; good, smooth quiet idle. Almost scary slow & quiet!


 average underhood temps are 170 to 200 degrees F. The truck didn't want to crank when it was hot on my drive test, but starts great cold.


 Apparently Toyota did some strangeness with their charging systems between 75 & 84. The different alts look the same, with some minor exceptions. I found a post by kawazx636 on Yotatech explaining the differences:


 This is also apparently why idle speeds for 4's are usually 800 to 1000 rpm, while V8's have idle speeds of 550 to 700. More pulses, more momentum, less rotational speed needed to keep it going at idle.

 Bed rebuild is on the to-do list.


