oxy acetylene set up
 02-01-2010, 07:50 PM
#1
Contributing Member
Thread Starter
oxy acetylene set up
I went ahead and picked up a used oxy acetylene set up off craigs for $300 with the 2 tanks (full ) oxy ,acet ,2 hoses 2 smith regulators (antique) cart and a bunch of smith torches .
I originaly bought this to cut with, but quickly decided to teach myself to weld, and wow its not easy .
so here are a couple pics of some of the practicing ive been doing.

i did check them for leaks and did not find any.but im still going to order some orings and stuff.

aluminum welding


stainless steel


mild steel

I originaly bought this to cut with, but quickly decided to teach myself to weld, and wow its not easy .
so here are a couple pics of some of the practicing ive been doing.
i did check them for leaks and did not find any.but im still going to order some orings and stuff.
aluminum welding
stainless steel
mild steel
Last edited by RMA; 02-01-2010 at 09:22 PM.
 02-09-2010, 08:16 AM
#2
Registered User
Join Date: Feb 2009
Location: Miami, Florida
Posts: 498
Likes: 0
Received 0 Likes
on
0 Posts
Learning to weld is the shiznit man..Good luck and the easiest way to learn is to grab a welding book to guide you and definately learn the appropriate procedures for each kind of welding. What are you welding on? That wooden table top?
02-09-2010, 08:19 AM
#3
Contributing Member
Thread Starter
yea welding with this gas is really hard , keeping the right amount of heat and working the puddle is a pain.
Hahaha yea im using an old rotor on top of the plywood , and welding on that.
I am looking at some fire bricks on ebay , so i will probably get a few of those and make a small table .
Hahaha yea im using an old rotor on top of the plywood , and welding on that.
I am looking at some fire bricks on ebay , so i will probably get a few of those and make a small table .
02-15-2010, 04:12 PM
#4
Registered User
Join Date: Sep 2009
Location: Guelph/Toronto Ontario
Posts: 69
Likes: 0
Received 0 Likes
on
0 Posts
looks like your flame might be to big. what pressures and tip sizes have you been using?
maybe see if you can get a smith welding chart it will tell you what tip size and gas pressures to use for what material thickness and material type your working on. but keep it up i w ish i had torches at home. i don't think my landlord would like that were not even supposed to have candles. haha
maybe see if you can get a smith welding chart it will tell you what tip size and gas pressures to use for what material thickness and material type your working on. but keep it up
i w ish i had torches at home. i don't think my landlord would like that were not even supposed to have candles. haha
02-16-2010, 07:47 AM
#5
If they had not raised their fees so high, you might consider the CCOC evening welding class:
- http://www.metroed.net/cte-eve.html
I took about 2 years of classes there back when it was about $100/semester (now nearly $600!). But they cover gas welding very well.
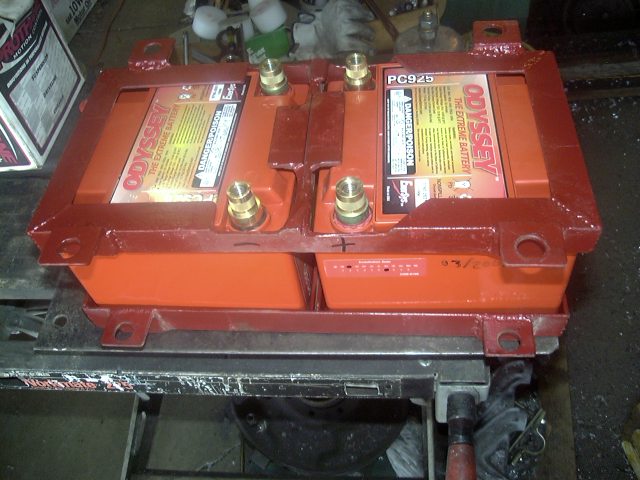
I gas welded my dual battery try one night in class:
- http://www.metroed.net/cte-eve.html
I took about 2 years of classes there back when it was about $100/semester (now nearly $600!). But they cover gas welding very well.
I gas welded my dual battery try one night in class:
02-16-2010, 07:59 AM
#6
Registered User
Join Date: Dec 2008
Location: DFW, Texas!
Posts: 1,015
Likes: 0
Received 0 Likes
on
0 Posts
http://www.weldingvideos.com/oawelding.html
This is a nice video, they go into good detail on how to watch the puddle with nice close-ups of the action, including shots of what is being done wrong.
IMO, well worth the $25 to get you going.
I -think- this is the same video that Northern Tool sells, but am not sure.
This is a nice video, they go into good detail on how to watch the puddle with nice close-ups of the action, including shots of what is being done wrong.
IMO, well worth the $25 to get you going.
I -think- this is the same video that Northern Tool sells, but am not sure.

Trending Topics
03-31-2010, 08:12 PM
#8
Contributing Member
Thread Starter
looks like your flame might be to big. what pressures and tip sizes have you been using?
maybe see if you can get a smith welding chart it will tell you what tip size and gas pressures to use for what material thickness and material type your working on. but keep it up i w ish i had torches at home. i don't think my landlord would like that were not even supposed to have candles. haha
maybe see if you can get a smith welding chart it will tell you what tip size and gas pressures to use for what material thickness and material type your working on. but keep it up
i w ish i had torches at home. i don't think my landlord would like that were not even supposed to have candles. hahaIf they had not raised their fees so high, you might consider the CCOC evening welding class:
- http://www.metroed.net/cte-eve.html
I took about 2 years of classes there back when it was about $100/semester (now nearly $600!). But they cover gas welding very well.
I gas welded my dual battery try one night in class:
- http://www.metroed.net/cte-eve.html
I took about 2 years of classes there back when it was about $100/semester (now nearly $600!). But they cover gas welding very well.
I gas welded my dual battery try one night in class:
I havnet built anything yet , actually really havnet had time to even practice anymore ..Hope to though.
http://www.weldingvideos.com/oawelding.html
This is a nice video, they go into good detail on how to watch the puddle with nice close-ups of the action, including shots of what is being done wrong.
IMO, well worth the $25 to get you going.
I -think- this is the same video that Northern Tool sells, but am not sure.
This is a nice video, they go into good detail on how to watch the puddle with nice close-ups of the action, including shots of what is being done wrong.
IMO, well worth the $25 to get you going.
I -think- this is the same video that Northern Tool sells, but am not sure.
03-31-2010, 08:13 PM
#9
Contributing Member
Thread Starter
04-09-2010, 07:45 PM
#10
Registered User

Join Date: May 2009
Location: East Bay Area, northern California
Posts: 8
Likes: 0
Received 0 Likes
on
0 Posts
You are definitely off to a good start. I do agree that it looks like your using too big of a flame. Try starting off with a smaller flame and try running a smaller puddle (1/8"-3/16" wide). I would suggest to hold off on the stainless and aluminum, and practice on carbon steel first. Also it helps a lot if you clean the metal prior to welding. This is even more important when welding aluminum since it has a thick oxide layer that you need to sand off before you weld on it. Back when i was in welding classes, we had little wire brushes that we used when cleaning the sheet metal we used for gas welding, a wire wheel or flap disk on a angle grinder will work even better. If you can manage to take a couple of classes it will help out tremendously (at least it did for me). In my opinion gas welding is probably one of the most difficult to master, but the great thing about it is once you get decent at gas welding tig welding is really easy to pick up on. Also as 4crawler showed, you can make some pretty nice welds with gas.
04-09-2010, 07:56 PM
#11
Registered User
Join Date: Feb 2008
Location: hendersonville, TN.
Posts: 1,417
Likes: 0
Received 0 Likes
on
0 Posts
holly wide weld batman!!! but props for taking it on. in auto and welding class I had to cut a buick in half and weld it back together using MIG,TIG and flame welding. flame for sure being the hardest to me. TIG often comes off harder then flame but I was welding soda cans together in about 8 hours!!! I love oxy/acet for cutting and is super convenient for both welding and cutting but difficult to master.. good luck and hell yea man!!!
04-09-2010, 08:06 PM
#12
Registered User
Join Date: Sep 2007
Location: Bremerton, WA
Posts: 180
Likes: 0
Received 0 Likes
on
0 Posts
I'm actually taking oxy/fuel welding at the local college this quarter. Getting the flame adjusted properly seems to be the key. Move your torch in small circles and practice working the puddle across the metal first without filler, then practice the same thing while adding filler, and don't put that acetylene pressure too high! 
04-09-2010, 08:44 PM
#13
Registered User
Join Date: Dec 2009
Posts: 87
Likes: 0
Received 0 Likes
on
0 Posts
for the mild steel in 22 gauge, 20 guage and 18 guage set you accet at 5psi and your oxy at 20 psi. light the acc and then bring in the oxy. you want to bring the flame to a nice slim blue point. it is just like welding with tig or mig in the you do a small join tack weld every inch and then come back and work the rest of the area. Unlike mig and tig you have to leave the panel for a lot longer due to the higher heat put into the panel. take your time and you will do fine. Practise makes perfect. Number 8 or 10 tip for these metals as well
04-21-2010, 01:05 PM
#14
Registered User
Join Date: May 2009
Location: Tucson, AZ
Posts: 255
Likes: 0
Received 0 Likes
on
0 Posts
I can't wait until next semester. I signed up for a Basic Arc and OxyAcetylene welding course, and one of our locals has a fab shop, so hopefully I can get some extra practice outside of class. Maybe on teh rig? 
04-02-2011, 10:41 PM
#15
Registered User
Join Date: Nov 2007
Location: Gilbert, Az.
Posts: 680
Likes: 0
Received 0 Likes
on
0 Posts
Learning....
Ok...Not to bash you man but Aluminum first....CRAZY! As said in previous posts...Aluminum has a lot of surface oxides...and the melting point of these oxides is far higher than that of Aluminum. Do carbon steel first, tanks gauge set up:Crack the valve open fully on the Oxygen Tank, set working pressure to 10lbs, open Acetylene to a line/ working pressure of 5 lbs. Never open the Acetylene bottle all the way...max pressure from the tank should be at 15lbs and working pressure at 5 -10 lbs, ocassionaly maybe 15lbs...any more than this and the 2 chemicals in side the bottle will start seperating...find a neutral flame first and for 3/16" steel plates...usually 2"x4" coupons, run a double ott...00 tip. As stated before, 1/4 turn of the Acetylene knob, strike to lite Acetylene get about a 3" barrell with a strong feather at the end of the flame and bring the oxygen in at a 1/4 trun as well...at this point you should see 3 different flames with your goggles on...the small blue flame is the inner cone closest to the tip...when you introduce more oxygen into the mix, it should draw the 2nd flame (center) closer to the inner cone...once you acheive the a sharp point on the inner cone, stop adjusting the oxygen....this is called a neutral flame....good start to practicing with. Now grab your coupon you cut previously and hold the inner cone about an 1/8" from the surface of the coupon...wait for the puddle to form about the size of an pencil eraser (should take a few seconds when working with a cold piece at first), then advance the flame and puddle just a little bit and carry this procedure the length of your coupon...FOREHAND technique for RH people is from right to left, LH people is from left to right. Run about 3 coupons full of these little practice puddles just to get use to reading the puddle and adjusting the heat to whats comfortable for you...now grab another coupon and a 3/32 filler rod....same as you did with the puddles...wait for the puddle to form, keeping your filler rod at the outside of the flame but in the heat, once the puddle forms, dip your filler rod (just touch in the center of the puddle, the puddle should melt the filler rod not the flame), and then move the puddle like you did with the stringer beads...learn how much filler rod it takes to just raise the puddle (when cooled) with a shoulder just above the surface of each little bead...that's when you should have a good weld with good penatration and the right amount of filler....
Hope this helps you out or any one else that comes across it.
-Ted
Hope this helps you out or any one else that comes across it.
-Ted
04-04-2011, 08:04 PM
#16
Contributing Member
Thread Starter
You are definitely off to a good start. I do agree that it looks like your using too big of a flame. Try starting off with a smaller flame and try running a smaller puddle (1/8"-3/16" wide). I would suggest to hold off on the stainless and aluminum, and practice on carbon steel first. Also it helps a lot if you clean the metal prior to welding. This is even more important when welding aluminum since it has a thick oxide layer that you need to sand off before you weld on it. Back when i was in welding classes, we had little wire brushes that we used when cleaning the sheet metal we used for gas welding, a wire wheel or flap disk on a angle grinder will work even better. If you can manage to take a couple of classes it will help out tremendously (at least it did for me). In my opinion gas welding is probably one of the most difficult to master, but the great thing about it is once you get decent at gas welding tig welding is really easy to pick up on. Also as 4crawler showed, you can make some pretty nice welds with gas.
holly wide weld batman!!! but props for taking it on. in auto and welding class I had to cut a buick in half and weld it back together using MIG,TIG and flame welding. flame for sure being the hardest to me. TIG often comes off harder then flame but I was welding soda cans together in about 8 hours!!! I love oxy/acet for cutting and is super convenient for both welding and cutting but difficult to master.. good luck and hell yea man!!!
I'm actually taking oxy/fuel welding at the local college this quarter. Getting the flame adjusted properly seems to be the key. Move your torch in small circles and practice working the puddle across the metal first without filler, then practice the same thing while adding filler, and don't put that acetylene pressure too high!
for the mild steel in 22 gauge, 20 guage and 18 guage set you accet at 5psi and your oxy at 20 psi. light the acc and then bring in the oxy. you want to bring the flame to a nice slim blue point. it is just like welding with tig or mig in the you do a small join tack weld every inch and then come back and work the rest of the area. Unlike mig and tig you have to leave the panel for a lot longer due to the higher heat put into the panel. take your time and you will do fine. Practise makes perfect. Number 8 or 10 tip for these metals as well
Ok...Not to bash you man but Aluminum first....CRAZY! As said in previous posts...Aluminum has a lot of surface oxides...and the melting point of these oxides is far higher than that of Aluminum. Do carbon steel first, tanks gauge set up:Crack the valve open fully on the Oxygen Tank, set working pressure to 10lbs, open Acetylene to a line/ working pressure of 5 lbs. Never open the Acetylene bottle all the way...max pressure from the tank should be at 15lbs and working pressure at 5 -10 lbs, ocassionaly maybe 15lbs...any more than this and the 2 chemicals in side the bottle will start seperating...find a neutral flame first and for 3/16" steel plates...usually 2"x4" coupons, run a double ott...00 tip. As stated before, 1/4 turn of the Acetylene knob, strike to lite Acetylene get about a 3" barrell with a strong feather at the end of the flame and bring the oxygen in at a 1/4 trun as well...at this point you should see 3 different flames with your goggles on...the small blue flame is the inner cone closest to the tip...when you introduce more oxygen into the mix, it should draw the 2nd flame (center) closer to the inner cone...once you acheive the a sharp point on the inner cone, stop adjusting the oxygen....this is called a neutral flame....good start to practicing with. Now grab your coupon you cut previously and hold the inner cone about an 1/8" from the surface of the coupon...wait for the puddle to form about the size of an pencil eraser (should take a few seconds when working with a cold piece at first), then advance the flame and puddle just a little bit and carry this procedure the length of your coupon...FOREHAND technique for RH people is from right to left, LH people is from left to right. Run about 3 coupons full of these little practice puddles just to get use to reading the puddle and adjusting the heat to whats comfortable for you...now grab another coupon and a 3/32 filler rod....same as you did with the puddles...wait for the puddle to form, keeping your filler rod at the outside of the flame but in the heat, once the puddle forms, dip your filler rod (just touch in the center of the puddle, the puddle should melt the filler rod not the flame), and then move the puddle like you did with the stringer beads...learn how much filler rod it takes to just raise the puddle (when cooled) with a shoulder just above the surface of each little bead...that's when you should have a good weld with good penatration and the right amount of filler....
Hope this helps you out or any one else that comes across it.
-Ted
Hope this helps you out or any one else that comes across it.
-Ted
 Thanks alot Guys !! i actually havent welded with this setup in a while , i have used it to heat things up and bend them though .. been to busy to mess with it .. i just use the mig welder
 one day ill get back to messing with this though .

Thread
Thread Starter
Forum
Replies
Last Post
FS[GreatLakes]: 33x12.5x15 bfg ko a\t
muddpigg
Axles - Suspensions - Tires - Wheels
8
11-02-2015 05:36 AM


