F150 spring mod?---Done!
 01-31-2010, 08:04 AM
#1
Registered User
Thread Starter

Join Date: Jun 2007
Location: TN/KY.
Posts: 388
Likes: 0
Received 0 Likes
on
0 Posts
F150 spring mod?---Done!
I recently put F150 springs under my 1991 extra cab to fix the sagging springs and get more articulation. I chose Ford springs over the chevy swap because the chevies just seem too long to me and the rear overhang must be something else with those. My truck is my DD and I use it as a truck (getting firewood etc) and that may make my needs different from a trail vehicle. I hoped to gain a few things with this:
1. carry more weight without sagging the springs
2. gain more flex
3. better ride than my 'helper' leaf spring set up
4. gain a little lift so that I could bring my TB back up to 'stock' with the BJ spacers I had installed.
The donor springs were from a 1990 F150 reg cab long bed. It showed no indication of a trailering package but had 57" springs that were 5 leaves + an overload. The springs also had the 'sliders' on the ends of them. I bought hangers, shackles and shock mounts from Sky Manufacturing. They are a pretty good company to work with and their products are first rate. My buddy that owns a machine shop was very impressed with the parts. So here is the build and I will hopefully correct some wrong info out there about the
Ford spring swap.

The following users liked this post:
silas444 (07-21-2023)
01-31-2010, 08:22 AM
#3
Registered User
Thread Starter
Join Date: Jun 2007
Location: TN/KY.
Posts: 388
Likes: 0
Received 0 Likes
on
0 Posts
I'm working on it. I have plenty of time today, however the computer I'm on is a little jacked up but I'll get it out slowly today.
First off some starting notes. If you want to do a swap like this don't assume that bolts you'll need can be easily sourced. Both Ford and Toyota use a metric (14mm?) bolt for the front and rear spring bushings. A 9/16 bolt will actually work better and fit the bushing just a little tighter but are nearly impossible to find so you'll have to order them. Another thing is sourcing some non-chinese u-bolts. Napa has chinese ones much to my dismay, however a local shop was able to make me up some good ones. Make sure with junk yard springs you also can get the bushing ordered before you start. With both the Toy and Ford springs the front hanger bolt came out and the bushing was fine but the rear ones on both destroyed the spring bushing getting them out. Obviously besides a welder, a hydraulic press is a must to do this swap.
First off some starting notes. If you want to do a swap like this don't assume that bolts you'll need can be easily sourced. Both Ford and Toyota use a metric (14mm?) bolt for the front and rear spring bushings. A 9/16 bolt will actually work better and fit the bushing just a little tighter but are nearly impossible to find so you'll have to order them. Another thing is sourcing some non-chinese u-bolts. Napa has chinese ones much to my dismay, however a local shop was able to make me up some good ones. Make sure with junk yard springs you also can get the bushing ordered before you start. With both the Toy and Ford springs the front hanger bolt came out and the bushing was fine but the rear ones on both destroyed the spring bushing getting them out. Obviously besides a welder, a hydraulic press is a must to do this swap.
01-31-2010, 08:44 AM
#4
Registered User
Thread Starter
Join Date: Jun 2007
Location: TN/KY.
Posts: 388
Likes: 0
Received 0 Likes
on
0 Posts
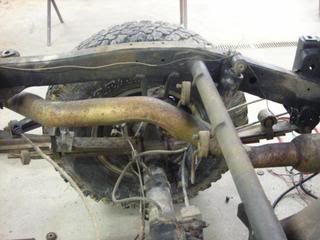
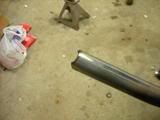
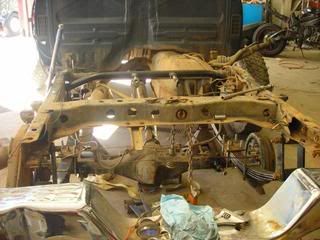
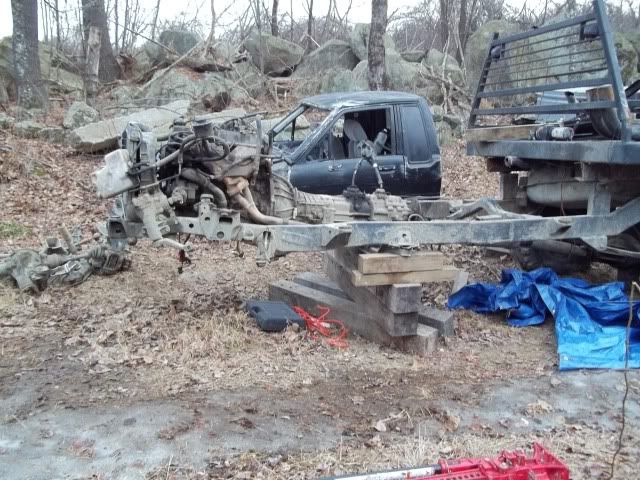
First thing I did was take off the bed. I couldn't recommend doing this mod without doing that first. Here the bed is off and you can see the factory setup
I plan on welding in hanger mounts and new shock mounts (u-bolt flip) to angle inwards using Sky Mfg upper shock mount bar and lower shock mounts
I plan on welding in hanger mounts and new shock mounts (u-bolt flip) to angle inwards using Sky Mfg upper shock mount bar and lower shock mounts
Last edited by 91diesel; 01-31-2010 at 01:17 PM.
01-31-2010, 12:00 PM
#6
Registered User
Thread Starter
Join Date: Jun 2007
Location: TN/KY.
Posts: 388
Likes: 0
Received 0 Likes
on
0 Posts
First thing we did after removing the bed was to take some measurements. We measured the rim to rim wheel base as well as measuring from the axle to the front hanger bolt. (I left the stock hangers in place, it is a factory jigged pt and might even be able to function as a front bumpstop like the factory springs have there.) Then we jacked up the back, put it on jack stands and removed the rear wheels and leaf packs. I had to press in new bearings for the rear of the F150 springs and to do that without tearing up the new bushing it is neccessary to chamfer the wrap where the bushing goes.
I ended up using the 3 longest leaves + the toyota overload leaf. I used the toy OL because it had the spring guide to keep the springs from twisting rivited on to it. The clamps for the ford leaf pack were not good at all for droop.
The front hanger ended up approx 3.5" horizontally forward of the factory hangers. (bolt hole to bolt hole). I can't tell you how many times I've read that the ford hangers have to go 9" forward just like the chevy ones. I don't know if that is compared to the older Toyota's 48" springs or my 91's 51" springs but I can tell you that's not even a starting point. We ended up welding the ramped spring hangers flat on the frame and adding a piece of round stock to the back to weld it to the part on the frame that rises up in the wheel well.
Trending Topics
01-31-2010, 12:25 PM
#8
Registered User
Thread Starter
Join Date: Jun 2007
Location: TN/KY.
Posts: 388
Likes: 0
Received 0 Likes
on
0 Posts
Ok here goes with some pics.
 This is the chamfer I had to put on the springs to get the bushing in without destruction.
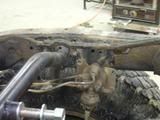
and this is the approx position of the front hanger. It needs to be about 3.5" horizontally in front of the factory hanger.
This is the chamfer I had to put on the springs to get the bushing in without destruction.and this is the approx position of the front hanger. It needs to be about 3.5" horizontally in front of the factory hanger.
Last edited by 91diesel; 01-31-2010 at 12:41 PM.
01-31-2010, 01:02 PM
#9
Registered User
Thread Starter
Join Date: Jun 2007
Location: TN/KY.
Posts: 388
Likes: 0
Received 0 Likes
on
0 Posts
We ended up welding the hanger 'flat' and using a piece of round stock to take up the space between the frame and the rear of the hanger.
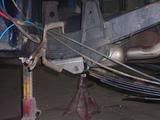
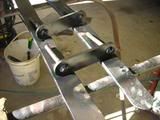
here it is tacked up with 6" shackles. Here I still had 4 leaves + OL. After a test ride I took another leaf out. With 4 leafs it was approx a 5" lift and still rode OK actually.
here is the sky upper shock mount. Notice it is a tight fit with the LSPV. I had to unbolt it to be able to get the weld in. Then it took some creative bending of the brake lines to go around the bar. I had to weld it in this low due to I was only going to do a 1" body lift. I ended up having to modify the bed some later.
01-31-2010, 01:13 PM
#10
Registered User
Thread Starter
Join Date: Jun 2007
Location: TN/KY.
Posts: 388
Likes: 0
Received 0 Likes
on
0 Posts
 I had to notch the bottom of the Sky mfg shock mount bar to clear the factory bumpstop mounts welded to the frame.
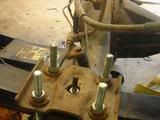 Cool thing about going the ford route is they come with their own u-bolt flip kit!
01-31-2010, 01:27 PM
Cool thing about going the ford route is they come with their own u-bolt flip kit!
01-31-2010, 01:27 PM
#11
Registered User
Thread Starter
Join Date: Jun 2007
Location: TN/KY.
Posts: 388
Likes: 0
Received 0 Likes
on
0 Posts
Here is how the LSPV bolted back up and shows how the brake lines could barely be bent around the bar. I've seen write ups on this shock mount before but never any mention of this. I guess maybe at this level you're supposed to know things like this before starting!
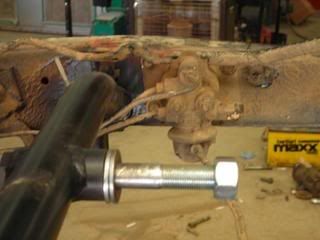
 Here is where not sourcing 9/16 bolts before hand comes into play. I ended up having to use my old square u-bolts (cut off) and welded them into each end like the factory set up is. I'm guessing this probably hurts articulation but may make highway ride a little more stable. Either way I still got more droop and articulation than the factory set up and my goal is a truck first and trail rig second.
01-31-2010, 03:16 PM
Here is where not sourcing 9/16 bolts before hand comes into play. I ended up having to use my old square u-bolts (cut off) and welded them into each end like the factory set up is. I'm guessing this probably hurts articulation but may make highway ride a little more stable. Either way I still got more droop and articulation than the factory set up and my goal is a truck first and trail rig second.
01-31-2010, 03:16 PM
#12
Registered User
Thread Starter
Join Date: Jun 2007
Location: TN/KY.
Posts: 388
Likes: 0
Received 0 Likes
on
0 Posts
 here the upper and lower shock mounts are on and ready to go. I ended up being able to get some pro comp 3000's at 4wheel parts. I needed something that would go between 28" and 18". In order to get the most droop from this I spaced the brake line mount on my axle by 1" up. I also took a large wrench and bent the mount for flex line (where it's on the gas tank) a little more at a downward angle. With these simple mods it allows the springs to droop as far down as they will go (with the stock toyota OL leave clamp thingy..) with out stretching the brake line.
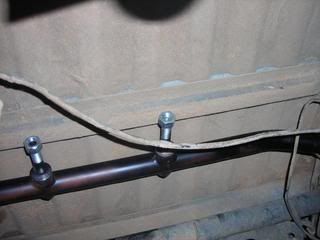 With the bed back on you can see where the shock mounts hit the ribbing on the bottom of the bed. This is another thing I hadn't heard anyone mention when using this upper mount. Remember I welded this bar as low as it would go on the frame.
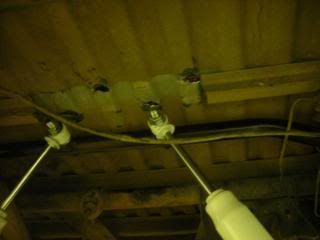 I just air chisieled the ribbing out and there was plenty of room. I also added a couple of more water drain holes in the bed. Oh well, the same guy who's shop I'm at is going to paint it when I'm deployed and he wanted me to find a different bed anyway for other reasons. Can you put a taco bed on a 91? anyone got a decent bed they want to sell?
01-31-2010, 03:37 PM
I just air chisieled the ribbing out and there was plenty of room. I also added a couple of more water drain holes in the bed. Oh well, the same guy who's shop I'm at is going to paint it when I'm deployed and he wanted me to find a different bed anyway for other reasons. Can you put a taco bed on a 91? anyone got a decent bed they want to sell?
01-31-2010, 03:37 PM
#13
Registered User
Thread Starter
Join Date: Jun 2007
Location: TN/KY.
Posts: 388
Likes: 0
Received 0 Likes
on
0 Posts
I guess I'll now take questions!
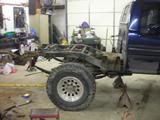
As mentioned earlier I ended up using 3 leaves + OL. I got about 3" of lift from where I'm pretty sure stock was (I had used a 'helper' spring to get the rear end up, this works amazingly well, I rode on that for almost a year). The pro-comp ES-3000's may be compromising my good ride characteristic I was looking for according to most of the internet, but they were the only thing I good get that was in stock and I didn't know what I'd need before hand. Overall the mod did what I wanted it to do, I've hauled some wood in it but not filled the truck up completely which will be the real test. It does flex more......
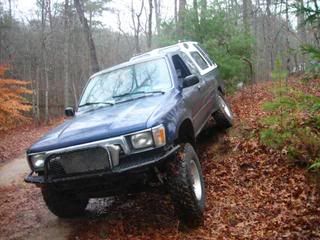 This is a before flex picture and you can see where the left front tire isn't touching. Well I didn't take a pic after due to having to get back home but when repeated the front tire was touching.
Closing notes:
Another thing to make sure you have or can make (remember my machinist buddy?) is the inner metal bushings on the toyota frame shackle mounts. I think this is part of the bolt from the factory or at least it was 20 yrs later on mine. The rubber pieces come out and where in pretty good shape but without that inner piece the 9/16 bolt is like throwing a hotdog down a hallway.
I had to put a sway bar back on, I guess the 3" lift moved the cg up enough to really make a difference with out it. (I've been driving around without it for about 4 yrs now and I know how to make a vehicle handle). I found a early model IFS sway bar (86-88) to put on it. They are slighty thinner and the ends are about 2" longer. This creates a much more articulate friendly sway bar. It also made a huge difference on the highway handling. The sway bar still limits articulation some though so I plan on extending the ends some more (this of course means relocating where it mounts on the frame) and adding a ranger or explorer rear sway bar. Being the realist/lazy person that I am I want a system that will do alright on the highway and each wheel will still flex enough to go without disconnects and having to diconnect them!
As mentioned earlier I ended up using 3 leaves + OL. I got about 3" of lift from where I'm pretty sure stock was (I had used a 'helper' spring to get the rear end up, this works amazingly well, I rode on that for almost a year). The pro-comp ES-3000's may be compromising my good ride characteristic I was looking for according to most of the internet, but they were the only thing I good get that was in stock and I didn't know what I'd need before hand. Overall the mod did what I wanted it to do, I've hauled some wood in it but not filled the truck up completely which will be the real test. It does flex more......
This is a before flex picture and you can see where the left front tire isn't touching. Well I didn't take a pic after due to having to get back home but when repeated the front tire was touching.Closing notes:
Another thing to make sure you have or can make (remember my machinist buddy?) is the inner metal bushings on the toyota frame shackle mounts. I think this is part of the bolt from the factory or at least it was 20 yrs later on mine. The rubber pieces come out and where in pretty good shape but without that inner piece the 9/16 bolt is like throwing a hotdog down a hallway.
I had to put a sway bar back on, I guess the 3" lift moved the cg up enough to really make a difference with out it. (I've been driving around without it for about 4 yrs now and I know how to make a vehicle handle). I found a early model IFS sway bar (86-88) to put on it. They are slighty thinner and the ends are about 2" longer. This creates a much more articulate friendly sway bar. It also made a huge difference on the highway handling. The sway bar still limits articulation some though so I plan on extending the ends some more (this of course means relocating where it mounts on the frame) and adding a ranger or explorer rear sway bar. Being the realist/lazy person that I am I want a system that will do alright on the highway and each wheel will still flex enough to go without disconnects and having to diconnect them!
Last edited by 91diesel; 01-31-2010 at 03:39 PM.
02-05-2010, 04:48 AM
#14
Registered User
Thread Starter
Join Date: Jun 2007
Location: TN/KY.
Posts: 388
Likes: 0
Received 0 Likes
on
0 Posts
I want to thank Import Rebuilders in Dahlonega, Ga. They are a great place that can do about anything but specialize in body repairs and painting. They have a frame machine and enclosed paint booth, The owner Randall actually prefers working on Honda cars though!
706-216-8994
706-216-8994
02-14-2010, 02:01 PM
#15
Registered User
Join Date: Jan 2010
Location: San Antonio
Posts: 16
Likes: 0
Received 0 Likes
on
0 Posts
I was looking at the general spring website at the basic specs of the springs you chose. With all 5 leaves they are definitely rated for some serious payload! At least compared to the packs with fewer leaves.
I'm going to do a long spring swap in the rear of my 82 and i think i'll go ford rather than chevy. Its said they have more curvature. (I'm looking to get rid of my blocks) This was one of the few places i could find info though!
It looks like you do some nice work! Do you have a post swap picture yet?
 02-26-2012, 10:41 AM
#20
Registered User
Rear are longer, (rear forward) new mount is 11" in front (eye to eye) of old mount.
And by the location of his rear hanger he did reverse them,just like I did.
His - notice the hanger on the flat part of the frame..
Mine (the jig I used to ensure proper placement)

Hope this helps...
And by the location of his rear hanger he did reverse them,just like I did.
His - notice the hanger on the flat part of the frame..
Mine (the jig I used to ensure proper placement)
Hope this helps...
Last edited by 91 4Runner; 02-26-2012 at 10:49 AM.


