The Fab Shop Tube buggies, armor protection and anything else that requires cutting, welding, or custom fab work

Another 3rd Gen Front Bumper Build - wjwerdna

Thread Tools
 
Search this Thread
 
Old 01-24-2008, 06:25 PM
  #1  
Contributing Member
Thread Starter
 
wjwerdna's Avatar
 
Join Date: Mar 2006
Location: Novi, MI
Posts: 1,861
Likes: 0
Received 1 Like on 1 Post
CAD Designed 3rd Gen Front Bumper Build - wjwerdna

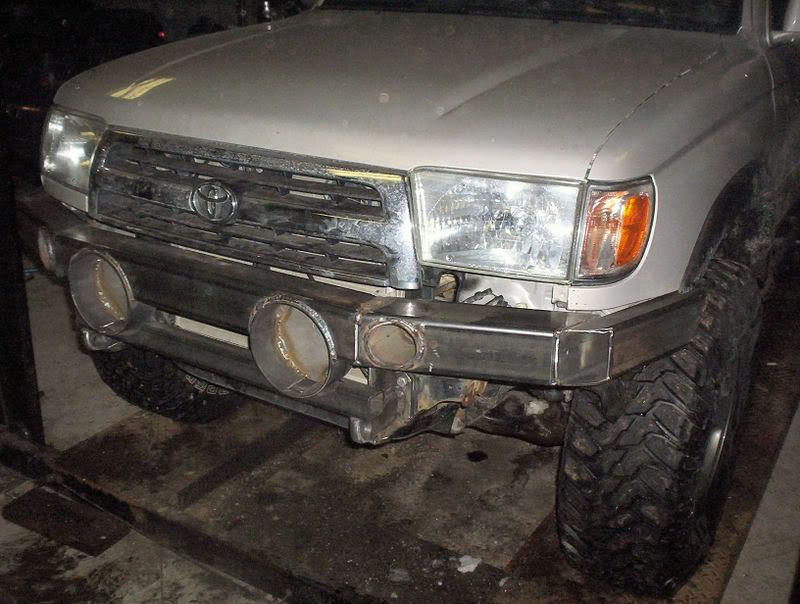
So, it's been a while since I have read or posted on the forums, but since that time, I've come to the need of a new front bumper... I've done some destructive testing, for educational purposes of course...

So first, a pic of what I have been playing with while I work through the 10 degree weather and cold here with no garage...


actual work will be starting next week!

Last edited by wjwerdna; 02-20-2008 at 05:48 PM. Reason: didnt like the title
Old 01-24-2008, 06:27 PM
  #2  
Registered User
 
Nate08's Avatar
 
Join Date: Jul 2007
Location: Bristol, TN
Posts: 644
Likes: 0
Received 0 Likes on 0 Posts
BE sure to take lots-o-pics.
Old 01-29-2008, 02:20 PM
  #3  
Contributing Member
Thread Starter
 
wjwerdna's Avatar
 
Join Date: Mar 2006
Location: Novi, MI
Posts: 1,861
Likes: 0
Received 1 Like on 1 Post
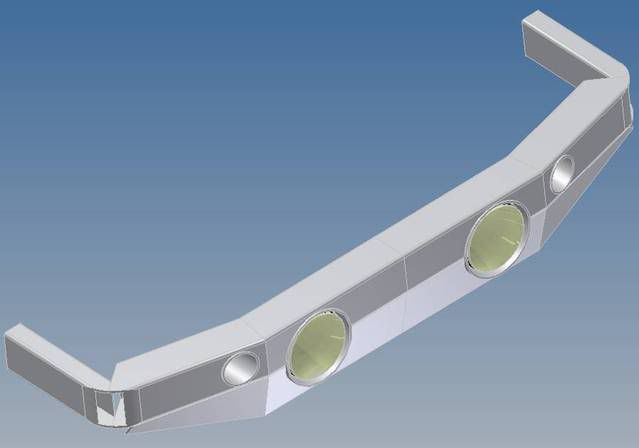
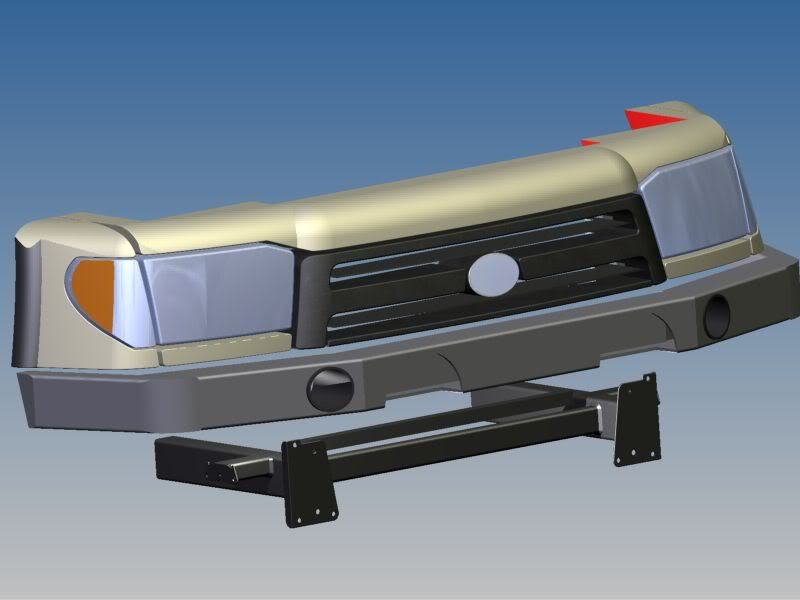
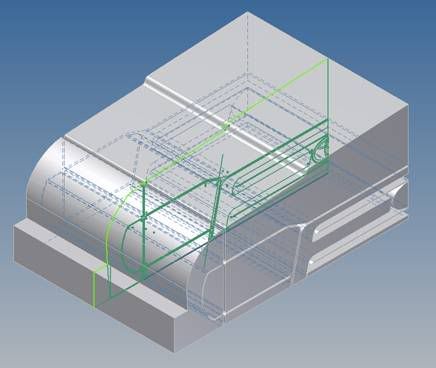
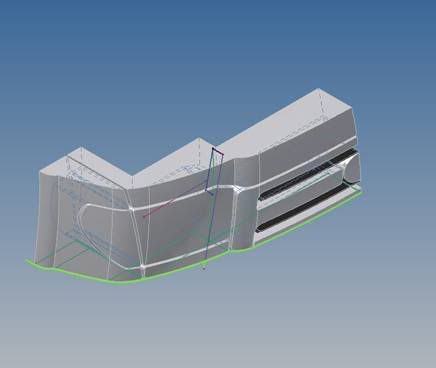
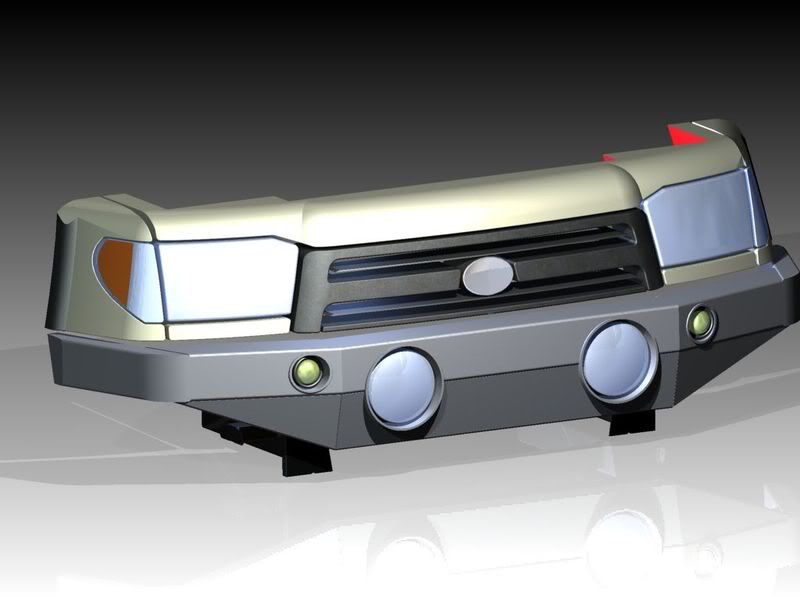
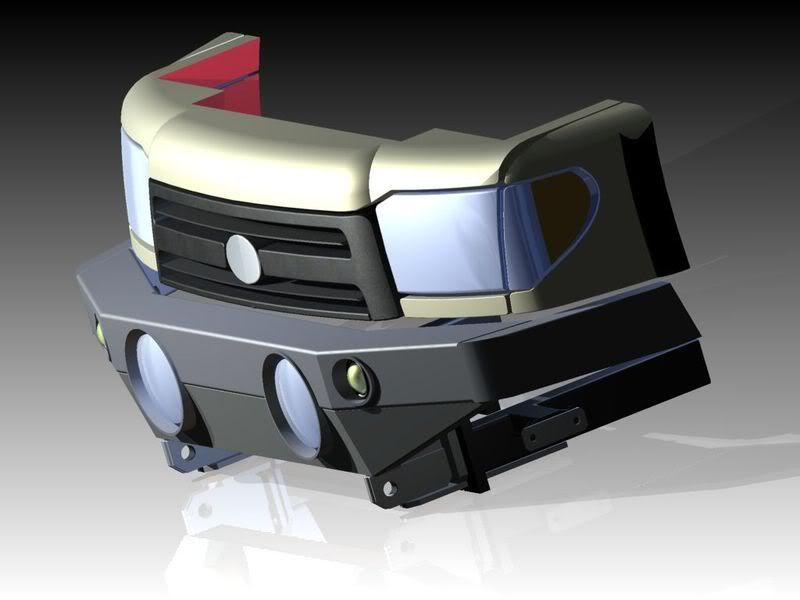
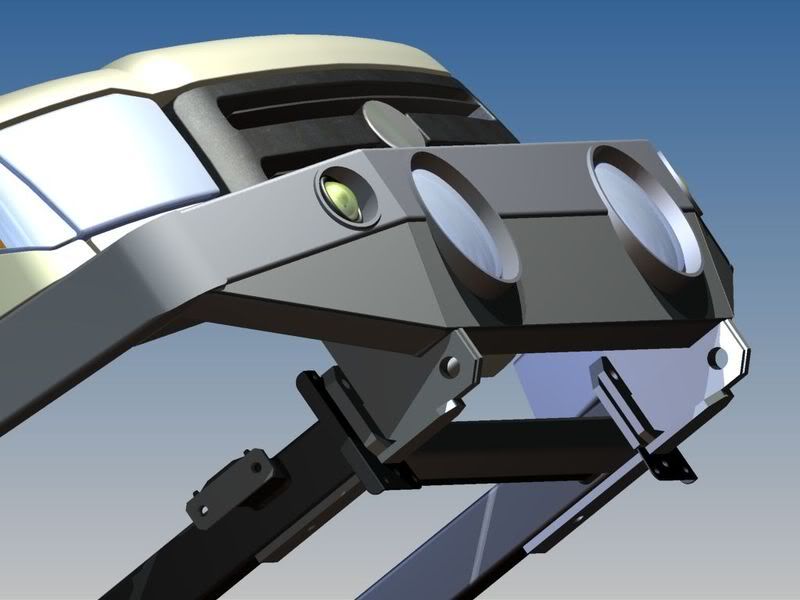
First, if anyone ever wondered, this is how to make your bumper in 3D

Start with truck model (measured by hand):


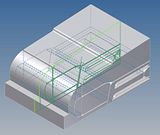
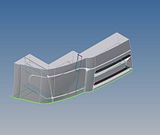
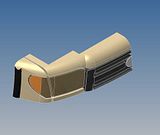
Then add frame and start making it!

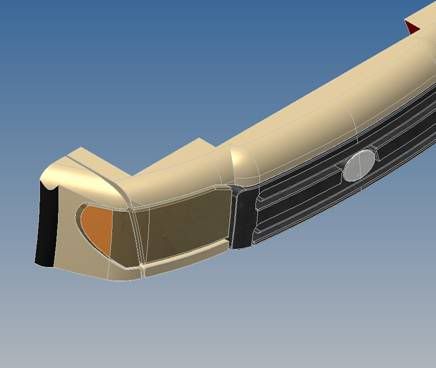
This is where I am at right now:
Old 01-29-2008, 04:43 PM
  #4  
Contributing Member
Thread Starter
 
wjwerdna's Avatar
 
Join Date: Mar 2006
Location: Novi, MI
Posts: 1,861
Likes: 0
Received 1 Like on 1 Post
Sorry, I realize this isn't as fun as pictures of actually cutting into it

Old 01-29-2008, 08:19 PM
  #5  
Registered User
 
Tylerars24's Avatar
 
Join Date: Aug 2007
Location: On top of your wife.
Posts: 127
Likes: 0
Received 0 Likes on 0 Posts
are you using solid edge?


thats a pretty good model
Old 01-29-2008, 09:40 PM
  #6  
Contributing Member
Thread Starter
 
wjwerdna's Avatar
 
Join Date: Mar 2006
Location: Novi, MI
Posts: 1,861
Likes: 0
Received 1 Like on 1 Post
no, I used to use SolidEdge years ago, then UG, then SolidWorks, now Inventor
Old 02-02-2008, 07:56 PM
  #7  
Contributing Member
Thread Starter
 
wjwerdna's Avatar
 
Join Date: Mar 2006
Location: Novi, MI
Posts: 1,861
Likes: 0
Received 1 Like on 1 Post
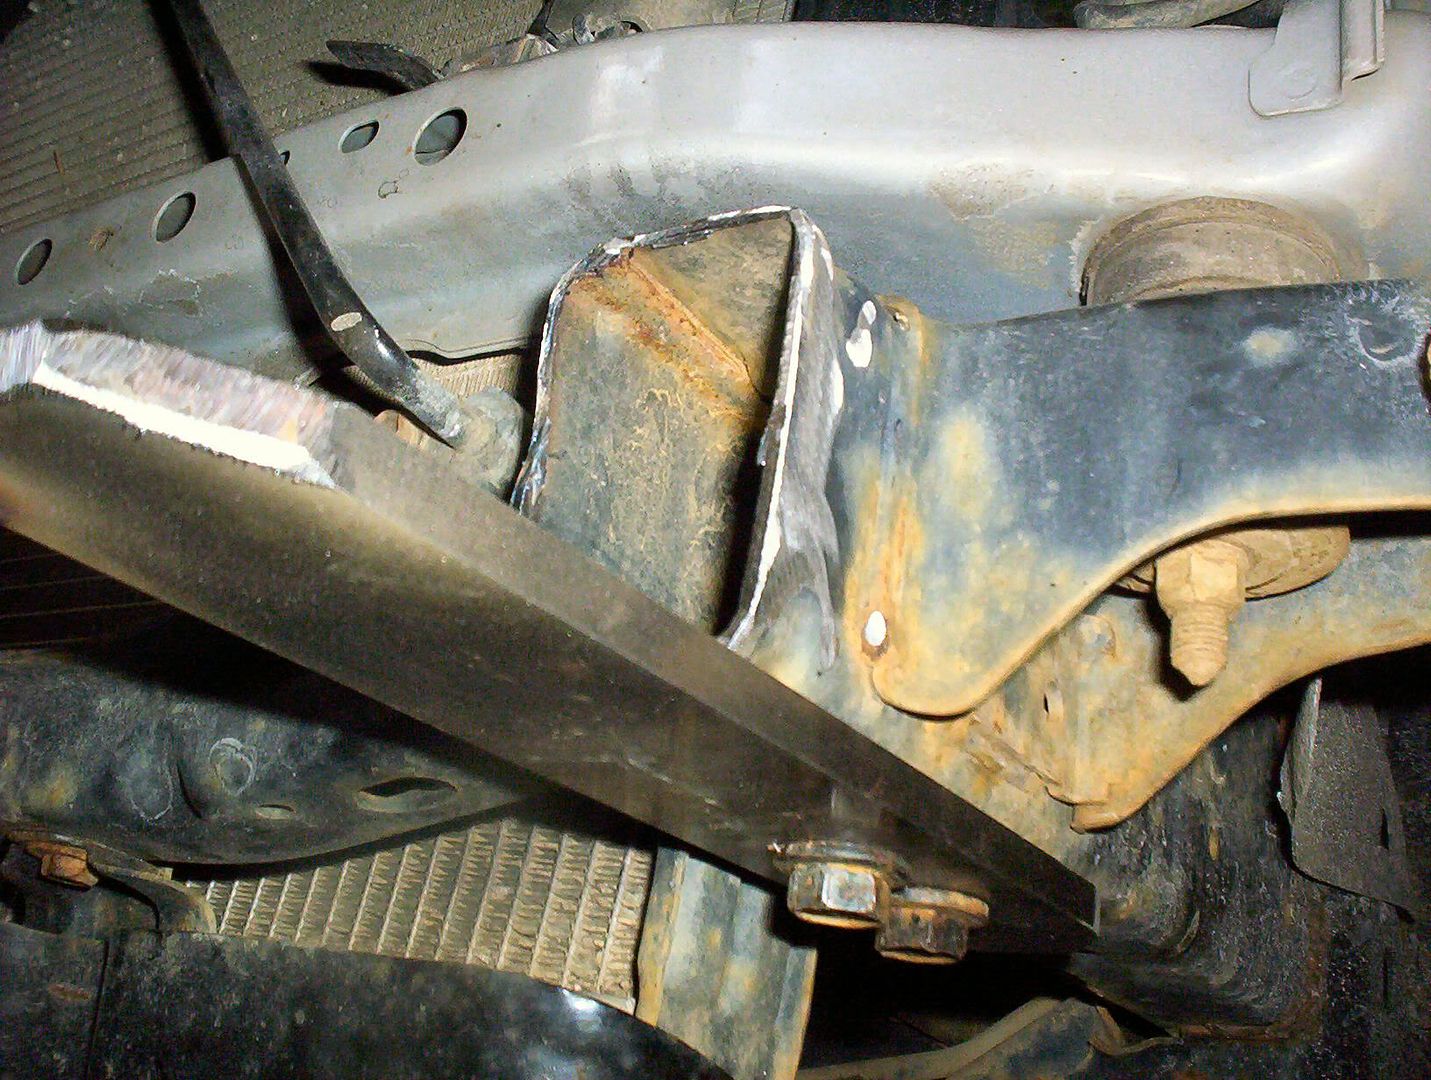
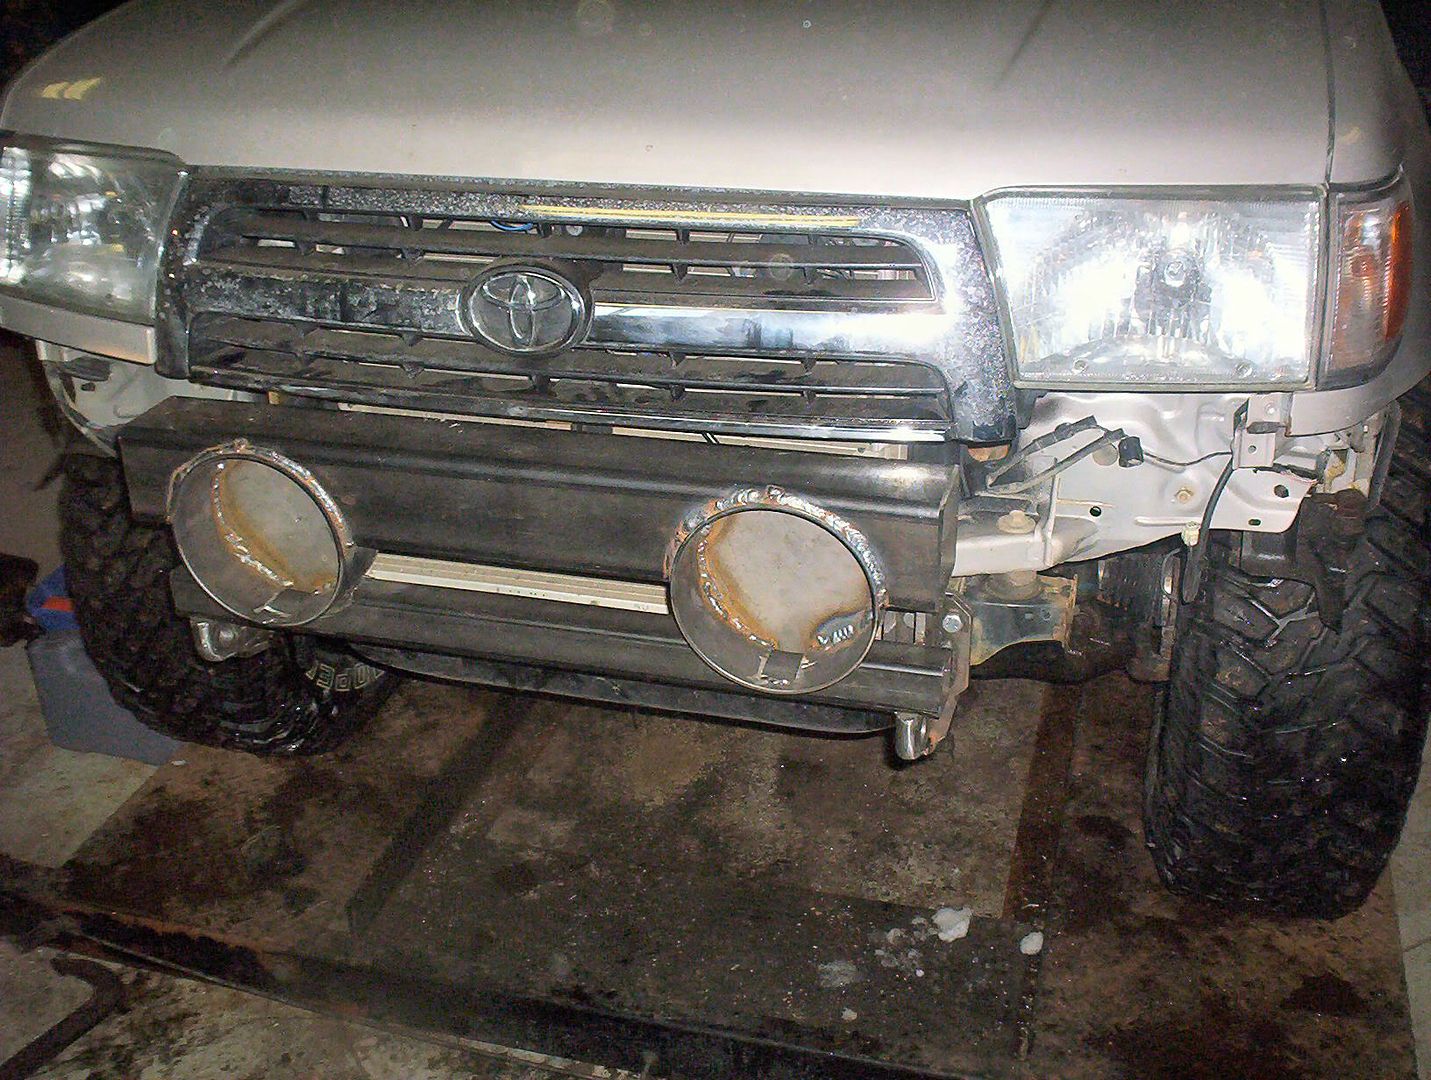
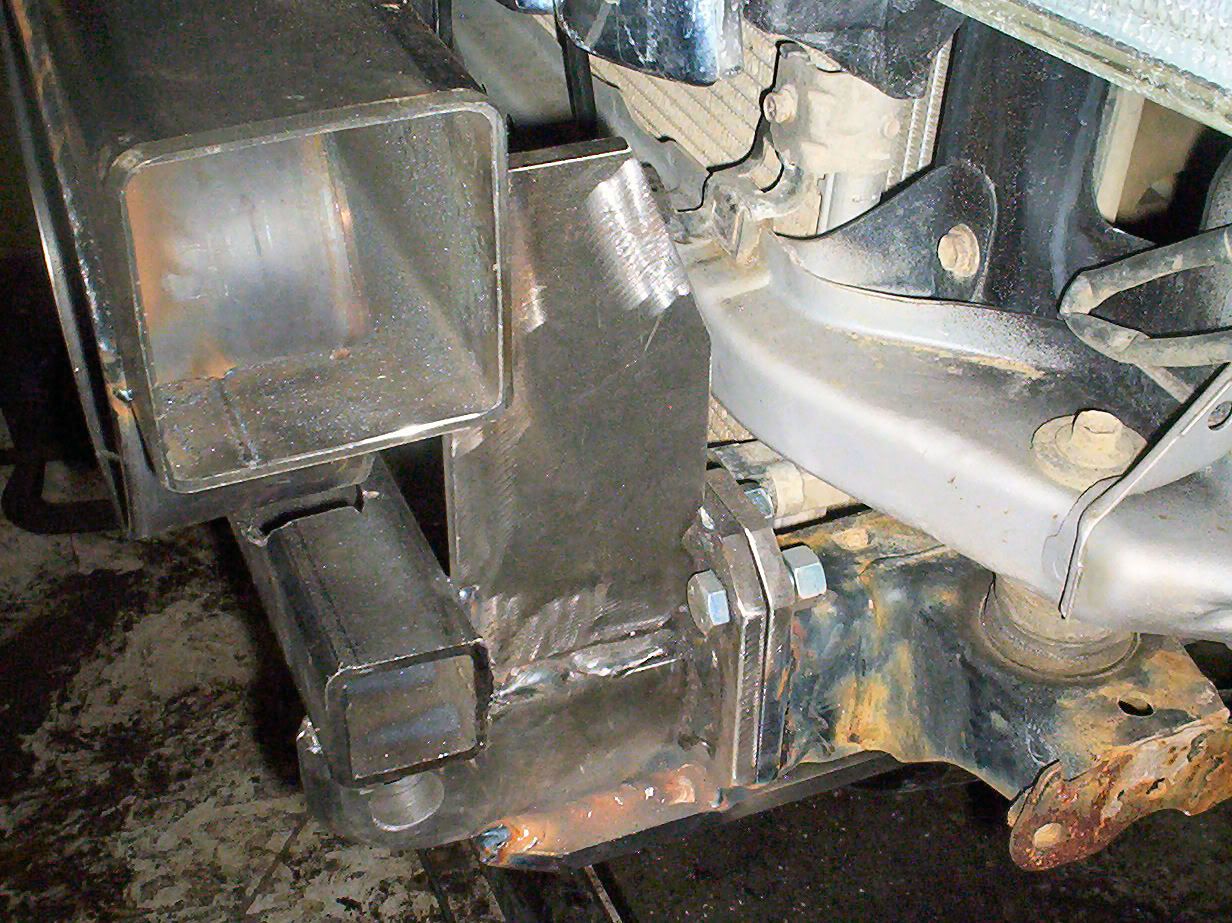
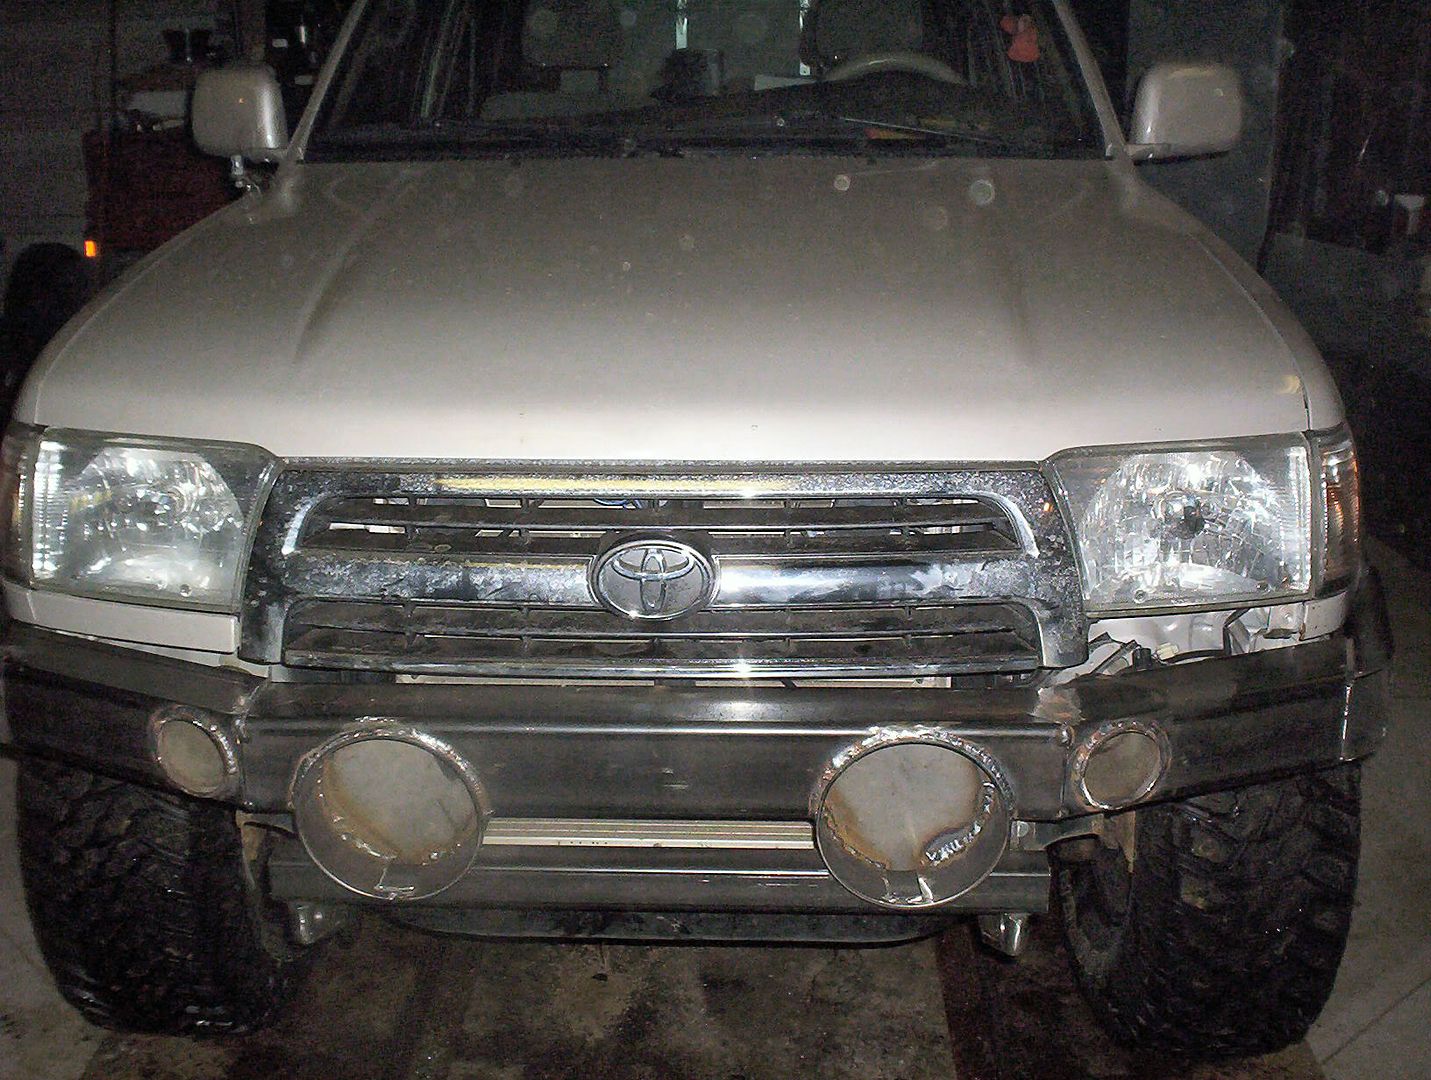
Ready... Set... Almost there

Ok, so I'm ready to start getting this going, tomorrow I am going to start cutting the smaller pieces. Monday-Wednesday should be able to get the rest of the steel, then onto getting it ready to bolt up. chopping the frame, and finishing it all up!!! With all the cold weather, I've had enough time to plan out everything on paper first, actual building should go very smooth


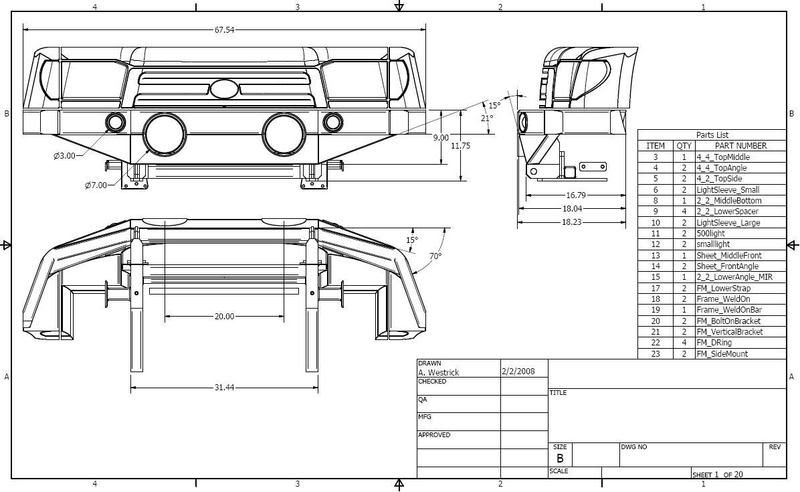
click pics for larger!
Old 02-02-2008, 08:05 PM
  #8  
Registered User
 
toylocost's Avatar
 
Join Date: Jul 2007
Location: Yotatech, because Pirate is too expensive. NorCal.
Posts: 1,705
Likes: 0
Received 10 Likes on 5 Posts
WOW. Hello Mr. CAD expert. How long did that take? I took a Advanced CAD class in HS but the fat teacher was to lazy to teach.
Old 02-02-2008, 08:24 PM
  #9  
Contributing Member
Thread Starter
 
wjwerdna's Avatar
 
Join Date: Mar 2006
Location: Novi, MI
Posts: 1,861
Likes: 0
Received 1 Like on 1 Post
Originally Posted by dirtbiker13575
WOW. Hello Mr. CAD expert. How long did that take? I took a Advanced CAD class in HS but the fat teacher was to lazy to teach.
lol, thanks =) It's fun to work with this software, and I get to use it a bit at work when I get a chance

I would say so far I have about 5-7 hours in actual measuring and sketching the 4runner body and frame in 2D, with another 3-4 hours to correctly model/extrude/shape and color it. Then quite a bit of time so far developing all of the bumper, brackets, etc.. probably 12-15 hours. Then another 2 hours finishing it up and creating all the separate print views to make each part For the most part I am done with the CAD part, so I would guess 20-30 hours total? maybe more.
Old 02-02-2008, 08:45 PM
  #10  
Registered User
 
Godzilla's Avatar
 
Join Date: Mar 2004
Location: Vancouver
Posts: 2,171
Likes: 0
Received 0 Likes on 0 Posts
cool stuff. where are the turn signals going to be? I like how you have the larger lights incorporated into the bumper.
Old 02-03-2008, 06:32 AM
  #11  
Contributing Member
Thread Starter
 
wjwerdna's Avatar
 
Join Date: Mar 2006
Location: Novi, MI
Posts: 1,861
Likes: 0
Received 1 Like on 1 Post
Originally Posted by Godzilla
cool stuff. where are the turn signals going to be? I like how you have the larger lights incorporated into the bumper.
the turn signals have allready been wired into the lights next to the headlights using higher wattage 2-filament bulbs
Old 02-03-2008, 09:45 AM
  #12  
Registered User
 
Atomic's Avatar
 
Join Date: Jul 2007
Location: Crystal Lake, IL
Posts: 343
Likes: 0
Received 0 Likes on 0 Posts
Wow, great work! I wish I knew how to use my SolidEdge like that! What do you do for a living?

Keep us updated!
Old 02-03-2008, 11:44 AM
  #13  
Contributing Member
Thread Starter
 
wjwerdna's Avatar
 
Join Date: Mar 2006
Location: Novi, MI
Posts: 1,861
Likes: 0
Received 1 Like on 1 Post
Originally Posted by Atomic
Wow, great work! I wish I knew how to use my SolidEdge like that! What do you do for a living?

Keep us updated!
I'm a mechanical engineering student, almost done with studies (1 year left)... I just started using this software (ACad Inventor) but it is pretty much the same as others, very similar to SolidWorks. All it takes to learn is to sit down and really work with the software =)

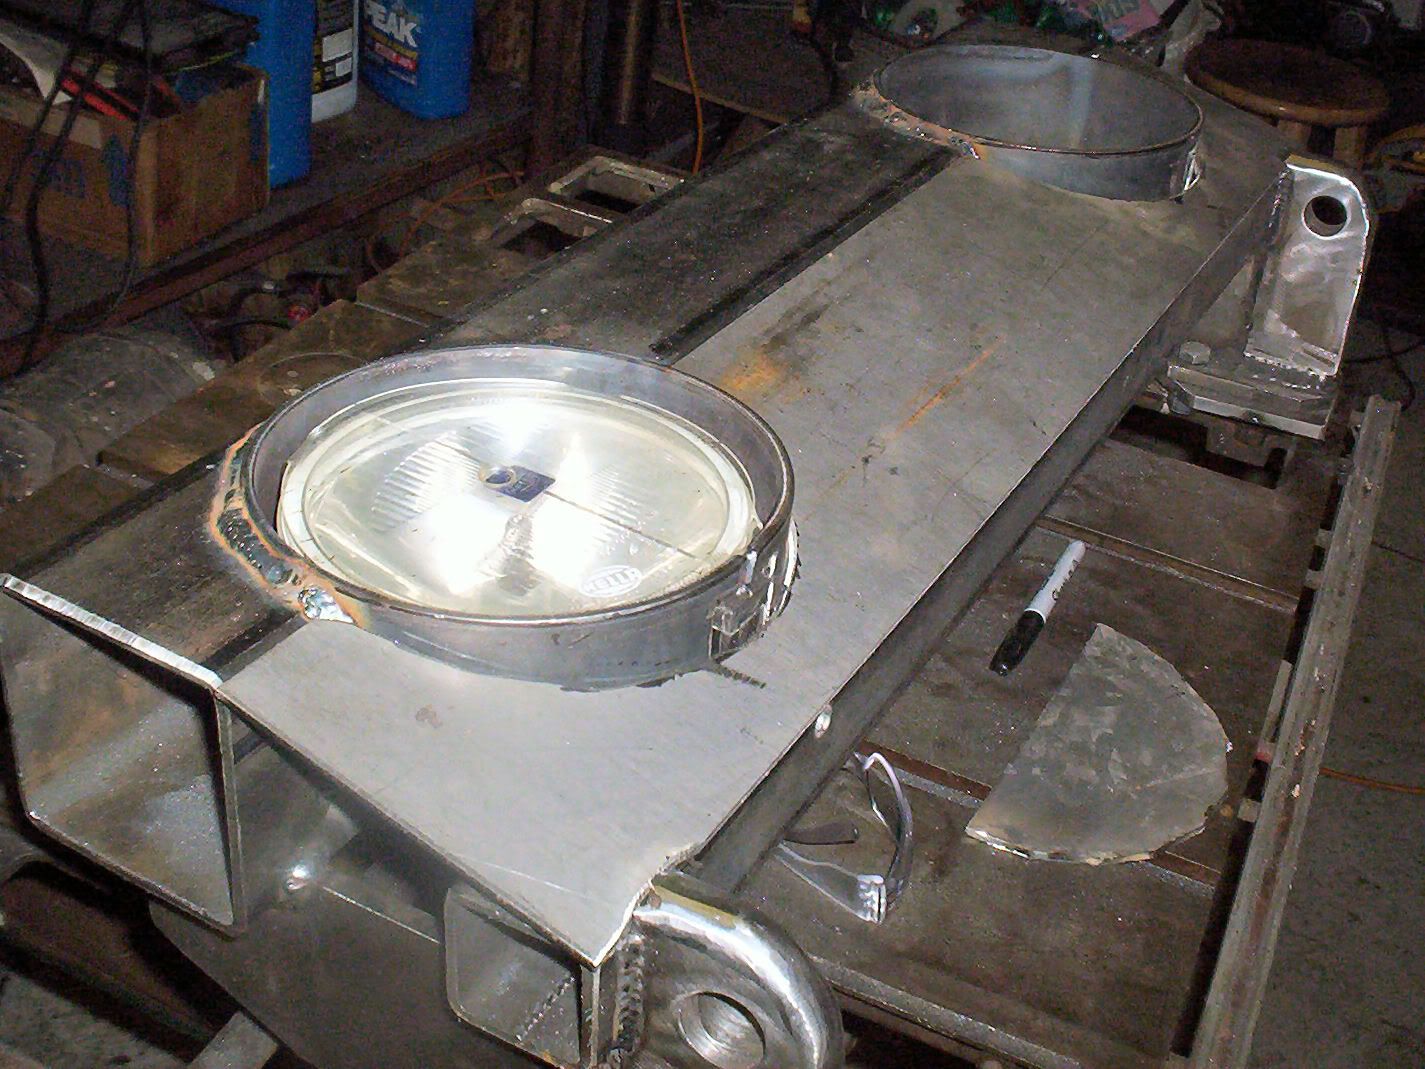
I started work cutting brackets and little pieces today, some progress at least tomorrow is a trip to the steel warehouse
Old 02-16-2008, 04:04 PM
  #14  
Contributing Member
Thread Starter
 
wjwerdna's Avatar
 
Join Date: Mar 2006
Location: Novi, MI
Posts: 1,861
Likes: 0
Received 1 Like on 1 Post


Looks sweet so far, it's coming together pretty good. a dozen grinding/cutting disks so far
Old 02-16-2008, 04:25 PM
  #15  
Registered User
 
Whitey13's Avatar
 
Join Date: Jan 2006
Location: MA
Posts: 1,101
Likes: 0
Received 0 Likes on 0 Posts
Looks great so far. What are you using for grinding discs? I work for the largest manufacturer of such products in the world. I may have some stuff hanging around that you could use.
Old 02-16-2008, 04:53 PM
  #16  
Registered User
 
Gerdo's Avatar
 
Join Date: Nov 2005
Location: SouthWest Littleton, Colorado
Posts: 1,205
Likes: 0
Received 1 Like on 1 Post
Good looking. Looks like it'll be solid. I like the indents for the lights. I'm thinking of something similar. Keep us updated.

I've always had good luck with Norton disks. I bought some cheap HF disks, what junk. It was the closest place, should have driven further for the Nortons.
Old 02-16-2008, 04:56 PM
  #17  
Registered User
 
fillsrunner4's Avatar
 
Join Date: Jun 2004
Location: Woodinville, wa
Posts: 2,906
Likes: 0
Received 2 Likes on 1 Post
Originally Posted by dirtbiker13575
WOW. Hello Mr. CAD expert. How long did that take? I took a Advanced CAD class in HS but the fat teacher was to lazy to teach.
Same here my teacher sucked

Looks great I wish I had some of that software it could come in handy
Old 02-16-2008, 06:35 PM
  #18  
Registered User
 
bruzer1123's Avatar
 
Join Date: Feb 2005
Location: Idaho
Posts: 329
Likes: 0
Received 0 Likes on 0 Posts
Wow-nice build. I too like the inset lights. Are you planning on marketing the bumper once complete?
Old 02-16-2008, 10:50 PM
  #19  
Contributing Member
Thread Starter
 
wjwerdna's Avatar
 
Join Date: Mar 2006
Location: Novi, MI
Posts: 1,861
Likes: 0
Received 1 Like on 1 Post
Originally Posted by fillsrunner4
Same here my teacher sucked
Looks great I wish I had some of that software it could come in handy
The teacher doesn't matter... ever, it is how you apply yourself

Originally Posted by Whitey13
Looks great so far. What are you using for grinding discs? I work for the largest manufacturer of such products in the world. I may have some stuff hanging around that you could use.
I have bought an assortment of dewalt 1/16" cutoffs, a Bosch grinding disk that came with grinder (longest lasting so far), a "gator grit", and an assortment of other ones from TSC

Originally Posted by bruzer1123
Wow-nice build. I too like the inset lights. Are you planning on marketing the bumper once complete?
Lol, I thought about it, but as of now, no. The plans/components/build details will not be available to anyone for free or purchase. Sorry
I have put too much time into the design for the plans to be affordable.

EDIT: My friend and I are contemplating the idea of marketing these bumpers "for off-road use" of course (due to implications of safety tests for roads). We are thinking about the possibility of fully customizable bumpers, with a "you name it, we make it style." We would try to keep the cost down, but truly it wouldn't be the cheapest out there, but could still be affordable, we don't have the time or resources to stock steel and materials in large quantities to get discounts.

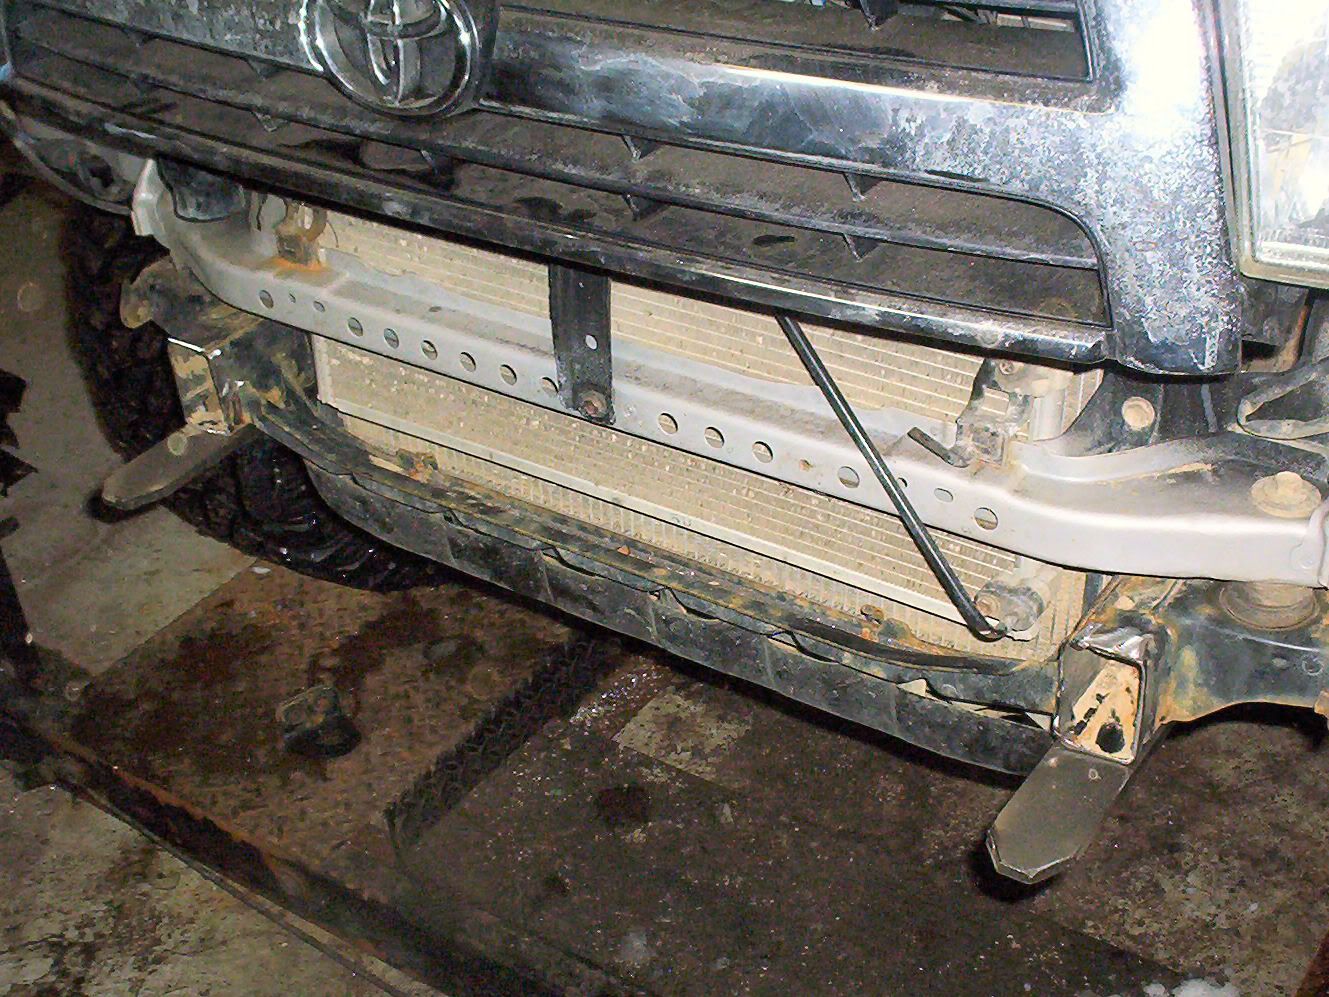
More pictures and details should be up end of Sunday, there is a lot more work to do, finish all welds, add front portions, a little more trim work, mount lights, clean-up, sandblast, paint, etc

Last edited by wjwerdna; 02-17-2008 at 05:59 PM.
Old 02-17-2008, 08:17 AM
  #20  
Registered User
 
Atomic's Avatar
 
Join Date: Jul 2007
Location: Crystal Lake, IL
Posts: 343
Likes: 0
Received 0 Likes on 0 Posts
Wow! Looks amazing so far. Keep up the great work!


Quick Reply: Another 3rd Gen Front Bumper Build - wjwerdna


All times are GMT -8. The time now is 02:33 PM.