87 4Runner bed side panels fab job
 12-04-2012, 04:27 PM
#1
Registered User
Thread Starter
Join Date: Nov 2012
Location: Las Vegas, NV
Posts: 78
Likes: 0
Received 0 Likes
on
0 Posts
87 4Runner bed side panels fab job
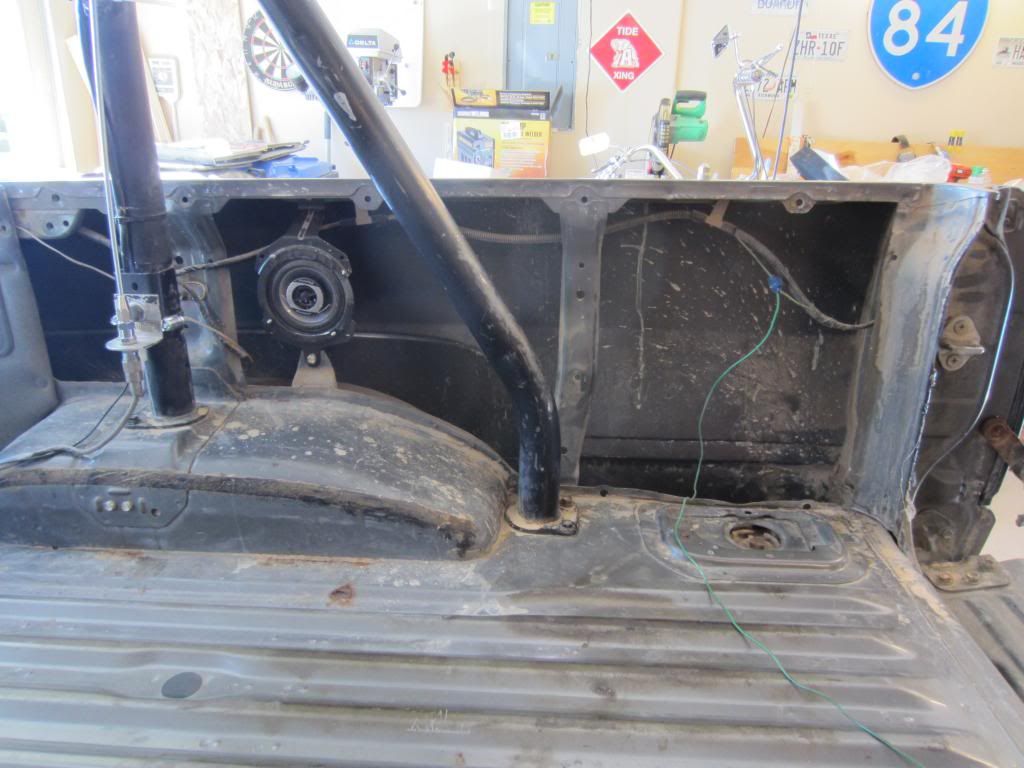
So I got tired of my old side panels not wanting to stay closed, looking brittle and crappy so I decided to make myself some. I bought a 4x8' sheet of 14 gauge aluminum diamond plate sheet metal and also a 2x4' sheet.(so that I could have a large piece left to either do the bed or other panels later. This also allows for an optional rear speaker upgrade to practically any size you so desire. I know we all hate those 4 inch worthless things. I will post pictures to illustrate each step I used to get to the finished product. Forgive me if this post isn't perfect, it is my first one.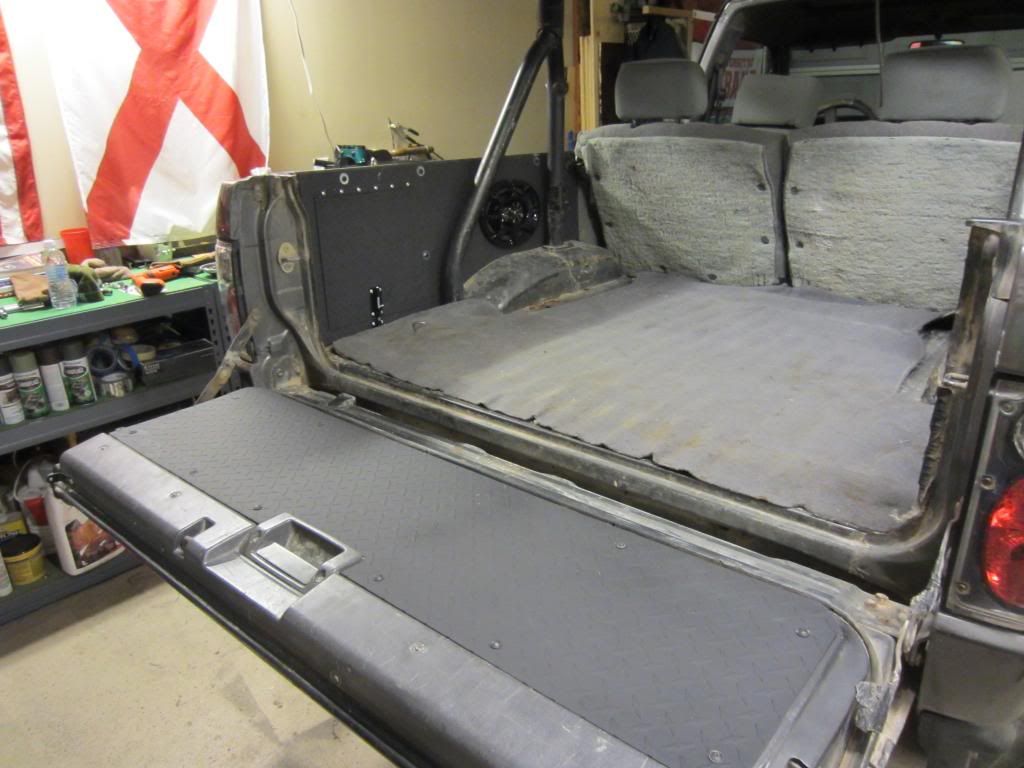

 12-04-2012, 04:52 PM
#3
Registered User
Thread Starter
Join Date: Nov 2012
Location: Las Vegas, NV
Posts: 78
Likes: 0
Received 0 Likes
on
0 Posts
So you are going to need the following for this job. 4x8 foot 14 gauge diamond plated sheet metal(I used aluminum) 12 inch hinges you can get at lowes, a couple of latches, rivets, and nuts bolts and washers. Tools wise you need a Jigsaw(with a sheet metal blade or two) wrenches for your bolts, files to work your edges smooth, some cardboard to make a template with a sharpie and a measuring tape. I also recommend a square but you dont have to have it.
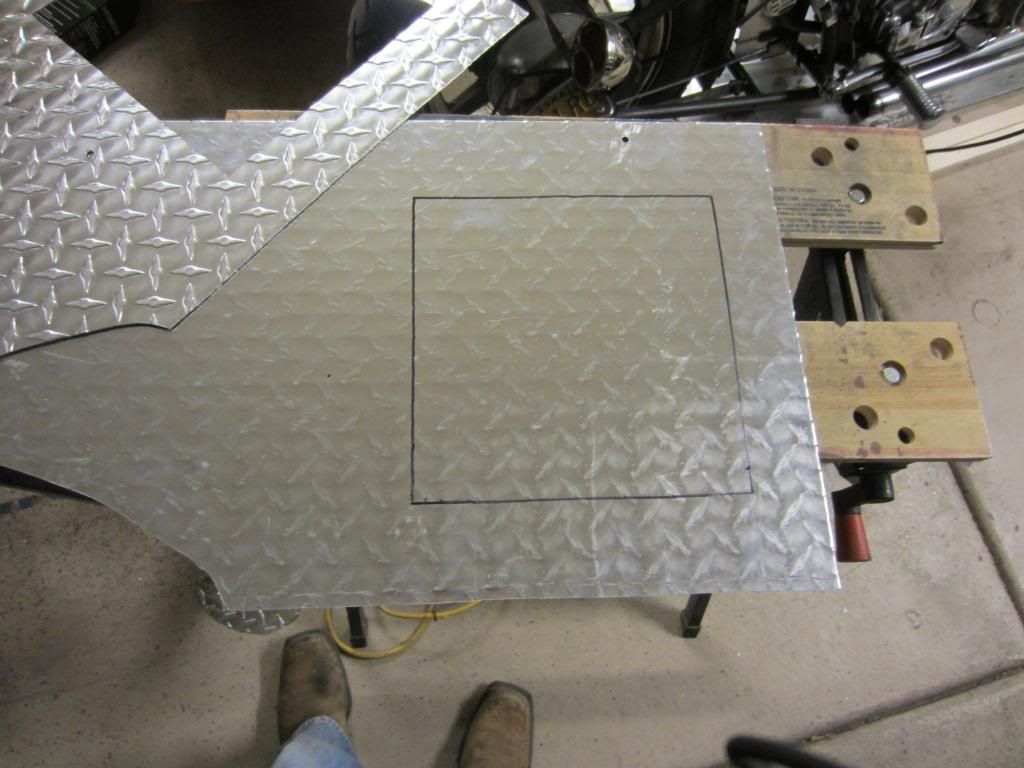
Here is your Diagram/Template. I recommend just using this as a reference. Keep in mind that these panels are going to be identical mirror images of each other, the first one might take a while to get just right but the second one will be a breeze.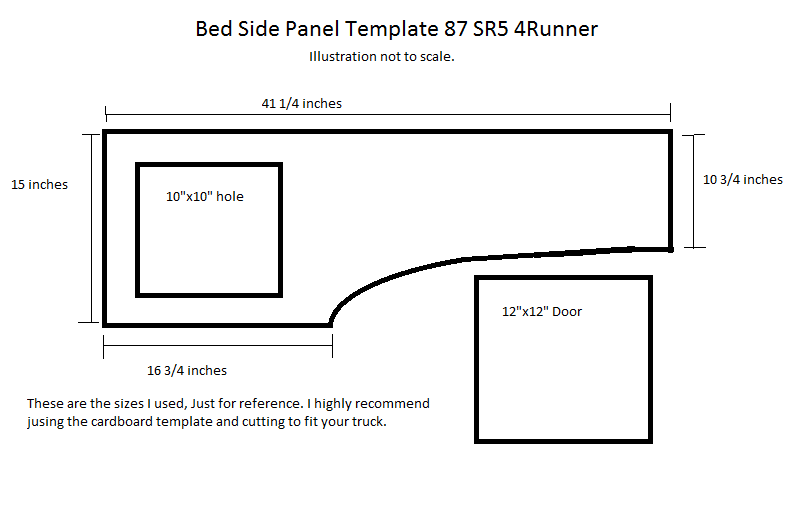
Start with your cardboard, keep taking it down piece by piece until you have a decent fit.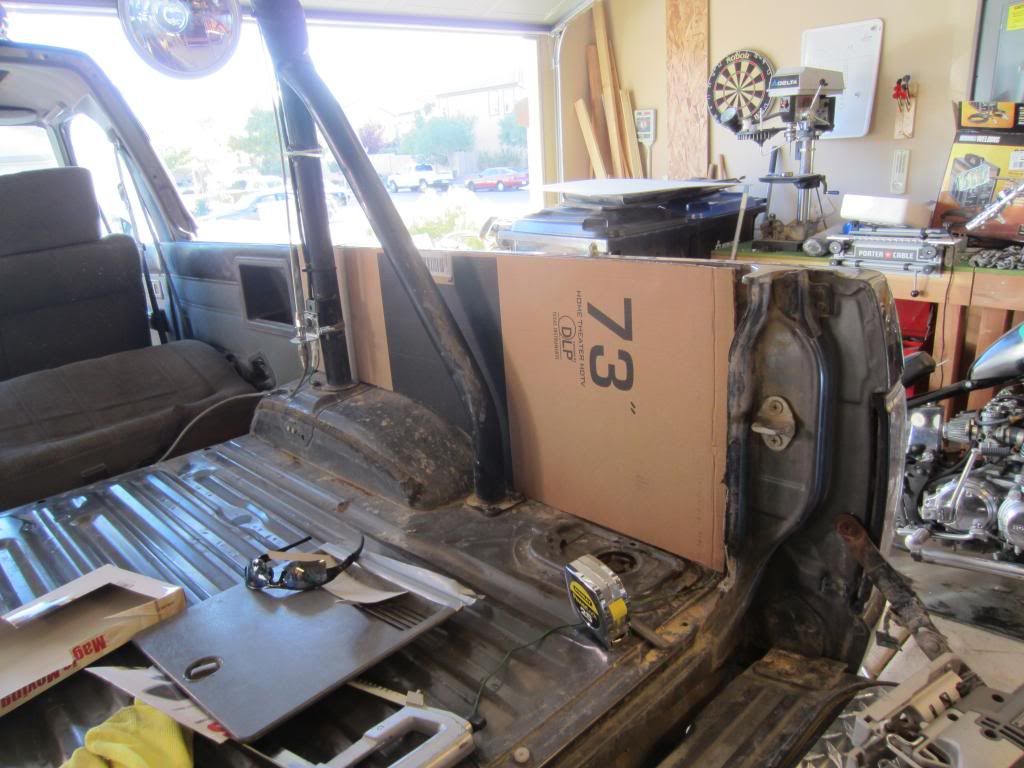
Once you have that layout your stencil.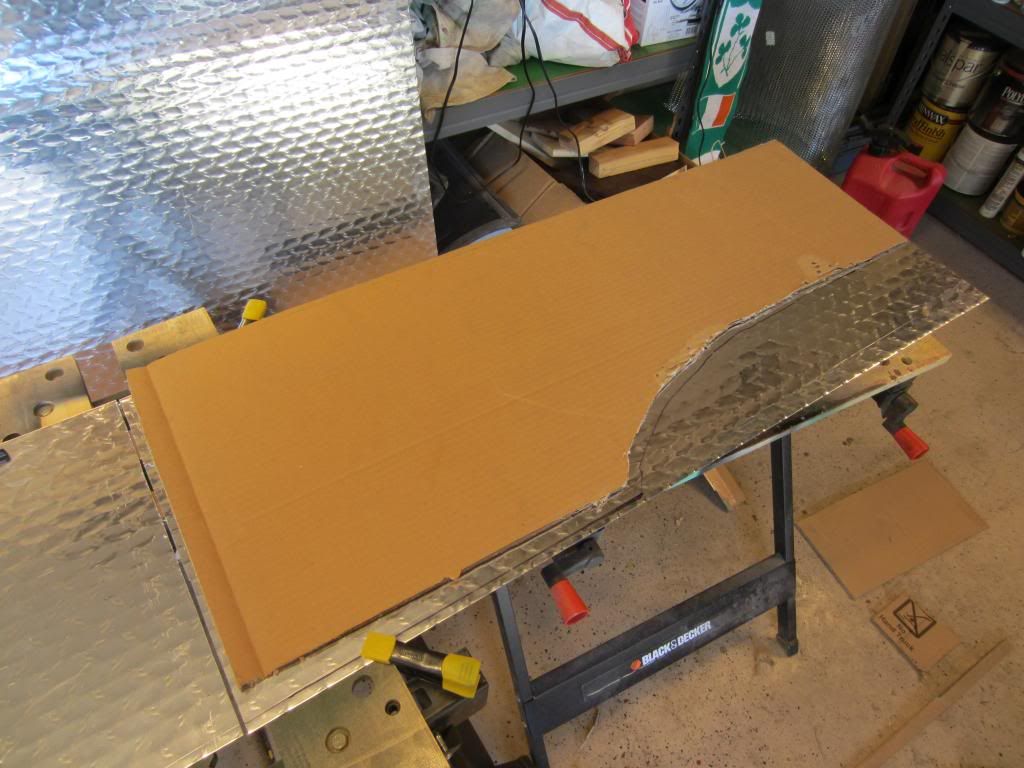
It is very possible to get a nice straight cut using a jigsaw you just have to be patient and slow. Remember that once you make a cut you cant undo it. Be careful and several little cuts beats one cut that is too big.
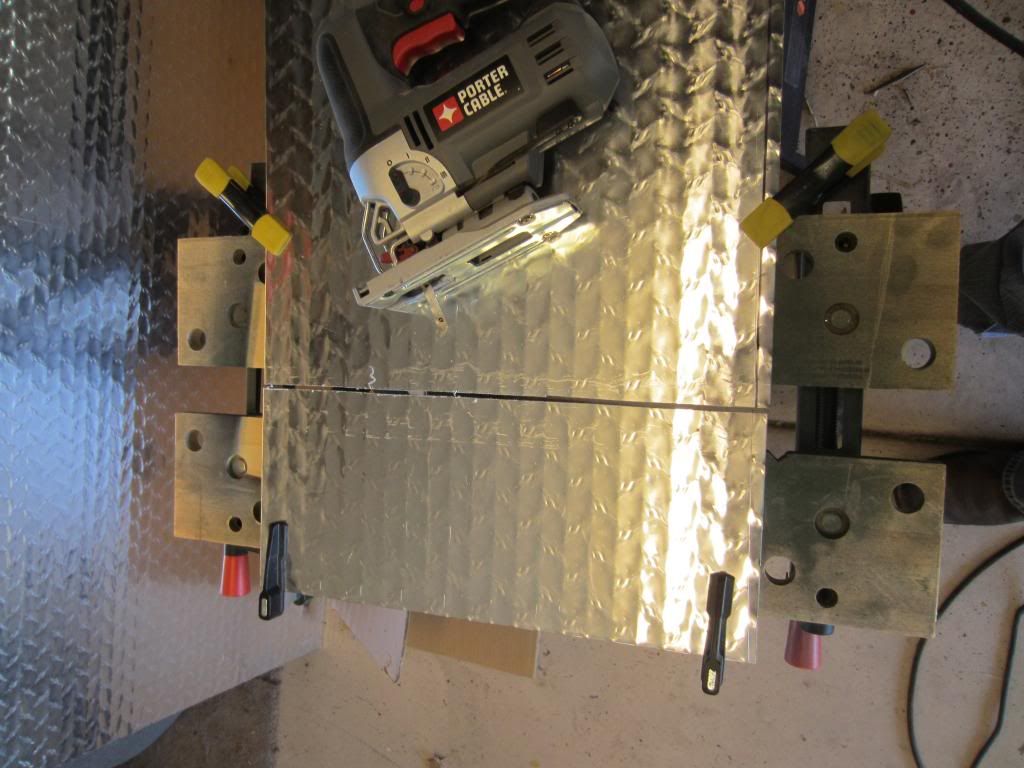
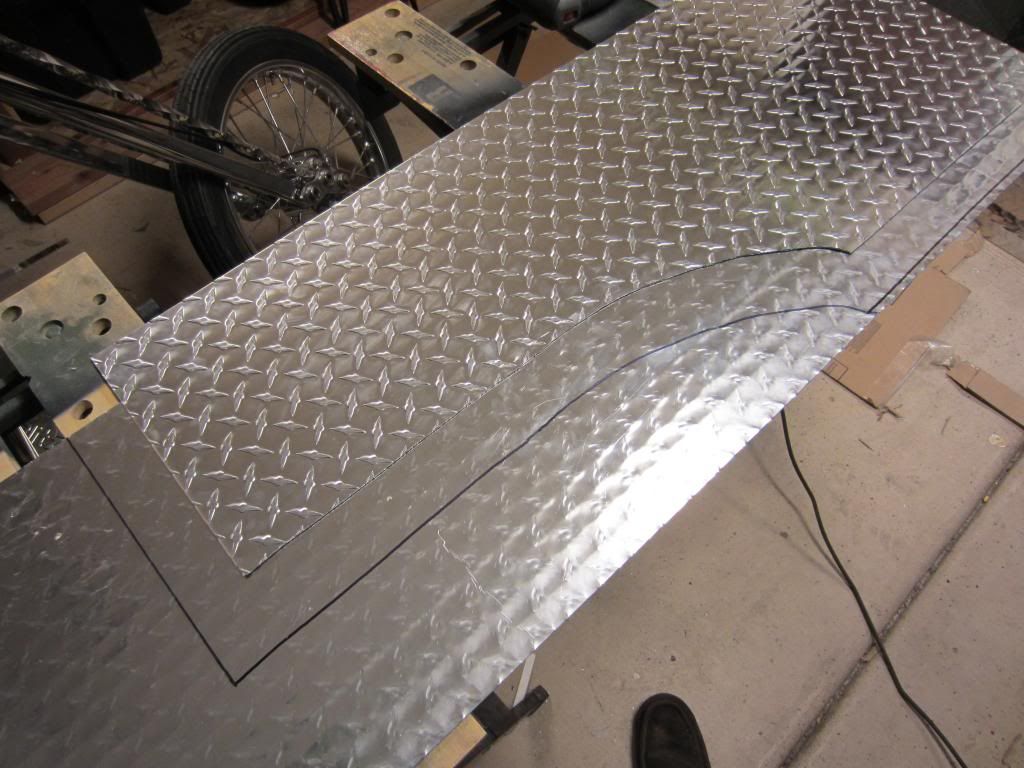
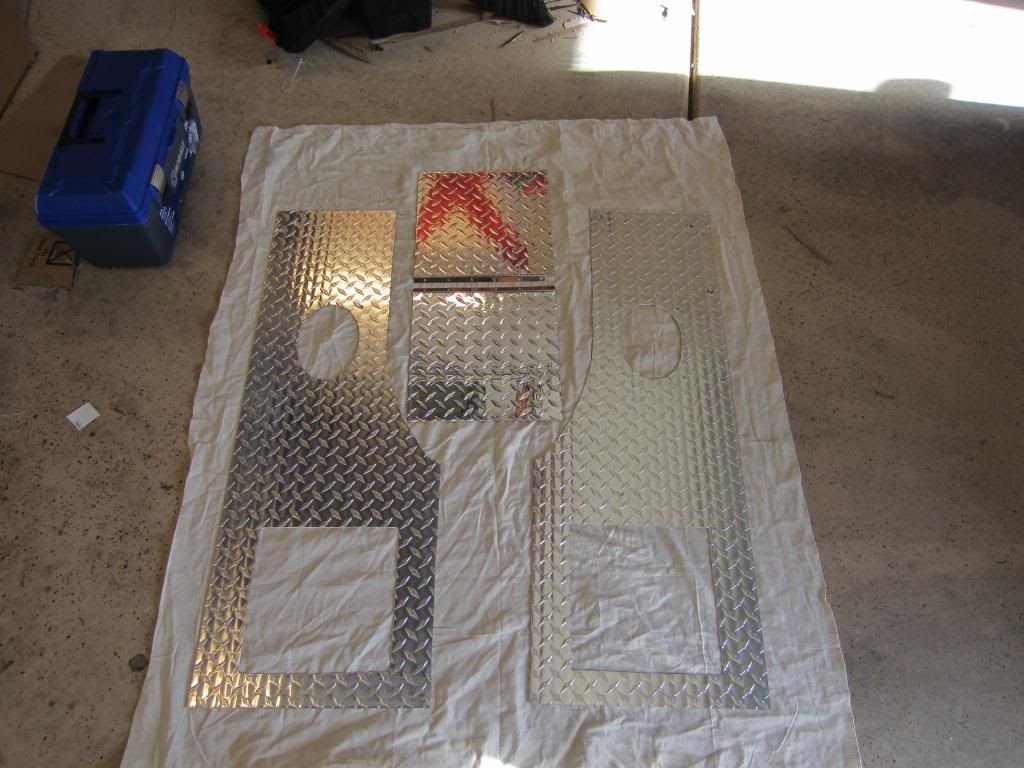
Once you finish your initial cuts you just have to keep cutting small pieces away until it fits right. I used a sharpie and just made a mark where it rubbed against the truck and then took it down a little at a time. Once you make your cuts file the edges down so they wont be jagged and scratch up your paint or your friends.
Once you finish side one the second will be a breeze.
If you choose to keep your storage compartments I recommend a 10x10 inch hole. this leaves a thick enough metal to maintain its integrity, also with a 12x12 door you have a nice coverage so it looks clean and fits the hinges without manipulation.
After this cut your speaker holes as required (if you choose to have speakers) I went with 6x9's. Once you are done you are ready to start lining up your holes with the ones already in the truck where the christmas trees used to be. This is a pain in the rear but doable, also if your hole isn't perfect no big deal the washers will help cover up any holes you have to expand. Just measure the hole from the inside to the edge of the metal. afterwards make the mark on the outside, this is the most difficult part, take your time it will be worth it. Rivet on you hinges to the door flap. and you are ready for paint. Sorry I don't have pictures with all this, i got into it and didnt think about it.
paint whatever color you want. I just went with primer.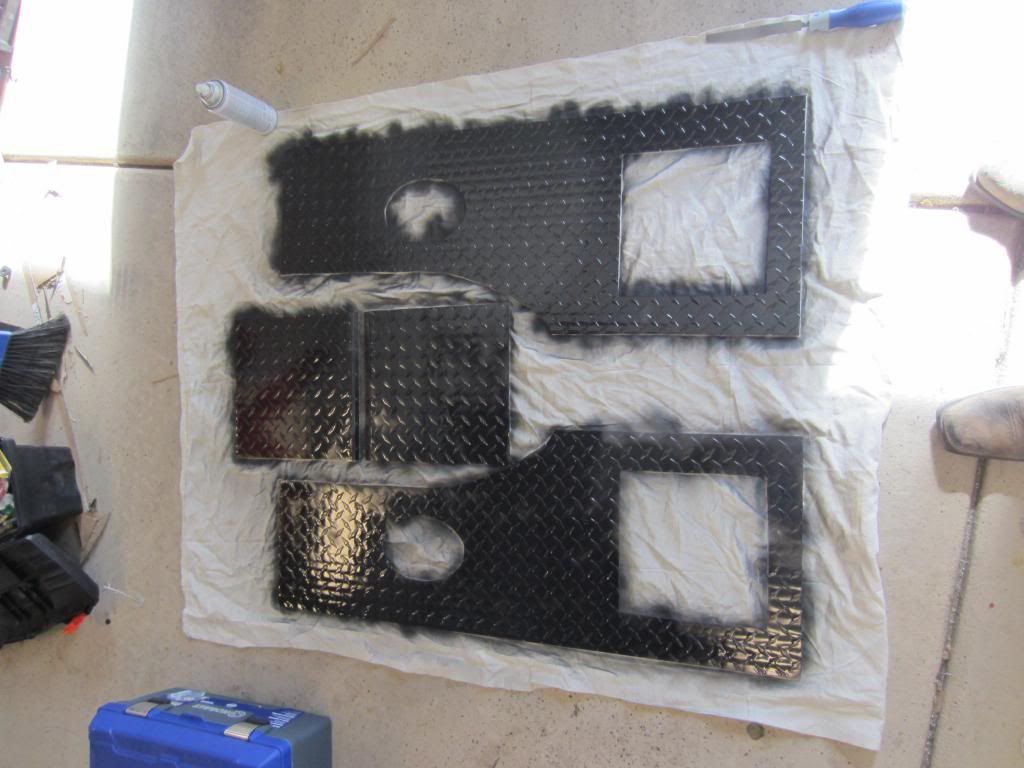
After paint, install your door flaps and then the latches. last put in your speakers(they are the thing you cant be rough with.
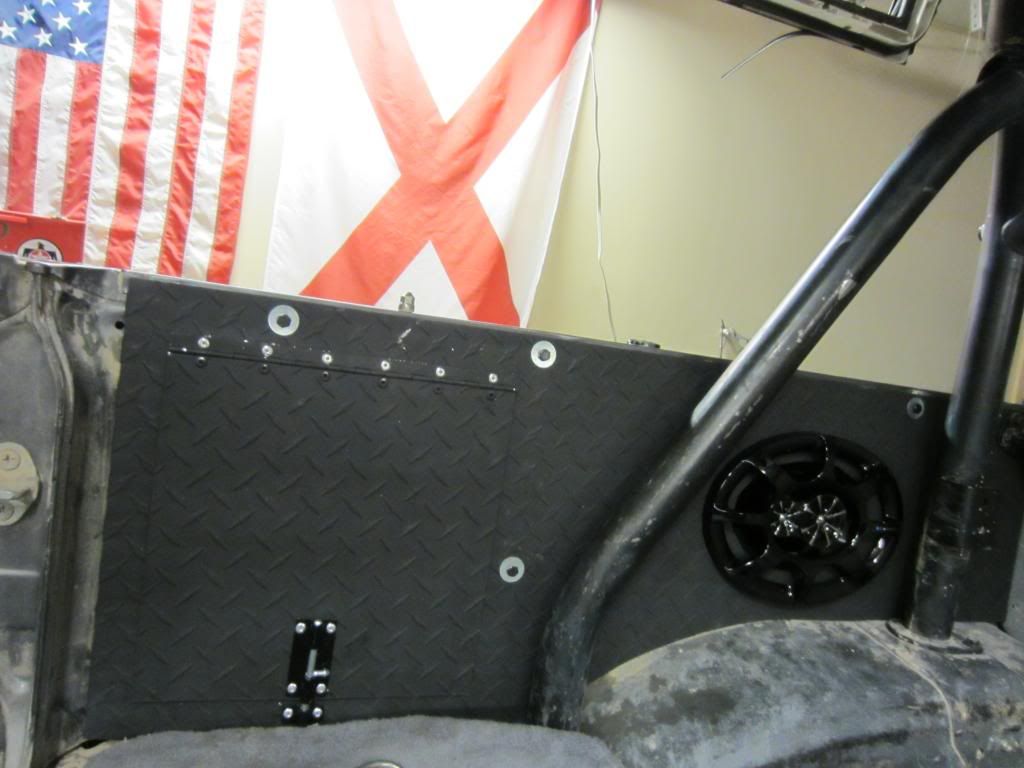
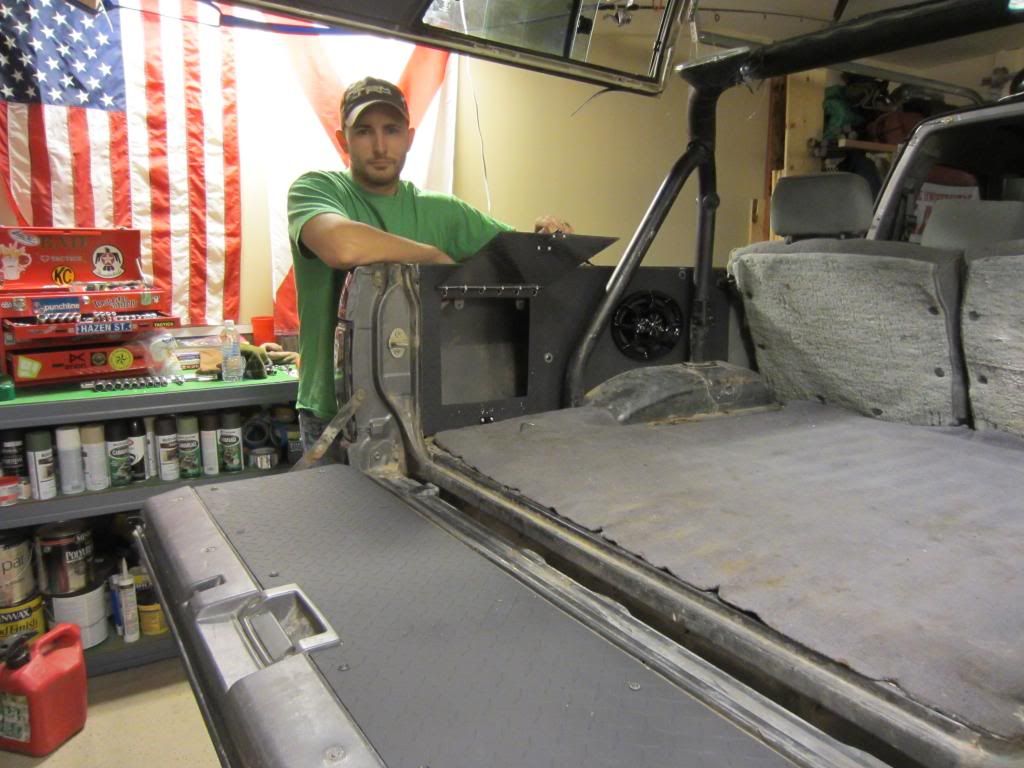
Finished product. If anyone wants more detailed pictures of something or has a question just ask. I know I didn't do a great job of photographing every step. I hope someone finds this useful. I am pretty happy with the outcome!
Here is your Diagram/Template. I recommend just using this as a reference. Keep in mind that these panels are going to be identical mirror images of each other, the first one might take a while to get just right but the second one will be a breeze.
Start with your cardboard, keep taking it down piece by piece until you have a decent fit.
Once you have that layout your stencil.
It is very possible to get a nice straight cut using a jigsaw you just have to be patient and slow. Remember that once you make a cut you cant undo it. Be careful and several little cuts beats one cut that is too big.
Once you finish your initial cuts you just have to keep cutting small pieces away until it fits right. I used a sharpie and just made a mark where it rubbed against the truck and then took it down a little at a time. Once you make your cuts file the edges down so they wont be jagged and scratch up your paint or your friends.
Once you finish side one the second will be a breeze.
If you choose to keep your storage compartments I recommend a 10x10 inch hole. this leaves a thick enough metal to maintain its integrity, also with a 12x12 door you have a nice coverage so it looks clean and fits the hinges without manipulation.
After this cut your speaker holes as required (if you choose to have speakers) I went with 6x9's. Once you are done you are ready to start lining up your holes with the ones already in the truck where the christmas trees used to be. This is a pain in the rear but doable, also if your hole isn't perfect no big deal the washers will help cover up any holes you have to expand. Just measure the hole from the inside to the edge of the metal. afterwards make the mark on the outside, this is the most difficult part, take your time it will be worth it. Rivet on you hinges to the door flap. and you are ready for paint. Sorry I don't have pictures with all this, i got into it and didnt think about it.
paint whatever color you want. I just went with primer.
After paint, install your door flaps and then the latches. last put in your speakers(they are the thing you cant be rough with.
Finished product. If anyone wants more detailed pictures of something or has a question just ask. I know I didn't do a great job of photographing every step. I hope someone finds this useful. I am pretty happy with the outcome!
12-05-2012, 08:06 PM
#5
Registered User
iTrader: (2)
Join Date: Dec 2009
Location: Pleasanton, CA - SF Bay Area
Posts: 2,159
Likes: 0
Received 7 Likes
on
5 Posts
Bad ass! How did you handle the area near the tailgate where the oem panels curve in? What about up front .where the seat latches stick out?
Looks great....would be cool to see backsides of how hinges mount.
Does it rattle a lot?
Did you use rivet nuts to mount?
Looks great....would be cool to see backsides of how hinges mount.
Does it rattle a lot?
Did you use rivet nuts to mount?
12-14-2012, 10:37 AM
#6
Registered User
Thread Starter
Join Date: Nov 2012
Location: Las Vegas, NV
Posts: 78
Likes: 0
Received 0 Likes
on
0 Posts
Thanks HighLux.
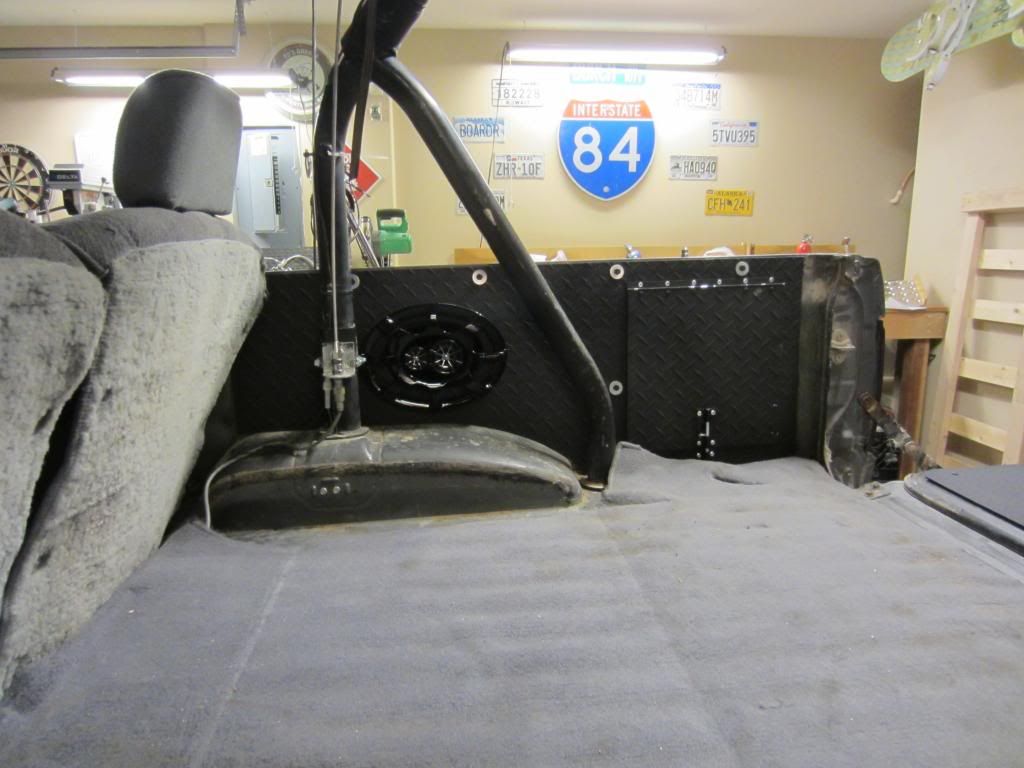
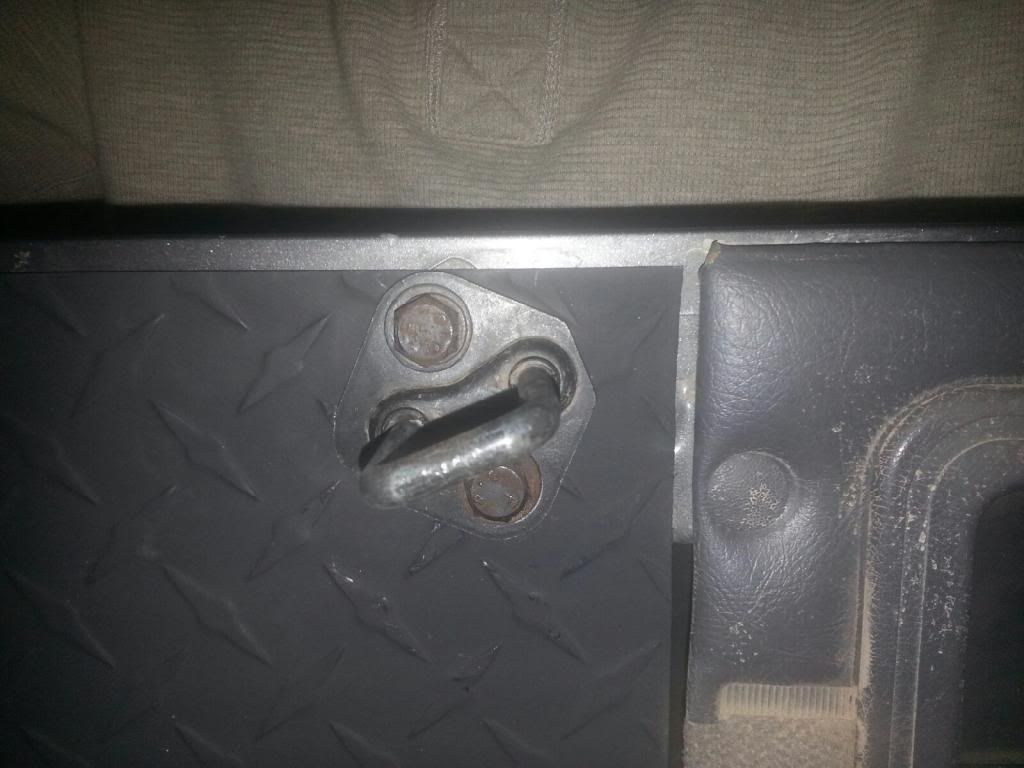
Philbert, thanks. I just removed the latches and bolted them down so they actually help secure the panels, It doesnt affect operation of the seats whatsoever. I did use rivets to attach the hinge and latch on the panels, the rest of it I just used the factory holes with nuts and bolts. There is no noticeable rattling so far. Maybe if I was listening while going down a rough trail I might notice it but so far it fit very snug with no rattle. If it does though it would be as simple as adding a little bit of rubber insulation or some type of material to absorb the rattle areas. I think the only area that has the potential to cause a rattle would be the bottom rear part of the panel near the door as there is no fastener there. So far no rattle though. You will see in the pictures below that I drilled holes in the part of the panel where the rivets would prevent flush closure of the door. I know it looks a little ghetto, but you never see it when the door is closed and I thought that cutting away the whole area affected would take be an unnecessary loss in integrity where the panel width is already at its slimmest. That is just my opinion. I can't really say that it would really matter. The door closes very snuggly though and does not rattle even the least bit.
Hinge inside.
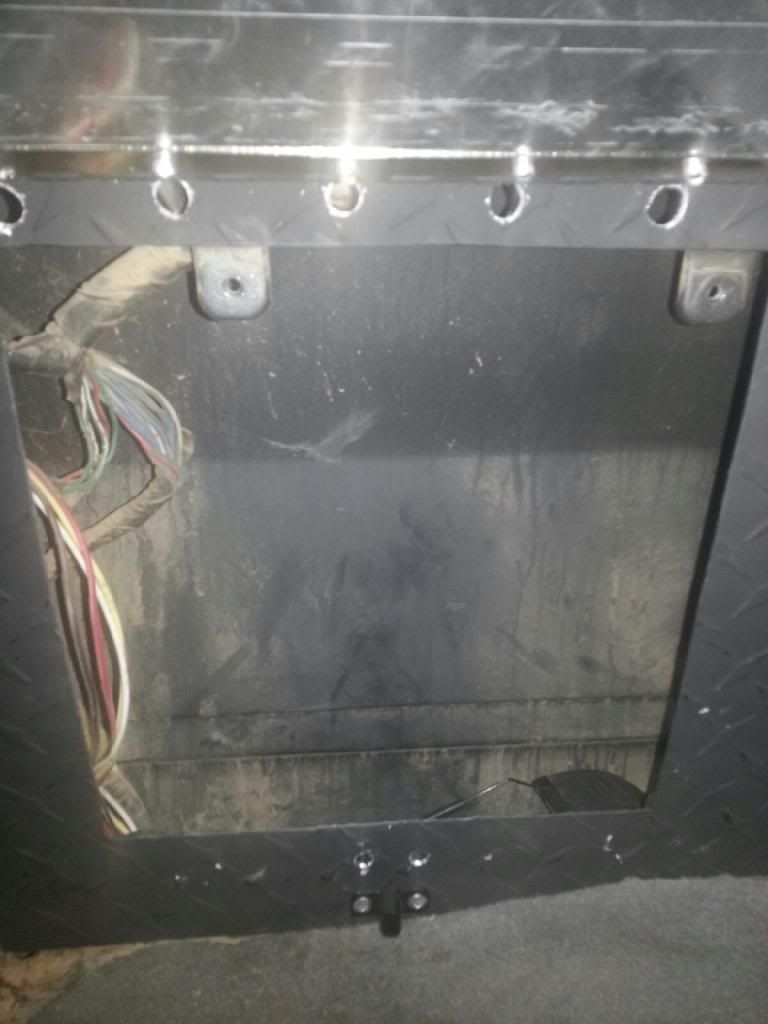
Hinge and latch holes

The Latch
Hopefully those pics are helpful.
Philbert, thanks. I just removed the latches and bolted them down so they actually help secure the panels, It doesnt affect operation of the seats whatsoever. I did use rivets to attach the hinge and latch on the panels, the rest of it I just used the factory holes with nuts and bolts. There is no noticeable rattling so far. Maybe if I was listening while going down a rough trail I might notice it but so far it fit very snug with no rattle. If it does though it would be as simple as adding a little bit of rubber insulation or some type of material to absorb the rattle areas. I think the only area that has the potential to cause a rattle would be the bottom rear part of the panel near the door as there is no fastener there. So far no rattle though. You will see in the pictures below that I drilled holes in the part of the panel where the rivets would prevent flush closure of the door. I know it looks a little ghetto, but you never see it when the door is closed and I thought that cutting away the whole area affected would take be an unnecessary loss in integrity where the panel width is already at its slimmest. That is just my opinion. I can't really say that it would really matter. The door closes very snuggly though and does not rattle even the least bit.
Hinge inside.
Hinge and latch holes
The Latch
Hopefully those pics are helpful.
12-14-2012, 11:24 AM
#7
Registered User
iTrader: (2)
Join Date: Dec 2009
Location: Pleasanton, CA - SF Bay Area
Posts: 2,159
Likes: 0
Received 7 Likes
on
5 Posts
Thanks Bama for the extra photos! I'm having a hard time conceptualizing the bolting of the panels - I would want something I could remove for updates/wiring in the future, hence the rivet nut question (I think the OEM holes are 1/4").
Also, for the rear end, near the cargo panels, where the OEM plastic panels wrap around and meet the opening of the tailgate...how did you handle that? Did you just end the panel short, and leave a small gap?
Also, for the rear end, near the cargo panels, where the OEM plastic panels wrap around and meet the opening of the tailgate...how did you handle that? Did you just end the panel short, and leave a small gap?
Trending Topics
12-14-2012, 12:57 PM
#8
Registered User
Thread Starter
Join Date: Nov 2012
Location: Las Vegas, NV
Posts: 78
Likes: 0
Received 0 Likes
on
0 Posts
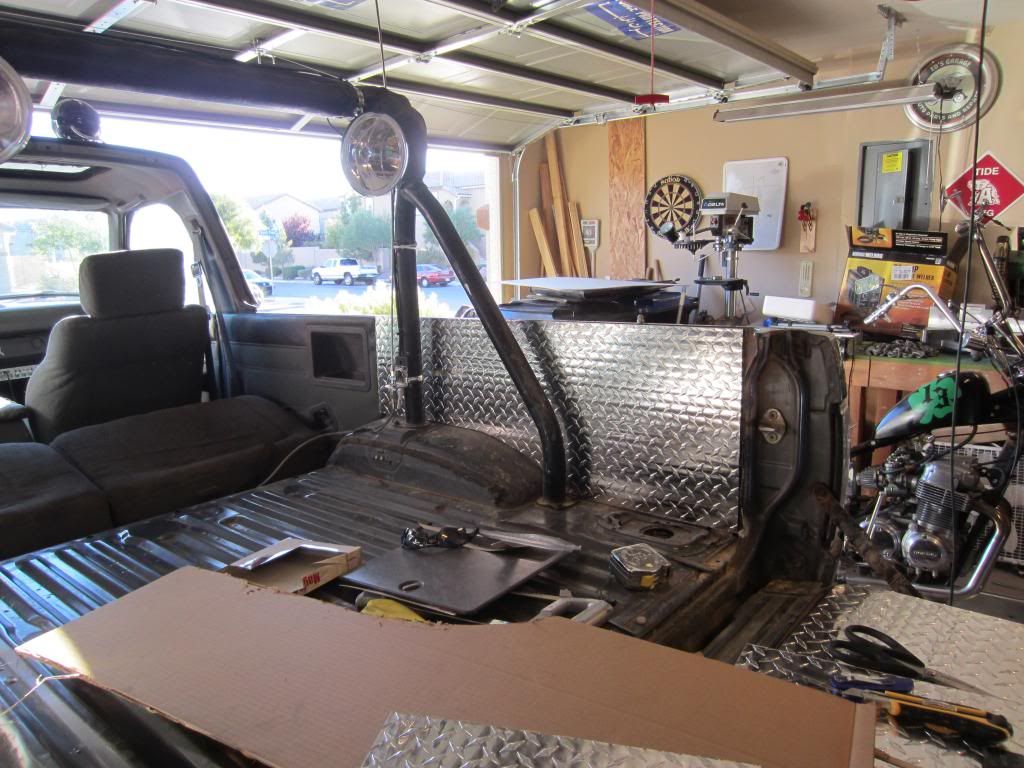
It is no problem to remove them, just need a wrench. The holes are 1/4inch i believe , I just used bolts that fit and washers to keep it tight and in place. It was really easy. If you wanted to do rivets, it really isnt that much trouble to drill them out and replace when you get done, I just went with nuts and bolts because I figured it would be easier. It is relatively easy to access all the front and backs of the bolts through either a panel or the compartment door. You just have to reach inside. I just left the curved portion uncovered by the panels, you can see it in one of the pictures really good actually. In the one focusing on the storage compartment with the flags in the back ground. Looks like a normal truck bed would.
12-15-2012, 03:30 PM
#9
Registered User
iTrader: (2)
Join Date: Dec 2009
Location: Pleasanton, CA - SF Bay Area
Posts: 2,159
Likes: 0
Received 7 Likes
on
5 Posts
Thanks again Bama for clearing that up. When I say Rivet Nuts I don't mean actual rivets - these are rivets that are open and threaded on the inside, so you can use bolts with them. It would be like your set up but you wouldn't need to reach around to hold the bolt while you undid the nut. Here's an image of one installed (they have a special tool to install them):

12-15-2012, 05:41 PM
#10
Registered User
Thread Starter
Join Date: Nov 2012
Location: Las Vegas, NV
Posts: 78
Likes: 0
Received 0 Likes
on
0 Posts
wow! those are cool! Thanks for the knowledge man. those would work, my only concern would be if/how much it would prevent a flush mount with the frame? I'd have to see it in person so if you go that way let me know.
 12-22-2012, 09:51 AM
#12
Registered User
Thread Starter
Join Date: Nov 2012
Location: Las Vegas, NV
Posts: 78
Likes: 0
Received 0 Likes
on
0 Posts
Thanks, in regards to the rattle. I finally put the top back on and there is a rattle. I'm going to have a friend drive with me in the back so I can find the place causin it then I'm just going to pop rivet that point.
12-22-2012, 10:30 AM
#13
Contributing Member
iTrader: (3)
You can get rivnuts in countersink head type or clearance the metal to flush mount them. Really easy to install. They are in aluminum and steel and you can strip them out really easy while installing if you're not careful.
03-08-2013, 11:50 AM
#14
Registered User
Join Date: Jan 2013
Location: traer ia
Posts: 2
Likes: 0
Received 0 Likes
on
0 Posts
I agree that does look bad ass. i just took the cheaper way of doing it and just made my panels out of plywood then covered them with carpet to match my carpet in my runner.

Thread
Thread Starter
Forum
Replies
Last Post


