Staun Beadlock install.
 07-12-2006, 07:29 PM
#1
Contributing Member
Thread Starter
Join Date: Mar 2003
Location: Elwood, Il
Posts: 1,252
Likes: 0
Received 0 Likes
on
0 Posts
Staun Beadlock install/initial review.
Being that i love myself, i decided to buy myself a nice birthday present, a set of Staun's.
A couple months ago i had ordered a set of Allied Rockathon's through a friend of mine, who accidentally ordered me the wrong size. Oops. I really hadn't wanted to get rid of my stockers that i currently run, but sending them off to OMF or Champion seemed like not only a hastle, but also very expensive. Plus, being aluminum im sure i will eventually damage one or more of these wheels, and if i broke a beadlocked rim that would set me back a decent buck.
So, i ultimately decided on Stauns, but at the time didnt have the cash(i spent and donated the money for the allieds), until Polyperformance listed a few sets on Pirate recently for inventory reduction, so i jumped at the opportunity. They were significantly cheaper than having my wheels beadlocked or ordering a set of beadlocks, plus maintained the sleeper look and got me a double beadlock with runflat capability. Yesterday i got arround to starting the install.
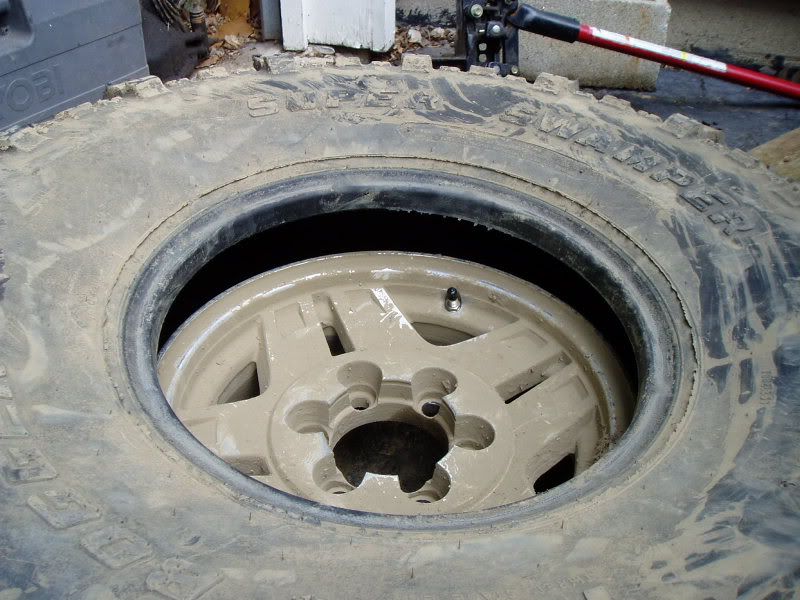
For those that dont know, Stauns are an internal, double beadlock that leaves your existing wheel almost completely unmodified. You do have to drill one hole, but that is it as far as modifying goes. They consist of an innertube, a special valvestem, and a kevlar and nylon "bag" that acts as the beadlock. Here are the components.
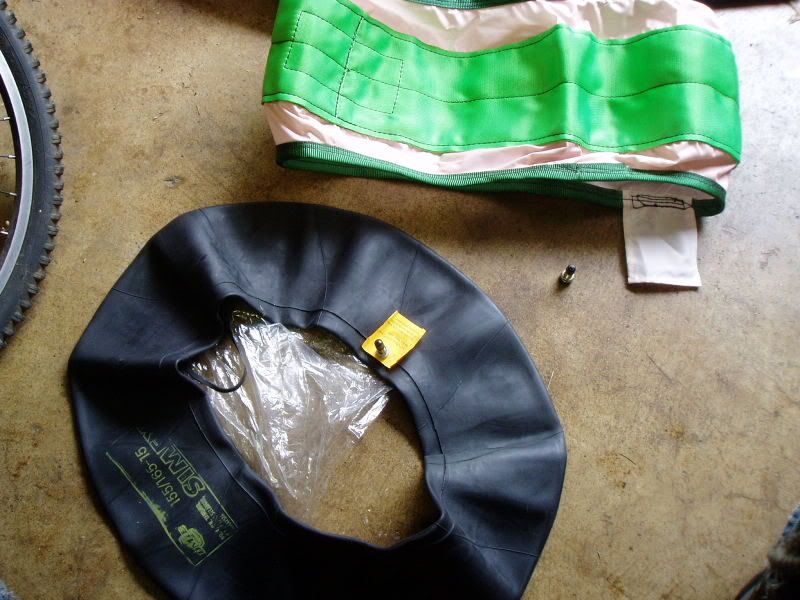
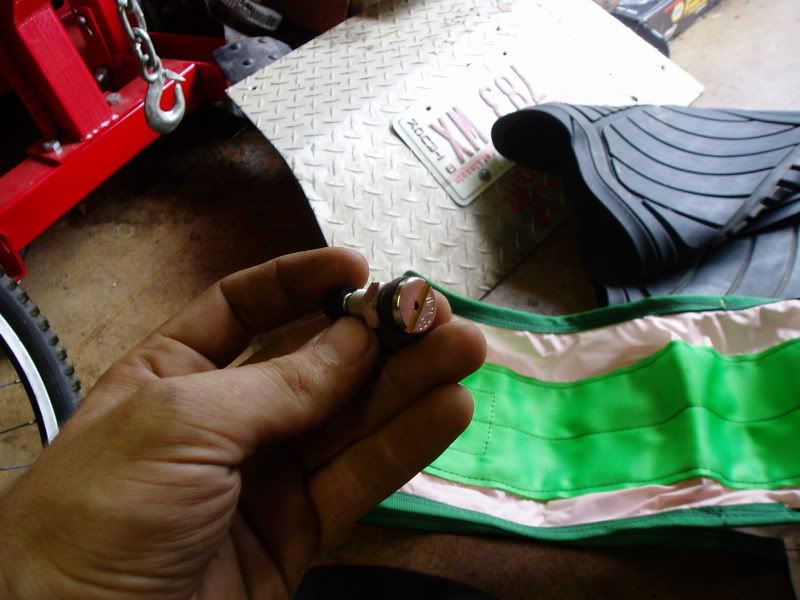
Special valvestem:
The beadlock itself:

The install is pretty straightforward, but the first one does take some time to get right. After the first one things go faster, alot faster. I would strongly recomend buying a decent set of tire spoons for the install, as it makes life alot easier and will save you money being able to change your own tires at home.
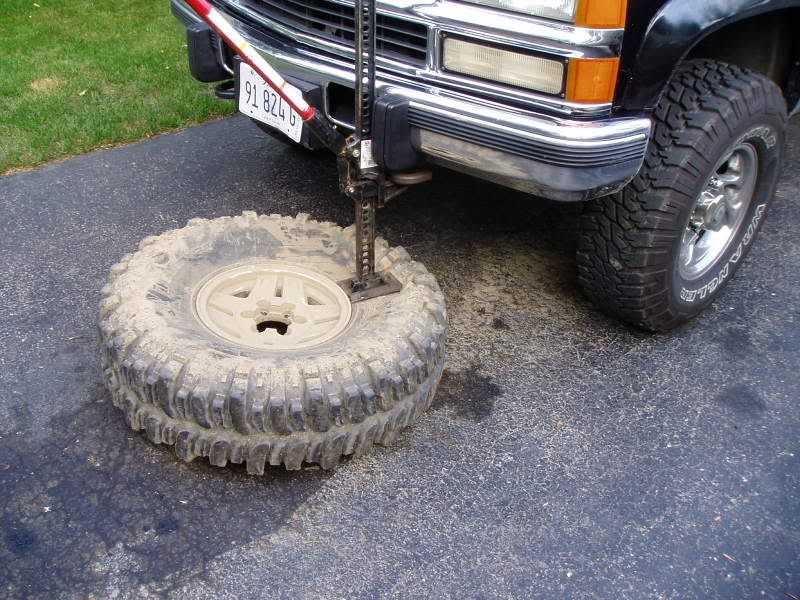
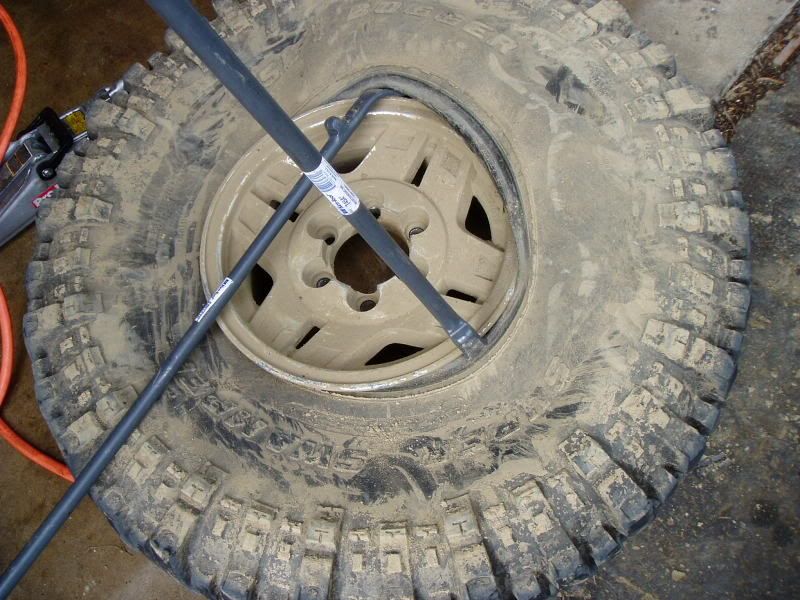
Anyway, on to the install. You will only need a 1/2" wrench, a couple tire spoons, an air compressor, a valvecore tool and a drill. And a fancy bead breaking tool:
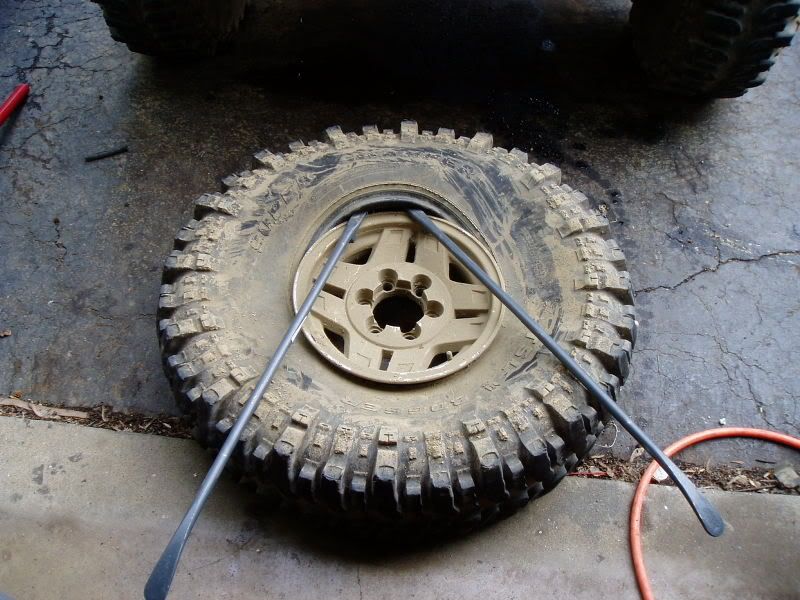
Once the bead is broke, go to work with the tire spoons. There is a technique to this, and when done properly you can mount and dismout tires amazingly fast. Start with both spoons on the same side of the tire about 4-6" appart from each other. Stand on the tire to get the opposite side to set in the well, and pry down with both spoons.
'
Pull one spoon out, and flip it to use the mount side instead of the dismout side of the tool. Dig under the lip of the rim until you can grab the bead, push the spoon down and pull the bead over the rim.
Leave that spoon in, and pull the other one out. Do the same thing as you did before, and then repeat with the other spoon. You will be about halfway done at this point.

Pull one spoon out, and grab the bead with your hands, and pull. The rest of the tire will peel off easily:
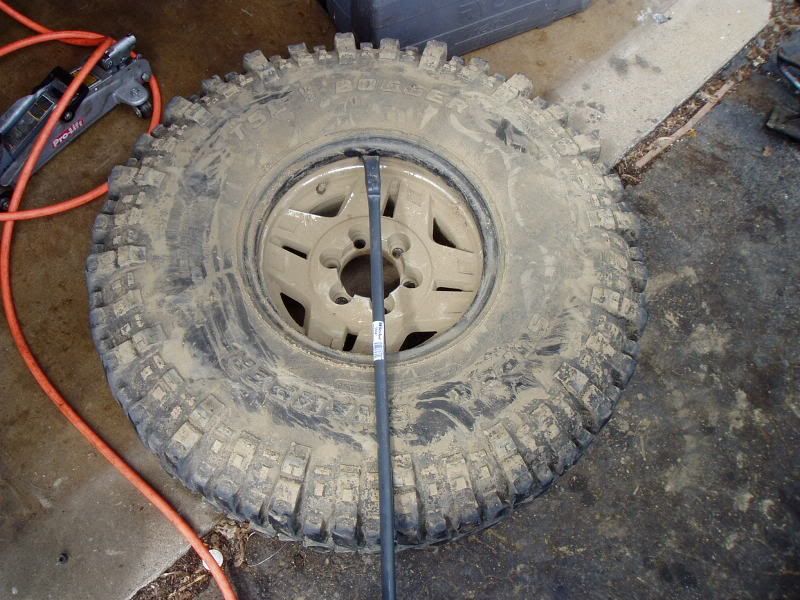
This is all you have to do to mount the stauns. If you want to clean the rim off, paint it, or just make sure that when you drill the hole for the second valvestem you dont get any shavings in the tire, you can pull the wheel out of the tire. I didnt, as its not needed.
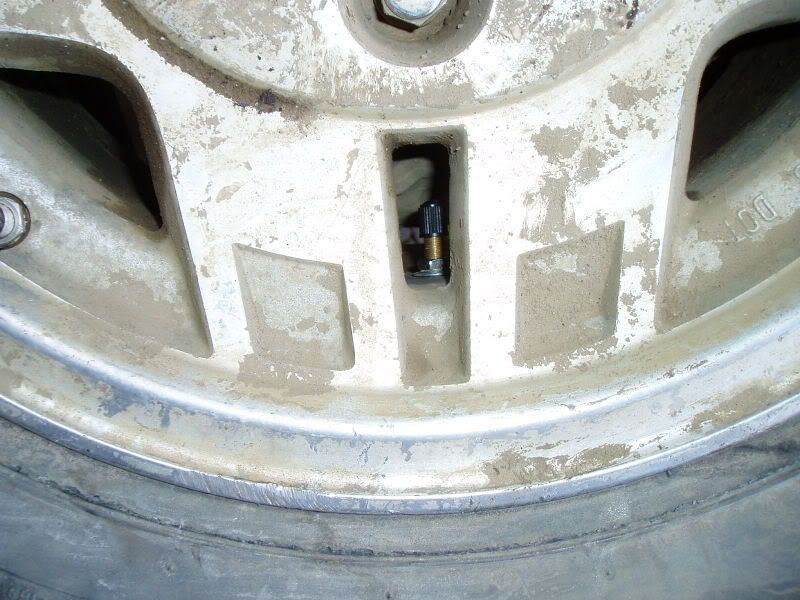
Remove your old valvestem, and replace it with the special valvestem provided with the kit. Tighten it up, and make sure the slot is running parallel to the rim surface. Also start to decide on a location for the second valvestem.
Keep the new valvestem 6-8" away from the other, make sure it is on a flat surface. You can mount it inside or outside on the rim, so long as it doesnt interfere with anything like your brake calipers. I chose to mount mine on the inside of the rims as there was nowhere on the outside to do it.
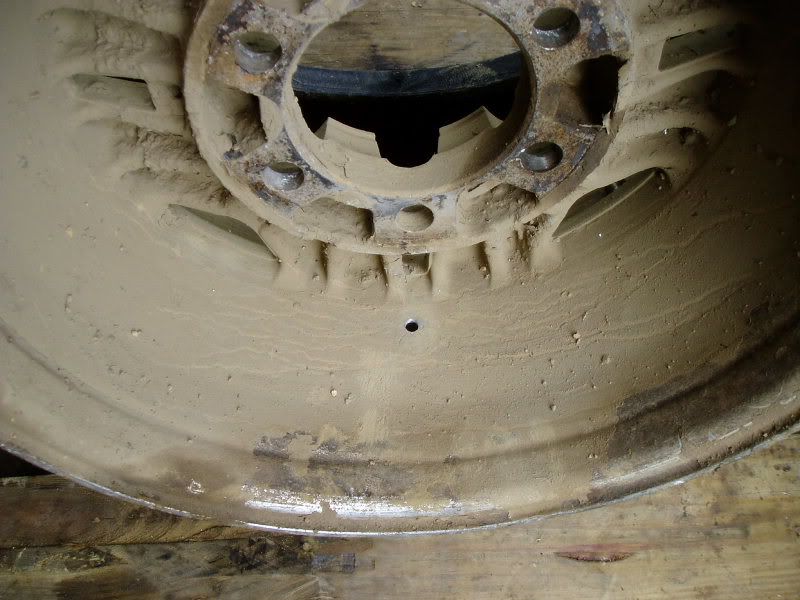
Once the hole is drilled, make sure you debur it with a file or other means, and make sure there are no shavings inside the tire that can chafe the beadlock. If there are shavings inside the tire, vacuum them out. If your rim is dirty like mine, clean the surrounding area to make sure the o-ring seals, you dont want any leaks.
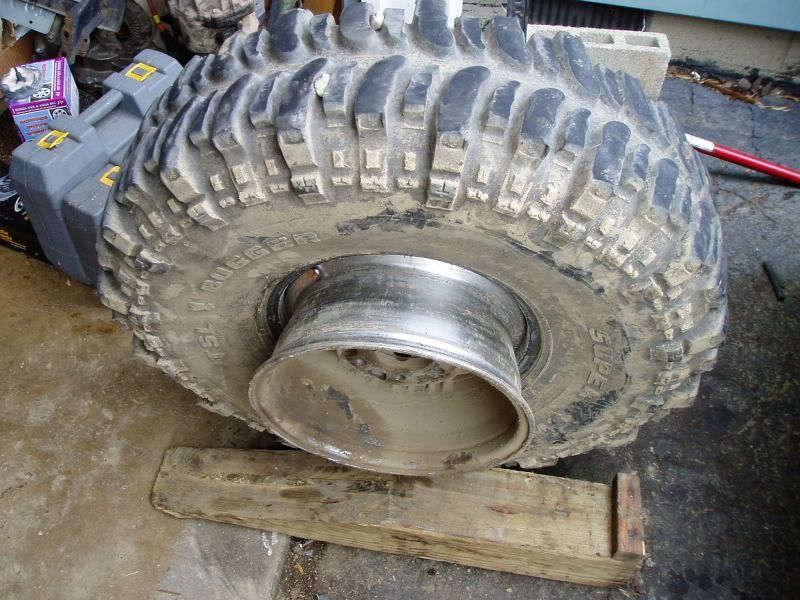
Set the tire up either on blocks, or use a makeshift hoist to pull the outside of the tire up to give yourself room to work.
Time to insert the beadlock. Use the supplied powedered lubrication if to help ease the install of the inside bead. Try to align the valve flap with the valvecore at this time as well.
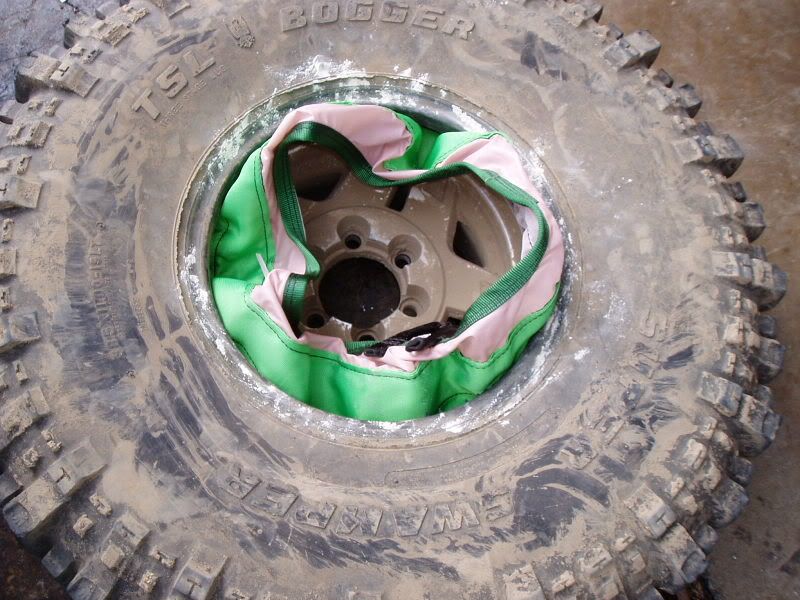
Set the beadlock in and smooth it out so there are no big wrinkles in the walls. Don't set the outer bead of the beadlock yet, though.
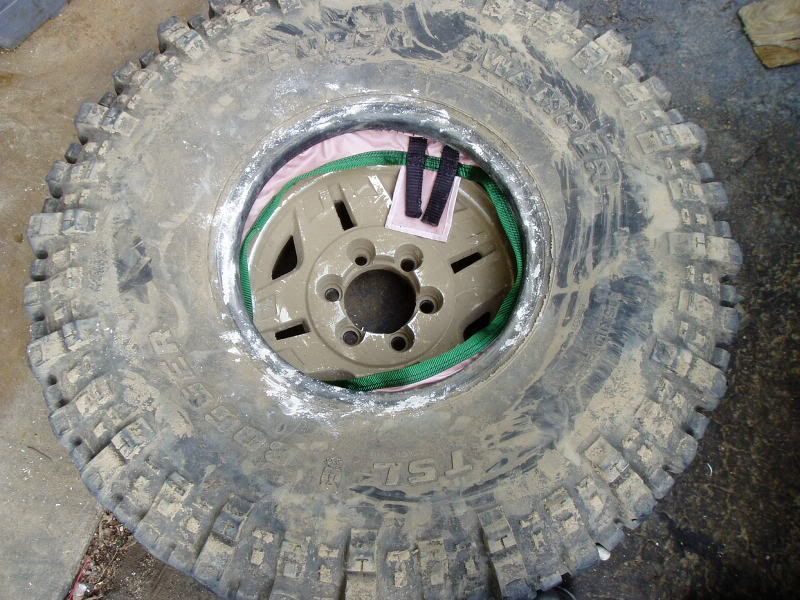
Now its time to install the tube. You will have to get rough with this to get it in smoothly and the valvestem through the newly drilled hole, but don't be to afraid of tearing it, its a tough tube. Don't get overzealous and try to force it in one shot either, though. Get the valvestem through the hole, and loosely bolt it in place.
Once its in, take the time to make sure there are no kinks or twists in the tube, as they will affect its ability to retain a bead, and can cause problems later on down the road. Once you are satisfied, mount the outer bead of the beadlock.
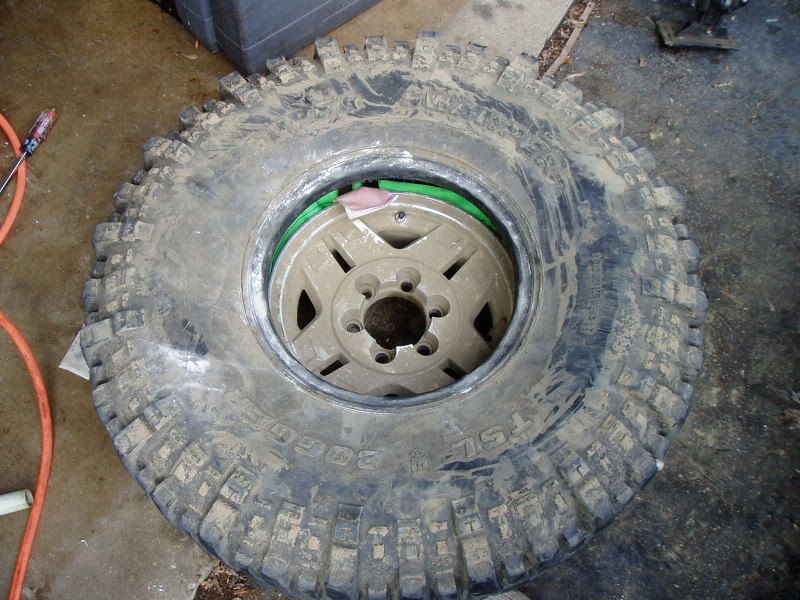
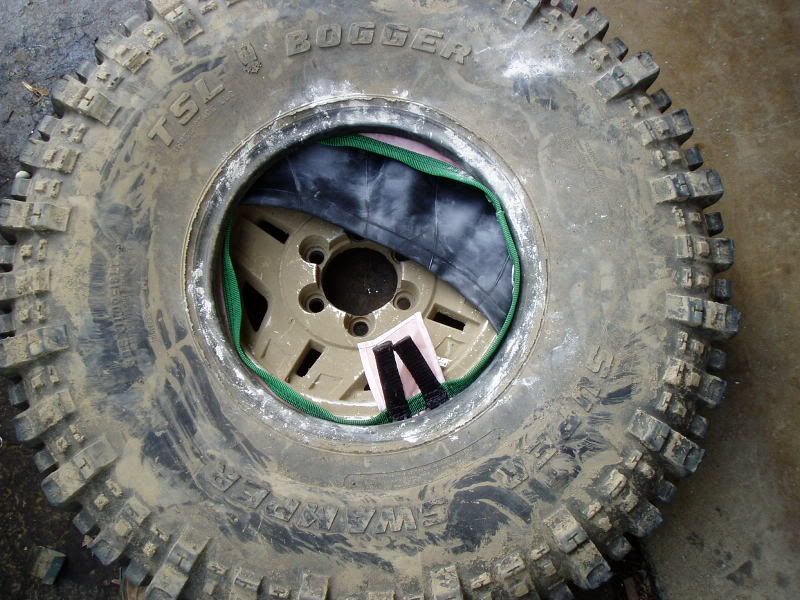
Now, put about a pound or two of air in the tube. Line the valve flap up with the valvecore, and feed it under the tube. This will create the air chanel that will allow you to still air up and down your tire.
Now pull the valvecore out of the tube, and remount the tire the opposite way you dismounted it. Seat the bead with the compressor and check for leaks. Make sure the tire is centered, and make sure the beadlock is not pinched anywhere between the bead and the rim. If everthing looks good, reinsert the valvecore in the tube, tighten up the nut and o-ring, and SLOWLY fill the tube. Listen for any hissing noises as that is a sign of a kink. If there are no noises, inflate it to 48psi.
This is the finished product, unless somebody really knows what to look for, nobody will suspect that you are running beadlocks, not even Officer Friendly.

This is the only sign that i am running beadlocks, and its a bit hard to see. Not only is it hard to see, its also hard for rocks to tear it off. And before its asked, yes i can still check the pressure and add air if needed with a tire chuck, they both still fit between the small slot in the spoke.
And thats the install in a nutshell. The first one i did took about 3 hours due to some complications, but the second one only took 45 minutes start to finish. Im sure by the time i get the other two done i will be able to get the time down to right arround 30 minutes.
I will be giving these a thorough testing this weekend at The Cliffs, and will report back as to how well they worked for me. I am hoping for another benefit of them helping stabalize the tire on sidehills as well, but im not sure if that will actually happen or not. But, we will see.
A couple months ago i had ordered a set of Allied Rockathon's through a friend of mine, who accidentally ordered me the wrong size. Oops. I really hadn't wanted to get rid of my stockers that i currently run, but sending them off to OMF or Champion seemed like not only a hastle, but also very expensive. Plus, being aluminum im sure i will eventually damage one or more of these wheels, and if i broke a beadlocked rim that would set me back a decent buck.
So, i ultimately decided on Stauns, but at the time didnt have the cash(i spent and donated the money for the allieds), until Polyperformance listed a few sets on Pirate recently for inventory reduction, so i jumped at the opportunity. They were significantly cheaper than having my wheels beadlocked or ordering a set of beadlocks, plus maintained the sleeper look and got me a double beadlock with runflat capability. Yesterday i got arround to starting the install.
For those that dont know, Stauns are an internal, double beadlock that leaves your existing wheel almost completely unmodified. You do have to drill one hole, but that is it as far as modifying goes. They consist of an innertube, a special valvestem, and a kevlar and nylon "bag" that acts as the beadlock. Here are the components.
Special valvestem:
The beadlock itself:
The install is pretty straightforward, but the first one does take some time to get right. After the first one things go faster, alot faster. I would strongly recomend buying a decent set of tire spoons for the install, as it makes life alot easier and will save you money being able to change your own tires at home.
Anyway, on to the install. You will only need a 1/2" wrench, a couple tire spoons, an air compressor, a valvecore tool and a drill. And a fancy bead breaking tool:
Once the bead is broke, go to work with the tire spoons. There is a technique to this, and when done properly you can mount and dismout tires amazingly fast. Start with both spoons on the same side of the tire about 4-6" appart from each other. Stand on the tire to get the opposite side to set in the well, and pry down with both spoons.
'
Pull one spoon out, and flip it to use the mount side instead of the dismout side of the tool. Dig under the lip of the rim until you can grab the bead, push the spoon down and pull the bead over the rim.
Leave that spoon in, and pull the other one out. Do the same thing as you did before, and then repeat with the other spoon. You will be about halfway done at this point.
Pull one spoon out, and grab the bead with your hands, and pull. The rest of the tire will peel off easily:
This is all you have to do to mount the stauns. If you want to clean the rim off, paint it, or just make sure that when you drill the hole for the second valvestem you dont get any shavings in the tire, you can pull the wheel out of the tire. I didnt, as its not needed.
Remove your old valvestem, and replace it with the special valvestem provided with the kit. Tighten it up, and make sure the slot is running parallel to the rim surface. Also start to decide on a location for the second valvestem.
Keep the new valvestem 6-8" away from the other, make sure it is on a flat surface. You can mount it inside or outside on the rim, so long as it doesnt interfere with anything like your brake calipers. I chose to mount mine on the inside of the rims as there was nowhere on the outside to do it.
Once the hole is drilled, make sure you debur it with a file or other means, and make sure there are no shavings inside the tire that can chafe the beadlock. If there are shavings inside the tire, vacuum them out. If your rim is dirty like mine, clean the surrounding area to make sure the o-ring seals, you dont want any leaks.
Set the tire up either on blocks, or use a makeshift hoist to pull the outside of the tire up to give yourself room to work.
Time to insert the beadlock. Use the supplied powedered lubrication if to help ease the install of the inside bead. Try to align the valve flap with the valvecore at this time as well.
Set the beadlock in and smooth it out so there are no big wrinkles in the walls. Don't set the outer bead of the beadlock yet, though.
Now its time to install the tube. You will have to get rough with this to get it in smoothly and the valvestem through the newly drilled hole, but don't be to afraid of tearing it, its a tough tube. Don't get overzealous and try to force it in one shot either, though. Get the valvestem through the hole, and loosely bolt it in place.
Once its in, take the time to make sure there are no kinks or twists in the tube, as they will affect its ability to retain a bead, and can cause problems later on down the road. Once you are satisfied, mount the outer bead of the beadlock.
Now, put about a pound or two of air in the tube. Line the valve flap up with the valvecore, and feed it under the tube. This will create the air chanel that will allow you to still air up and down your tire.
Now pull the valvecore out of the tube, and remount the tire the opposite way you dismounted it. Seat the bead with the compressor and check for leaks. Make sure the tire is centered, and make sure the beadlock is not pinched anywhere between the bead and the rim. If everthing looks good, reinsert the valvecore in the tube, tighten up the nut and o-ring, and SLOWLY fill the tube. Listen for any hissing noises as that is a sign of a kink. If there are no noises, inflate it to 48psi.
This is the finished product, unless somebody really knows what to look for, nobody will suspect that you are running beadlocks, not even Officer Friendly.
This is the only sign that i am running beadlocks, and its a bit hard to see. Not only is it hard to see, its also hard for rocks to tear it off. And before its asked, yes i can still check the pressure and add air if needed with a tire chuck, they both still fit between the small slot in the spoke.
And thats the install in a nutshell. The first one i did took about 3 hours due to some complications, but the second one only took 45 minutes start to finish. Im sure by the time i get the other two done i will be able to get the time down to right arround 30 minutes.
I will be giving these a thorough testing this weekend at The Cliffs, and will report back as to how well they worked for me. I am hoping for another benefit of them helping stabalize the tire on sidehills as well, but im not sure if that will actually happen or not. But, we will see.
Last edited by joez; 07-16-2006 at 05:25 PM.
 07-12-2006, 07:39 PM
#2
Registered User
Join Date: Oct 2005
Location: Estes Park Co
Posts: 422
Likes: 0
Received 0 Likes
on
0 Posts
Iv seen these for sale before and didnt know what to think. do tell how they perform after you get back from the cliffs! I really dont wheel hard enough to need beadlocks yet but I just want to know if these things really work!


 07-13-2006, 04:48 PM
#6
Contributing Member
Thread Starter
Join Date: Mar 2003
Location: Elwood, Il
Posts: 1,252
Likes: 0
Received 0 Likes
on
0 Posts
Yeah i did, but it really wasnt bad. The others i hit with the hose first, but it didnt make to much difference. I still needed a shower BAD by the time i was done.
I got the other two done today, both went smoothly without much hastle. Took me a couple hours in the afternoon heat with quite a few beer breaks. I can't wait to wheel with them this weekend, now i can finally run single digit pressures without any concern. Before even at 10 psi i would catch myself folding a tire over and worrying about the bead. I hate changing tires in ravines.
I got the other two done today, both went smoothly without much hastle. Took me a couple hours in the afternoon heat with quite a few beer breaks. I can't wait to wheel with them this weekend, now i can finally run single digit pressures without any concern. Before even at 10 psi i would catch myself folding a tire over and worrying about the bead. I hate changing tires in ravines.
07-16-2006, 01:49 PM
#7
Contributing Member
Thread Starter
Join Date: Mar 2003
Location: Elwood, Il
Posts: 1,252
Likes: 0
Received 0 Likes
on
0 Posts
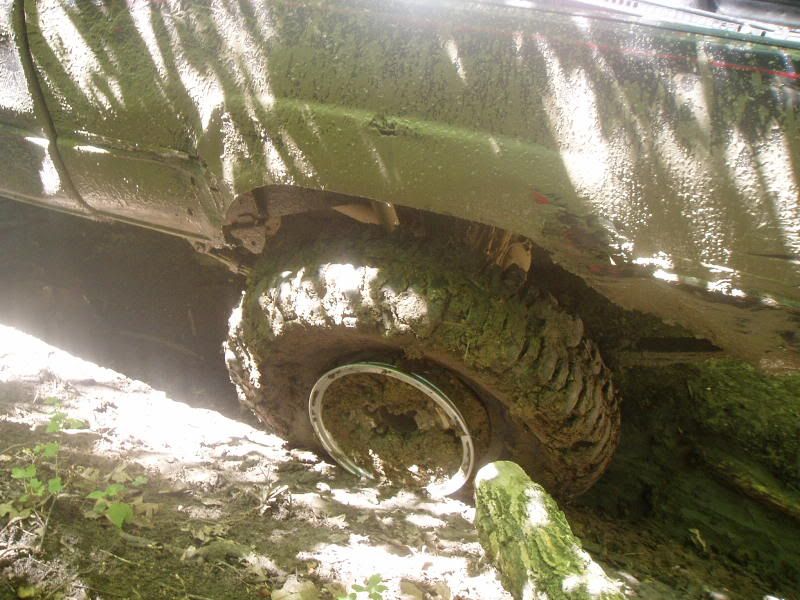
Well, i tested them hard today, so hard that one failed. It was a wheel that gave me some problems during the install, so i dont know if it was a problem with my install itself or if something happened on the trail. Nearest i can tell, the tire spun on the rim and tore the innertube, then it was only a matter of time before the bead failed. I have a good idea of where it happened, but im not entirely positive.
I was much harder on the front two tires than i was on the rears, which is the other weird thing. All 4 tires were at 6 psi, all 4 beadlocks at 48, and like i said i was being much harder on the fronts. Full lock on downhills folding the entire tire over onto its sidewall, stuff like that. I really wanted to see how well they worked and i was watching the fronts alot for signs of movement, or possible failure. I got to the end of the trail, found myself almost driving on my side and unable to make a hillclimb i would normally walk right up. As im sitting there trying my 3rd or 4th attempt, i look back and noticed that the rear tire wasnt turing. I thought i broke a shaft until i was told that the bead was off the rim and the wheel was turning in the tire.
For the rear to fail in the manner that it did leads me to believe it was more my fault than the Stauns, but that doesnt change the fact that im still pissed that it happened, and on the first day of wheeling with them installed. Actually i was more upset that i had to pull cable at the very end of the trail, and i had made it through the entire thing without any real difficulty prior to this. By far the easiest part of the trail and im unspooling the winch, i wasnt happy. But, i am glad to see that it was the tube that failed and not the girdle itself, so it will be a cheap and easy replacement.
There are so many possibilities as to why it failed that i wont even start listing them all, but i do know that i will be leary of the other 3 now. Since i didnt see it fail i dont know how or why it did, so i just will have to watch the others and see. I know i will be a bit leary of them now, until they really prove themselves.
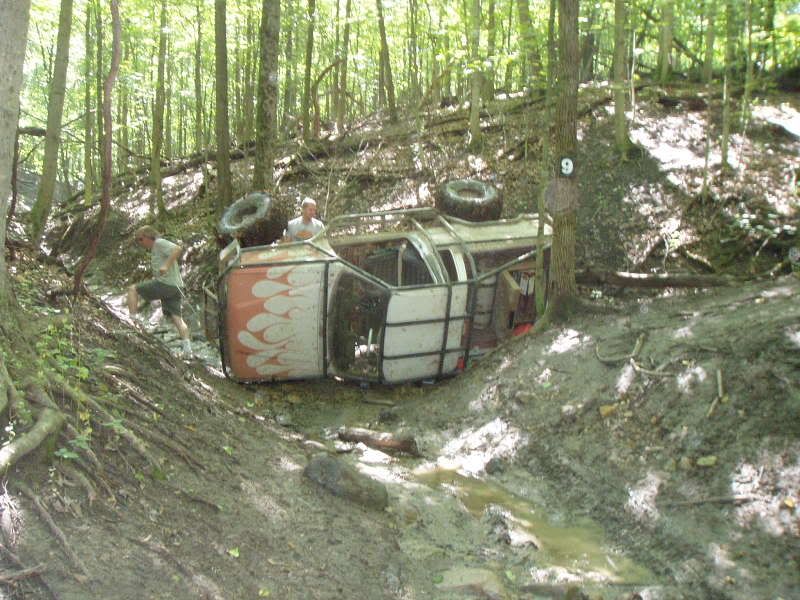
All in all it wasnt to great of a day of wheeling. I lost a bead on a double beadlocked wheel, had a couple power steering issues in the heat, and took a lot of body damage. But it wasnt as bad as Tom's day, which consisted of 3 rollovers, two of them HARD, alot of winching, and other steering issues.
Anyway, on to the pics. I'll have to get some from the other guys who were out with us who got some other good shots of my toy. I let one guy borrow my camera a few times, and he took the blurry pics, so no comments on those.
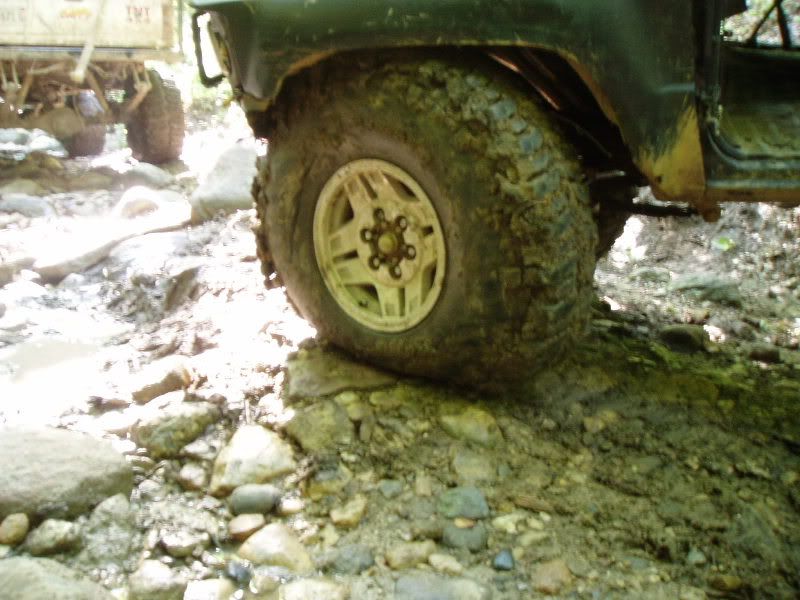
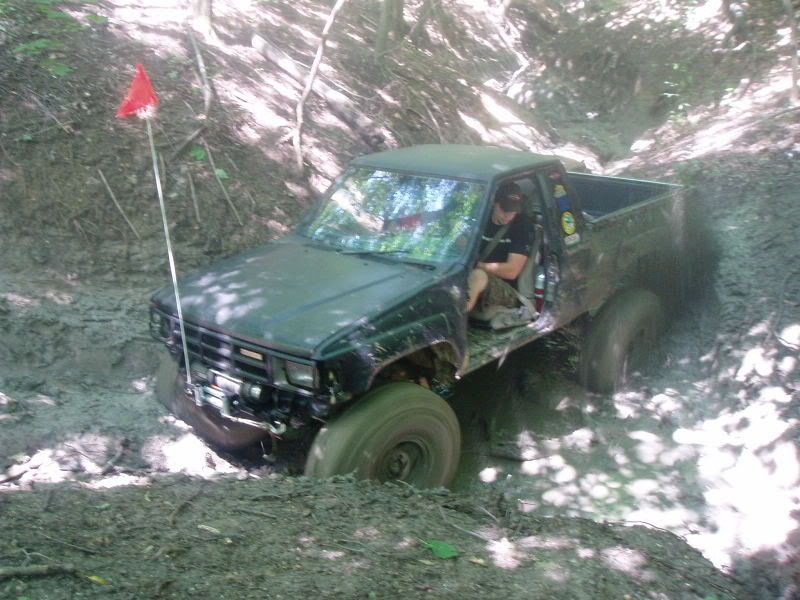
I did this to the fronts all day long without a single problem.

This just happened to be the only time i had stopped and gotten out when the tire was like this, i was harder on them in the ravines.
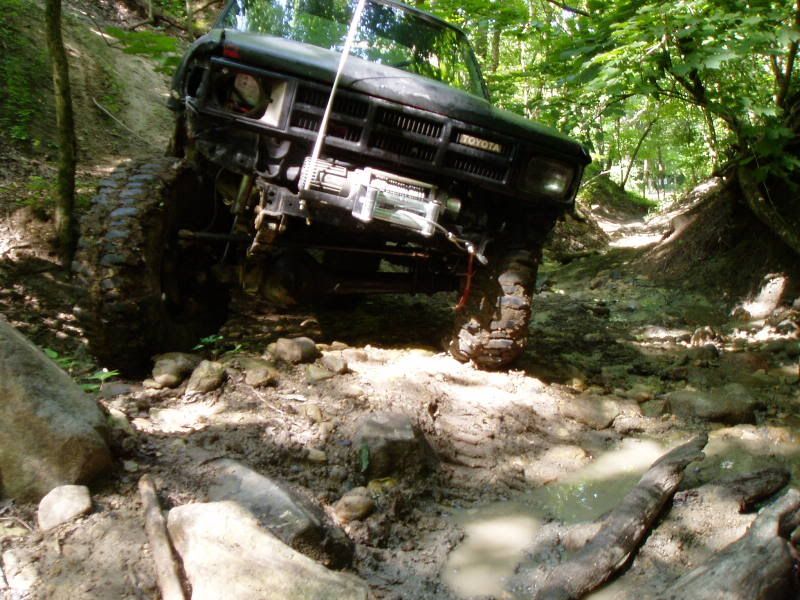
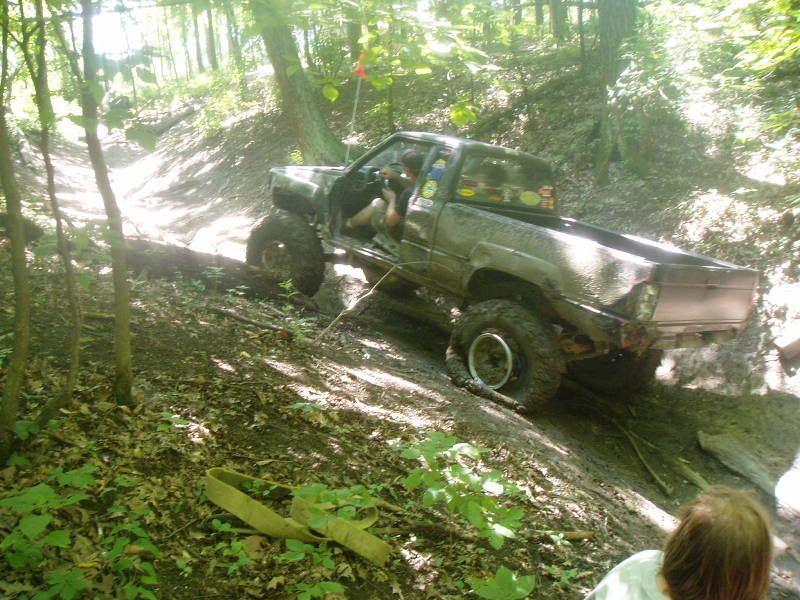
Then tom went and rolled, and we had an hour long recovery to work on.
And heres where it all went downhill for me. Tom had to winch at this point to get lined up, and he is much shorter than i am. I was bound and determined to make that turn without a winch, so i was dumping the clutch in second gear with just the rear case in low at 5K rpm.
I made it, but look closely at the rear tire in this next pic.
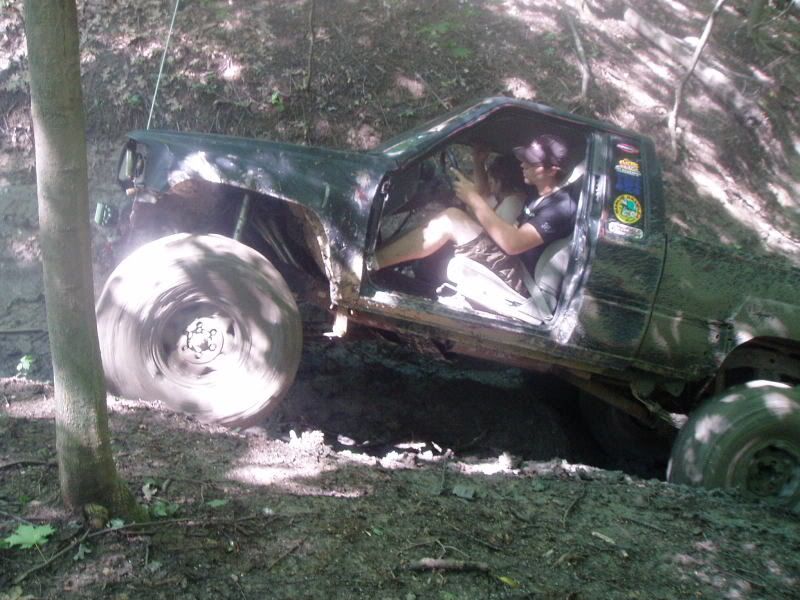
See that pink thing? Yup, i think thats the beadlock too, i think at this poing the tube had been ripped and the outer bead was peeling off.
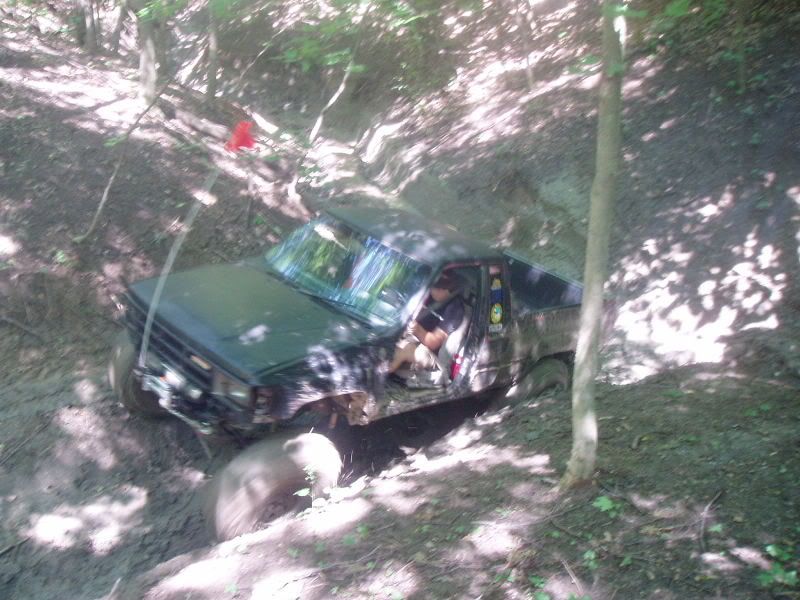
Same goes for this pic, i dont know if its me or if there really is a lost bead on that rear tire, but it sure looks like it.
All i know is that this is shortly after we realized the whole tire was off and winched to more level ground. I had no choise but to drive out on it and get off the trail to flatter ground.
Thankfully i do have a full size spare, so I swapped it on and kept wheeling.
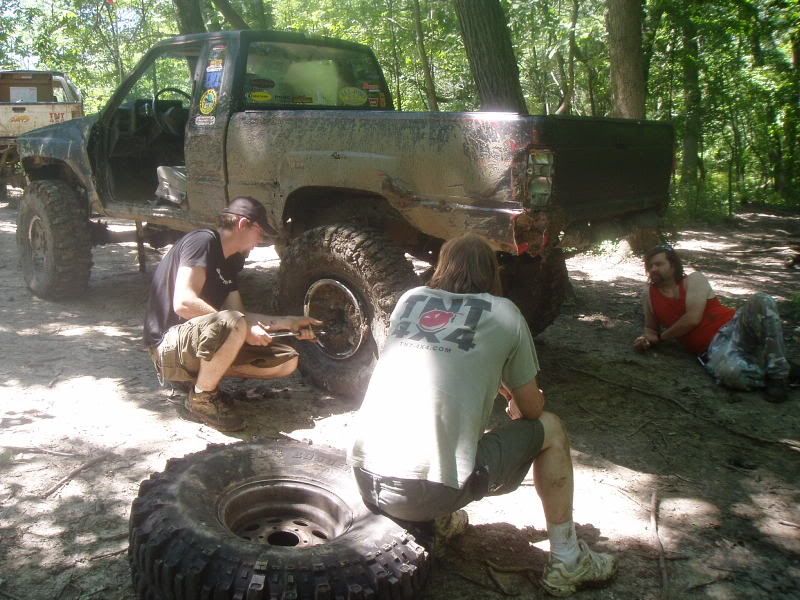
And, this is what i found when i got home and broke the tire down
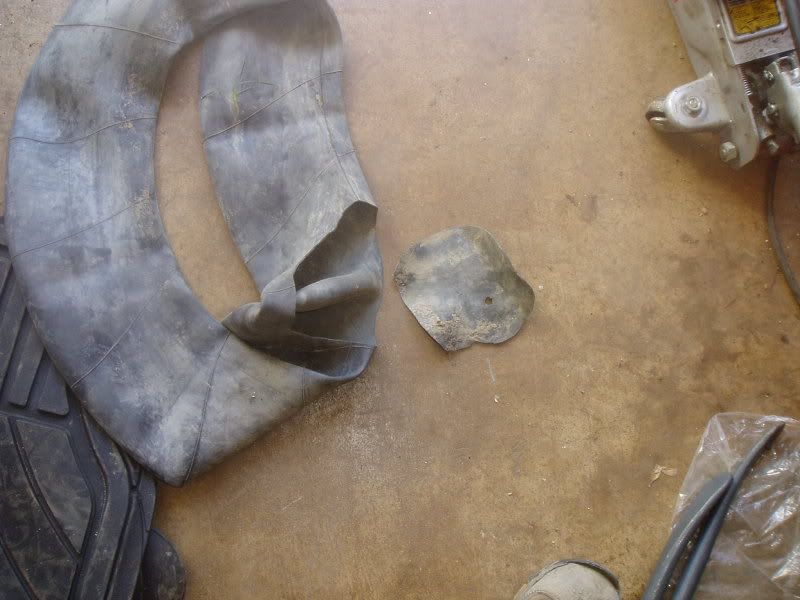
The tire spun on the rim and tore it off in a very odd way, but the question is why did the tire spin on the rim. Was the beadlock not installed correctly letting mud work its way in the bead and cause it to spin? Was it dirty from my install and not seated fully? Did it just get so much bite at one point that it just spun? I dont know and probobally never will, all i know is that i have seen not only my other 3 but my friends set take alot more abuse without failure than this one did. I will get a new tube, reinstall it and see what happens.
The rest of the pics from todays trip can be found in my webshots link in my sig.
I was much harder on the front two tires than i was on the rears, which is the other weird thing. All 4 tires were at 6 psi, all 4 beadlocks at 48, and like i said i was being much harder on the fronts. Full lock on downhills folding the entire tire over onto its sidewall, stuff like that. I really wanted to see how well they worked and i was watching the fronts alot for signs of movement, or possible failure. I got to the end of the trail, found myself almost driving on my side and unable to make a hillclimb i would normally walk right up. As im sitting there trying my 3rd or 4th attempt, i look back and noticed that the rear tire wasnt turing. I thought i broke a shaft until i was told that the bead was off the rim and the wheel was turning in the tire.
For the rear to fail in the manner that it did leads me to believe it was more my fault than the Stauns, but that doesnt change the fact that im still pissed that it happened, and on the first day of wheeling with them installed. Actually i was more upset that i had to pull cable at the very end of the trail, and i had made it through the entire thing without any real difficulty prior to this. By far the easiest part of the trail and im unspooling the winch, i wasnt happy. But, i am glad to see that it was the tube that failed and not the girdle itself, so it will be a cheap and easy replacement.
There are so many possibilities as to why it failed that i wont even start listing them all, but i do know that i will be leary of the other 3 now. Since i didnt see it fail i dont know how or why it did, so i just will have to watch the others and see. I know i will be a bit leary of them now, until they really prove themselves.
All in all it wasnt to great of a day of wheeling. I lost a bead on a double beadlocked wheel, had a couple power steering issues in the heat, and took a lot of body damage. But it wasnt as bad as Tom's day, which consisted of 3 rollovers, two of them HARD, alot of winching, and other steering issues.
Anyway, on to the pics. I'll have to get some from the other guys who were out with us who got some other good shots of my toy. I let one guy borrow my camera a few times, and he took the blurry pics, so no comments on those.
I did this to the fronts all day long without a single problem.
This just happened to be the only time i had stopped and gotten out when the tire was like this, i was harder on them in the ravines.
Then tom went and rolled, and we had an hour long recovery to work on.
And heres where it all went downhill for me. Tom had to winch at this point to get lined up, and he is much shorter than i am. I was bound and determined to make that turn without a winch, so i was dumping the clutch in second gear with just the rear case in low at 5K rpm.
I made it, but look closely at the rear tire in this next pic.
See that pink thing? Yup, i think thats the beadlock too, i think at this poing the tube had been ripped and the outer bead was peeling off.
Same goes for this pic, i dont know if its me or if there really is a lost bead on that rear tire, but it sure looks like it.
All i know is that this is shortly after we realized the whole tire was off and winched to more level ground. I had no choise but to drive out on it and get off the trail to flatter ground.
Thankfully i do have a full size spare, so I swapped it on and kept wheeling.
And, this is what i found when i got home and broke the tire down
The tire spun on the rim and tore it off in a very odd way, but the question is why did the tire spin on the rim. Was the beadlock not installed correctly letting mud work its way in the bead and cause it to spin? Was it dirty from my install and not seated fully? Did it just get so much bite at one point that it just spun? I dont know and probobally never will, all i know is that i have seen not only my other 3 but my friends set take alot more abuse without failure than this one did. I will get a new tube, reinstall it and see what happens.
The rest of the pics from todays trip can be found in my webshots link in my sig.
Last edited by joez; 07-16-2006 at 01:53 PM.
Trending Topics
08-06-2006, 11:56 AM
#10
Registered User

Join Date: Mar 2006
Posts: 7
Likes: 0
Received 0 Likes
on
0 Posts
Off topic but... where did you get you tire spoons? I am looking for a pair like yours and striking out...
I am interested in what else you have found as I am entertaining the idea of stauns
thanks
I am interested in what else you have found as I am entertaining the idea of stauns
thanks
08-06-2006, 08:04 PM
#11
Contributing Member
Thread Starter
Join Date: Mar 2003
Location: Elwood, Il
Posts: 1,252
Likes: 0
Received 0 Likes
on
0 Posts
Got the spoons from Carquest. If they just give you a blank stare when you say you want tire spoons, tell them they are in the Ken Tool book and they have to order them from Ken, they will open the book up and let you pick out what you want.
Ive got 2 more trips on the stauns after i hurt the one the first trip, and have yet to have any other issues. No leaks, no lost beads, nothing. I'm convinced that the first one failed due to my install.
Ive got 2 more trips on the stauns after i hurt the one the first trip, and have yet to have any other issues. No leaks, no lost beads, nothing. I'm convinced that the first one failed due to my install.
08-07-2006, 06:03 AM
#13
Registered User
I wonder if using that black bead sealer that some tire shops use on alloys would help that problem with the tire spinning. I've had tires go flat in the winter from losing a bead while sitting due to what I was told was "slight corrosion of the alum rim on the mounting surface". They said it is a pretty common problem and the cause of many slow leaks. I don't know if it's true or not, but I never had a problem after they put that goo on there.
Awesome writeup! Thanks for sharing your experiences on these!
Awesome writeup! Thanks for sharing your experiences on these!
08-26-2006, 10:14 AM
#14
Contributing Member
Thread Starter
Join Date: Mar 2003
Location: Elwood, Il
Posts: 1,252
Likes: 0
Received 0 Likes
on
0 Posts
Still haven't had any other issues, and ive been out 6 times since the failure, wheeling in everything from rocks to ravines to sand, and they havent skipped a beat. Ive been wheeling the truck so hard its actually gotten to the point where it no longer has any glass left in it, and im already planning my next build because this one just isnt going to last much longer. I need something with about a foot less wheelbase and to ditch my rear spool and ill be golden.
But back on topic, i have had no more issues, and to answer Waskilly's question, yes, i would buy them again without any concerns in a heartbeat. These things rock.
But back on topic, i have had no more issues, and to answer Waskilly's question, yes, i would buy them again without any concerns in a heartbeat. These things rock.

Thread
Thread Starter
Forum
Replies
Last Post
1uzRunner
84-85 Trucks & 4Runners (Build-Up Section)
63
11-10-2018 03:58 PM
justdifferentials
Vendors Build-Ups (Build-Up Section)
0
09-05-2015 06:52 PM
alum, bead, beadlock, beadlocks, double, installation, installing, lock, pink, replacement, review, rims, staun, tire, tube


