Corey's 2007 FJ Cruiser Build-Up Thread


 08-05-2016, 04:46 PM
#402
More Recovery Gear Added 8-5-2016
My Warn recovery bag I have had since I had my '91 4Runner before the FJ Cruiser was starting to get pretty crowded with some of the new items I have added.
I bought a new kinetic recovery rope from Masterpull, and I also decided to get their large gear bag.
The new bag does not zip closed like the Warn, you roll down the top of it, then secure it closed with webbing and Fastex type buckles to cinch it closed.
There was no way my new recovery rope was going to fit into the old Warn bag.
Also the Warn bag weighed a ton, and I remembered it came with a long chain with a hook on it which I will probably never use, so I am saving a lot of weight there by not adding it back to the new Masterpull bag.
There is still a ton of room in the new bag, but I have everything I would need.
Several shackles, a tree saver strap, gloves, the Masterpull synthetic winch extension mentioned in a previous post in this thread, a snatch block, and the Warn wired remote which I will probably not use since I now have the Warn Wireless one also covered here in my thread previously.
Links:
Masterpull Gear Bag
Masterpull Kinetic Recovery Rope 7/8"x25'
A few pictures:
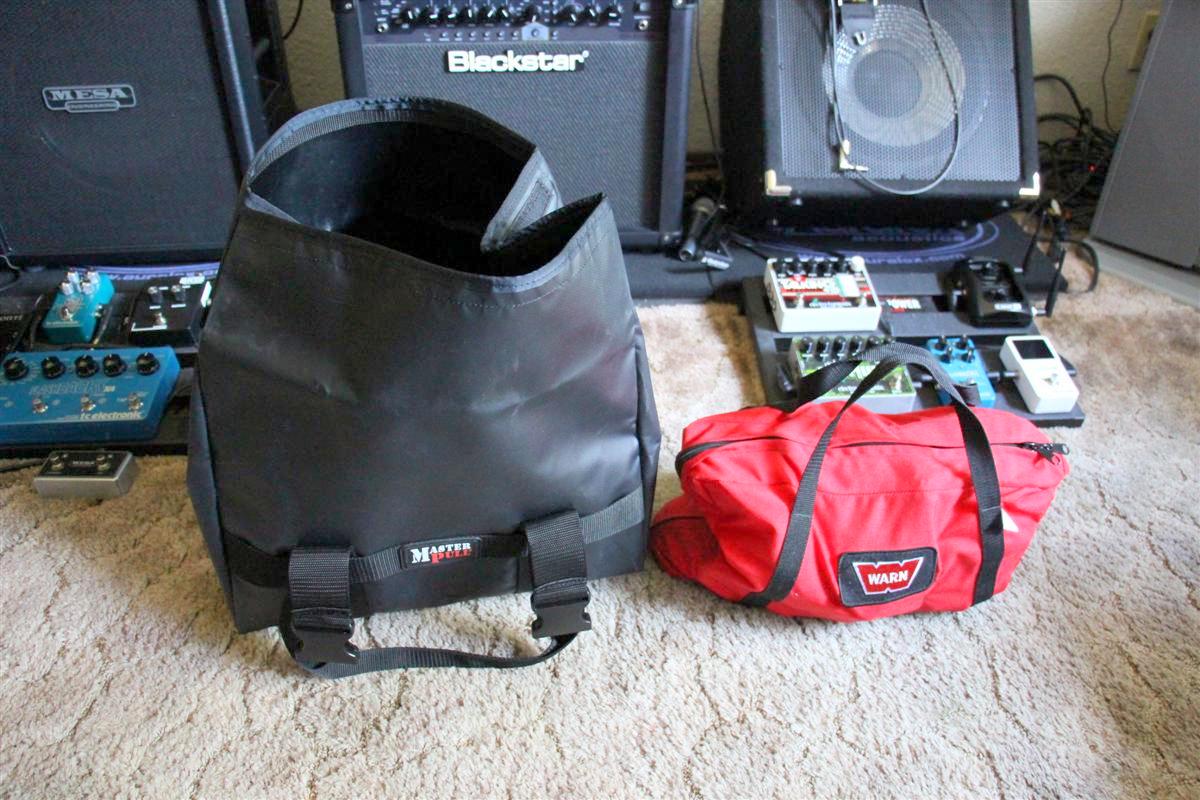
Size comparison between the new black Masterpull bag, and the old red Warn bag
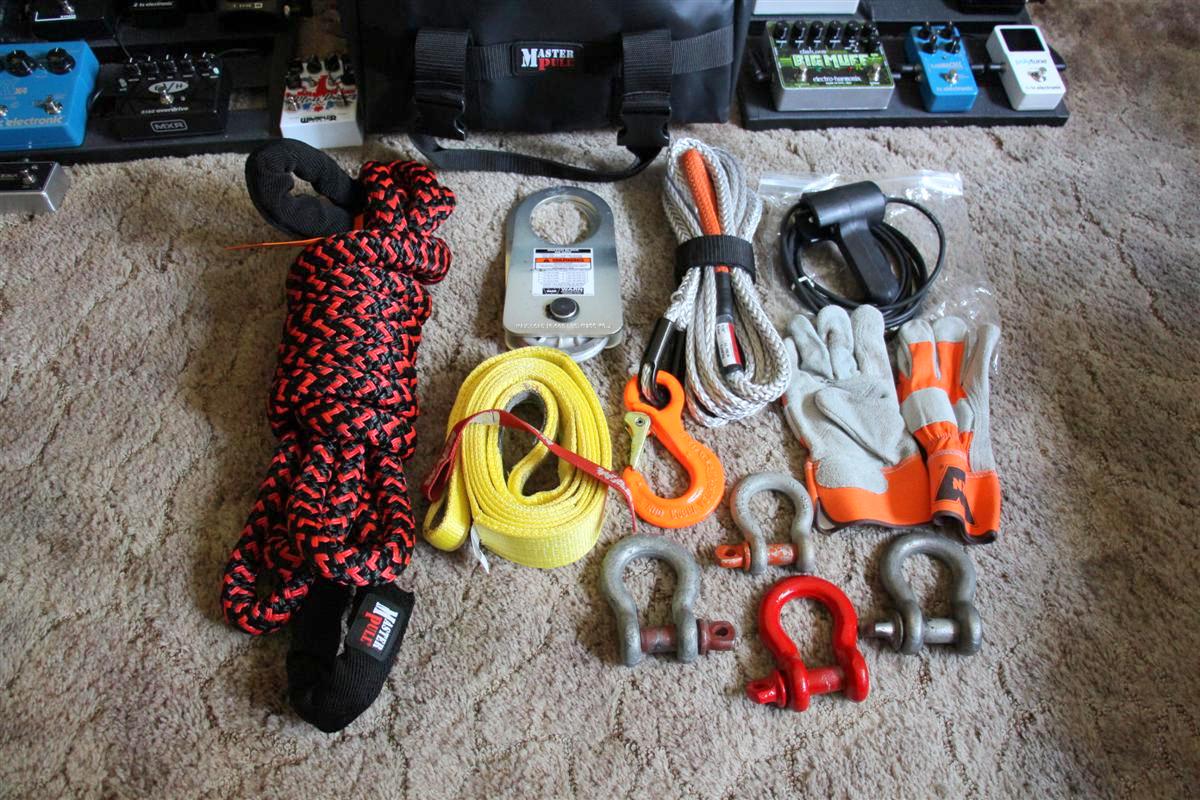
All the gear laid out, the new kinetic rope is looking mighty nice
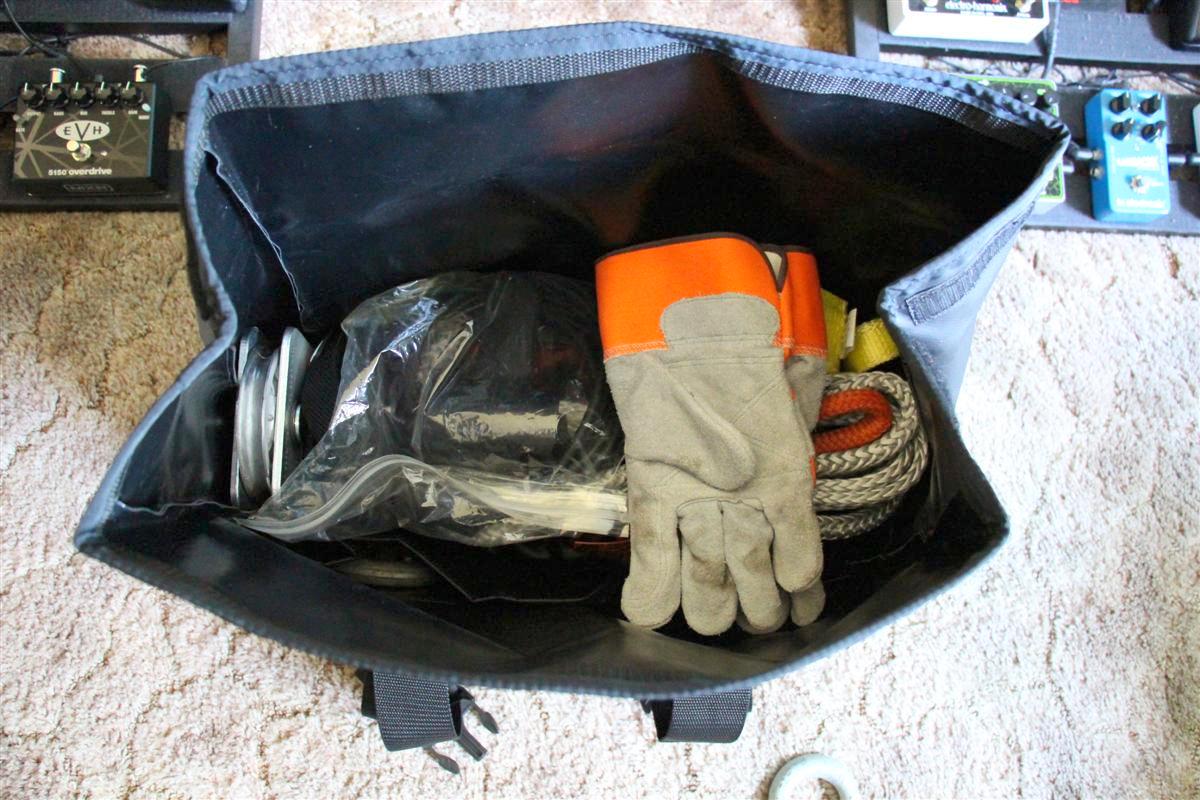
Yep, it all fits, and that is only about 1/2 full, where you could not even fit the new kinetic rope into the old bag
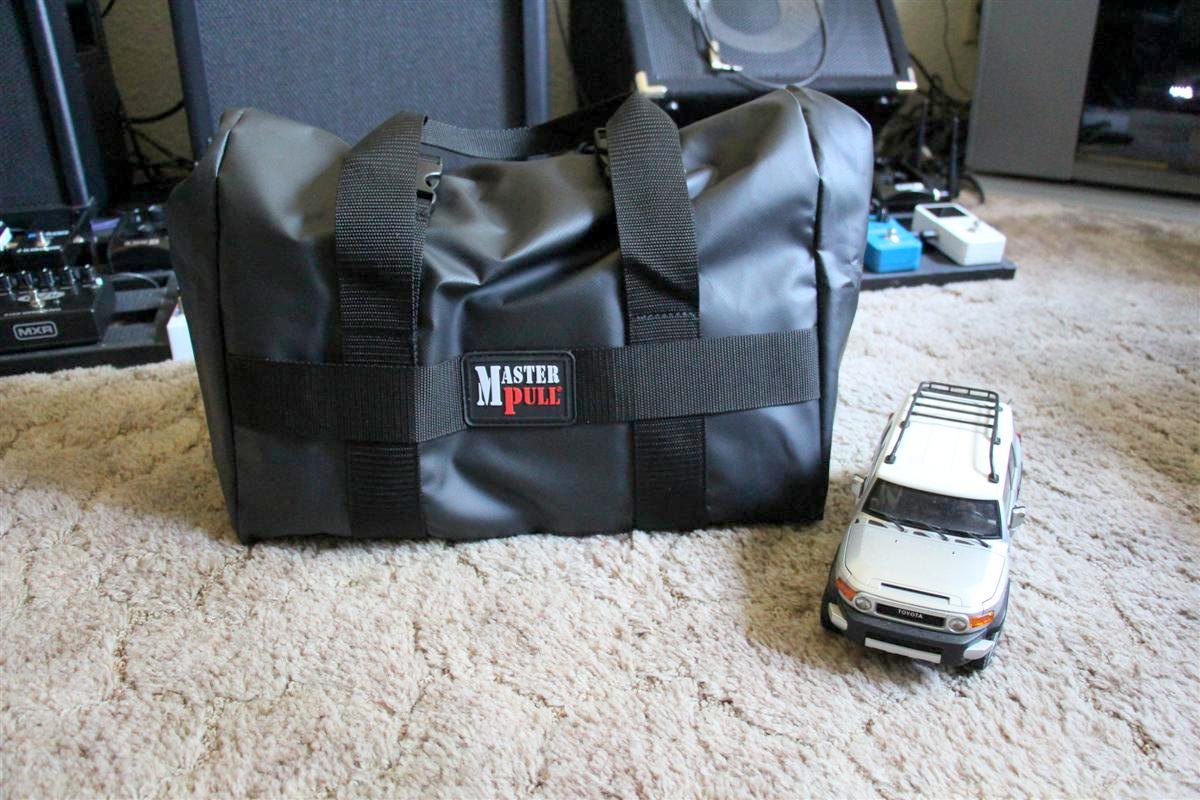
Nice and compact
I bought a new kinetic recovery rope from Masterpull, and I also decided to get their large gear bag.
The new bag does not zip closed like the Warn, you roll down the top of it, then secure it closed with webbing and Fastex type buckles to cinch it closed.
There was no way my new recovery rope was going to fit into the old Warn bag.
Also the Warn bag weighed a ton, and I remembered it came with a long chain with a hook on it which I will probably never use, so I am saving a lot of weight there by not adding it back to the new Masterpull bag.
There is still a ton of room in the new bag, but I have everything I would need.
Several shackles, a tree saver strap, gloves, the Masterpull synthetic winch extension mentioned in a previous post in this thread, a snatch block, and the Warn wired remote which I will probably not use since I now have the Warn Wireless one also covered here in my thread previously.
Links:
Masterpull Gear Bag
Masterpull Kinetic Recovery Rope 7/8"x25'
A few pictures:
Size comparison between the new black Masterpull bag, and the old red Warn bag
All the gear laid out, the new kinetic rope is looking mighty nice
Yep, it all fits, and that is only about 1/2 full, where you could not even fit the new kinetic rope into the old bag
Nice and compact
08-07-2016, 12:57 PM
#403
Hi-Lift Jack Cover Installed 8-7-2016
I have had this cover now for a few weeks, and just now got it done.
I had tried test fitting it before, but two things kept it from going on.
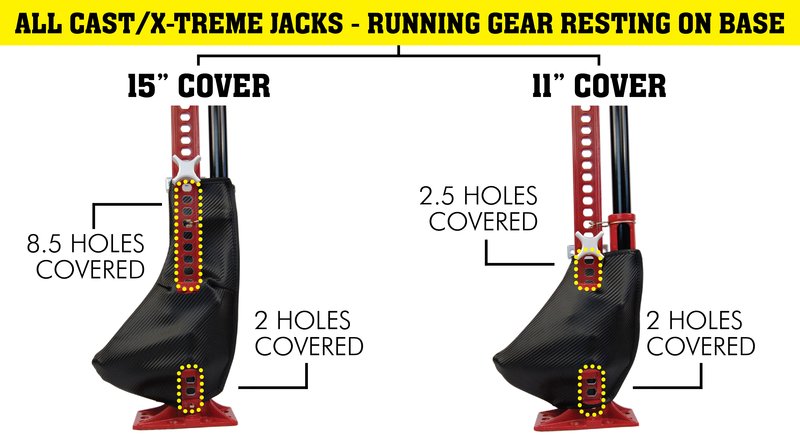
First the Hi-Lift needed to have a few more holes exposed on the jacks mounting plate, and I had to remove the WabFab Slider Adapter.
Too bad the WabFab unit cannot stay on, but I keep a wrench in my new Masterpull Recovery bag that I can use to tighten up the bolt and nut to reinstall it if needed.
Only had to move the Hi-Lift towards the drivers side a few holes, and all is good.
Have not road tested it yet to see if the cover will silence the lifting mechanism on the jack when going over bumps on the road, or washboard ruts on forest service roads.
It was very noisy before, and I used a couple of Zip-Ties around the jack and the WabFab unit to hold them to keep them quiet.
Link:
01 - Black Lighting CF 11"
A few pictures:
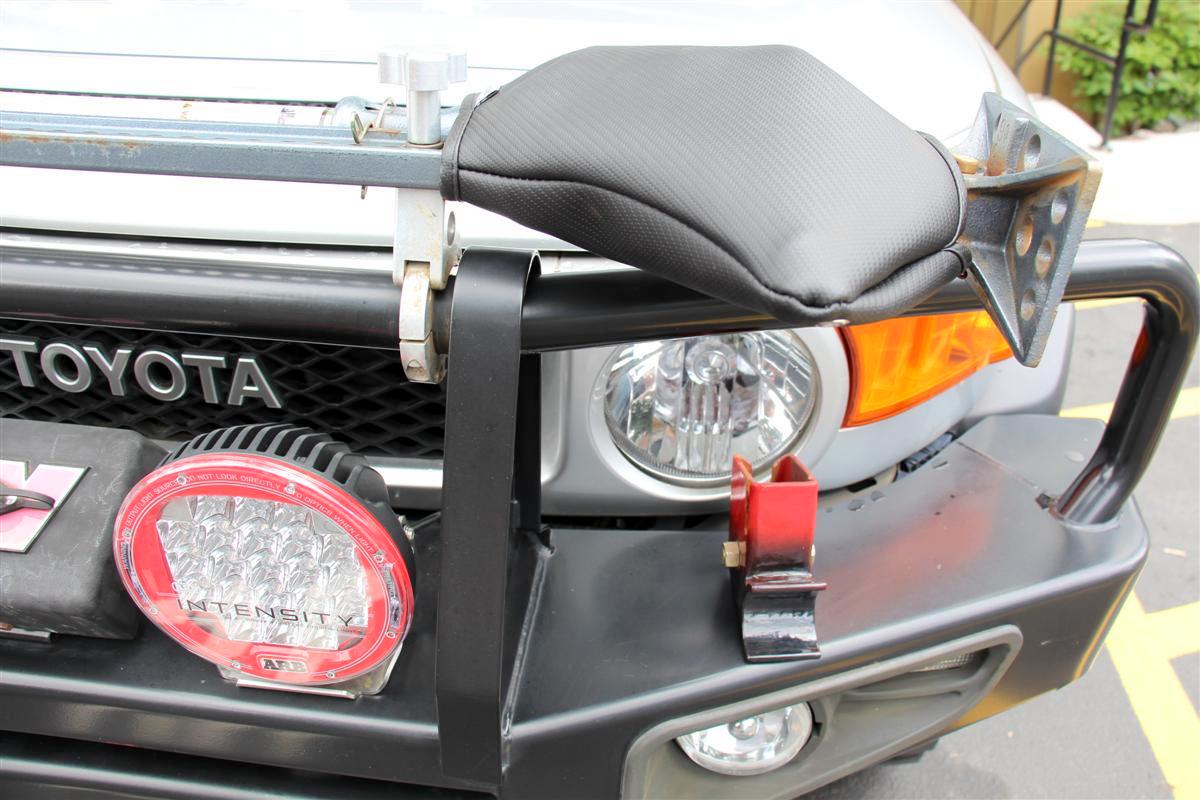
Cover on, and WabFab slider adapter below on bumper, too big to fit under the cover
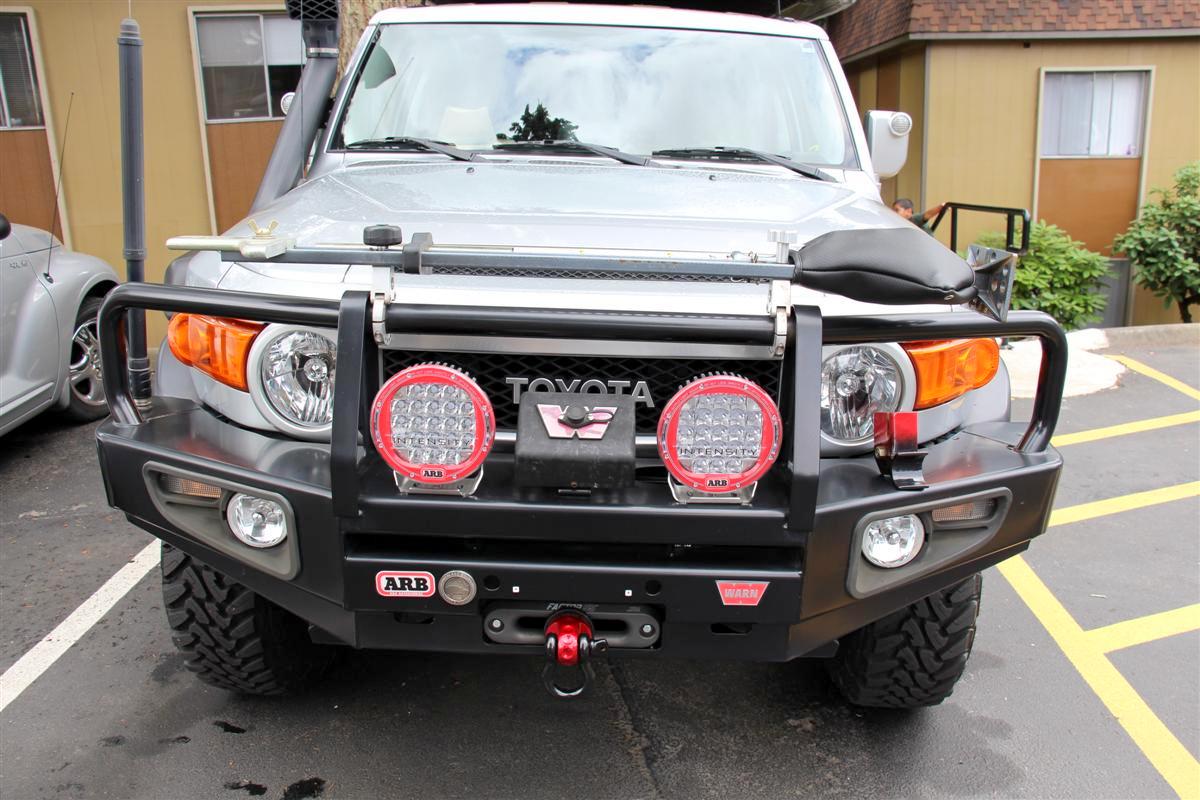
Full view
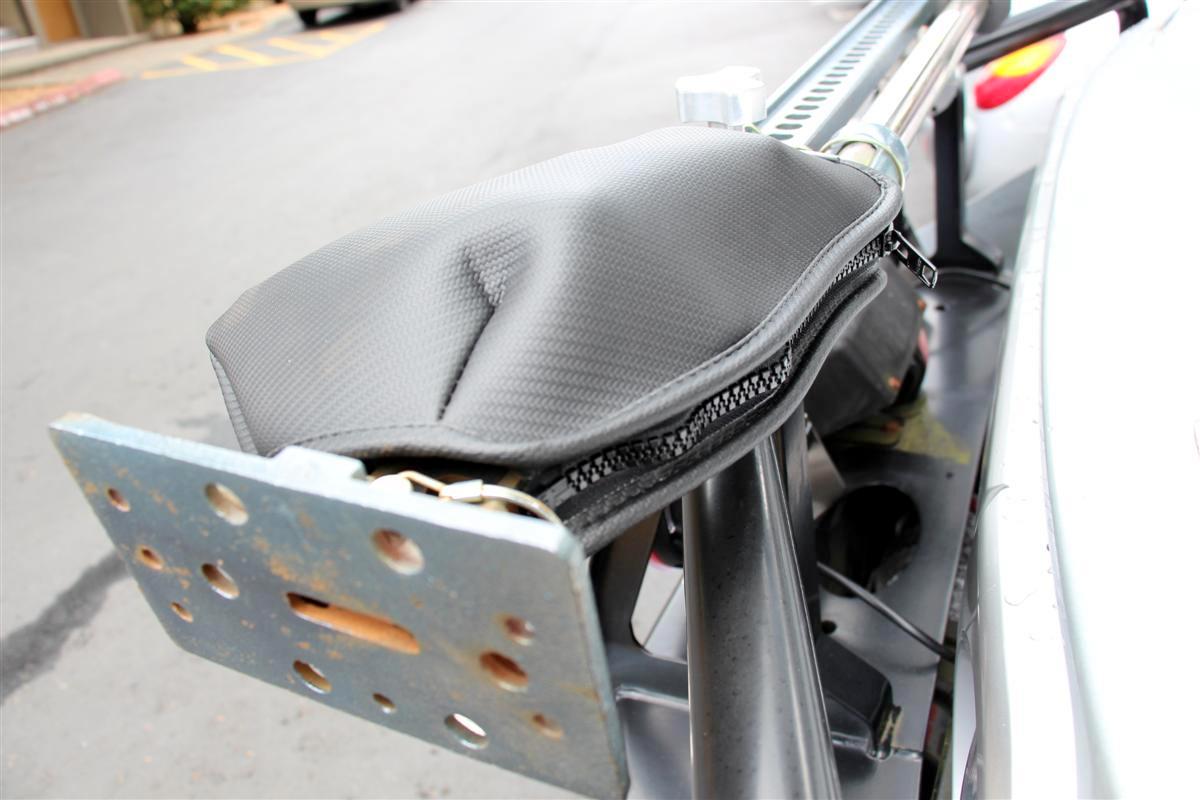
Close-up from behind

I had tried test fitting it before, but two things kept it from going on.
First the Hi-Lift needed to have a few more holes exposed on the jacks mounting plate, and I had to remove the WabFab Slider Adapter.
Too bad the WabFab unit cannot stay on, but I keep a wrench in my new Masterpull Recovery bag that I can use to tighten up the bolt and nut to reinstall it if needed.
Only had to move the Hi-Lift towards the drivers side a few holes, and all is good.
Have not road tested it yet to see if the cover will silence the lifting mechanism on the jack when going over bumps on the road, or washboard ruts on forest service roads.
It was very noisy before, and I used a couple of Zip-Ties around the jack and the WabFab unit to hold them to keep them quiet.
Link:
01 - Black Lighting CF 11"
A few pictures:
Cover on, and WabFab slider adapter below on bumper, too big to fit under the cover
Full view
Close-up from behind
08-20-2016, 08:39 AM
#404
Outer Limit Weekend Warrior First Aid Kit Installed 8-20-2016
I have a few first aid kits and I keep a small one in the FJ Cruiser full time, and I have a big tackle box full of first aid stuff for when I go camping.
But after seeing this one online, I had to have it as it is pro quality.
It is a bit pricey, but the owner is a one man company who is also a fire fighter/EMT, and he does this kind of on the side.
All the contents are professional grade packed into a nice air tight/dust proof case.
Plus some of the $$$ from the purchase price goes to three organizations, you can look them up for more info.
Blue Ribbon Coalition
Wheeling For Warriors
Set Them Free
What I like about this kit is it comes with a mounting plate to mount it in your vehicle.
I mounted mine on the Mpac rack on my rear door, a great spot for it.
The contents come packaged in a few clear bags, but he wants you to organize your kit the way you want it, so this way you become familiar with every item in the kit.
There is a lot of stuff packaged into this medium sized kit.
And you can add some of your own supplies too if you want to.
I have already seen a few of these kits on some of the off-road/overlanding forums I frequent, I think the kit is very nice one.
Links:
Outer Limit First Aid Kits
Weekend Warrior Kit (The one I bought)
A few pics, uh OK, a lot:
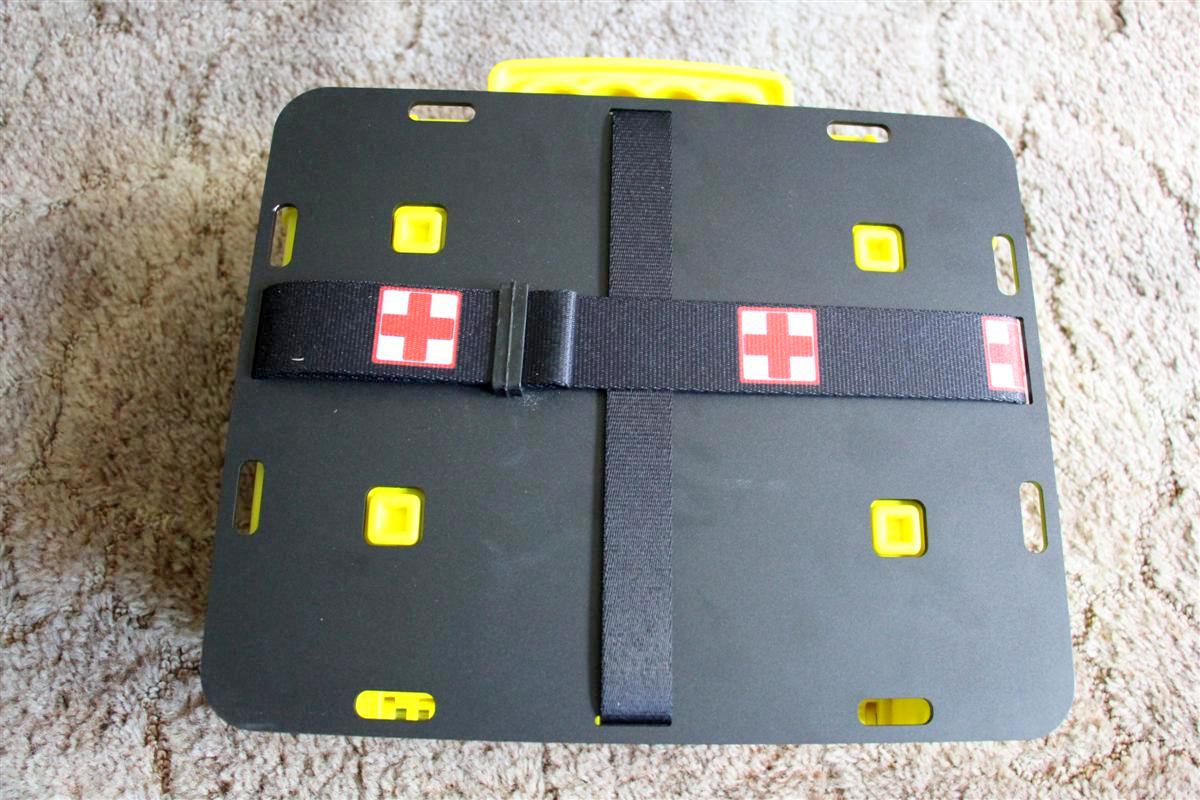
Back side of the mounting plate
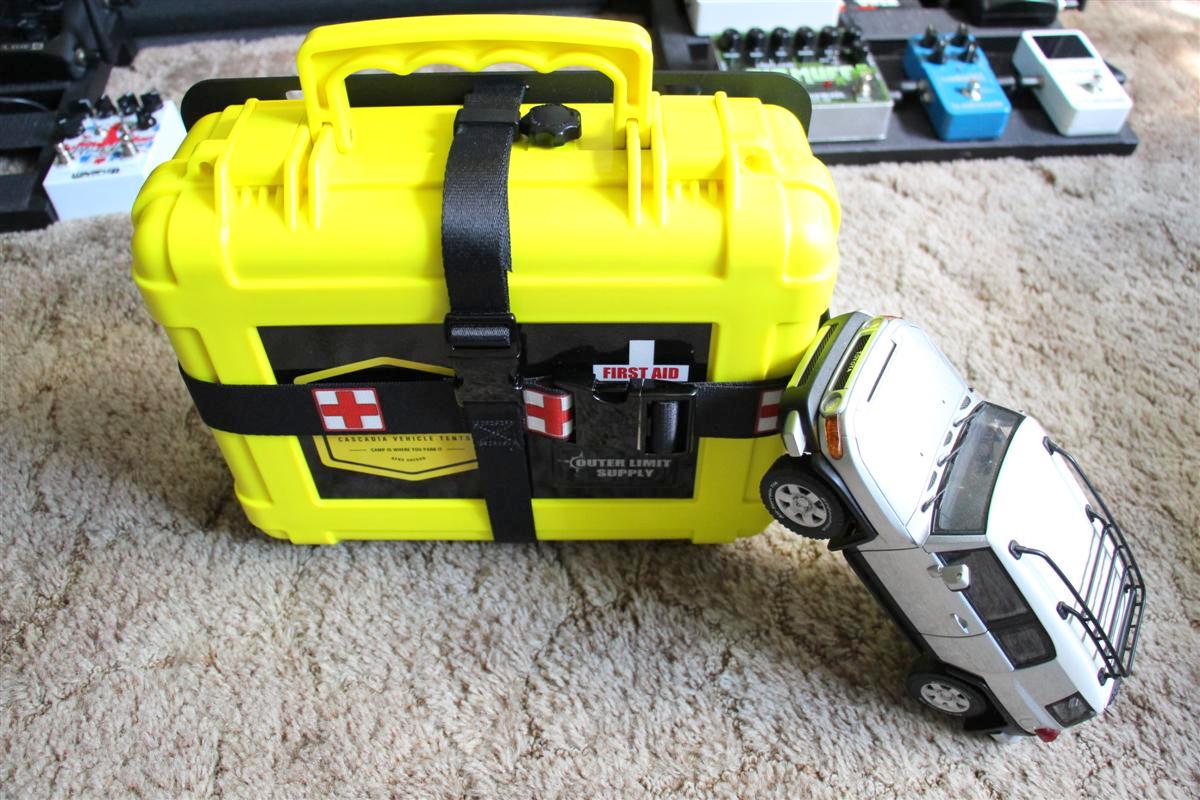
Kit strapped to the mounting plate
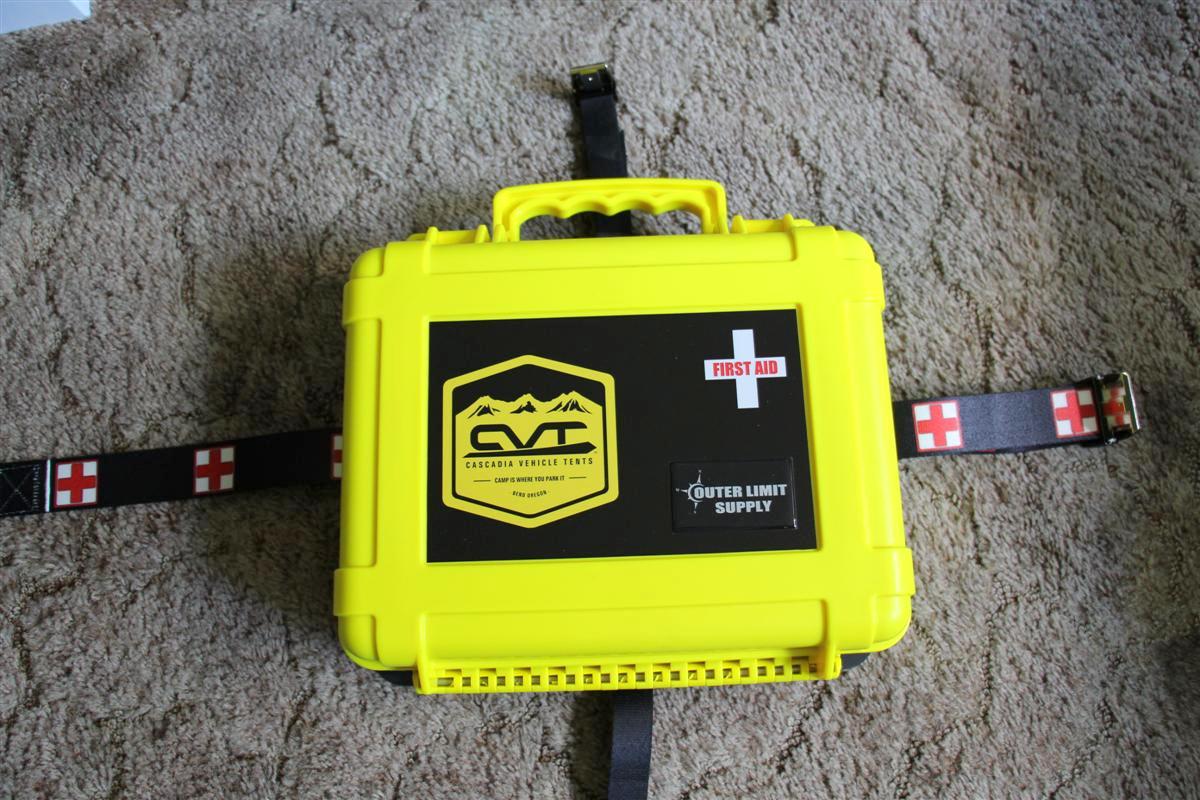
Since Travis does not sell directly to the public, many re-sellers will put their logo on it such as mine from Cascadia Vehicle Roof Top Tents
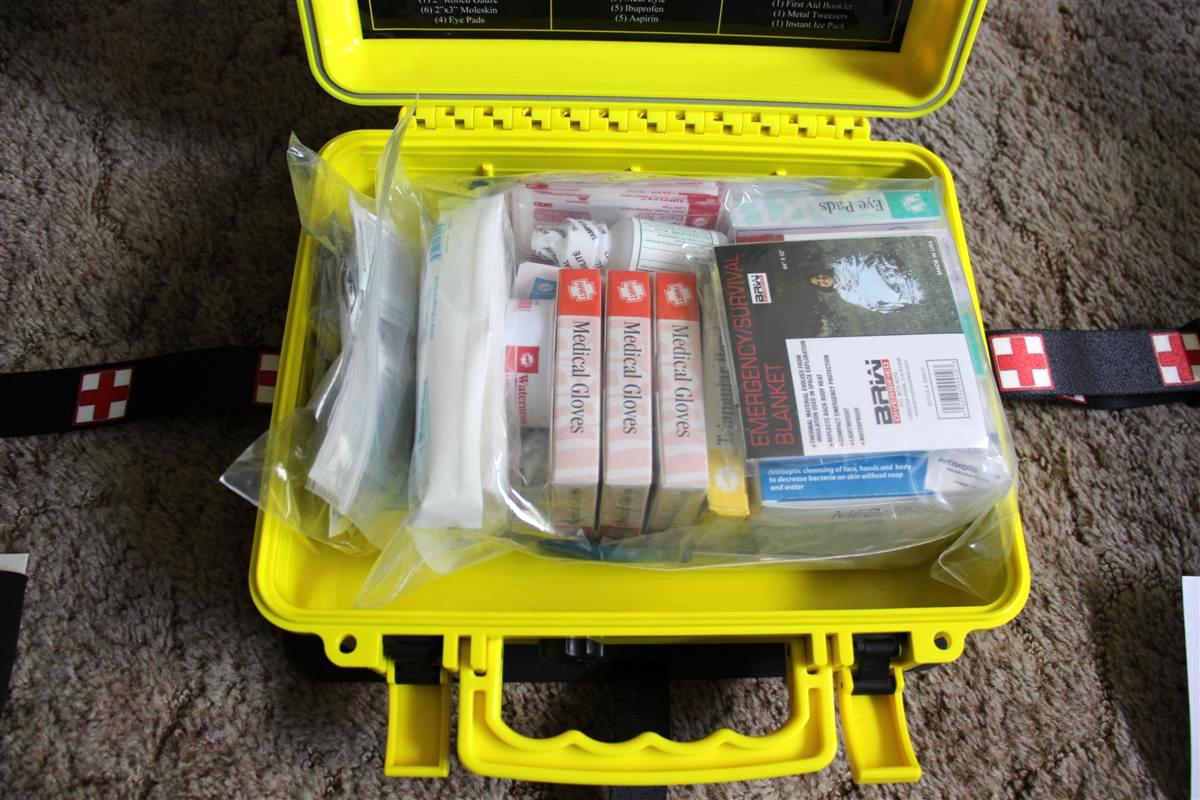
This is the way it appeared when I opened it up, most everything in plastic bags until you organize it yourself
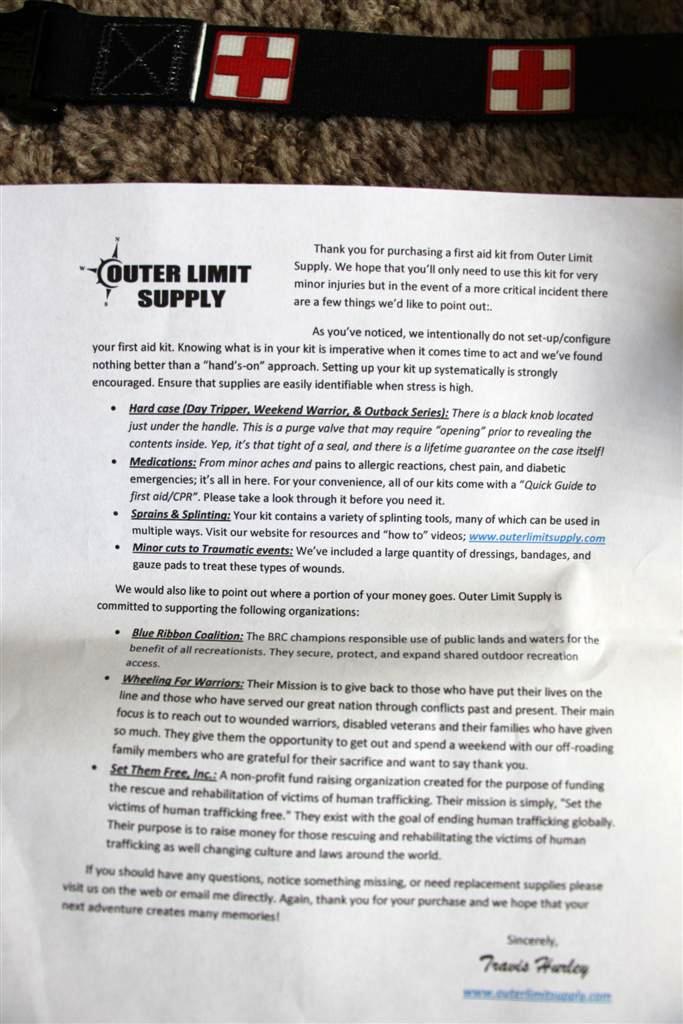
A letter explaining about the kit
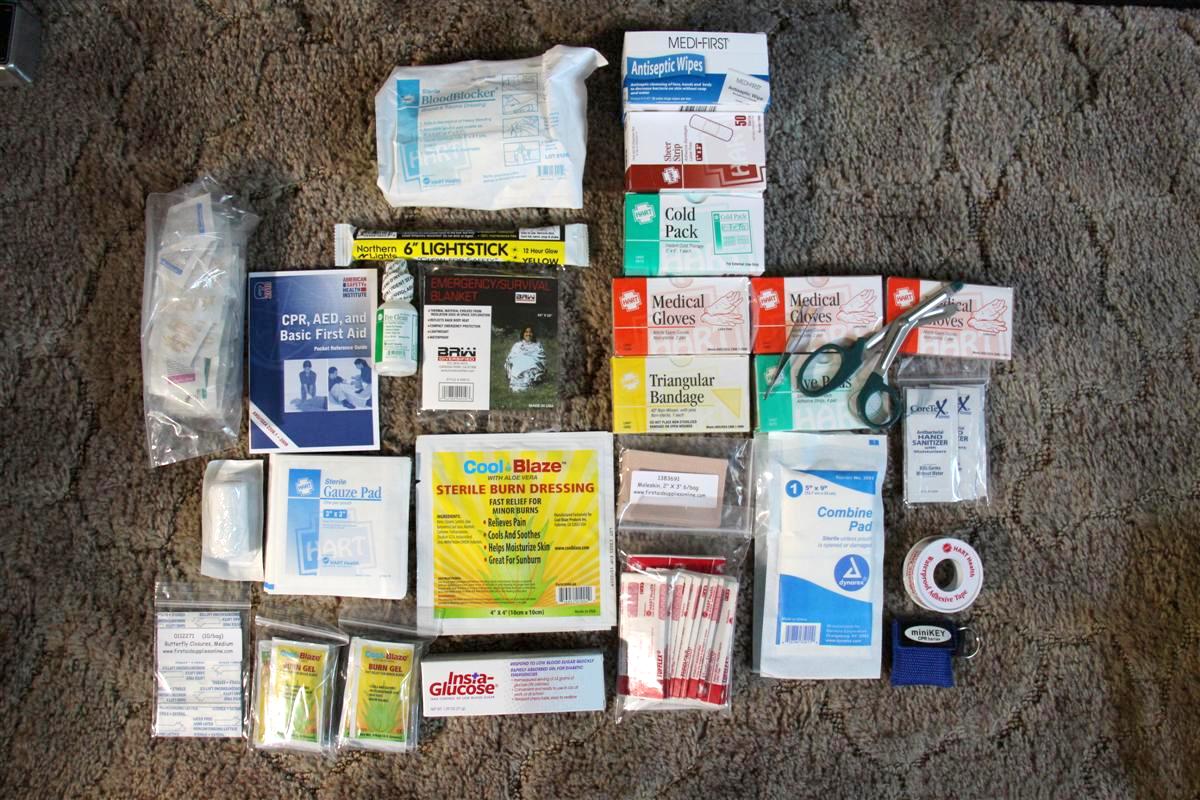
All the contents laid out
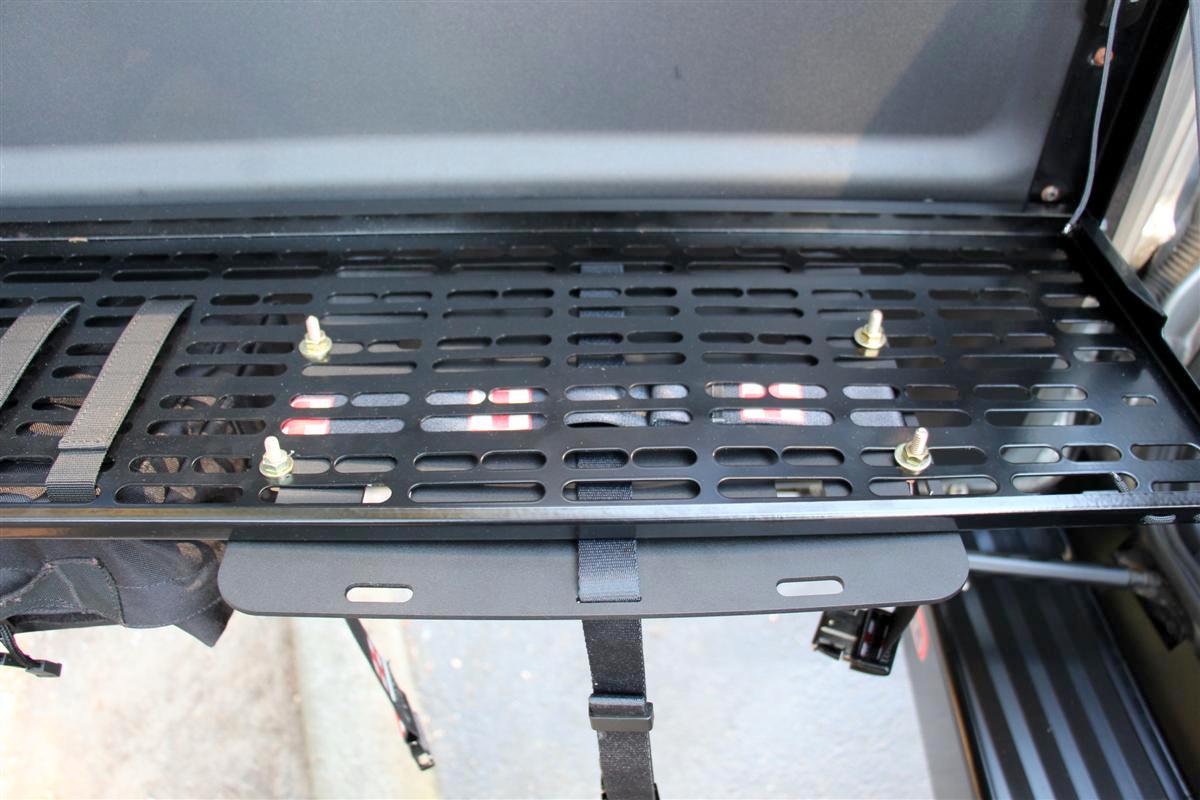
Mounting plate attached to my folding table on the rear door
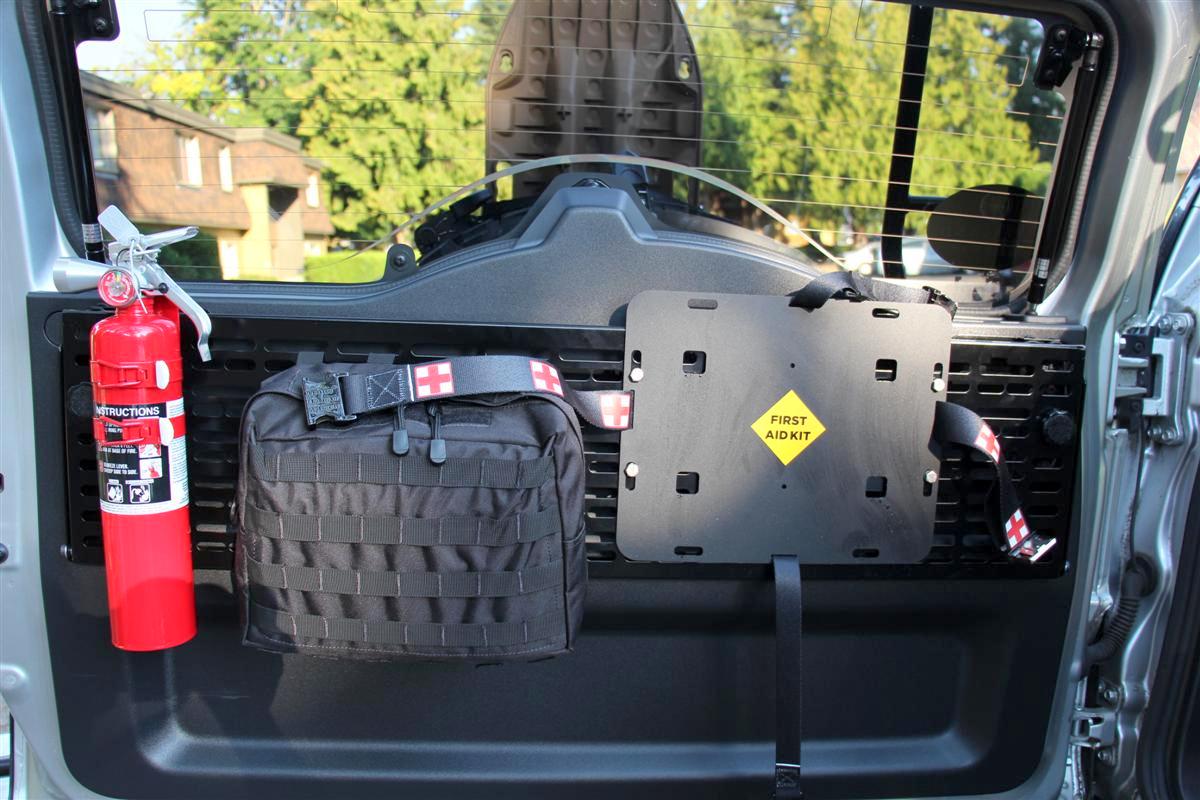
Table back up and mounting plate installed
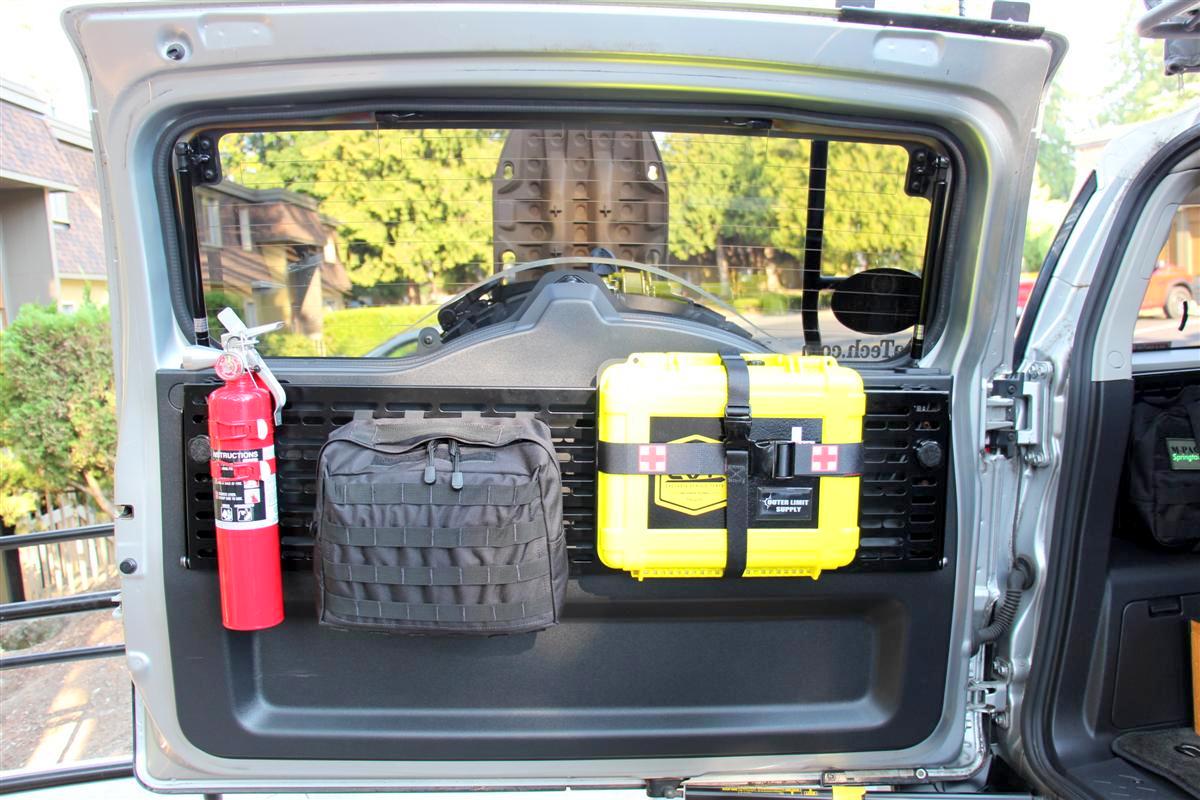
All mounted
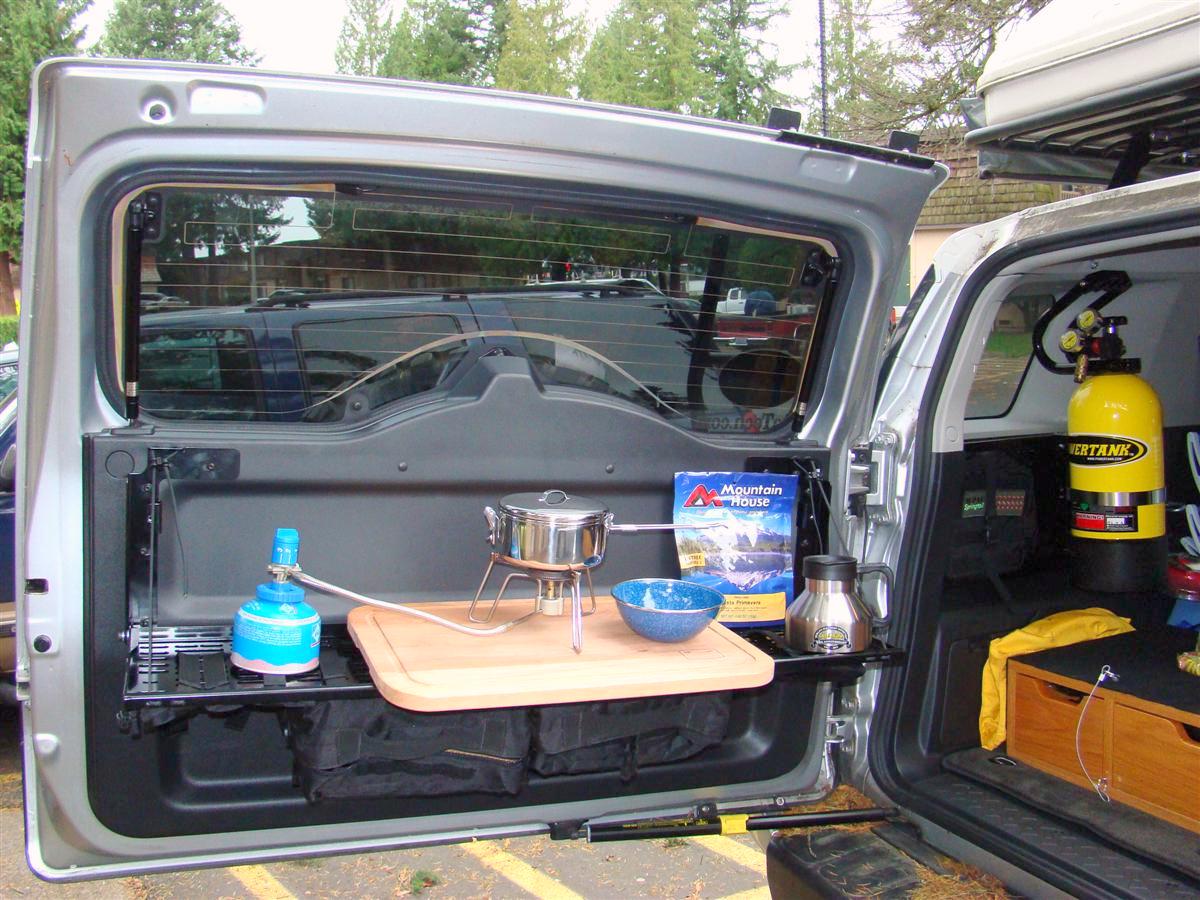
In case anyone was wondering why I called that rack on the rear door a table
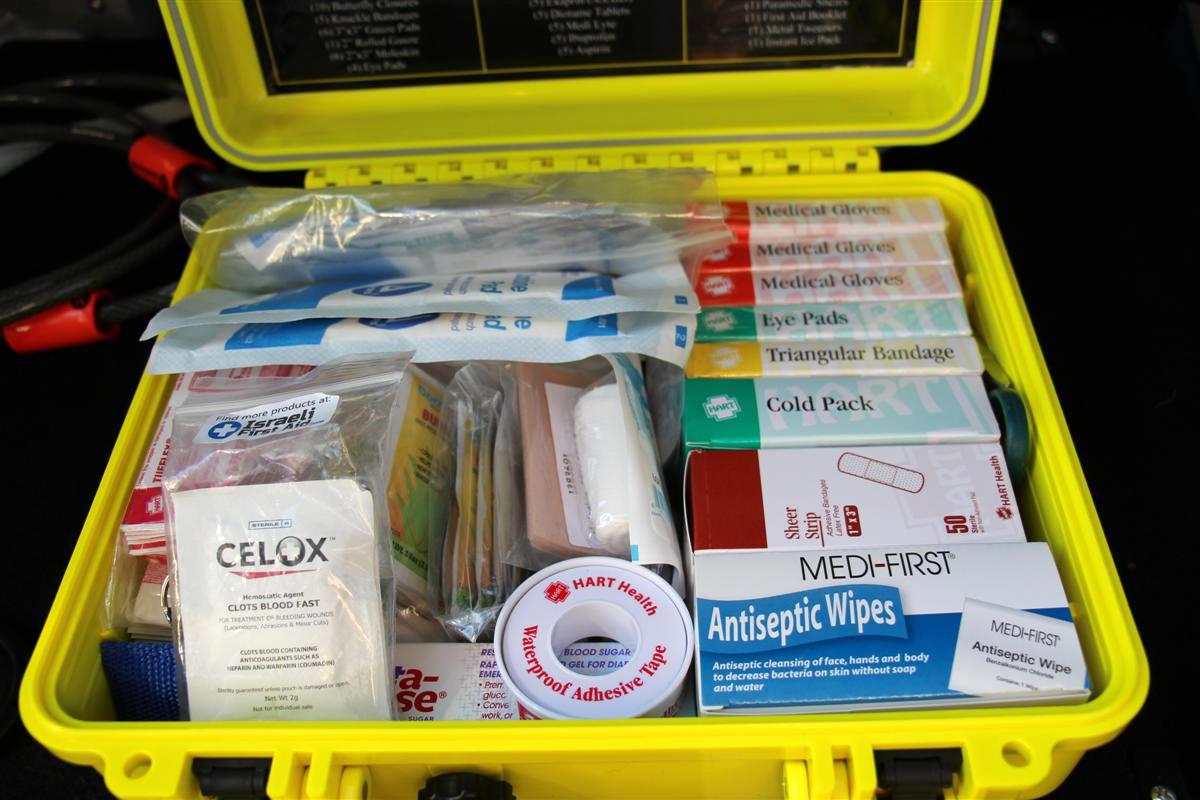
Updated picture from 8-27-2016, added some Celox to the kit, and showing how I organized my kit
Ordered some of that blood blocking stuff for wounds from Amazon.
Celox 2 GM package of 5
Contents of The Weekend Warrior kit:
Dressings:
(50) 1 X 3 Plastic Strip Bandage Box
(1) 1/2" X 5 Yards Adhesive Tape
(1) 2" Rolled Gauze
(6) 2” X 2” Gauze Pads
(6) 2” X 3” Moleskin
(3) 3" Rolled Gauze
(6) 3” X 3” Gauze Pads
(2) 4" Rolled Gauze
(2) 4” X 4” Cool Blaze Burn Dressing
(16) 1” X 3” Woven Elastic Patch Bandages
(5) 2” X 3” Elastic Patch Bandages
(5) Elastic Knuckle Bandages
(5) XL Elastic Fingertip Bandages
(6) 4” X 4” Gauze Pad 12 Ply
(2) 5” X 9” Abdominal Pad Each
(1) Blood Blocker Wound & Trauma Dressing
(4) Eye Pads Sterile
(10) Triple Biotic Ointment
(1) Vaseline Petroleum Gauze
Tools:
(20) Antiseptic Wipes
(1) Basic First Aid Booklet
(10) Butterfly Closures
(1) Cold Pack
(1) CPR Shield
(3) Disposable Gloves (3 Pairs)
(1) Emergency Survival Blanket (84"X52")
(1) Eye Wash 1oz Bottle
(6) Hand Sanitizer
(1) Light Stick Yellow (12 Hour)
(1) Paramedic Shears
(1) Triangle Bandage (40" X 40" X 56")
(1) Tweezers
Medications:
(5) Aspirin (Chest Pain)
(1) Glucose Tube (Low Blood Sugar)
(5) Cetafen Extra Strength (Non-Aspirin)
(5) Diotame (Diarrhea)
(5) Exaprin (Pain Relief)
(5) Histaprin (Allergic Reaction)
(5) Ibuprofen (Pain Relief)
(5) Medi Lyte (Dehydration)
But after seeing this one online, I had to have it as it is pro quality.
It is a bit pricey, but the owner is a one man company who is also a fire fighter/EMT, and he does this kind of on the side.
All the contents are professional grade packed into a nice air tight/dust proof case.
Plus some of the $$$ from the purchase price goes to three organizations, you can look them up for more info.
Blue Ribbon Coalition
Wheeling For Warriors
Set Them Free
What I like about this kit is it comes with a mounting plate to mount it in your vehicle.
I mounted mine on the Mpac rack on my rear door, a great spot for it.
The contents come packaged in a few clear bags, but he wants you to organize your kit the way you want it, so this way you become familiar with every item in the kit.
There is a lot of stuff packaged into this medium sized kit.
And you can add some of your own supplies too if you want to.
I have already seen a few of these kits on some of the off-road/overlanding forums I frequent, I think the kit is very nice one.
Links:
Outer Limit First Aid Kits
Weekend Warrior Kit (The one I bought)
A few pics, uh OK, a lot:
Back side of the mounting plate
Kit strapped to the mounting plate
Since Travis does not sell directly to the public, many re-sellers will put their logo on it such as mine from Cascadia Vehicle Roof Top Tents
This is the way it appeared when I opened it up, most everything in plastic bags until you organize it yourself
A letter explaining about the kit
All the contents laid out
Mounting plate attached to my folding table on the rear door
Table back up and mounting plate installed
All mounted
In case anyone was wondering why I called that rack on the rear door a table
Updated picture from 8-27-2016, added some Celox to the kit, and showing how I organized my kit
Ordered some of that blood blocking stuff for wounds from Amazon.
Celox 2 GM package of 5
Contents of The Weekend Warrior kit:
Dressings:
(50) 1 X 3 Plastic Strip Bandage Box
(1) 1/2" X 5 Yards Adhesive Tape
(1) 2" Rolled Gauze
(6) 2” X 2” Gauze Pads
(6) 2” X 3” Moleskin
(3) 3" Rolled Gauze
(6) 3” X 3” Gauze Pads
(2) 4" Rolled Gauze
(2) 4” X 4” Cool Blaze Burn Dressing
(16) 1” X 3” Woven Elastic Patch Bandages
(5) 2” X 3” Elastic Patch Bandages
(5) Elastic Knuckle Bandages
(5) XL Elastic Fingertip Bandages
(6) 4” X 4” Gauze Pad 12 Ply
(2) 5” X 9” Abdominal Pad Each
(1) Blood Blocker Wound & Trauma Dressing
(4) Eye Pads Sterile
(10) Triple Biotic Ointment
(1) Vaseline Petroleum Gauze
Tools:
(20) Antiseptic Wipes
(1) Basic First Aid Booklet
(10) Butterfly Closures
(1) Cold Pack
(1) CPR Shield
(3) Disposable Gloves (3 Pairs)
(1) Emergency Survival Blanket (84"X52")
(1) Eye Wash 1oz Bottle
(6) Hand Sanitizer
(1) Light Stick Yellow (12 Hour)
(1) Paramedic Shears
(1) Triangle Bandage (40" X 40" X 56")
(1) Tweezers
Medications:
(5) Aspirin (Chest Pain)
(1) Glucose Tube (Low Blood Sugar)
(5) Cetafen Extra Strength (Non-Aspirin)
(5) Diotame (Diarrhea)
(5) Exaprin (Pain Relief)
(5) Histaprin (Allergic Reaction)
(5) Ibuprofen (Pain Relief)
(5) Medi Lyte (Dehydration)
09-03-2016, 02:52 AM
#405
Rigid Industries Rock Lights Installed 9-2-2016
I did not purchase these really for rock crawling, but more to light up forest service roads/fire trails when venturing out before the sun comes up.
What we have liked to do in the past is go up the the Greenwater area early in morning up FS road 72 and park at the top in a big open space that faces Mount Rainier, and we will watch the sun rise and take in the full view of Mount Rainiers spectacular beauty.
These will come in handy while milling around making coffee, having a quick breakfast, etc.
Also these will come in handy when setting up/breaking camp when it is dark out.
I thought about getting one of the much cheaper sets from other brands that can change colors on the fly with the push of a button on a remote, but often those light kits fail from reading online reviews.
The Rigid line of lights are pro lighting and well made, but also a lot more $$$.
So well made that ARB partnered with them to make the ARB Intensity LED lights that I am running on my front ARB bumper.
These do come in other colors, and I was tempted to get the green ones as that would cast a wicked looking green glow under the rig.
But as far as putting out enough usable light, I think the white color LED is a much better choice.
Since John the owner of Auburn Car Repair & Offroad has done some other work on my FJ Cruiser (body mount chop, ARB rear bumper, ARB Intensity LED lights, and the hawse fairlead for my winch), I contacted him to see if they wanted to install these.
John has a great shop and crew, and comes highly recommended by many offroaders and overlanders including myself.
Jason was the tech who installed these for me.
I went with the bigger six pod kit, they do have a smaller kit of four lights.
Also have these wired up hot so I can turn them on without the key.
My ARB Intensity lights are wired up so that the key has to be on at least in the accessory position.
Also for the front pod light to put out enough light it had to be positioned pointing straight down, and about the only place was at the front of the front half of the two part factory skid plate area.
They did not want to mount it directly to the skid plate because if I have to remove it as when changing out a synthetic winchline like I did awhile back the wires would get ripped off.
What Jason did was cut the skid plate and notch it so the light could be permanently mounted to the frame and not interfere with the skid plate during removal/re-installation, pretty darn trick!
Links:
Auburn Car Repair & Offroad
All of their rock light kits
A-Series Rock Light Kit - 6 Lights (Cool White)
A few pictures and a video:
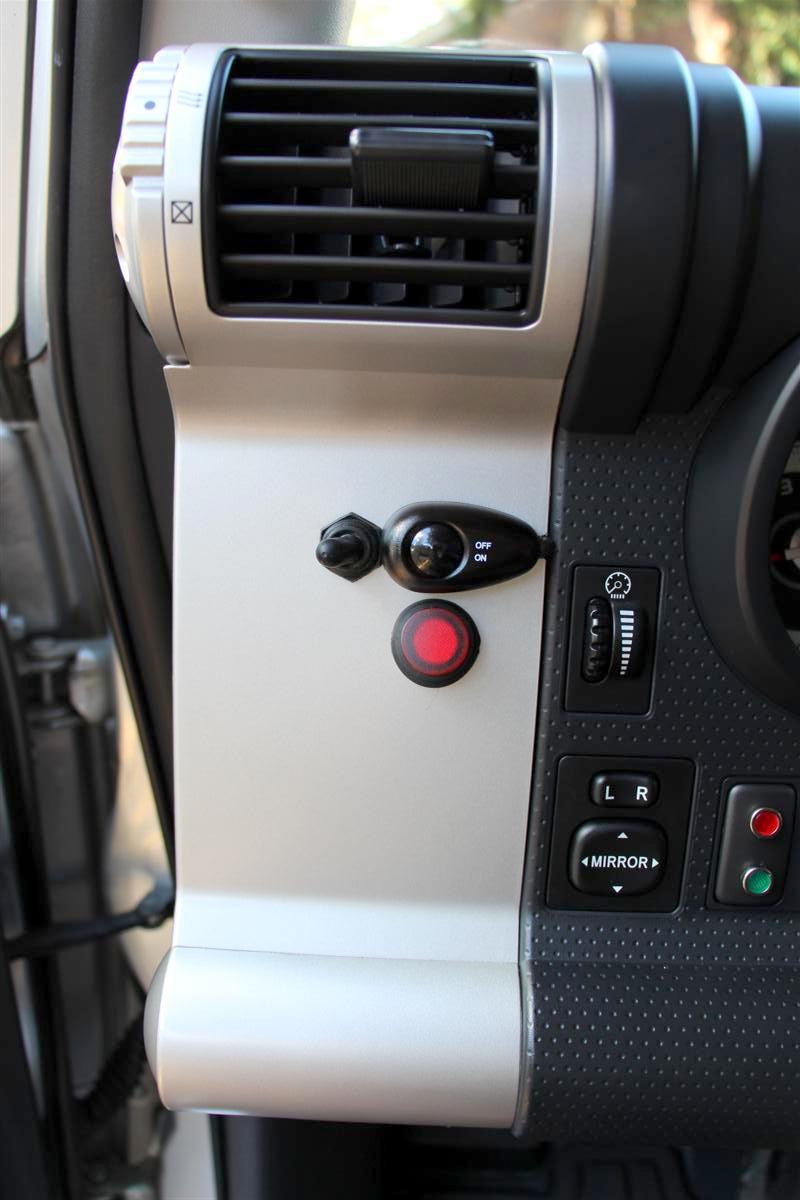
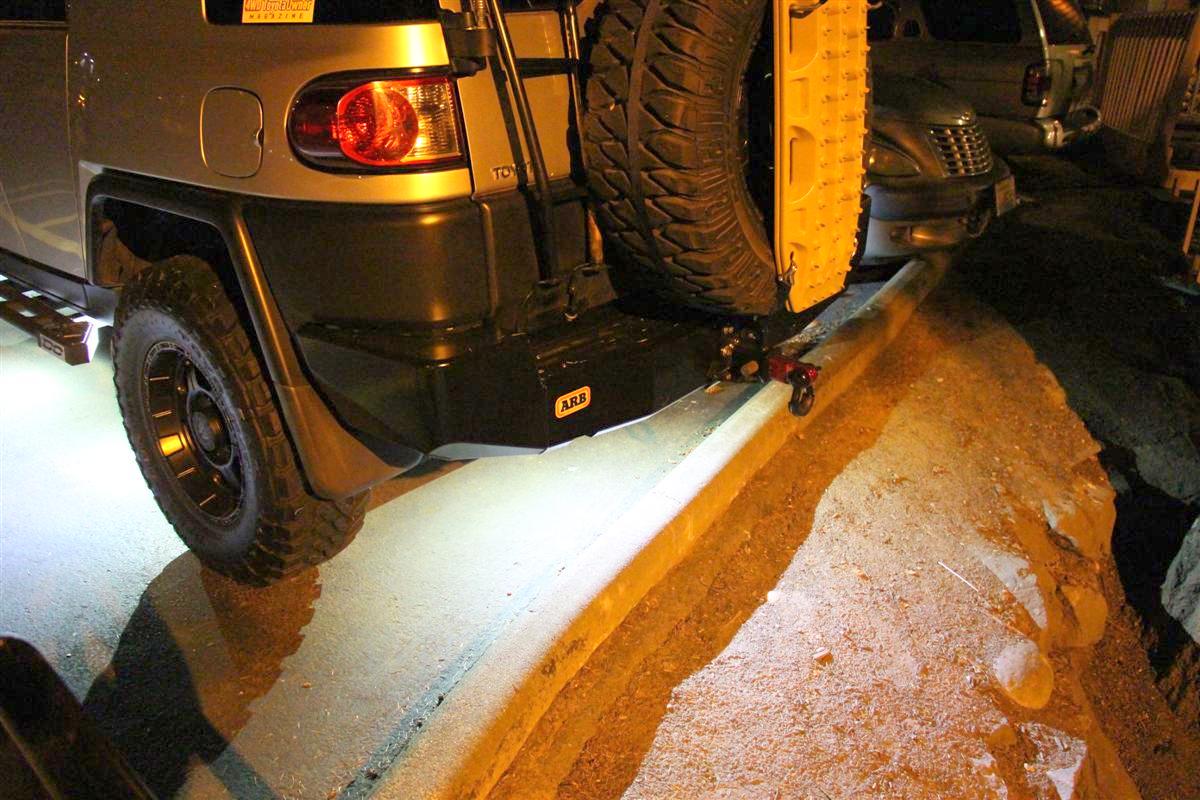
Rock light switch turned off, it is unlit when off
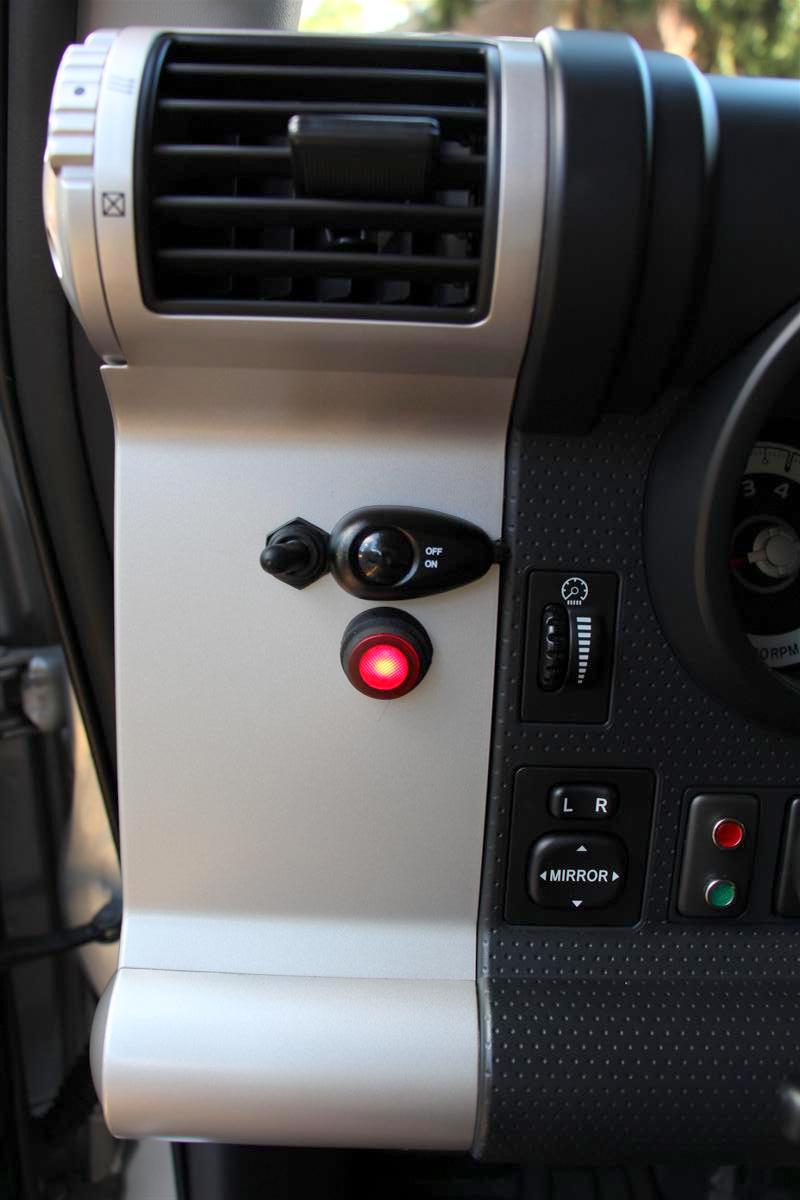
Rock light switch turned on, casts a red glow
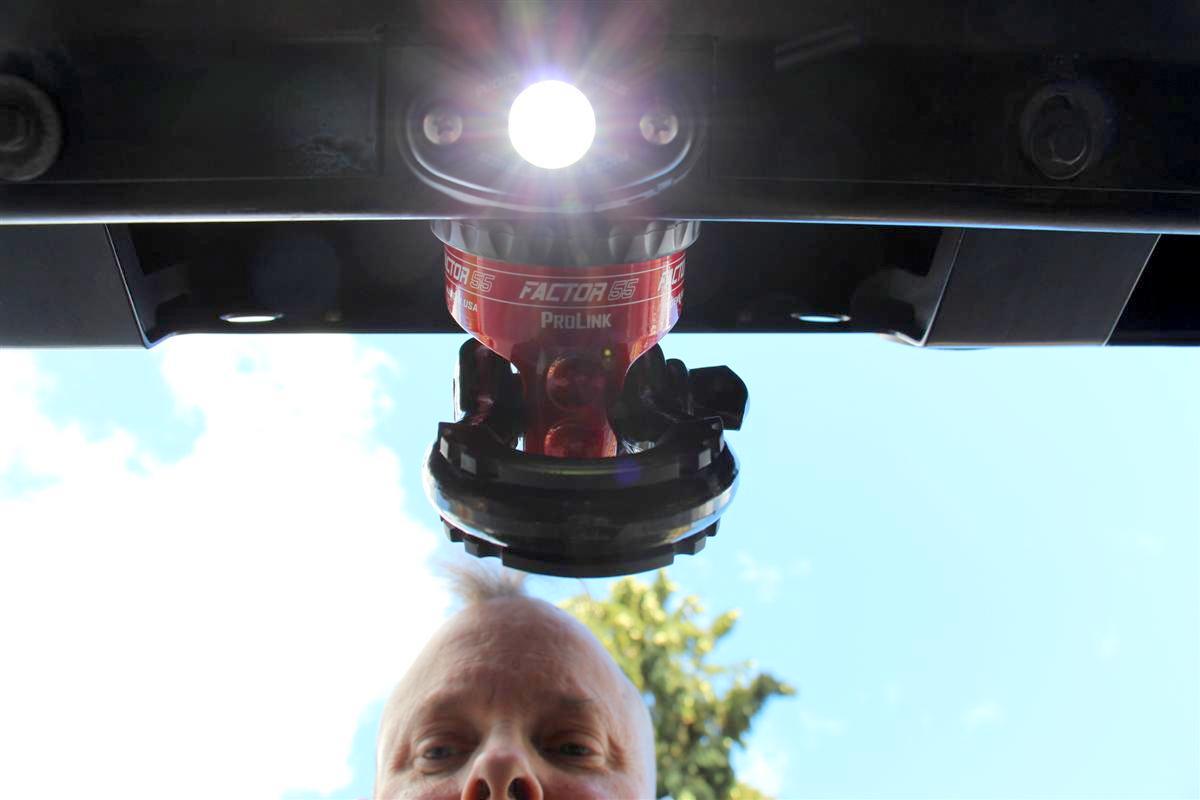
Under the rig view with the front pod lit up in daylight
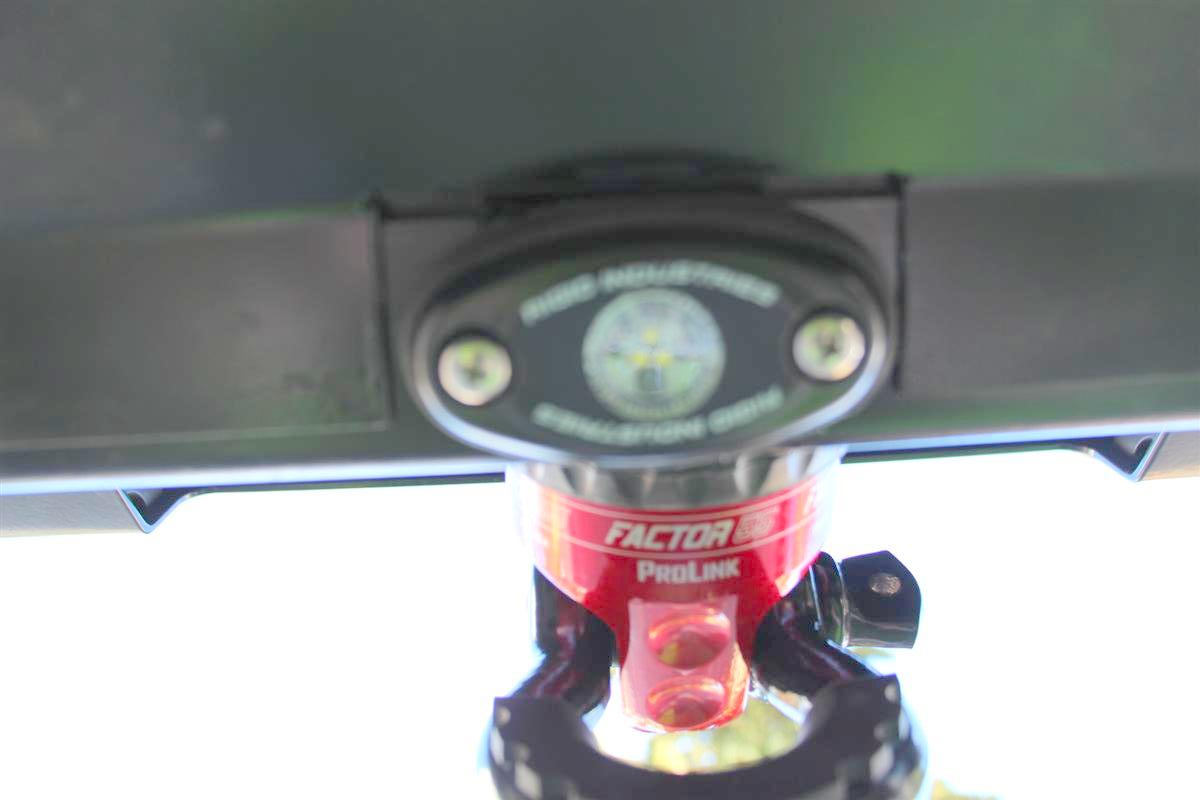
Picture of the skid plate notched so the pod is not affected by removal of the skid plate
Could not get the camera to focus on it very well as I have a very big lens on it, and I was only a few inches away.
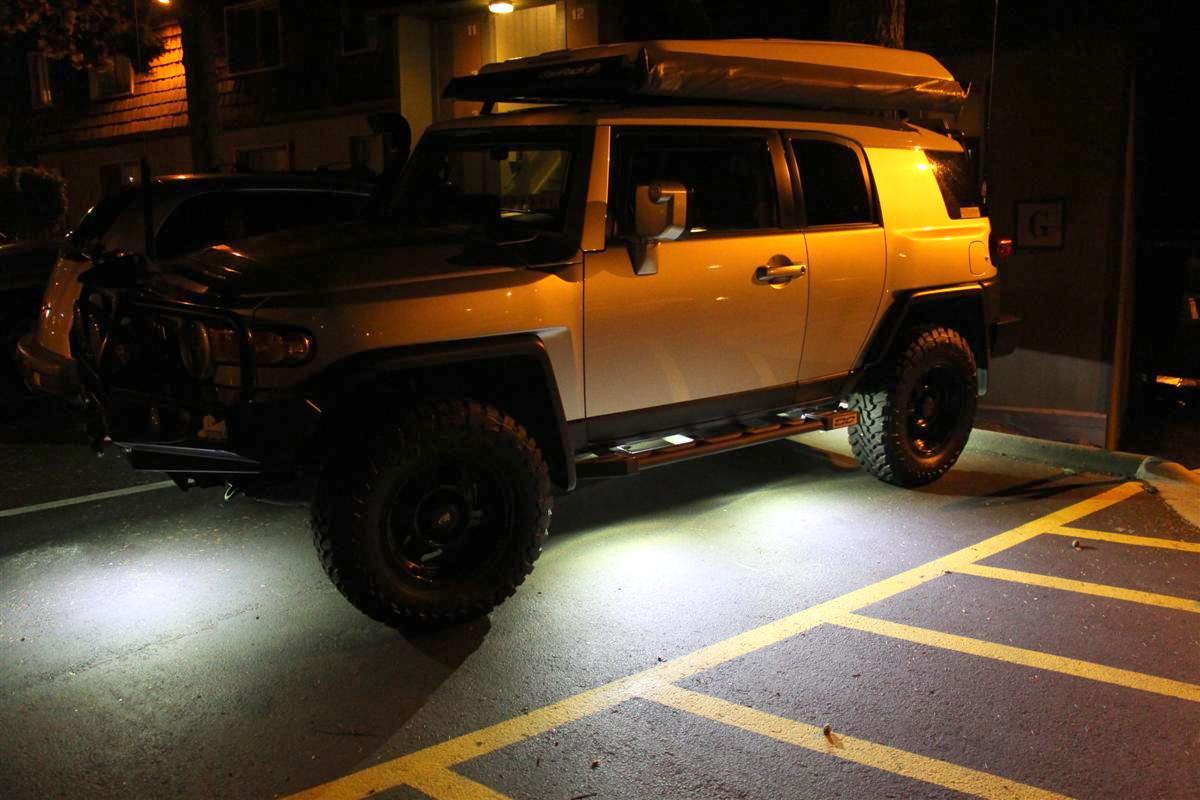

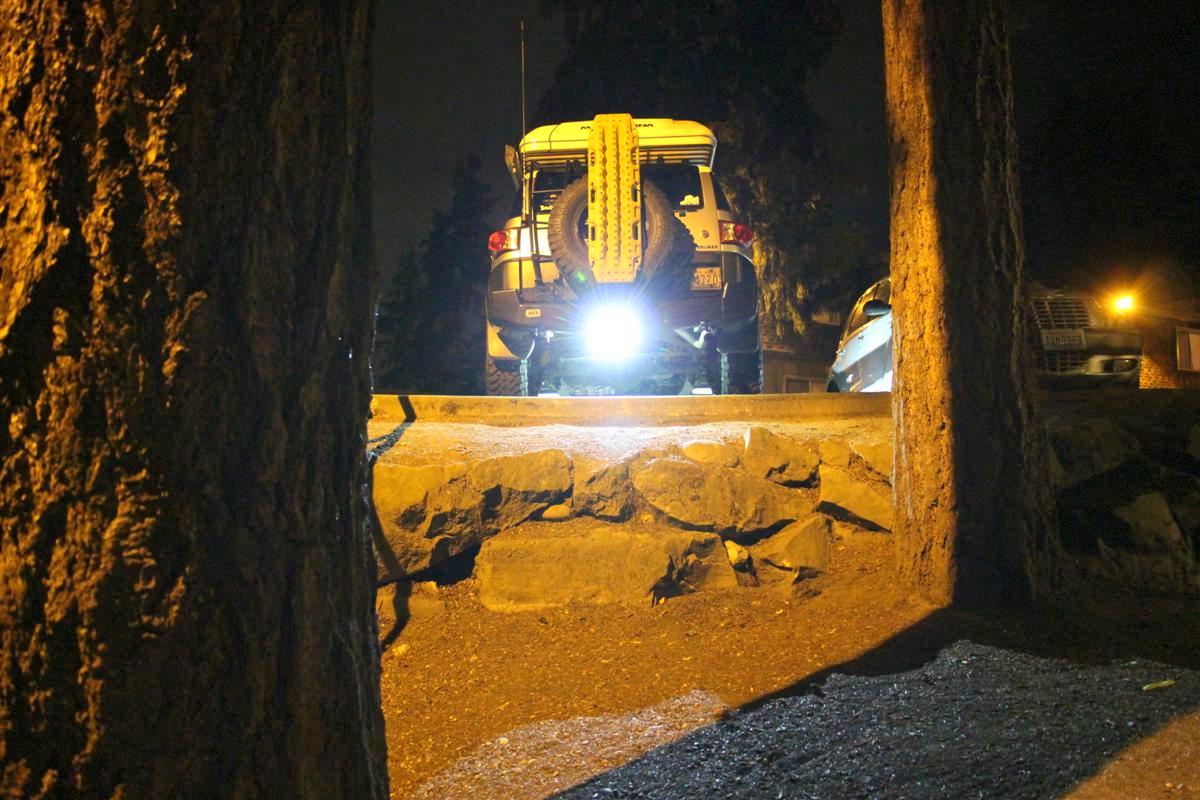
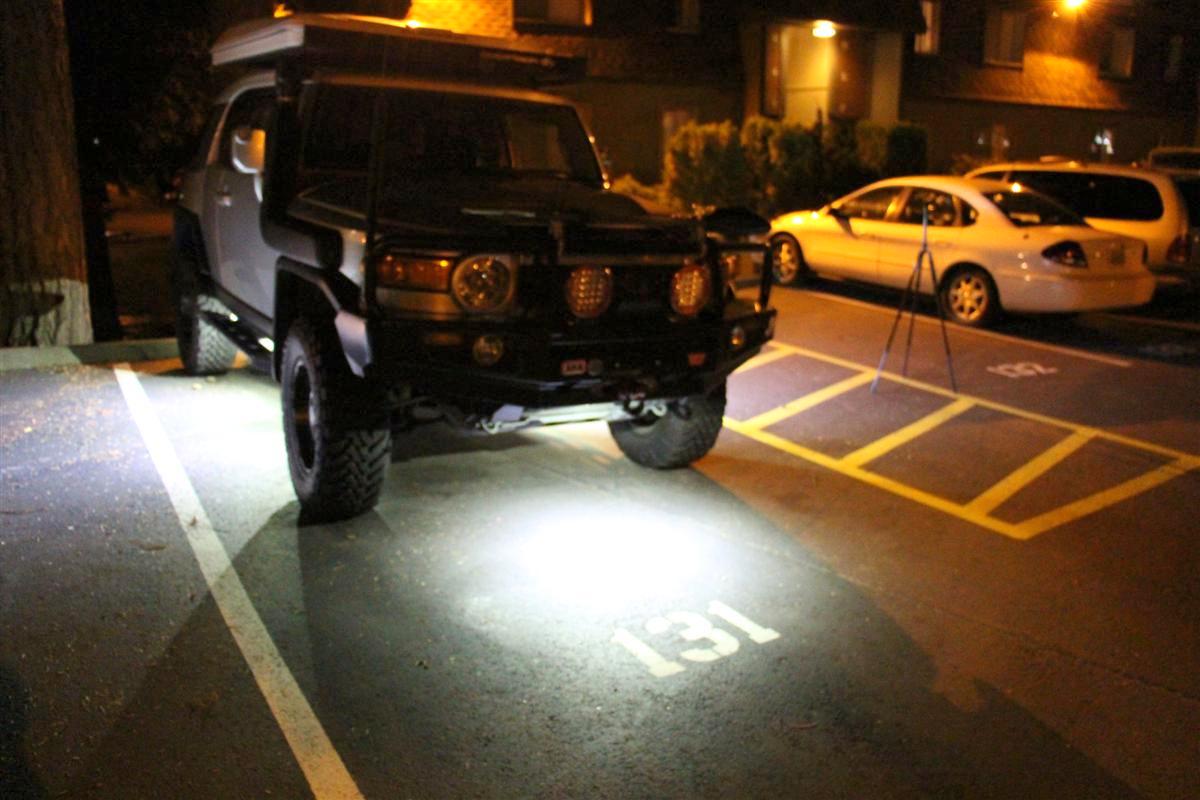
Overall view with all six pods lit up at 3 am
There is a lot of over spill light from the buildings, but this shows you overall how much light they are putting out.
I cannot wait to see how it lights up in a totally dark area.
Video below was shot early Saturday the 27th
The hissing sound you hear in the video is the lawn sprinklers, they come on around 3 am here.
What we have liked to do in the past is go up the the Greenwater area early in morning up FS road 72 and park at the top in a big open space that faces Mount Rainier, and we will watch the sun rise and take in the full view of Mount Rainiers spectacular beauty.
These will come in handy while milling around making coffee, having a quick breakfast, etc.
Also these will come in handy when setting up/breaking camp when it is dark out.
I thought about getting one of the much cheaper sets from other brands that can change colors on the fly with the push of a button on a remote, but often those light kits fail from reading online reviews.
The Rigid line of lights are pro lighting and well made, but also a lot more $$$.
So well made that ARB partnered with them to make the ARB Intensity LED lights that I am running on my front ARB bumper.
These do come in other colors, and I was tempted to get the green ones as that would cast a wicked looking green glow under the rig.
But as far as putting out enough usable light, I think the white color LED is a much better choice.
Since John the owner of Auburn Car Repair & Offroad has done some other work on my FJ Cruiser (body mount chop, ARB rear bumper, ARB Intensity LED lights, and the hawse fairlead for my winch), I contacted him to see if they wanted to install these.
John has a great shop and crew, and comes highly recommended by many offroaders and overlanders including myself.
Jason was the tech who installed these for me.
I went with the bigger six pod kit, they do have a smaller kit of four lights.
Also have these wired up hot so I can turn them on without the key.
My ARB Intensity lights are wired up so that the key has to be on at least in the accessory position.
Also for the front pod light to put out enough light it had to be positioned pointing straight down, and about the only place was at the front of the front half of the two part factory skid plate area.
They did not want to mount it directly to the skid plate because if I have to remove it as when changing out a synthetic winchline like I did awhile back the wires would get ripped off.
What Jason did was cut the skid plate and notch it so the light could be permanently mounted to the frame and not interfere with the skid plate during removal/re-installation, pretty darn trick!
Links:
Auburn Car Repair & Offroad
All of their rock light kits
A-Series Rock Light Kit - 6 Lights (Cool White)
A few pictures and a video:
Rock light switch turned off, it is unlit when off
Rock light switch turned on, casts a red glow
Under the rig view with the front pod lit up in daylight
Picture of the skid plate notched so the pod is not affected by removal of the skid plate
Could not get the camera to focus on it very well as I have a very big lens on it, and I was only a few inches away.
Overall view with all six pods lit up at 3 am
There is a lot of over spill light from the buildings, but this shows you overall how much light they are putting out.
I cannot wait to see how it lights up in a totally dark area.
Video below was shot early Saturday the 27th
The hissing sound you hear in the video is the lawn sprinklers, they come on around 3 am here.
09-04-2016, 03:53 PM
#407
They are pretty bright Robb.
Beau, the guy that runs that over landing camping blog for cooking while camping has a few of the same type of lights from Rigid mounted in the back of the 4Runner under the hatch for cooking/preparing meals.
Beau, the guy that runs that over landing camping blog for cooking while camping has a few of the same type of lights from Rigid mounted in the back of the 4Runner under the hatch for cooking/preparing meals.


 09-05-2016, 02:31 AM
#409
I have some Phillips LED bulbs on order for the two interior lights in my rig, should be here tomorrow.
I got the kind that just slip into the regular place, did not get the conversion kit that had a plate with multiple LEDs on it, but it will be much brighter than stock.
A few rock lights will look great underneath your rig.
09-08-2016, 12:17 PM
#410
Philips LED Interior Lamps Installed 9-8-2016
First, knock on wood...
Have had my rig ten years as of July the 25th this year, and I am still on all of the stock bulbs, not one has burned out on me.
But after seeing a few online threads about LED interior lights, I decided to try these 30 mm Festoon shaped lights from Philips.
They are slightly longer than the stock ones you take out, but they work just fine.
If they do not light up at first, you have to put the bulb in the other way.
For some reasons LED bulbs are finicky this way.
I opted for a single LED emitter as I did not want to put in the adapter type fake bulb with a clip on that you then attach to a plate you stick in there with sticky back tape that has multiple LEDs on it as it might be a pain to get off the sticky backed plate you put in there.
They do make a Festoon bulb with two emitters on them, but I decided to try these as they got pretty good reviews on Amazon where I bought them from.
They are a much whiter light than stock, and they stay cool.
Oh yeah, when I did the front one the stock bulb had been on for a bit, and it was quite hot to the touch.
With these when you put them in you have to make sure the LED emitter is facing downwards to project the light output correctly.
So far I am happy with these.
I put the front one in a few days ago so I got to see how it was in the dark,and I just finished up the rear one.
Link:
Philips 30mm festoon Bright White Interior Vision LED light, 1 Pack
One pack equals one bulb, so you will need two, unless you have a different vehicle you will need more.
A few pics:
These were all taken in daylight too, they are much brighter than they appear here.
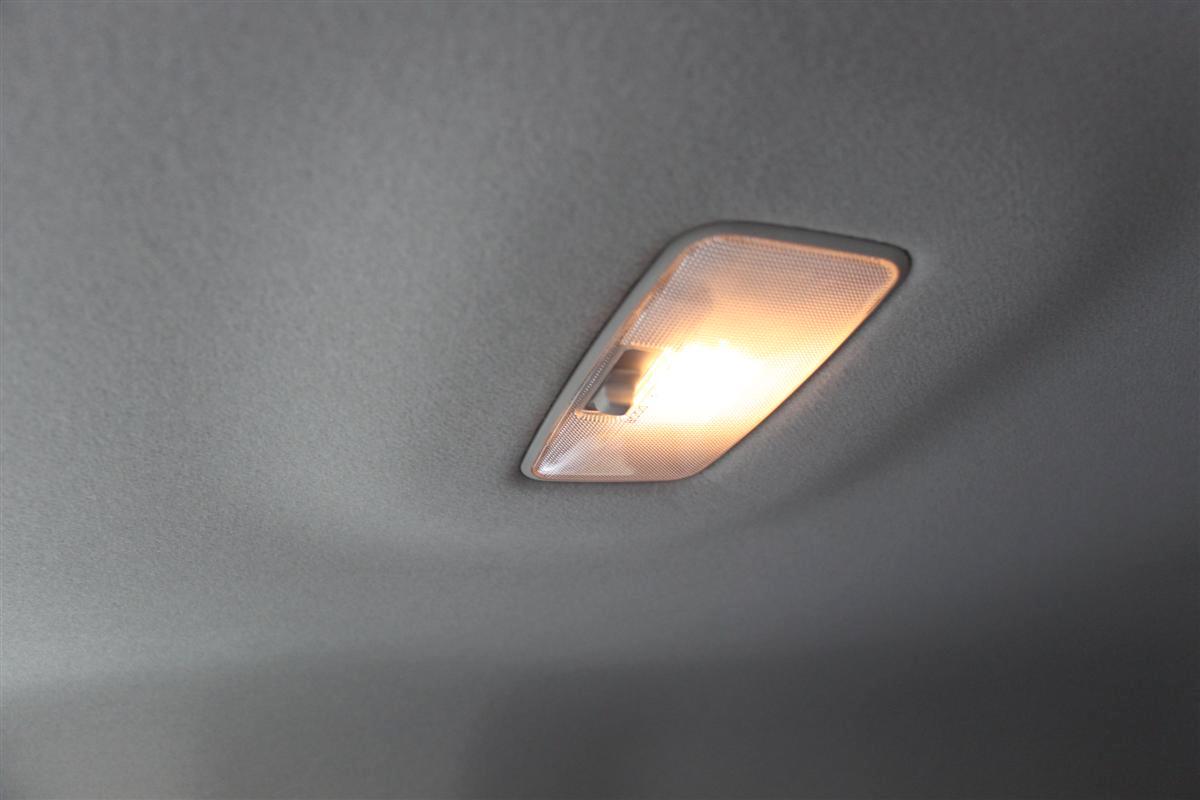
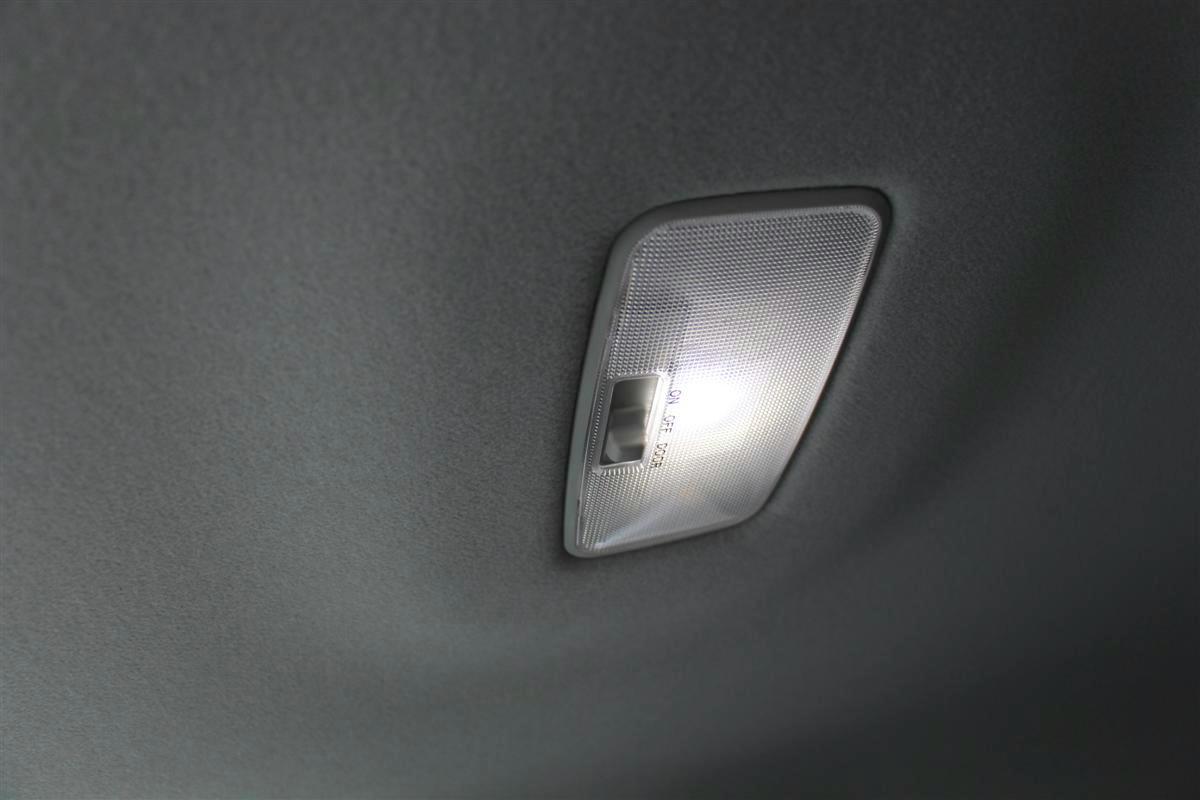
Stock front bulb
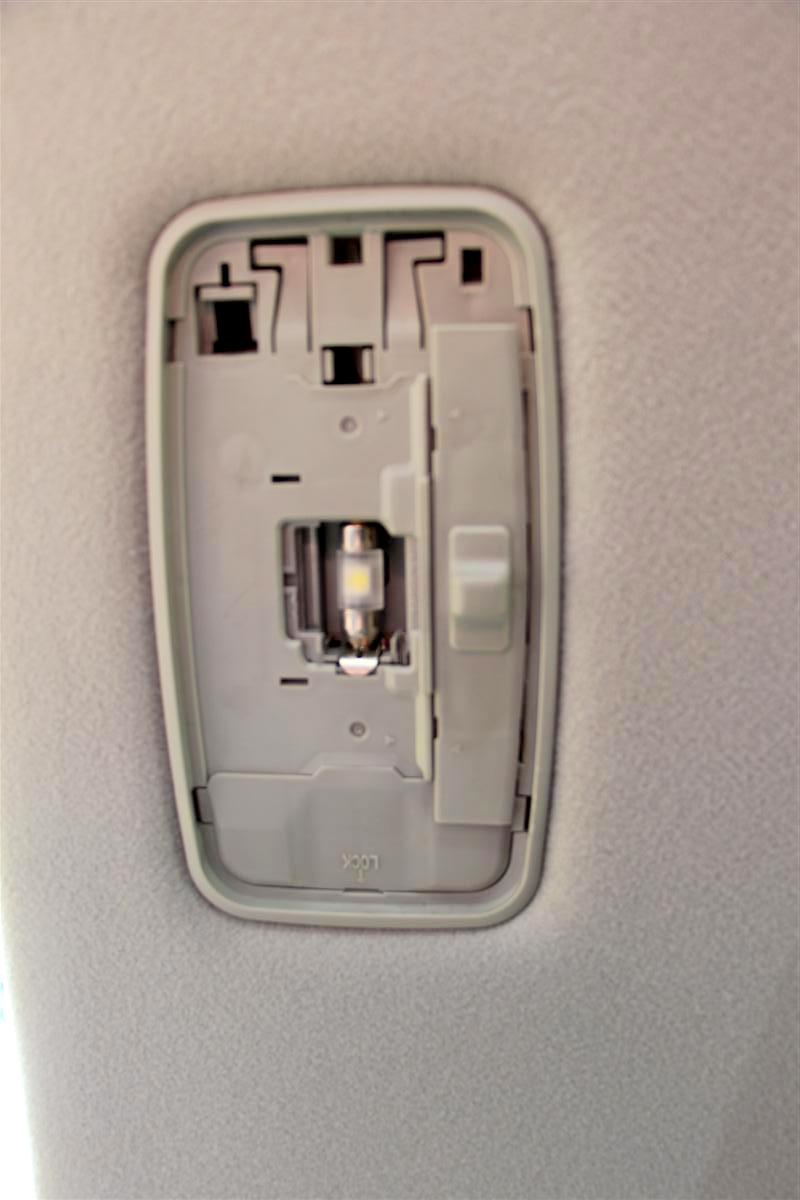
Front LED lit up
LED bulb in place in the rear socket
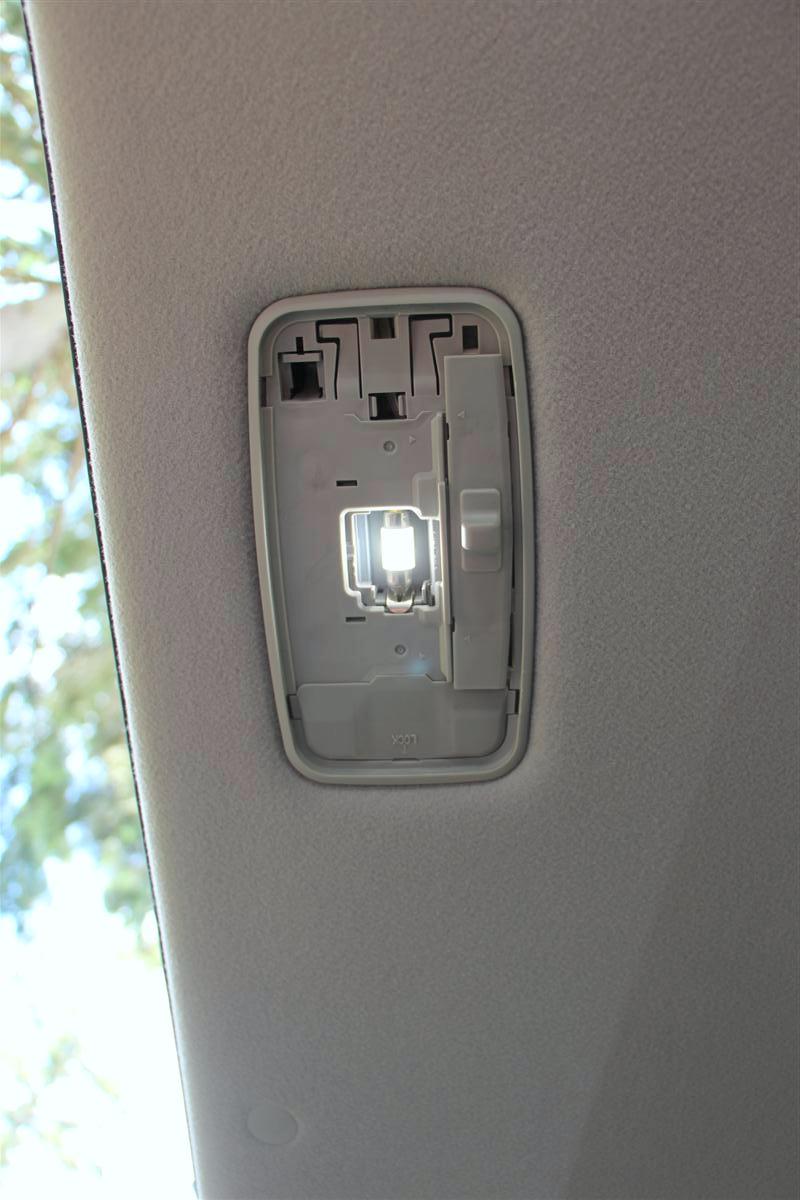
Rear LED lit up
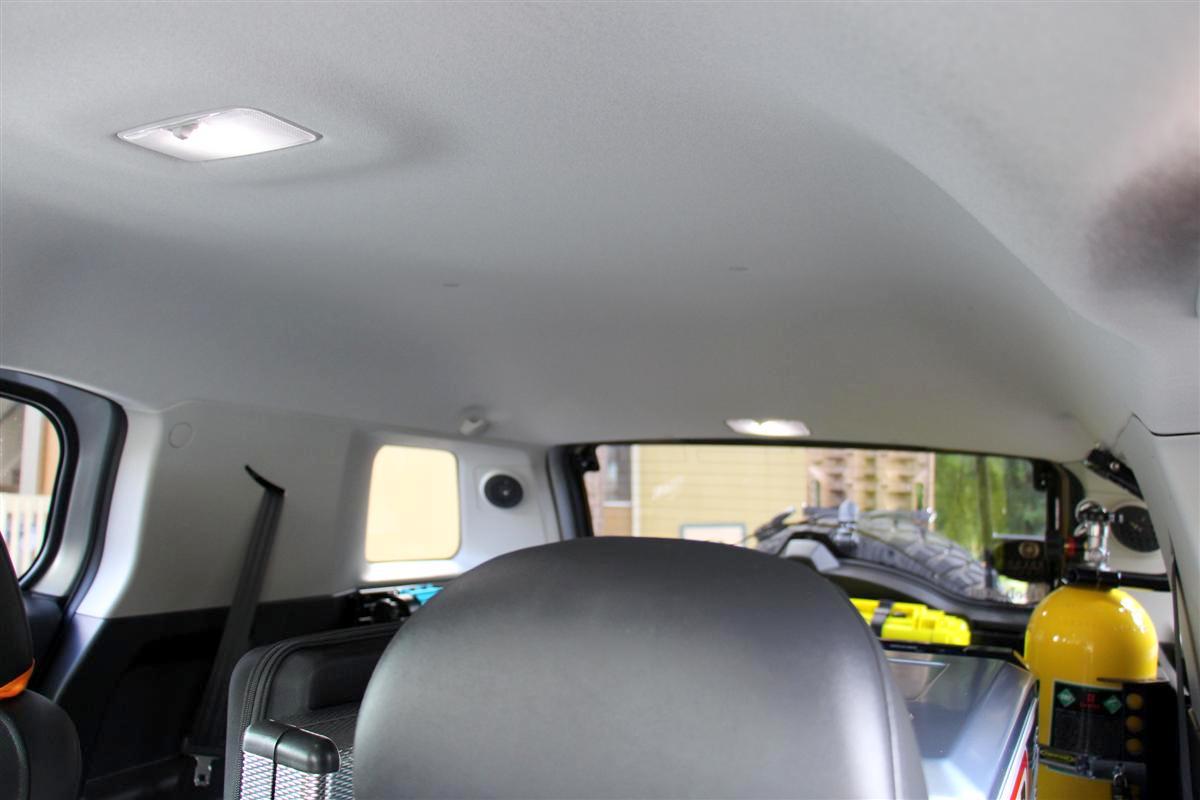
A view to both LEDs lit up
Have had my rig ten years as of July the 25th this year, and I am still on all of the stock bulbs, not one has burned out on me.
But after seeing a few online threads about LED interior lights, I decided to try these 30 mm Festoon shaped lights from Philips.
They are slightly longer than the stock ones you take out, but they work just fine.
If they do not light up at first, you have to put the bulb in the other way.
For some reasons LED bulbs are finicky this way.
I opted for a single LED emitter as I did not want to put in the adapter type fake bulb with a clip on that you then attach to a plate you stick in there with sticky back tape that has multiple LEDs on it as it might be a pain to get off the sticky backed plate you put in there.
They do make a Festoon bulb with two emitters on them, but I decided to try these as they got pretty good reviews on Amazon where I bought them from.
They are a much whiter light than stock, and they stay cool.
Oh yeah, when I did the front one the stock bulb had been on for a bit, and it was quite hot to the touch.
With these when you put them in you have to make sure the LED emitter is facing downwards to project the light output correctly.
So far I am happy with these.
I put the front one in a few days ago so I got to see how it was in the dark,and I just finished up the rear one.
Link:
Philips 30mm festoon Bright White Interior Vision LED light, 1 Pack
One pack equals one bulb, so you will need two, unless you have a different vehicle you will need more.
A few pics:
These were all taken in daylight too, they are much brighter than they appear here.
Stock front bulb
Front LED lit up
LED bulb in place in the rear socket
Rear LED lit up
A view to both LEDs lit up
09-24-2016, 11:20 AM
#411
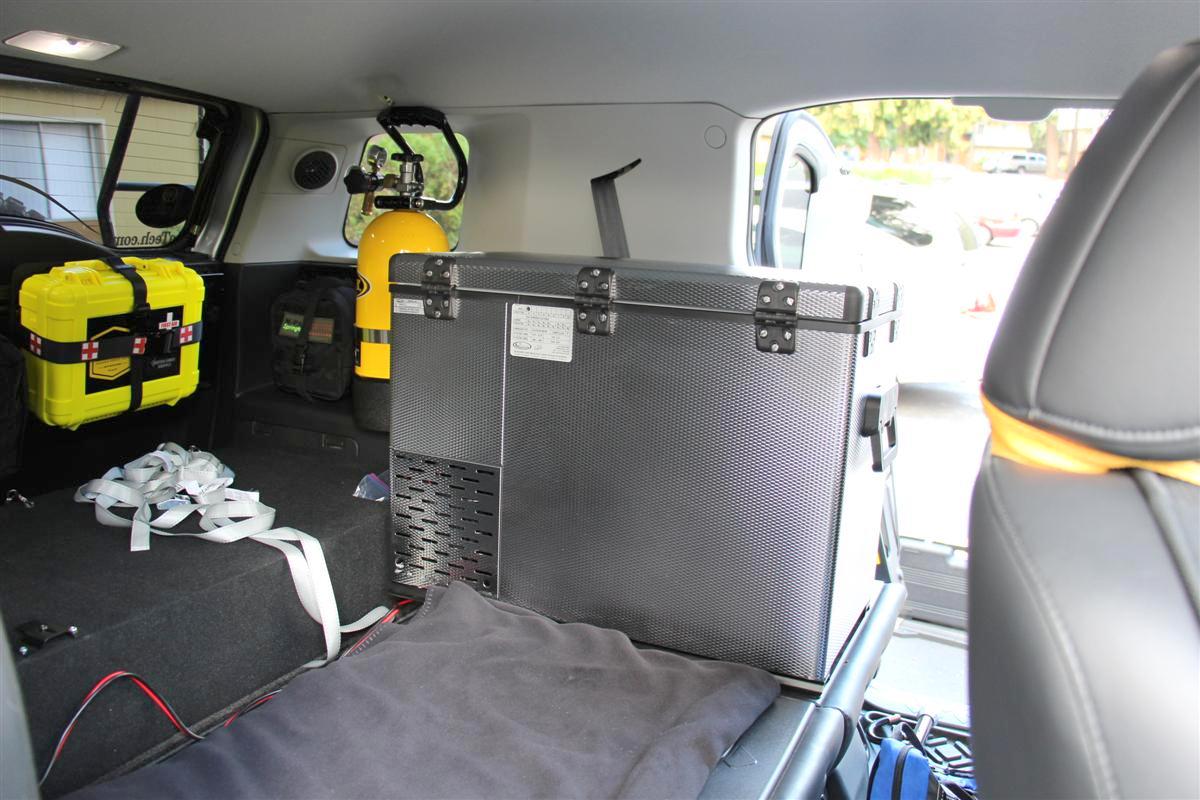
National Luna Weekender 50 Installed 9-24-2016
Say what? Did you not already have an ARB fridge?
Why yes I did, since 2007.
But with the ARB fridge you could only use it as a fridge or a freezer, and not both at the same time.
The ARB worked great for camping in fridge mode, and then when we went on just a day run to the mountains I set it to freeze, and I passed out ice cream bars to everyone.
I was all set to upgrade to the newer ARB fridges as it has digital control of the temperature, and a battery cutoff if the battery gets too low.
I had heard of National Luna, but I did not pay too much attention to them.
Then I read an article a few weeks back by Jonathan Hanson of Exploring Overland.
Happy Hour with National Luna
I have a lot of respect for Jonathan and his wife Roseann as they have been into overlanding for quite a long time.
I did the research and watched several YouTube videos which I will embed into my post here later down the thread.
I came to the conclusion if I was going to get a new fridge, it was going to be the dual compartment National Luna Weekender 50.
Now I can have my refrigerated food in one section, and frozen stuff including ice cream bars in another section.
The fridge side has two plastic bins on top of each other, and the freezer section has one deep bin, perfect.
There are a few cons to this fridge, and I will list them now.
* Only Celsius readout, no Fahrenheit reading, but I can use a conversion chart like I did with my older ARB fridge.
* No cigarette lighter style plug, it uses a European/Din style of plug and receptacle, so you will have to install the one supplied and wire it up .
That is all I can think of, I really dig the new fridge.
Paul May at EQuipt1 who I purchased the fridge from recommended not cutting the 12v cord and installing a regular plug, as the one supplied has more metal, thus a stronger current available.
I tapped into my two 12v plugs in the back that Wayne and I installed many years ago.
I used a step drill bit sized at 3/4", and it was the perfect size for the female receptacle supplied with the fridge.
I could not mount it in one of the other 12v receptacle holes as they were about 1" in diameter, hence why I had to drill a new hole.
What I like about the new fridge it has battery management, digital temperature setting, and digital readout of the current temperature.
You use the up/down arrows on the control panel to set the temperature.
If you want it as 3 Celsius, set it to that, and the fridge will power up or power down to that setting, very nice.
Time for the links, pics, and videos I watched.
Links:
National Luna Headquarters in South Africa
The Weekender 50 on Equipt1's site
National Luna Weekender 50-52 Liter Fridge Freezer Mounting Base Plate
Pictures:
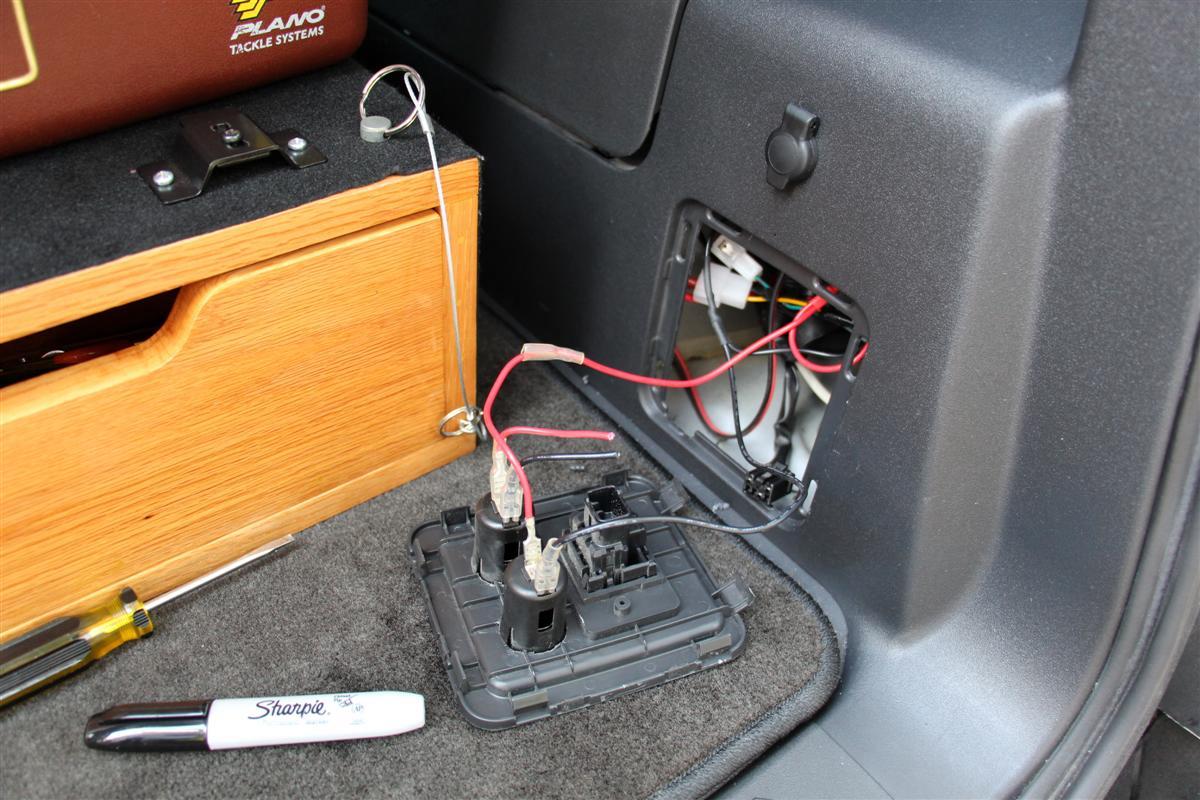
Getting to the 12v power
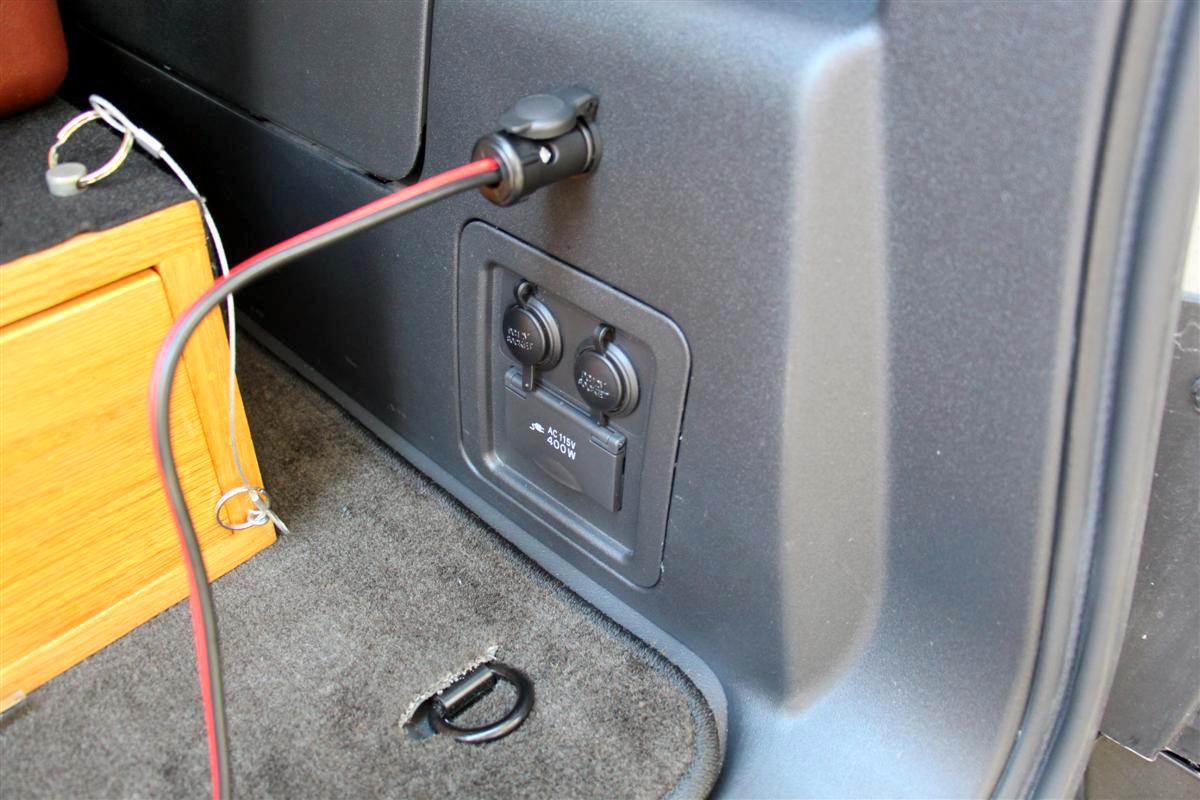
The new plug and receptacle in place
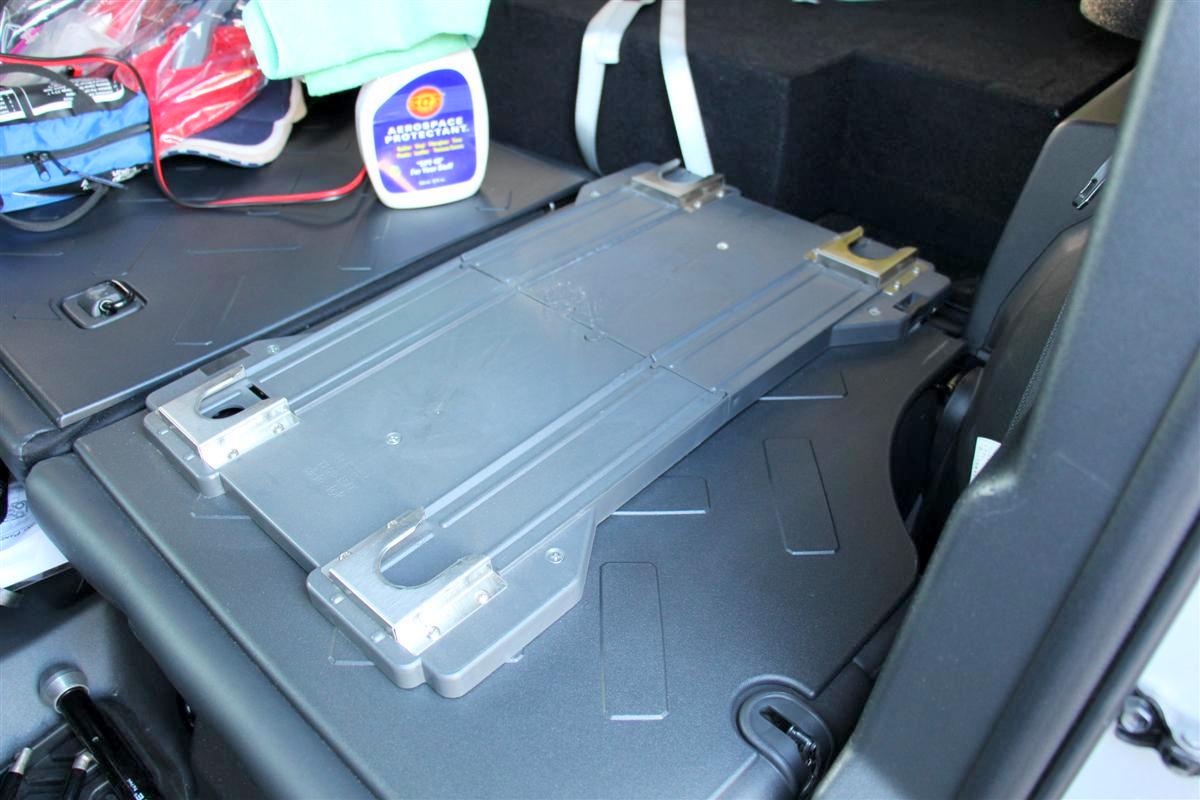
The old Engel fridge mount before I removed it
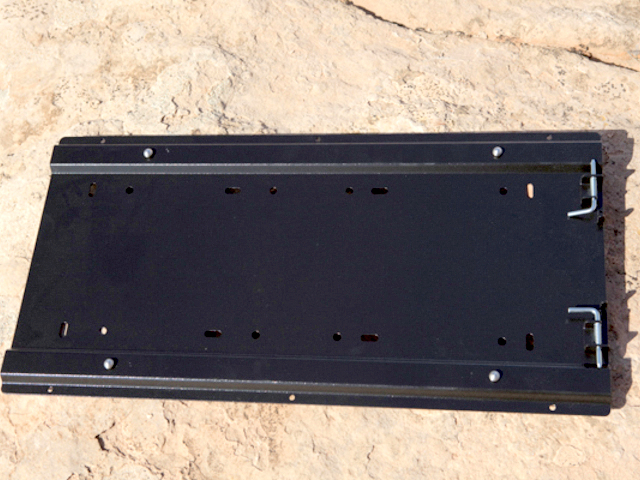
Sorry, I forgot to take a picture of the new steel mounting plate, so I "borrowed" one from Paul's site
It has four nubs on top that go into the bottom of the fridge, then you slide the fridge towards the drivers seat, and flip those two levers that spring down, and they lock against the aft end of the fridge keeping it in place.
It is not going anywhere, very nice and tight.
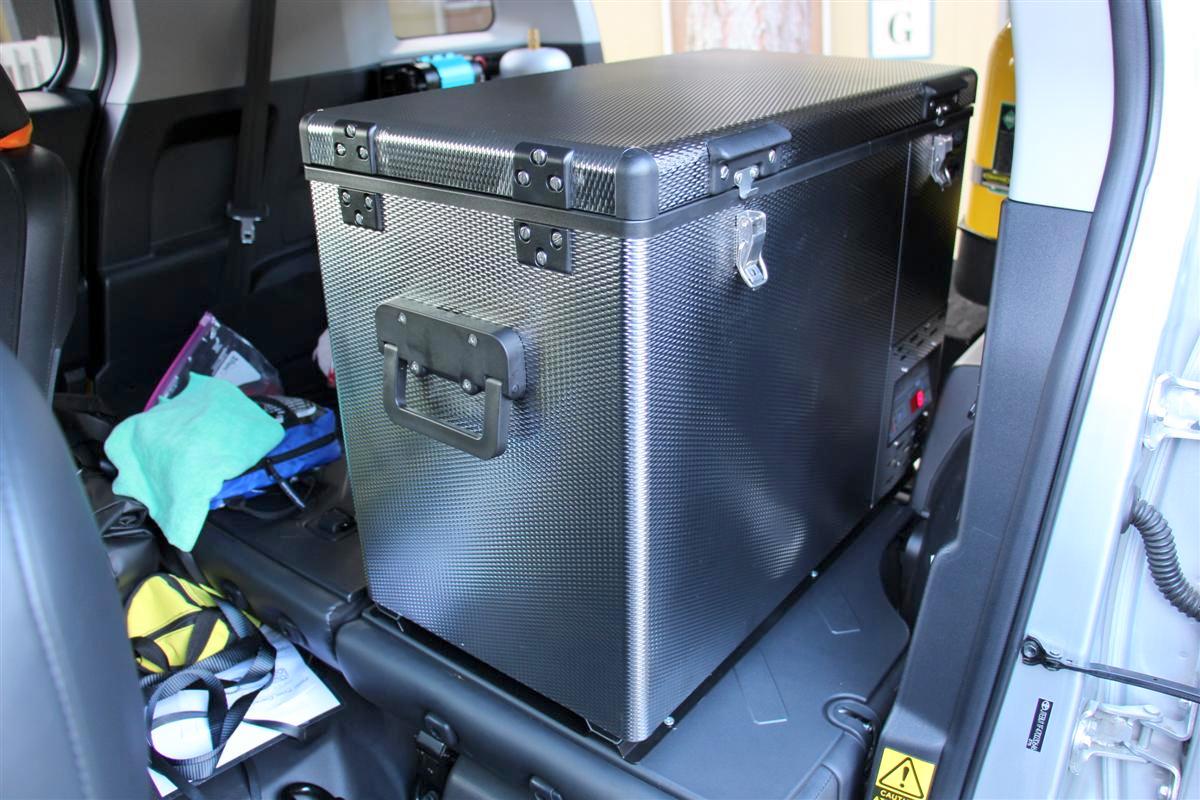
Fridge mounted to the steel plate
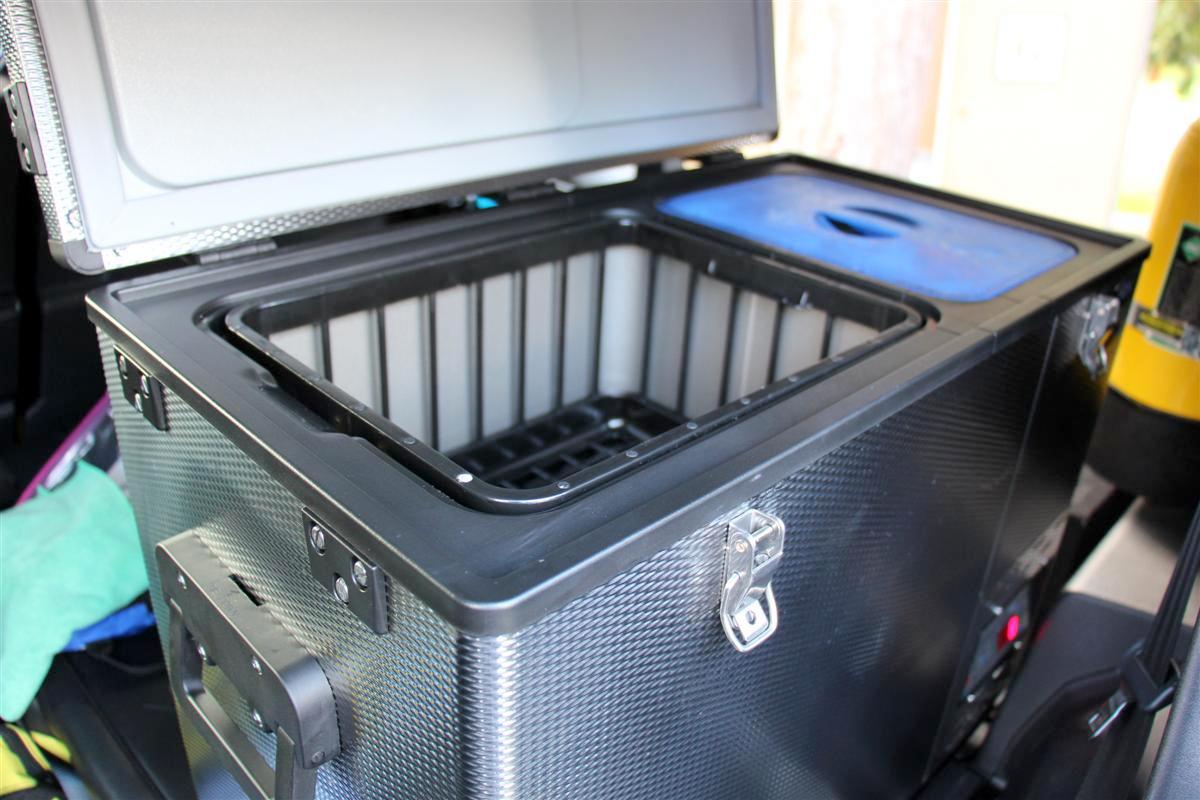
Lid open showing the two compartments
The freezer section has its own lid too since there is only one outer lid on the fridge.
Rear shot showing the LED light in the fridge
If you power off the fridge, the LED light will still work, and some of the LEDs on the control panel will be lit.
To save your battery from draining, unplug the fridge all the way.
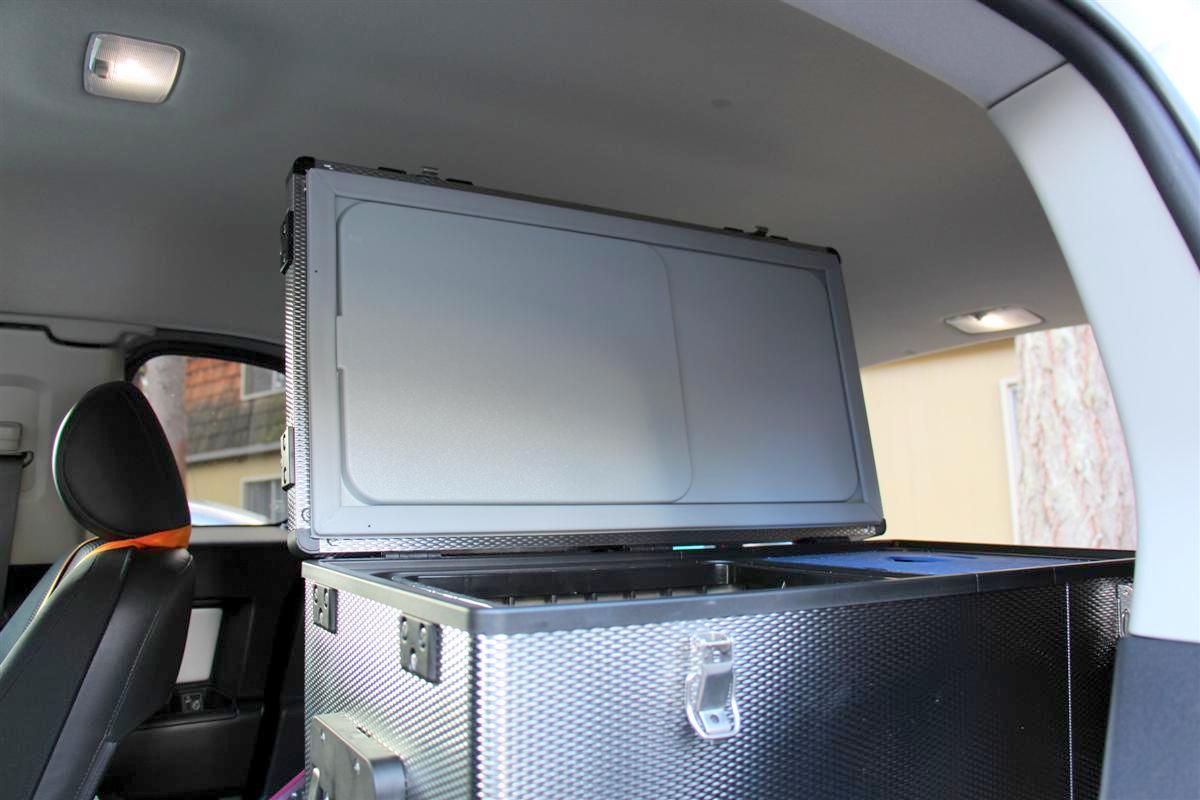
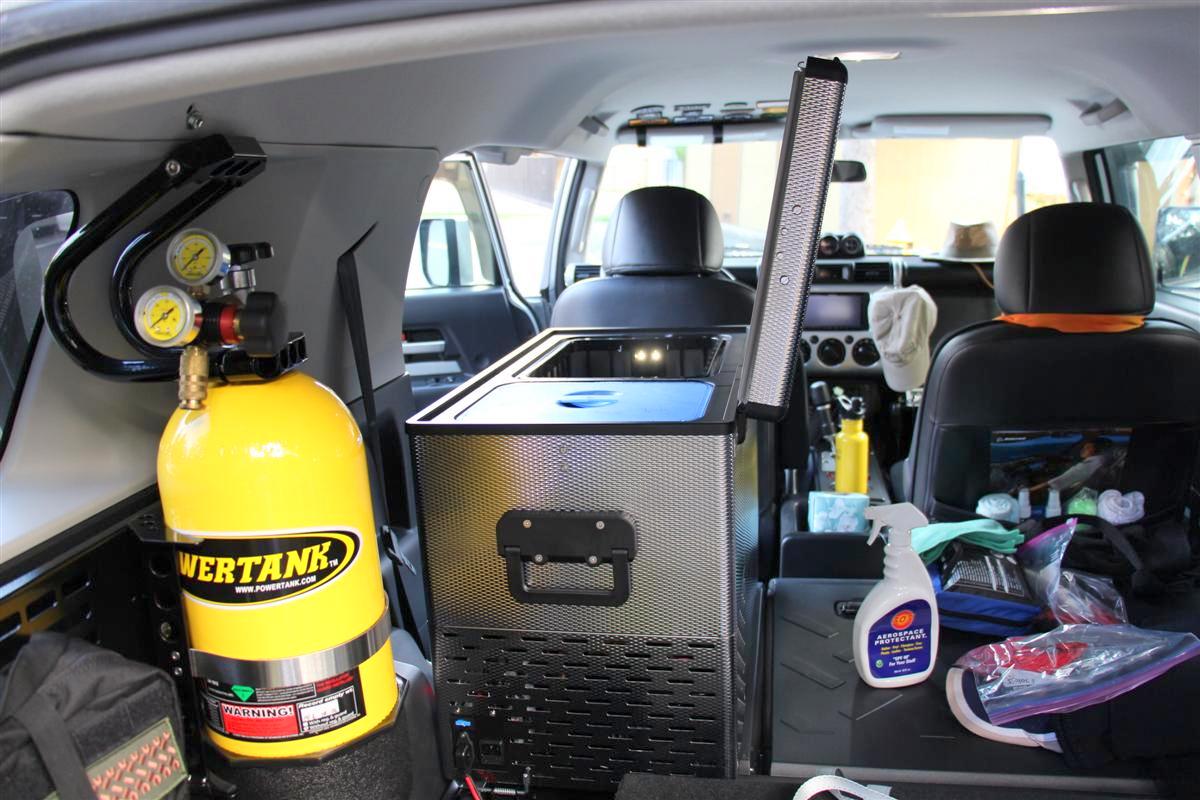
Plenty of room with the lid straight up
I had to mod my old ARB fridge by changing the hinges so the lid would open like this one.
The new ARBs open the log ways, so it would not have opened up all the way.
You can pull the lids off of them, but that is extra work.
Side shot from the passenger side
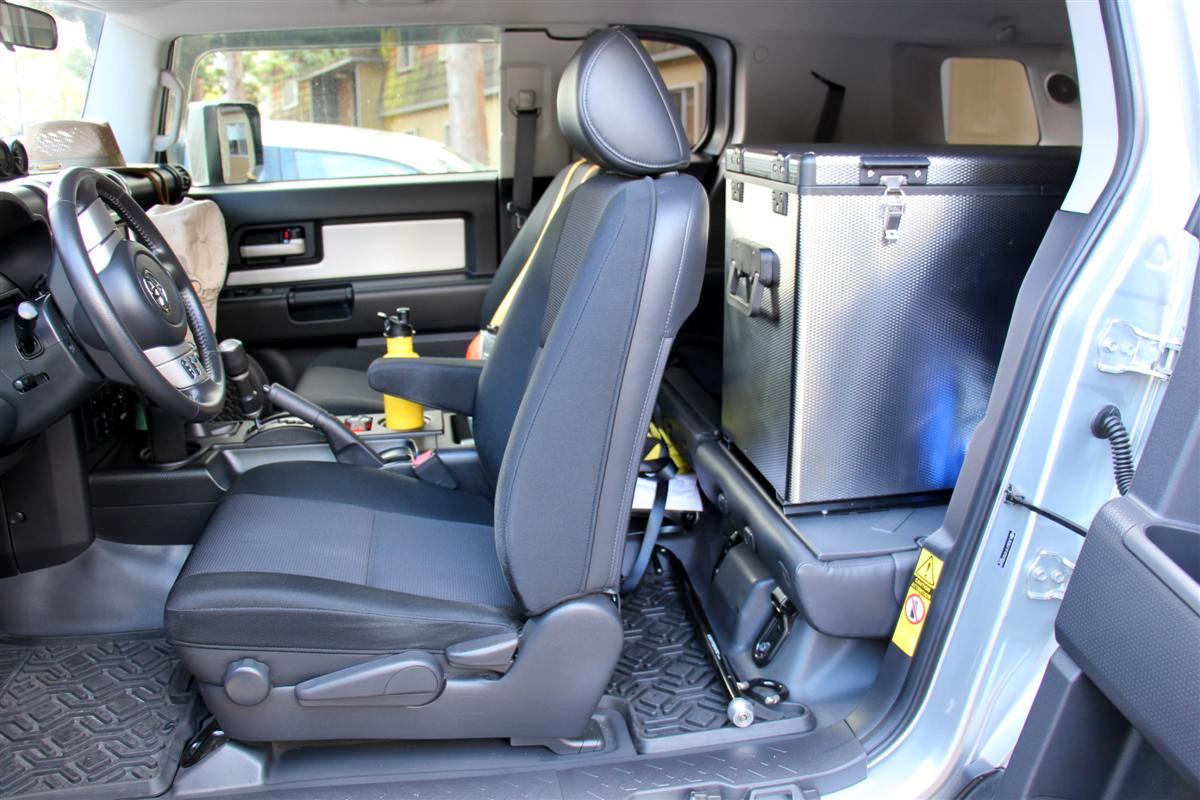
Open door view from drivers side
Videos from YouTube land:
National Luna 50L Fridge Freeze from Paul at Equipt1
National Luna Fridges - How Are They Made?
Why yes I did, since 2007.
But with the ARB fridge you could only use it as a fridge or a freezer, and not both at the same time.
The ARB worked great for camping in fridge mode, and then when we went on just a day run to the mountains I set it to freeze, and I passed out ice cream bars to everyone.
I was all set to upgrade to the newer ARB fridges as it has digital control of the temperature, and a battery cutoff if the battery gets too low.
I had heard of National Luna, but I did not pay too much attention to them.
Then I read an article a few weeks back by Jonathan Hanson of Exploring Overland.
Happy Hour with National Luna
I have a lot of respect for Jonathan and his wife Roseann as they have been into overlanding for quite a long time.
I did the research and watched several YouTube videos which I will embed into my post here later down the thread.
I came to the conclusion if I was going to get a new fridge, it was going to be the dual compartment National Luna Weekender 50.
Now I can have my refrigerated food in one section, and frozen stuff including ice cream bars in another section.
The fridge side has two plastic bins on top of each other, and the freezer section has one deep bin, perfect.
There are a few cons to this fridge, and I will list them now.
* Only Celsius readout, no Fahrenheit reading, but I can use a conversion chart like I did with my older ARB fridge.
* No cigarette lighter style plug, it uses a European/Din style of plug and receptacle, so you will have to install the one supplied and wire it up .
That is all I can think of, I really dig the new fridge.
Paul May at EQuipt1 who I purchased the fridge from recommended not cutting the 12v cord and installing a regular plug, as the one supplied has more metal, thus a stronger current available.
I tapped into my two 12v plugs in the back that Wayne and I installed many years ago.
I used a step drill bit sized at 3/4", and it was the perfect size for the female receptacle supplied with the fridge.
I could not mount it in one of the other 12v receptacle holes as they were about 1" in diameter, hence why I had to drill a new hole.
What I like about the new fridge it has battery management, digital temperature setting, and digital readout of the current temperature.
You use the up/down arrows on the control panel to set the temperature.
If you want it as 3 Celsius, set it to that, and the fridge will power up or power down to that setting, very nice.
Time for the links, pics, and videos I watched.
Links:
National Luna Headquarters in South Africa
The Weekender 50 on Equipt1's site
National Luna Weekender 50-52 Liter Fridge Freezer Mounting Base Plate
Pictures:
Getting to the 12v power
The new plug and receptacle in place
The old Engel fridge mount before I removed it
Sorry, I forgot to take a picture of the new steel mounting plate, so I "borrowed" one from Paul's site
It has four nubs on top that go into the bottom of the fridge, then you slide the fridge towards the drivers seat, and flip those two levers that spring down, and they lock against the aft end of the fridge keeping it in place.
It is not going anywhere, very nice and tight.
Fridge mounted to the steel plate
Lid open showing the two compartments
The freezer section has its own lid too since there is only one outer lid on the fridge.
Rear shot showing the LED light in the fridge
If you power off the fridge, the LED light will still work, and some of the LEDs on the control panel will be lit.
To save your battery from draining, unplug the fridge all the way.
Plenty of room with the lid straight up
I had to mod my old ARB fridge by changing the hinges so the lid would open like this one.
The new ARBs open the log ways, so it would not have opened up all the way.
You can pull the lids off of them, but that is extra work.
Side shot from the passenger side
Open door view from drivers side
Videos from YouTube land:
National Luna 50L Fridge Freeze from Paul at Equipt1
National Luna Fridges - How Are They Made?
09-25-2016, 07:09 AM
#413
I think it is lower once stuff is cold in there.
The old ARB drew around 1.75 amps or so.
Hey, the ARB will be up for sale too, but I cannot ship it.
It will include the Engel fridge mount, 12v and 110v cords, and the two Engel baskets I bought for it that go in the top to keep food at the upper level.
The old ARB drew around 1.75 amps or so.
Hey, the ARB will be up for sale too, but I cannot ship it.
It will include the Engel fridge mount, 12v and 110v cords, and the two Engel baskets I bought for it that go in the top to keep food at the upper level.
09-25-2016, 07:37 AM
#414
I think it is lower once stuff is cold in there.
The old ARB drew around 1.75 amps or so.
Hey, the ARB will be up for sale too, but I cannot ship it.
It will include the Engel fridge mount, 12v and 110v cords, and the two Engel baskets I bought for it that go in the top to keep food at the upper level.
The old ARB drew around 1.75 amps or so.
Hey, the ARB will be up for sale too, but I cannot ship it.
It will include the Engel fridge mount, 12v and 110v cords, and the two Engel baskets I bought for it that go in the top to keep food at the upper level.
i have already wired a dedicated circuit to the rear of the 4Runner for a fridge.
10-08-2016, 12:50 PM
#416
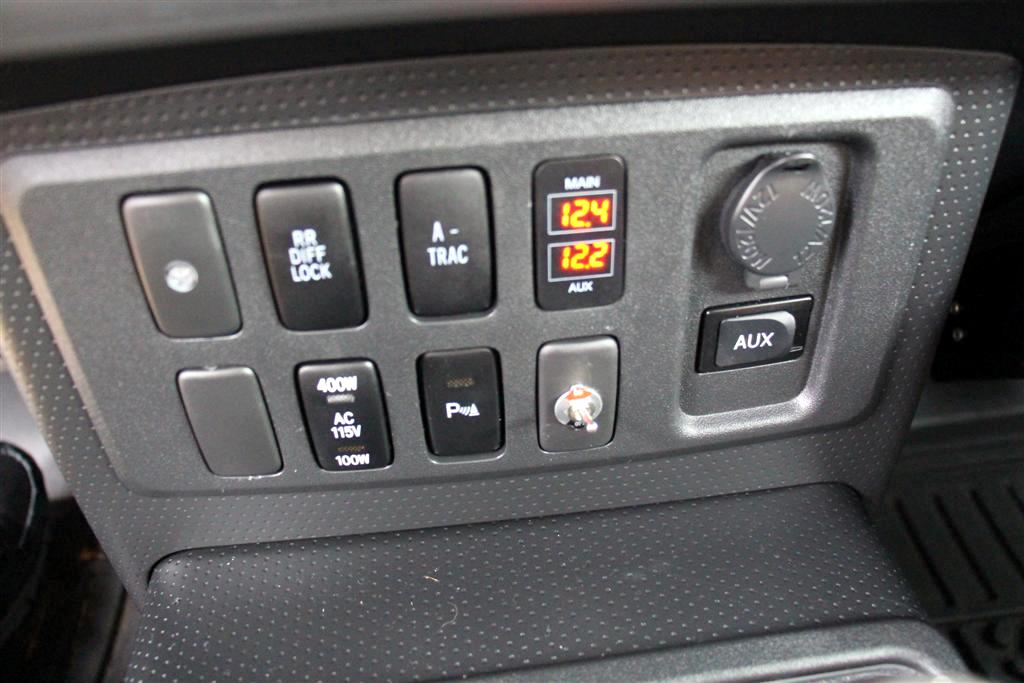
Solid Kit Dual Battery Volt Meter Installed 10-8-2016, And Fridge Wiring Updated
Saw this dual battery meter for Toyotas in a solar panel thread on Expedition Portal I am subscribed too, and I knew I was going to get one.
These are from Australia, so they take about three weeks to get once you make your PayPal transaction with them.
The price on their site is in Oz bucks, but PayPal converts it for you at checkout, and it came in a lot less than the Oz price.
This is a very cool way to keep an eye on your dual battery voltages, and there are several ways to wire it up.
I opted to have Car Toys wire in a toggle switch on the ground side.
They did not have switches that would go into the Toyota dash blanks, so I had them temp install the switch directly below the new battery meter.
Later on I will pick up a rocker switch that goes into the Toyota blank there, and it will look much better than having the toggle there like it is now.
Links:
Dual Battery Volt Meter Toyota Prado 120, FJ Cruiser, Landcruiser 100, 79 Series, Hilux and More
A few pictures:
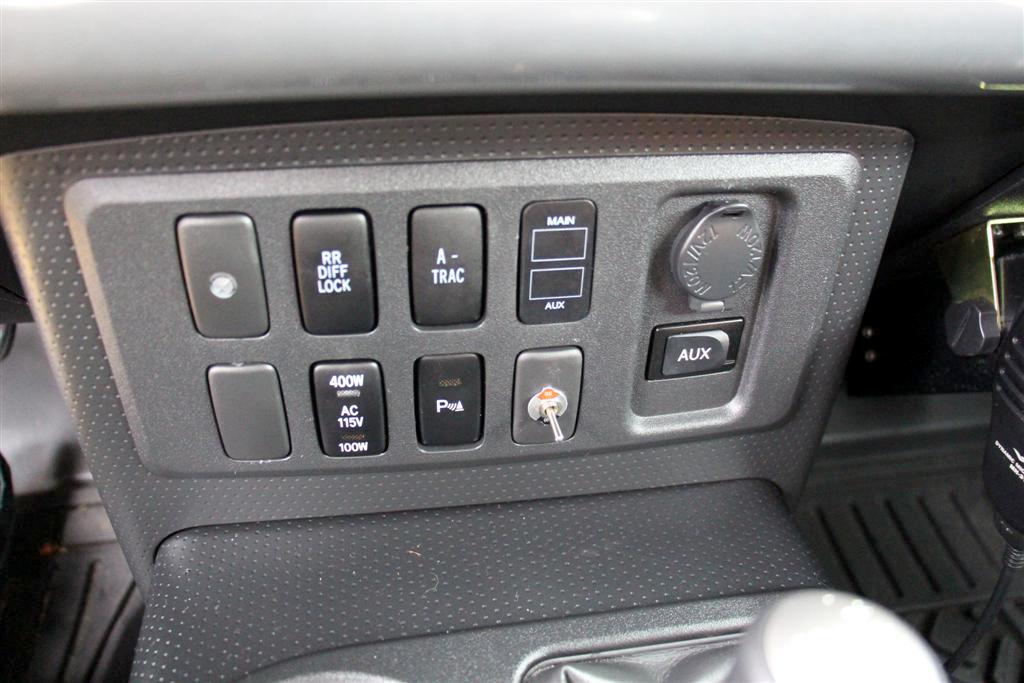
Toggle turned off, LED meter is off
Vehicle is turned off, voltages are a little over 12v with no engine running
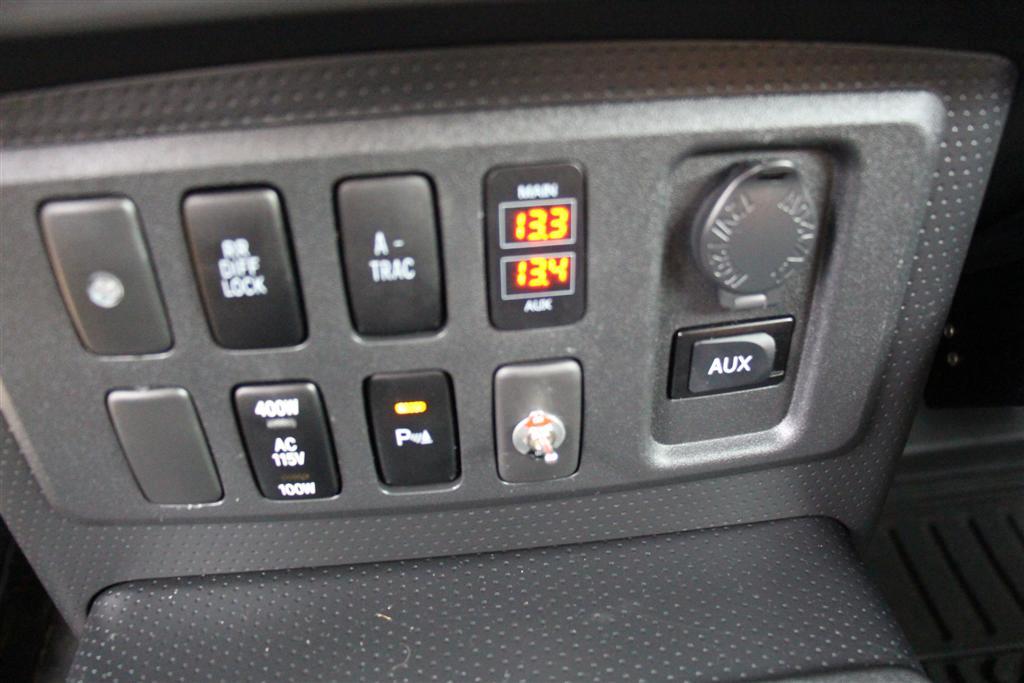
Engine running, voltages for both batteries higher
It was hard to capture the voltages, as when viewing them on the LCD screen of my Cannon Rebel T5i camera, they were flickering.
Also with the big lens on my camera, stuff up close gets out of focus, and I had it set to macro too.
I am sure it is 99.9% operator error
I also had Car Toys run 8 gauge stereo amp wire from my National Luna plug I installed in the rear for my new fridge straight to the Optima auxiliary battery with a stereo 15 amp fuse holder located near the battery.
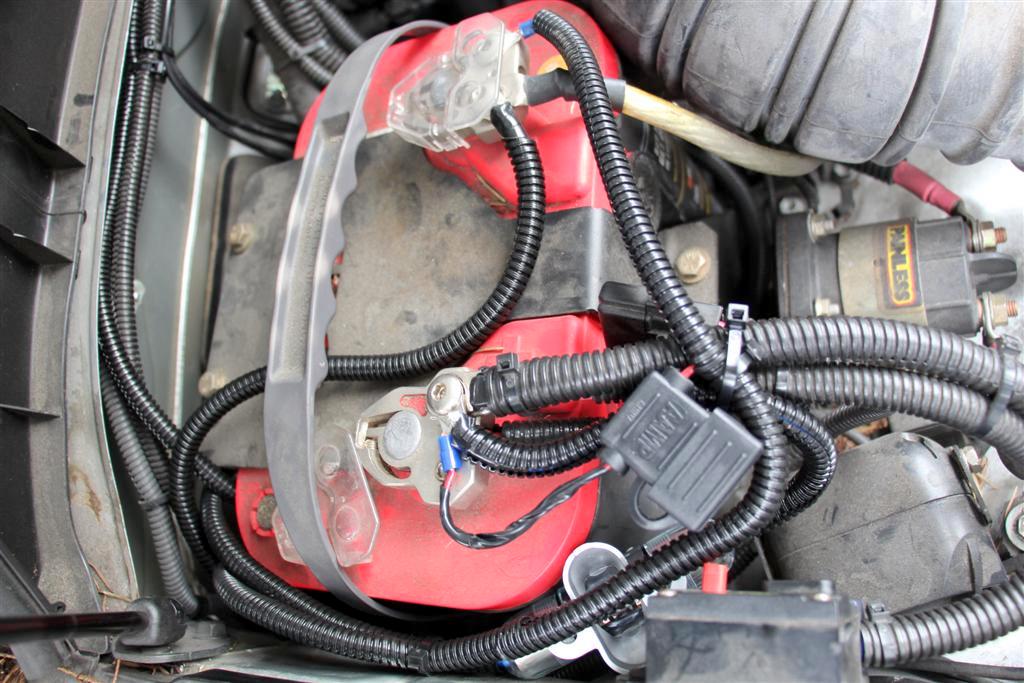
Plastic stereo fuse holder can be seen at the bottom edge of the picture underneath the black wireloom, and it has a 15 amp fuse in it
The small black fuse holder above it is for the dual battery meter, and it contains a 10 amp fuse
I did not snag a picture of the battery meter wiring to the stock Toyota battery.
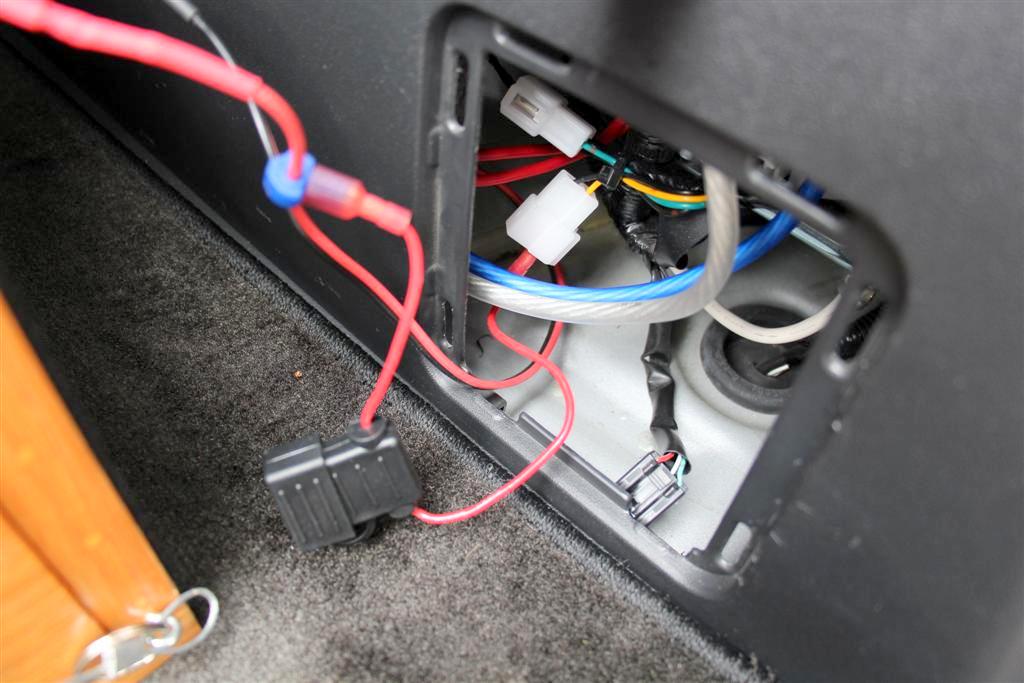
Cover off of my two 12v outlets showing the big 8 gauge wire for the fridge
Blue is hot, gray is the ground.
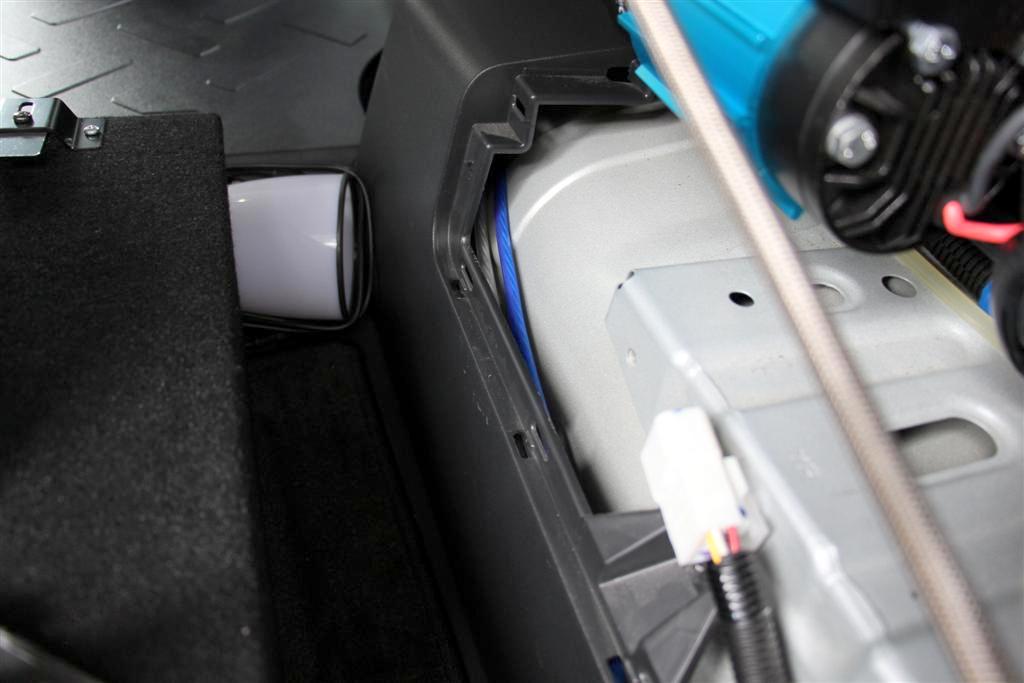
Other cover off below the ARB twin compressor showing the new fridge wire
I should have another mod to report tomorrow, it has something to do with a beaver, but I am not done with it yet.
These are from Australia, so they take about three weeks to get once you make your PayPal transaction with them.
The price on their site is in Oz bucks, but PayPal converts it for you at checkout, and it came in a lot less than the Oz price.
This is a very cool way to keep an eye on your dual battery voltages, and there are several ways to wire it up.
I opted to have Car Toys wire in a toggle switch on the ground side.
They did not have switches that would go into the Toyota dash blanks, so I had them temp install the switch directly below the new battery meter.
Later on I will pick up a rocker switch that goes into the Toyota blank there, and it will look much better than having the toggle there like it is now.
Links:
Dual Battery Volt Meter Toyota Prado 120, FJ Cruiser, Landcruiser 100, 79 Series, Hilux and More
A few pictures:
Toggle turned off, LED meter is off
Vehicle is turned off, voltages are a little over 12v with no engine running
Engine running, voltages for both batteries higher
It was hard to capture the voltages, as when viewing them on the LCD screen of my Cannon Rebel T5i camera, they were flickering.
Also with the big lens on my camera, stuff up close gets out of focus, and I had it set to macro too.
I am sure it is 99.9% operator error
I also had Car Toys run 8 gauge stereo amp wire from my National Luna plug I installed in the rear for my new fridge straight to the Optima auxiliary battery with a stereo 15 amp fuse holder located near the battery.
Plastic stereo fuse holder can be seen at the bottom edge of the picture underneath the black wireloom, and it has a 15 amp fuse in it
The small black fuse holder above it is for the dual battery meter, and it contains a 10 amp fuse
I did not snag a picture of the battery meter wiring to the stock Toyota battery.
Cover off of my two 12v outlets showing the big 8 gauge wire for the fridge
Blue is hot, gray is the ground.
Other cover off below the ARB twin compressor showing the new fridge wire
I should have another mod to report tomorrow, it has something to do with a beaver, but I am not done with it yet.
10-16-2016, 12:05 PM
#417
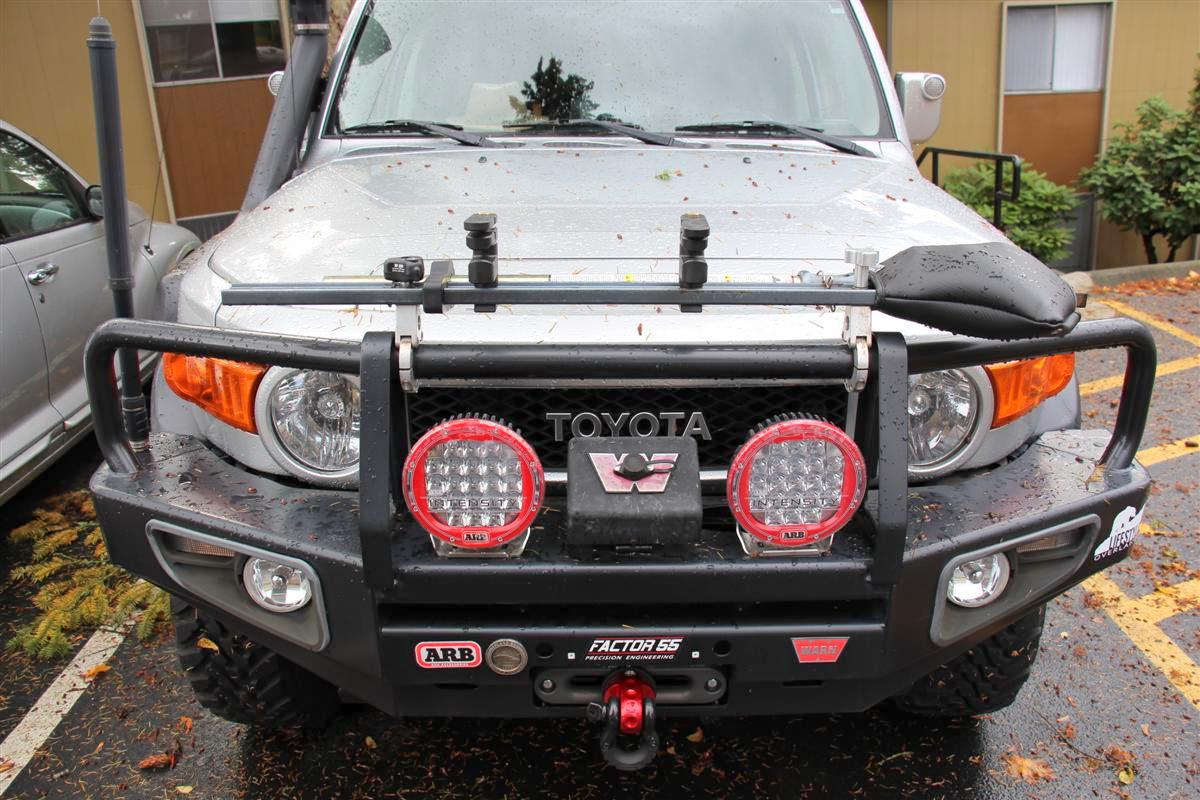
Bomber Products Shove-Lock & Krazy Beaver Shovel Installed 10-16-2016
I have had my Hi-Lift on my front ARB bumper for quite sometime now.
Recently Bomber Products released a mount for attaching a shovel to your Hi-Lift, and I snagged one up.
I also snagged up one of the Krazy Beaver shovels, also known as a Killer Spork from the way it looks.
I have had the Hi-Lift Handle-All for eons, it is a handle that you can attach a sledge hammer, pick-ax, and a shovel to it, and it all stores in a nice bag behind my drivers seat.
But I wanted a dedicated shovel with a little more heft, and the Krazy Beaver caught my eye when viewing it awhile back.
Joshua of Bomber Products is on a few forums out there, and a Toyota guy too.
Joshua also carries the Krazy Beaver shovel, but I had bought mine directly from Krazy Beaver.
This will not be on full time, only when going off road perhaps.
Going to test it for rattles though on my way into work tomorrow.
Links:
Bomber Products
Shove-Lock
Krazy Beaver Tools
Krazy Beaver shovel, the model I bought
A few pictures:
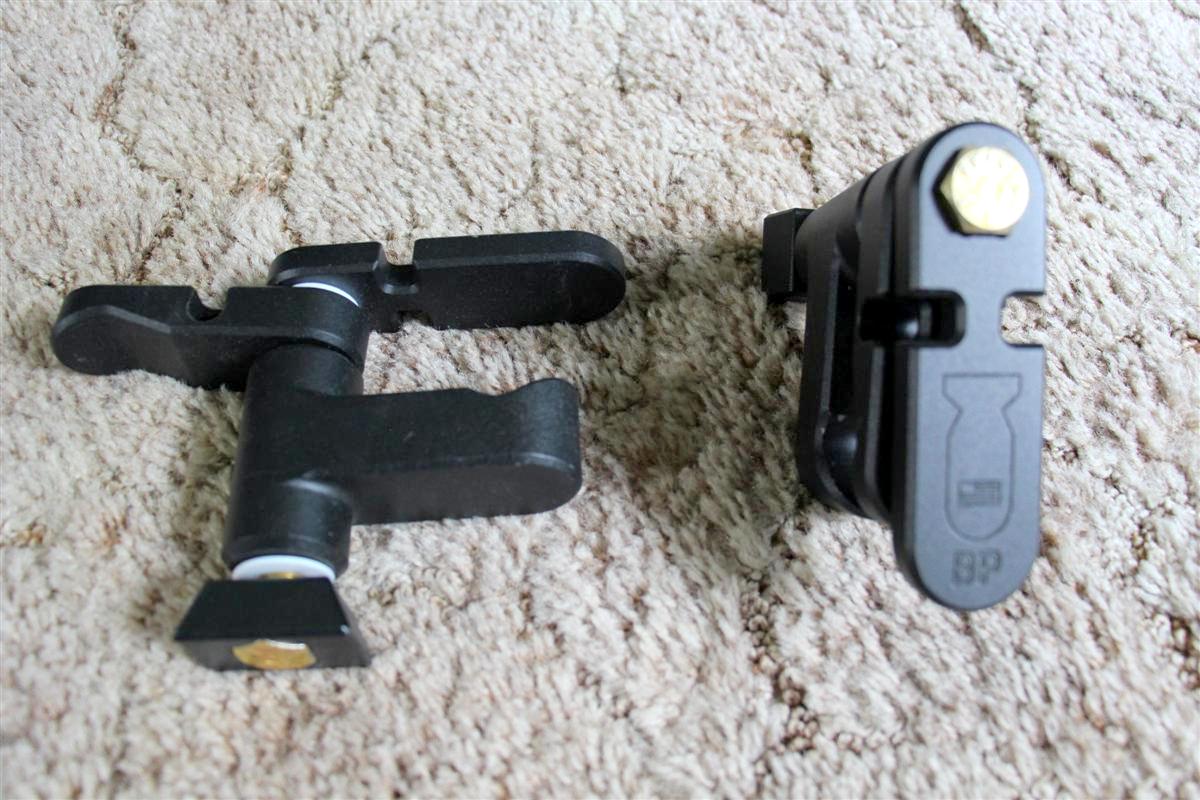
Parts laid out on floor
Mounts on the Hi-Lift, I had to use big lock washers on top of the bolt where it protrudes out of the hole on the jack, this was to make the product point out straight when tightened
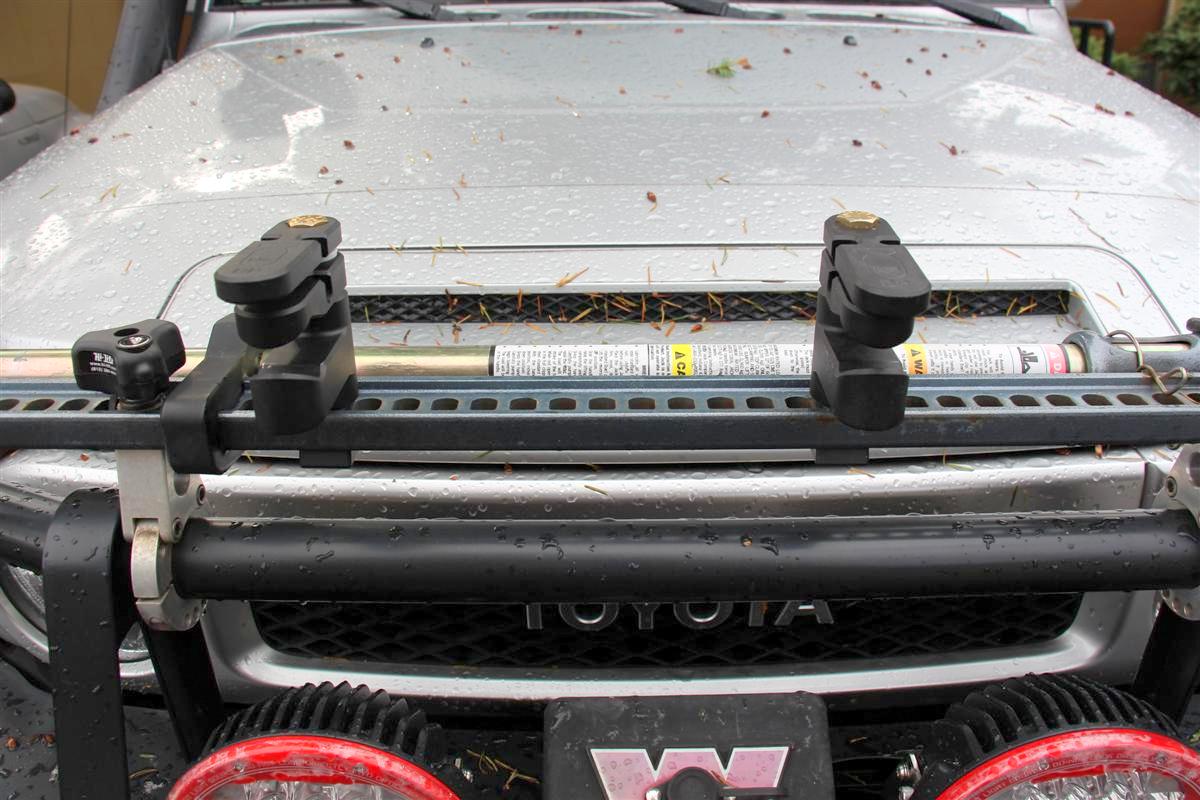
Close-up of mounts, and yes, rig is dirty from the storm we had
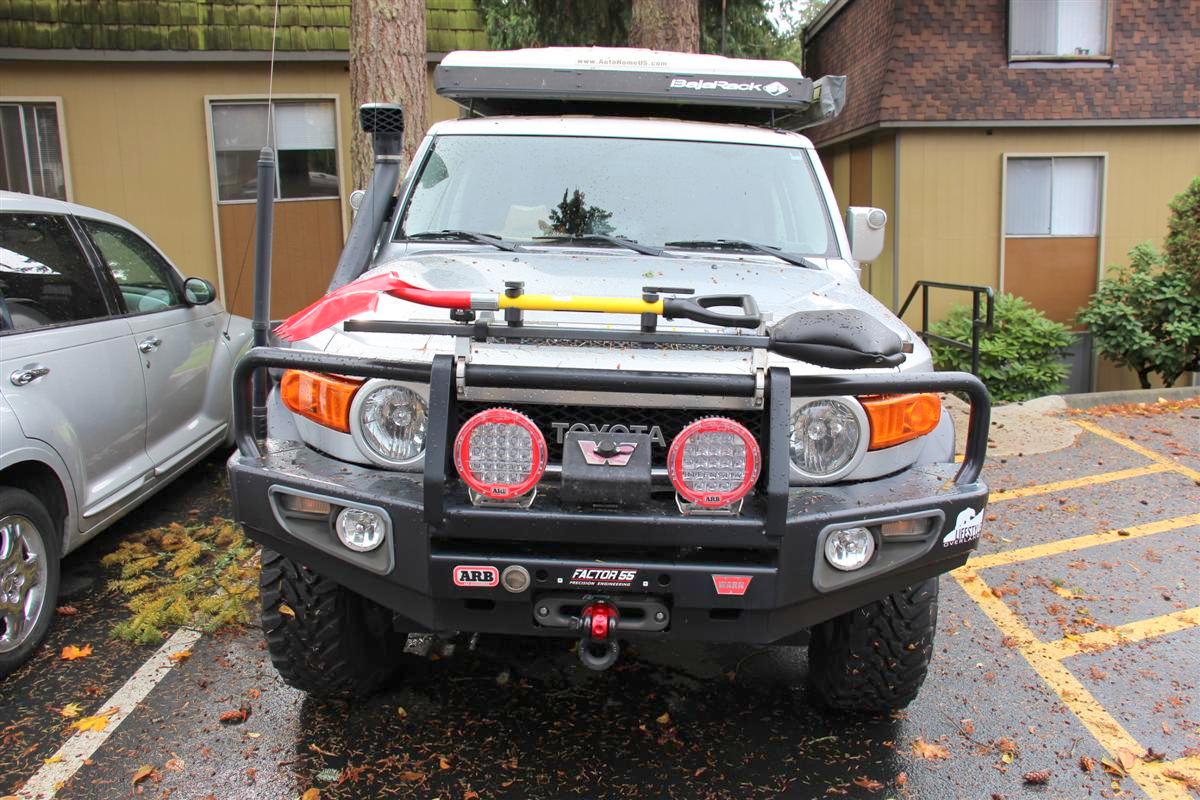
The Beaver mounted up, I may full around at a later date with its position
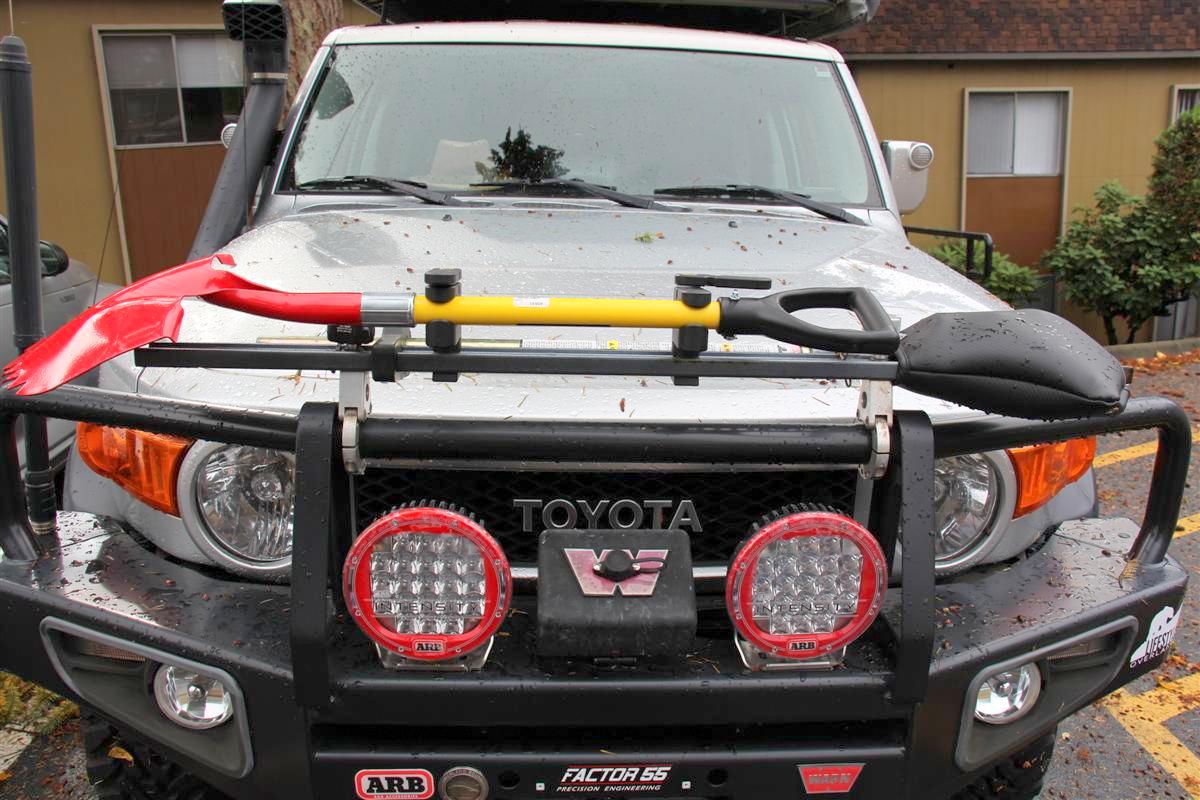
The Beaver close-up
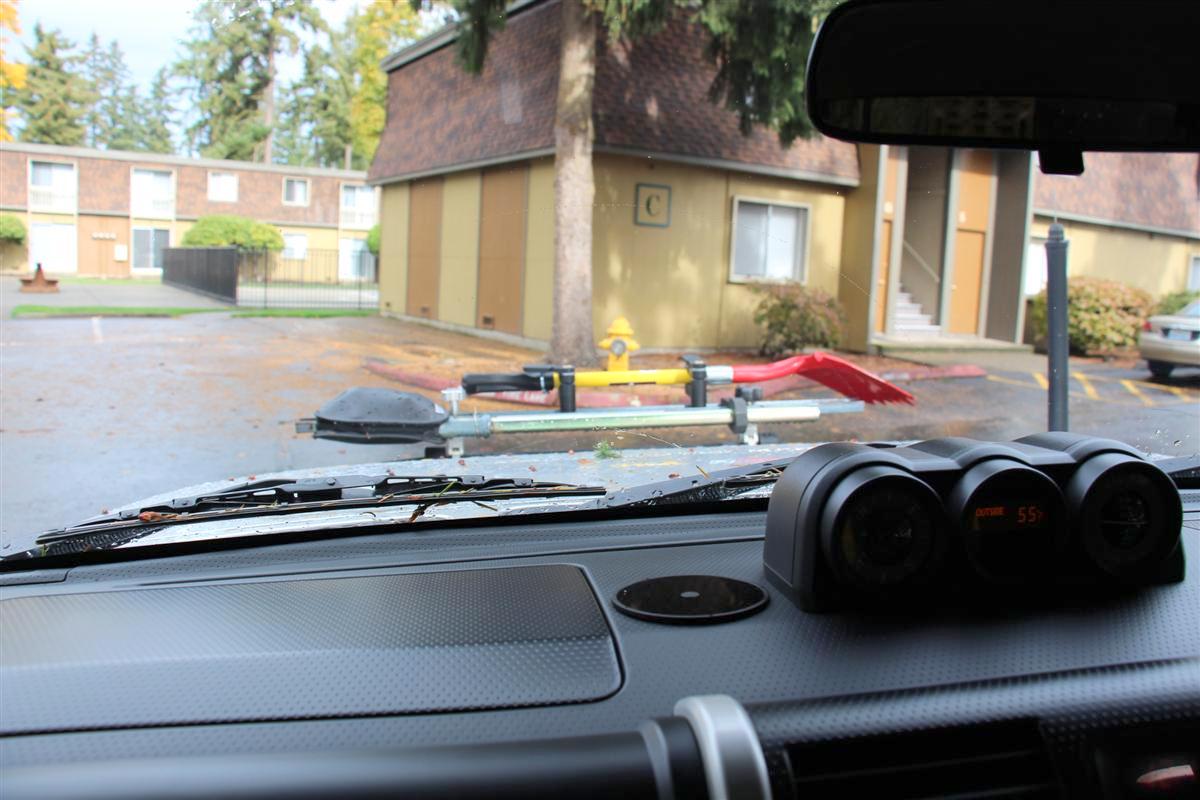
Inside the cab view, and not bad, I can see clearly over the hood
Recently Bomber Products released a mount for attaching a shovel to your Hi-Lift, and I snagged one up.
I also snagged up one of the Krazy Beaver shovels, also known as a Killer Spork from the way it looks.
I have had the Hi-Lift Handle-All for eons, it is a handle that you can attach a sledge hammer, pick-ax, and a shovel to it, and it all stores in a nice bag behind my drivers seat.
But I wanted a dedicated shovel with a little more heft, and the Krazy Beaver caught my eye when viewing it awhile back.
Joshua of Bomber Products is on a few forums out there, and a Toyota guy too.
Joshua also carries the Krazy Beaver shovel, but I had bought mine directly from Krazy Beaver.
This will not be on full time, only when going off road perhaps.
Going to test it for rattles though on my way into work tomorrow.
Links:
Bomber Products
Shove-Lock
Krazy Beaver Tools
Krazy Beaver shovel, the model I bought
A few pictures:
Parts laid out on floor
Mounts on the Hi-Lift, I had to use big lock washers on top of the bolt where it protrudes out of the hole on the jack, this was to make the product point out straight when tightened
Close-up of mounts, and yes, rig is dirty from the storm we had
The Beaver mounted up, I may full around at a later date with its position
The Beaver close-up
Inside the cab view, and not bad, I can see clearly over the hood
10-17-2016, 03:35 AM
#418
The drive into work today my vision was not compromised, can hardly tell the shovel is there really, as it is not much higher than the Hi-Lift.
If I did not have a roof top tent, the Hi-Lift and shovel would be on the back of the rack like I use to run it years ago.
If I did not have a roof top tent, the Hi-Lift and shovel would be on the back of the rack like I use to run it years ago.


