Corey's 2007 FJ Cruiser Build-Up Thread
 06-20-2016, 01:56 PM
#381
Doh!
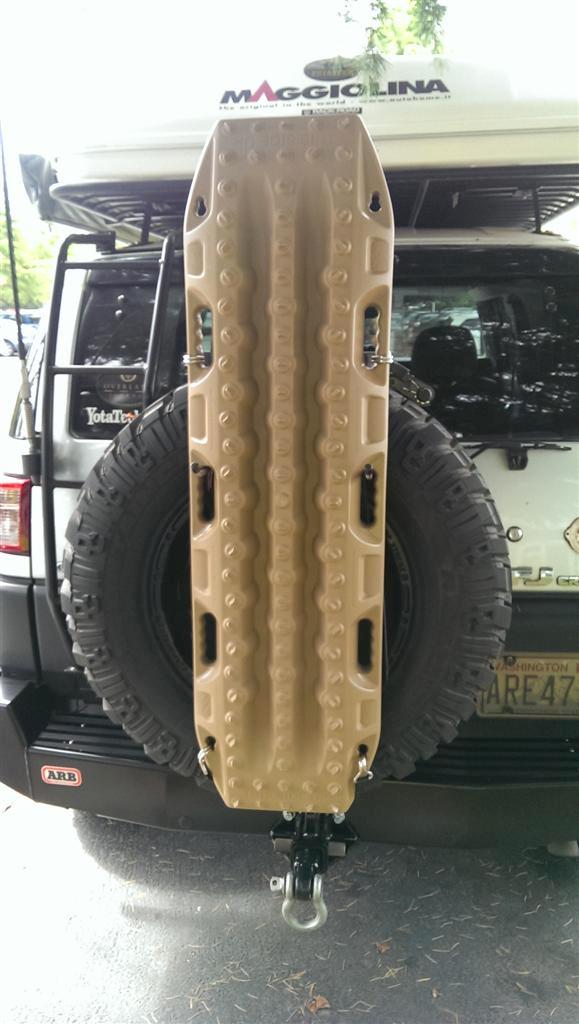
I had the top hooks in the middle handles, and they needed to be in the top handles.
Problem rectified at work today.
I could have sworn the instructions said to use the middle handles, but I goofed
Now in the correct handles, and this will secure them maybe a little better, not really sure if it makes that much of a difference, but best to do it the way they say.
The spare tire mount for the Maxtrax is rock solid, they are not going anywhere.
Speaking of that, I best throw a cable lock through them and a hole in the wheel, or these may end up walking during the middle of the night.
 07-05-2016, 01:59 PM
#382
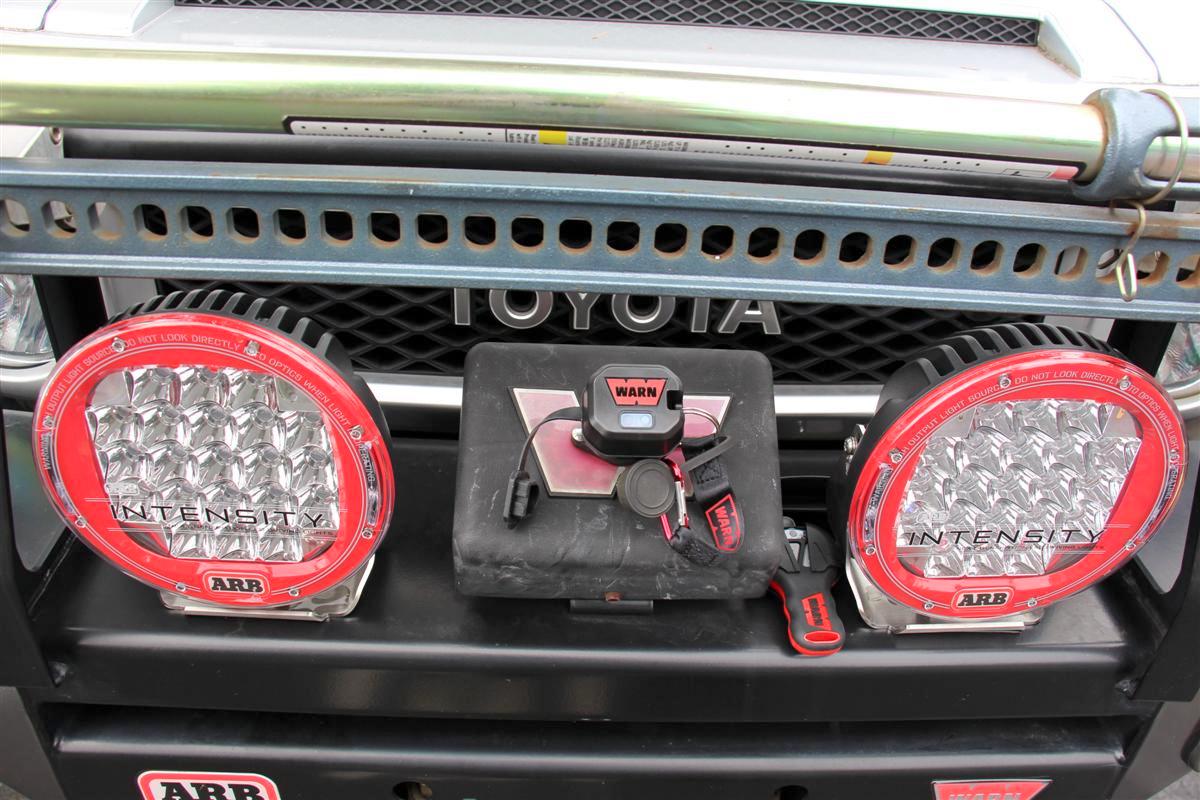
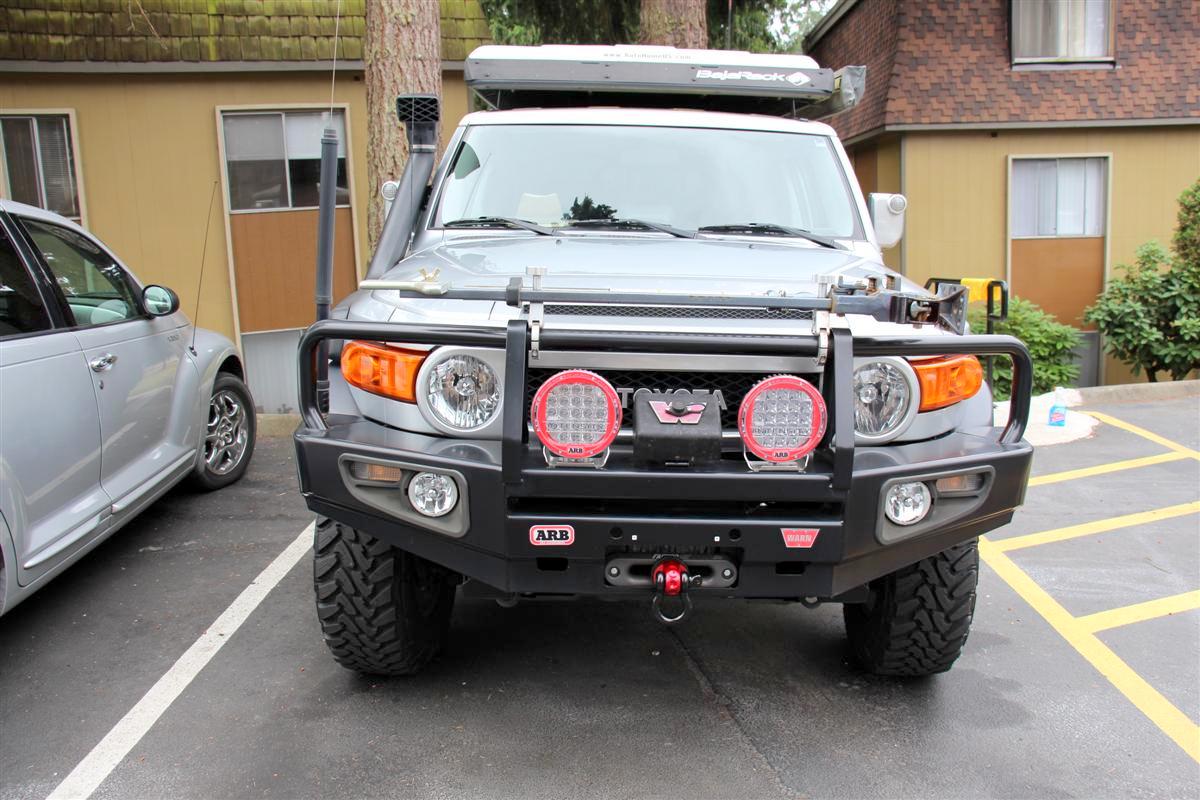
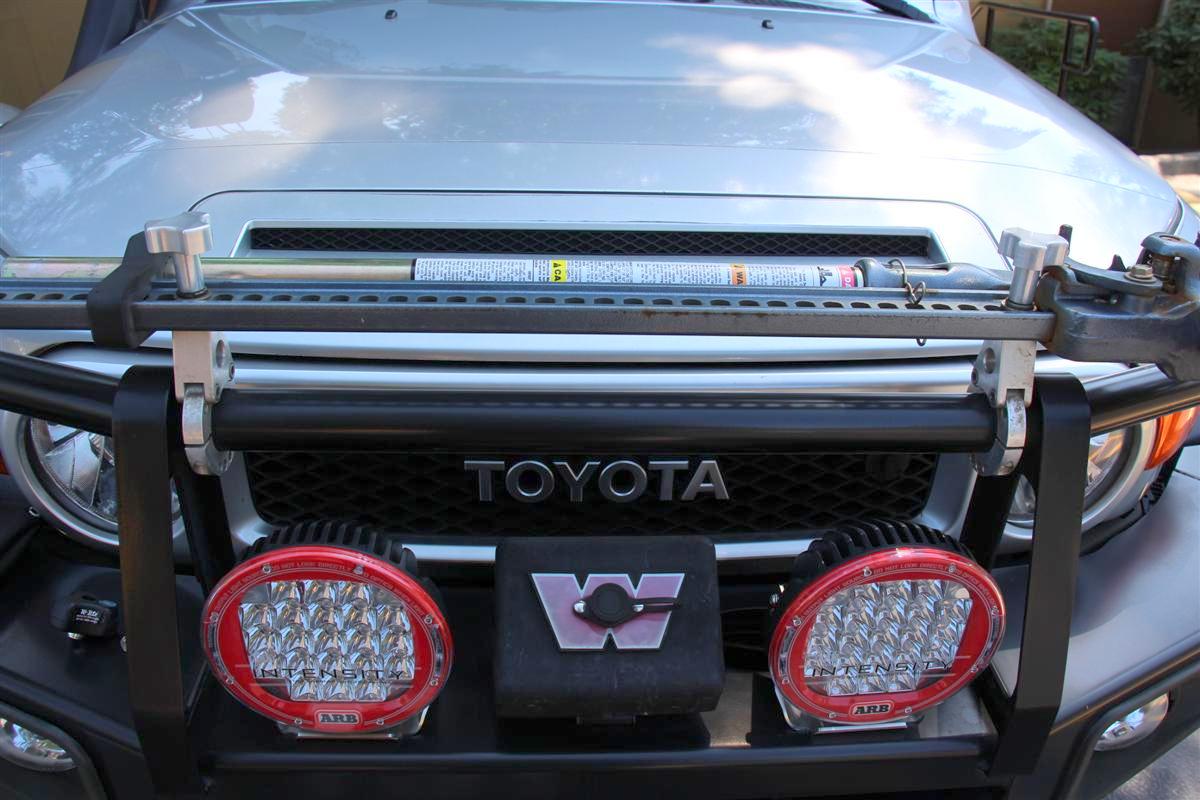
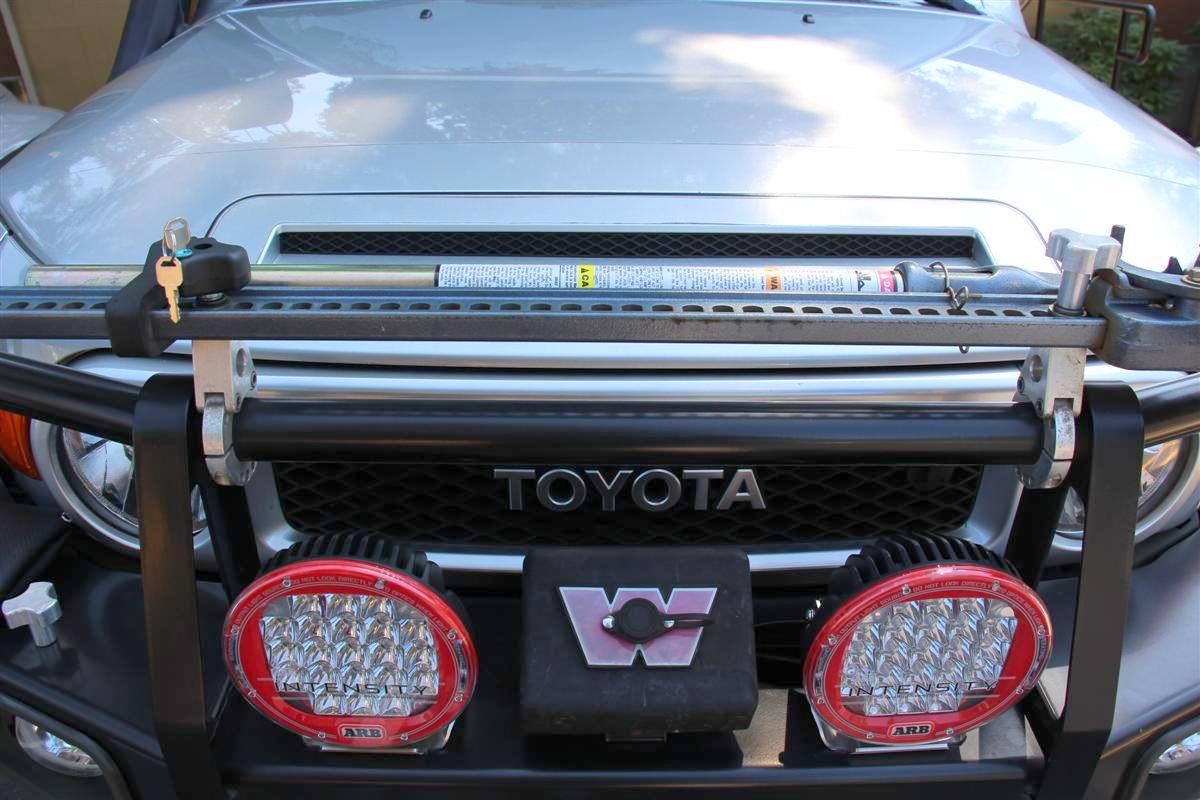
ARB Intensity LED Lights Installed 7-5-2016
I ran two sets of Hella 500s on my old '91 4Runner, but never got around to getting some decent off road lighting for the FJ until I saw John owner of Auburn Car Repair & Offroad when I went in awhile back for my body mount chop as my tires were rubbing against it.
The Hellas never impressed me that much, but they were older technology.
Enter the high quality LED lighting of today, and these ARB lights are very bright and high quality.
These are not built in Australia like most of ARB products, but built in the USA by Rigid.
ARB partnered up with Rigid Lighting to make these awesome lights.
Here is a video from ARB, and there are many other on YouTube of these lights.
On with some pics, and if I get time I will try and shoot a video of my own showing how bright these puppies are.
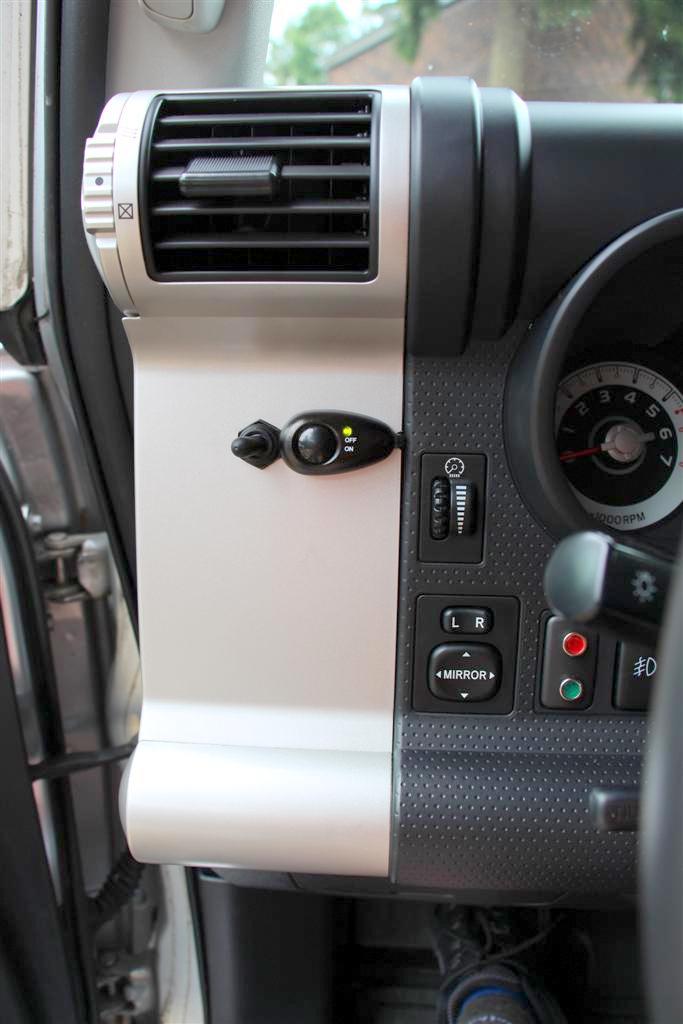
Light switch lights up green when the ignition key is on
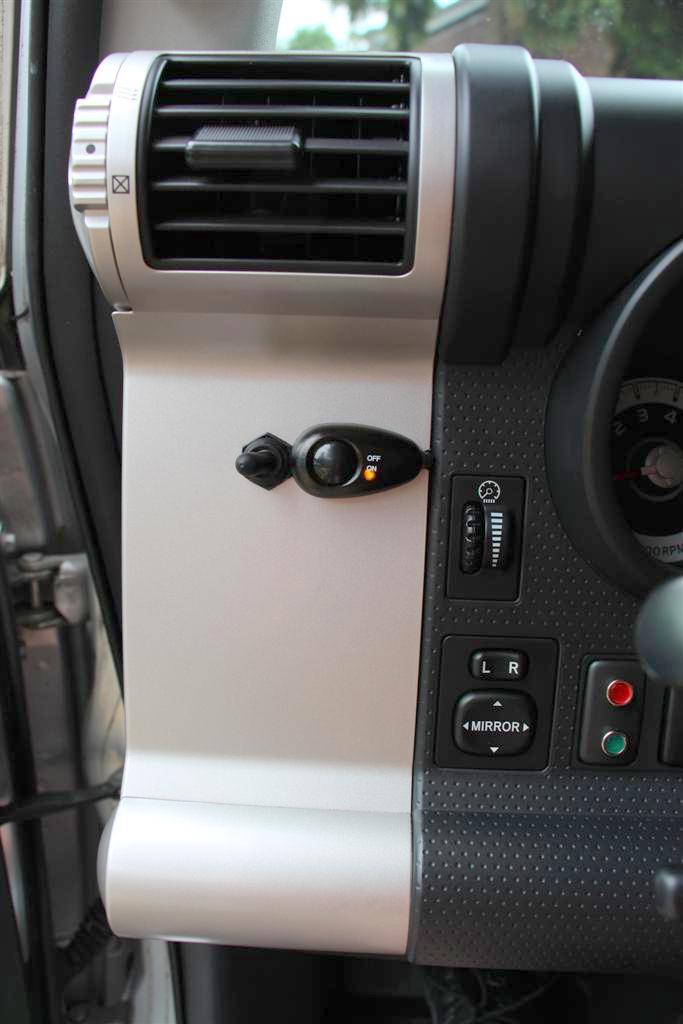
Light switch lights up amber when the ARB lights are turned on
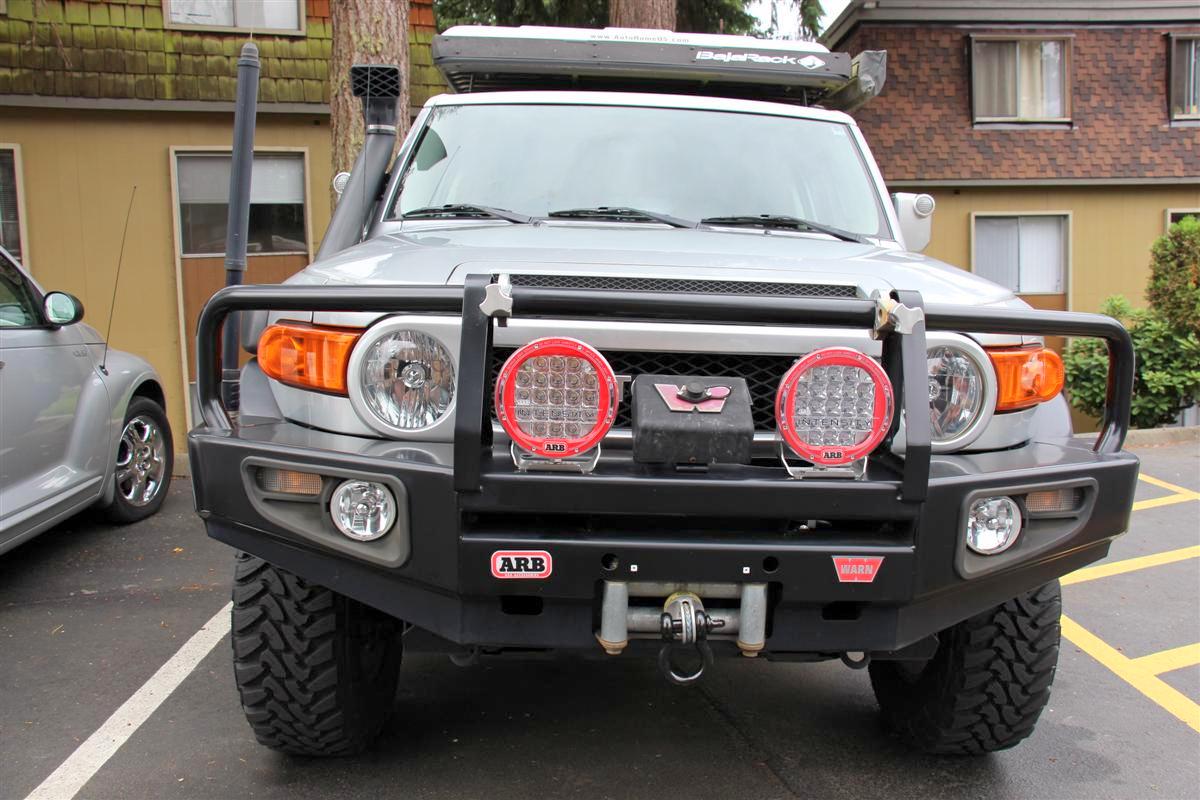
Lamps off, boy those are big, and they make a 9" lens version too
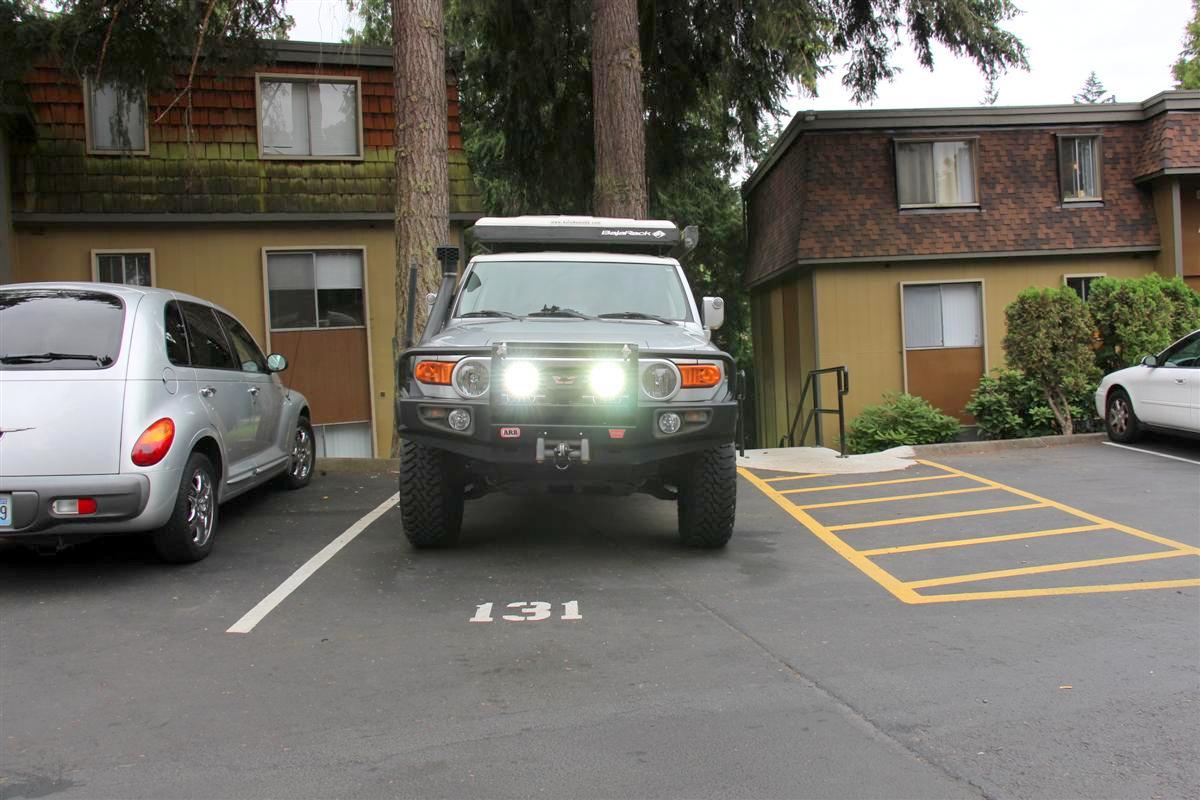
ARBs on, headlights off
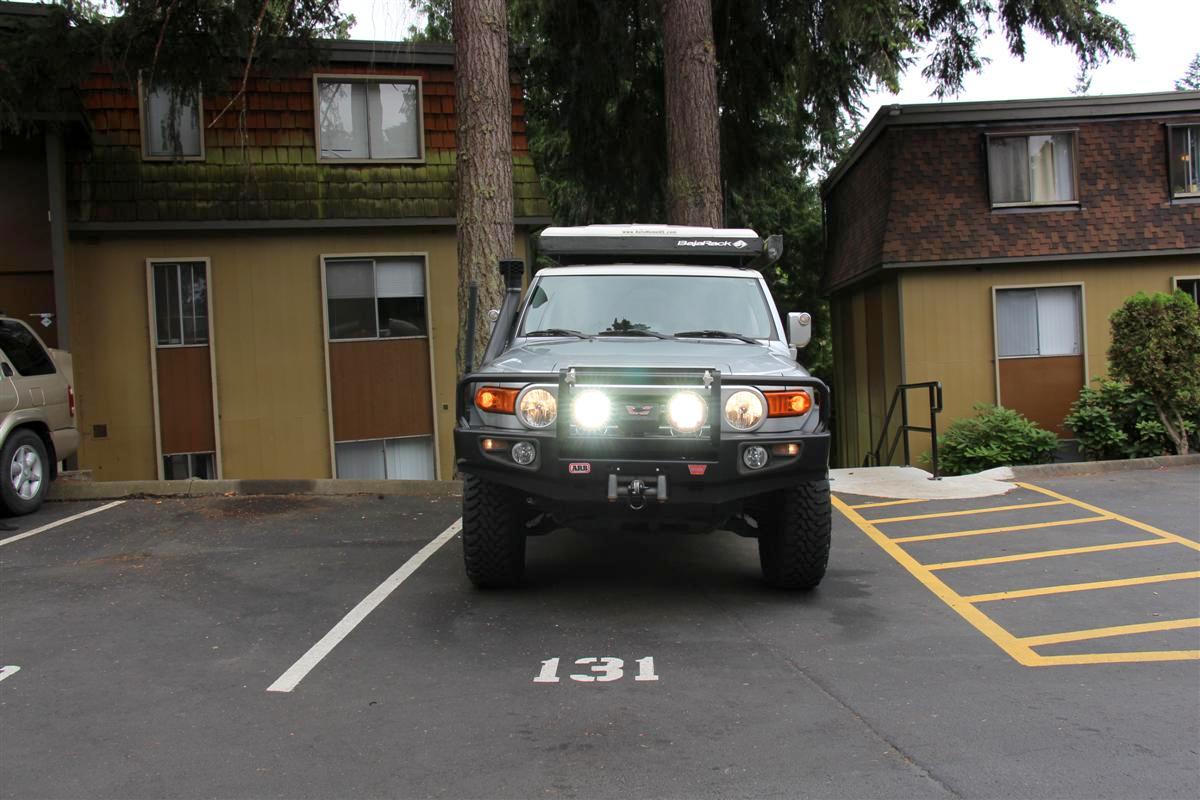
ARBs and low beams on
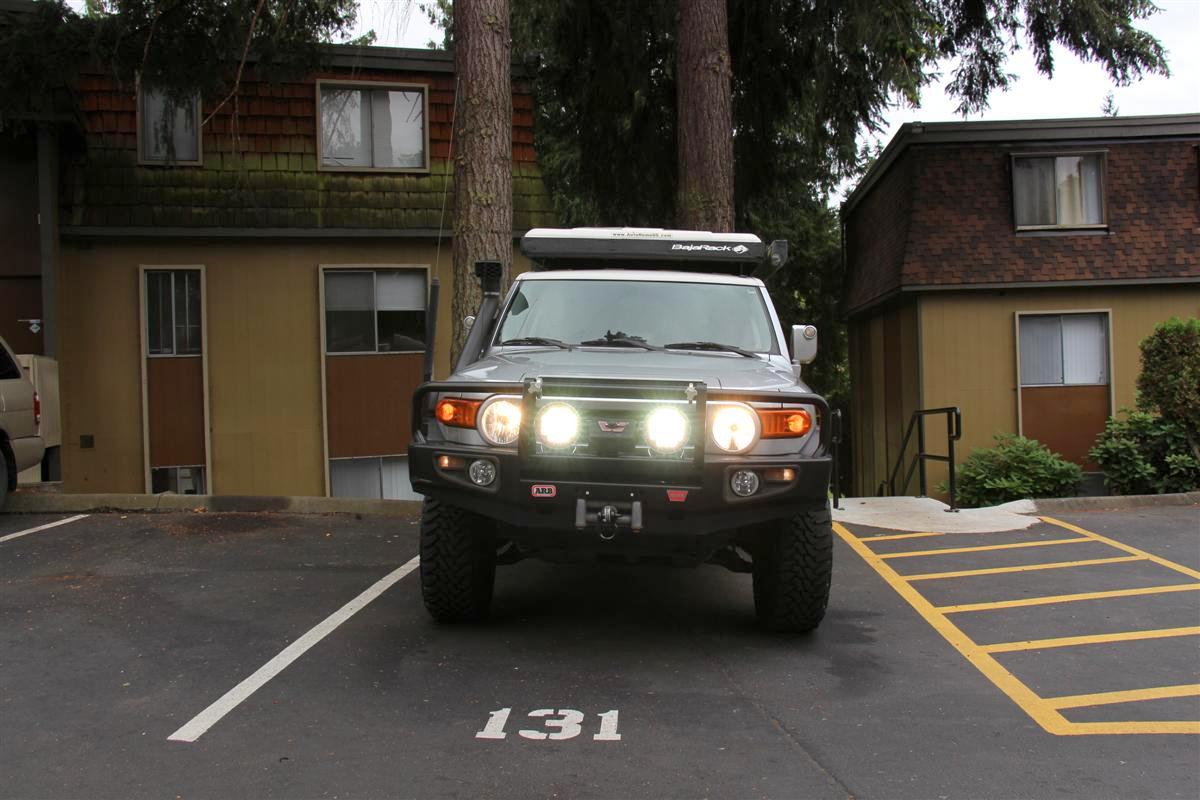
ARBs and high beams on
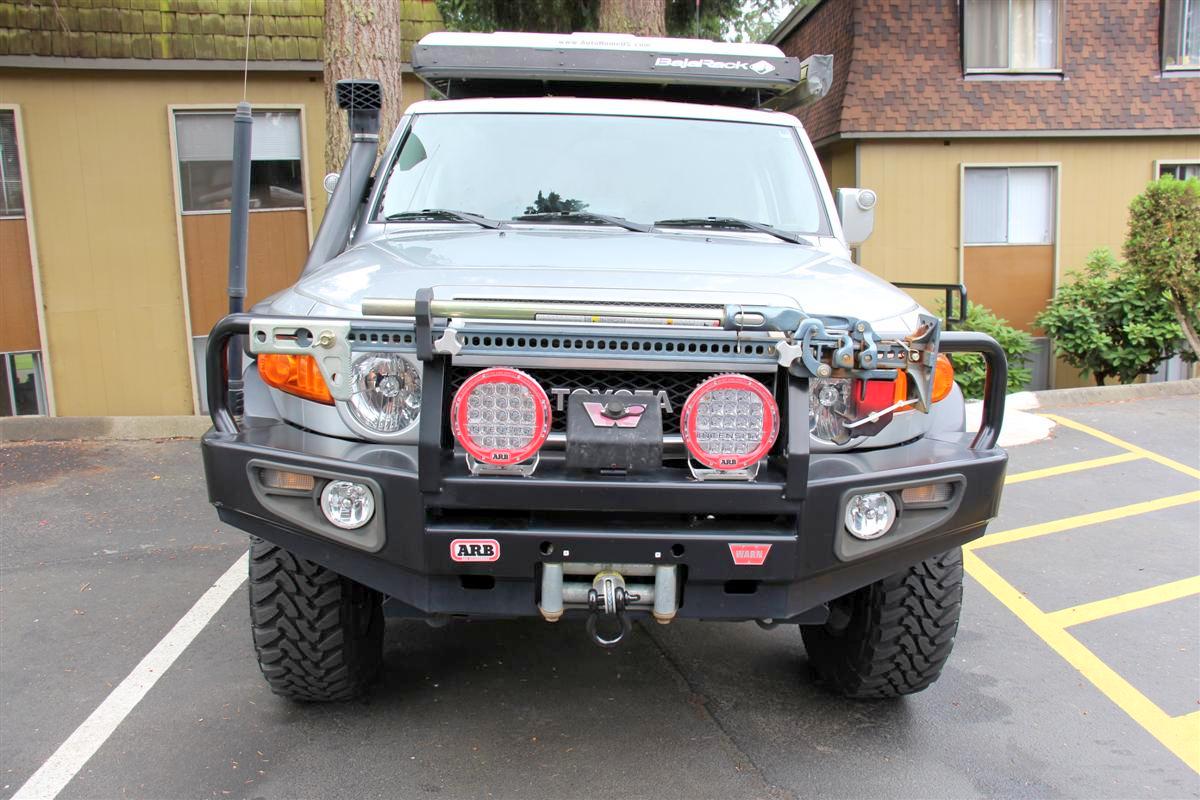
I pulled my Hi-Lift jack from its Four Trek's mounts on the bumper to give the tech more room to work, and after putting it back on, it does not cover the new lights at all
I brought a few extra switches with me, but after mulling it over I decided to go with the stock switch.
Also instead of having the switch installed down in the switch cluster on the console, I also decided to have the switch where it is to be able to get to it faster.
John the owner of the shop has his wired so they only come on with the high beams, but I wanted mine wired up so they could come on anytime the ignition switch was energized.
This way too I cannot leave them on accidentally when I turn the key off.
They aimed them for me too at the shop.
Drivers side is a spot, and the passenger side s the flood.
Tomorrow morning at zero dark thirty I will be able to test them out on a long stretch of road on my way into work that has no street lighting.
That is if there is no oncoming traffic.
The pics do not do these justice, as they are blinding to look at.
Links:
ARB Intensity 7" LED Driving Lights - Flood Beam (AR21F)
ARB Intensity 7" LED Driving Lights -Spot Beam (AR21S)
ARB Intensity LED Wire Loom (3500520)
Auburn Car Repair & Offroad
The Hellas never impressed me that much, but they were older technology.
Enter the high quality LED lighting of today, and these ARB lights are very bright and high quality.
These are not built in Australia like most of ARB products, but built in the USA by Rigid.
ARB partnered up with Rigid Lighting to make these awesome lights.
Here is a video from ARB, and there are many other on YouTube of these lights.
On with some pics, and if I get time I will try and shoot a video of my own showing how bright these puppies are.
Light switch lights up green when the ignition key is on
Light switch lights up amber when the ARB lights are turned on
Lamps off, boy those are big, and they make a 9" lens version too
ARBs on, headlights off
ARBs and low beams on
ARBs and high beams on
I pulled my Hi-Lift jack from its Four Trek's mounts on the bumper to give the tech more room to work, and after putting it back on, it does not cover the new lights at all
I brought a few extra switches with me, but after mulling it over I decided to go with the stock switch.
Also instead of having the switch installed down in the switch cluster on the console, I also decided to have the switch where it is to be able to get to it faster.
John the owner of the shop has his wired so they only come on with the high beams, but I wanted mine wired up so they could come on anytime the ignition switch was energized.
This way too I cannot leave them on accidentally when I turn the key off.
They aimed them for me too at the shop.
Drivers side is a spot, and the passenger side s the flood.
Tomorrow morning at zero dark thirty I will be able to test them out on a long stretch of road on my way into work that has no street lighting.
That is if there is no oncoming traffic.
The pics do not do these justice, as they are blinding to look at.
Links:
ARB Intensity 7" LED Driving Lights - Flood Beam (AR21F)
ARB Intensity 7" LED Driving Lights -Spot Beam (AR21S)
ARB Intensity LED Wire Loom (3500520)
Auburn Car Repair & Offroad
07-09-2016, 12:27 PM
#383
Warn 90287 Wireless Remote Installed 7-9-2016
I really cannot call this an installation, as there is no installation like my old Ramsey wireless winch controller.
I use to run a Ramsey Wireless winch setup on the FJ, but over last weekend I ruined it.
I unspooled my winch line to inspect it, and when I put it back on the spool, the cord that has the plug on it you plug into the Warns controller box got caught on the winchline and ripped it in two.
I could have fixed it, but this was older tech, and I saw in my online search that Warn had out a very simple setup with zero installation.
The Ramsey unit required mounting the receiver underneath the hood, hooking up an antenna, and then running the cable with the plug down to the winches controller box.
With the new Warn unit you just plug the receiver into the control box like you would a wired controller, then use the included remote control.
It does not get much simpler than that.
It also comes with a tether that clips to the receiver, and you take the end with the carabiner and attach it to the winches control box cap that goes over the plug to keep the elements out of the contacts.
This way you can leave it on while wheeling and not loose it.
When I was at the off road shop last Tuesday getting the ARB Intensity LED lights installed, John the owner also has this new Warn Wireless Remote for his Jeeps, and he likes the wireless unit a lot.
Here is a video showing the simplicity of it I found on YouTube.
A few pics:
Pull the cap off of the control box, insert wireless receiver, hook carabiner to pulled cap, and you are setup for wireless
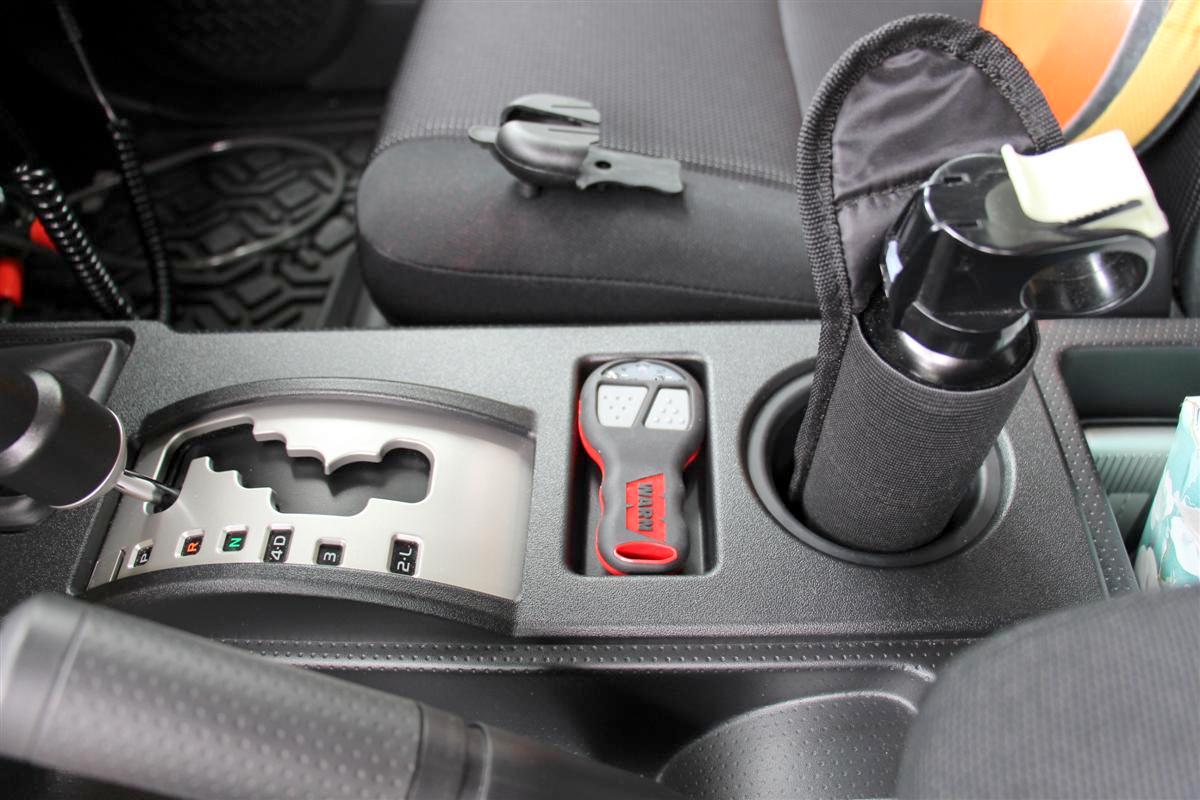
It comes with a nice holster you can Velcro of use a rotating clip to screw to a surface, but I think I am going to leave it in the tray on my center console as that is where I had the Ramsey one
Here is a short video of it.
Links:
Warn 90287 Wireless Remote
Got mine from Amazon, Warn 90287 Wireless Remote
I use to run a Ramsey Wireless winch setup on the FJ, but over last weekend I ruined it.
I unspooled my winch line to inspect it, and when I put it back on the spool, the cord that has the plug on it you plug into the Warns controller box got caught on the winchline and ripped it in two.
I could have fixed it, but this was older tech, and I saw in my online search that Warn had out a very simple setup with zero installation.
The Ramsey unit required mounting the receiver underneath the hood, hooking up an antenna, and then running the cable with the plug down to the winches controller box.
With the new Warn unit you just plug the receiver into the control box like you would a wired controller, then use the included remote control.
It does not get much simpler than that.
It also comes with a tether that clips to the receiver, and you take the end with the carabiner and attach it to the winches control box cap that goes over the plug to keep the elements out of the contacts.
This way you can leave it on while wheeling and not loose it.
When I was at the off road shop last Tuesday getting the ARB Intensity LED lights installed, John the owner also has this new Warn Wireless Remote for his Jeeps, and he likes the wireless unit a lot.
Here is a video showing the simplicity of it I found on YouTube.
A few pics:
Pull the cap off of the control box, insert wireless receiver, hook carabiner to pulled cap, and you are setup for wireless
It comes with a nice holster you can Velcro of use a rotating clip to screw to a surface, but I think I am going to leave it in the tray on my center console as that is where I had the Ramsey one
Here is a short video of it.
Warn 90287 Wireless Remote
Got mine from Amazon, Warn 90287 Wireless Remote
07-17-2016, 06:55 AM
#384
Hi-Lift Jack Moved 7-17-2016
For years my Hi-Lift jack has been angled down with the Fourtrek mounts.
I have to admit the business end of the jack was covering my drivers side headlight some, but not so much that I could not see to drive.
Since having my new ARB Intensity LED lights installed, them and the Hi-Lift was in the way of me getting my hand into the hole on the ARB bumper to access the engage/free spool lever on the Warn XD 9000 winch.
Never had this problem before with just the Hi-Lift there, only after the LED lights were added.
So this morning I took off the Hi-Lift and loosened one end of the Fourtrek mounts (1/4" allen wrench) and angled the knobs pointing to the sky.
Both headlights are now wide open with no jack obscuring any of their light, plus I can now get my right hand into the hole to access the lever on the winch.
This is something I should have done a long time ago, and I am looking forward to seeing if the headlight output has increased with the Hi-Lift out of the way.
One day I may go for some brighter headlights either with a bulb exchange, or the whole lens.
I looked at some of those Halo things online last week, and all I see is terrible reviews of them, and bulbs and wiring harnesses burning out.
No thanks, unless there is a good set of those on the market that are trouble free.
Links:
Fourtek's
Luke is a great guy to work with, have bought numerous mounts from him over the years.
I already had these of course, but if anyone is looking at getting some, I am providing the link.
A few pictures from today

Hi-Lift in its old position, angled down
With the gray bar on the Hi-Lift out of the way, I can now get my hand behind the ARB Intensity LED light to access the lever on the winch, and you can see both headlights with no obstructions
I notice the Hi-Lift more from inside the FJ, but not enough to cause any visibility issues
I have to admit the business end of the jack was covering my drivers side headlight some, but not so much that I could not see to drive.
Since having my new ARB Intensity LED lights installed, them and the Hi-Lift was in the way of me getting my hand into the hole on the ARB bumper to access the engage/free spool lever on the Warn XD 9000 winch.
Never had this problem before with just the Hi-Lift there, only after the LED lights were added.
So this morning I took off the Hi-Lift and loosened one end of the Fourtrek mounts (1/4" allen wrench) and angled the knobs pointing to the sky.
Both headlights are now wide open with no jack obscuring any of their light, plus I can now get my right hand into the hole to access the lever on the winch.
This is something I should have done a long time ago, and I am looking forward to seeing if the headlight output has increased with the Hi-Lift out of the way.
One day I may go for some brighter headlights either with a bulb exchange, or the whole lens.
I looked at some of those Halo things online last week, and all I see is terrible reviews of them, and bulbs and wiring harnesses burning out.
No thanks, unless there is a good set of those on the market that are trouble free.
Links:
Fourtek's
Luke is a great guy to work with, have bought numerous mounts from him over the years.
I already had these of course, but if anyone is looking at getting some, I am providing the link.
A few pictures from today
Hi-Lift in its old position, angled down
With the gray bar on the Hi-Lift out of the way, I can now get my hand behind the ARB Intensity LED light to access the lever on the winch, and you can see both headlights with no obstructions
I notice the Hi-Lift more from inside the FJ, but not enough to cause any visibility issues
07-17-2016, 11:31 AM
#386
Thanks Robb.
Have never actually used it yet Robb.
But with my lift the factory bottle jack will probably not work, so I keep this with me in case of a flat.
Funny thing is (knock on wood) my last flat was in the '91 4Runner back around 2005.
But the moment I take it off is when I will need it the most.
Have been looking into those jacket covers for it, but not sure if it will work with mine on account of the holes being covered where they go into the Fourtrek mounts.
http://jackcovers.com/
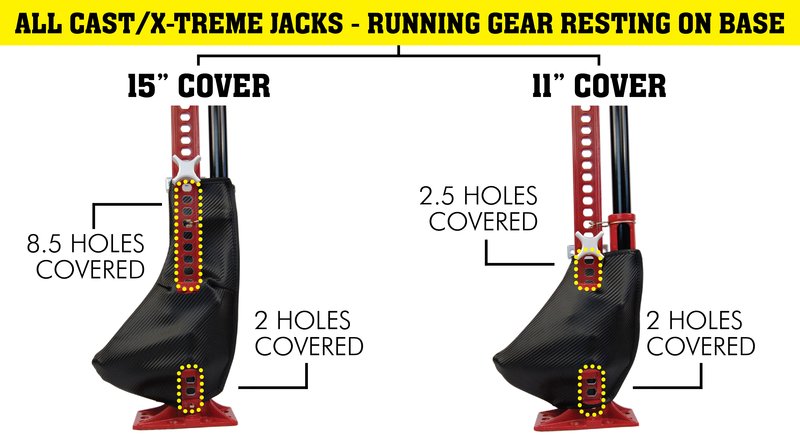
I might be able to get away with the shorter one and move the jack to the drivers side and expose a few holes in the gray bar, as you can see now in my last pic above I am on the last hole for the mount.
I may order a cover and try it on the third hole.
Have never actually used it yet Robb.
But with my lift the factory bottle jack will probably not work, so I keep this with me in case of a flat.
Funny thing is (knock on wood) my last flat was in the '91 4Runner back around 2005.
But the moment I take it off is when I will need it the most.
Have been looking into those jacket covers for it, but not sure if it will work with mine on account of the holes being covered where they go into the Fourtrek mounts.
http://jackcovers.com/
I might be able to get away with the shorter one and move the jack to the drivers side and expose a few holes in the gray bar, as you can see now in my last pic above I am on the last hole for the mount.
I may order a cover and try it on the third hole.
 07-17-2016, 12:20 PM
#391
Registered User

In my book, they do.
I certainly would never disparage the utility of a High-lift.
I saw, and helped, pull a CJ-5 up a near vertical cliff once, using a High-lift for a come-along, after a couple high dollar electric winches failed.
And indeed, I have seen them pissed on, to get the sand and mud out, so that they would function.
I don't leave home without one.
They sure can hurt ya though if you don't know whats really goin on with them.
Last edited by millball; 07-17-2016 at 12:33 PM.
07-22-2016, 03:42 PM
#393
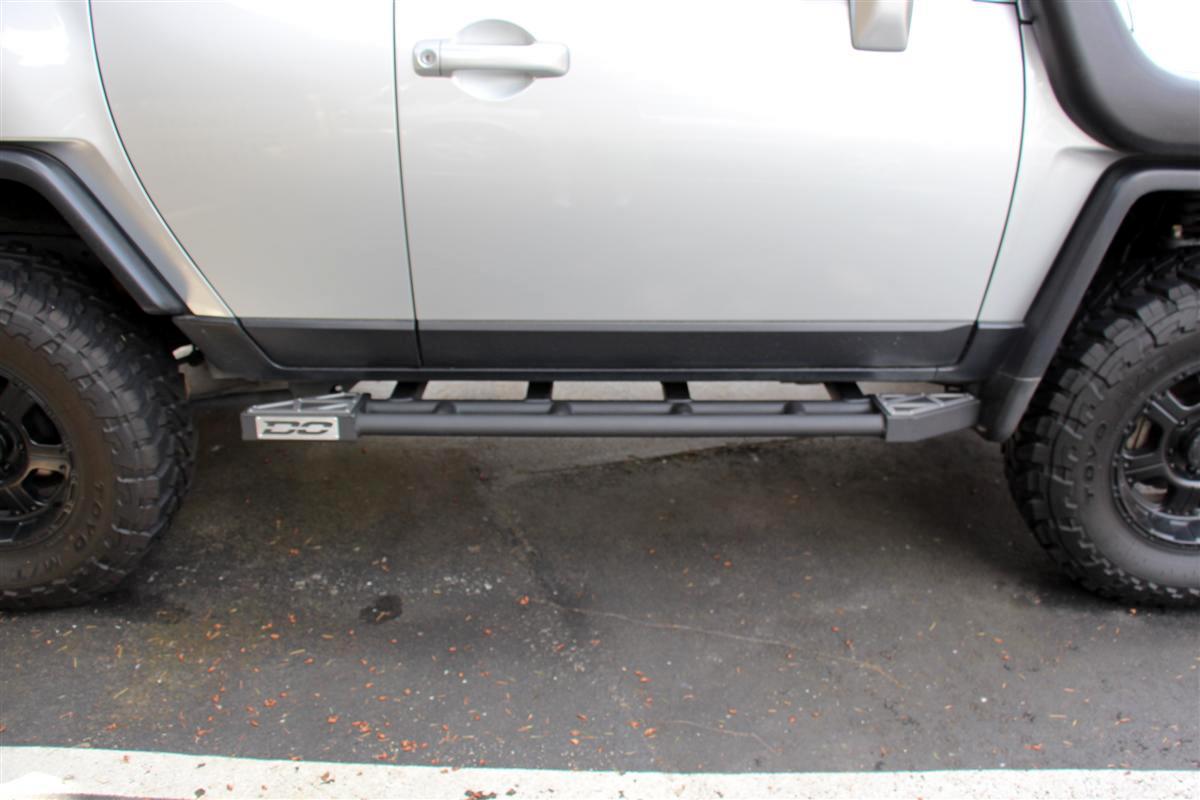
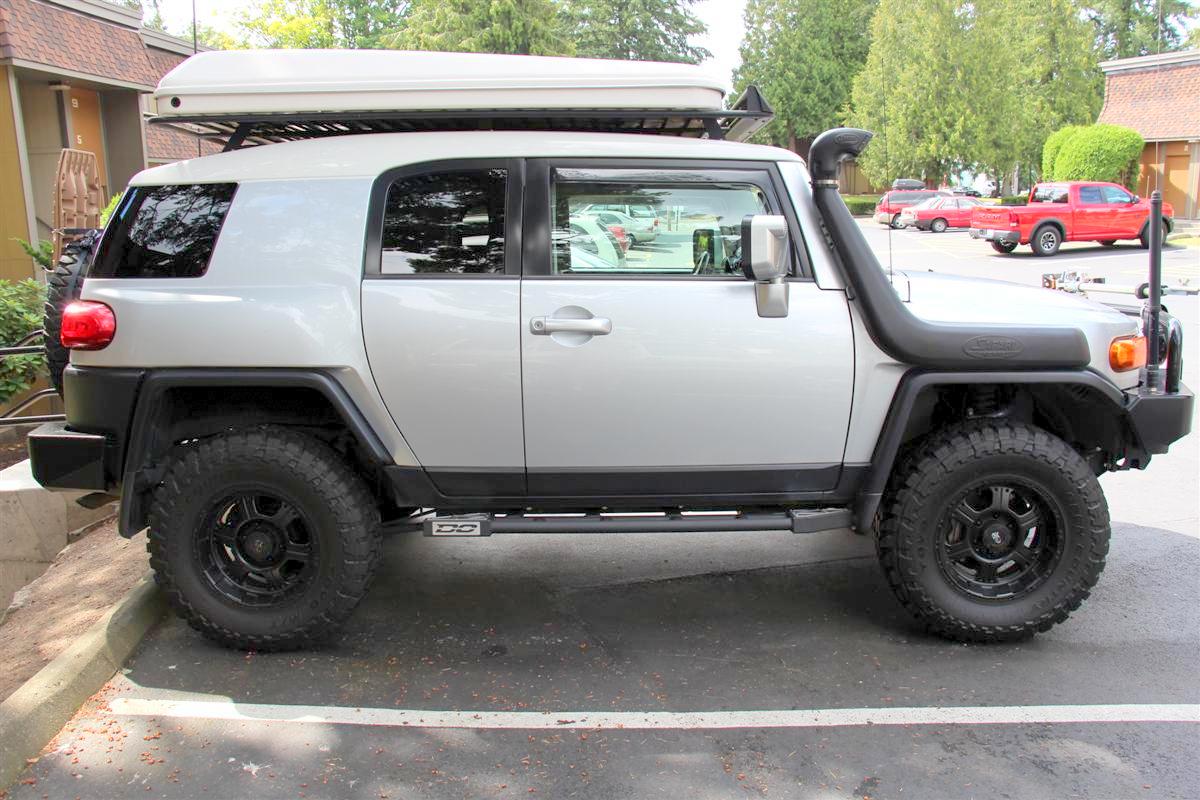
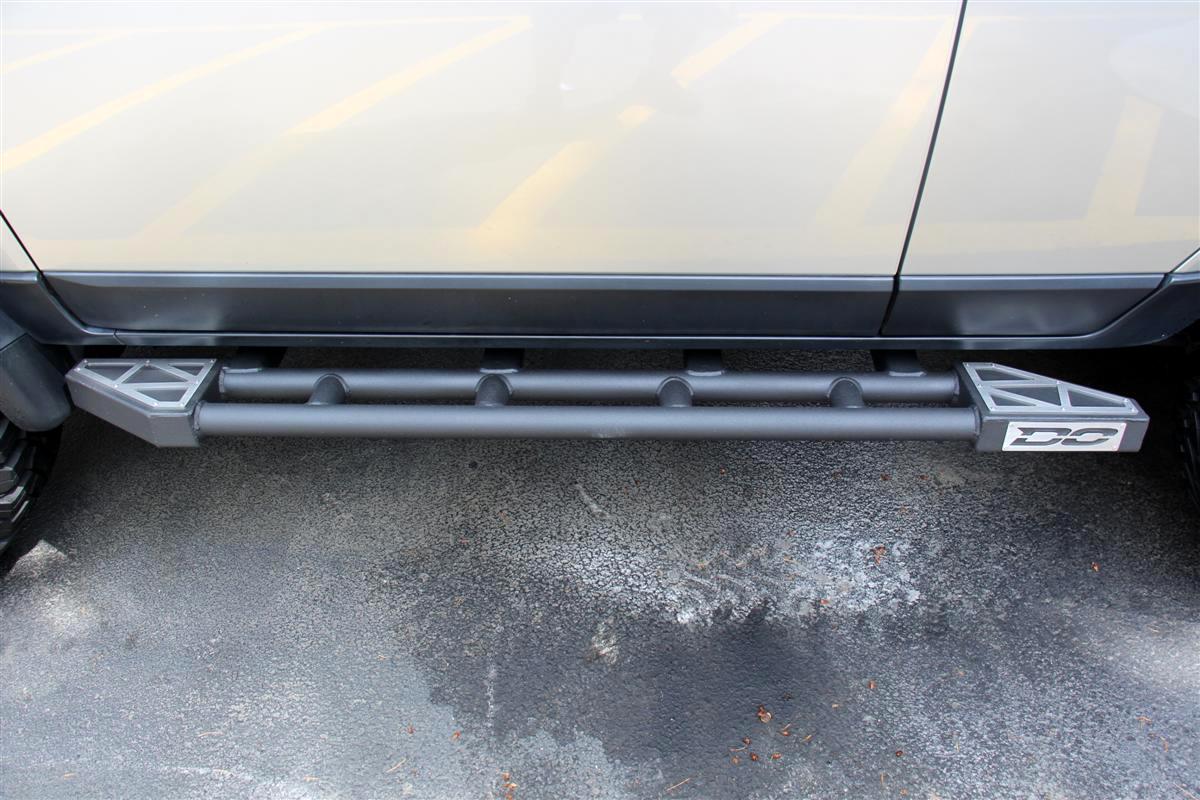
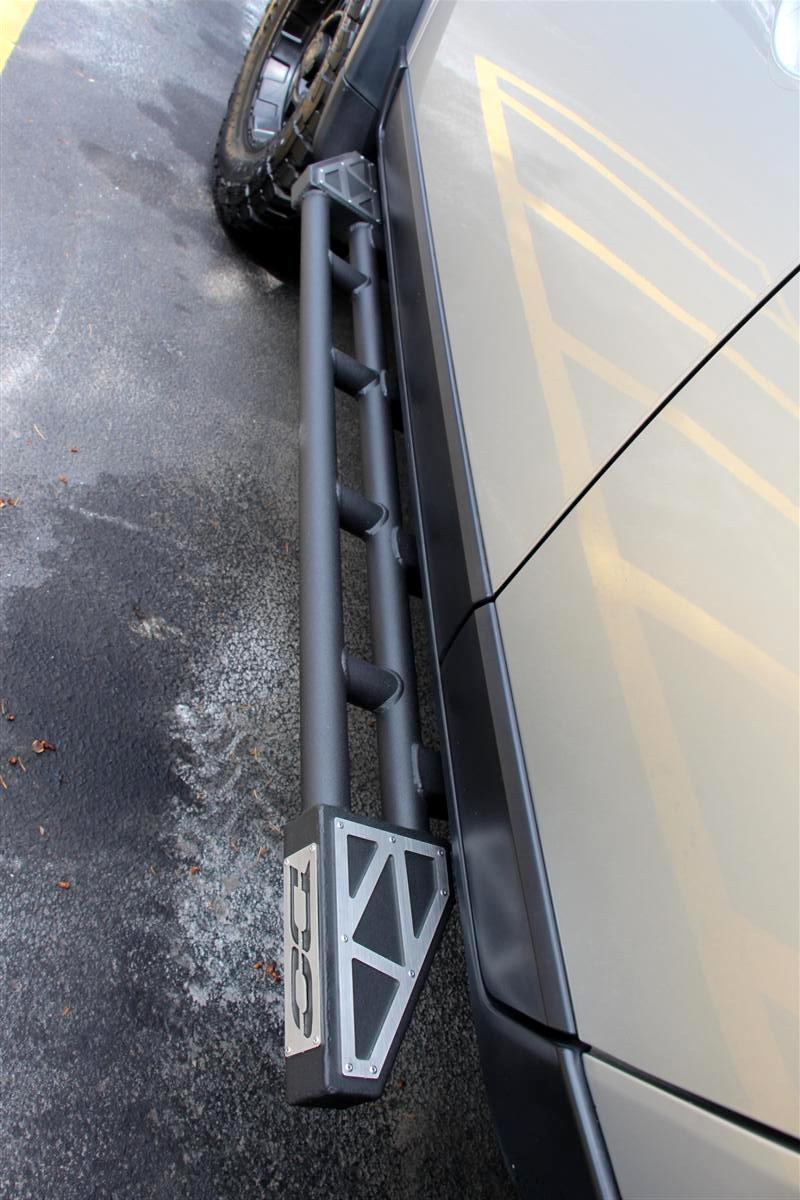
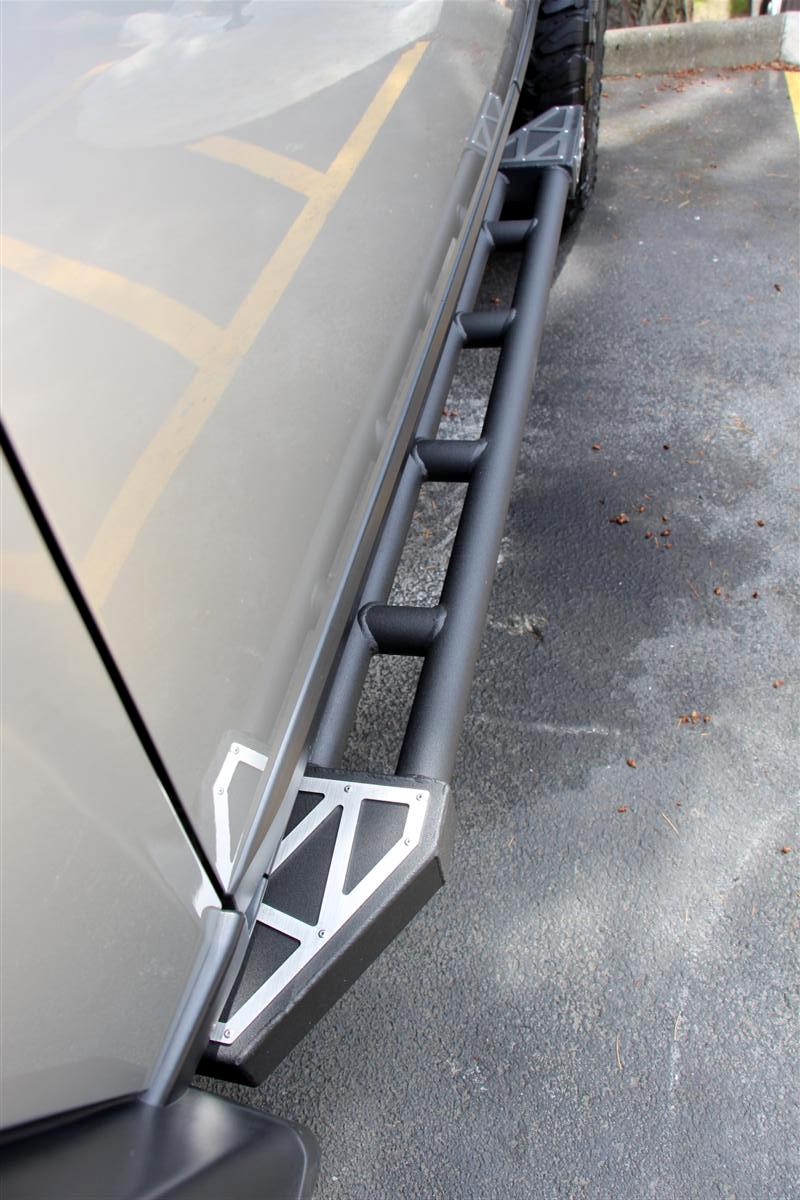
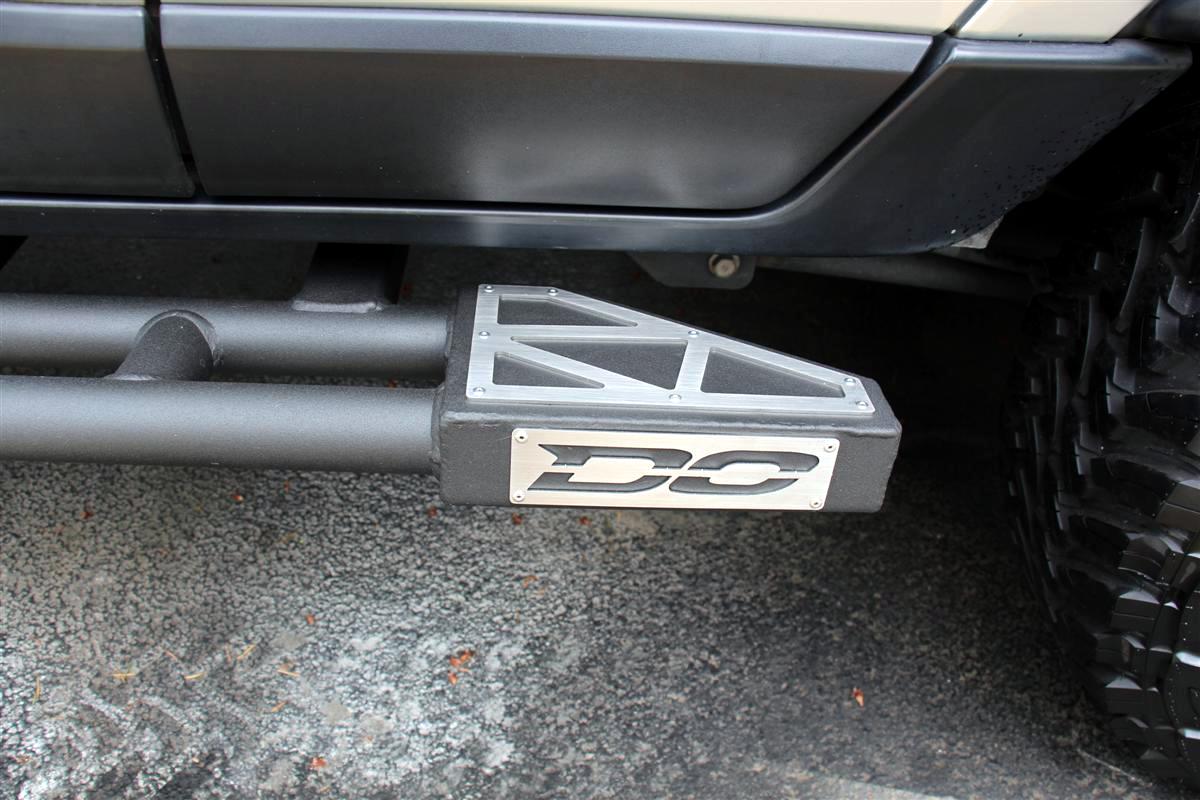
Demello Dominatorz Sliders Installed 7-22-2016
Ordered them on June the 22nd, and they arrived on July the 22nd.
My current set of sliders have been on the rig since I bought my FJ in July of 2006.
The powder coating is chipped off quite a bit, and it was time for an update.
I checked out Demello's site, and I liked what I saw when I checked out the Dominatorz.
These came with all new hardware, the bolts take a 13 mm socket of ratchet wrench.
I actually used both.
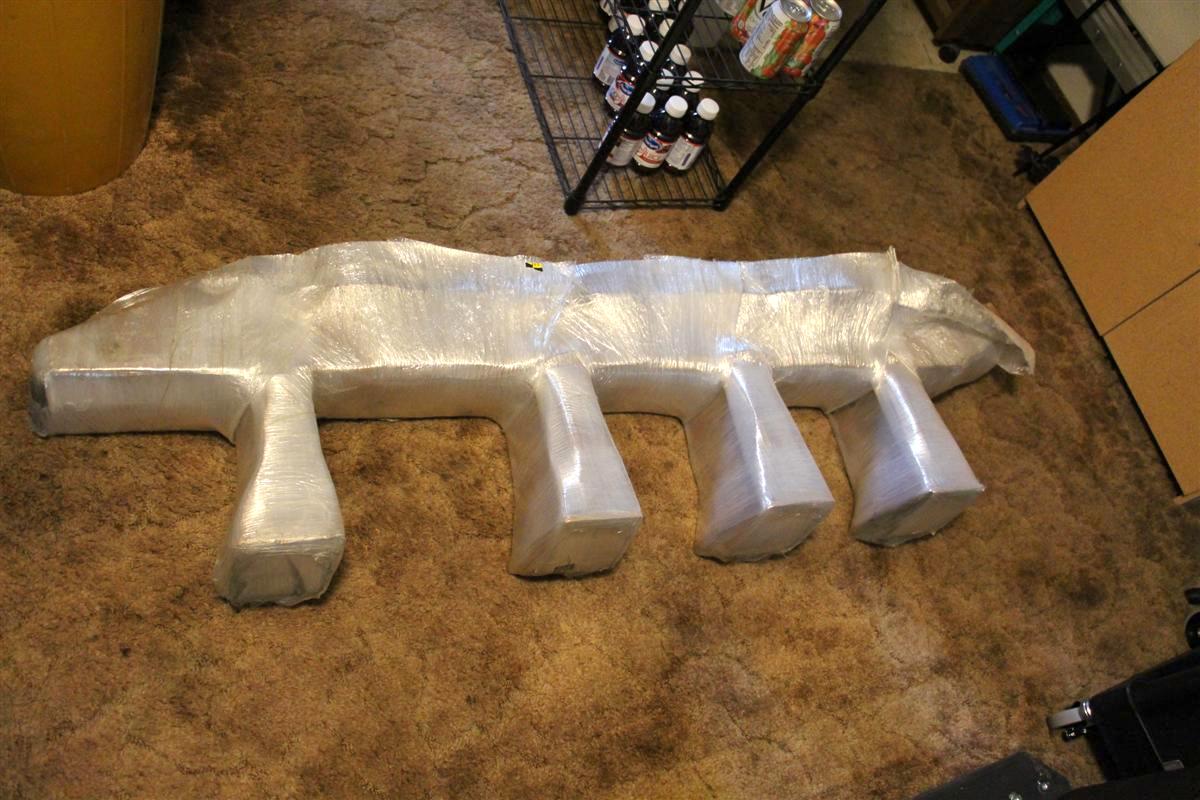
They were packed quite well too as you can see in the first picture below.
I would say it took me a good hour or more to get all the plastic wrap off, then the cardboard, then even more plastic wrap
Piece of cake to install, but a lot heavier than my old ones.
Balanced them on my stomach, and used my knees to lift them up so I could align the holes.
Link:
DEMELLO OFF-ROAD DOMINATORZ
A few pictures, and after I wash my rig hopefully tomorrow, I am going to get some better pics to add to my thread here.
For some reason that picture reminds of of those Star Wars Walkers
Also bought a new winchline to replace an old one, and I will update the thread here once it is installed.
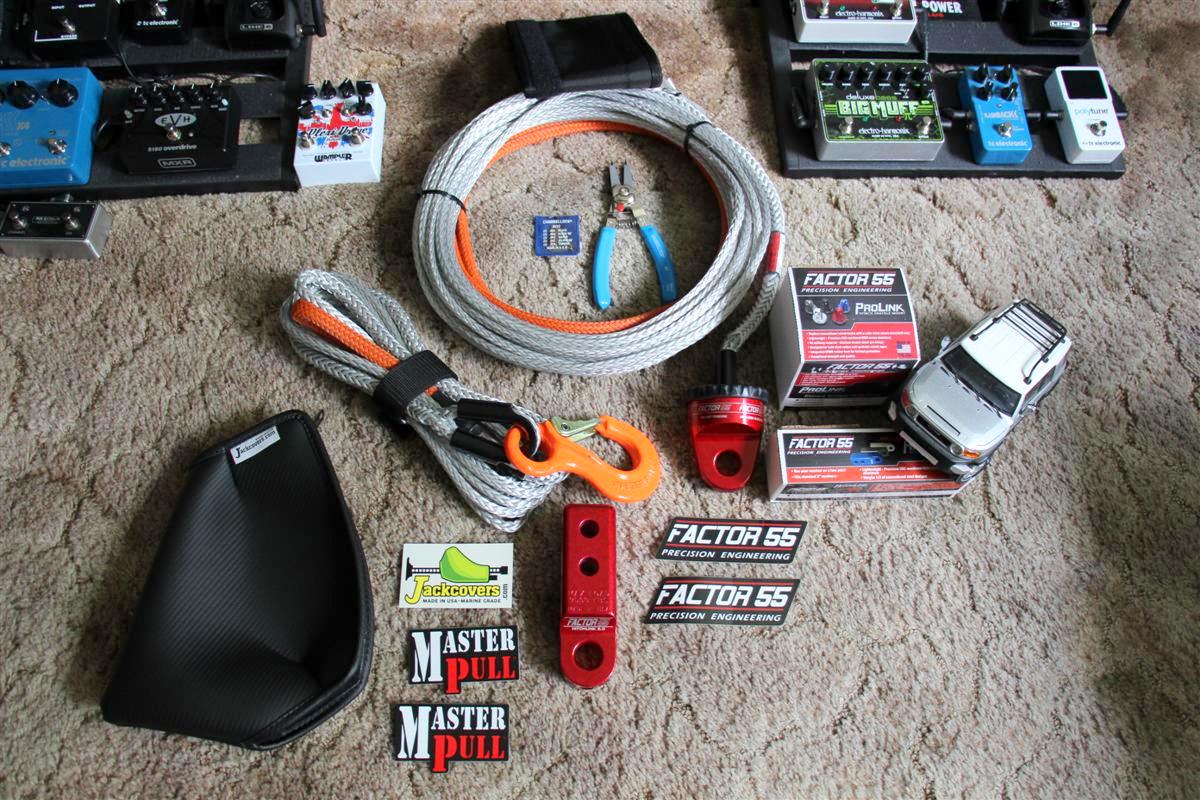
Masterpull 8mm (5/16") Superline Winch Line - 21,700 lbs, 75'
8mm (5/16") Superline Winch Extension - 21,700 lbs, 25'
ProLink Thimble
HitchLink 2.0
Channellock 927 8-Inch Retaining Ring Plier
The snap ring pliers are required to secure the titanium pin into the ProLink that goes on the winchline
Jack Cover for the Hi-Lift to cover just the moving parts near the base
My current set of sliders have been on the rig since I bought my FJ in July of 2006.
The powder coating is chipped off quite a bit, and it was time for an update.
I checked out Demello's site, and I liked what I saw when I checked out the Dominatorz.
These came with all new hardware, the bolts take a 13 mm socket of ratchet wrench.
I actually used both.
They were packed quite well too as you can see in the first picture below.
I would say it took me a good hour or more to get all the plastic wrap off, then the cardboard, then even more plastic wrap
Piece of cake to install, but a lot heavier than my old ones.
Balanced them on my stomach, and used my knees to lift them up so I could align the holes.
Link:
DEMELLO OFF-ROAD DOMINATORZ
A few pictures, and after I wash my rig hopefully tomorrow, I am going to get some better pics to add to my thread here.
For some reason that picture reminds of of those Star Wars Walkers
Also bought a new winchline to replace an old one, and I will update the thread here once it is installed.
Masterpull 8mm (5/16") Superline Winch Line - 21,700 lbs, 75'
8mm (5/16") Superline Winch Extension - 21,700 lbs, 25'
ProLink Thimble
HitchLink 2.0
Channellock 927 8-Inch Retaining Ring Plier
The snap ring pliers are required to secure the titanium pin into the ProLink that goes on the winchline
Jack Cover for the Hi-Lift to cover just the moving parts near the base
07-24-2016, 02:58 AM
#396
Added a few more pics from Saturday of the new Demello sliders.
Please excuse the mess on the ground, that is Ajax powder from scrubbing my tires in the morning when I gave the rig a bath in my parking spot.
I am still sore from installing these on Friday, and in addition to balancing them on my stomach, I used my knees and lower legs to hold them up while aligning up the bolt holes.
Back of my calves are sore too, gettin' too old for crawling under the rig
07-30-2016, 08:12 AM
#397
New Recovery Stuff Installed 7-29/30-2016
I took off work a little early yesterday to stop by John's shop, Auburn Car Repair & Offroad.
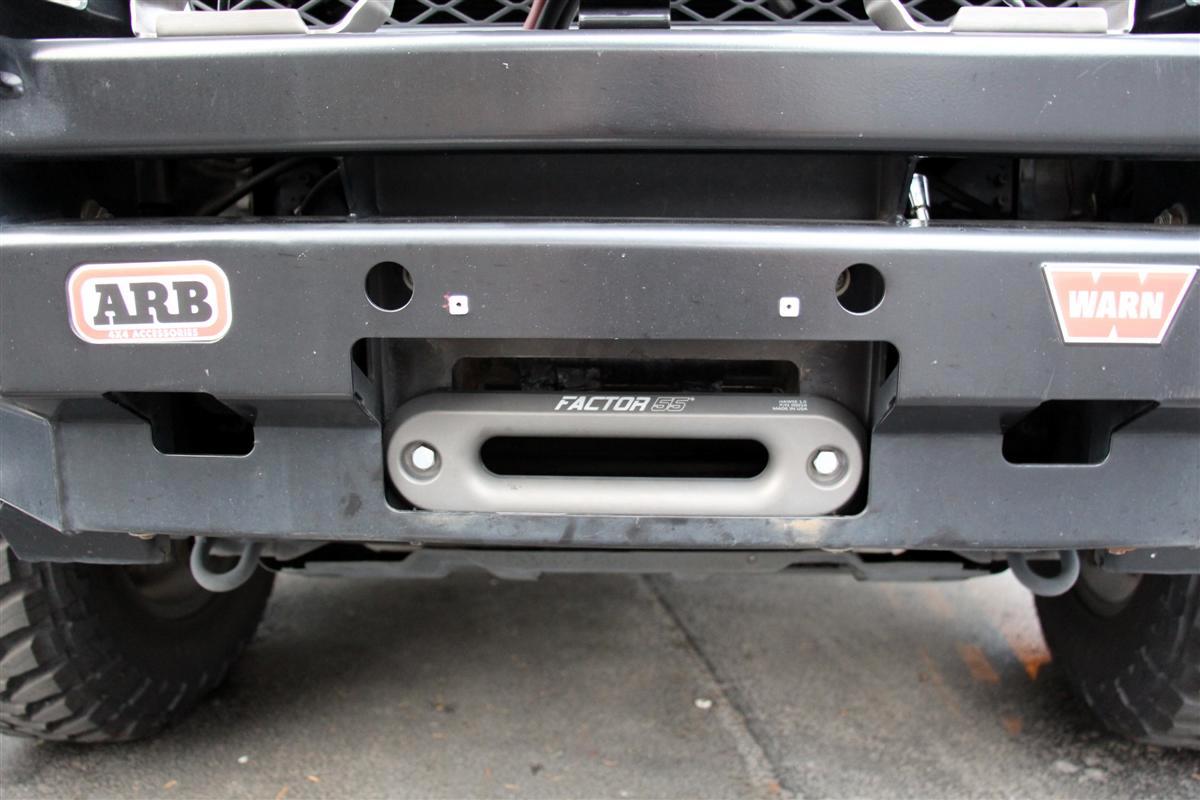
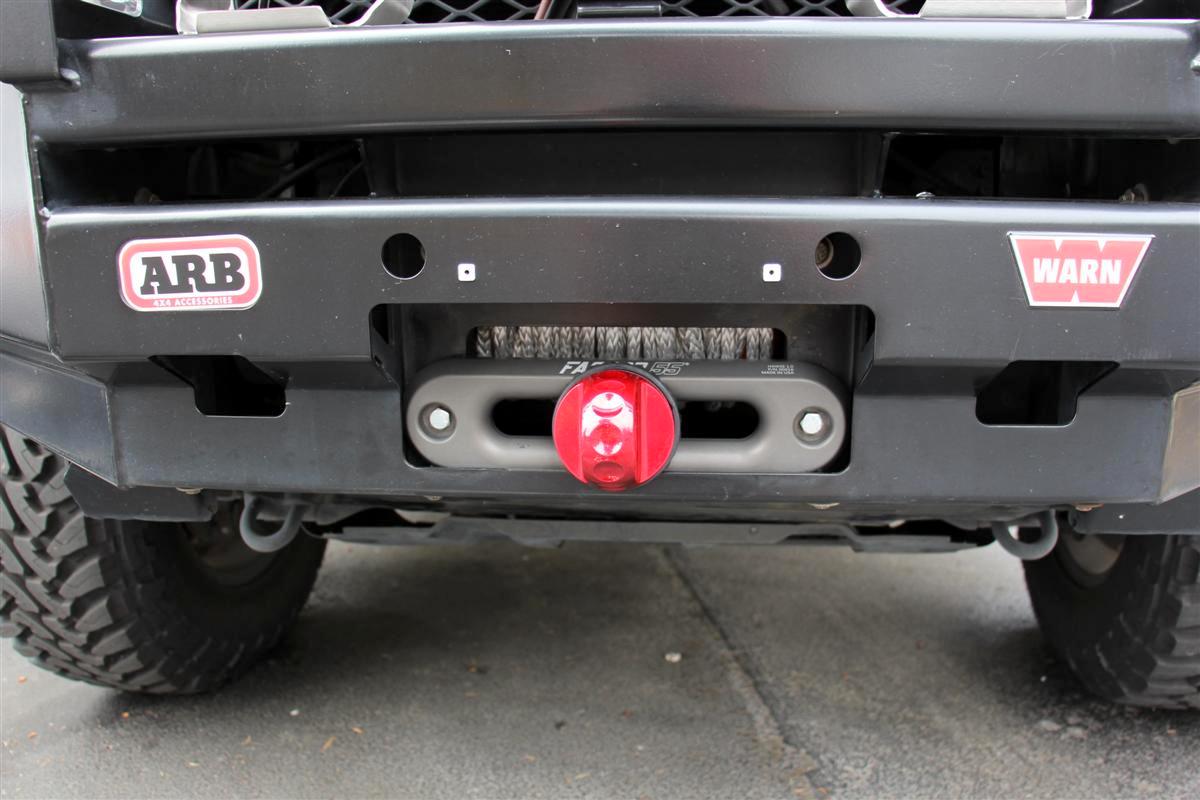
I bought a Factor 55 1.0 Hawse fairlead earlier in the week, and I knew there were going to be complications with it for having an ARB bumper (they fit others with no modifications I hear) with it not fitting without modifying it first.
The tech there pulled off my roller fairlead, and the space then to put on the Factor 55 one would not allow it to go in.
Some aluminum on each side of the fairlead would need to be shaved some.
Also the lip on the bumper behind where the Hawse sits was up to high, and this would cause the synthetic line rubbing over it and getting worn.
That needed to be ground down as well, and then touched up with some paint.
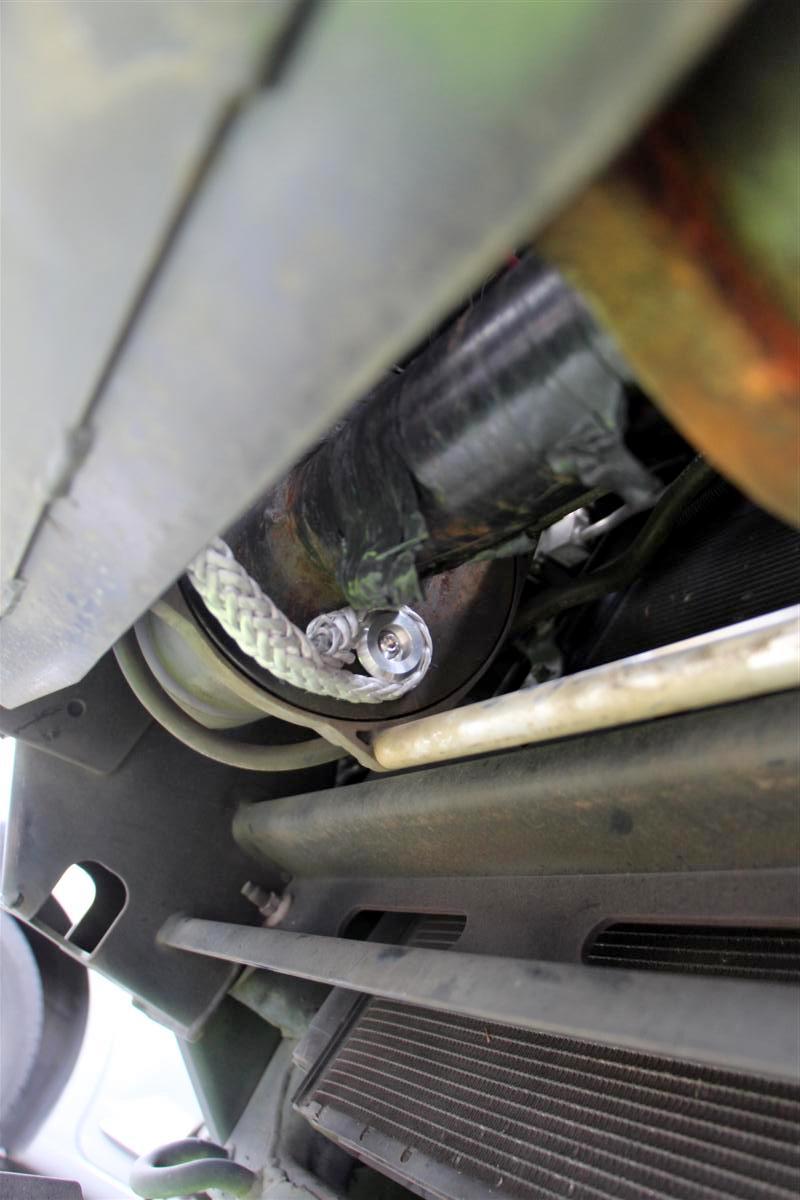
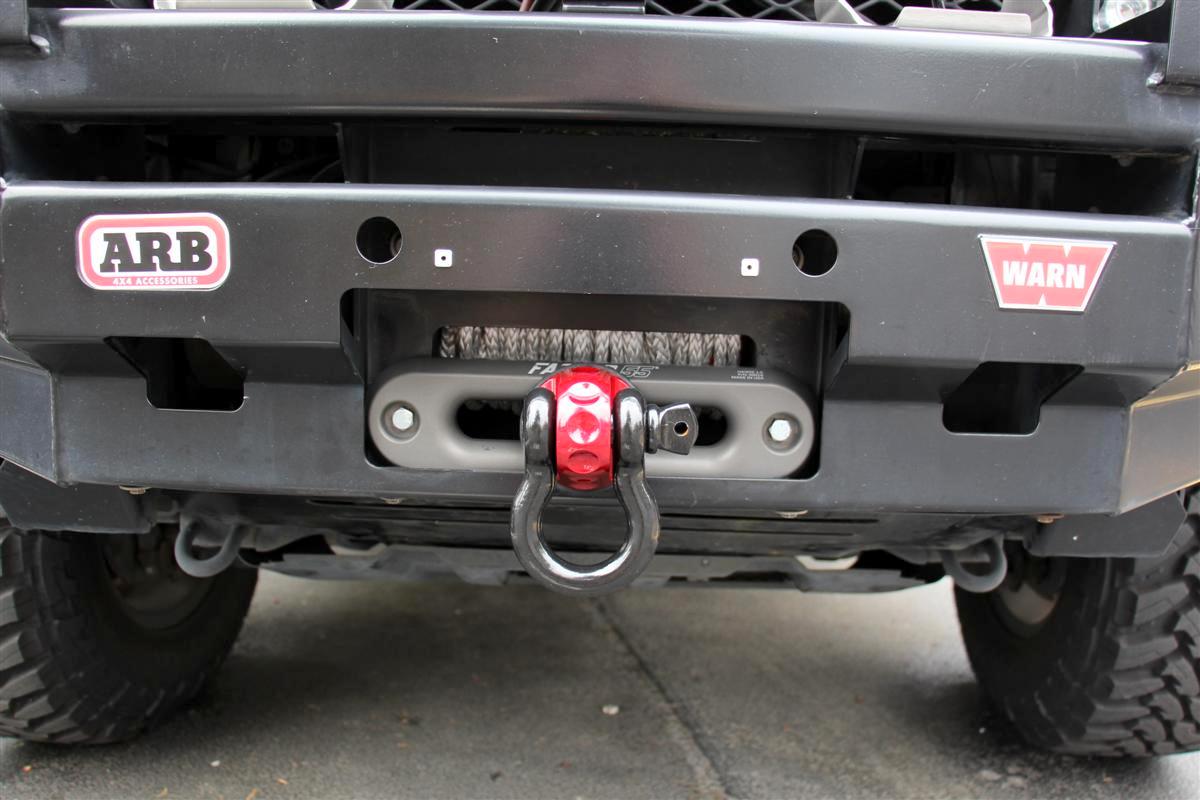
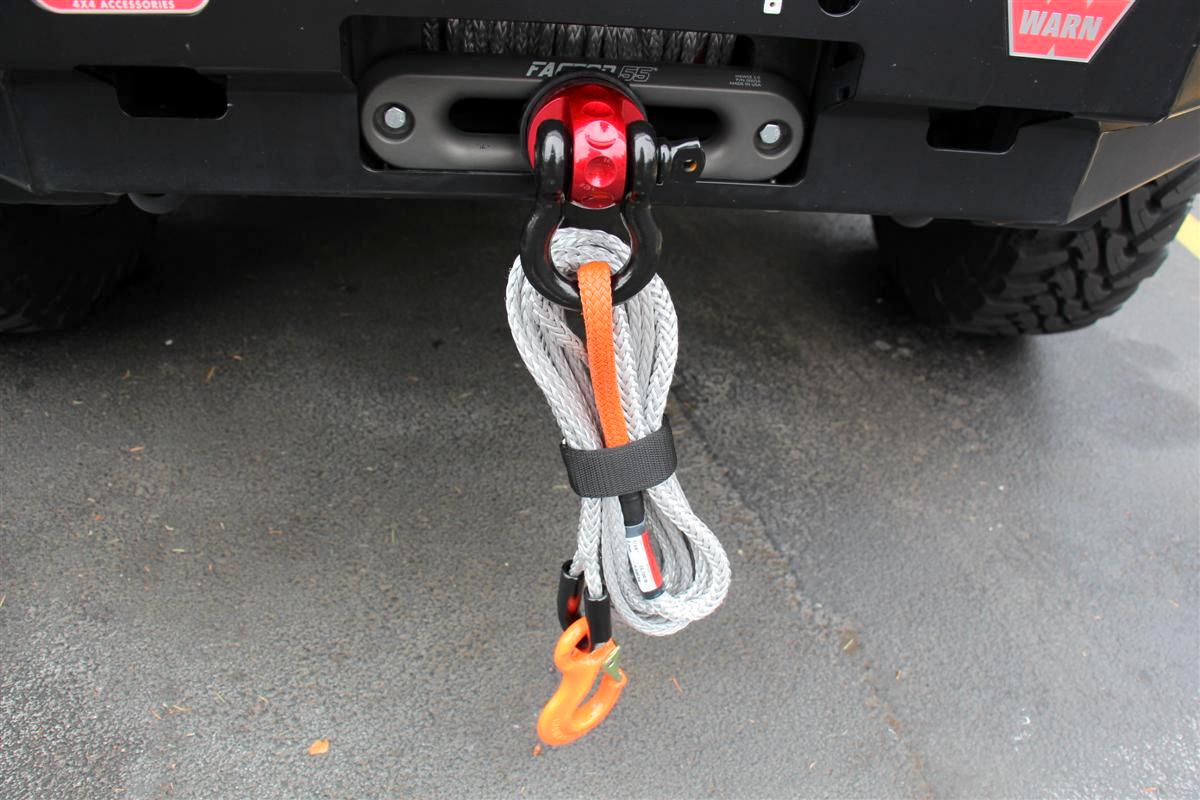
Today I installed my new Masterpull 75' Superline synthetic winchline.
I also have a 25' Superline extension line if ever needed.
The Factor 55 ProLink is very cool as you can take it off of the winchline without having to weave a synthetic winchline onto a thimble or a hook.
Simply use a snap-ring pliers, and the titanium pin come out, and you remove the small thimble end on the winchline.
This makes it easy too if I ever want to switch to the FlatLink thimble.
Same as the bigger ProLink, but it folds flat against the fairlead instead of protruding like Rudolph's nose.
Links:
8mm (5/16") Superline 75' Winch Line - 21,700 lbs
8mm (5/16") Superline 25' Winch Extension with Cobra Sling Hook - 21,700 lbs
ProLink With Titanium Pin & Rubber Guard Safety Thimble
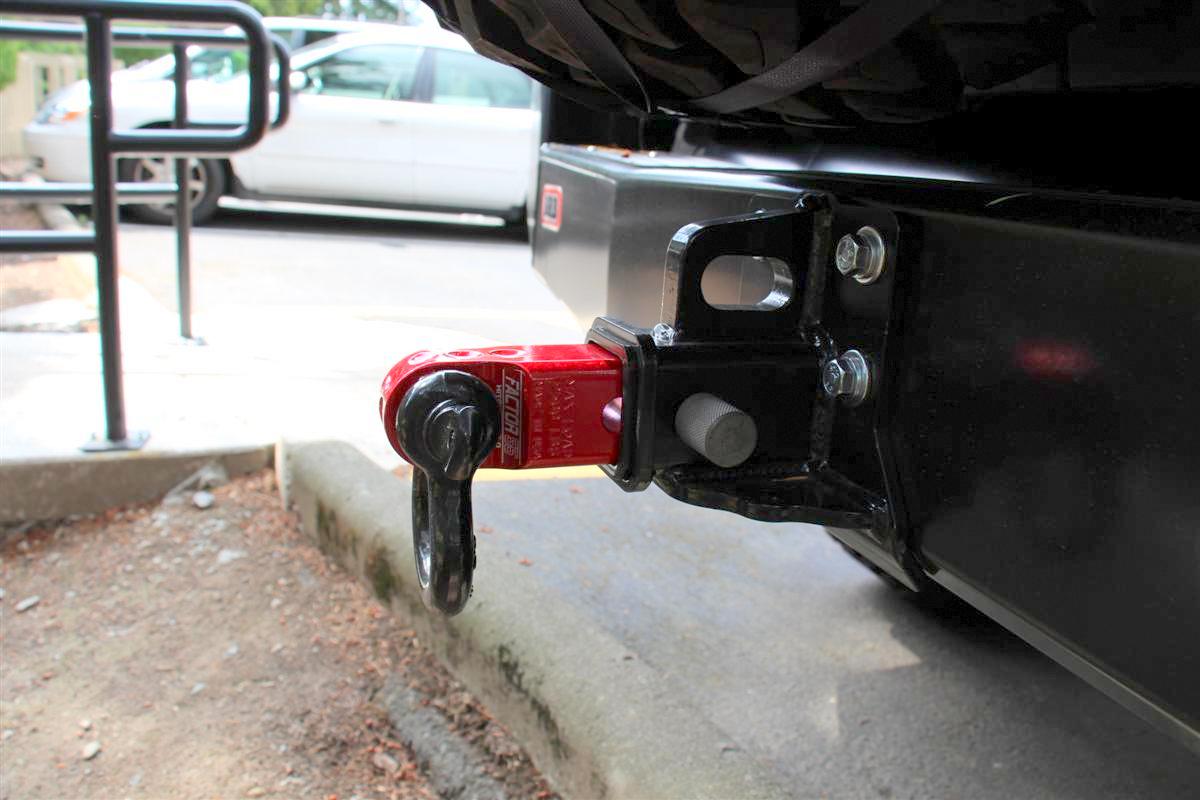
Factor 55 1.0 Hawse Fairlead
A few pictures:

Very cool attachment point to fasten the winchline to the Warn XD9000s drum
Compare it to the other one on my old line.
Fairlead with no winchline loaded onto to the spool
New line attached to side of drum
Line installed, and ProLink thimble attached
And with shackle with rust already forming in the little side hole on the pin
They have only been on the rig for a few weeks too.
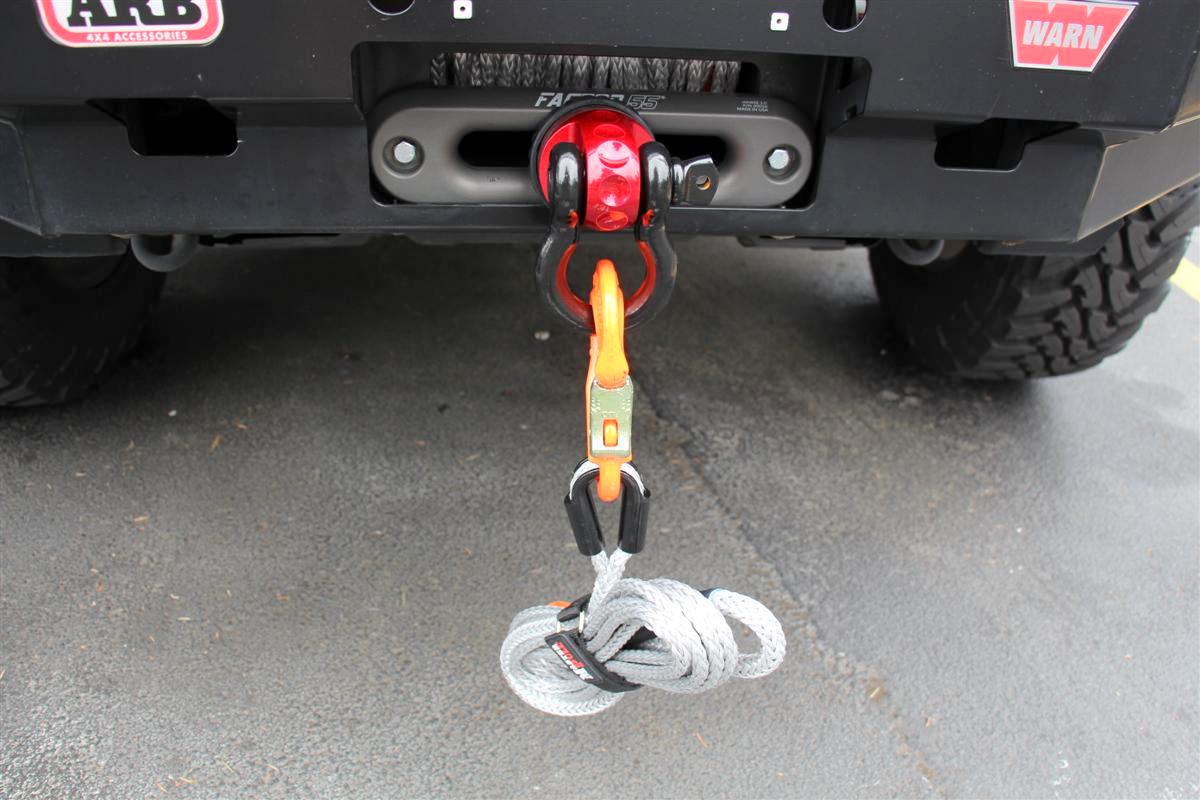
Masterpull 25' extension with its orange hook around shackle
Note the red coloring of the curved part of the shackle.
That is not paint, that is the reflection of the anodized finish of the ProLink thimble on the black shackle.
Another way to hook the extension to the shackle by using the heavy loop end on it, leaving the hook end to attach to a tree saver
I like the look of the new Factor 55 Hawse 1.0 fairlead
I was telling John the owner at the shop Jeeps have it made, the Hawse on his Jeep and others at his shop with ARB bumpers required no modifications to them.
He took back the president of ARB's Jeep, and came back with another AB employees to do some work on it while I was there too.
ARB USA headquarters is just down the street from his shop.
I bought a Factor 55 1.0 Hawse fairlead earlier in the week, and I knew there were going to be complications with it for having an ARB bumper (they fit others with no modifications I hear) with it not fitting without modifying it first.
The tech there pulled off my roller fairlead, and the space then to put on the Factor 55 one would not allow it to go in.
Some aluminum on each side of the fairlead would need to be shaved some.
Also the lip on the bumper behind where the Hawse sits was up to high, and this would cause the synthetic line rubbing over it and getting worn.
That needed to be ground down as well, and then touched up with some paint.
Today I installed my new Masterpull 75' Superline synthetic winchline.
I also have a 25' Superline extension line if ever needed.
The Factor 55 ProLink is very cool as you can take it off of the winchline without having to weave a synthetic winchline onto a thimble or a hook.
Simply use a snap-ring pliers, and the titanium pin come out, and you remove the small thimble end on the winchline.
This makes it easy too if I ever want to switch to the FlatLink thimble.
Same as the bigger ProLink, but it folds flat against the fairlead instead of protruding like Rudolph's nose.
Links:
8mm (5/16") Superline 75' Winch Line - 21,700 lbs
8mm (5/16") Superline 25' Winch Extension with Cobra Sling Hook - 21,700 lbs
ProLink With Titanium Pin & Rubber Guard Safety Thimble
Factor 55 1.0 Hawse Fairlead
A few pictures:
Very cool attachment point to fasten the winchline to the Warn XD9000s drum
Compare it to the other one on my old line.
Fairlead with no winchline loaded onto to the spool
New line attached to side of drum
Line installed, and ProLink thimble attached
And with shackle with rust already forming in the little side hole on the pin
They have only been on the rig for a few weeks too.
Masterpull 25' extension with its orange hook around shackle
Note the red coloring of the curved part of the shackle.
That is not paint, that is the reflection of the anodized finish of the ProLink thimble on the black shackle.
Another way to hook the extension to the shackle by using the heavy loop end on it, leaving the hook end to attach to a tree saver
I like the look of the new Factor 55 Hawse 1.0 fairlead
I was telling John the owner at the shop Jeeps have it made, the Hawse on his Jeep and others at his shop with ARB bumpers required no modifications to them.
He took back the president of ARB's Jeep, and came back with another AB employees to do some work on it while I was there too.
ARB USA headquarters is just down the street from his shop.
08-01-2016, 02:36 PM
#398
Hi-Lift Lock - Versatile Lock - 1/2" Bolt Lock Installed 8-1-2016
For years I have had my Hi-Lift installed on my ARB bumper using Luke's Fourtrek mounts.
Very nice product, but anyone can come up to them and unscrew the huge wingnut and be off with your Hi-Lift.
So far that has not happened to me as where I live it pretty much is alive 24/7 with someone one walking their dog, or just going for a walk.
But after buying a jackcover from Jackcovers.com, I saw on their site a lock that might work.
I got a hold of Luke at Fourtrek's and asked him for the bolt size used on his mounts, and it is 1/2" x 13 threds per pitch.
I got a hold of Adam at jackcovers.com, and his locks will work with that perfectly.
I now have extra security in case of sticky fingers wanting to pawn my Hi-Lift for meth
By the way, Adam is a member on fjcruiserforums.com I found out from him.
Great guy to work with.
You only really need one lock too, and they are not keyed the same, so if you do order two, you will have to carry two keys with you.
Links:
Hi-Lift Lock - Versatile Lock - 1/2" Bolt Lock
Fourtrek Hi-Lift Mounts
11" Jackcover (have not got it installed yet)
A few pictures:
Stock knobs/wingnuts
Full view
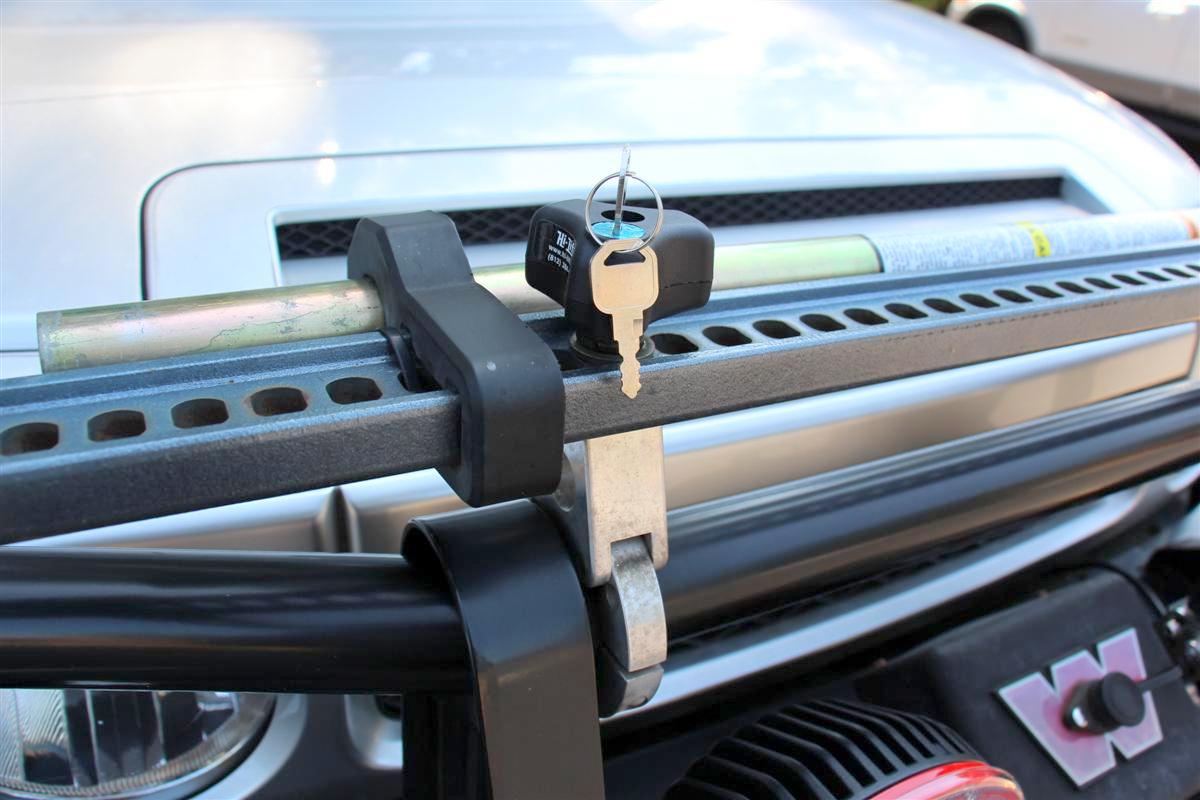
New lock
I do have one of his jack covers too for the Hi-Lift, but I need to move my jack some to expose more of the mounting holes so I can get the cover on.
That will happen probably over the upcoming weekend.
Very nice product, but anyone can come up to them and unscrew the huge wingnut and be off with your Hi-Lift.
So far that has not happened to me as where I live it pretty much is alive 24/7 with someone one walking their dog, or just going for a walk.
But after buying a jackcover from Jackcovers.com, I saw on their site a lock that might work.
I got a hold of Luke at Fourtrek's and asked him for the bolt size used on his mounts, and it is 1/2" x 13 threds per pitch.
I got a hold of Adam at jackcovers.com, and his locks will work with that perfectly.
I now have extra security in case of sticky fingers wanting to pawn my Hi-Lift for meth
By the way, Adam is a member on fjcruiserforums.com I found out from him.
Great guy to work with.
You only really need one lock too, and they are not keyed the same, so if you do order two, you will have to carry two keys with you.
Links:
Hi-Lift Lock - Versatile Lock - 1/2" Bolt Lock
Fourtrek Hi-Lift Mounts
11" Jackcover (have not got it installed yet)
A few pictures:
Stock knobs/wingnuts
Full view
New lock
I do have one of his jack covers too for the Hi-Lift, but I need to move my jack some to expose more of the mounting holes so I can get the cover on.
That will happen probably over the upcoming weekend.


