When you click on links to various merchants on this site and make a purchase, this can result in this site earning a commission. Affiliate programs and affiliations include, but are not limited to, the eBay Partner Network.
NVIDIA Shield Tablet/Ram Mount Installed 10-22-2016
I have been noticing a lot more rigs going on back country trips using a tablet device to run Back Country Navigator and other mapping apps instead of a dedicated GPS unit.
I have an iPad Air, but Apple products do not have a built in GPS chip, so you have to add a Bluetooth one.
Not a problem, but my iPad Air also has a Bluetooth keyboard/cover attached to it, and I really do not want to have to take it off each time, plus the iPad is a little big for my tastes to have in the FJ Cruiser on a trip.
I posted up a thread on Expedition Portal in their GPS/Navigation section, and a member posted the NVIDIA Shield 8" tablet as a good one to use.
It has a fast processor, and just about all Android based tablets have the GPS chip installed, no need for tethering to a separate Bluetooth GPS antenna.
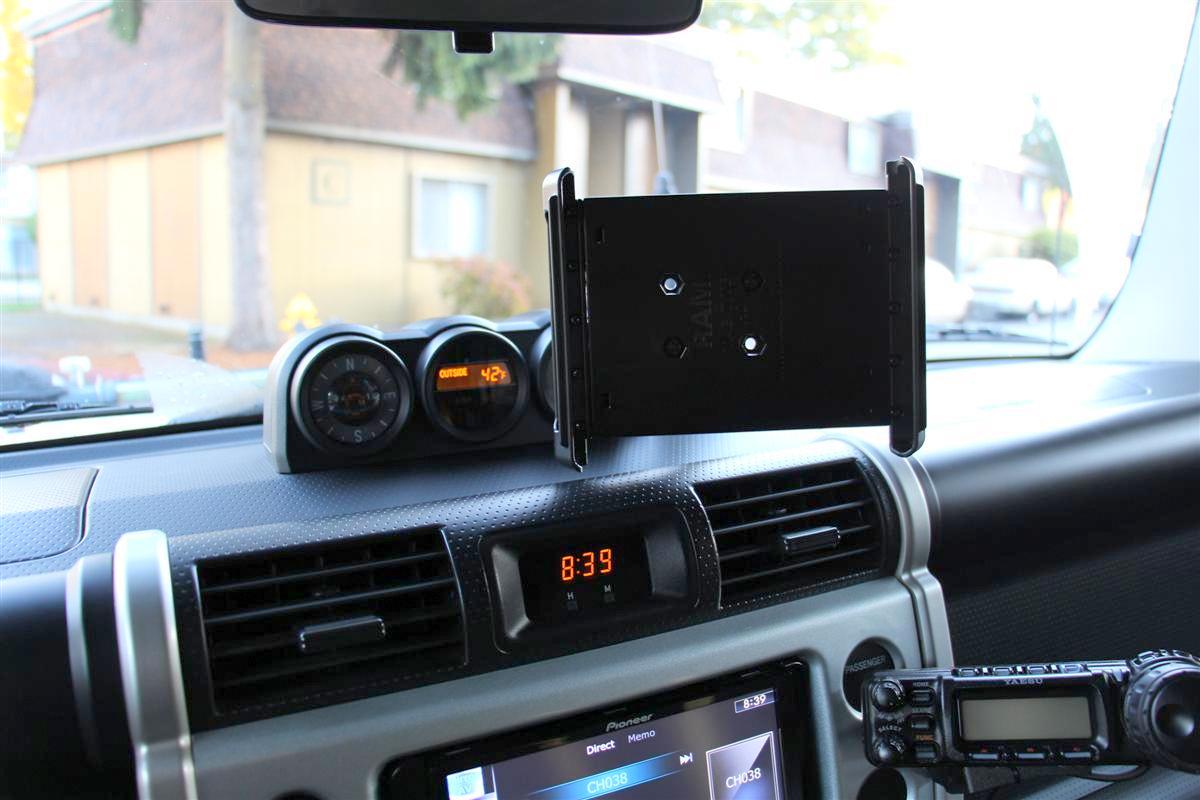
I got a hold of Matt at Ram Mounts out of Seattle, WA., and asked him what type of mounts would work with my FJ Cruiser.
I got a RAM Tab-Tite cradle for the tablet, and a few mounts listed below in the links.
Currently using the suction cup one, have not installed the rod one, and I may not.
All of the items listed below in the links are available off of Amazon too, and that is where I got mine.
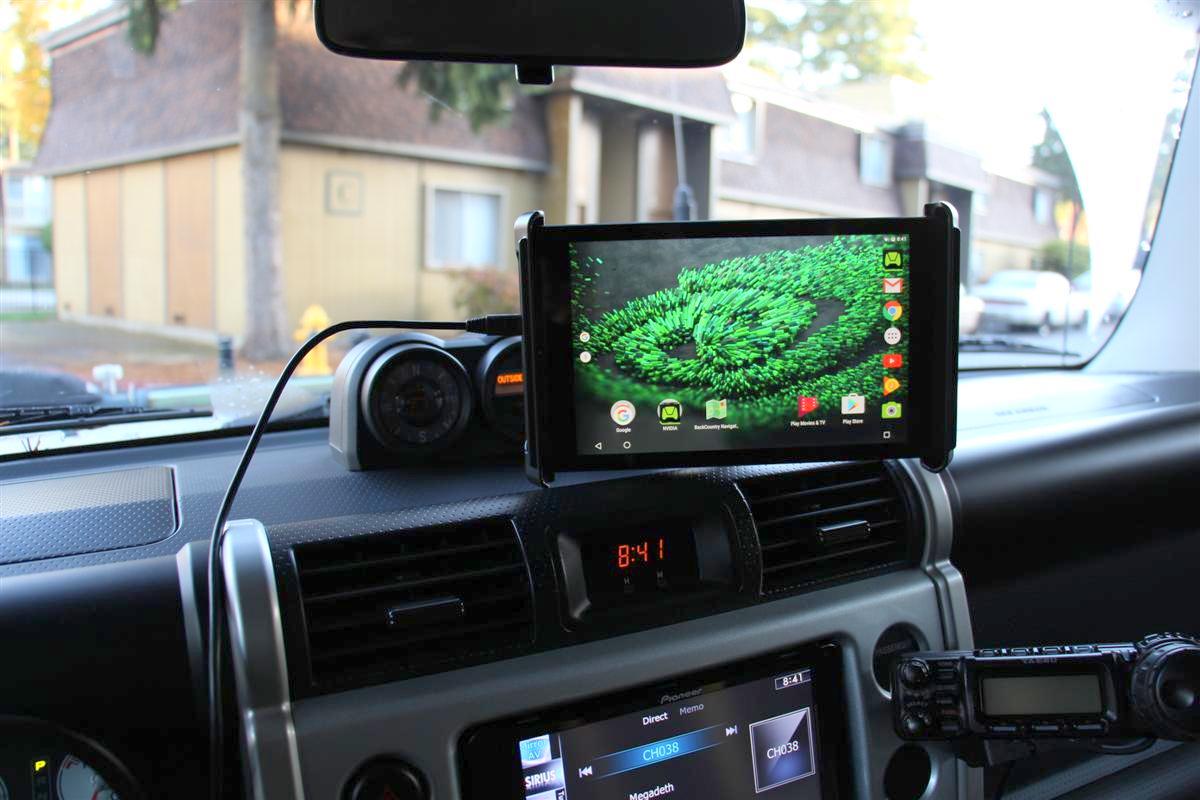
This tablet is also a gaming one, so you know it will be fast.
As soon as I turned it on yesterday, it prompted me for my homes Wi-Fi login, and then it asked me is I wanted to copy/transfer my apps and date from my HTC One Android phone over to the new tablet.
I choose not too, as I have a lot of apps that are not needed on the new tablet.
I did find a screen later where I would pick which apps to transfer, and I did.
Google Maps and Google Earth work perfect on the new tablet, and I also downloaded the Pro paid version of Back Country Navigator, and have been messing around with it here at home.
I had the free trial one on my phone, and after updated to the paid version on the new tablet, I also installed the paid one on my phone.
Kind of new to apps like this, so there will be a learning curve.
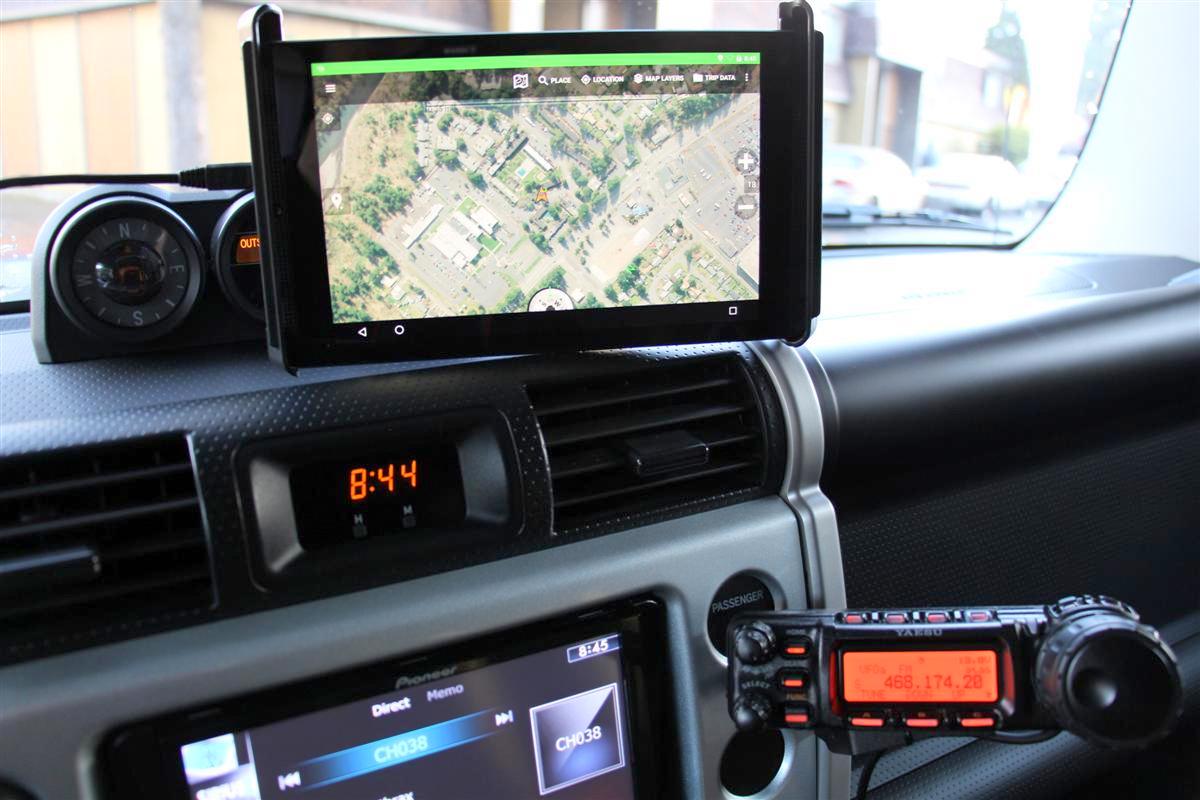
My main objective with the software is to log forest service roads I explore up at Greenwater, and also log future campsites I run across.
Then when I want to get back to them, the tablet will guide me.
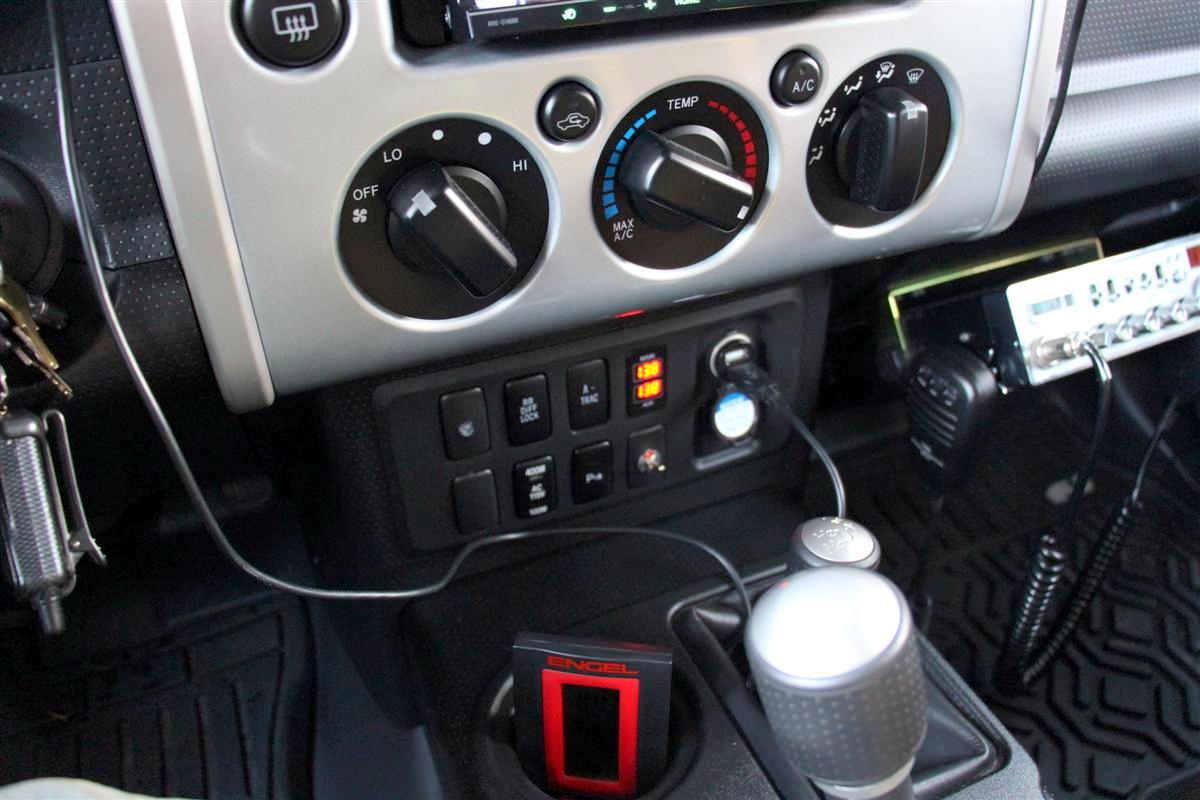
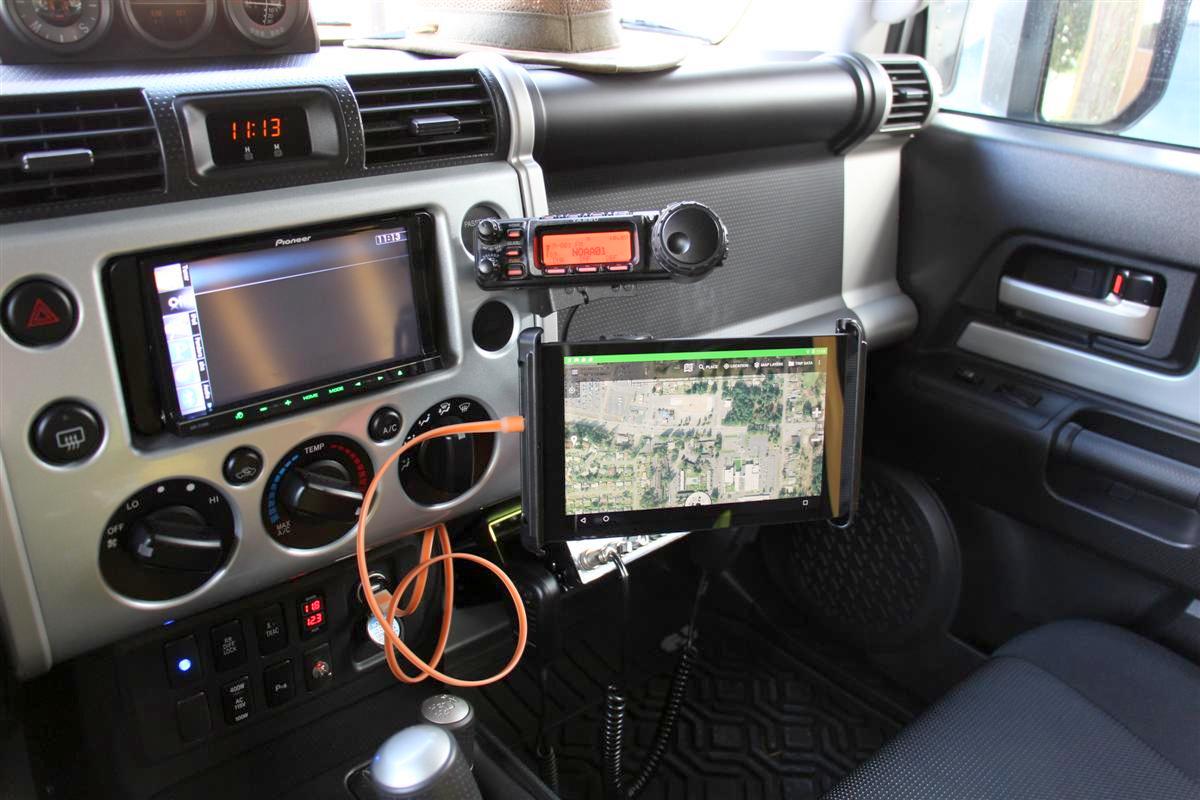
Also put in a two port USB charger into the stock 12v outlet on the lower dash to power the tablet to keep its battery topped off when in use.
The suction mount is not holding good enough to my dash though, it loosens up after a bit, and that is not good.
Later today, or perhaps tomorrow I am going to mount the one that attaches with the passenger seat bolt, that should be better.
I could probably get the suction mount to work if I attached it to the windshield, but I really do not want it blocking the view.
They have a lot of informative videos on their YouTube channel too, and if you search Back Country Navigator, there are also a ton of end user videos. https://www.youtube.com/user/crittermap/videos
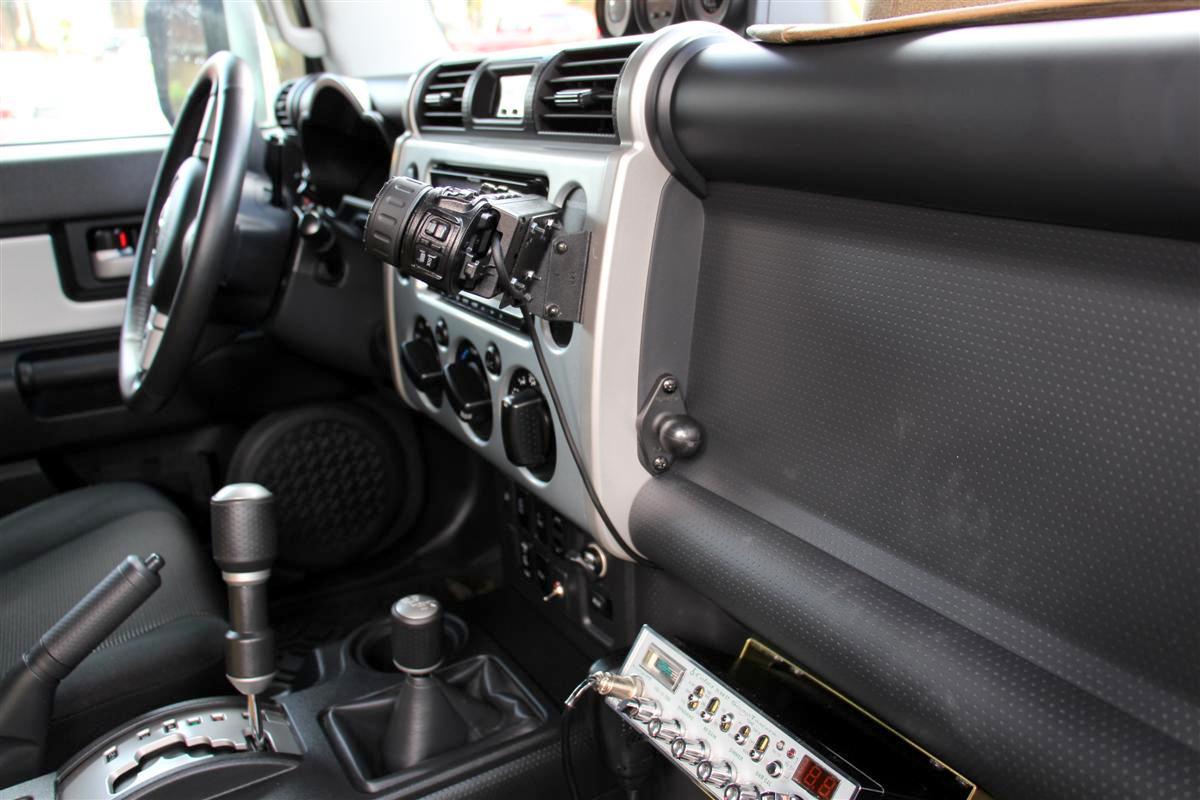
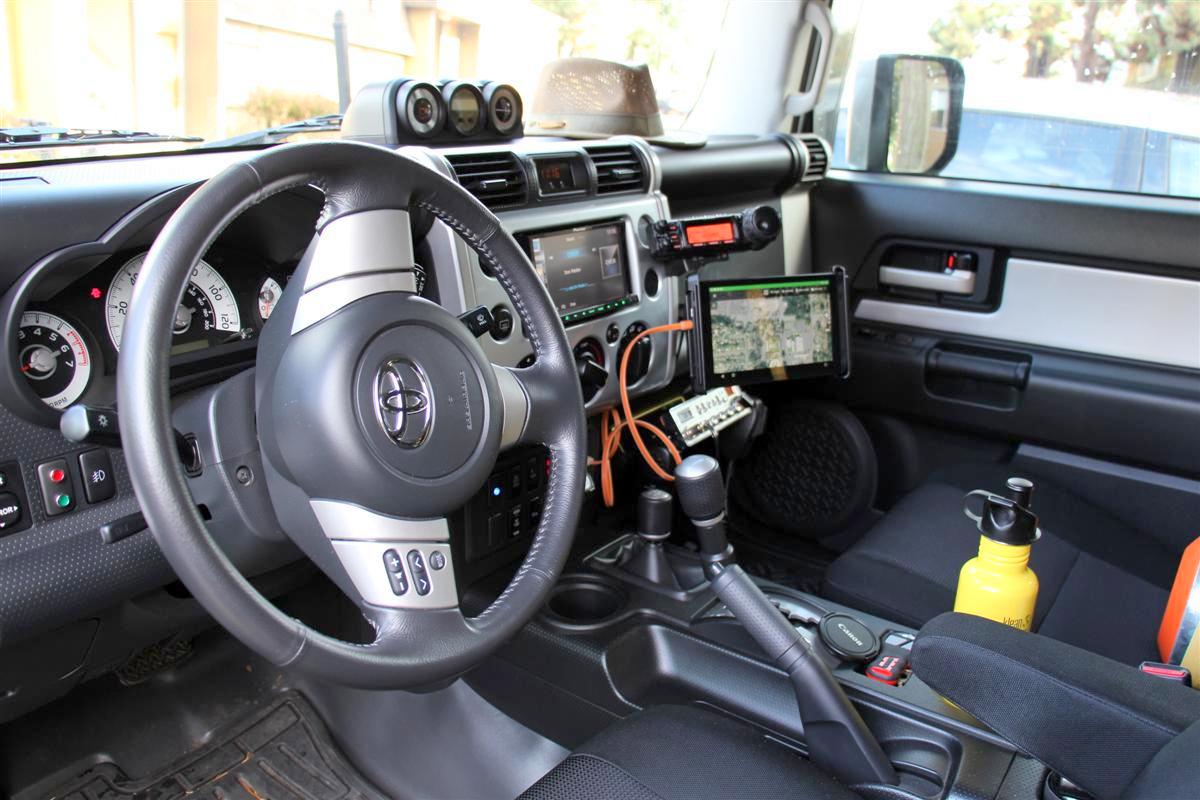
I followed Zero's installation of his tablet and RAM arm/ball mount from fjcruiserforums website, and put the ball backing plate in the same position as he did.
This allows the tablet mount to be folded up flat against the flat surface that is just above the glovebox.
Simply unscrew the big plastic nut on the mounting arm to allow both ball ends to loosen, then you can adjust the angle up/down, and sideways of the tablet plate.
I drilled two small holes into the side of the dash, and used some screws that came with the mount.
It is nice and strong, and best part is I did not have to disassemble my dash by pulling the heater control/stereo surround panel off.
That would have been kind of a PITA as I would have had to unbolt the mounting bracket that holds the Yaesu ham radio faceplate too.
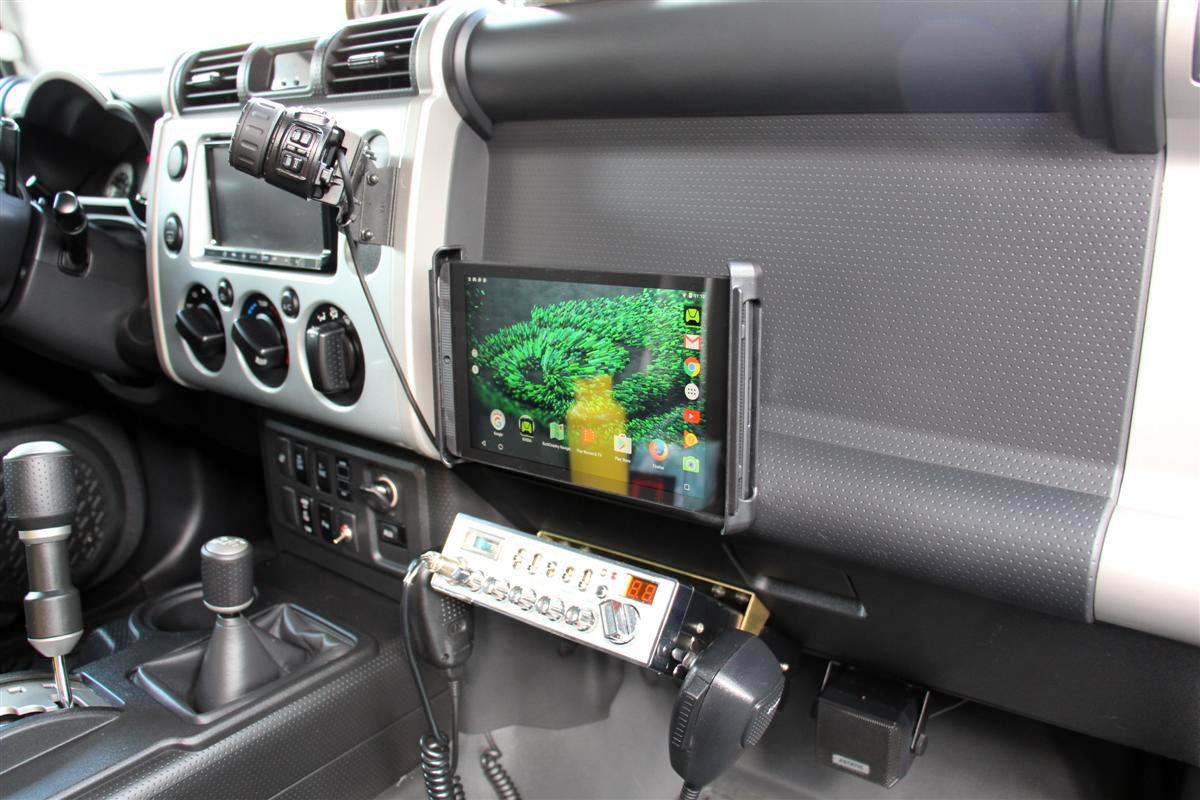
I use these flat USB cables too that I get off of Amazon, and no, I did take the time yet to shorten it up to make it look better, and I had not wiped down the black plastic yet either on the dash behind the mount, that all will come later.
Overall I am very happy with how the project turned out.
Cannot wait to hit Greenwater with it and start making some tracks and waypoints of some future campsites.
OK, on with some fresh pictures from today:
Ball mount screwed into the side of the dash
Mount folded up flat against the dash
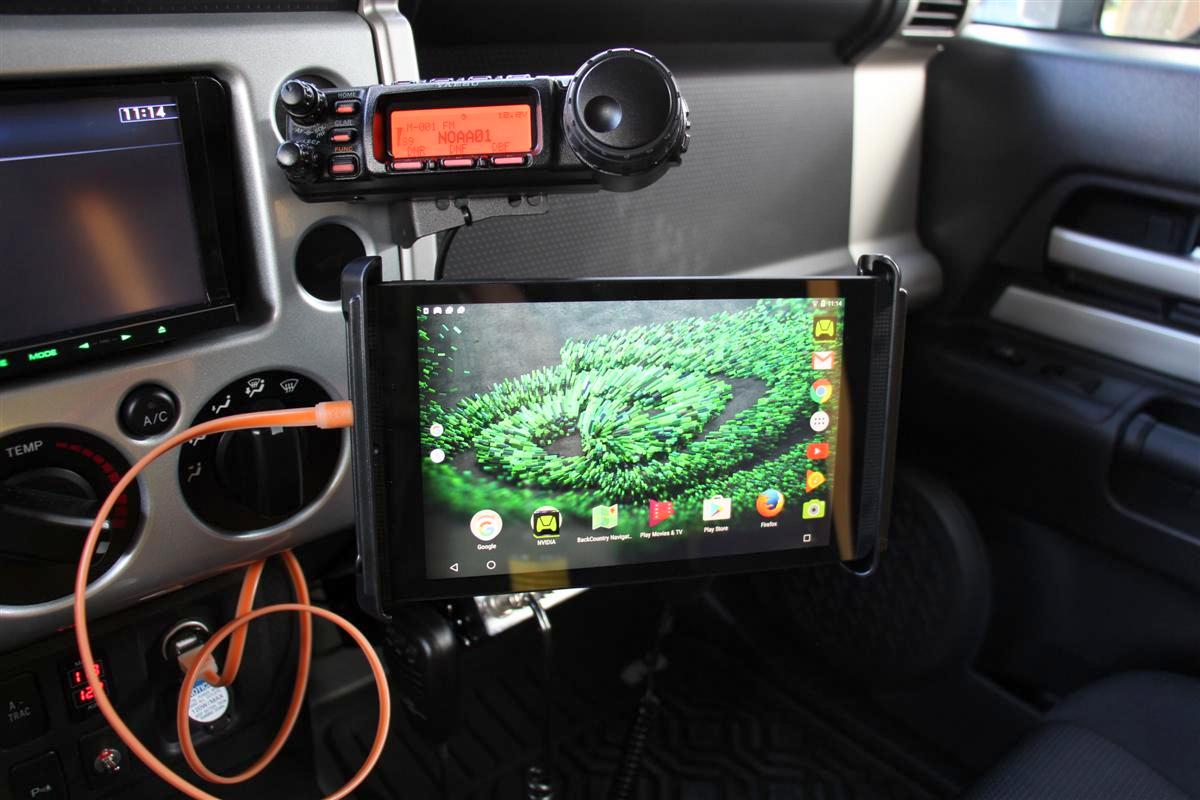
Screen with the Back Country Navigator app opened, and the USB charging cable plugged in
We have a bug on the forum, the word battery above is underlined, and it takes you to WalMart.
I did not put the link in there either.
Going to have to let IB know about this.
That is cool, I saw that but then I saw you had an open switch blank in your dash too
Can you do me a favor and measure how wide your FJ grill is to the outside of the headlights and how high it is?
I may have a line on an FJC grill and debating about stashing it for a light conversion on the 4Runner..gonna have to play with photoshop to see if it might work
WOW! That is a sweet setup!
I like the Ham unit. I thought of buying a Yaesu a while back but the Icom I am more familiar with. Great looking rig!!
Nice work!
You are welcome Robb.
Cristian answered about the links, tech is going to have to take care of it on their end as they should not be showing for logged in members.
Originally Posted by toyospearo
WOW! That is a sweet setup!
I like the Ham unit. I thought of buying a Yaesu a while back but the Icom I am more familiar with. Great looking rig!!
Nice work!
Thanks, quite happy with the tablet, but now I am going to be exploring other apps too such as Hema Explorer for North America, and the Gaia app as well.
Pretty happy with the Yaesu for the time being, so many controls though
Thanks for the comps on the rig too, I have been busy this year starting in the summer with a ton of new mods.
And I thought I was done with it before this new mod chapter started up again.
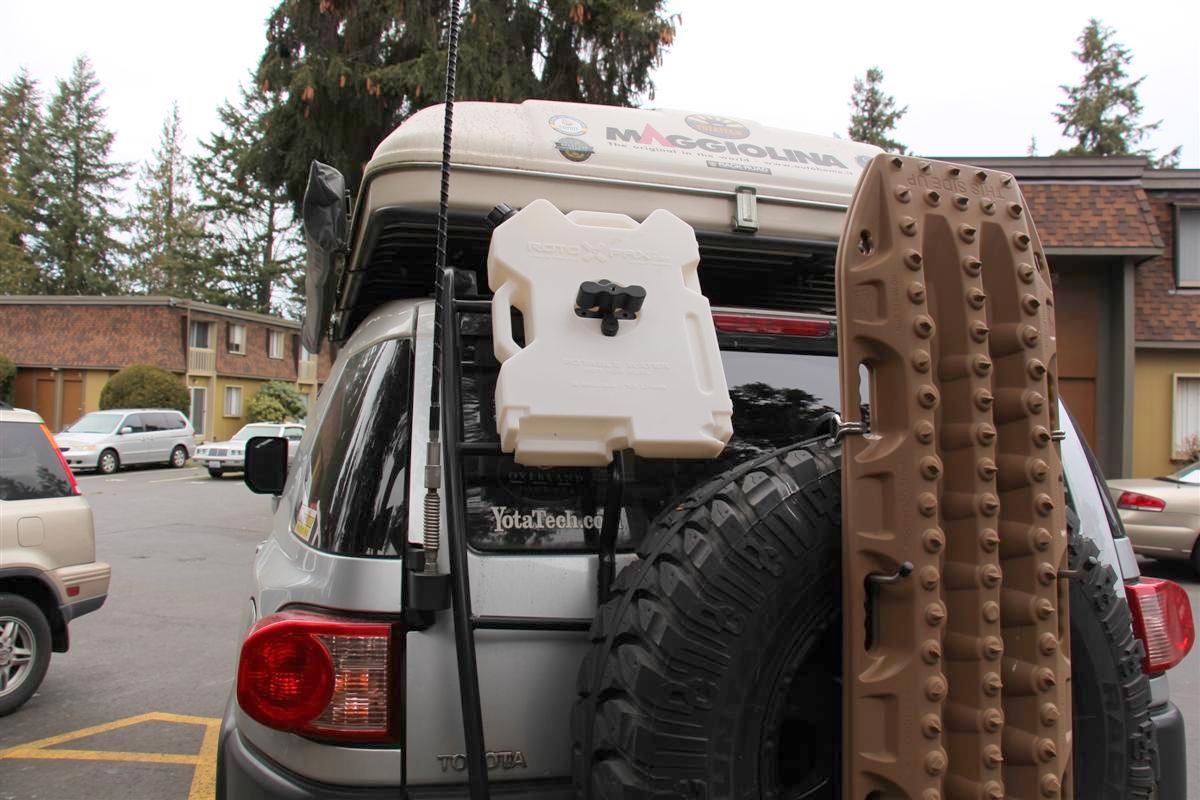
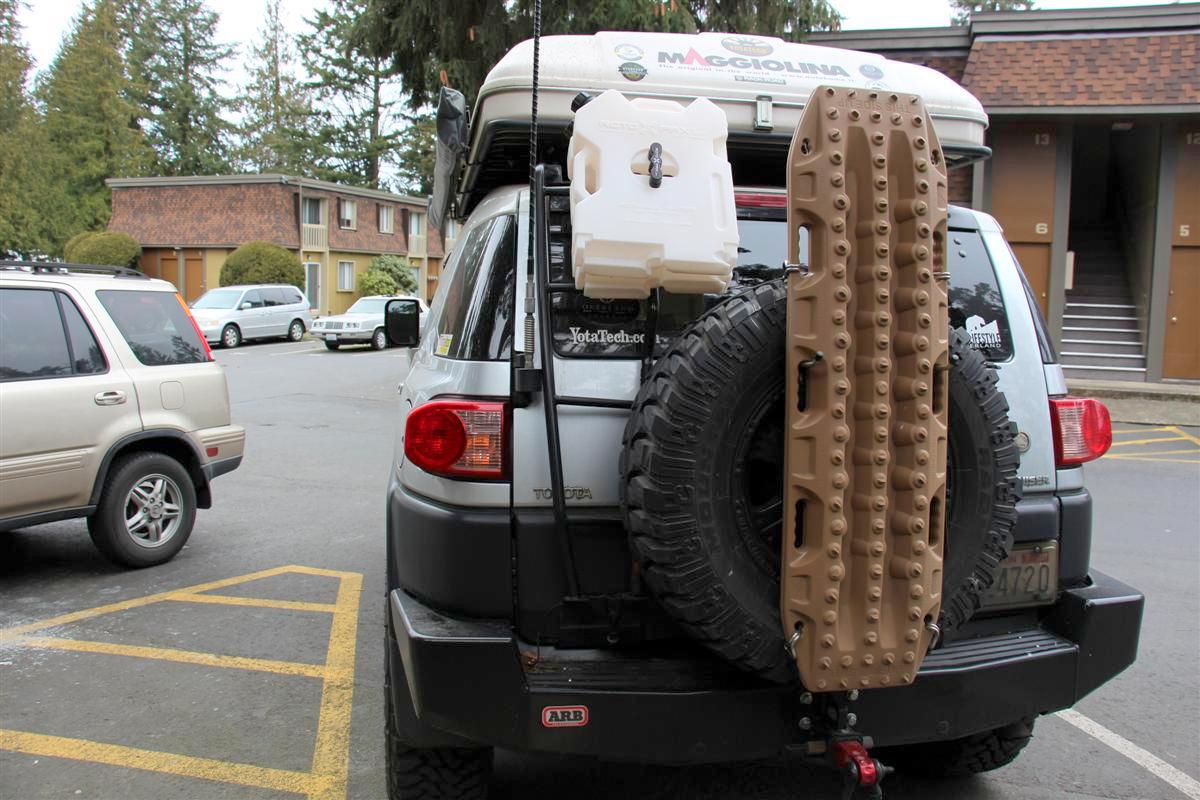
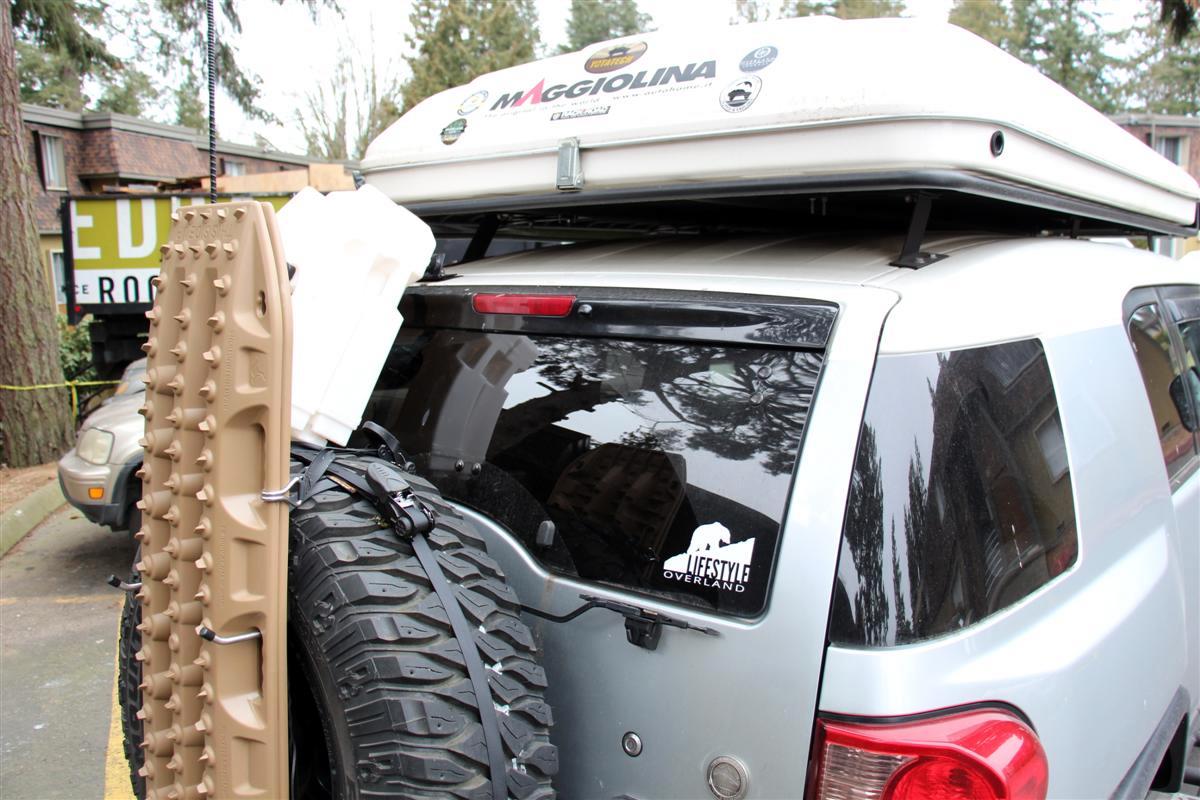
For quite awhile I have been trying out how to carry a few jerrycans of water or fuel on my rig.
Cannot put them on the roof since the roof top tent takes up the whole rack, and I do not have a swingout bumper to install a jerrycan holder on.
Last week I saw on Instagram a nice patch for a headliner (I collect them and install on my FJ Cruisers headliner) for Overland Equipped.
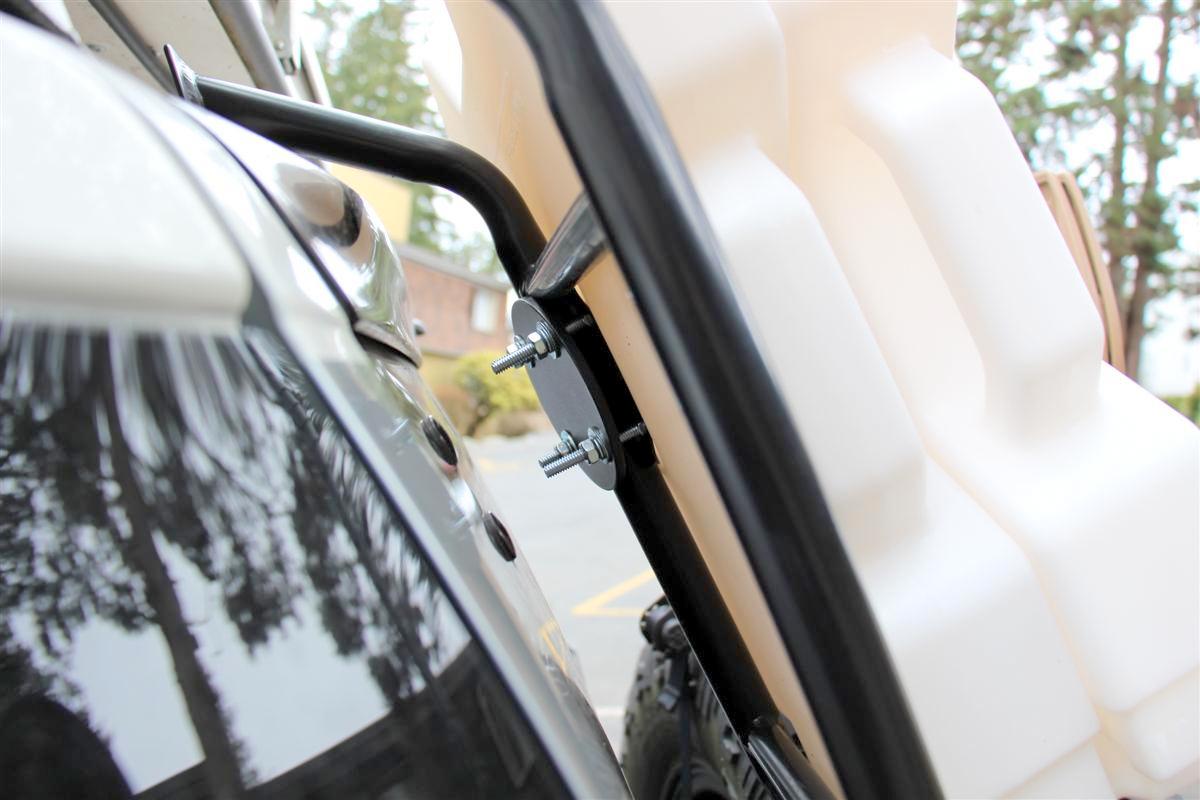
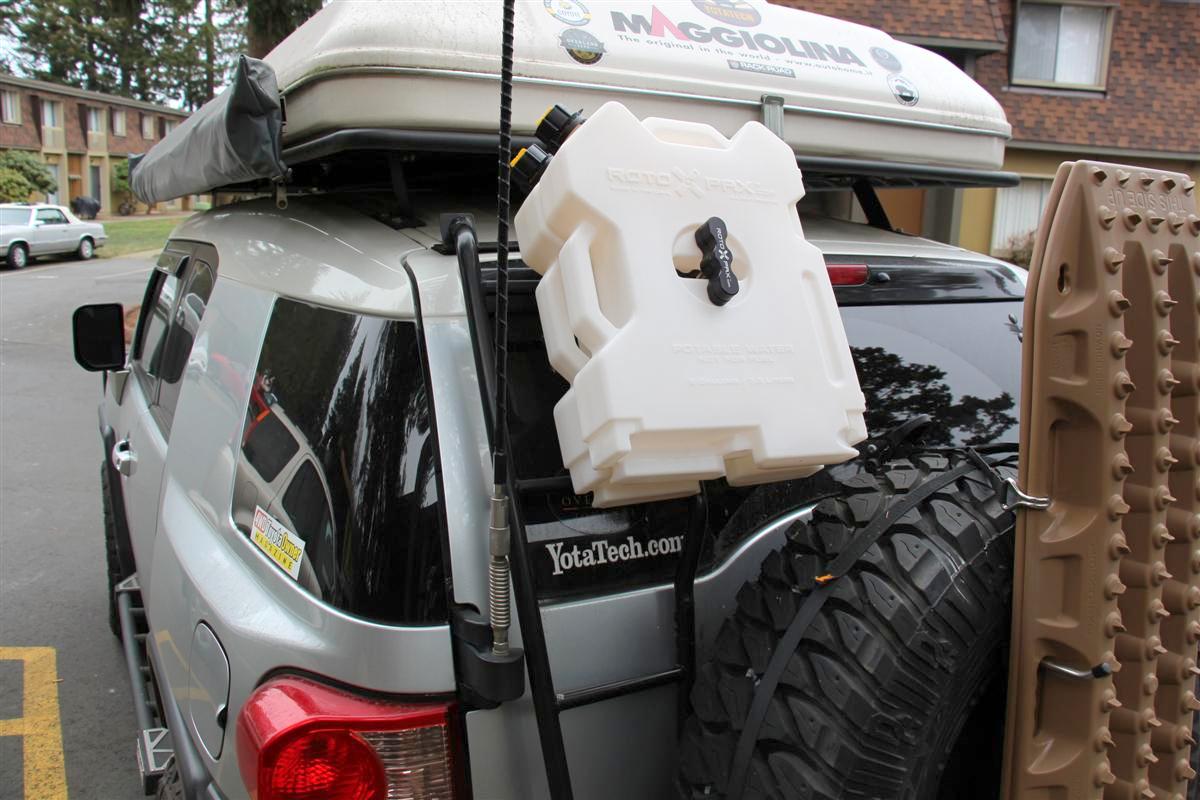
I had never heard of them, and I headed over to their site and saw they had a Rotopax mount that goes behind a ladder on a rig.
Well I have a ladder, so I emailed Matt from there and then talked to him on the phone and ordered up the plate, and I also got a sticker and two patches from him.
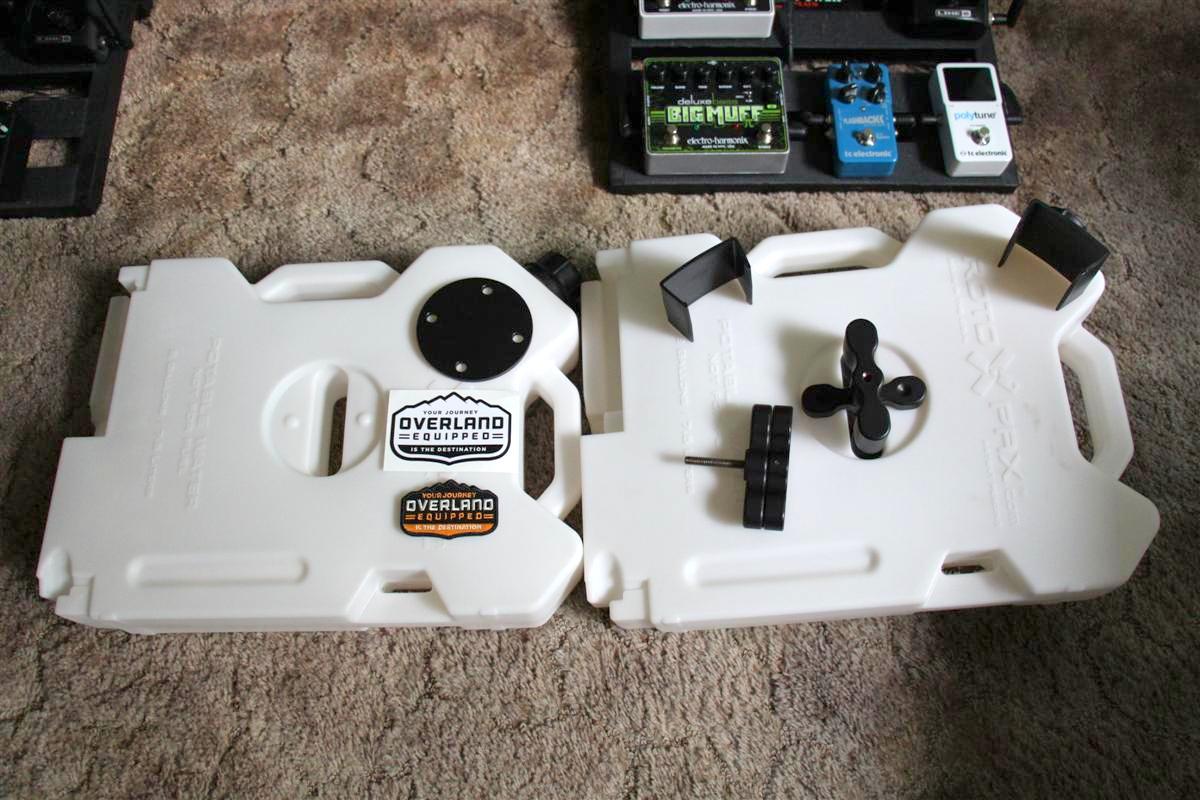
He told me what I needed from Rotopax, so I ordered up two white water only two gallon cans, the DLX Pack Mount, and an extension so I could add a second can.
Matt and I were not sure if this was going to fit, as I may be the first FJ Cruiser to have tried this, I am not 100% sure.
But as you can see from the pictures it turned out perfect.
The only thing is the cans block my Overland Journal oval sticker, so I will have to mount a new sticker.
The hardware Matt includes use 7/16" nuts, and most of my tools including my nice Craftsman ratchet wrenches I have in my home and rig are metric.
I tried a 12 mm ratchet, but a little too big.
Fortunately my neighbor had a closed end 7/16" wrench.
It was very slow with it, so I will now be ordering a standard ratchet wrench set.
If I had one, it would have gone a lot faster.
But I am very happy with the outcome here, I think it turned out great.
The water will be used for drinking water when camping, and save me a ton of room over carrying a big water container in my rig.
I hope this helps some other FJ Cruiser owners who have been wanting to add either fuel or water cans to their rigs.
All the parts spreed out with Matt's ladder mount on top of the left can
I did not know what those two plastic clips are, and Matt answered me over on Instagram that they clip together two cans if used side by side.
One can mounted, no T lock handle on yet
The second can will push in over that black part.
Both cans mounted and T handle turned and tightened down to hold both cans
Showing Matt's round black plate on the backside of the ladder, it bolts to the Rotopax mount
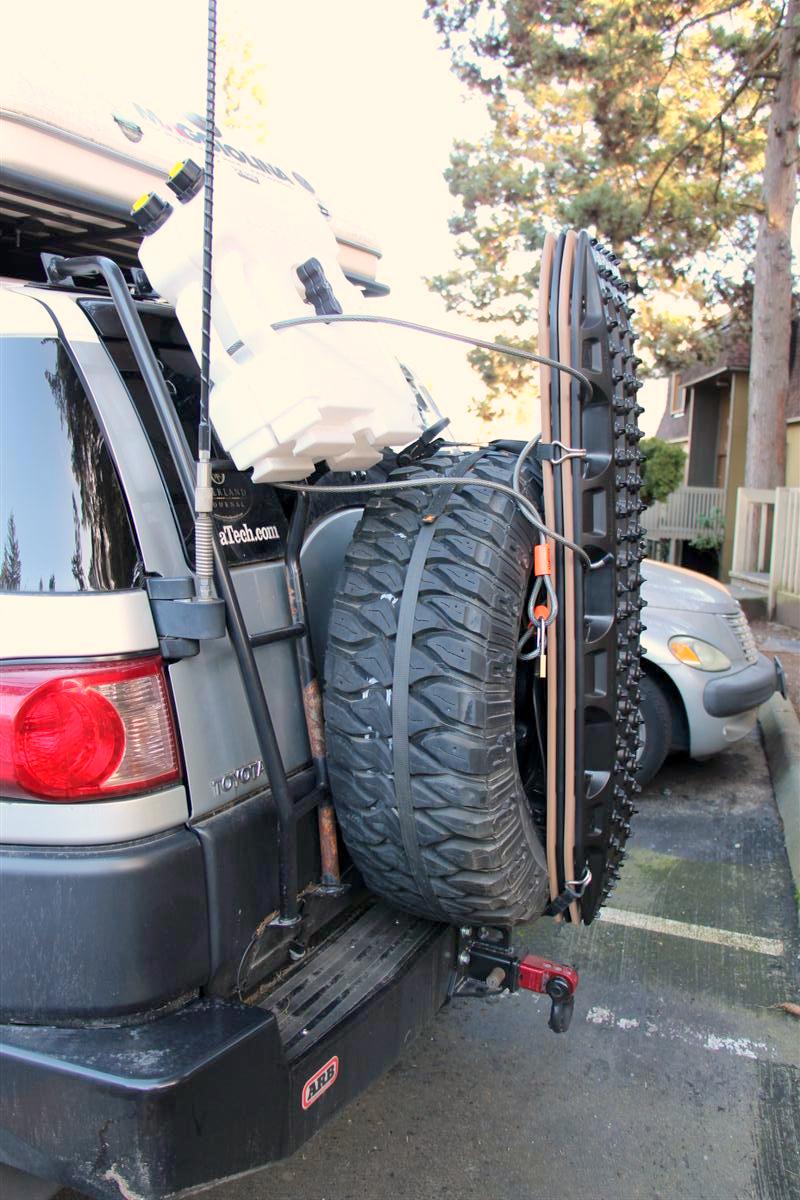
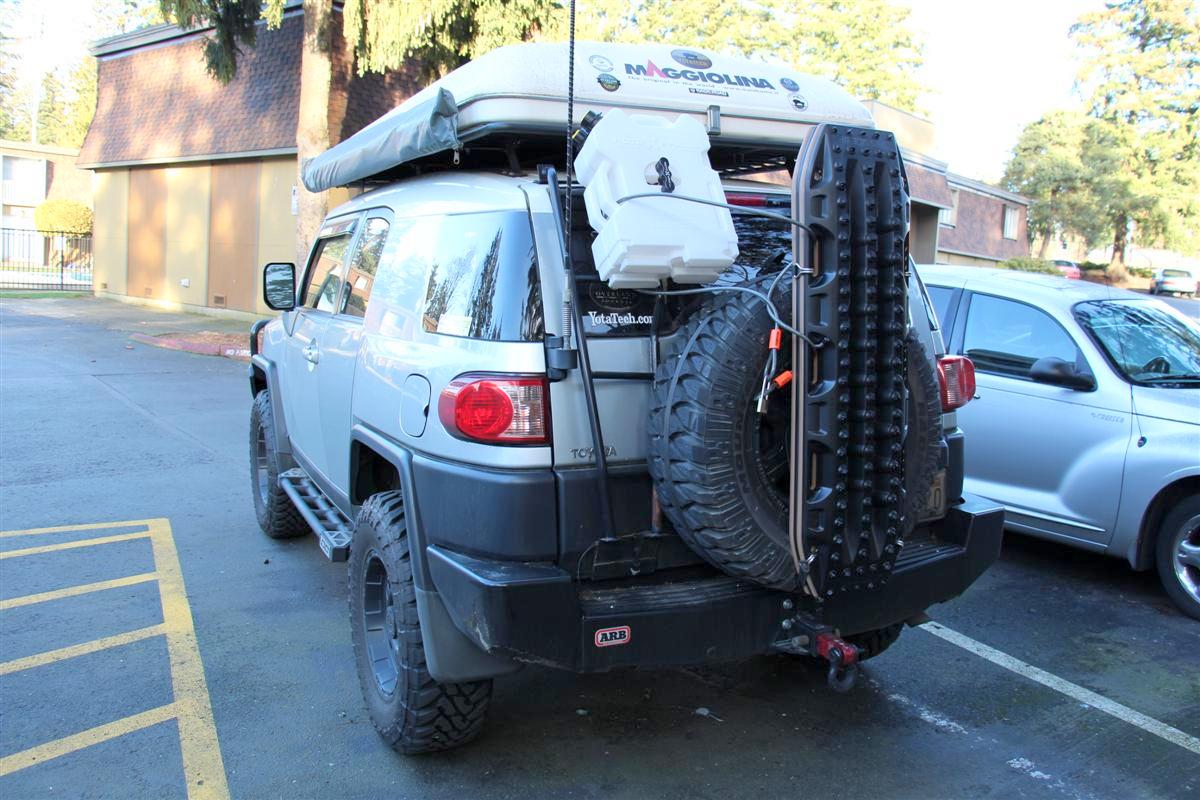
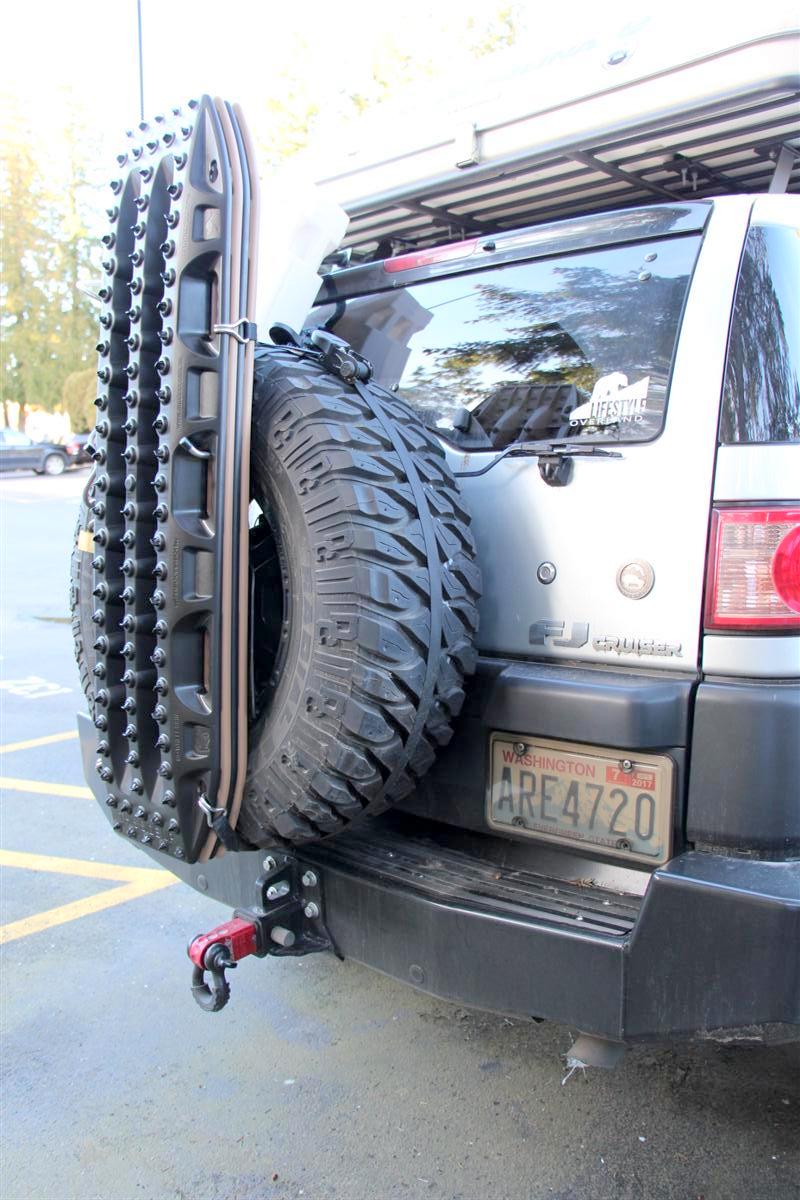
Yes, there is some rear window blockage, but I do not really use the window anyways with the Maxtrax mounted there, and it is worse when the chuckbox is loaded in the rear for a trip
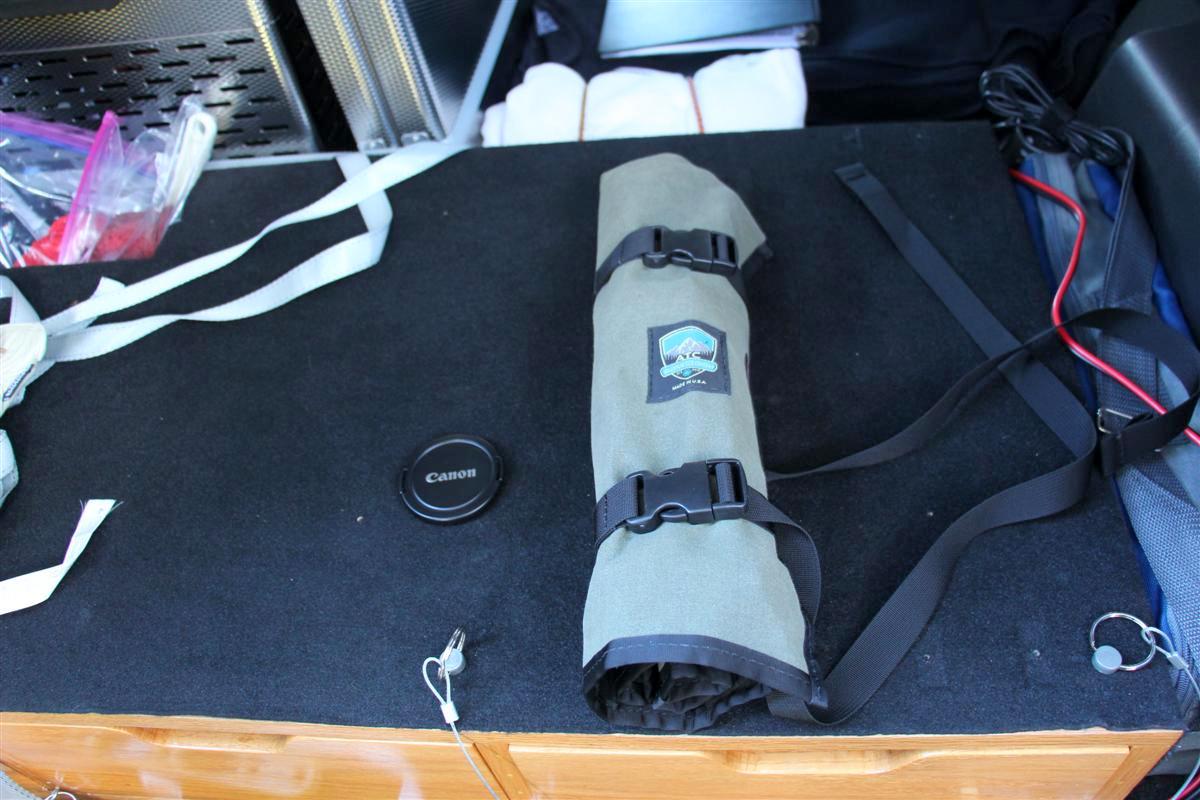
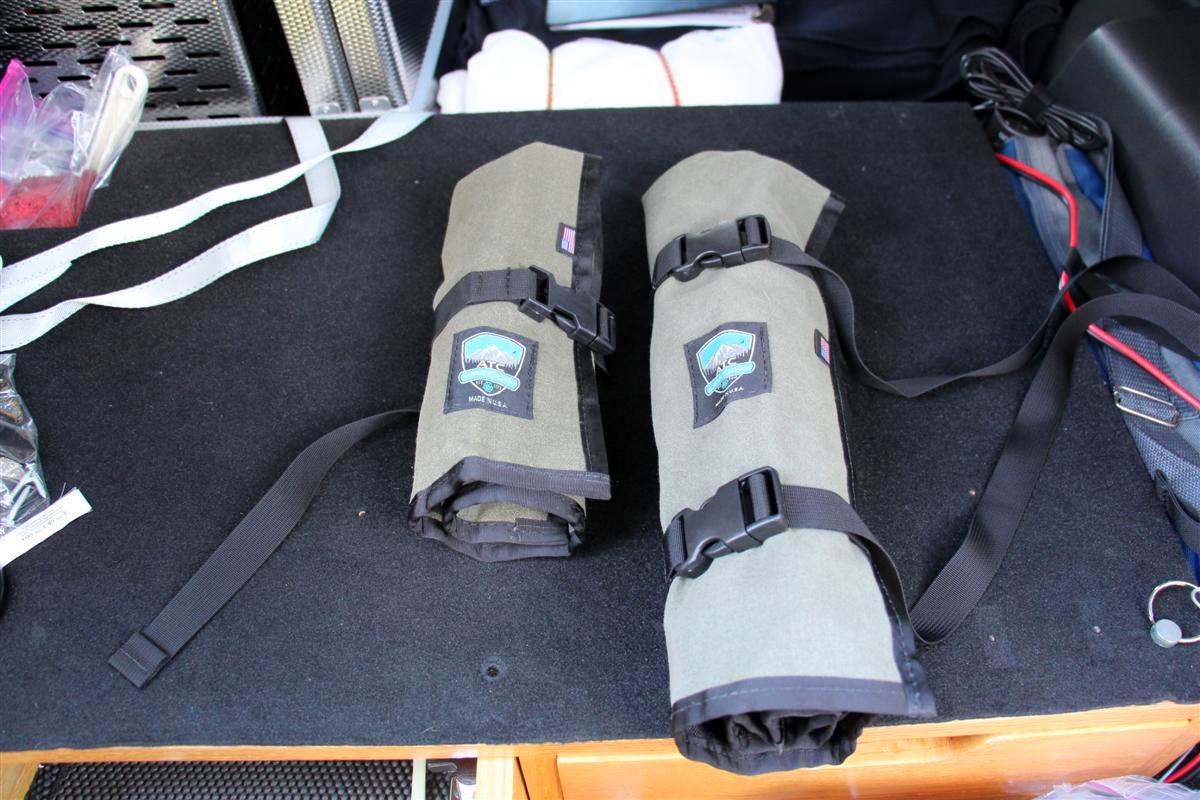
Notice I did not say installed, as these are not actually installed, but carried in my cargobox.
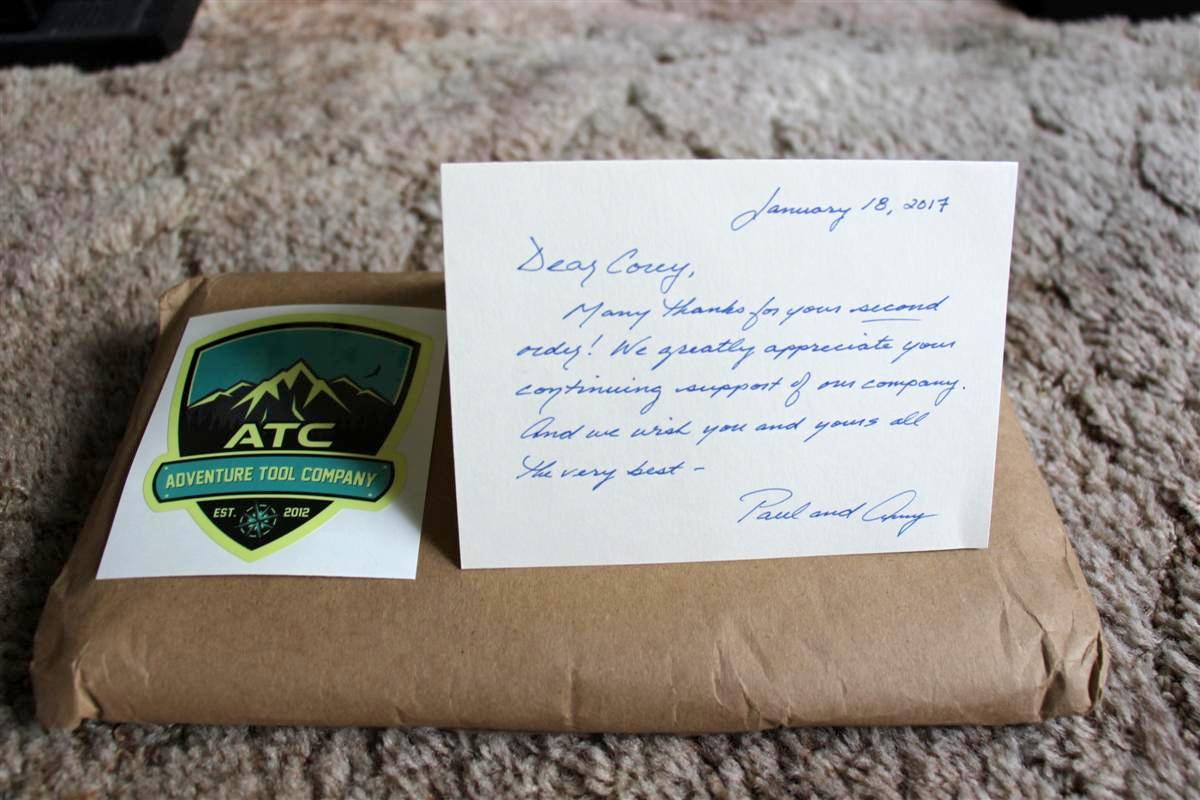
I first found out about tool rolls I think from the Hanson's at Overland Expo.
Then I joined Instagram awhile back and started following Adventure Tool Company.
And what got me to finally take a real close look at these fine tool rolls was a video by Expedition Overland featuring Jeff and Kurt from XO.
Kurt is also the owner of Cruiser Outfitters in Utah.
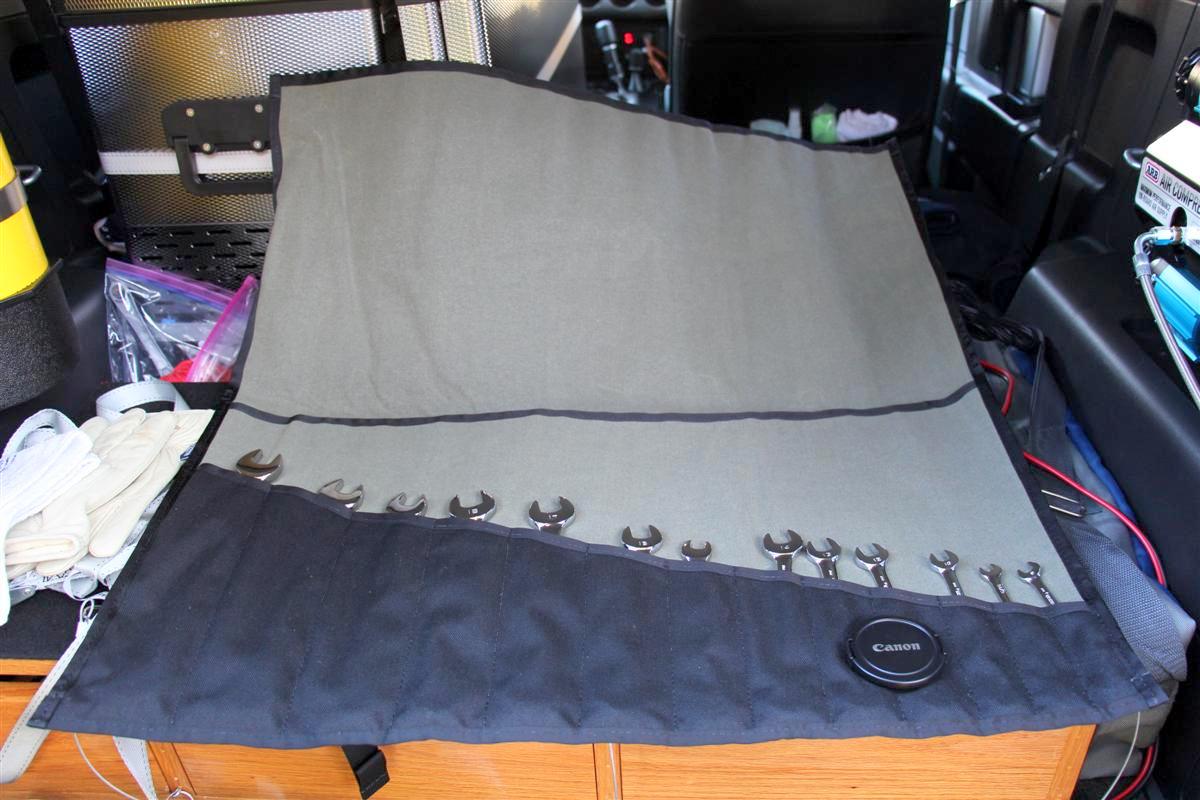
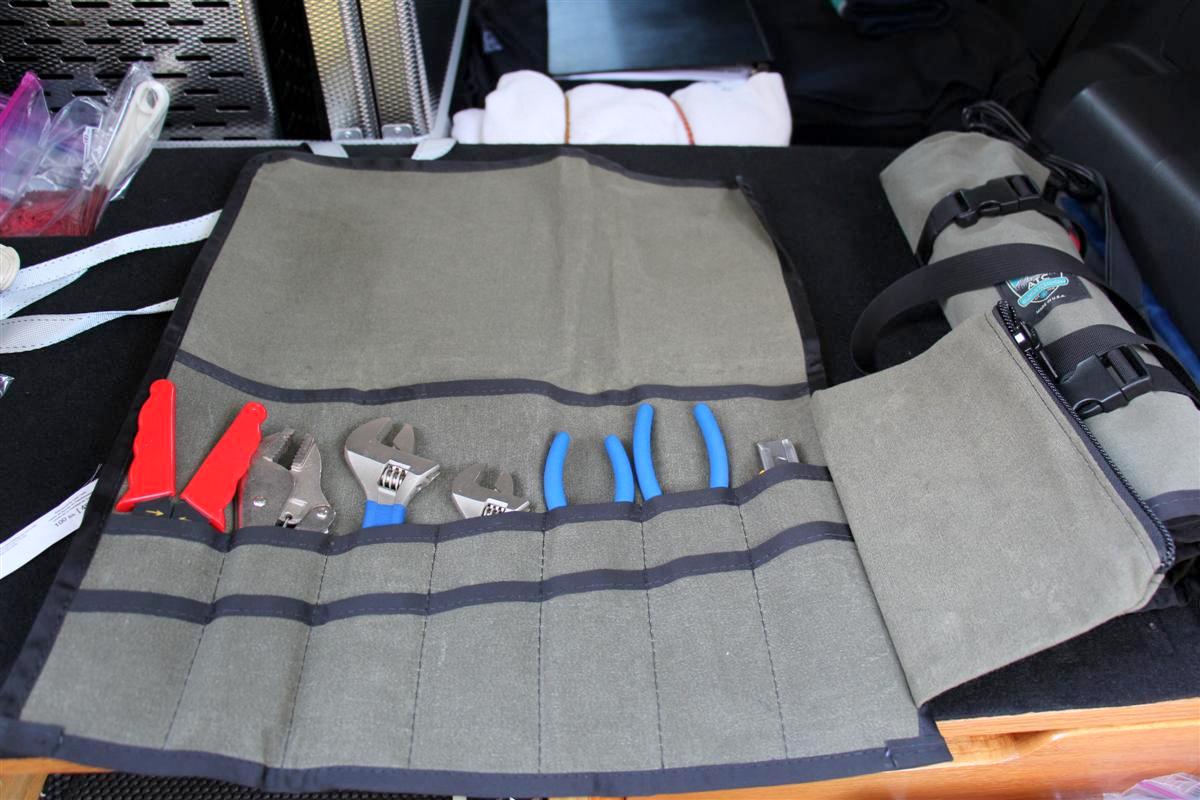
I checked out Paul and Amy's Adventure Tool Companies site, and I first bought the WrenchRoll, then a few days later ordered the SportRoll.
The former will be for my ratchet wrenches, and the latter will be for adjustable wrenches, pliers, etc.
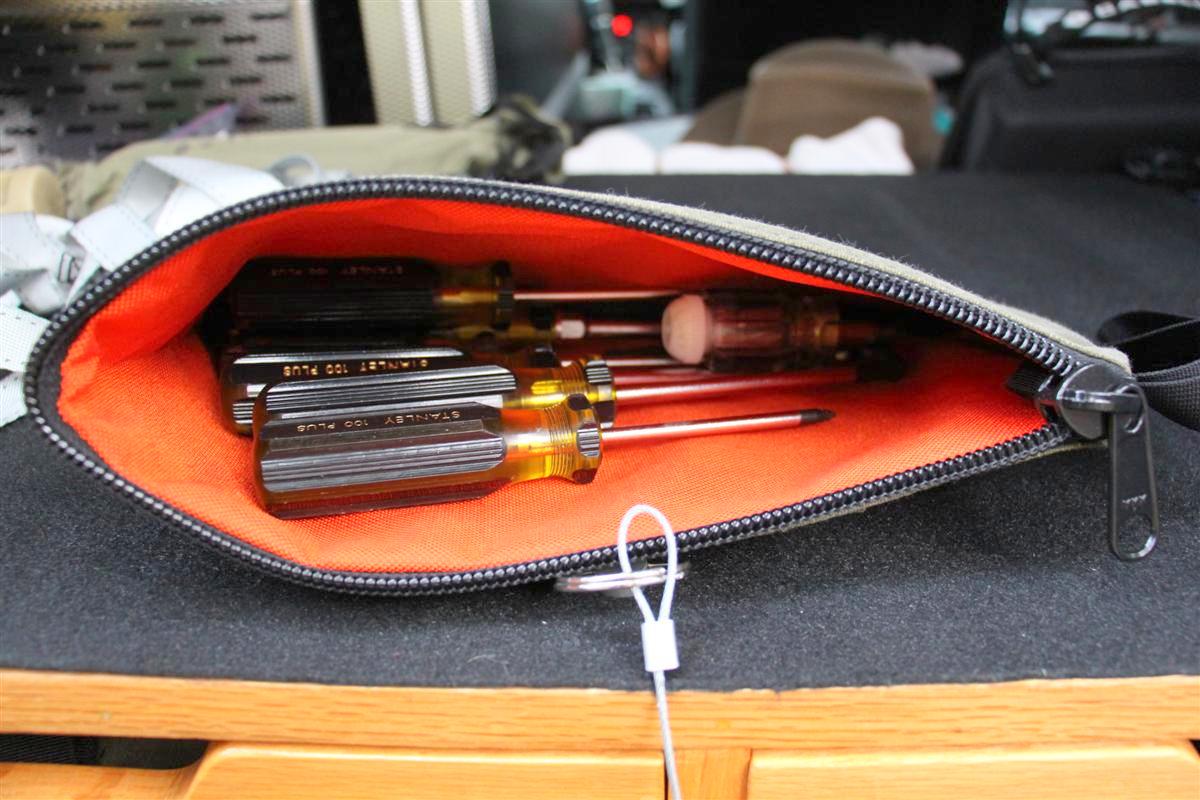
I did not have room to put my screwdrivers in, so maybe I will order another tool roll.
I planned on putting them into the SportRoll, but some are too long for it.
I probably could take out the SAE ratchet wrenches since I only need metric for my rig, and put the screwdrivers into the WrenchRoll.
Will try that at another time.
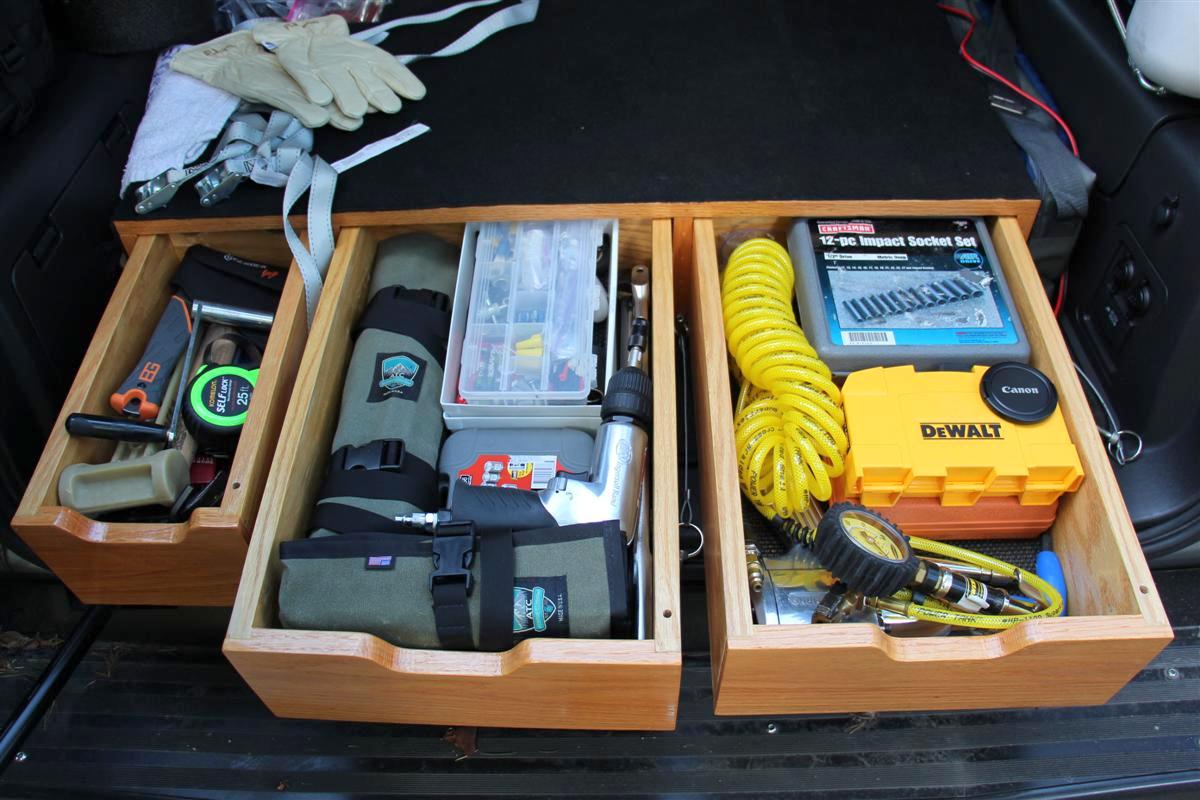
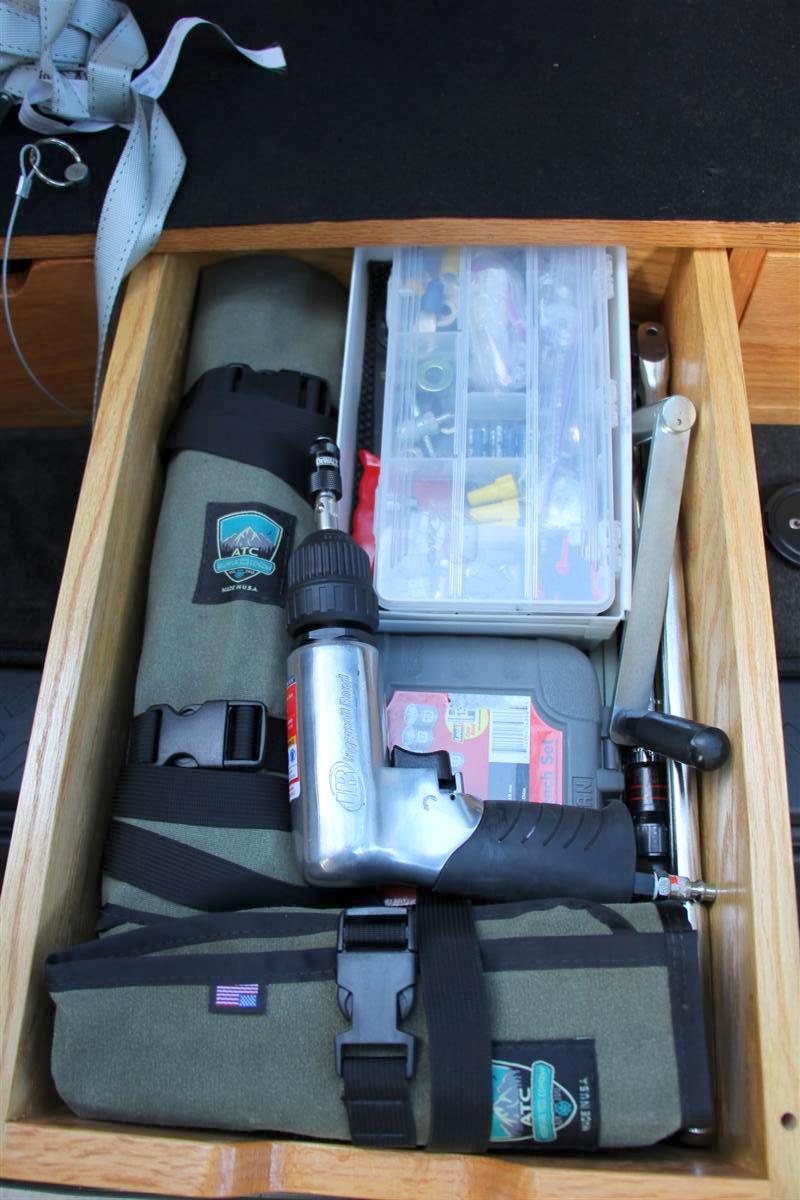
Before I had my tools in my cargobox just loose, but sitting on toolbox liner.
These ATC tool rolls will keep the tools much better organized.
Plus these are made in the USA in Colorado, very happy to support a USA company.
I will include a link below in the links section where you can read about their company.
I do not think you are going to find better tool rolls out there, these are crafted perfection.
Oh, and they smell great too!
If you are looking for a great way to carry your tools in your off road/camping/overlanding/expedition rig, look no further than these fine tool rolls.
Give them a follow too on social media, as they are always posting up cool stuff.
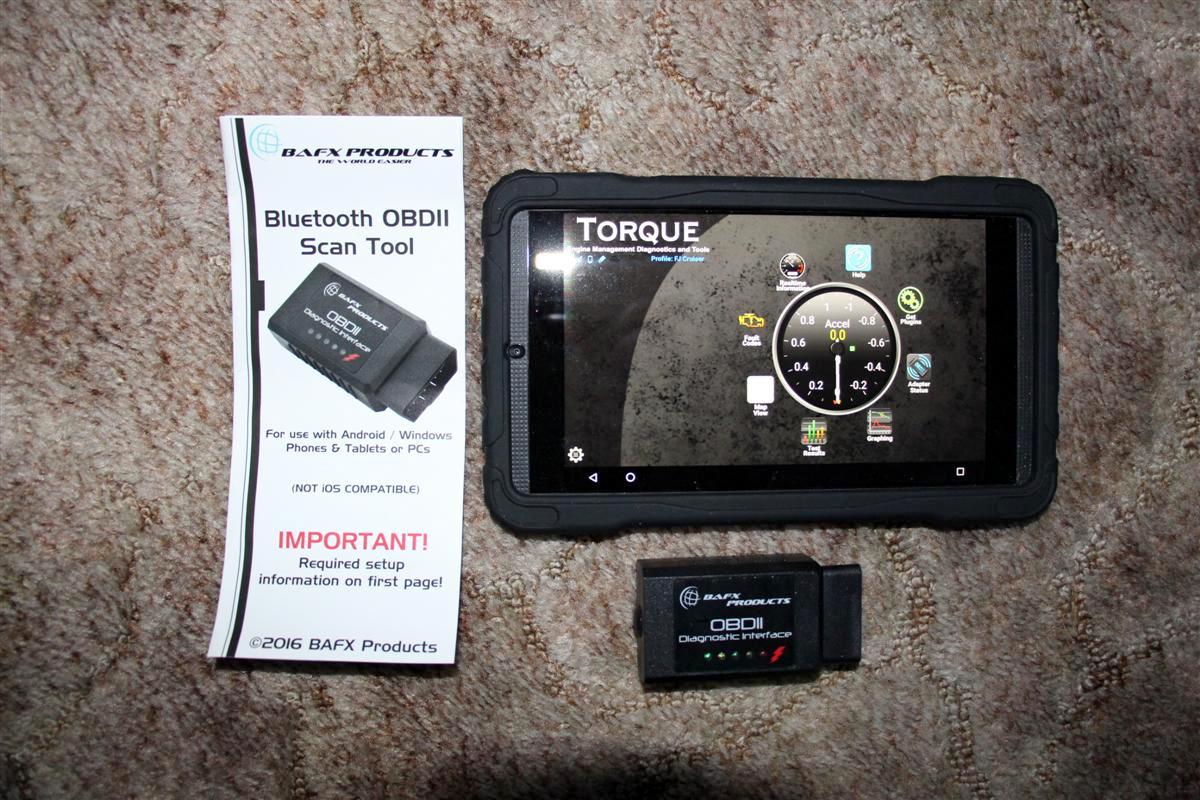
I have always thought about getting one of those scan gauge tools in the past, but never got around to it.
I saw a post the other day by Lifestyle Overland on Facebook, and he had a tablet running in his 4Runner with the Torque app from Android running on it, and I was intrigued since I run an NVIDIA Shield tablet for the Gaia GPS/Mapping app in my rig for logging future campsites.
I asked him about the device he he was using in his OBDII port, and he said it was the BAFX Products one which is highly rated on Amazon.
I bought it via Amazon, and I went to the Play Store on my PC, and bought the Torque Pro app, and told it to send the file to my NVIDIA Shield tablet.
I like how you can be on a computer, but tell it to go to your phone of your tablet, very neat!
I have never looked at my OBDII port before, but I had an idea where it was since the emissions place hooks up their scanning cable to it when you go to get your emissions done here every other year.
I plugged in the device, and a red LED came on like it was suppose to.
Since the port has power all the time, the light will remain on when the rig is off, no biggy, very small current draw.
The instructions for the device to pair it with the Torque Pro app is very simple.
Have the scanner plugged into the port, fire up the rig, then go to your Android device and have it scan for new devices, and it said OBDII in there, and I selected it, typed in 1234 for the code.
Then you open up the Torque app, and it fired right up with the tachometer showing me my RPMs.
You have a few different screen you can go through, and I selected the one that shows all of the gauges on there such as tach, vacuum, water temperature, and a few others.
I will have to play around with it more later to see if I can add in more gauges.
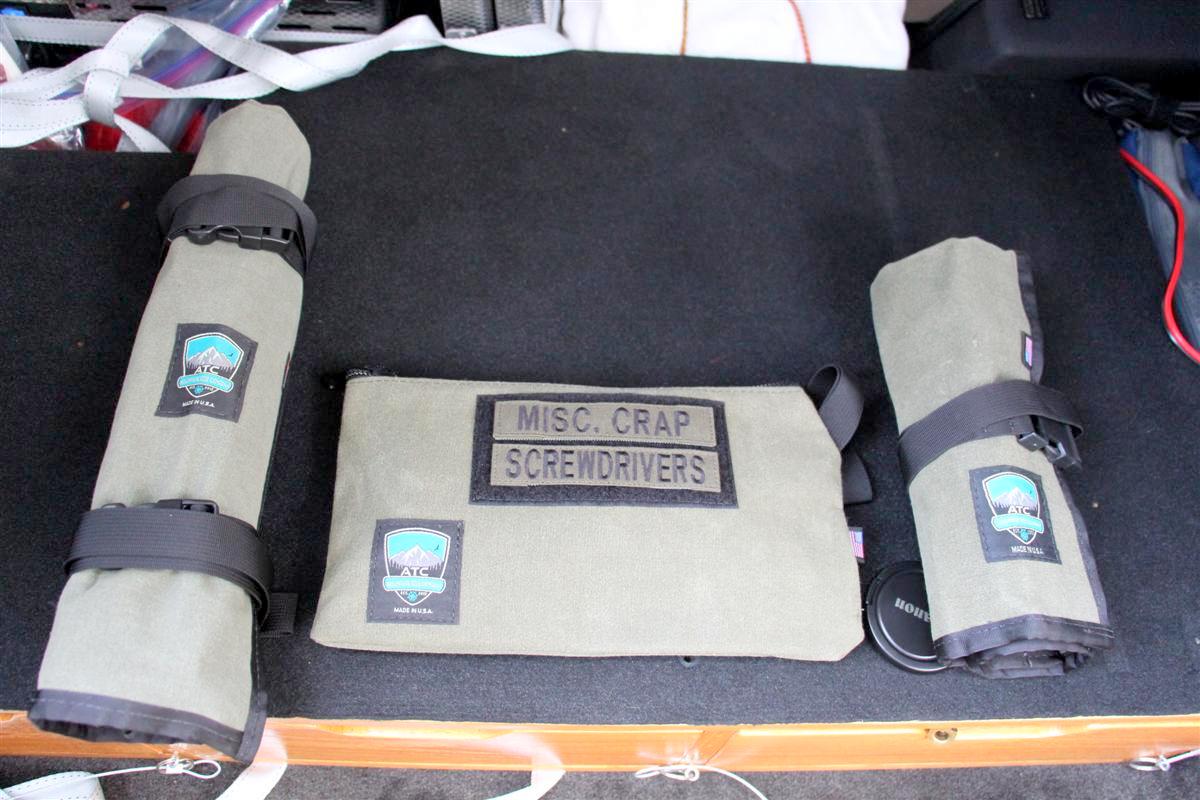
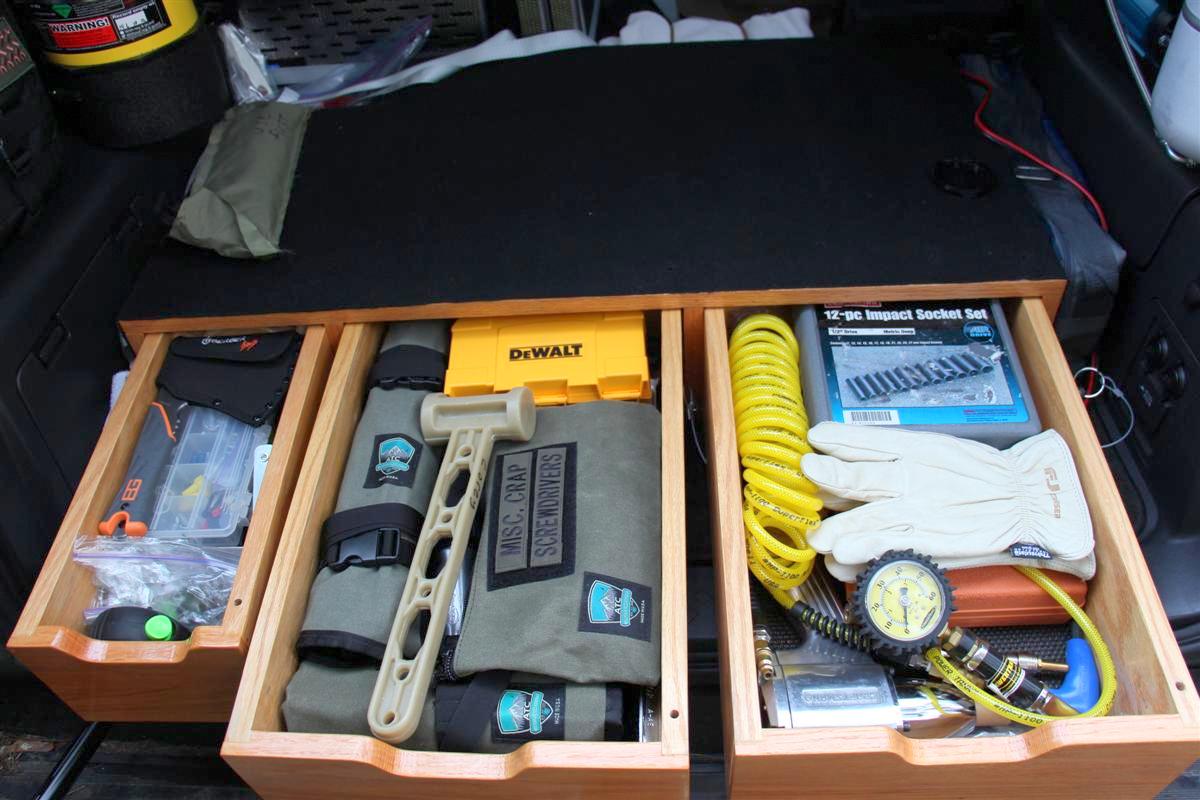
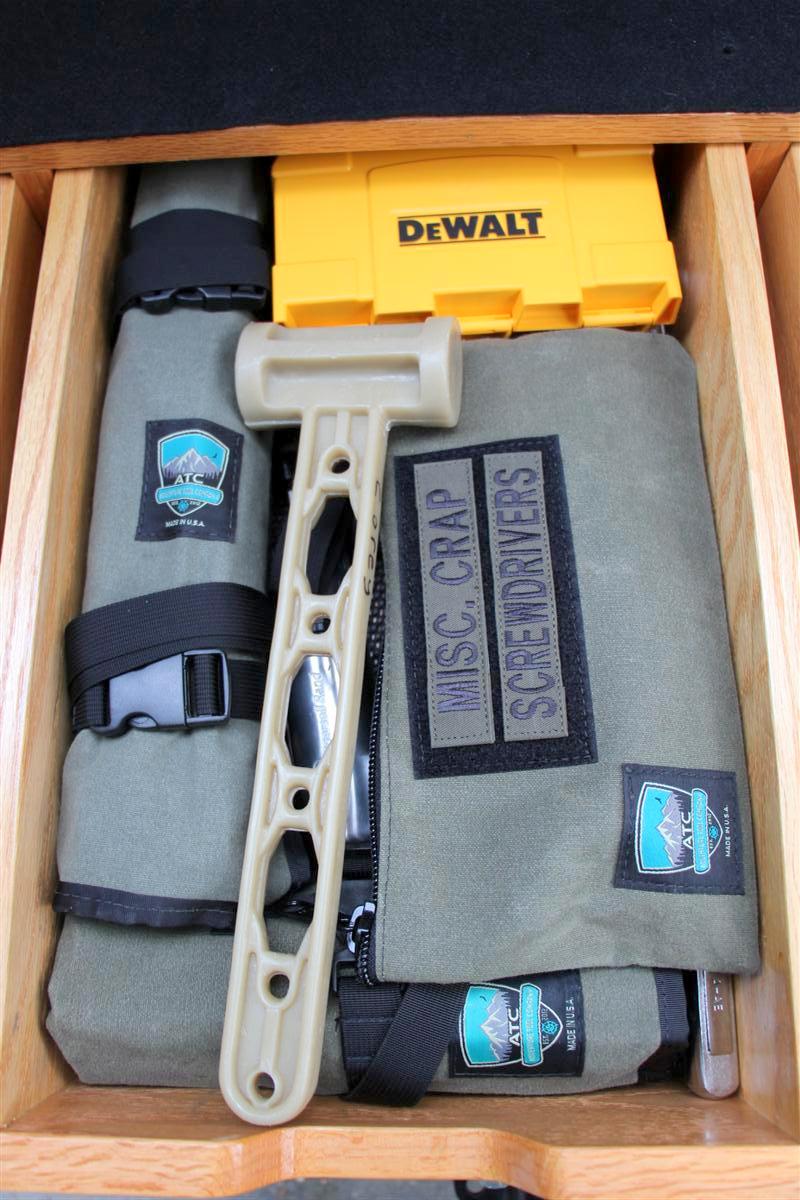
Adventure Tool Company Medium Pouch Added 2-11-2017
I bought another item from Adventure Tool Company, the medium sized tool pouch.
This one is for screwdrivers and misc. crap as you can see from the two Velcro patches on the pouch.
No more screwdrivers and other stuff rattling around in my smallest of my three cargo drawers.
The bag comes with one patch of your choosing, and you pay for a second patch, pretty nice to name what is inside of the pouch.
I also took some time and rearranged my drawers some, and pulled out the full size hammer.
I do not think I really need it, as the Gerber Bear Gryll's hatchet can be used as a hammer.
The plastic hammer you see if one I have had since my backpacking days 2.5 decades or so ago to drive in tent stakes.
I still use it to pound in tent stakes for my awning, the shower/crapper tent, and the Coleman lantern stand.
Friday afternoon at the mods!
Yep, added another pair just now.
Why???
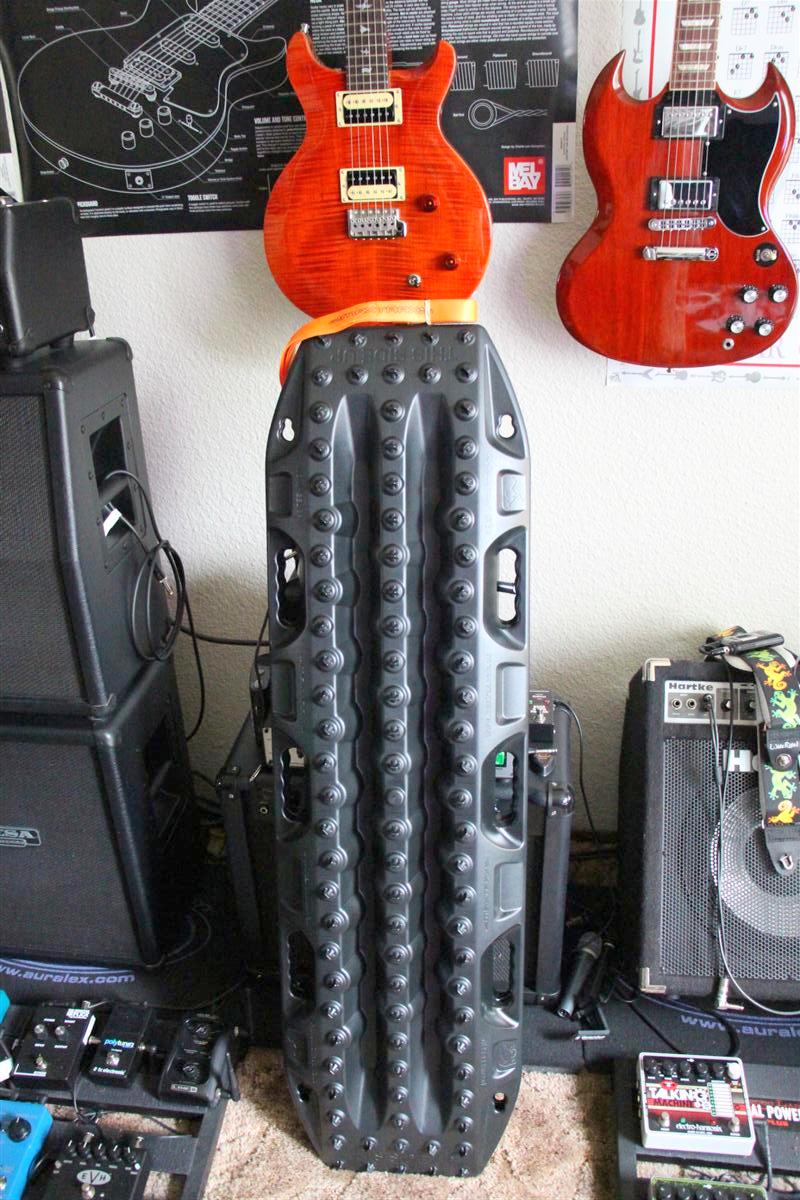
I also use my Maxtrax for leveling the FJ Cruiser when camped on uneven terrain, and two is not enough sometimes.
Now if I need to level both the front and rear, I am covered.
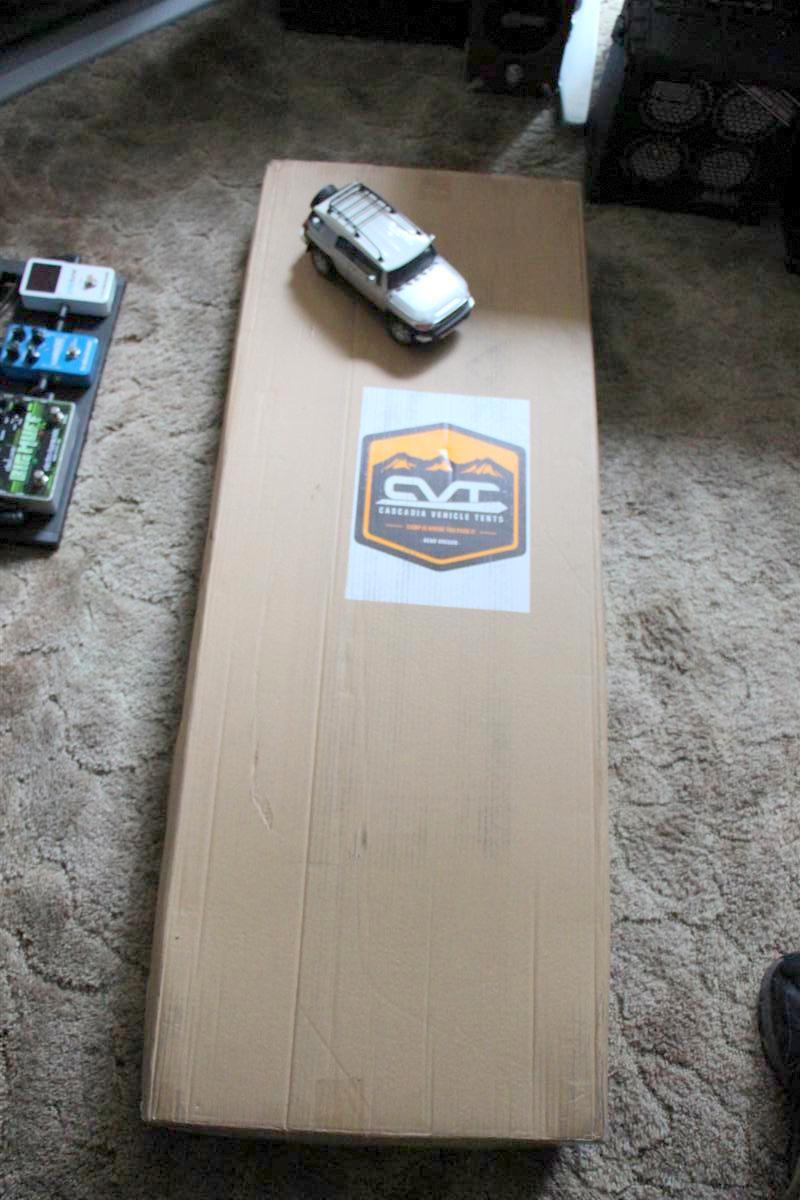
I went for Stealth Black Maxtrax this time around, as I really do not need the bright orange as I do not do mud where the orange would be beneficial if they get buried.
These are handy for sand as well, and they stand less of a chance of disappearing into sand than they would in mud or very loose dirt on a trail.
Bought these from the fine folk's at CVT Tents, same place I got my Outer Limits first aid kit from.
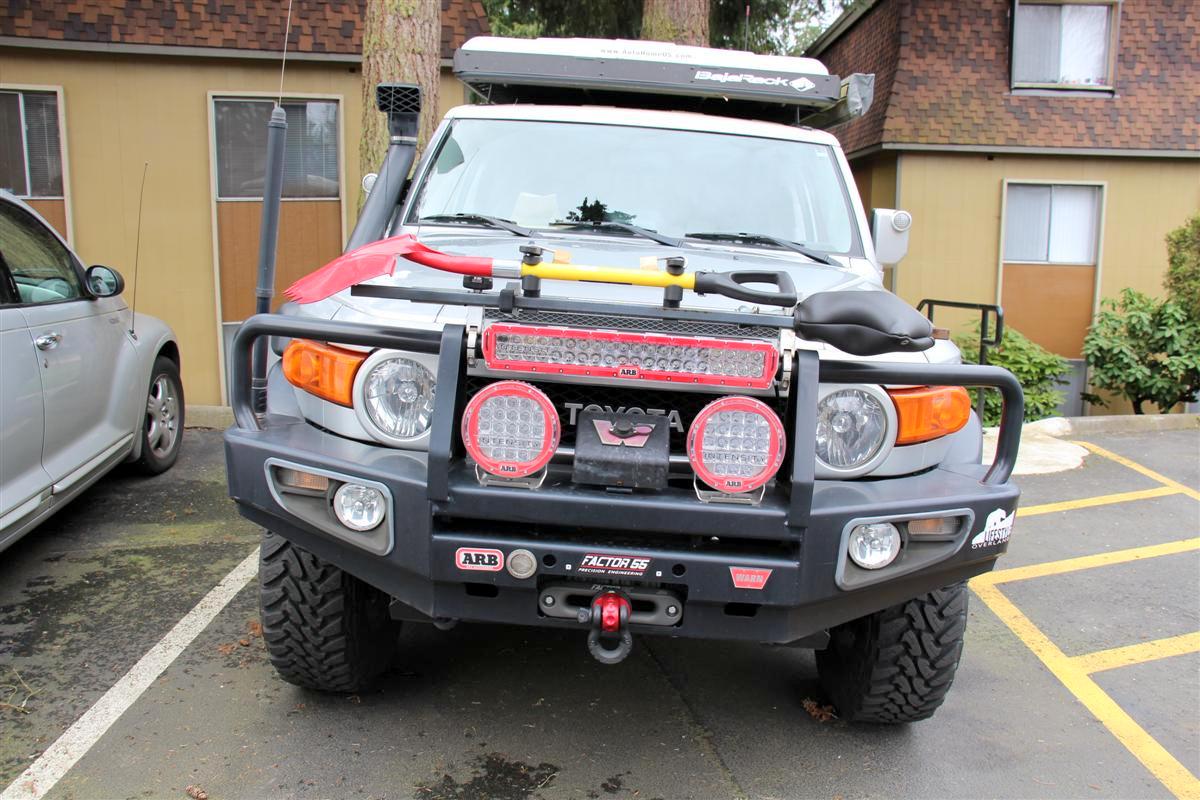
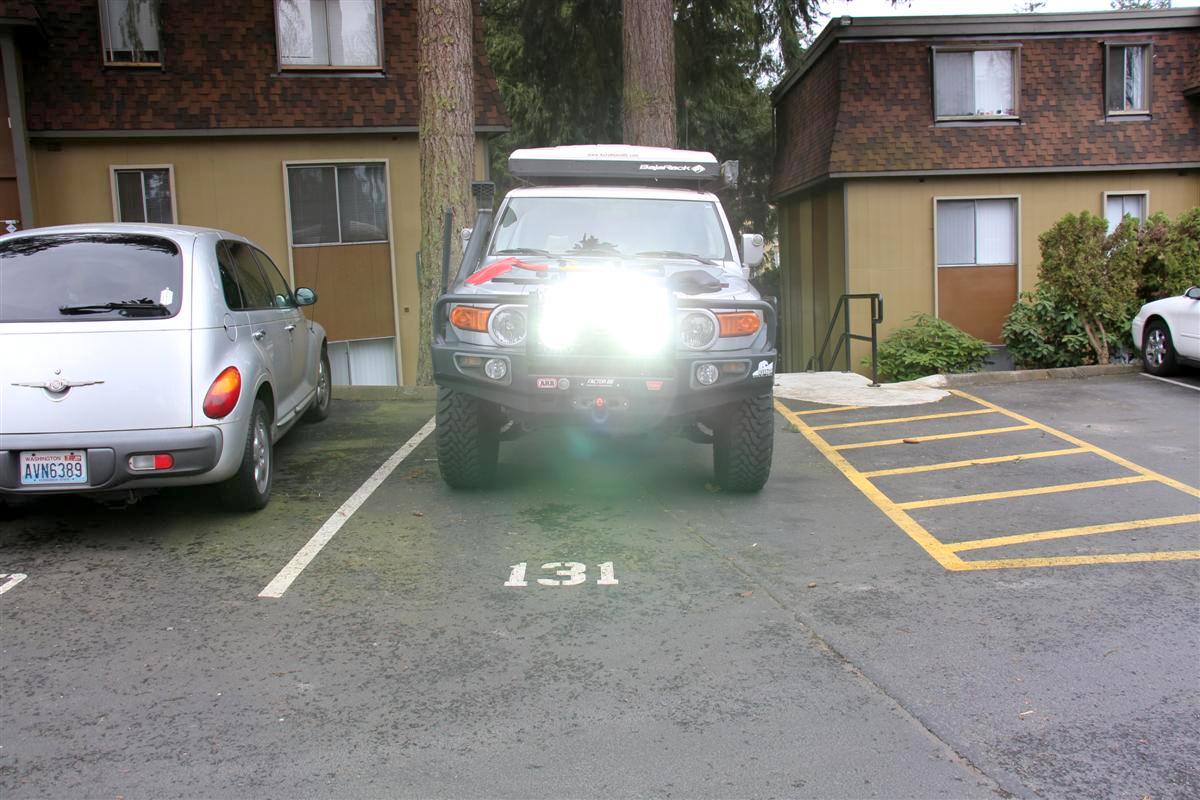
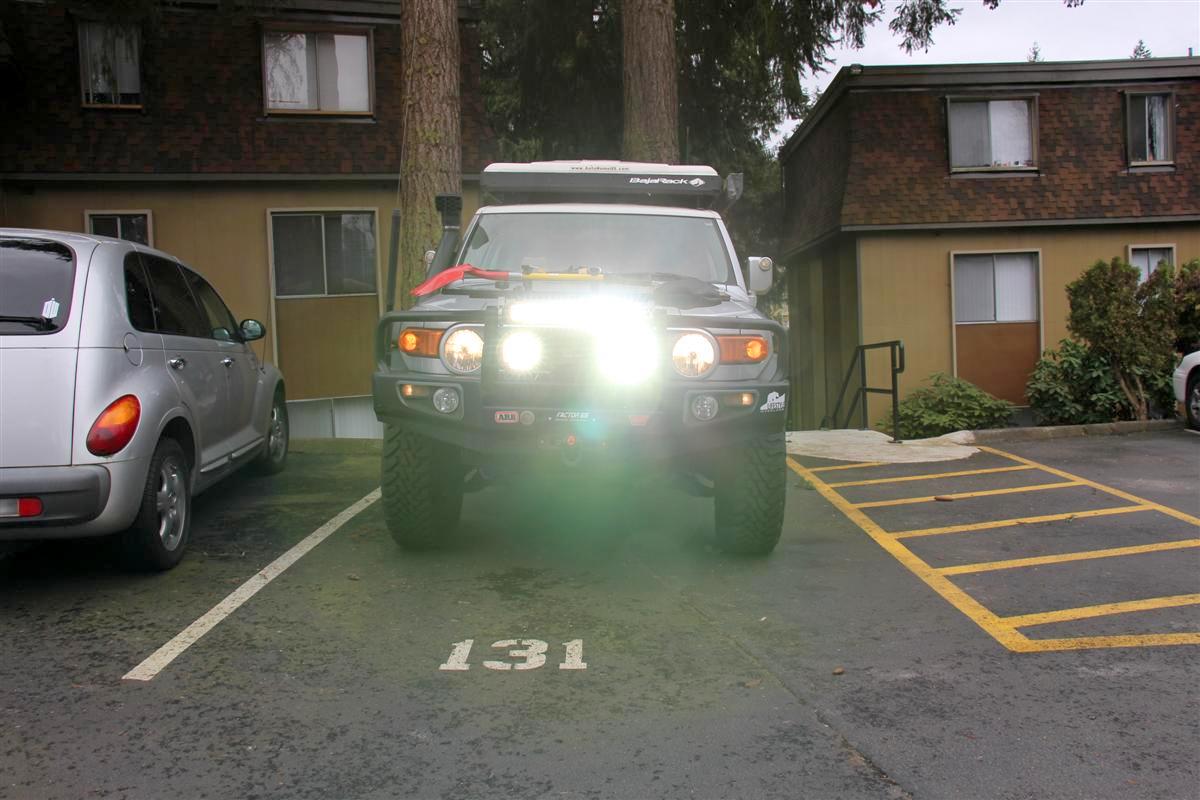
When I saw this lightbar last year in development I knew I was going to get one as it will compliment the two ARB Intensity LED round light I had installed on my ARB front bumper over the summer.
This has the same beam pattern, spot on the left side, and flood on the right side like my round lights.
Like the round lights, the lightbar is designed by ARB, but actually made by Rigid Industries in the USA, so you know it is of the most excellent high quality.
I talked with John the owner of Auburn Car Repair & Offroad earlier in the week, and the wiring harnesses had just shown up on Wednesday at ARB headquarters which is a few blocks away from John's shop.
I do believe I may be the first rig in the USA to have these, but not 100% sure.
ARB had another lightbar on display in their showroom, but no harness for it yet late last year.
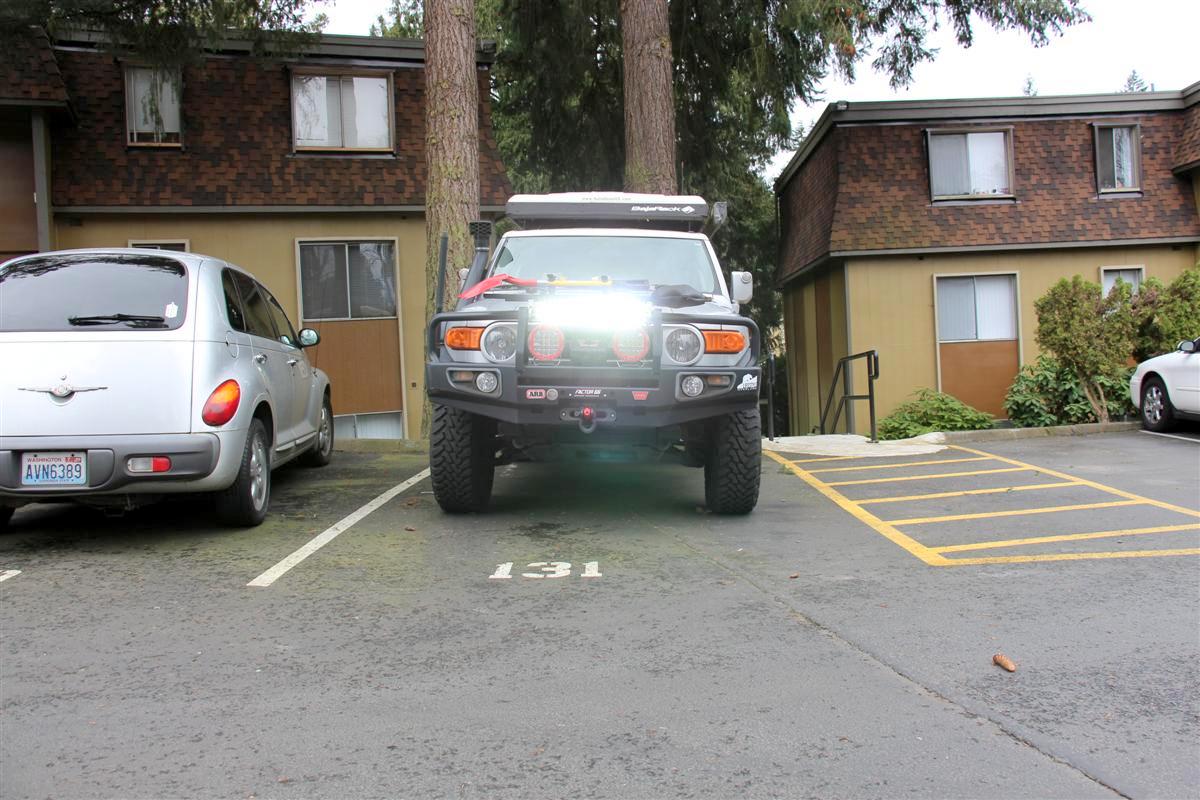
These lights will burn your retinas for sure, so they are not for use at all if you have traffic in front of you or coming at you.
I have been using my round ones on the way into work in the wee hours of the morning when there is no traffic, and it is light night and day compared to just the stock headlights.
Will try and get a video at a later date in the dark and update my thread with it.
I could go with another one on top of my rack by the BajaRack spoiler, but I had bad experience years ago with my '91 4RUnner with Hella 500s up there, it reflected off the hood, they were pretty much useless, but they looked cool
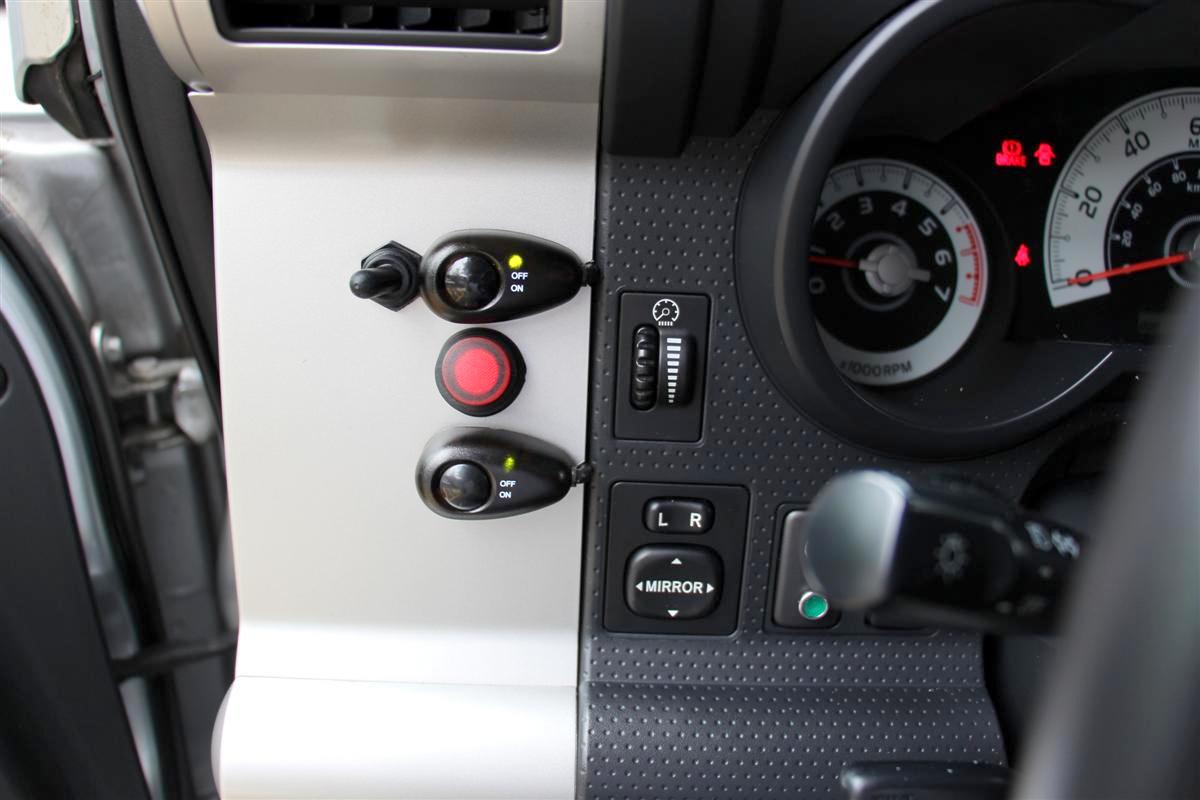
Upper switch is for the lightbar, middle switch is for the rocklights, and the bottom switch is for the round ARB lights, and with the key on, the switches light up green when the lights are off
Some of you may remember the upper switch was for the round ones, and I wanted the tech to put the new lightbar switch above the old one, but alas there was no room.
So he swapped the wires on the first switch over to the new lightbar since the lightbar is higher up on the bumper than the round ones.
Worked out great!
When the lights are turned on, the switches light up amber
All LED lights off
Upper lightbar on only
Both the lightbar and round lights on
Headlights turned on too on low, they do not stand a chance to outshine these ARB Intensity LED lights


 10-22-2016, 08:23 AM