Texas_Ace's 200 4Runner Build up Stage-2! The Supercharger Adventure Begins!
 05-31-2008, 09:46 PM
#1
Contributing Member
Thread Starter
Texas_Ace's 200 4Runner Build up Stage-2! The Supercharger Adventure Begins!
EDIT: IT RUNS! Skip to page 3 for video of first start
Edit: Skip to page 10 for Dyno results and video of dyno
Ok, after bragging in the other thread I am going to make this thread as pretty much the real time Stage-2 Build up of my truck thread that ya’ll have been waiting for. So stay tuned for everything I am going to do to my already HOT HOT truck (I need some lights though, I think that would look good).
First a rundown of what has happened so far to get people caught up, then what I need now.
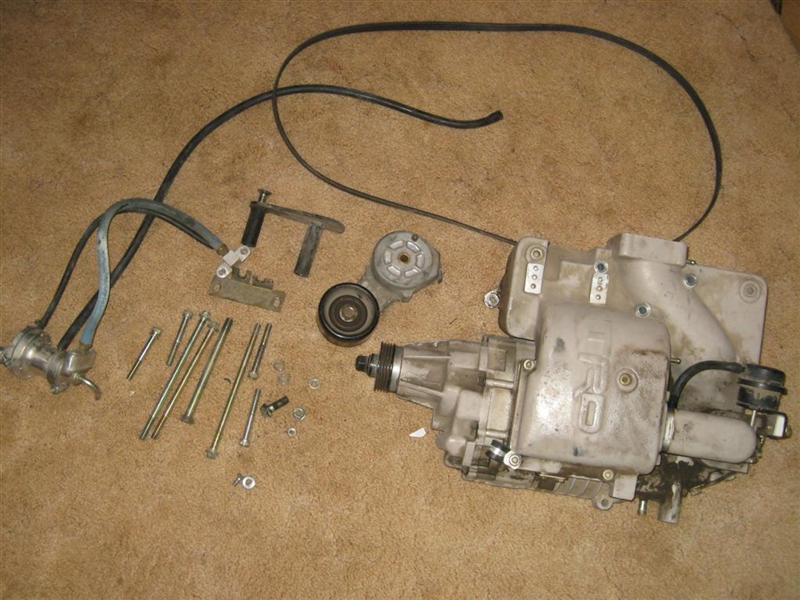
I got one heck of a deal on a 1st gen Supercharger (gray model), a whole $325!! The nose bearing was supposedly bad on it but when I got it in, I could not feel ANY play or roughness at all. But since the seller said it needed the bearing I decided to replace it anyways and since I got such a deal I could afford it.
Here is when I got it:


So I am going to rebuild it with a $75 kit off ebay Eaton Rebuild kit on Ebay
So I started taking it apart to see what it looked like inside before I committed to getting a rebuild kit. If I found something bad I was going to send it in to have it professionally rebuilt.
Here is the SC after I drained most of the oil (which was totally clear and in perfect condition. It was also all there as well) and started to take the bolts that hold the nose on out:


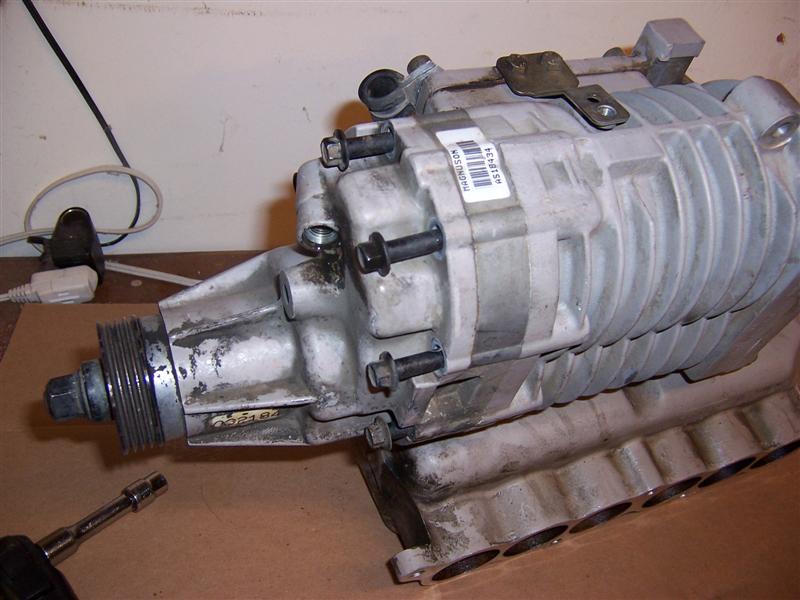
So after I got the bolts out I tried lightly tapping the nose to see if it would come off with a rubber hammer. It didn’t really move so I thought maybe the pully was holding it on, so I used my impact wrench to take it off.
Yes, I forgot to take a picture with the nose still on


So I got the nose off and looked inside, and was surprised to see it looked to be in PERFECT condition. You see it 5 seconds after I got it off. It ws that clean to start with. No metal shavings at all and the coupling was still tight (from what I have read that is the first thing to go).


So after seeing this I am planning on rebuilding the SC myself and spending the $$$ on something else. But I can’t figure out how to get the Nose shaft out, but I will address that in another post.
Overall I am VERY VERY happy with the SC and can’t wait to get it installed! I just wish I could find a manual for the 1st gen (of even a 2nd gen) SC so I could see all the install procedure so I can make sure I have everything I need before I try to install it.
My plans are to do all the fuel mods and all the other goodies to get this working right. URD 7th injector is in my future as well as all the other goodies to get the most out of this. I am hoping for 250RWHP at the wheels when I am done, we will see. I am going to get it dyno’ed after I am done for sure and depending on price before as well.
I will post some of the other goodies I have got some far tomorrow, for now I have a question in the next post
EDIT! Price list so far!
Supercharger: 325
Rebuild: 400
URD 7th: 800
URD 2.2 Pully: 95
OBD Interface: 30
AEM AFM Gauge: 225
Boost Gauge: 30
URD O2 cal: 250
Mics little things: 250
----------------------
Total so far: $2405
Not too bad so far, and baring anything major should be the final cost for the SC. I am VERY happy with the price, now to get it installed...
So subscribe if you want to keep tabs on my off-roading MONSTER! (i mean it is already a monster, adding a SC and all the other stuff i am going to do will make it something bigger and badder....... i know!......... A Hillary!)
Edit: Skip to page 10 for Dyno results and video of dyno
Ok, after bragging in the other thread I am going to make this thread as pretty much the real time Stage-2 Build up of my truck thread that ya’ll have been waiting for. So stay tuned for everything I am going to do to my already HOT HOT truck (I need some lights though, I think that would look good).
First a rundown of what has happened so far to get people caught up, then what I need now.
I got one heck of a deal on a 1st gen Supercharger (gray model), a whole $325!! The nose bearing was supposedly bad on it but when I got it in, I could not feel ANY play or roughness at all. But since the seller said it needed the bearing I decided to replace it anyways and since I got such a deal I could afford it.
Here is when I got it:
So I am going to rebuild it with a $75 kit off ebay Eaton Rebuild kit on Ebay
So I started taking it apart to see what it looked like inside before I committed to getting a rebuild kit. If I found something bad I was going to send it in to have it professionally rebuilt.
Here is the SC after I drained most of the oil (which was totally clear and in perfect condition. It was also all there as well) and started to take the bolts that hold the nose on out:
So after I got the bolts out I tried lightly tapping the nose to see if it would come off with a rubber hammer. It didn’t really move so I thought maybe the pully was holding it on, so I used my impact wrench to take it off.
Yes, I forgot to take a picture with the nose still on
So I got the nose off and looked inside, and was surprised to see it looked to be in PERFECT condition. You see it 5 seconds after I got it off. It ws that clean to start with. No metal shavings at all and the coupling was still tight (from what I have read that is the first thing to go).
So after seeing this I am planning on rebuilding the SC myself and spending the $$$ on something else. But I can’t figure out how to get the Nose shaft out, but I will address that in another post.
Overall I am VERY VERY happy with the SC and can’t wait to get it installed! I just wish I could find a manual for the 1st gen (of even a 2nd gen) SC so I could see all the install procedure so I can make sure I have everything I need before I try to install it.
My plans are to do all the fuel mods and all the other goodies to get this working right. URD 7th injector is in my future as well as all the other goodies to get the most out of this. I am hoping for 250RWHP at the wheels when I am done, we will see. I am going to get it dyno’ed after I am done for sure and depending on price before as well.
I will post some of the other goodies I have got some far tomorrow, for now I have a question in the next post
EDIT! Price list so far!
Supercharger: 325
Rebuild: 400
URD 7th: 800
URD 2.2 Pully: 95
OBD Interface: 30
AEM AFM Gauge: 225
Boost Gauge: 30
URD O2 cal: 250
Mics little things: 250
----------------------
Total so far: $2405
Not too bad so far, and baring anything major should be the final cost for the SC. I am VERY happy with the price, now to get it installed...
So subscribe if you want to keep tabs on my off-roading MONSTER! (i mean it is already a monster, adding a SC and all the other stuff i am going to do will make it something bigger and badder....... i know!......... A Hillary!)
Last edited by Texas_Ace; 01-15-2009 at 07:53 PM.
 05-31-2008, 09:51 PM
#2
Contributing Member
Thread Starter
Ok, now my first of what will i am sure be plenty of Questions. How do you get the nose shaft out of the housing to replace the bearings?
I think you are supposed to tap it out, what i don't know is which dirrection you are supposed to tap it, from the pulley side into the SC? Or from the inside out towards the Pulley?
I have tapped it both ways but it doesn't move, and yes i have the snap ring taken out.
I think you are supposed to tap it out, what i don't know is which dirrection you are supposed to tap it, from the pulley side into the SC? Or from the inside out towards the Pulley?
I have tapped it both ways but it doesn't move, and yes i have the snap ring taken out.
05-31-2008, 11:24 PM
#3
Contributing Member
Ok, now my first of what will i am sure be plenty of Questions. How do you get the nose shaft out of the housing to replace the bearings?
I think you are supposed to tap it out, what i don't know is which dirrection you are supposed to tap it, from the pulley side into the SC? Or from the inside out towards the Pulley?
I have tapped it both ways but it doesn't move, and yes i have the snap ring taken out.
I think you are supposed to tap it out, what i don't know is which dirrection you are supposed to tap it, from the pulley side into the SC? Or from the inside out towards the Pulley?
I have tapped it both ways but it doesn't move, and yes i have the snap ring taken out.
06-01-2008, 04:45 AM
#5
Contributing Member
Join Date: Nov 2006
Location: Dickson,Tennessee
Posts: 1,562
Likes: 0
Received 0 Likes
on
0 Posts
not to be a jerk but are you sure you wont be better off having the pros rebuild it? I would rather have the comfort of knowing that it was done right and not questioning it.
06-01-2008, 04:47 AM
#6
Contributing Member
Here's some instructions on replacing the nose for a 2nd gen, I see you already have it off but it may help some putting it back on (torque specs or something):
http://www.trdsparks.com/install/PTR29-35042inst.pdf
http://www.trdsparks.com/install/PTR29-35042inst.pdf
Last edited by mt_goat; 06-01-2008 at 04:49 AM.
06-01-2008, 04:52 AM
#7
Contributing Member
Here's some instructions for a M90:
http://rollingperformance.com/snoutrebuild.htm
Did you read though all those links I gave you in the first thread?
https://www.yotatech.com/50834174-post10.html
http://rollingperformance.com/snoutrebuild.htm
Did you read though all those links I gave you in the first thread?
https://www.yotatech.com/50834174-post10.html
Trending Topics
06-01-2008, 05:46 AM
#8
Contributing Member
Join Date: Sep 2003
Location: Littleton,CO
Posts: 10,549
Likes: 0
Received 0 Likes
on
0 Posts
I agree that if there are parts of the install/rebuild you are iffy on you should let a pro do it since this is a major upgrade and you don't want to "ef" it up.
Also the headers are a bitch to install and IMO aren't worth the trouble or the cost to have somebody install them for you since the perf gains are minimal even with an SC from a couple of dynos I'd seen plus if they do crack it's going to be a PITA to fix.
Just something to consider.
Also the headers are a bitch to install and IMO aren't worth the trouble or the cost to have somebody install them for you since the perf gains are minimal even with an SC from a couple of dynos I'd seen plus if they do crack it's going to be a PITA to fix.
Just something to consider.
06-01-2008, 06:48 AM
#9
Contributing Member
X3, especially when you consider that if the SCer blows apart small metal parts can be sucked straight into the engine ruining the whole engine.
06-01-2008, 06:54 AM
#10
Contributing Member
I can't remember the exact reason now but I've heard not to use an impact wrench to remove the pulley. I've been using a chain wrench with rubber wrapped around the pulley to hold the pulley while turning the nut with a wrench.
06-01-2008, 07:47 AM
#11
Contributing Member
Thread Starter
Do do I�.;-)
Here's some instructions on replacing the nose for a 2nd gen, I see you already have it off but it may help some putting it back on (torque specs or something):
http://www.trdsparks.com/install/PTR29-35042inst.pdf
http://www.trdsparks.com/install/PTR29-35042inst.pdf
Here's some instructions for a M90:
http://rollingperformance.com/snoutrebuild.htm
Did you read though all those links I gave you in the first thread?
https://www.yotatech.com/50834174-post10.html
http://rollingperformance.com/snoutrebuild.htm
Did you read though all those links I gave you in the first thread?
https://www.yotatech.com/50834174-post10.html
I agree that if there are parts of the install/rebuild you are iffy on you should let a pro do it since this is a major upgrade and you don't want to "ef" it up.
Also the headers are a bitch to install and IMO aren't worth the trouble or the cost to have somebody install them for you since the perf gains are minimal even with an SC from a couple of dynos I'd seen plus if they do crack it's going to be a PITA to fix.
Just something to consider.
Also the headers are a bitch to install and IMO aren't worth the trouble or the cost to have somebody install them for you since the perf gains are minimal even with an SC from a couple of dynos I'd seen plus if they do crack it's going to be a PITA to fix.
Just something to consider.
After looking at the condition and talking to the seller it looks like this was on the truck until about 50K when a mechanic said that he would need to replace the nose bearing pretty soon and he wanted better MPG. So he just took it off. It is quite clean and looks to have been taken care of.
Now for the headers, only reason I go them was because they were $70. No way would I have spent $300+ on a set. For $70 I figure I will chance them working and if they leak I have a REAL good muffler shop I know that can fix anything for cheap too. It is a gamble I will admit, I just could not pass up the deal.
Thanks for all the comments/help so far everyone!
06-01-2008, 08:01 AM
#12
Contributing Member
Thread Starter
Ok, just read through those threads and though there is a lot fo good info i could not figure out which way i am supposed to press the nise shaft out still.
I think i am just going to have a local shop press it for me but i need to know from what side to have them press.
I think i am just going to have a local shop press it for me but i need to know from what side to have them press.
06-04-2008, 07:28 PM
#13
Contributing Member
Thread Starter
Ok, quick update.
I called magnason about a rebuild due to me selling a paintball gun on ebay and having a little extra cash and i have not bought the bearings yet.
So i removed the Supdercharger from the housing and decided to send it in for them to look at and hopfully just do the bearings.
I looked at the rotors (forgot to take before pictures, darn it) and they looked perfect and it spins fine so here is hoping for the best. If it is just the bearings it is only going to cost about $250 - $350.
Ok, now for something else. I actually started really monitering my gas milage the other day. Since i have had my truck i have had a full tank maybe a handful of times due to high gas prices i usually just have enough to get me where i am going. So i have never really been able to find out my milage.
Well i filled it up all the way and now that i am actually paying attention it is quite shocking. I have driven 30 miles and from a full tank (1 click at the pump) i am already down to the first hash mark on the fuel gauge! This just seems like outragesly bad milage. And i have been going easy on the peldel even.
I am going to drive 100 miles then fill up again and calculate my actual milage but is this even close to right for most of ya'll??
06-04-2008, 07:41 PM
#14
Registered User

I have driven 30 miles and from a full tank (1 click at the pump) i am already down to the first hash mark on the fuel gauge! This just seems like outragesly bad milage. And i have been going easy on the peldel even.
I am going to drive 100 miles then fill up again and calculate my actual milage but is this even close to right for most of ya'll??
I am going to drive 100 miles then fill up again and calculate my actual milage but is this even close to right for most of ya'll??
I experience the same thing. I think it's just our fuel gauges being inaccurate. If it was accurate that would mean you burned over 4 gallons in 30 miles which I can't see happening. I would say drive as many miles as you can before filling up and calculating your mileage, just to make sure it's semi-accurate.
06-04-2008, 08:31 PM
#15
Contributing Member
Thread Starter
I experience the same thing. I think it's just our fuel gauges being inaccurate. If it was accurate that would mean you burned over 4 gallons in 30 miles which I can't see happening. I would say drive as many miles as you can before filling up and calculating your mileage, just to make sure it's semi-accurate.
But at least it looks like it is not right. I know i could not think of a way for it to really burn that much, even if it was ubber rich.
06-05-2008, 03:18 AM
#17
Registered User

Join Date: Dec 2006
Posts: 369
Likes: 0
Received 0 Likes
on
0 Posts
I experience the same thing. I think it's just our fuel gauges being inaccurate. If it was accurate that would mean you burned over 4 gallons in 30 miles which I can't see happening. I would say drive as many miles as you can before filling up and calculating your mileage, just to make sure it's semi-accurate.
06-05-2008, 07:08 AM
#18
Contributing Member
Thread Starter
Well at least it looks like it just might be the gauge. Guess only time will tell.
06-05-2008, 01:56 PM
#19
Contributing Member
Thread Starter
Got in some toys today!
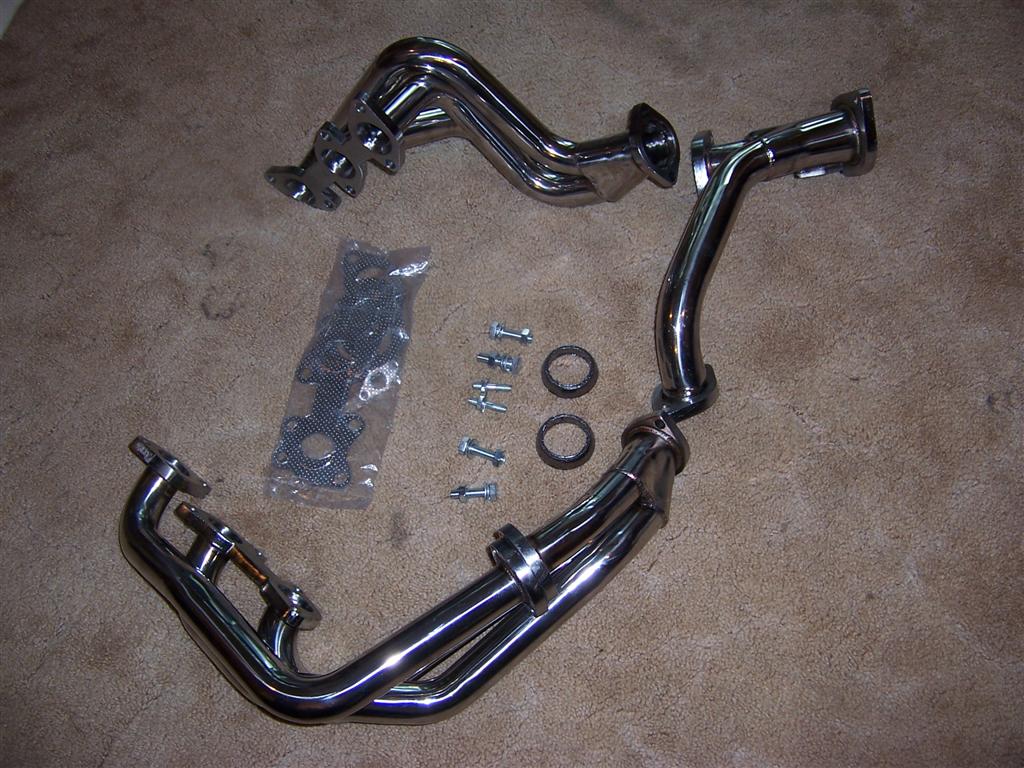
Got the headers in and they look great! sure they are not the best design around but for $70 i am VERY happy with the quality. The steel really looks to be stainless and the welds looks good and sealed. And overall i am quite happy with the quality.
Plus they look like they are going to flow much better than stock.


Now i have my High-Amp alternator. I got it from http://stores.ebay.com/ACE-ALTERNATORS-AND-STARTERS
It looks real nice, i will see how it works after i install it.


Got the headers in and they look great! sure they are not the best design around but for $70 i am VERY happy with the quality. The steel really looks to be stainless and the welds looks good and sealed. And overall i am quite happy with the quality.
Plus they look like they are going to flow much better than stock.
Now i have my High-Amp alternator. I got it from http://stores.ebay.com/ACE-ALTERNATORS-AND-STARTERS
It looks real nice, i will see how it works after i install it.
06-05-2008, 02:04 PM
#20
Registered User
Join Date: Dec 2007
Location: Hazzard County, Georgia
Posts: 433
Likes: 0
Received 2 Likes
on
2 Posts
Got in some toys today!
Got the headers in and they look great! sure they are not the best design around but for $70 i am VERY happy with the quality. The steel really looks to be stainless and the welds looks good and sealed. And overall i am quite happy with the quality.
Plus they look like they are going to flow much better than stock.
Now i have my High-Amp alternator. I got it from http://stores.ebay.com/ACE-ALTERNATORS-AND-STARTERS
It looks real nice, i will see how it works after i install it.


