Snowshredder's 1997 4Runner Build-up
 12-28-2011, 06:36 AM
#1
Registered User
Thread Starter
Join Date: Nov 2007
Location: Gilbert, Az.
Posts: 680
Likes: 0
Received 0 Likes
on
0 Posts
Snowshredder's 1997 4Runner Build-up
Ok, I've been here on YotaTech for a few years and have had three Yota's now: A 90' 4Runner with the lathargic 3.0L V6, a 96' regular cab Taco with the 2.4L and now a 97' 4Runner with the 3.4l V6. I have to say, the 3.0 was built fairly well and with the only exception being the engine, I was very happy with it. The 96' Tacoma was a blast to drive for the time I had it. And if I ever come across one again, I'll probably buy it...if I can convince the wife of it.
Now on to the 97': After having to sell the 90' because of the fuel economy and needing a more fuel efficient daily driver other than my 04' F-150 with the 5.4L V-8, the 96' Taco make's it's apperance at this point. Well, with only being a 2WD I really missed the 4Runner and being able to go wheeling. So I was out "wheeling" with a couple of member's here and saw a 4Runner that looked close to my 90' that I had to do a double take. My buddy I was riding shotgun with asked me if I missed it...? I damn near started crying.... So I went home that night and presented my case to the wife: You know we're not strapped for money like before and I really miss wheeling! What'd ya say I get another 4Runner?! Well, that night passed and the next morning at breakfast I hit her up again. We consult each other with decision's like this...it help's the releationship..**cough** I mean me to help get what I want. She agreed I needed "something" and didn't give me a price range, so I was off! Did nothing except dream about getting another one in the drive way for about two week's. She hate's it when I get tunnel vision, but really now, who wouldn't!?! After checking out many "stock" over priced rig's I landed on the 97' I purchased. The owner was asking way to much but I thought I'd check it out any way.
So here she is as is the day she found her "new" home:
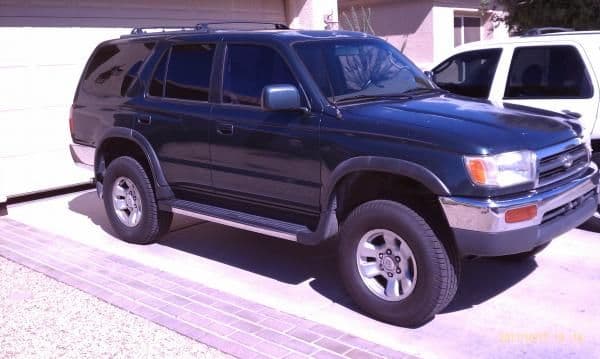
I really like the 3.4L over the 3.0:

And a shot of the inside:

The plans are, at this moment, to make it wheelable but not loose the comfort of it being my daily driver now. I'll up-date more as the progress continues and more pic's of what I've already done to her since she's been in my posession. Feel free to comment or flame as you see fit...I'll try not to take it personally.
Thanks for looking
-Ted
Now on to the 97': After having to sell the 90' because of the fuel economy and needing a more fuel efficient daily driver other than my 04' F-150 with the 5.4L V-8, the 96' Taco make's it's apperance at this point. Well, with only being a 2WD I really missed the 4Runner and being able to go wheeling. So I was out "wheeling" with a couple of member's here and saw a 4Runner that looked close to my 90' that I had to do a double take. My buddy I was riding shotgun with asked me if I missed it...? I damn near started crying.... So I went home that night and presented my case to the wife: You know we're not strapped for money like before and I really miss wheeling! What'd ya say I get another 4Runner?! Well, that night passed and the next morning at breakfast I hit her up again. We consult each other with decision's like this...it help's the releationship..**cough** I mean me to help get what I want. She agreed I needed "something" and didn't give me a price range, so I was off! Did nothing except dream about getting another one in the drive way for about two week's. She hate's it when I get tunnel vision, but really now, who wouldn't!?! After checking out many "stock" over priced rig's I landed on the 97' I purchased. The owner was asking way to much but I thought I'd check it out any way.
So here she is as is the day she found her "new" home:
I really like the 3.4L over the 3.0:
And a shot of the inside:
The plans are, at this moment, to make it wheelable but not loose the comfort of it being my daily driver now. I'll up-date more as the progress continues and more pic's of what I've already done to her since she's been in my posession. Feel free to comment or flame as you see fit...I'll try not to take it personally.
Thanks for looking
-Ted
 12-28-2011, 04:01 PM
#4
Registered User
Thread Starter
Join Date: Nov 2007
Location: Gilbert, Az.
Posts: 680
Likes: 0
Received 0 Likes
on
0 Posts
Hey! What's up Nate...
-Ted
Last edited by snowshredder555; 12-28-2011 at 04:24 PM.
12-28-2011, 04:22 PM
#5
Registered User
Thread Starter
Join Date: Nov 2007
Location: Gilbert, Az.
Posts: 680
Likes: 0
Received 0 Likes
on
0 Posts
Ok, I'd done a little bit of research and came away with my solution to the saggy rearend. It's funny when you read other post's by 3rd Gen owners and the solution the dealerships/ factory came up with. "I know, let's add three inches of rubber spacers on an already weak coil spring. Then we'll put an internal bump stop that only allows for 4" of travel." Maybe I'm exagerating a little here, but have you seen that internal bump stop? Holy CRAP! That things huge!
Anyhow, MY solution has been: OME 891 rear coils and Bilstein 5125's as the damper's. I relocated the rear shock's top mount to an outboard position. I did this because I had seen another member here and on T4R.org do this. I really liked this idea because I feel as though there's a little more body roll control but it's hard to tell with the rear bushings being shot. I'll add pictures of the shock relocation in a little bit.
Here's a before pic:

And an after shot:

Opinions', comment's?? Good/ bad, let em' fly.
-Ted
Anyhow, MY solution has been: OME 891 rear coils and Bilstein 5125's as the damper's. I relocated the rear shock's top mount to an outboard position. I did this because I had seen another member here and on T4R.org do this. I really liked this idea because I feel as though there's a little more body roll control but it's hard to tell with the rear bushings being shot. I'll add pictures of the shock relocation in a little bit.
Here's a before pic:
And an after shot:
Opinions', comment's?? Good/ bad, let em' fly.
-Ted
12-28-2011, 10:15 PM
#7
Registered User
Thread Starter
Join Date: Nov 2007
Location: Gilbert, Az.
Posts: 680
Likes: 0
Received 0 Likes
on
0 Posts
Now on to the rear shock's:
Here's a pic of the driver side:

And the passenger side clearence with the tire mounted:

And the passenger side:

-Ted
Trending Topics
12-29-2011, 09:41 AM
#8
Registered User
I like the idea of relocateing the shocks, havent seen it done before. My 97 has leather interior too, kinda wish it was s little more plane but it is comfy LOL.
12-29-2011, 11:25 PM
#9
Registered User
Thread Starter
Join Date: Nov 2007
Location: Gilbert, Az.
Posts: 680
Likes: 0
Received 0 Likes
on
0 Posts
So onto some more pics with some progress...
The "Boss", at work, reserve's the week after Christmas for us to consentrate on building stuff for our own rig's instead of building order's and we still get paid for the week
 it's like having your favorite cake with a tall glass of milke AND eating it too. I've been trying to think this through but keep day dreaming about the front suspension and all the other bit's and pieces I already have that still need to be installed. I've had these parts for a little while now and haven't been able to get to it...either we've had a family "thing" going on or I've been sick and haven't had the energy to deal with it. So I thought...if you just start cutting the steel, something will fall into place. We did have a customer come by today for an install so we had that order of business to take care of first. Then I got to cracking again on my stuff:
Here's one side in the bender after the kick out portion has been bent already:

And making sure both front and rear bends are level:

And now the main portion is all tacked ready for welding..And that's the "BOSS" in the back ground.

And here's the main portion with the finished welding:

The end caps still need to be ground and rounded and frame mounts still need to be fabricated and welded together, but that'll happen tomorrow.
Comment's?? Any body...Any body...?
-Ted
Last edited by snowshredder555; 12-30-2011 at 05:59 AM. Reason: I had more I wanted to add but didn't want to submit another reply
12-30-2011, 05:51 AM
#11
Registered User
Thread Starter
Join Date: Nov 2007
Location: Gilbert, Az.
Posts: 680
Likes: 0
Received 0 Likes
on
0 Posts
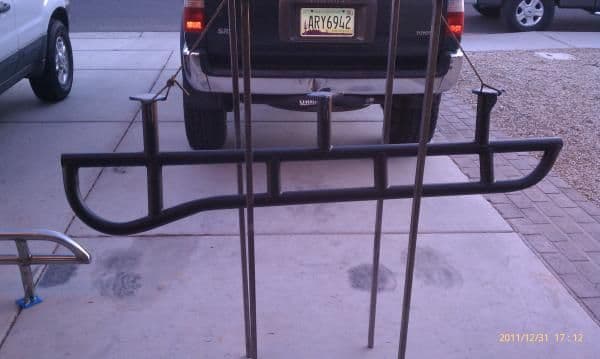
My plans for the day are to get the slider's mounted and the first coat of primer on and THEN start on the rear bumper. I figure I have today and a half day tomorrow so I might be able to at least get it started. I also need to replace the steering rack bushings and one or more bushings in the rear links. Sucks that this week is almost over...
-Ted
12-30-2011, 02:45 PM
#13
Registered User
I really enjoy fab work not good at it but enjoy it LOL. A new rear bumper is on my short list to, might wait and see what you come up with. I also thought about fabbing my skid plates but in the end thought it would be better to buy them.
12-30-2011, 08:47 PM
#14
Registered User
Thread Starter
Join Date: Nov 2007
Location: Gilbert, Az.
Posts: 680
Likes: 0
Received 0 Likes
on
0 Posts
-Ted
12-31-2011, 09:07 AM
#15
Registered User
Thread Starter
Join Date: Nov 2007
Location: Gilbert, Az.
Posts: 680
Likes: 0
Received 0 Likes
on
0 Posts
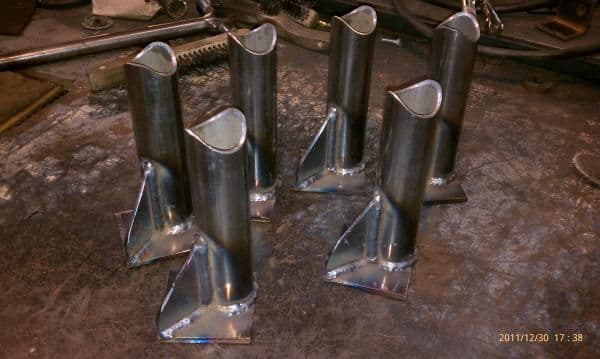
So yesterday didn't turn out quite like I'd hoped. I was only able to get the mounts cut, notched and welded up.
Cut, notched and ready to be welded:


-Ted
Cut, notched and ready to be welded:
-Ted

 12-31-2011, 08:29 PM
#17
Registered User
Thread Starter
Join Date: Nov 2007
Location: Gilbert, Az.
Posts: 680
Likes: 0
Received 0 Likes
on
0 Posts
Decided to paint the sliders before I installed them. This is good, cause now I can level off the rear flare's with the bottom and finish with the front mud flaps.
Shameless plug for work
-Ted
Shameless plug for work
-Ted
01-01-2012, 06:47 PM
#19
Registered User
Thread Starter
Join Date: Nov 2007
Location: Gilbert, Az.
Posts: 680
Likes: 0
Received 0 Likes
on
0 Posts
-Ted
01-02-2012, 08:57 PM
#20
Registered User
Thread Starter
Join Date: Nov 2007
Location: Gilbert, Az.
Posts: 680
Likes: 0
Received 0 Likes
on
0 Posts
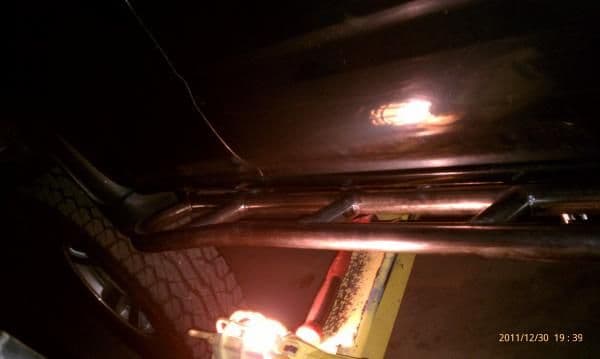
So the "BOSS" came by last night and I hit up about doing the roll cage. I bounced a couple of idea's on how I wanted it done and we immediately started talking about strength and how close we could keep it to the headliner. Of course I'm gonna have to take out the plastic side piece's in the rear but that's trivial for why it's being built. I think it should maybe take a couple of week's only working an hour or so on it each day. But in the end, I'll have something I know will protect my precious cargo.
I did go in to work today for the sole purpose of welding the sliders to the 4Runner. Initially with cutting the leg's at 7" and notching em' in at a 1/2" then mocking em up to the frame with the slider's I thought they'd stick out WAY to far. But truth be told, I'm really happy with how they've turned out. The idea is to keep the slider's being the first in contact with the rock's and the kick out portion being utilized to push the body out of harms way. Only secondary is the ability to gain a secure foot hold to reach the roof.
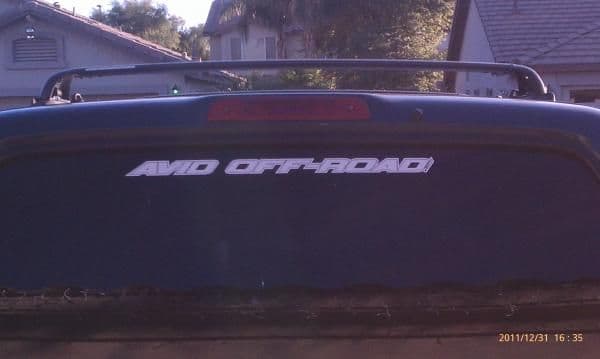
So, here's how the 4Runner looks now:


Questions, thoughts, or comments...
-Ted
I did go in to work today for the sole purpose of welding the sliders to the 4Runner. Initially with cutting the leg's at 7" and notching em' in at a 1/2" then mocking em up to the frame with the slider's I thought they'd stick out WAY to far. But truth be told, I'm really happy with how they've turned out. The idea is to keep the slider's being the first in contact with the rock's and the kick out portion being utilized to push the body out of harms way. Only secondary is the ability to gain a secure foot hold to reach the roof.
So, here's how the 4Runner looks now:
Questions, thoughts, or comments...
-Ted


