Weekend Lighting-a-thon
 03-02-2008, 10:04 PM
#1
Weekend Lighting-a-thon
Finally got two days in arwo off so decided with the good weather here I would finish up my light install. I did a couple of things that really helped this install. I used one OEM Toyota light switch. When I get the second in I will swap it out with the Hella supplied switch. To make long story short, finished up wiring harness modification (Toyota OEM fog light harness) so it will work. Utilized recently install Auxillary fuse panel install to provide power for relays, routed new wires in split loom, mounted relays, switches disassembled the gauge cluster and installed LED indicatiors for both sets of lights.
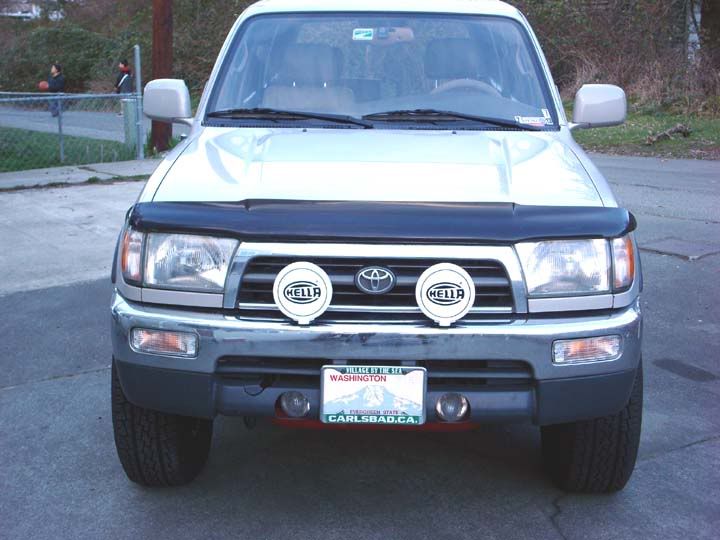
I had started the original install using a set of fog/driving lights from a 99 Pontiac Grand AM mounted in the lower radiator support which located them almost perfectly in line with the lower edged of the valence for the bumper. I also installed the supplied Hella harnes wires but enclosed them in split loom as well. I drilled the bumper to mount the Hella's. I had to modify their wiring instructions but everything works! Here are a few quickies. I will attempt a full write up later after work slows a bit, but will be happy to answer any questions or comments.
Ready to go
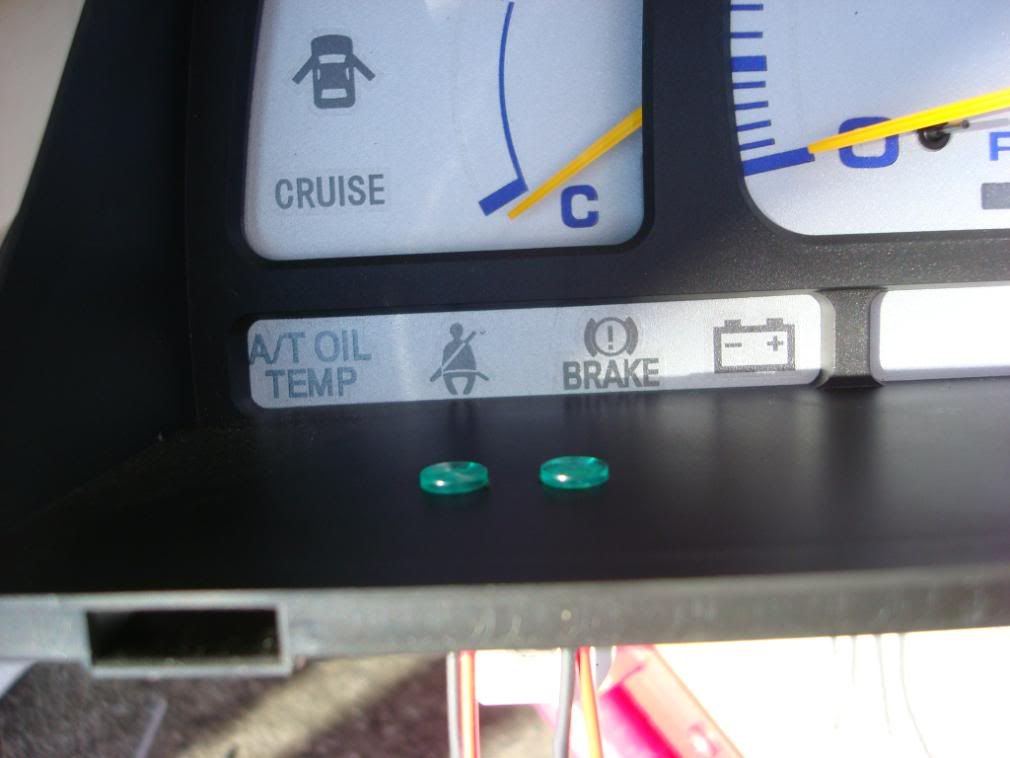
LED indicators showing when the lights are on. Nice reminder and these were preassembled from Radio Shack. Low profile and I mounted them in the gauge cluster behind the glass face plate.
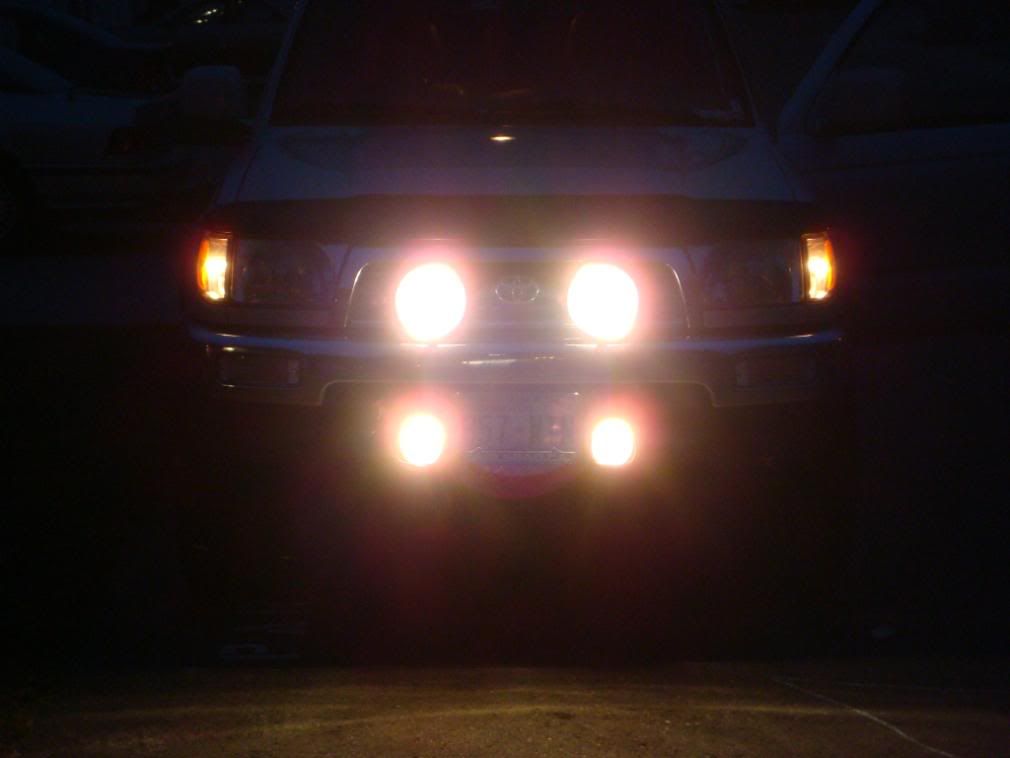
Lights, camera, ACTION!
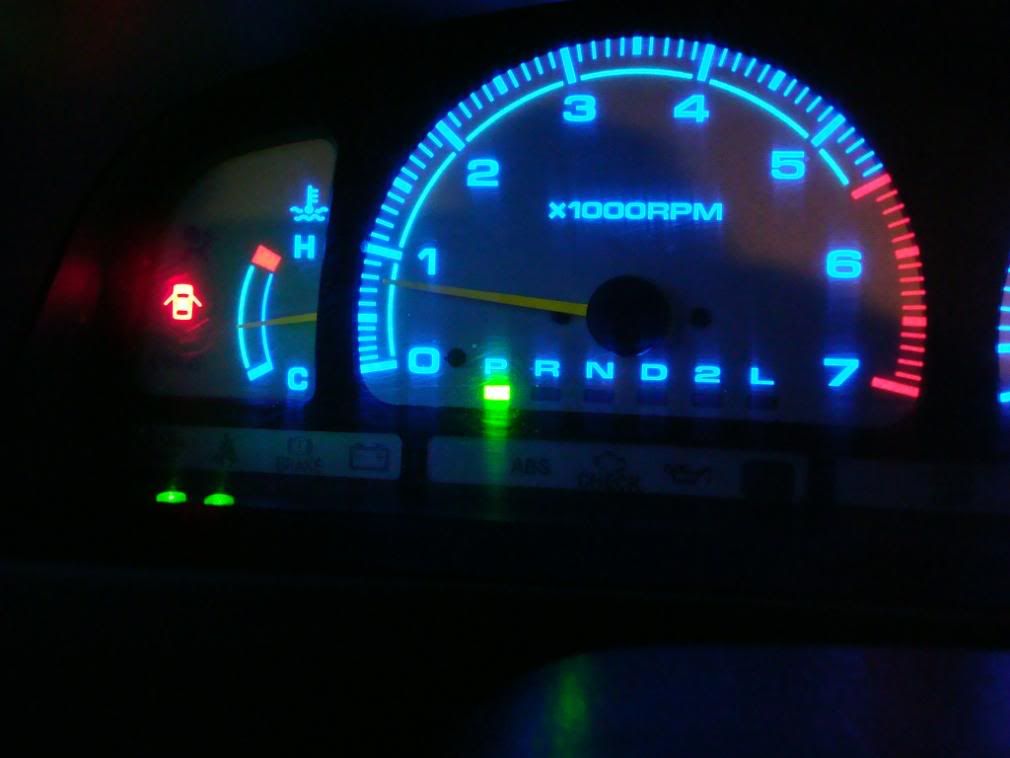
LED indicators doing their thing. Very low light around 30mfd so they are not distracting.
I had started the original install using a set of fog/driving lights from a 99 Pontiac Grand AM mounted in the lower radiator support which located them almost perfectly in line with the lower edged of the valence for the bumper. I also installed the supplied Hella harnes wires but enclosed them in split loom as well. I drilled the bumper to mount the Hella's. I had to modify their wiring instructions but everything works! Here are a few quickies. I will attempt a full write up later after work slows a bit, but will be happy to answer any questions or comments.
Ready to go
LED indicators showing when the lights are on. Nice reminder and these were preassembled from Radio Shack. Low profile and I mounted them in the gauge cluster behind the glass face plate.
Lights, camera, ACTION!
LED indicators doing their thing. Very low light around 30mfd so they are not distracting.
 03-03-2008, 06:42 AM
#3
 Thanks Fo_SheeZy, I can't take complete credit for the LED, saw it on here. Wish I could remember who it was but he mentioned the mod along with an install he was doing but the link was to another (shudder)
  4Runner site. But he used some different parts. The lead article was for the LED mod of the Cup holders which really worked out well for me. so much in fact I am going to install at least two more LED's in the center console, one for the little pooka just to the left of the eBrake handle and another for the rear heater slide lever, which in a dark vehicle you can not see in the rear seats.
  Still have quite a few little projects I would like to do including LED in the overhead lights, there just isn't enough LIGHT in the cabin of our trucks! Adding a second outlet in the rear which is identical to the one already there. Just need to make a template for the add on outlet. Adding a few to the front, but I may have that one figured out if I can figure out how to wire the 99+ radio bezel into the 98 harness. Need to find the guy who has done that saw the posting awhile back. Not crazy about disassembly of switches, don't have access to replacements if it all goes south! But hey its what we do right? So many GR8 ideas here.
  03-04-2008, 05:38 AM
#5
Thanks SC4Runner, it was really fun installing them and running the wires in the split loom really made for a clean install. Not much of a 'bling' guy but I really do like some of the niceities that I have seen. If you want to do this mod and you already have offroad or driving lights installed, it will take you about 2 hours or less. Gauge cluster removal is so simple even if you have never done it. 8 screws, unclipping 5 plugs, popping the clear gauge cluster cover off and drilling out the holes. Piece a cake!
The only real potential slow down was the install of the LED indicators. I almost messed up when I did them too, as the gauge cluster is inset in the dash. I really did not notice that when I first pulled the cluster and then decided on where to put the LED's. I went originally for aesthetics in my location and fortunately it worked out really nicely as they ended up being just in front of one of the mount screws which happens to be where the inset is! If I had missed that location by even a 1/4 inch I would have been screwed!
 I'll eventually do a write up on the install with pics so if your interested, email me or just wait for the write up. It really isn't that hard, heck I did all the work figuring where it needs to go for ya! As for parts, Radio Shack has them already pre-made so you don't even have to mess with resistor soldering, heat shrinking the wires, its really simple to mount, hook up and enjoy!
The only real potential slow down was the install of the LED indicators. I almost messed up when I did them too, as the gauge cluster is inset in the dash. I really did not notice that when I first pulled the cluster and then decided on where to put the LED's. I went originally for aesthetics in my location and fortunately it worked out really nicely as they ended up being just in front of one of the mount screws which happens to be where the inset is! If I had missed that location by even a 1/4 inch I would have been screwed!
I'll eventually do a write up on the install with pics so if your interested, email me or just wait for the write up. It really isn't that hard, heck I did all the work figuring where it needs to go for ya! As for parts, Radio Shack has them already pre-made so you don't even have to mess with resistor soldering, heat shrinking the wires, its really simple to mount, hook up and enjoy!

Thread
Thread Starter
Forum
Replies
Last Post
kbpickens
Newbie Tech Section
5
10-02-2015 03:37 PM
FS[PacNorWest]: 1987 4Runner SAS, 22RE, 5Spd, Dual Cases, etc
toyotasaurus
Vehicles - Trailers (Complete)
0
09-24-2015 03:30 PM


