VH1: Behind the Lift - Picture Story of the Lift
 08-21-2006, 05:55 PM
#1
Contributing Member
Thread Starter
Join Date: Aug 2005
Location: Indian River, MI
Posts: 177
Likes: 0
Received 0 Likes
on
0 Posts
VH1: Behind the Lift - Picture Story of the Lift
TONS OF PICTURES TO LOAD!!! Just be aware on 56k 
This isn't meant to be a technical write up, just my experience lifting the 'runner
Ok, so here the long version goes. So, my buddy Carl has the tools/garage/jack/and jackstands to do the lift. On my way to his house I'm kicking my iPod with the front windows down... It's a tad bit warm so I put my back rear windows down. WOOOOSSSHHHHH!!! packing peanuts out of the rear suspension box go EVERYWHERE, including out the window. I decide this is a good time to snap a picture.

I've got the 4" disc grinder, just in case, I know I'll need it for the Diff Drop.
Here's the Tundra/OME front setup chillin in my backseat. I was smart enough to take them out of the box, but i left my OME 891 and N86's in the box.

I pull into my buddie's driveway, all stock with the saggins rear end

We decide to install the front end first, we didn't have to compress the springs, and Tanto shipped me the whoe coilover completely bult (woo)
So here, my buddy Carl is cutting off the old studs. We tried PB blasting them, and then after torquing them, we stripped the base of them, and they were spinning freely... had to be cut, luckily they didn't have to be reused.

And then the most brilliant trick ever (don't know who exactly to give credit for this, but I saw it on http://www.4rnr.net/suspension.html first) Using the stock jackstand, to push down the A-Arm. I don't know if it would have been possible without doing this.
Random Pic of Carl holding the Tundra/OME, and making the *SMUG* face (South Park thing, for those of you who are in the dark)

So, you probably think I didn't do any work, but that's only because I took all the pics. On Carl's camera, it looks like *I* did all the work.
Pic of him torqueing the diff drop bolts to 100 FT lbs

Diff Drop Installed

Front finally installed (both sides basically look the same, hehe)

REVERSE RAKE!

My other friend who is drunk, and being totally useless.... Well that might not be true, he provided comic releif, via Dr. Pepper and SoCo

My favorite picture.... Cutting off the old shocks. The bolt on top is REALLY hard to get to, and not worth it. Just cut 'em off

OME891 VS OEM... TONS more coils, and way beafier... I'm getting all excited by now!

Vice Grips... Don't leave home without them! They were usefull for pulling off the rubber from the old shocks.

Finally at 4AM... it was finished... Ahh, time to relax

BUT WAIT, We lost a bolt off of the top of the rear sway bar, using a big flashlight, we found it in the driveway.
Pictures from earlier today, after a few days of driving, and loving the lift, I washed my car, and took some pictures.


I'm a proud member Alpha Kappa Psi Professional Business Fraternity at Michigan Technological University in Houghton, MI


This isn't meant to be a technical write up, just my experience lifting the 'runner
Ok, so here the long version goes. So, my buddy Carl has the tools/garage/jack/and jackstands to do the lift. On my way to his house I'm kicking my iPod with the front windows down... It's a tad bit warm so I put my back rear windows down. WOOOOSSSHHHHH!!! packing peanuts out of the rear suspension box go EVERYWHERE, including out the window. I decide this is a good time to snap a picture.
I've got the 4" disc grinder, just in case, I know I'll need it for the Diff Drop.
Here's the Tundra/OME front setup chillin in my backseat. I was smart enough to take them out of the box, but i left my OME 891 and N86's in the box.
I pull into my buddie's driveway, all stock with the saggins rear end
We decide to install the front end first, we didn't have to compress the springs, and Tanto shipped me the whoe coilover completely bult (woo)
So here, my buddy Carl is cutting off the old studs. We tried PB blasting them, and then after torquing them, we stripped the base of them, and they were spinning freely... had to be cut, luckily they didn't have to be reused.
And then the most brilliant trick ever (don't know who exactly to give credit for this, but I saw it on http://www.4rnr.net/suspension.html first) Using the stock jackstand, to push down the A-Arm. I don't know if it would have been possible without doing this.
Random Pic of Carl holding the Tundra/OME, and making the *SMUG* face (South Park thing, for those of you who are in the dark)
So, you probably think I didn't do any work, but that's only because I took all the pics
. On Carl's camera, it looks like *I* did all the work.Pic of him torqueing the diff drop bolts to 100 FT lbs
Diff Drop Installed
Front finally installed (both sides basically look the same, hehe)
REVERSE RAKE!
My other friend who is drunk, and being totally useless.... Well that might not be true, he provided comic releif, via Dr. Pepper and SoCo
My favorite picture.... Cutting off the old shocks. The bolt on top is REALLY hard to get to, and not worth it. Just cut 'em off
OME891 VS OEM... TONS more coils, and way beafier... I'm getting all excited by now!
Vice Grips... Don't leave home without them! They were usefull for pulling off the rubber from the old shocks.
Finally at 4AM... it was finished... Ahh, time to relax
BUT WAIT, We lost a bolt off of the top of the rear sway bar, using a big flashlight, we found it in the driveway.
Pictures from earlier today, after a few days of driving, and loving the lift, I washed my car, and took some pictures.
I'm a proud member Alpha Kappa Psi Professional Business Fraternity at Michigan Technological University in Houghton, MI
Last edited by ilikesoup; 08-21-2006 at 06:08 PM.
 08-21-2006, 06:11 PM
#4
Contributing Member
Thread Starter
Join Date: Aug 2005
Location: Indian River, MI
Posts: 177
Likes: 0
Received 0 Likes
on
0 Posts
I can't take them off, then it looks really weird... It looks unfinished. There's like unfinished looking plastic hanging down. It's not like the limiteds. I actually don't see many 'runners with the same fender flairs that I have. (I have the running boards removed)
08-21-2006, 06:33 PM
#6
Contributing Member
Thread Starter
Join Date: Aug 2005
Location: Indian River, MI
Posts: 177
Likes: 0
Received 0 Likes
on
0 Posts
Yeah... eventually. I've gotta run the 265's for a while (proally 10k). I don't have money to buy new tires before the old ones wear out. I'll be on the lookout for used tires for cheap (or free!) proally get 285/75r16 BFG AT KO
08-22-2006, 03:33 AM
#7
Registered User

Join Date: Aug 2006
Location: eastern Canada
Posts: 20
Likes: 0
Received 0 Likes
on
0 Posts
looks real good man, what is the actual measurement of the lift that the OME setup gives you?... do you find the front and rear lift perfectly equal or does it tend to have any forward or rear rake at all?
thanks for sharing
thanks for sharing
Trending Topics
 08-22-2006, 05:03 AM
#9
Registered User

Join Date: Dec 2004
Posts: 142
Likes: 0
Received 0 Likes
on
0 Posts
Good on ya, yooouper!! Finally another Michigan 4R!!!
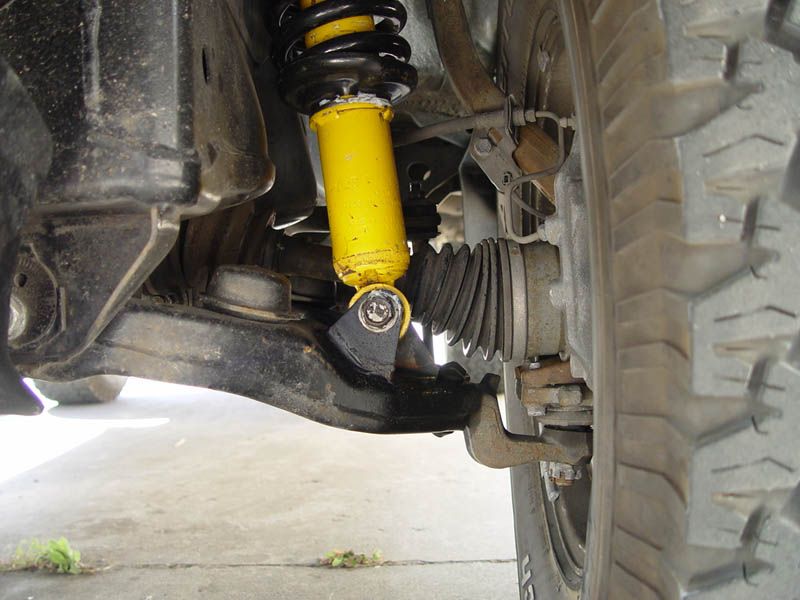
Question: The picture of your front suspension after the lift, it looks like the spring perch is upside down? Am I seeing things? It doesn't "look" right. I could be off, though.
Looks great though. Can you look at your front mudflaps and get a PN off of them? I have the same flares, but my mud guards are gone (and it does look strange).
uber
08-22-2006, 06:05 AM
#11
Contributing Member
Thread Starter
Join Date: Aug 2005
Location: Indian River, MI
Posts: 177
Likes: 0
Received 0 Likes
on
0 Posts
With the 3/8" spacers and the Tundra/OME in the front, the back is raked about an inch, I'd have to measure to be sure, but that's what it looks like. Also my OME coils were used for about 15k or so, so new OME coils might actually give you a tad bit more if they were brand new. I don't like the extreme raked look, and that's why i didn't go with LC coils. It appears as though two sets of 3/8" spacers would perfectly level the lift out.
I'm not a yoooper yet I'm living in the Lower Penninsula with the family for summer, headding back to college in the UP on saturday!
As for the spring perch, *I* didn't build the shocks, but that is how they are supposed to look, it looks upside down.
Ok the part numbers for the front mud flaps are:
PT413-35966-DF
PT413-35966-PF
Those part #'s might be superceded by new ones, but that should at least point you in the right direction. I ordered mine in July 2005.
Oh, and by buying used stuff on the boards... I ended up spending a grand total of $454.00... Not too bad for a nice suspension lift......................I gotta change my avatar now
I'm not a yoooper yet
I'm living in the Lower Penninsula with the family for summer, headding back to college in the UP on saturday!As for the spring perch, *I* didn't build the shocks
, but that is how they are supposed to look, it looks upside down. Ok the part numbers for the front mud flaps are:
PT413-35966-DF
PT413-35966-PF
Those part #'s might be superceded by new ones, but that should at least point you in the right direction. I ordered mine in July 2005.
Oh, and by buying used stuff on the boards... I ended up spending a grand total of $454.00... Not too bad for a nice suspension lift......................I gotta change my avatar now
Last edited by ilikesoup; 08-22-2006 at 06:08 AM.
08-22-2006, 08:09 AM
#12
Contributing Member
Its not a HUGE deal, but, the cups on the front shocks that hold the coils, are... upsidedown.
If you wanted the front up higher (1/2" or so) you could flip them.
If you wanted the front up higher (1/2" or so) you could flip them.
 08-22-2006, 08:35 AM
#14
Contributing Member
Thread Starter
Join Date: Aug 2005
Location: Indian River, MI
Posts: 177
Likes: 0
Received 0 Likes
on
0 Posts
Hmmm, I think i saw a picture of the perch as it is instlaled now... Tanto and ecchamberlin built the coilovers, and i bought them off of Tanto.
I guess that's why i've got the rake with the OME rear setup, I thought it would be level.
I guess that's why i've got the rake with the OME rear setup, I thought it would be level.
Last edited by ilikesoup; 08-22-2006 at 08:41 AM.
08-22-2006, 09:05 AM
#16
Contributing Member
Join Date: Apr 2004
Location: Los Angeles, CA
Posts: 940
Likes: 0
Received 0 Likes
on
0 Posts
Originally Posted by ilikesoup
Oh, and by buying used stuff on the boards... I ended up spending a grand total of $454.00... Not too bad for a nice suspension lift......................I gotta change my avatar now
08-22-2006, 09:42 AM
#18
Contributing Member
Thread Starter
Join Date: Aug 2005
Location: Indian River, MI
Posts: 177
Likes: 0
Received 0 Likes
on
0 Posts
Originally Posted by Tanto
Oops...my bad on that. That does look a lot better in your pic, SC4Runner. No problems wheeling that setup the way it is though.
Hmmm yeah, I'll change the signature too...
08-22-2006, 11:10 AM
#19
Contributing Member
Join Date: Sep 2003
Location: Littleton,CO
Posts: 10,549
Likes: 0
Received 0 Likes
on
0 Posts
The factory front mudflaps are actually quite coveted by those with the pre '00 SR5s who remove their running boards;I was lucky since mine never had the running boards so I got the flaps.
08-22-2006, 11:27 AM
#20
Contributing Member
Originally Posted by KyleT
looks nice, now take off the mudflap things.
.....and holy cow, good catch on those shocks, the cups ARE upside down. The rig will level off alot more if you flip them over.....unless of course you like the way it sits now. I almost put mine in upside down myself, but checked a few writeups and saw my mistake before I had everything back together.
Last edited by MTL_4runner; 08-22-2006 at 11:31 AM.


