timing belt replacement
 01-19-2006, 05:11 PM
#1
Registered User
Thread Starter
Join Date: Aug 2005
Location: Pittsboro, NC
Posts: 109
Likes: 0
Received 0 Likes
on
0 Posts
timing belt replacement
When I bought my 4runner it had 145k on it, now it is at 153k and I'm not sure if the timing belt has been replaced. How can I check to see if it needs replaced? Is it something that I can do on my own or do I need to take it to a shop? I searched but didn't find anything for 3rd gens, only 2nd.
 01-20-2006, 04:49 AM
#4
Contributing Member
Originally Posted by ohio4runner4x4
You could pull the cover off and take a look......But if I were you and did not know the history....I'd replace it and the water pump soon.
01-20-2006, 07:29 AM
#5
Contributing Member
You can't check to see if it needs replaced, used belts look the same as new ones. Most replacement belts come with a sticker that should be on the cover, with date and mileage. If there isn't one assume it's original. Here's a write up on replacing the belt, if you want to tackle it yourself. It's not really that hard to do.
http://www.4x4wire.com/toyota/maintenance/timing_belt/
http://www.4x4wire.com/toyota/maintenance/timing_belt/
01-20-2006, 09:04 AM
#6
Registered User

Join Date: May 2005
Location: Jacksonville
Posts: 20
Likes: 0
Received 0 Likes
on
0 Posts
I bought my truck used and did not get any service history with it, but when I took it to the dealership, they put the VIN into their database and were able to give me the details of all of the maint performed at any toyota dealership. Many people use the dealership when it's under warranty and you may be surprised what they can tell you.
If you can't get the info I've been told that an experience mechanic can tell by looking at the belt whether its relatively new or needing replacement.
If you can't get the info I've been told that an experience mechanic can tell by looking at the belt whether its relatively new or needing replacement.
01-20-2006, 09:25 AM
#7
Registered User
Join Date: Sep 2005
Location: Reno, NV
Posts: 409
Likes: 0
Received 0 Likes
on
0 Posts
Any noises coming from the front of the motor?
I just did mine on my 97 with 160k on it, took about two nights of work to replace the belt, water pump, thermostat and both idler pulleys. The pulleys are a little expensive but if your gonna have it apart you might as well get it all replaced.
I just did mine on my 97 with 160k on it, took about two nights of work to replace the belt, water pump, thermostat and both idler pulleys. The pulleys are a little expensive but if your gonna have it apart you might as well get it all replaced.
Trending Topics
 103,000 miles and almost 5 years old. Should be a fun DIY...
01-21-2006, 07:02 AM
103,000 miles and almost 5 years old. Should be a fun DIY...
01-21-2006, 07:02 AM
#9
Registered User
Join Date: Jul 2003
Location: Cheyenne, Wyoming
Posts: 196
Likes: 0
Received 0 Likes
on
0 Posts
Just did the timing belt and water pump on my wifes 4runner. The tool is essential to press the tensioner pulley to install the belt. I should have pulled the radiator. I banged it up a little. I think it didn't take longer than 8 hours to do.
01-21-2006, 07:04 AM
#10
Contributing Member

sgirt,
I was under the assumption that removing the radiator would allow far more working room, but that the auto tranny cooler lines run through the radiator. Is this correct?
Andreas
I was under the assumption that removing the radiator would allow far more working room, but that the auto tranny cooler lines run through the radiator. Is this correct?
Andreas
01-21-2006, 11:33 AM
#11
Contributing Member
Originally Posted by aowRS
sgirt,
I was under the assumption that removing the radiator would allow far more working room, but that the auto tranny cooler lines run through the radiator. Is this correct?
Andreas
I was under the assumption that removing the radiator would allow far more working room, but that the auto tranny cooler lines run through the radiator. Is this correct?
Andreas
01-21-2006, 01:03 PM
#13
Registered User
Join Date: Sep 2005
Location: Reno, NV
Posts: 409
Likes: 0
Received 0 Likes
on
0 Posts
I left the radiator in place and there was enough room, not enough to use an impact gun but enough room to work. Make sure to get a pulley or harmonic balancer puller with the metric bolts. I got one at harbor for $9.
01-21-2006, 01:27 PM
#14
Contributing Member
Originally Posted by aowRS
Jamie,
So there's enough room to get the bolt off with a large breaker bar or the starter trick? Looks tight down there but manageable.
Andreas
So there's enough room to get the bolt off with a large breaker bar or the starter trick? Looks tight down there but manageable.
Andreas
01-21-2006, 07:04 PM
#16
Registered User
Join Date: Aug 2004
Posts: 51
Likes: 0
Received 0 Likes
on
0 Posts
When using the SnapOn (SnapOff) SST go very, very slowly. I've used it once before without trouble. The last effort was a minor disaster. Using a cam type open end wrench I went too fast. Here is the result.
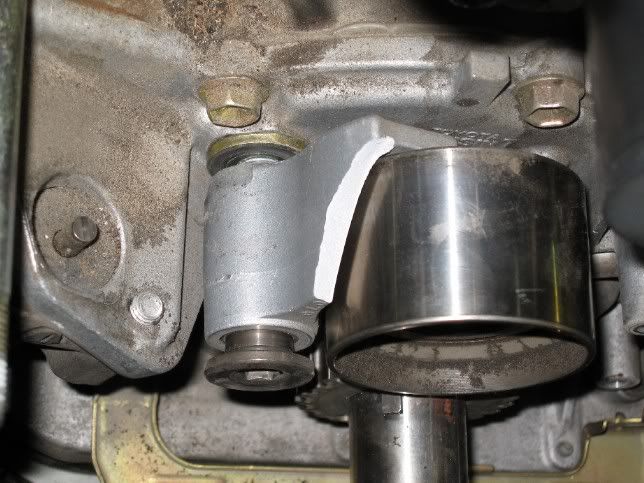
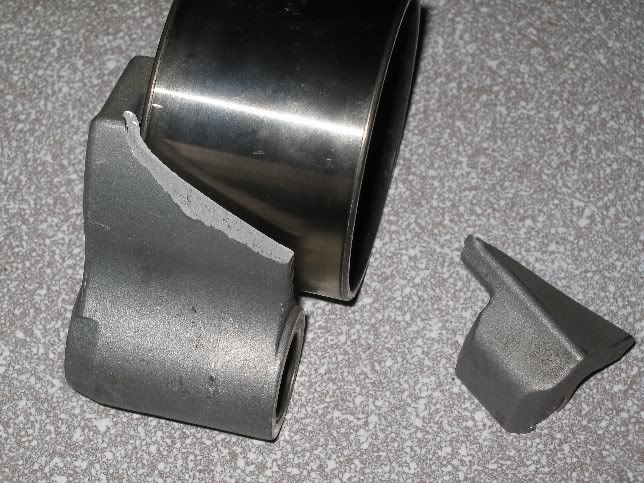
Ended up having to remove the a/c brackets after all. If I ever have to do another, I will either remove the tensioner or make/find a very shallow 'C'-clamp to press directly on the pin. Torqueing against cast aluminum is too risky.
To hold the front pulley against 210 ft/lb requires a substantial pin.

Grade 5 5/16ths finally did the job.
I think the tensioner must be fluid filled, since even in the vise, depressing it seems to be a function of time as well as force.
Ended up having to remove the a/c brackets after all. If I ever have to do another, I will either remove the tensioner or make/find a very shallow 'C'-clamp to press directly on the pin. Torqueing against cast aluminum is too risky.
To hold the front pulley against 210 ft/lb requires a substantial pin.
Grade 5 5/16ths finally did the job.
I think the tensioner must be fluid filled, since even in the vise, depressing it seems to be a function of time as well as force.
01-21-2006, 08:58 PM
#17
Registered User

Join Date: Jan 2006
Posts: 3
Likes: 0
Received 0 Likes
on
0 Posts
Originally Posted by vegaskurt
I left the radiator in place and there was enough room, not enough to use an impact gun but enough room to work. Make sure to get a pulley or harmonic balancer puller with the metric bolts. I got one at harbor for $9.
01-22-2006, 03:43 PM
#19
Contributing Member
You don't have to have the tensioner SST or a puller for the crank pulley but both can help. With the SST you do need to be careful because as Randy� displayed, you can do damage if you compress the tensioner too fast and it is hydraulic (ie fluid filled) so it will compress much slower than you think. When I do it I just remove the AC brackets and unbolt the tensioner. Then just use a slightly longer bolt when reinstalling to get one side started then pull the longer bolt and install the correct one. If you live in a rust belt area you may need a crank pulley puller, but I never needed one (some PB blaster and a few taps with a dead blow mallet is usually enough).
01-23-2006, 10:00 AM
#20
Registered User
Join Date: Sep 2005
Location: Reno, NV
Posts: 409
Likes: 0
Received 0 Likes
on
0 Posts
Its a harmonic balancer puller kit. It came with both us and metric bolts in an assortment. I thinkg its the only one they sell. it was either 9 or 12 dollars.
If I have to do it again I would get the SST, there are more than one company that makes them besides snap-on. Removing the AC bracket was a pita, then I had to compress the tensioner with a large C-clamp.
If I have to do it again I would get the SST, there are more than one company that makes them besides snap-on. Removing the AC bracket was a pita, then I had to compress the tensioner with a large C-clamp.


