
 03-30-2016, 02:59 PM
Last edit by: IB Advertising
See related guides and technical advice from our community experts:
- Toyota Tacoma How to Replace Steering Rack Bushings<br>Step by step instructions for do-it-yourself repairs.

steering rack bushing replacement
03-09-2009, 09:35 PM
#1
Registered User
Thread Starter
Join Date: Aug 2008
Location: Arizona
Posts: 488
Likes: 0
Received 0 Likes
on
0 Posts
steering rack bushing replacement
So I went to have my aligmnent done last week and they said it was a waste in till I replaced my steering rack bushings. So I bought some from wheelersoffroad.com. And I started doing it tonight and ran into some problems. First of all the all the directions stated that you must remove the drivers side tie rod from the knuckle. Which I dont understand why you would do that? Also on the mount on the drivers side of the rack, the sleeve thats in there right now needs to come out towards the crossmember, therefore there is no clearance. If anybody has installed new bushings on their rack please let me know how you did it. Thanks. BTW if anybody is having trouble following me I can post photos.
 03-09-2009, 11:23 PM
#2
Registered User
Join Date: Sep 2008
Posts: 69
Likes: 0
Received 0 Likes
on
0 Posts
simple, time consuming, but not a hard job
ok jack up the front (front wheels off the ground), yada yada yada, don't kill your self in the process.
then keep a jack stand handy to lay the rack on
i had a breaker bar, this was the best thing ever.
start taking out the bolts (the drivers long bolt and nut, the passanger side 2 nuts then the center bolt (from the top))
ok then just pul it backwards and it will slide out enough to lay on the jack stand.
i used a long socket (like a 19 or 20 or anything that fits on the bushings and can slide thru the bushing holder on the rack) and a hammer to knock out the bushings. put some wd40 if it makes it easier. i didn't need it
just put on the new bushings, i had a problem putting it back. the center would not slide back in so i had to bend the metal a bit to make it wider on the car. it's easy to bend. just play with it.
keep everytihng loose until you get all the nuts and bolts in place with a few turns. i used the breaker bard to tighten everything
03-10-2009, 01:08 AM
#3
Contributing Member
iTrader: (1)
Join Date: Apr 2005
Location: Colorado
Posts: 4,683
Likes: 0
Received 0 Likes
on
0 Posts
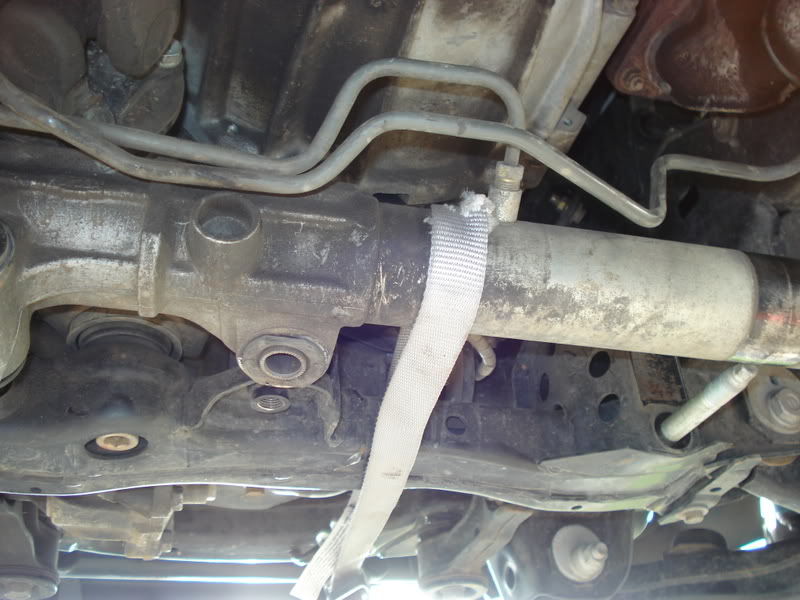
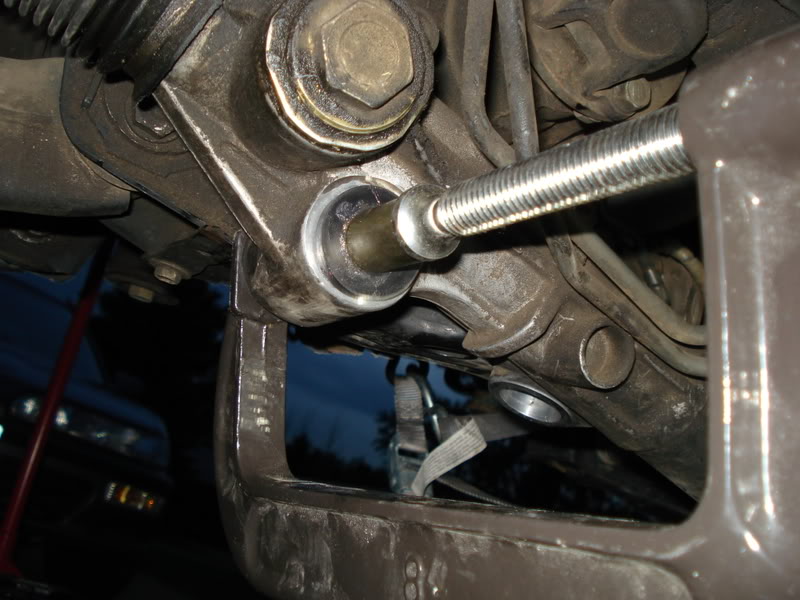
A couple large C-clamps work great for removing and installing the center and drivers side bushings.
In place of jack stand...
Use a rope or strap to support the rack...it'll allow you move it around when necessary. Being able to turn the wheels (left/right) really helps with the install. You DO NOT need to touch the tie rods!
I was going to do a write-up on this but lost some pics. Have a few that should help.
In no particular order...
Adjustable strap hung over/through crossmember...
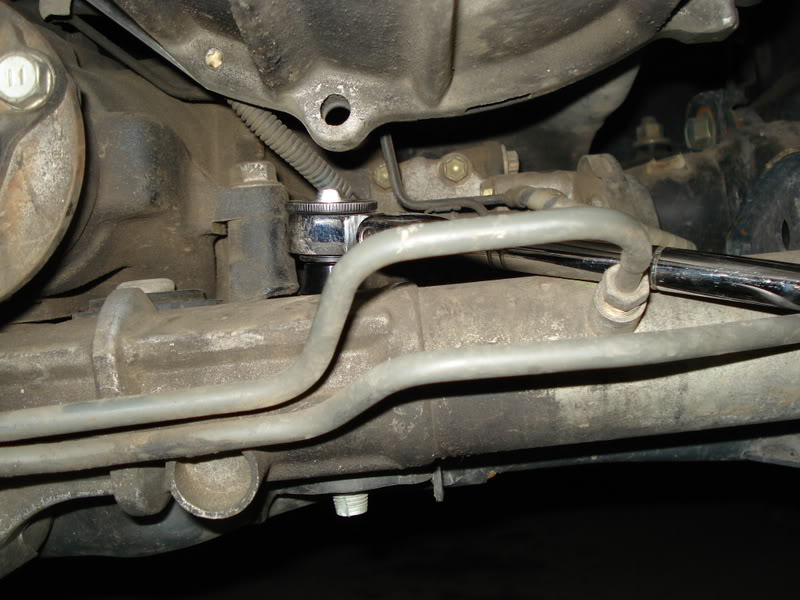
I trimmed portions of the center bushing "lip" with wire-cutters to help it pass through...

If you want to make the job easier and save time, a flex-head ratchet on all the bolts is a MUST have...
Pounding out old driver's side bushing...IIRC I eventually used a C-clamp w/socket...
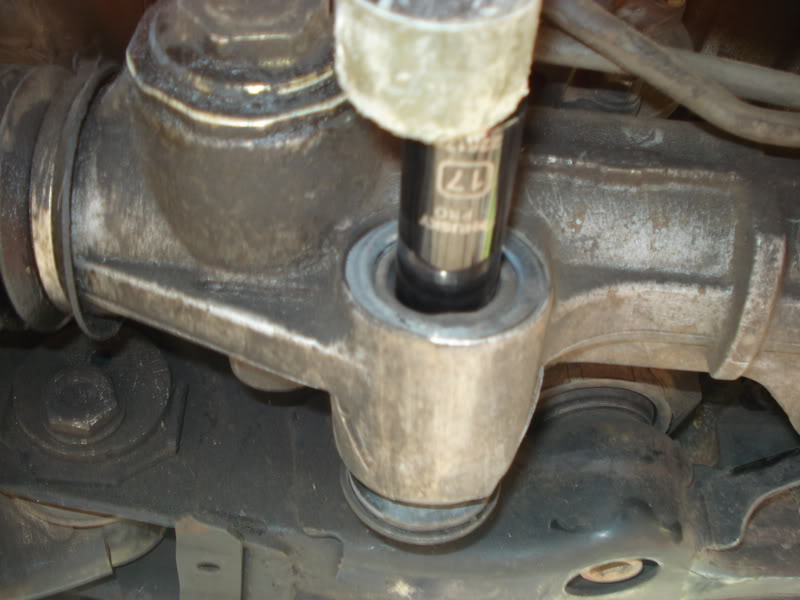
Pressing new center bushing in..
Pressing new bushing in on driver's side...
in...
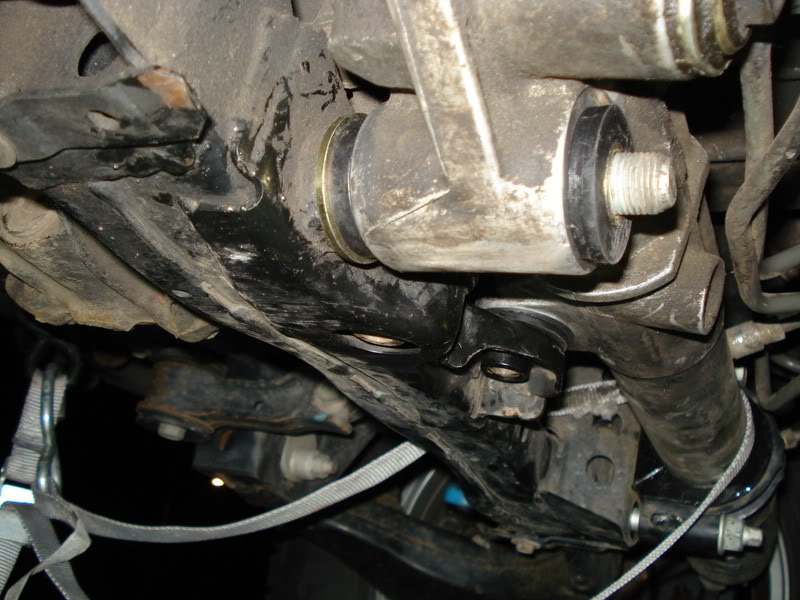
Torqued to spec...
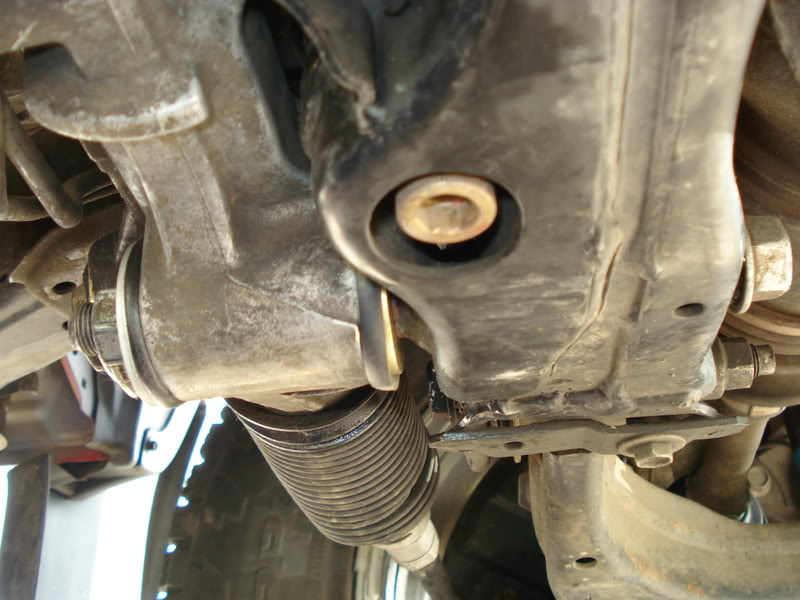
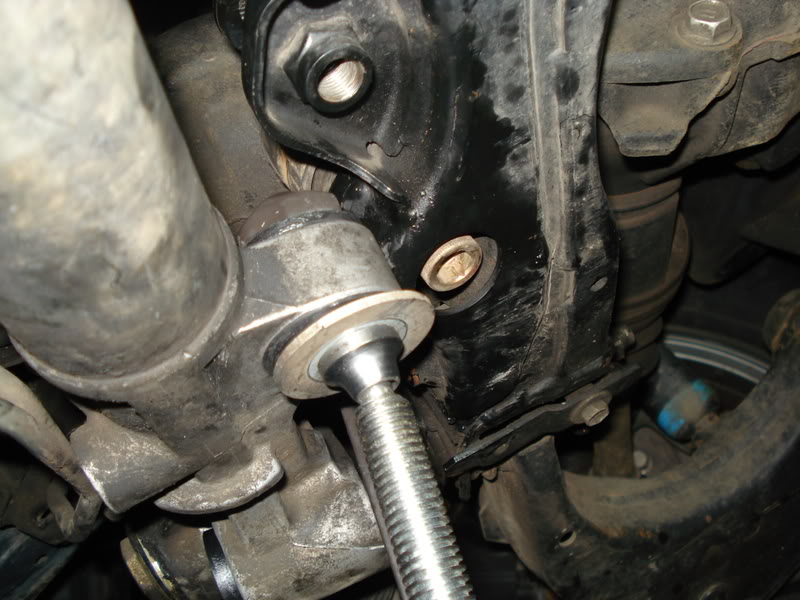
passenger side...
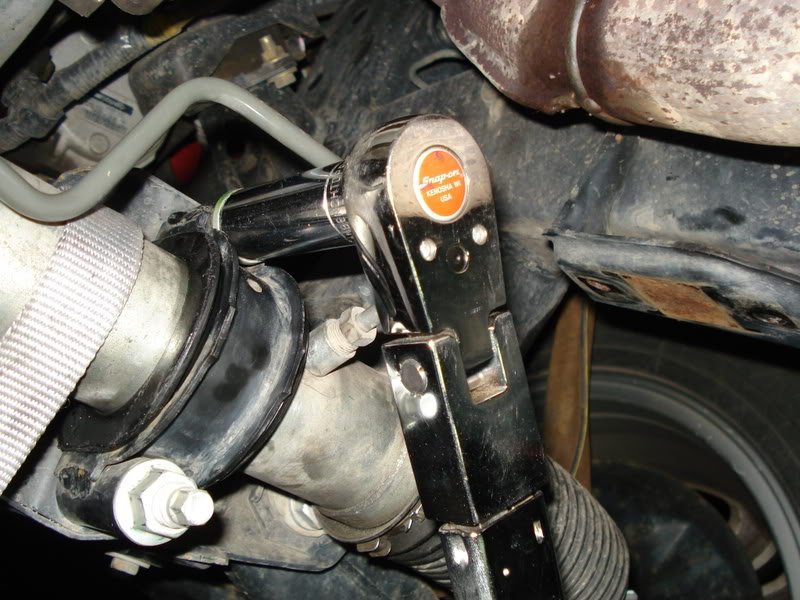
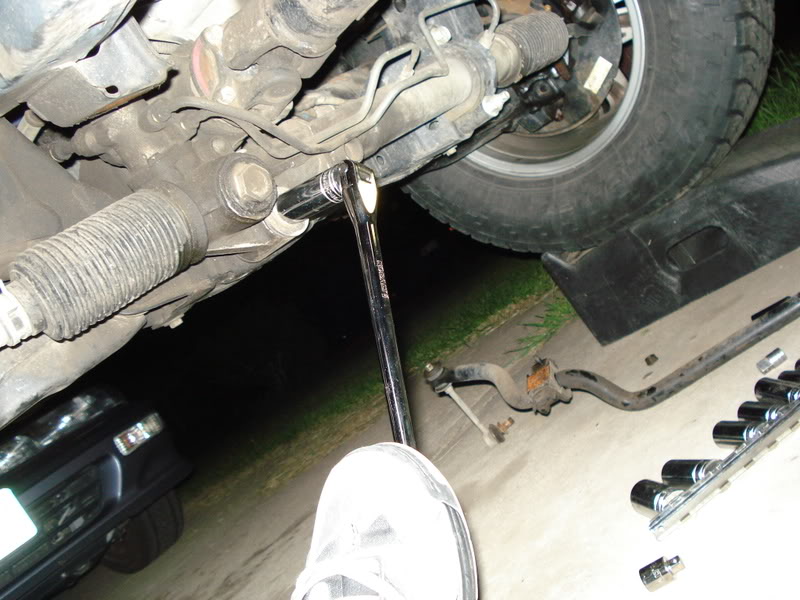
The only time I used a breaker bar (and car ramps) was to *remove* the driver's side bolt like so...
In place of jack stand...
Use a rope or strap to support the rack...it'll allow you move it around when necessary. Being able to turn the wheels (left/right) really helps with the install. You DO NOT need to touch the tie rods!
I was going to do a write-up on this but lost some pics. Have a few that should help.
In no particular order...
Adjustable strap hung over/through crossmember...
I trimmed portions of the center bushing "lip" with wire-cutters to help it pass through...
If you want to make the job easier and save time, a flex-head ratchet on all the bolts is a MUST have...
Pounding out old driver's side bushing...IIRC I eventually used a C-clamp w/socket...
Pressing new center bushing in..
Pressing new bushing in on driver's side...
in...
Torqued to spec...
passenger side...
The only time I used a breaker bar (and car ramps) was to *remove* the driver's side bolt like so...
 03-10-2009, 09:30 AM
#5
Registered User
iTrader: (1)
Join Date: Feb 2007
Location: Shelburne, VT previous: Everett, WA; Bellingham, WA
Posts: 419
Likes: 0
Received 0 Likes
on
0 Posts
i didn't remove the sway bar in any place, but i did separate the driver's side tie rod end (because that's what i was replacing, originally), and i think the reason they say to separate it from the steering knuckle is for free play when re-installing the rack with the new bushings installed- hardest part of the whole process, imo. install the center bolt first, then the driver's side/pass. side bolts.
i had the same idea as rocket with the press (though, i used the bottle jack on a crossmember to seat the driver's side bushing). a c-clamp wouldn't work for me. it worked like a charm and gave me a smile when completed. also just used the unused sleeves in the kit instead of the socket rocket used.
i had the same idea as rocket with the press (though, i used the bottle jack on a crossmember to seat the driver's side bushing). a c-clamp wouldn't work for me. it worked like a charm and gave me a smile when completed. also just used the unused sleeves in the kit instead of the socket rocket used.
Trending Topics
03-11-2009, 12:12 PM
#8
Contributing Member
Join Date: May 2003
Location: AZ USA
Posts: 30
Likes: 0
Received 0 Likes
on
0 Posts
03-12-2009, 10:24 PM
#9
Registered User

Join Date: Mar 2009
Posts: 10
Likes: 0
Received 0 Likes
on
0 Posts
So I went to have my aligmnent done last week and they said it was a waste in till I replaced my steering rack bushings. So I bought some from wheelersoffroad.com. And I started doing it tonight and ran into some problems. First of all the all the directions stated that you must remove the drivers side tie rod from the knuckle. Which I dont understand why you would do that? Also on the mount on the drivers side of the rack, the sleeve thats in there right now needs to come out towards the crossmember, therefore there is no clearance. If anybody has installed new bushings on their rack please let me know how you did it. Thanks. BTW if anybody is having trouble following me I can post photos.
at this point i dont know who to believe. the dealer said if i replace the bushings with aftermarket, the tightness will just go to the steering wheel and would shake worse?
i think my ball joints are worn and going to check those tomorrow. i still think my bushings are worn too. when i move my wheels back and forth, you can see the middle part of the rack move, where the bushings would be. not sure why those wouldnt have been replaced when the steering gear was replaced under warranty.
03-14-2009, 03:55 PM
#10
Registered User
Join Date: Oct 2008
Posts: 6
Likes: 0
Received 0 Likes
on
0 Posts
Hey guys
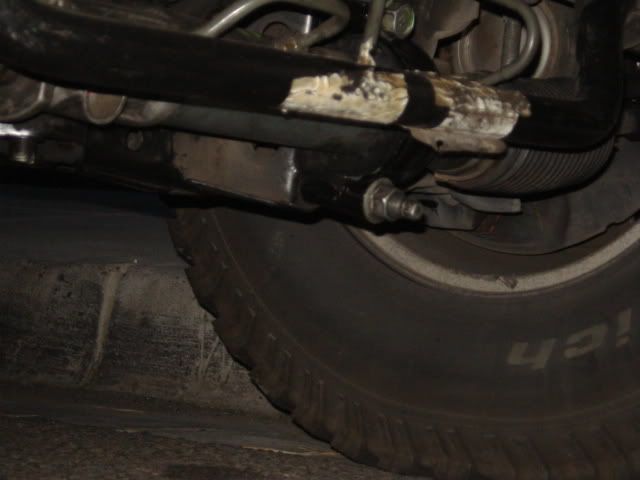
i've change my steering rack bushing the other day cause them are worn out i'm new here on this site and i owened a 024runner i took an image of the passenger side bracket for info it looks like it's crooked???
[IMG]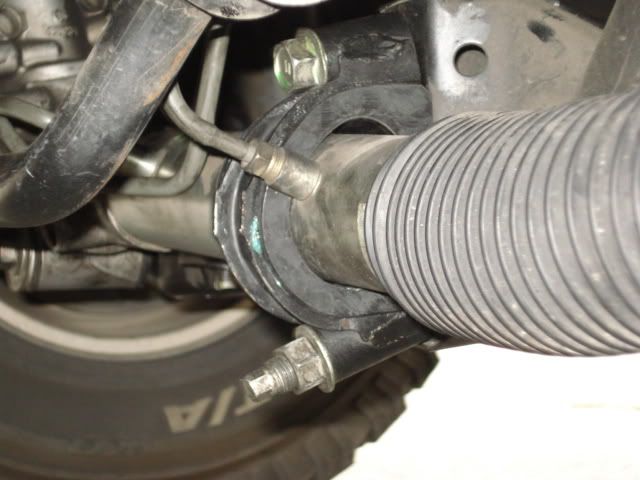 [/IMG]
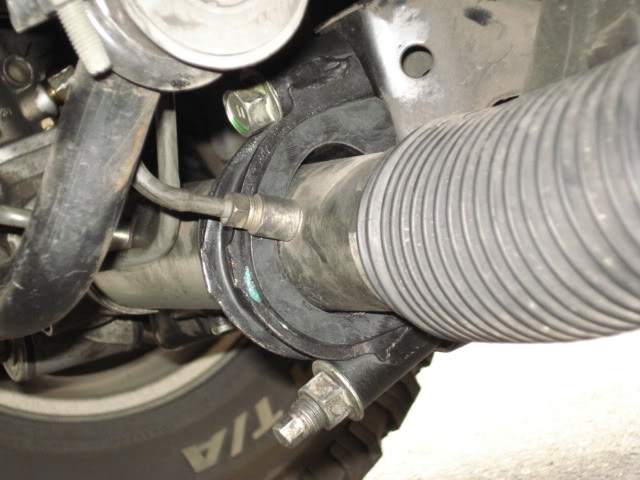
Let me know guys if its crooked cause i noticed that the lower bolt is facing down as shown here on the encircled image
thanks
B
i've change my steering rack bushing the other day cause them are worn out i'm new here on this site and i owened a 024runner i took an image of the passenger side bracket for info it looks like it's crooked???
[IMG]
[/IMG]Let me know guys if its crooked cause i noticed that the lower bolt is facing down as shown here on the encircled image
thanks
B
Last edited by titokid; 03-14-2009 at 04:09 PM.
03-14-2009, 05:42 PM
#11
Registered User
iTrader: (1)
Join Date: Feb 2007
Location: Shelburne, VT previous: Everett, WA; Bellingham, WA
Posts: 419
Likes: 0
Received 0 Likes
on
0 Posts
that doesn't look too good. looks like that stud is bent- just bushings won't help that. you're going to want to take that bushing/housing off to see the damage that's done.
03-15-2009, 05:23 AM
#13
Registered User
Join Date: Nov 2006
Location: Ohio
Posts: 321
Likes: 0
Received 0 Likes
on
0 Posts
Last edited by atistang; 04-01-2009 at 05:47 AM.


 03-29-2009, 06:13 AM
#18
Registered User
an alignment shop told me the samething the other day. ive already been through two steering gears, within the last year and a half. the dealer says the shop is trying to get money from me, but i beg to differ. the shop told me they dont want to take my money and showed me the bushing movement.
at this point i dont know who to believe. the dealer said if i replace the bushings with aftermarket, the tightness will just go to the steering wheel and would shake worse?
i think my ball joints are worn and going to check those tomorrow. i still think my bushings are worn too. when i move my wheels back and forth, you can see the middle part of the rack move, where the bushings would be. not sure why those wouldnt have been replaced when the steering gear was replaced under warranty.

Thread
Thread Starter
Forum
Replies
Last Post


