Sheared 2 of 3 thermo housing bolts
 06-12-2010, 07:38 PM
#1
Registered User
Thread Starter
Join Date: Oct 2009
Location: Nevada/SLC
Posts: 19
Likes: 0
Received 0 Likes
on
0 Posts
Sheared 2 of 3 thermo housing bolts
I decided to undertake the old radiator/transmission cooler/timing belt/pump/thermo replacement. As I was very carefully working my way out, I sheared 2/3 thermo housing bolts. I have my ideas on how to handle this, but thought to check if anyone has made this mistake and found a good way to navigate.
Thanks!
Thanks!
 06-14-2010, 06:24 AM
#2
Registered User
Join Date: Nov 2009
Posts: 127
Likes: 0
Received 0 Likes
on
0 Posts
You mean the bolt heads just came off while turning them out? Yikes, that's not cool. I'm about to replace this stuff too (coolant, stat, gaskets, temp sensor), and would rather not encounter this.
 06-14-2010, 06:45 AM
#4
Registered User
Join Date: Mar 2006
Location: Connecticut (NY State of Mind)
Posts: 452
Likes: 0
Received 0 Likes
on
0 Posts
Should have soaked them in PB prior to this. Looks like like you either have to soak them in PB, drill them and then use an easy out or you just have to drill and tap them.
06-14-2010, 08:06 AM
#5
Registered User
I sheared one going back on. Torque was 13 or 14 ft-lbs and stud sheared off when wrench was at like 12. There was enough left I could get it out with Vice-grips once I pulled the housing back off. I took my wrench downtown and had it checked. It was fine. I think those studs are just a bit too soft after 10 years in the block.
06-14-2010, 06:18 PM
#6
Registered User
Thread Starter
Join Date: Oct 2009
Location: Nevada/SLC
Posts: 19
Likes: 0
Received 0 Likes
on
0 Posts
A Lucky Shake!
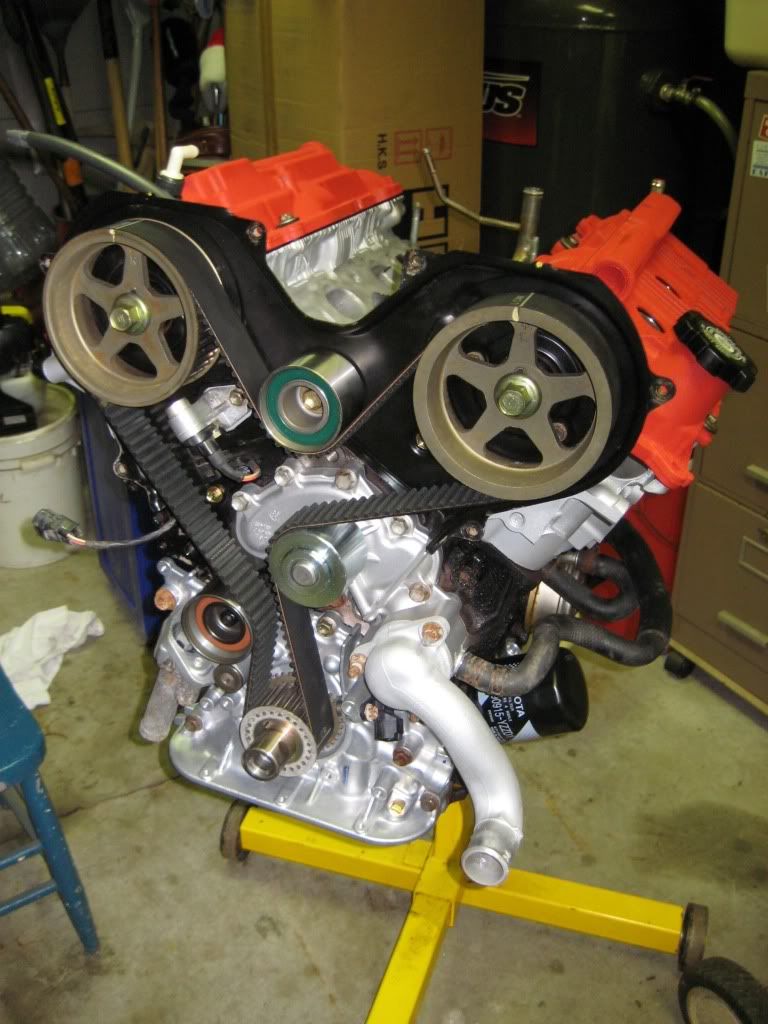
So a little update:
Saturday, after I broke the studs, I tried wrenching them with a vise-grip. When that didn't work, I quit for the day. I started looking at heli-coil, drill-out and tap, etc. I decided before I went through all that trouble, I would get a new pair of channel locks and try it again. Soaked the boys in PB for about 20 minutes, and they turned right out! I am usually not lucky, so today was great! I ordered replacement studs and nuts for $6 total.
I followed incorrect torque specs from the Haynes manual even though I had my FSM all ready to rock. Lesson learned.
Also, thought I'd share my run-in with the R cam pulley. 2 stitches.
Speaking of the R pulley, when I opened the cover, the marks on the left pulley/belt/block were all lined up. The right however were not. The belt and block marks were in line, but the pulley mark was off. When I install the new belt, All marks should be perfectly in line, regardless of position of the old belt, correct? The timing was not off before the change--purred like a kitten in fact.
Great looking motor, Greg
Qyota, if you need the tensioner compressor and crank pulley holder, PM me and we can work out an arrangement
Thanks![IMG]file:///F:/DCIM/100KC360/100_0712.JPG[/IMG]
Last edited by ft_surgn; 06-14-2010 at 06:21 PM. Reason: compliment
06-15-2010, 06:02 AM
#7
Registered User
Join Date: Nov 2009
Posts: 127
Likes: 0
Received 0 Likes
on
0 Posts
Thanks surgeon, but I'm just doing the t-stat and CTS, not the timing belt. Fortunately, that stuff was changed before I bought the truck.
So, it looks like even though you sheared the studs, there was plenty of stud left to get a vise grips on...right?
So, it looks like even though you sheared the studs, there was plenty of stud left to get a vise grips on...right?
Trending Topics
06-15-2010, 06:10 AM
#8
Registered User

So a little update:
Saturday, after I broke the studs, I tried wrenching them with a vise-grip. When that didn't work, I quit for the day. I started looking at heli-coil, drill-out and tap, etc. I decided before I went through all that trouble, I would get a new pair of channel locks and try it again. Soaked the boys in PB for about 20 minutes, and they turned right out! I am usually not lucky, so today was great! I ordered replacement studs and nuts for $6 total.
I followed incorrect torque specs from the Haynes manual even though I had my FSM all ready to rock. Lesson learned.
Also, thought I'd share my run-in with the R cam pulley. 2 stitches.
Speaking of the R pulley, when I opened the cover, the marks on the left pulley/belt/block were all lined up. The right however were not. The belt and block marks were in line, but the pulley mark was off. When I install the new belt, All marks should be perfectly in line, regardless of position of the old belt, correct? The timing was not off before the change--purred like a kitten in fact.
Great looking motor, Greg
Qyota, if you need the tensioner compressor and crank pulley holder, PM me and we can work out an arrangement
Thanks![IMG]file:///F:/DCIM/100KC360/100_0712.JPG[/IMG]
Saturday, after I broke the studs, I tried wrenching them with a vise-grip. When that didn't work, I quit for the day. I started looking at heli-coil, drill-out and tap, etc. I decided before I went through all that trouble, I would get a new pair of channel locks and try it again. Soaked the boys in PB for about 20 minutes, and they turned right out! I am usually not lucky, so today was great! I ordered replacement studs and nuts for $6 total.
I followed incorrect torque specs from the Haynes manual even though I had my FSM all ready to rock. Lesson learned.
Also, thought I'd share my run-in with the R cam pulley. 2 stitches.
Speaking of the R pulley, when I opened the cover, the marks on the left pulley/belt/block were all lined up. The right however were not. The belt and block marks were in line, but the pulley mark was off. When I install the new belt, All marks should be perfectly in line, regardless of position of the old belt, correct? The timing was not off before the change--purred like a kitten in fact.
Great looking motor, Greg
Qyota, if you need the tensioner compressor and crank pulley holder, PM me and we can work out an arrangement
Thanks![IMG]file:///F:/DCIM/100KC360/100_0712.JPG[/IMG]
When you line up the new belt the marks should all line up (2 cams and the crankshaft). Once you turn it over a revolution they wont line up any more. It's perfectly OK.

Thread
Thread Starter
Forum
Replies
Last Post
DiZ86
Pre 84 Trucks
12
12-27-2015 09:33 PM
TransAmBandit
86-95 Trucks & 4Runners
6
07-28-2015 11:30 PM


