Seat Brackets
 04-09-2011, 07:53 PM
#1
Registered User
Thread Starter

Join Date: Feb 2009
Location: Colorado Springs
Posts: 94
Likes: 0
Received 0 Likes
on
0 Posts
Seat Brackets
1996 4Runner Limited, power leather seats want to replace them with different width spaced brackets.
My 4Runner seats are shot and I need some fabrication help. The new seats I have a 14" from slide mount bolt to slide mount bolt center, 4Runner seats are 17" from slide mount bolt center. I can bend the flat steel to make the feet but my problem is how do I get the extra 1.5" on the sides and have it stable enough to mount the feet to it?
I just do not know if flat steel is strong enough to hold a person in the seat and also to have the feet bolted or welded to it. Seems like a place for failure to me. Any ideas or expertise would be great. I have also looked at unbolting the old brackets from the old seats but they are heavily integrated into everything and does not look like that is a feasible route.
Here are some pictures of the 2 seats, both passenger seats.
New seat:


Old seat:


My 4Runner seats are shot and I need some fabrication help. The new seats I have a 14" from slide mount bolt to slide mount bolt center, 4Runner seats are 17" from slide mount bolt center. I can bend the flat steel to make the feet but my problem is how do I get the extra 1.5" on the sides and have it stable enough to mount the feet to it?
I just do not know if flat steel is strong enough to hold a person in the seat and also to have the feet bolted or welded to it. Seems like a place for failure to me. Any ideas or expertise would be great. I have also looked at unbolting the old brackets from the old seats but they are heavily integrated into everything and does not look like that is a feasible route.
Here are some pictures of the 2 seats, both passenger seats.
New seat:
Old seat:
 04-09-2011, 08:29 PM
#2
Contributing Member
I used 1x1 steel to mount my old 4Runner seat feet to (I'm short enough for the extra inch), then bolted my 'new' seats to those.....
what if you did something somewhat similar but weld in cross pieces to mount your seat to.
I don't know if flat steel would be strong enough to bolt the seat to. In my case I thought it would be too flexy- and I wanted the extra height. Then again, I've seen those 4Runner feets.
My seat build.....just add the cross pieces at the interval you'd need to bolt in the new seat rails...
https://www.yotatech.com/forums/f200...l#post51687049
#227
Hmmm....might not be enough seat to cover the rails the way I have them... maybe you could come up with a way to angle your feet in enough, then either make a frame or just rails for them. Don't forget to post what you end up with!
Last edited by habanero; 04-09-2011 at 08:35 PM.
04-09-2011, 08:44 PM
#3
Registered User
Thread Starter
Join Date: Feb 2009
Location: Colorado Springs
Posts: 94
Likes: 0
Received 0 Likes
on
0 Posts
@habanero - Thanks for the link and ideas. I wish it was just the feet mounting to the chairs with this but as you can see I have to add an 1.5" to each side and then mount the feet to that. My fear is that if I go to angle iron that would be strong enough that the seat would be to high to use, but if I go to flat steel it would be to weak to support an adult.
I think my best action plan would be to take the rails off the new seat and then use thick flat steel or tube to move them out the 1.5". HMMMMMMM....
I think my best action plan would be to take the rails off the new seat and then use thick flat steel or tube to move them out the 1.5". HMMMMMMM....
Last edited by alteredvision; 04-09-2011 at 08:46 PM.
04-09-2011, 08:45 PM
#4
Registered User
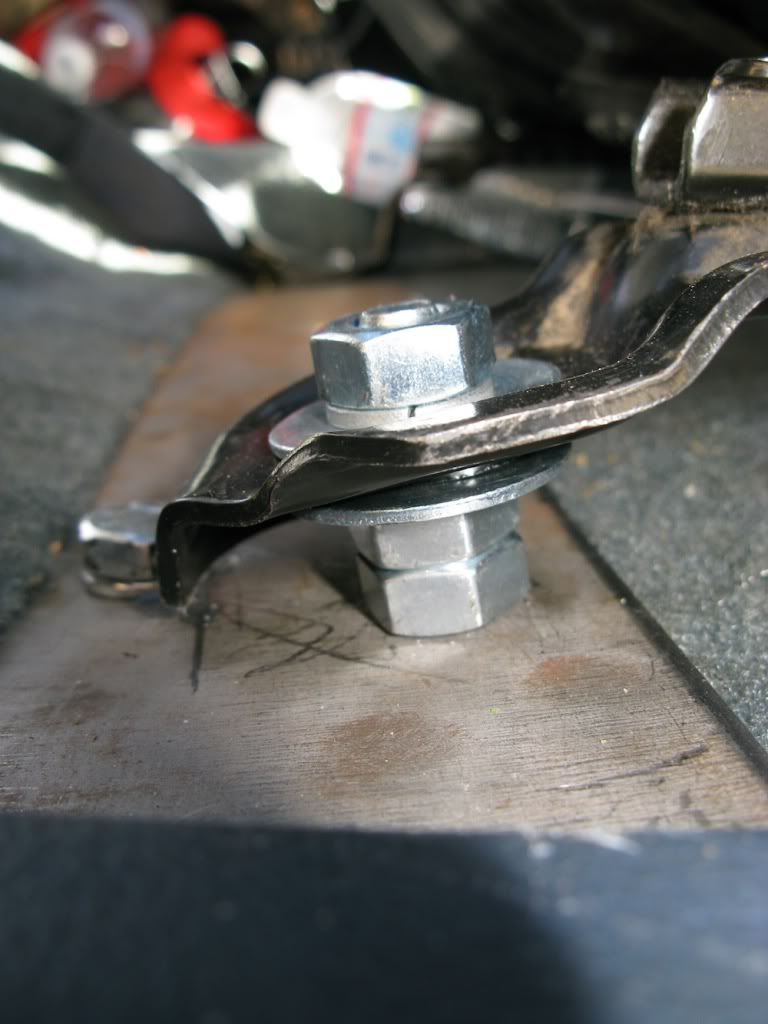
I would run a piece of 3 or 4 inch stock steel across the floor bolted to the stock floor bolts. Drill holes in the steel the new width and put a bolt through the hole facing up with a washer on either side of the steel. Use double nuts below the seat bracket so you don't need to get a wrench under the stock steel and tighten it all down with lock tight.
Last edited by SCToy; 04-09-2011 at 08:46 PM.
04-09-2011, 08:49 PM
#5
Registered User
Thread Starter
Join Date: Feb 2009
Location: Colorado Springs
Posts: 94
Likes: 0
Received 0 Likes
on
0 Posts
@SCToy - that is a great idea, but how would I go the back as the bolt is not straight it is to the side?
Maybe use angle iron on the back to mount to the hole, or build a bracket to go to that 1 hole.
Maybe use angle iron on the back to mount to the hole, or build a bracket to go to that 1 hole.
Trending Topics
04-09-2011, 09:04 PM
#8
Contributing Member
Yeah, my idea might work if you had enough overhang on the seat to cover the old rails, otherwise you'd see the bar that connected the feet.
The seats I used were a tad taller from the bottom of the rail to the top of the butt part so giving me even more height. Is that the case with your new seats or are they the same or shorter than the old ones?
The seats I used were a tad taller from the bottom of the rail to the top of the butt part so giving me even more height. Is that the case with your new seats or are they the same or shorter than the old ones?
04-09-2011, 09:08 PM
#9
Contributing Member
SCToy- that's not a 3rd gen, is it? If it is, how did you deal with the side bolt, just run a bolt through the floor pan?
04-09-2011, 09:14 PM
#10
Registered User
It's a 3rd gen pickup. That's a shot of the 2 rear bolts. one of the fronts lined up and I had to drill for the second. The seats were out of an 86 MR2. Toyota used a very similar design, just needed to move the rear bolt holes around and I didn't want to drill a bunch of holes in my floor. I'm not familiar with his exact floor plan, I was just shooting him an idea of how I dealt with a similar problem. I'm sure it would need to be modified.

04-09-2011, 09:18 PM
#11
Contributing Member
Sure, I just didn't recognize the bracket. It sounded like a potentially better plan than mine, less fuss and muss if he can figure it out for the 4Runner.
04-10-2011, 05:26 AM
#12
Contributing Member
Two very rough different versions using angle iron for the feet mounts to keep the seat lower. Feet mounts might stick out too much? Would need to weld feet and I don't know about the strength factor but it seems like it'd be better than flat in this use?
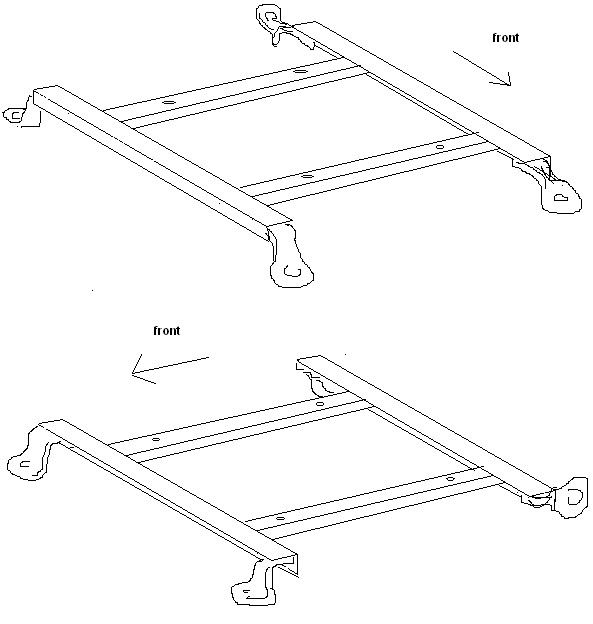
Curious to see what you come up with...
Curious to see what you come up with...
Last edited by habanero; 04-10-2011 at 05:31 AM.
04-10-2011, 06:46 AM
#13
Registered User
Oh, I see now, I had the 2 front brackets which are bent down and mount on the ridge that runs across the front. So he could use my idea I had for the rear bracket, but he would need to weld a piece of angle iron to the plate As long as he has a good amount of weld it should be fine. I'd TIG it personally (That's what I own and trust). Wouldn't cost much to have someone do it if he got it all cut out.
04-10-2011, 07:24 PM
#14
Registered User
Thread Starter
Join Date: Feb 2009
Location: Colorado Springs
Posts: 94
Likes: 0
Received 0 Likes
on
0 Posts
New idea hit me today. I am going to use 3/4" square tube and cut that into 4, 2.5" pieces. Remove the brackets from the new seats and then bolt the brackets to tubing and the the tubing to the seat. This should keep it strong because the square tubing is stronger then the brackets, the feet, and the mounting holes. I am then going to fabricate the feet to fit onto those brackets and that should do it, I think? I will take some pictures as soon as I get all the pieces cut.
04-11-2011, 06:32 PM
#15
Registered User
Thread Starter
Join Date: Feb 2009
Location: Colorado Springs
Posts: 94
Likes: 0
Received 0 Likes
on
0 Posts
I have now made the seat brackets be 17" center point to center point! I have also kept the center of gravity and not had to add a lot of extra steel to make this all happen, hoping to keep everything strong and safe.
I now just have to fab up the feet and bolt it all in. I will have to add 1" to the feet because the bracket holes are short a little.
Also note to anyone that is doing this, the bar that moves the seat forward has to be bent from the center not the sides. You have to keep the sides square so the lever will release correctly so bend from the forward most bends. The Harbor Freight kinkier worked perfect for this task and kept everything straight.
Last edited by alteredvision; 04-13-2011 at 06:03 AM.
04-12-2011, 04:22 AM
#16
Contributing Member
Interesting take. Some thoughts to chew on or discard as you please....
Are you going to have problems with the bulk of the weight being on the inside of your bars?
It seems like your mount bars can wiggle out of square. How will you keep them in place?
Furniture leg caps might could close up your exposed bar holes if you wanted them closed.
Are you going to have problems with the bulk of the weight being on the inside of your bars?
It seems like your mount bars can wiggle out of square. How will you keep them in place?
Furniture leg caps might could close up your exposed bar holes if you wanted them closed.
04-12-2011, 06:15 AM
#17
Registered User
Thread Starter
Join Date: Feb 2009
Location: Colorado Springs
Posts: 94
Likes: 0
Received 0 Likes
on
0 Posts
The wiggle factor is definitely there and I think if it does happen I will just weld the bracket on and not bolt it. I am thinking that because it is bolted in 4 places to the seat and the brackets will be bolted it is going to make it hard for the brackets to wiggle unless they come loose. Good call though and something I am going to have to watch for.
That is an excellent idea about the the caps. I am going to get those!
That is an excellent idea about the the caps. I am going to get those!
04-12-2011, 09:33 AM
#18
Contributing Member
Cool. Yeah, tacking the bars makes sense. Only bummer would be having to take the foam and stuff away from it to do so. Guess you could also go with a slightly longer bar and put in two bolts to hold it straight? If it's even an issue.
I love to watch a brainstorm in progress!
I love to watch a brainstorm in progress!
04-13-2011, 01:29 PM
#20
Contributing Member
Vise and Big Friendly Hammer?
(Watch any springiness- teeth don't look too good on the floor.)
(Watch any springiness- teeth don't look too good on the floor.)
Last edited by habanero; 04-13-2011 at 01:31 PM.


