OME rear install??
 03-06-2007, 01:05 PM
#1
Registered User
Thread Starter
Join Date: Nov 2006
Location: Missouri Ozarks
Posts: 90
Likes: 0
Received 0 Likes
on
0 Posts
OME rear install??
Hey everyone! I've had some Donahoe's and OME 890's sitting around the garage for a few months now, but if all goes well the UPS guy should be bringing the last of the stuff I need from Sonoran Steel later today so I can get this long awaited project finished. I did some searching here and over at ttora, but I didn't come across a decent write up for a rear 3rd gen installation. If someone knows of one please post it up, if not I'll take my digi cam with me and make one for the future.
I did the front suspension on my Tacoma a couple times, so I'm familiar with that, but I do have a couple questions about the rear...
Basically I disconnect the shocks and panhard bar, jack it up from the frame until I can remove the old springs and get the new ones in there. Install the new springs, SS panhard bar, new brake stuff, and shocks, and I'm done?
The coils have A and B on them respectively. Is A d/s and B p/s? Also, the shocks don't have and d/s p/s markings on them that I can find. It mattered on my Tacoma, does it not on a 4runner?
Thanks for any help, I'm really looking forward to getting this animal upgraded
 03-06-2007, 02:01 PM
#2
Registered User

Join Date: Nov 2006
Posts: 37
Likes: 0
Received 0 Likes
on
0 Posts
I have a question about the rears,
I just want to replace the rear springs, can i just disconnect the bottom rear shock bolt and remove the springs while jack up? this is the same method i used for cars
I just want to replace the rear springs, can i just disconnect the bottom rear shock bolt and remove the springs while jack up? this is the same method i used for cars
03-06-2007, 02:54 PM
#4
Contributing Member
Join Date: Aug 2004
Location: Auburn, Al
Posts: 1,306
Likes: 0
Received 0 Likes
on
0 Posts
Ozarks,
There is no reason to disconnect the panhard unless you are replacing it.
It the shocks do not have a left and right. Is there a difference in length on the coils? The longer should go on the driver's side due to the extra weight of the gas tank.
There is no reason to disconnect the panhard unless you are replacing it.
It the shocks do not have a left and right. Is there a difference in length on the coils? The longer should go on the driver's side due to the extra weight of the gas tank.
03-06-2007, 03:02 PM
#5
Contributing Member
Rear is actually pretty simple.
1) Disconnect shocks
2) Disconnect swaybar
3) Disconnect panhard bar (if replacing)
Jack up vehicle from pumpkin, support the frame rails with jack stands. Lower pumpkin down until the springs fall out. Just make sure you keep an eye on your rear brake line. Don't stretch it.
put in the new coils/cones, jack up axle, take out floor jacks, bring back down to ground and replace everything else.
The panhard bar might be easier to put in while in the air so you can orientate the axle easier.
03-06-2007, 04:03 PM
#6
Contributing Member
Join Date: Apr 2004
Location: Los Angeles, CA
Posts: 940
Likes: 0
Received 0 Likes
on
0 Posts
Rear is actually pretty simple.
1) Disconnect shocks
2) Disconnect swaybar
3) Disconnect panhard bar (if replacing)
Jack up vehicle from pumpkin, support the frame rails with jack stands. Lower pumpkin down until the springs fall out. Just make sure you keep an eye on your rear brake line. Don't stretch it.
put in the new coils/cones, jack up axle, take out floor jacks, bring back down to ground and replace everything else.
The panhard bar might be easier to put in while in the air so you can orientate the axle easier.
1) Disconnect shocks
2) Disconnect swaybar
3) Disconnect panhard bar (if replacing)
Jack up vehicle from pumpkin, support the frame rails with jack stands. Lower pumpkin down until the springs fall out. Just make sure you keep an eye on your rear brake line. Don't stretch it.
put in the new coils/cones, jack up axle, take out floor jacks, bring back down to ground and replace everything else.
The panhard bar might be easier to put in while in the air so you can orientate the axle easier.
03-06-2007, 04:12 PM
#7
Registered User
Thread Starter
Join Date: Nov 2006
Location: Missouri Ozarks
Posts: 90
Likes: 0
Received 0 Likes
on
0 Posts
Thanks guys! I didn't think to check the length guess the shocks are the same length?... The A is a little longer so it must be the d/s. I am replacing the panhard with an adjustable from SS. I'm also getting an extended brake line and e-brake relocater. I don't think I'll need all that this time around cause I'm just going up to some 275/65 (32's?), but the next set I plan to stick 33's (285's?) on there. Might as well do it right the first time. Sorry, still haven't gotten used to the 16" measurements, I've never had anything other than 15's before
guess the shocks are the same length?... The A is a little longer so it must be the d/s. I am replacing the panhard with an adjustable from SS. I'm also getting an extended brake line and e-brake relocater. I don't think I'll need all that this time around cause I'm just going up to some 275/65 (32's?), but the next set I plan to stick 33's (285's?) on there. Might as well do it right the first time. Sorry, still haven't gotten used to the 16" measurements, I've never had anything other than 15's before
Trending Topics
03-07-2007, 05:05 AM
#9
Contributing Member
Install writeups for you:
http://www.disknet.com/ExideC/suspension_lift.htm
http://www.truckinweb.com/tech/0108suv_level/ (2nd gen, but process is the same)
I am sure there are alot more, but hopefully you can add some pics and a writeup for future reading pleasure.
http://www.disknet.com/ExideC/suspension_lift.htm
http://www.truckinweb.com/tech/0108suv_level/ (2nd gen, but process is the same)
I am sure there are alot more, but hopefully you can add some pics and a writeup for future reading pleasure.
03-07-2007, 05:26 AM
#10
Contributing Member
Join Date: May 2006
Location: Houston
Posts: 219
Likes: 0
Received 0 Likes
on
0 Posts
I did not disconnect the panhard bar or sway bars when I replaced my springs. I just left the lower shocks disconnected.
Last edited by saulgoode; 03-07-2007 at 05:28 AM.
03-07-2007, 03:38 PM
#12
Registered User
Thread Starter
Join Date: Nov 2006
Location: Missouri Ozarks
Posts: 90
Likes: 0
Received 0 Likes
on
0 Posts
Thanks for all the replies everyone! So, I ran to UPS today on my lunch break and they had the rest of my stuff waiting for me. Since I'm never home during delivery hours, they just keep it at the DC . You know you've been spending alot of money and having stuff shipped to you alot when the guys at the ups DC know you by name...lol
Anyhow, the plan is to install everything in the morning and hopefully have some time during the afternoon to try it out a little in the lake bottoms. I plan to take before and after pics of my rig as well as a writeup for the rear install with all the new stuff included. Should be trailworthy soon
Anyhow, the plan is to install everything in the morning and hopefully have some time during the afternoon to try it out a little in the lake bottoms. I plan to take before and after pics of my rig as well as a writeup for the rear install with all the new stuff included. Should be trailworthy soon
03-09-2007, 10:48 AM
#14
Registered User
Thread Starter
Join Date: Nov 2006
Location: Missouri Ozarks
Posts: 90
Likes: 0
Received 0 Likes
on
0 Posts
Hey everyone! After a good part of the day on my back in the driveway the Hoes and OME's are on and damn does it feel nice!
I started to do a writeup for the rear install, but my camera crapped out about the time we were dropping the pumkin...Gota say that removing the rear shocks was the toughest part of the project, what a pain in the ass it was to get those top nuts off! Other than that I think it was pretty strait forward and simple.
I'm at work now, so can't get any pics posted till I get home later tonight, but I promise I will.
I'm plannin to make a dif thread to show the new changes that have happened over the last 10 days...Warn brush guard/winch plate, Wet Okole seat covers front/rear. 15% tint all the way around, new tires/wheels and obviously the new susp. Should have some pics up in the next couple days of all the new fun.
03-09-2007, 06:34 PM
#15
Registered User
Thread Starter
Join Date: Nov 2006
Location: Missouri Ozarks
Posts: 90
Likes: 0
Received 0 Likes
on
0 Posts
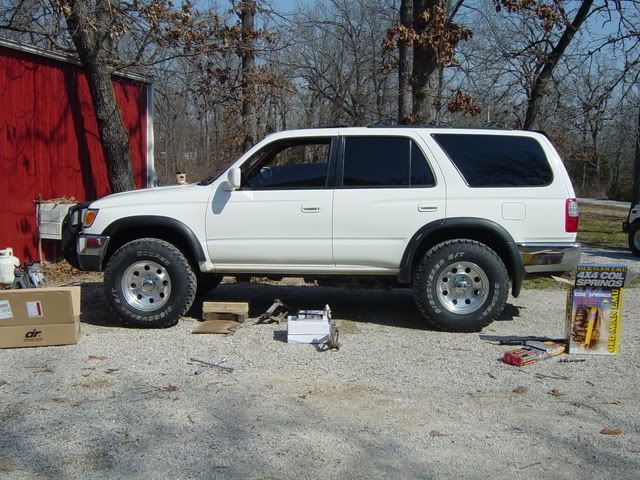
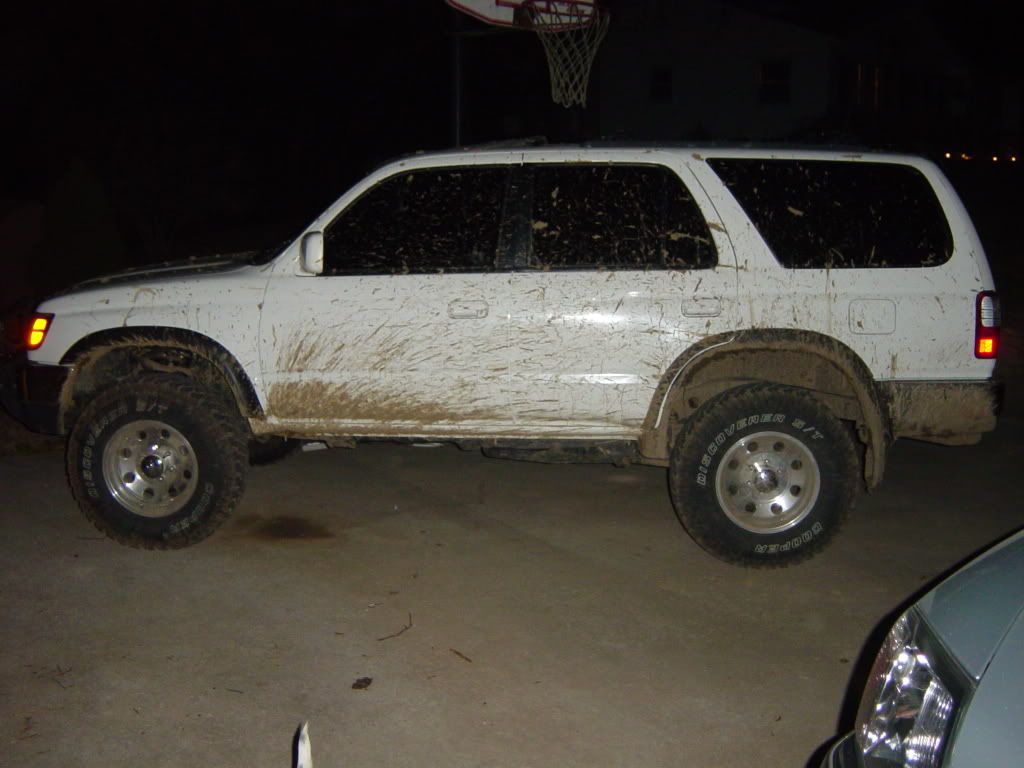
As promised... PICS!!!
Just a before and after. 265x75's. The rear has already dropped about 1/2 an inch from yesterday.
Morning...
Night...
Just a before and after. 265x75's. The rear has already dropped about 1/2 an inch from yesterday.
Morning...
Night...
03-09-2007, 06:52 PM
#16
Registered User
Well, you've convinced me...time for an OME lift. I've been debating on just getting the PP springs but yours looks too good at that height! Other than the shocks how was the install of the coils and stuff?
03-09-2007, 06:55 PM
#18
Registered User
Join Date: Mar 2006
Location: Lake Stevens, Washington
Posts: 586
Likes: 0
Received 0 Likes
on
0 Posts
Sweeet lookin rig!1 looks like you had a little fun testing out the new rear susp!! Like some of the others already said...when I did mine I placed a jack under the rear diff with tires off, desconnected the shocks and used a bottle jack to articulate the other side to get the springs in, viola! Thanks for the pics
03-09-2007, 07:13 PM
#19
Registered User
Thread Starter
Join Date: Nov 2006
Location: Missouri Ozarks
Posts: 90
Likes: 0
Received 0 Likes
on
0 Posts
Skrillah - I went with the 890's & OME N86C shocks to match. I also got the extended brake line, e-brake relocater bracket, and adjustable panhard bar from Sonoran Steel. All of which were recommended by other members here, and I'm glad I got them. With two people everything but the shocks was relatively easy. And its just the placement of the top nut that makes the shocks any problem really.
Jdizzydub - thanks man! Had to go try em out in the bottoms at some speed LOL! Gota say the combo soaked up the ruff stuff exceptionally well.
Jdizzydub - thanks man! Had to go try em out in the bottoms at some speed LOL! Gota say the combo soaked up the ruff stuff exceptionally well.
03-09-2007, 07:18 PM
#20
Registered User
I have replaced the rear shocks on mine and it took forever, not to mention a case of beer and some bloody knuckles. Then again the beer could have been half the problem...lol.
The extended brake lines, e-brake, and panhard bar weren't required for the install though right? I mean you could do the lift and not worry about these things?
The extended brake lines, e-brake, and panhard bar weren't required for the install though right? I mean you could do the lift and not worry about these things?


