New Wheels Installed - Eagle Alloy Series 137
 05-26-2009, 04:28 AM
#1
Registered User
Thread Starter
New Wheels Installed - Eagle Alloy Series 137
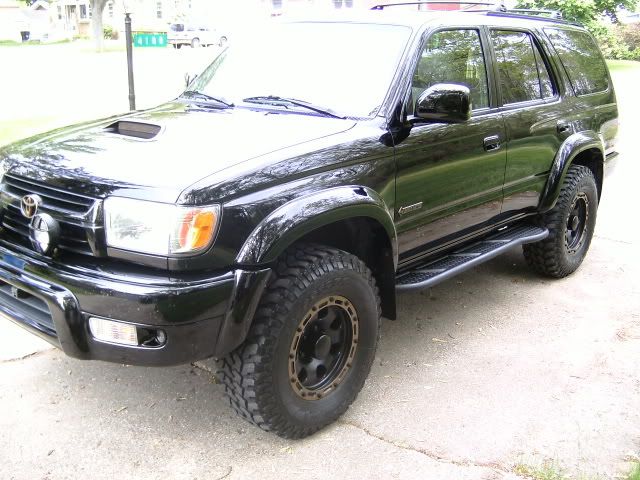
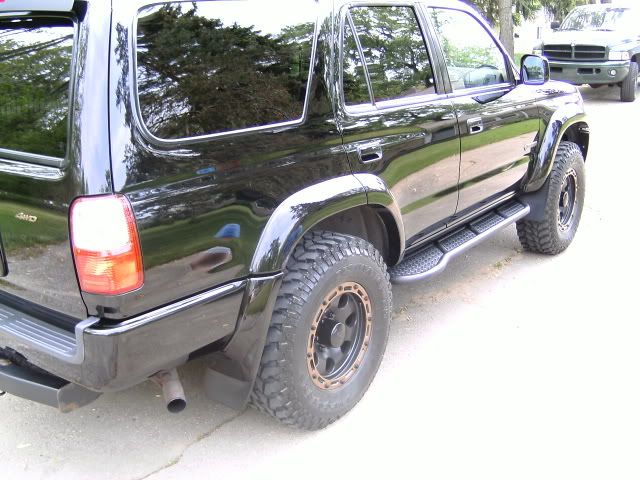
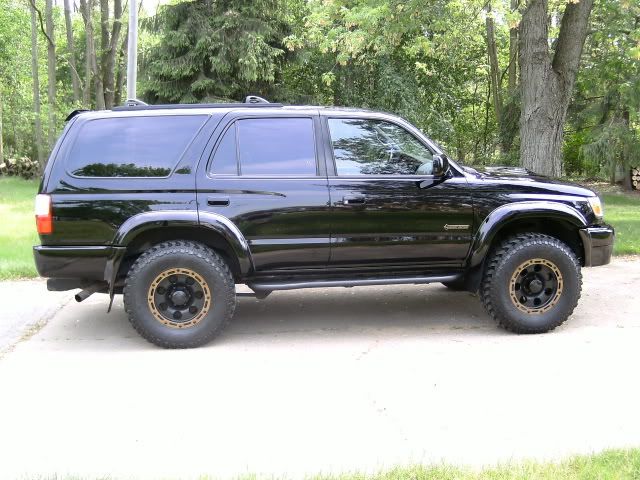
I finally got my new wheels installed. They are Eagle Alloy Series 137, 16 x 8", black. I got them new for a good price on ebay. Here is what they looked like when I received them:

I knew right away that the polished outer ring had to go (too blingy for me). So I decided to paint it a dark bronze to match all of my trucks emblems. I also had to paint all the ring bolts, center caps, and valve stems black. That was a lot of work! (Sorry, no pics of painting in progress.) I also bought some black lug nuts from Wheelers Offroad.
I really like the way they turned out. Here are some pics:

Thanks for looking.
I knew right away that the polished outer ring had to go (too blingy for me). So I decided to paint it a dark bronze to match all of my trucks emblems. I also had to paint all the ring bolts, center caps, and valve stems black. That was a lot of work! (Sorry, no pics of painting in progress.) I also bought some black lug nuts from Wheelers Offroad.
I really like the way they turned out. Here are some pics:
Thanks for looking.

 05-27-2009, 08:58 AM
#7
Registered User
Thread Starter
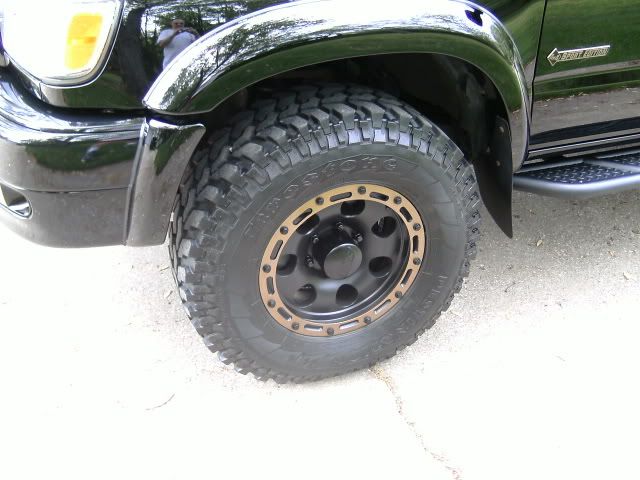
As far as painting goes, it was a lot of work. I used Rustoleum enamel for the bronze, black, and clearcoat.
for the Wheels:
1. Remove all 48 bolts from the perimeter ring area of the wheels, set aside.
2. Sand down the bright ring face and edges. I used an orbital sander. (I don't think it was actually chrome, because it came off pretty easy)
3. Clean/degrease wheels very well.
4. Mask off all other areas of the wheel, leaving the ring areas exposed. (This took forever!)
5. Spray primer on exposed ring areas. (I did 2-3 light coats.) Wait a couple of days before next step.
6. Spray bronze (or color of choice) paint on ring. (3-5 light coats) I like to wait at least a week to let this paint cure before putting on the clear coat.
7. Spray clear coat on ring. (2-3 light coats) Wait a day or two before unmasking.
8. Unmask wheels, stand back and admire your work.
Meanwhile, while the paint on your wheels is drying, you can start on the ring bolts, center caps, and valve stems.
for the ring bolts:
1. I decided to grind down the tops of the bolts, because they were too tall for my liking, and had a strange "bowl" shape to them that I didn't like.
(I used an angle grinder to smooth the tops of the bolts off while they were still in the wheels. ***Be careful not to hit wheels with angle grinder!)
Then I used a file and sand paper to get the bolts looking real nice.
2. Clean bolts really well.
3. Find something to stand the bolts in while painting them. I cut 48 pieces of plastic tubing 1/2" long each to stand them in. A board with 48 holes in it might work better.
4. Stand up 48 bolts to be painted.
5. Same painting steps as above for wheels (#'s 5,6 &7) (I used semi-gloss black, and it matched the powder coat black on the wheels really good.)
Basically the same steps for the chrome center caps and valve stems.
1. Sand
2. Clean
3. Mask
4. Paint as above.
Finally put everything back together and stand back to admire your work.
Trending Topics
05-27-2009, 11:26 AM
#10
Registered User
Thread Starter
Sweet
I have procomps and I don't think the ring comes off. Crappy!
I have procomps and I don't think the ring comes off. Crappy!
02-13-2010, 08:12 PM
#11
Registered User
iTrader: (1)
Join Date: Jul 2009
Location: Central, Arkansas
Posts: 1,088
Likes: 0
Received 0 Likes
on
0 Posts
Bringing out a kinda old thread here but was looking into getting the same wheels soon.. Just wondering how the paint was holding up on the ring and to see if you wheel with these things. I think I might be investing in the polished and not the black.
02-14-2010, 06:13 AM
#12
Registered User
Join Date: Jul 2009
Location: Ontario, Canada
Posts: 246
Likes: 0
Received 0 Likes
on
0 Posts
I really like the way those wheels turned out! I find black rigs look way better with black or charcoal paint. I like those wheels in both color hues! They looked great the way the were, but you really made them look great the way you painted them too! Great job!
02-15-2010, 08:18 AM
#15
Registered User
Thread Starter
Bringing out a kinda old thread here but was looking into getting the same wheels soon.. Just wondering how the paint was holding up on the ring and to see if you wheel with these things. I think I might be investing in the polished and not the black.
Looks really good man. How are those destination m/ts holding up?

Thread
Thread Starter
Forum
Replies
Last Post
FS[PacNorWest]: Factory Alloy Wheels - Bay area
94whiterunner
Axles - Suspensions - Tires - Wheels
9
09-22-2015 07:28 PM
Yotadawgjr
95.5-2004 Tacomas & 96-2002 4Runners
10
08-23-2015 10:51 AM
highonpottery
Buying & Selling Advice - Feeler/Gauging Interest
7
07-18-2015 02:48 PM
rushw
General Electrical & Lighting Related Topics
4
07-18-2015 01:46 PM


