Installed Hayden Transmission Cooler
 04-25-2006, 11:02 PM
#1
Contributing Member
Thread Starter
Installed Hayden Transmission Cooler
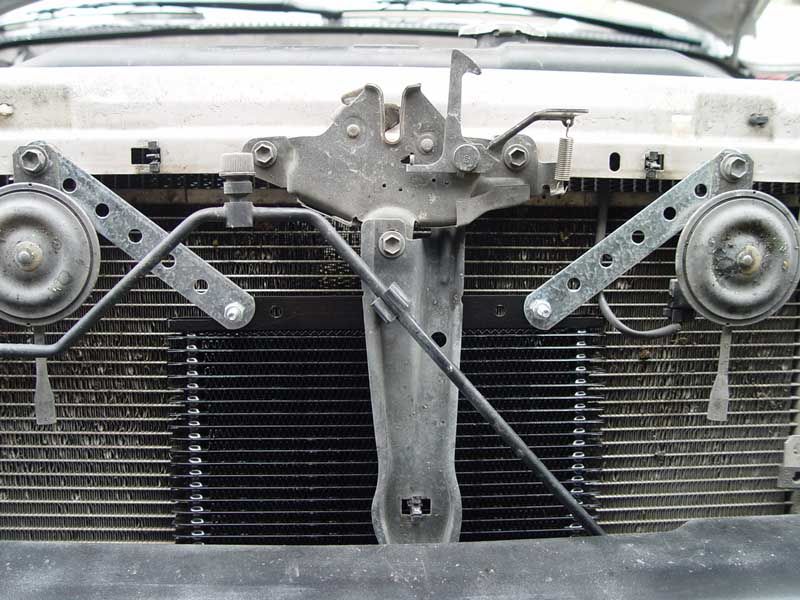
Not much to show really. But just thought I'd post some pictures of it.
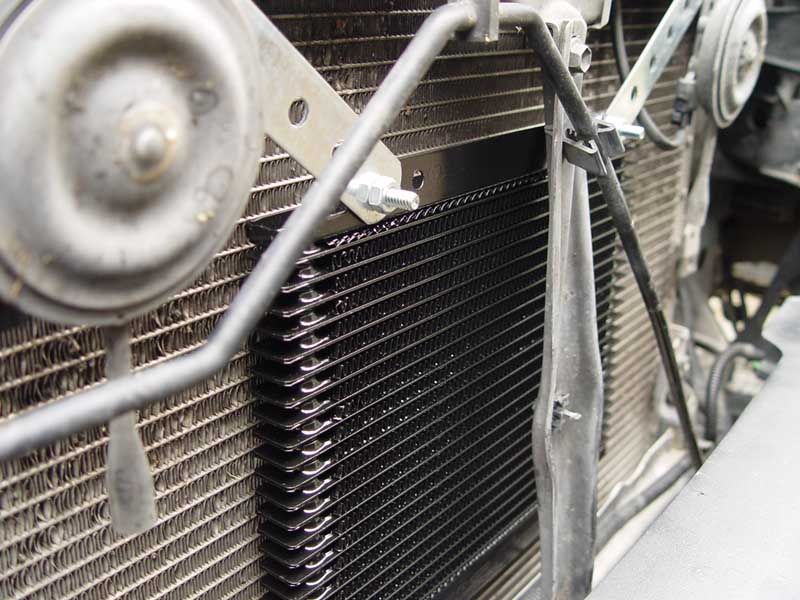
Install was easy. I used the included brakets that they provided. I had kept reading on other installs that no brakets were used and people use zip ties and whatnot. I really didn't like that idea, so I figured something else out.
Also, I opted to mount the inlets/outlets facing down, which were a lot closer to the AT lines.
Just a little added security, so I feel better at least. I would recommend anyone who is thinking about getting one to go ahead and buy the $40 Hayden cooler!
Well, here are the pictures...
Install was easy. I used the included brakets that they provided. I had kept reading on other installs that no brakets were used and people use zip ties and whatnot. I really didn't like that idea, so I figured something else out.
Also, I opted to mount the inlets/outlets facing down, which were a lot closer to the AT lines.
Just a little added security, so I feel better at least.
I would recommend anyone who is thinking about getting one to go ahead and buy the $40 Hayden cooler!Well, here are the pictures...
 04-25-2006, 11:31 PM
#2
Registered User

judging by the pic, it does not look like those brackets are sturdy enough. but i could be wrong. also, what is supporting the bottom? finally, if you keep everything as is, i'd definitely put some thread locker on that and rebolt it down. that looks like it will vibrate off itself.
04-25-2006, 11:50 PM
#3
Contributing Member
Thread Starter
Yeah, its super sturdy. A lot more than I would think with zip ties. I got lock washers on there, but, you cant see them. I actually was pressing the hoses on from the bottom up onto the inlets and it stayed put !
I have the little square sticky things on there too, and they are keeping everything tight in there as well.
I have the little square sticky things on there too, and they are keeping everything tight in there as well.
04-26-2006, 05:36 AM
#5
Registered User
Originally Posted by MTL_4runner
Do you have any pics of how you attached the bottom part of the cooler?
If you didn't, then figure on the cooler slapping the radiator over fwoops. That's not gonna be a feature. Outside of the WHACK! noise, it's gonna be trying to punch a hole in the radiator and flexing those top brackets. Flex 'em enough and they're gonna break. If they break, you'll tear off the cooler, and there goes your fun for the day.
I can appreciate you wanting to do "more" than the zip ties, but the zip ties are sufficient to create a solid unit and eliminate the possibility of slapping.
04-26-2006, 06:18 AM
#6
Contributing Member
Join Date: Jul 2005
Location: Socal
Posts: 1,963
Likes: 0
Received 0 Likes
on
0 Posts
Originally Posted by midiwall
I can appreciate you wanting to do "more" than the zip ties, but the zip ties are sufficient to create a solid unit and eliminate the possibility of slapping.
04-26-2006, 06:31 AM
#7
Contributing Member
Originally Posted by ebelen1
Zip ties do work incredibly well and are probably why they include them w/ the kit. Just my two cents as I used the included zip ties (knock on wood) w/ no issues so far...
Trending Topics
04-26-2006, 07:51 AM
#9
Contributing Member
Thread Starter
Love how everyone is so skeptical because I mounted it a differerent way.
Did you read that I was using my entire strength pushing the hoses onto it?
The squares are pusing the front of the cooler up against the front verticle mount that you see, while the mounts are holding it from moving side to side and up and down. I'll probably use one of the supplied zip-ties to mount on the bottom just in case though.
I just drove on a mini dirt road on my way to work and heard no noises. So thats cool.
04-26-2006, 08:19 AM
#10
Contributing Member
Originally Posted by gpcollen1
Did you guys cut, bend and flare lines or is that not necessary and rubber lines are used?
I wasn't being skeptical....I asked to see pics because I coun't see how you actually mounted despite your description. I was actually hoping to learn a new way of mounting mine if it works well.
Last edited by MTL_4runner; 04-26-2006 at 08:20 AM.
04-26-2006, 09:02 AM
#12
Contributing Member
Thread Starter
I got it here:
http://www.bulkpart.com/Merchant2/me...roduct_Count=2
Sorry I was cranky this morning. I'm stoked to have yotatech give me some constructive critisism.
http://www.bulkpart.com/Merchant2/me...roduct_Count=2
Sorry I was cranky this morning. I'm stoked to have yotatech give me some constructive critisism.
04-26-2006, 10:06 AM
#13
Registered User
Join Date: Sep 2005
Location: Reno, NV
Posts: 409
Likes: 0
Received 0 Likes
on
0 Posts
Did you plumb it so that fluid leaving the stock cooler goes into the hayden or did you bypass the stock one all together? I'm planning on by passing the stocker after I looked at how they are doing the atf cooler on the 4th gen.
04-27-2006, 01:21 PM
#15
Contributing Member
Join Date: Jul 2005
Location: Socal
Posts: 1,963
Likes: 0
Received 0 Likes
on
0 Posts
Originally Posted by DoubleZero4x4
Thinking that this is a good way to go for the rig...I have a question though, did you have to buy any inatallation kit(s) or adapters for the 678 kit?
04-28-2006, 08:39 AM
#16
Registered User
Join Date: Jun 2005
Location: Gilbert, AZ
Posts: 209
Likes: 0
Received 0 Likes
on
0 Posts
Ok...I ordered my Hayden 678 Trans Cooler.
For those who have installed this mod on a 3rd Gen 4Runner, are there any "Gotcha's" that I should be aware of?
Any Installation tips that you might want to pass down? I will probably install it next weekend along with the Goodridge G-Stop SS brake lines.
For those who have installed this mod on a 3rd Gen 4Runner, are there any "Gotcha's" that I should be aware of?
Any Installation tips that you might want to pass down? I will probably install it next weekend along with the Goodridge G-Stop SS brake lines.
04-28-2006, 09:23 AM
#18
Contributing Member
Thread Starter
Hey guys,
To answer the questions:
The Hayden cooler is connected after the stock cooler. So the ATF pressure line runs to the stock cooler, and then the return line from the stock cooler runs to the Hayden, and then keeps going back to the AT.
This is what I had heard was the best, but, information is just repeated like a broket record sometimes 'round here, so who knows.
As for any hiccups... I'd connect the hoses first, then mount the tranny cooler. Sounds obvious, but, I didn't think about it at the time.
Getting the stock rubber hose return line off of the metal line (that eventually runs into the AT) was hard to get off. I had to get some pliers, take off the clamp, then use a razor blade (utility knife) to slice it off. You don't need this line anymore.
Honestly, after that, its just connecting the new hose.
You need to buy 4' of AT or Powersteering hose. It is NOT fule line. I've heard that the ATF can actually eat through the rubber supposidly.
Connect one side of the Hayden to your return line that goes to the AT
Connect the other side to the return line of the stock cooler.
The stock return line is the only thing you need to mess with. You take it completely off.
When you take the return line off, you'll get about a 1/2 cup of ATF drip out.
Just connect the hoses and you're done!
Add ATF to the dipstick location. I just added about 3/4 cup to replace the sutff that had dripped out and to go into the cooler.
08-30-2007, 07:25 AM
#19
Registered User
Join Date: Dec 2005
Location: Columbia, SC
Posts: 702
Likes: 0
Received 0 Likes
on
0 Posts
Does the 5/8" ID size AT hose from Macko here work with this mod? I am stoked to see that the hayden cooler is so cheap. I am definitely ordering one today.
I noticed the other day after hooking up my electric fan in reverse (Whoops! I went temporarily color blind) that the transmission was shifting a little hard. Once I got the fan blowing in the right direction, it started shifting a little smoother. That seems to me to mean that lower temps equals smoother shifting. I am hoping the aux cooler will help even more because my little Taurus fan is mounted near the top of the radiator. I hope the cooler will provide better cooling if positioned directly in the path of the fan.
I noticed the other day after hooking up my electric fan in reverse (Whoops! I went temporarily color blind) that the transmission was shifting a little hard. Once I got the fan blowing in the right direction, it started shifting a little smoother. That seems to me to mean that lower temps equals smoother shifting. I am hoping the aux cooler will help even more because my little Taurus fan is mounted near the top of the radiator. I hope the cooler will provide better cooling if positioned directly in the path of the fan.
Last edited by mjwalfredo; 08-30-2007 at 07:26 AM.
08-30-2007, 07:48 AM
#20
Registered User
Is there any noticeable difference just in the overall drive of the vehicle?
I've debated on getting one of these but don't really do any heavy towing, I suppose it would help during my 4 wheelin excursions as I do worry when I put the AT in a lower gear to compensate for a down/up hill grade.
Good info by the way!
I've debated on getting one of these but don't really do any heavy towing, I suppose it would help during my 4 wheelin excursions as I do worry when I put the AT in a lower gear to compensate for a down/up hill grade.
Good info by the way!


