Hood Scoop Insert!!
 02-24-2011, 03:10 PM
#1
Registered User
Thread Starter
Join Date: May 2010
Location: Texas, Mcallen/ Soon 2 be Houston
Posts: 36
Likes: 0
Received 0 Likes
on
0 Posts
So because of my wreck i needed to replace the hood an thought perfect time 4 a sport hood with scoop. its niceee! still primer black but worth it.
The thing is i need to find the scoop insert and hardware.
Where can i find this insert??
Any links to websites??
oh i'll post some pics up later of how shes coming along!
The thing is i need to find the scoop insert and hardware.
Where can i find this insert??
Any links to websites??
oh i'll post some pics up later of how shes coming along!
 02-24-2011, 04:12 PM
#2
Registered User
Join Date: Jun 2007
Location: Salt Lake City, UT
Posts: 442
Likes: 0
Received 0 Likes
on
0 Posts
As far as I have heard, you have to buy the insert and hardware from the dealer. No aftermarket options available. Quick search on here for "scooped hood" and you will find answers...
02-24-2011, 04:36 PM
#5
Registered User
^^^^ this, if it was put on by the dealer just enter the info of the truck the parts were meant for and it will most likely be on toyotapartszone and much cheaper than the dealer.
 02-25-2011, 06:53 AM
#7
Yeah, how did you miss the friggin sticky??? Lemme help ya out
this is a quick-ish run down of what you need, what you don't need, and what i have found useful in putting a sport hood or scooped hood on a 3rd generation 4runner that didn't come with the sport hood stock from the factory.
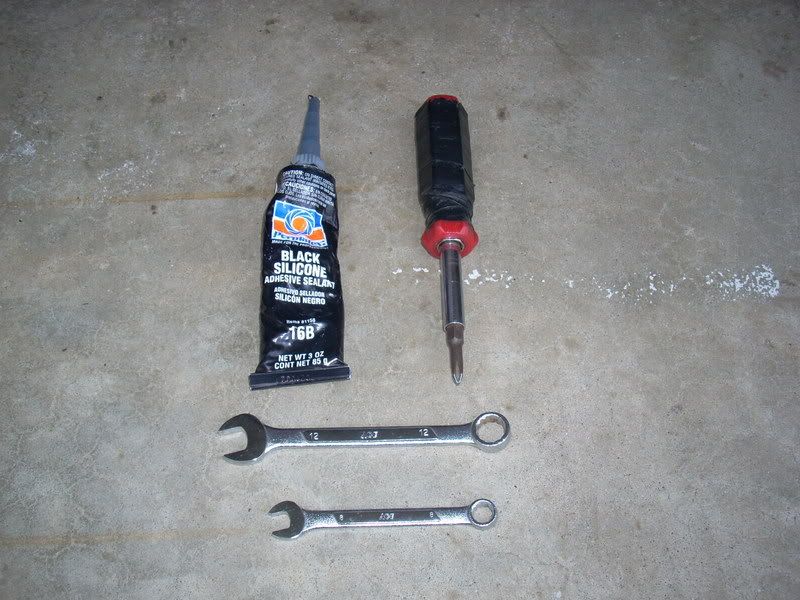
Parts needed:
12mm wrench or socket/ratchet
10mm wrench or socket/ratchet
Phillips head screwdriver
small flat head screwdriver (optional)
RTV of your color choice (optional)
Vice Grips (optional)
Parts purchased from a Toyota dealer (or elsewhere if you can find them)
53301-35170 Hood Sub-Assy, Sport Hood ($325.29)
76181-35901 Bulge Hood ($114.15)
76192-35010 Plate, Hood Bulge ($13.20)
76182-35020 Guide, Hood Air ($13.58)
90263-04054 Rivet ($0.57) X 2
90167-45005 Screw, Pan Tappin ($0.72)
76183-12030 Protector, Hood ($0.71)
90179-06324 Nut ($2.20) X4
76187-35010 Retainer, Hood ($0.89)
76184-12020 Protector, Hood ($0.71) Don't Buy
76185-35010 Protector, Hood ($7.00) Don't Buy
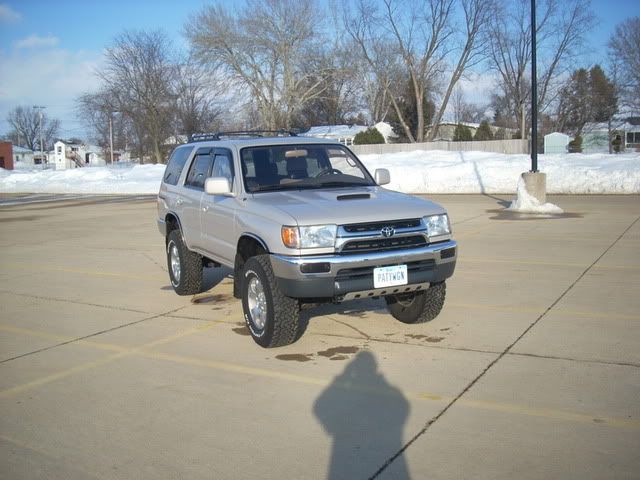
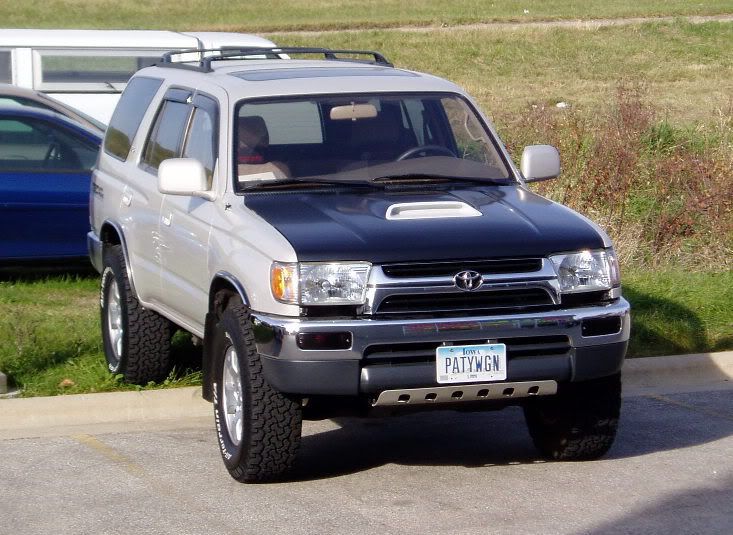
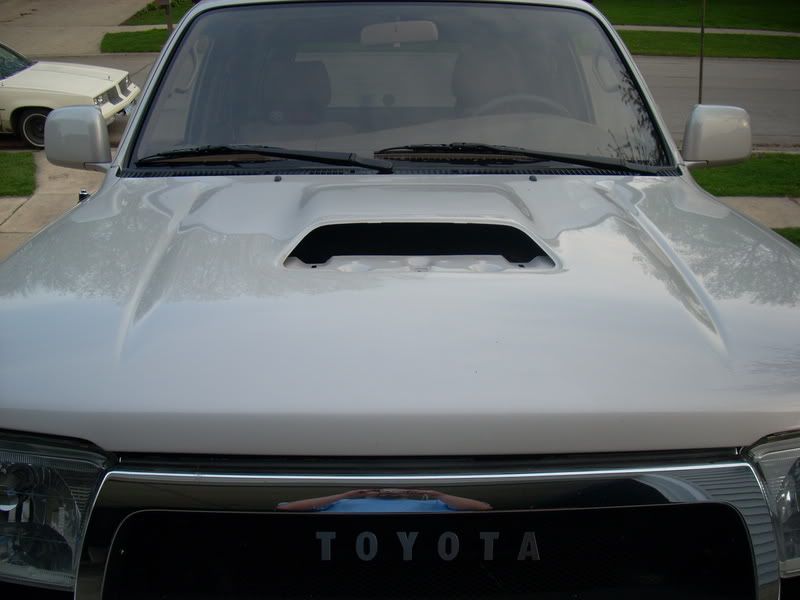
OK, let's start with the hood. it will come in a black primer from the dealer and you will want to get it painted, probably before install unless you want to test fit it first to make sure it fits properly. the hood has the hump on it but has an open area in front of the hump where the "Bulge" fits in.
This is a picture of the black hood and the white fiberglass "Bulge" piece when I test fit my hood before painting.
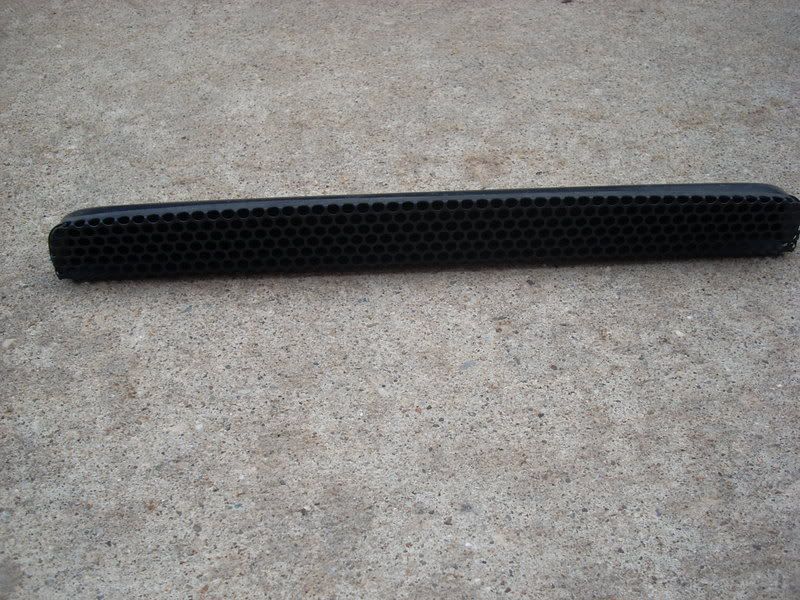
The "Bulge" is a fiberglass piece that fits in the opening in the hood and is secured with four nuts using a 10mm wrench. before you put this in, you will want to put together the mesh piece etc that goes inside this part. you will also want to have this piece painted as well, it comes unpainted plain white.
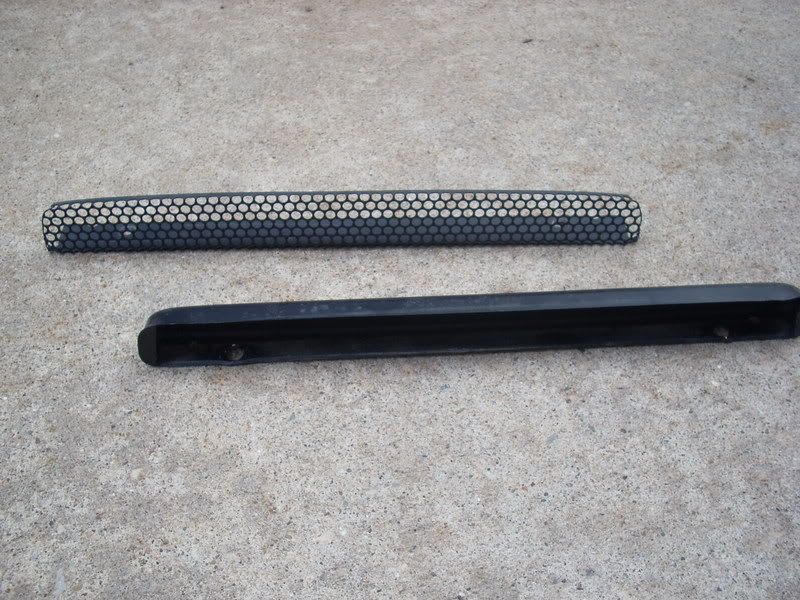
The first part that goes in the Bulge is the "Guide" which is a black plastic piece that i believe is used to "guide" water that accumulates in the bulge back out through tiny holes in the hood and harmlessly into the engine compartment.
here is a picture of the "plate" and the "guide" pieces:
Second, the "Plate" or Mesh fits snugly inside the guide, there are four holes that line up in the Plate, Guide, and Bulge so you know everything is lined up correctly. You will need two rivets to secure the plate, guide, and bulge together; they go through two of the holes between those pieces. The rivets from Toyota are black (or dark brown, i can't remember) and seem to be a bit longer than what is available at the local hardware store, this is so they are long enough to fit through the bulge, plate, and guide and will secure them together. *I had a hard time with the rivets so i went a different route that i will explain later on.
how the plate and guide fit together:
these two pieces slide into the bulge piece and get riveted in.
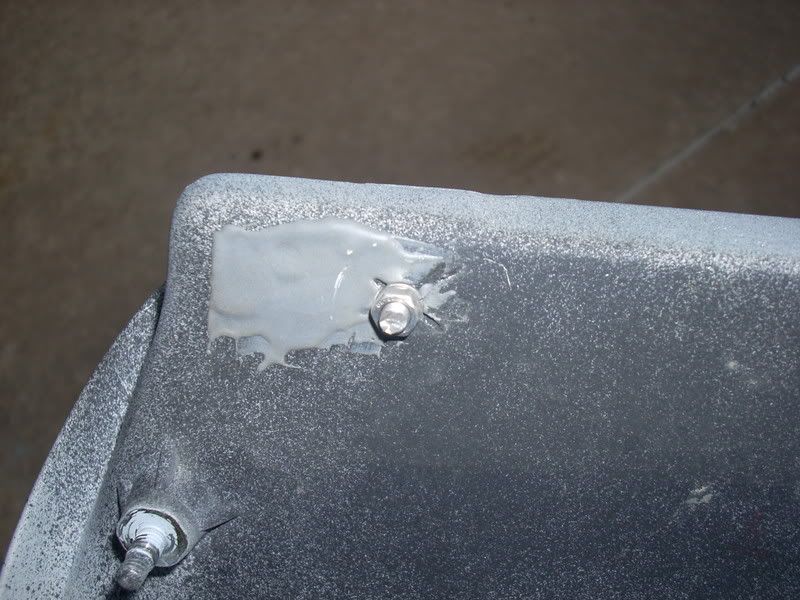
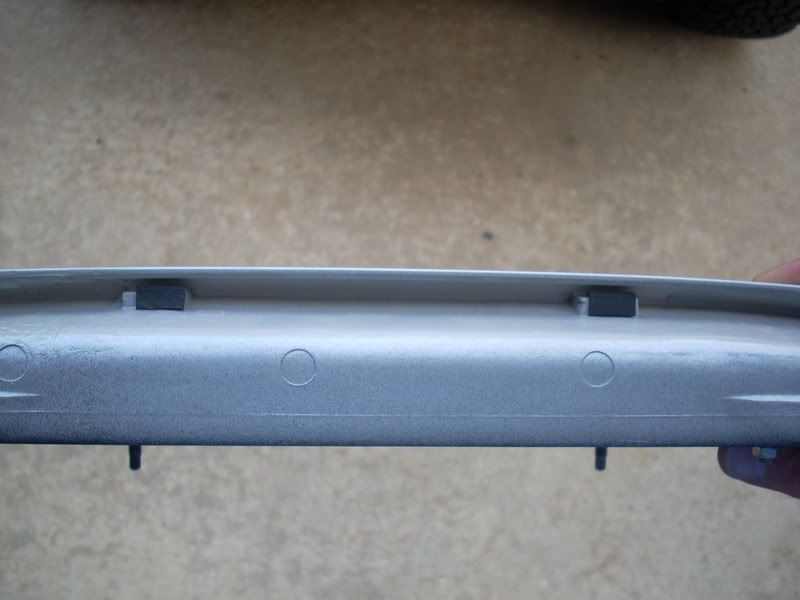
Once you have the bulge piece assembled, flip it over and there is a hole near the front of the bulge on the under side. This is where the "Retainer" goes.
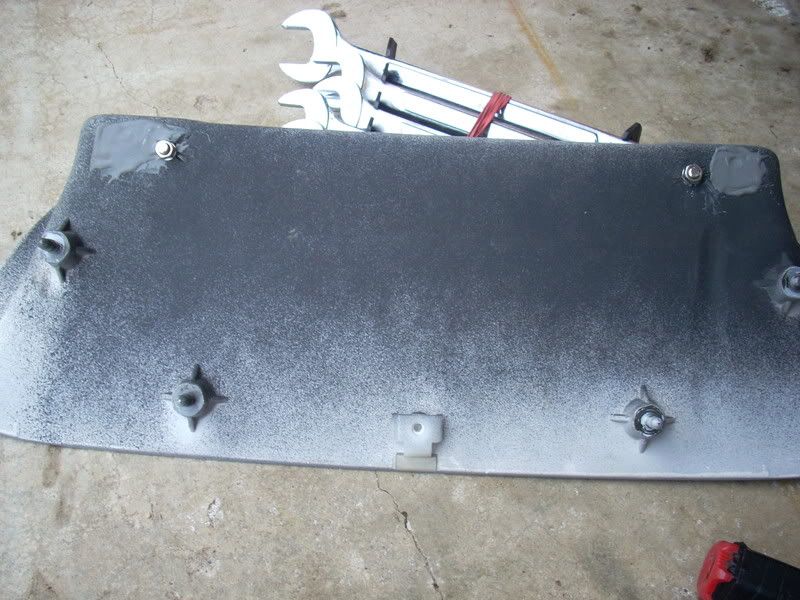
This piece is just another little plastic clip that helps secure the Bulge to the hood, and probably helps keep the front part of the bulge held down closer toward the front. It is held in place with one phillips head screw as shown in the picture.
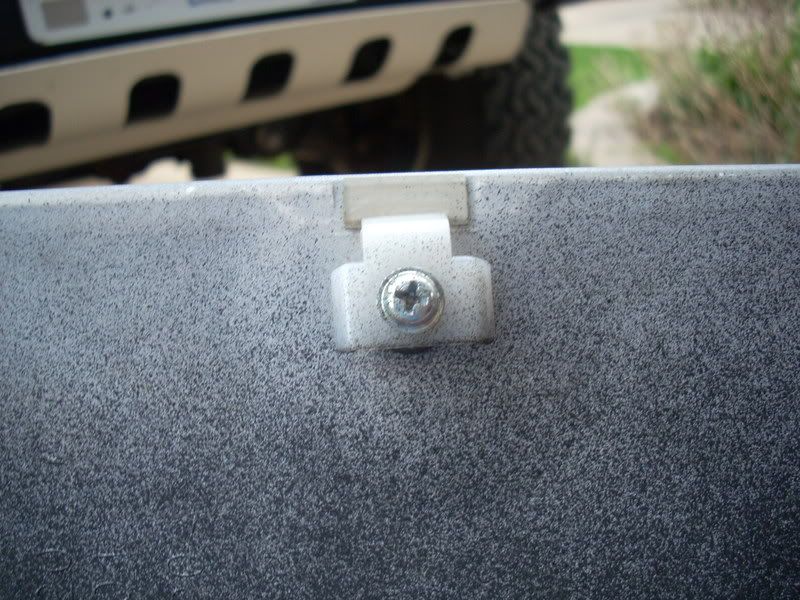
*It is up to you whether you feel this is necessary, it might help or it might not; or you may decide to buy the retainer but source the screw from a hardware store instead of shelling out $.72, for ease i just bought it from the dealer.
Now it's time to slide the Bulge assembly into the open area on the sport hood (get your mind out of the gutter! ).
).
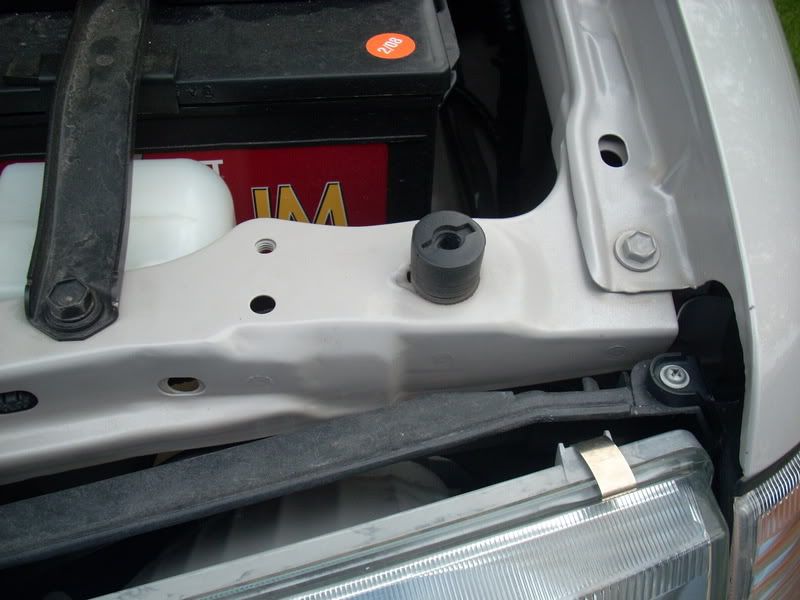
this is just the sport hood with the bulge piece missing, you can see the metal part of the hood where the bulge piece mounts to:
there really is no wrong way to do this, there are four threaded pieces on the underside of the bulge that go through holes in the hood. the retainer should snap into it's designated place on the hood itself.
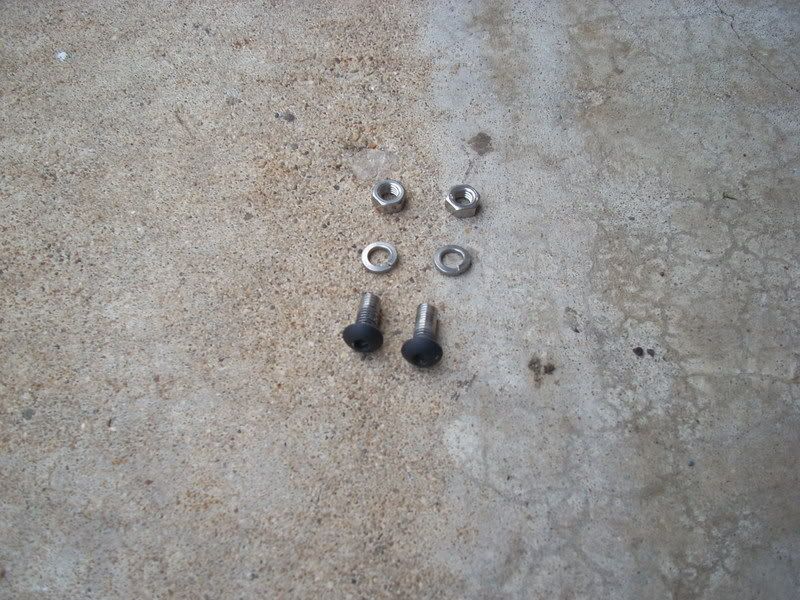
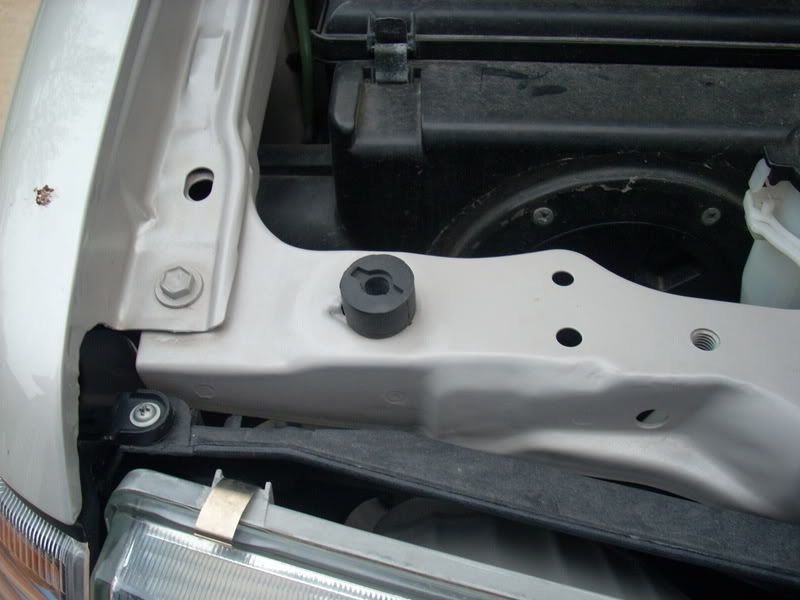
Next, just thread the four nuts on the underside of the hood and tighten them down with your 10mm wrench.
and all attached!
*again, you might be able to source the nuts at a hardware store and save yourself some dough since the dealer charges $2.20 a piece, i am not sure what the threads are for these at this time. You will need FOUR (4).
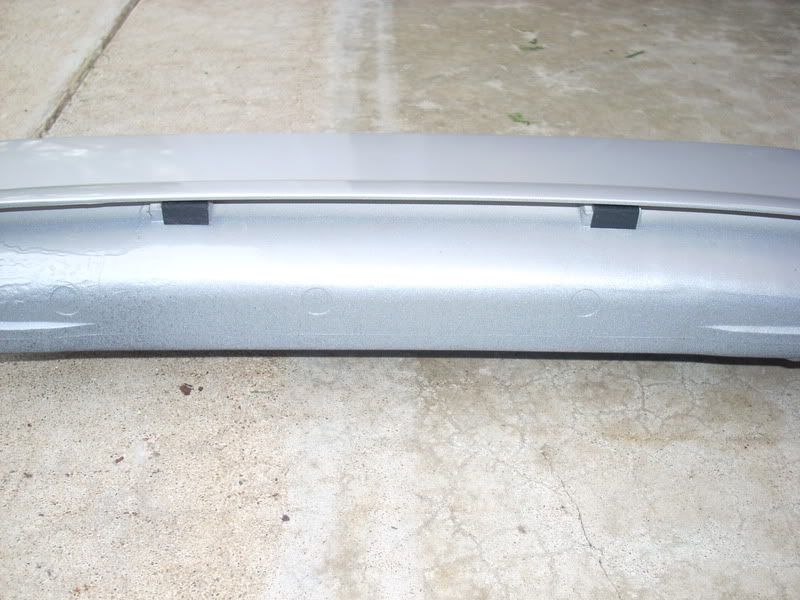
this is the bulge piece fully assembled with the guide and plate, all attached to the hood:
Ok, here is where i delineated from the Factory OEM way of doing things...
as stated above, i had some trouble with the rivets. the first time, one went in fine and the other one tightened down only about half way. i used the Dremel and lopped it off, ordered 3 more and gave it a shot. i had the same problem with the next one, and i went out and bought a new rivet tool, a nice one that cost some $$. tried it again, same results. tried it one last time, same results. so, i went to the hardware store (Ace, Home Depot, Lowes) and i couldn't find any rivets long enough to go through the bulge, guide, and plate. so, instead of buying more from the dealer and waiting another week for perhaps the same results, i cut the good one off and started from scratch. i went up to Ace (any hardware store should do) and found some hex head button head bolts that were small enough to fit through the holes and long enough as well. i got them in stainless since this would be exposed to the elements, although i did paint them with some flat black paint to conceal them behind the plate. i also picked up some lock washers and nuts to hold them in.
so, i slid the little bolts through the plate, guide and then carefully through the bulge piece,
took a small flat head screwdriver and put it through the plate screen to put some pressure on the bolt head while i threaded on the nut and washer below. i then held on to the bolt from below with some Vice Grips and tightened the nut on the bolt, securing all pieces together.
sounds like a lot of work, but it really isn't, i'm just being thorough. i also, plugged the drain holes with some JB Weld because in the winter i noticed a lot of ice build up on my engine that i wasn't too keen about.
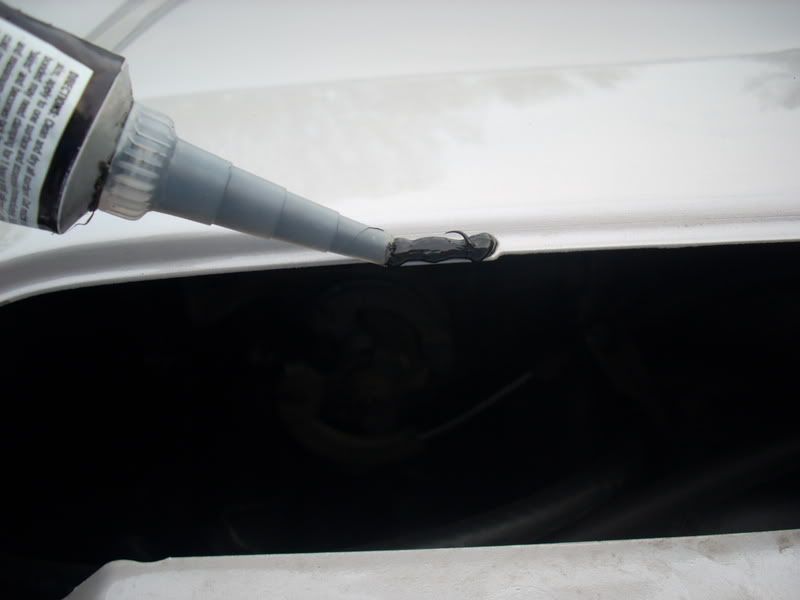
the next departure from the recommended assembly was the "protector" pieces. i don't have any pictures of these really, but some were little rubber "feet" looking things and others were just strips of clear vinyl with an adhesive backing. some i couldn't really figure out where they went so i pretty much junked them. i believe they are to keep a dampening barrier between the bulge and the hood so the bulge piece doesn't move around and wear the paint off and start to rust the hood. what i found to be a good alternative is to run a thin, (or sometimes moderately thick) bead of RTV around the edge of the bulge opening on the hood and various other spots that seem to make contact with each other; i think (and this is only MY opinion) that this should be sufficient for keeping the parts from rubbing (again, mind out of the gutter!).
if you have doubts, you can always take off the four nuts that secure the bulge piece and check it once in awhile to make sure it's still doing a good job "protecting" your hood.
so now, some common questions i came up with about what was needed and what was re-used from your old hood, install tips, etc.
1. you obviously need the parts i listed above from Toyota. Parts re-used from the old hood are:
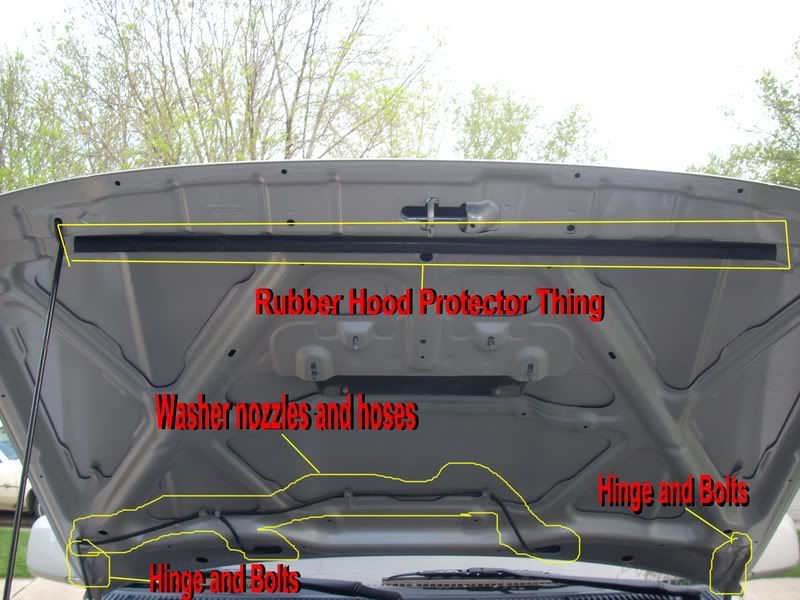
-your hinges and the 12mm bolts that secure the hood to the hinges.
-your washer sprayer nozzle thing-a-ma-bobbers.
-tubing from washer sprayer nozzle thing-a-ma-bobbers to your washer pump or whatever it attaches to, i can't remember right now
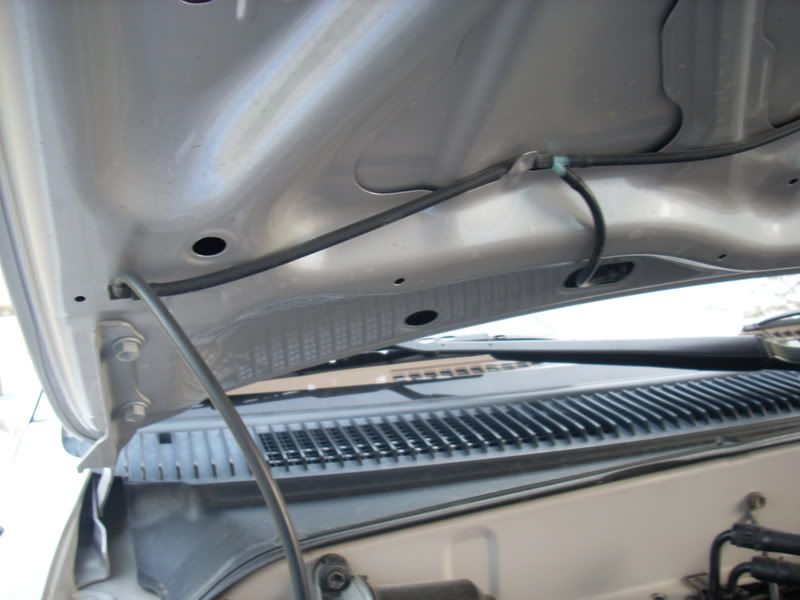

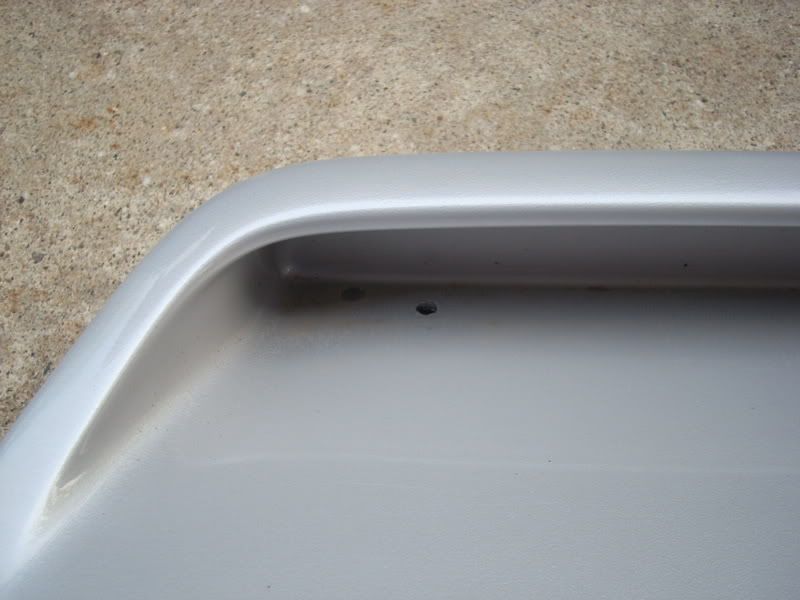
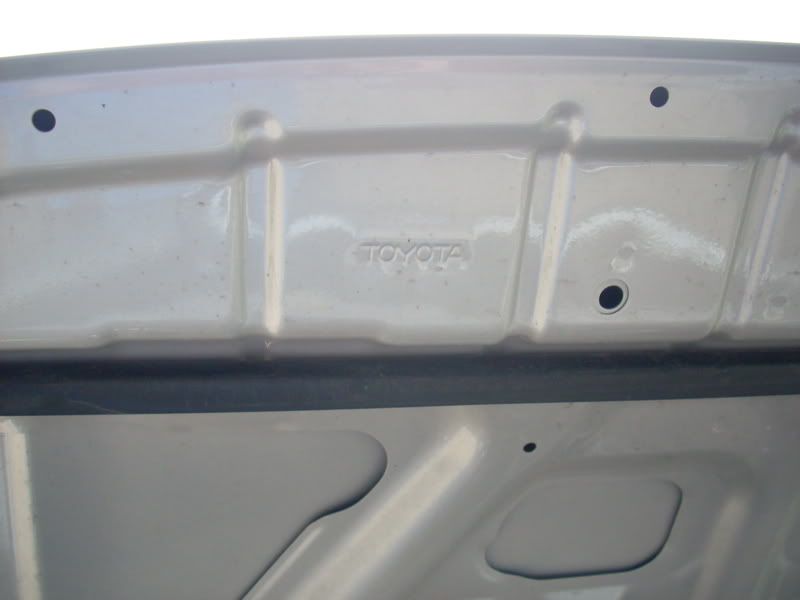
-the protective rubber piece that is on the front part of the underside of the hood (see picture), and possibly some new push tabs to hold it in (i broke all of mine taking this piece off the old hood).
-if you have a bug deflector, i guess you'll have to figure out how to put that on the new hood, i left mine off.
2. A tip when putting the hood on: put down some tape on the fenders to keep anything from being scratched. i have a couple that need wet sanding now from some "oopsies" when fitting it the first time. also, have a couple friends help you out. one person on each side of the hood holding it and a third to thread and tighten the bolts is optimal.
3. getting it to fit right. you can loosen the bolts on the hinges to fit the hood side to side so you don't have super small or super huge panel gaps. for the front of the hood, you can use the little rubber stoppers under the hood to raise and lower the hood a little bit if it's off up or down in the front.
4. before you slam the hood down for the first time, test fit it gently to make sure the hood latch is aligned with the hood. mine was perfect, but you never know, and it would be a shame to get to this point and have a mishap!
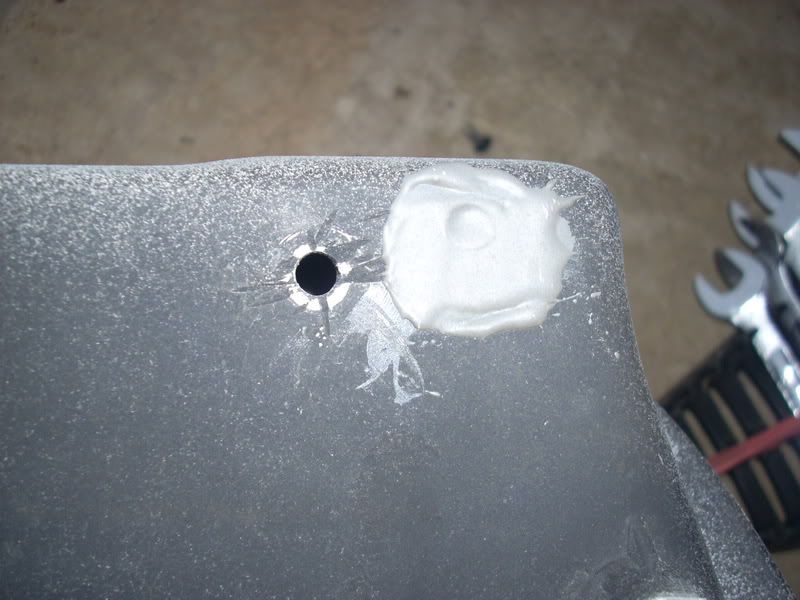
5. one other tip. the threaded pieces on the bulge are screw type things that dig into the fiberglass of the bulge piece and the other side is the threaded piece for the nuts to hold it on the hood. when i test fit mine, i went to take that piece out, and instead of the nut loosening, the entire screw portion came out of the bulge piece. to fix this, i put some JB Weld in each hole and then screwed the threaded pieces in and left overnight. now they are solidly in there and don't come out when i loosen the nuts on the bulge piece, the way it should work.
That's it! that's all i can think of right now. if i have something to add later i will, or if you think of something i've missed please feel free to add to this as well.
misc pics that may help:
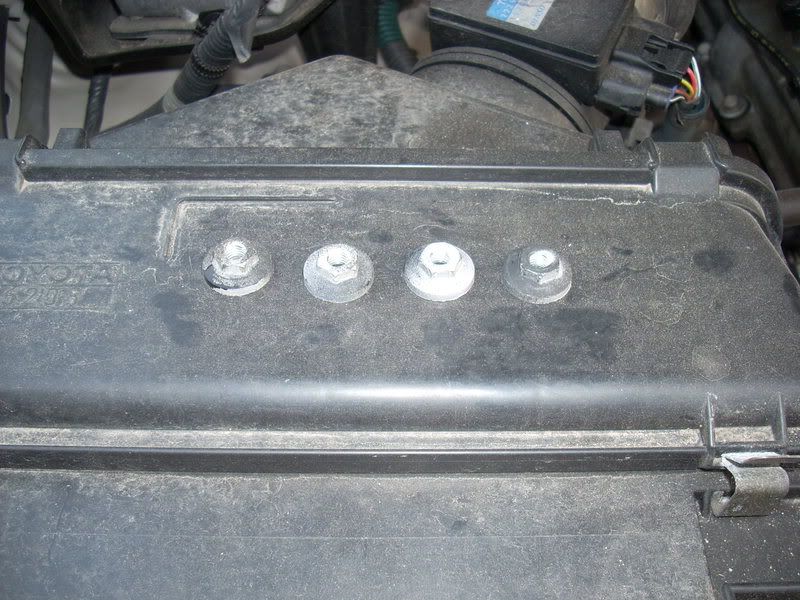
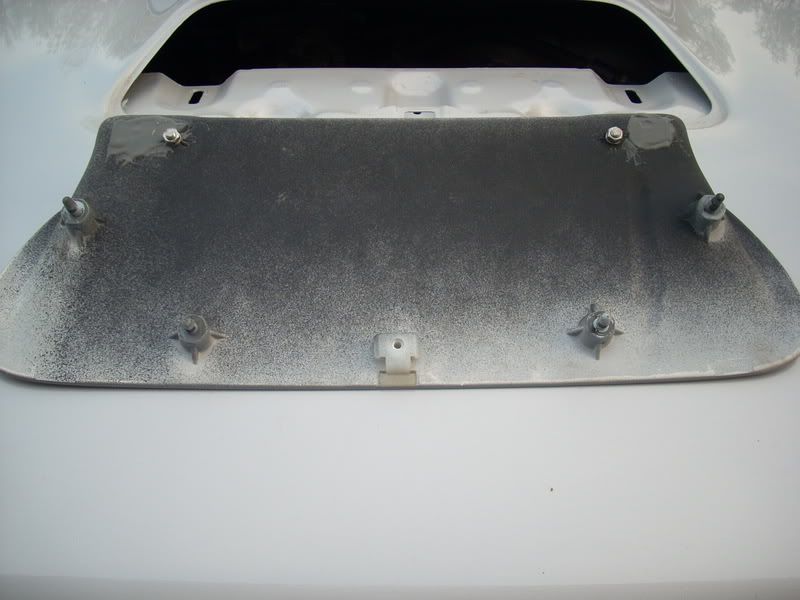
bulge nuts:
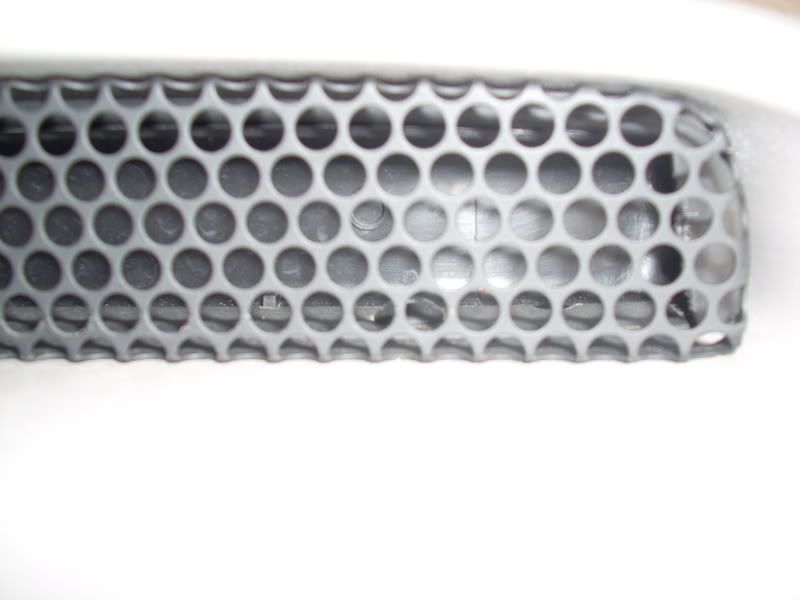
close up view of the inside of the bulge without the guide and plate installed:
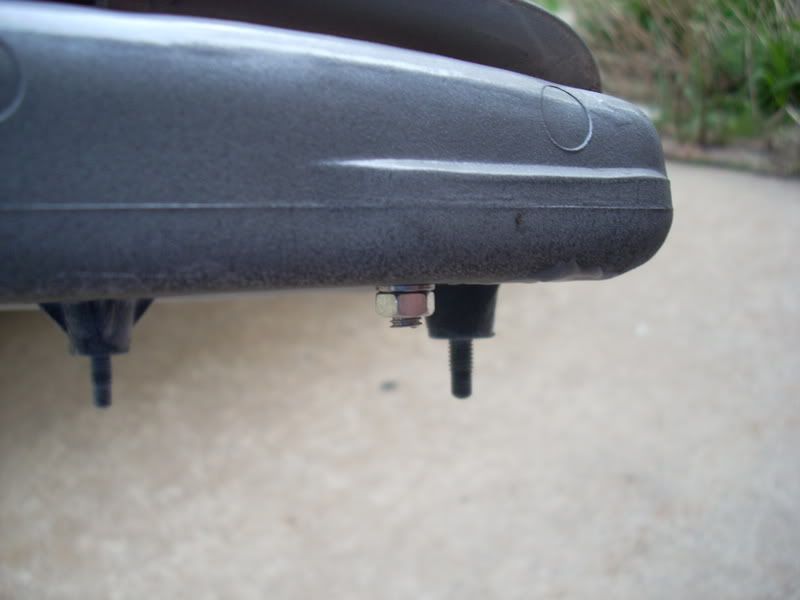
this is the back of the bulge with two of the "protectors" installed, there are two little "feet" areas on the back that meet with the hood, this is where i used RTV for added protection:
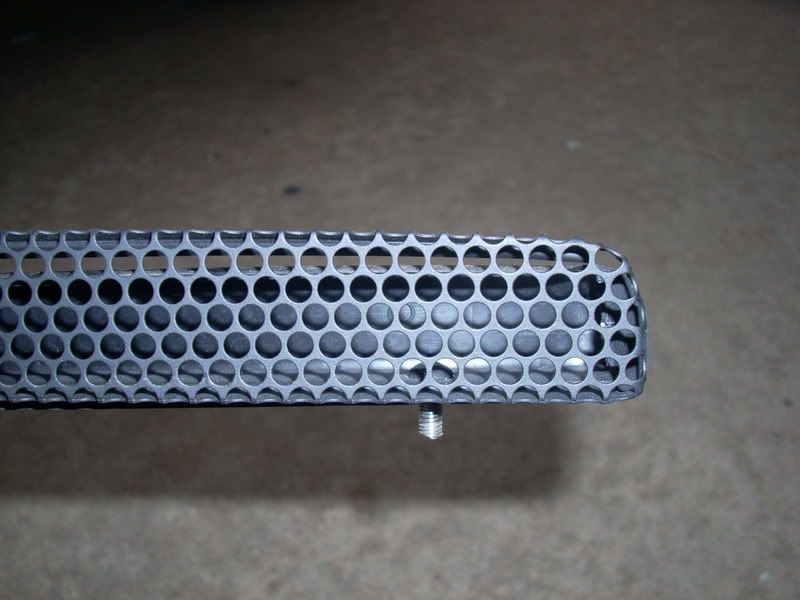
the underside of the bulge:
another pic of how i jerry rigged the plate and guide with the button cap bolt:
another stunning view of the bottom of the bulge piece where the button cap bolt (or rivet) goes through, and my great JB Weld job of the drain hole.
OEM BABY!
did i forget anything?
Parts needed:
12mm wrench or socket/ratchet
10mm wrench or socket/ratchet
Phillips head screwdriver
small flat head screwdriver (optional)
RTV of your color choice (optional)
Vice Grips (optional)
Parts purchased from a Toyota dealer (or elsewhere if you can find them)
53301-35170 Hood Sub-Assy, Sport Hood ($325.29)
76181-35901 Bulge Hood ($114.15)
76192-35010 Plate, Hood Bulge ($13.20)
76182-35020 Guide, Hood Air ($13.58)
90263-04054 Rivet ($0.57) X 2
90167-45005 Screw, Pan Tappin ($0.72)
76183-12030 Protector, Hood ($0.71)
90179-06324 Nut ($2.20) X4
76187-35010 Retainer, Hood ($0.89)
76184-12020 Protector, Hood ($0.71) Don't Buy
76185-35010 Protector, Hood ($7.00) Don't Buy
OK, let's start with the hood. it will come in a black primer from the dealer and you will want to get it painted, probably before install unless you want to test fit it first to make sure it fits properly. the hood has the hump on it but has an open area in front of the hump where the "Bulge" fits in.
This is a picture of the black hood and the white fiberglass "Bulge" piece when I test fit my hood before painting.
The "Bulge" is a fiberglass piece that fits in the opening in the hood and is secured with four nuts using a 10mm wrench. before you put this in, you will want to put together the mesh piece etc that goes inside this part. you will also want to have this piece painted as well, it comes unpainted plain white.
The first part that goes in the Bulge is the "Guide" which is a black plastic piece that i believe is used to "guide" water that accumulates in the bulge back out through tiny holes in the hood and harmlessly into the engine compartment.
here is a picture of the "plate" and the "guide" pieces:
Second, the "Plate" or Mesh fits snugly inside the guide, there are four holes that line up in the Plate, Guide, and Bulge so you know everything is lined up correctly. You will need two rivets to secure the plate, guide, and bulge together; they go through two of the holes between those pieces. The rivets from Toyota are black (or dark brown, i can't remember) and seem to be a bit longer than what is available at the local hardware store, this is so they are long enough to fit through the bulge, plate, and guide and will secure them together. *I had a hard time with the rivets so i went a different route that i will explain later on.
how the plate and guide fit together:
these two pieces slide into the bulge piece and get riveted in.
Once you have the bulge piece assembled, flip it over and there is a hole near the front of the bulge on the under side. This is where the "Retainer" goes.
This piece is just another little plastic clip that helps secure the Bulge to the hood, and probably helps keep the front part of the bulge held down closer toward the front. It is held in place with one phillips head screw as shown in the picture.
*It is up to you whether you feel this is necessary, it might help or it might not; or you may decide to buy the retainer but source the screw from a hardware store instead of shelling out $.72, for ease i just bought it from the dealer.
Now it's time to slide the Bulge assembly into the open area on the sport hood (get your mind out of the gutter!
). this is just the sport hood with the bulge piece missing, you can see the metal part of the hood where the bulge piece mounts to:
there really is no wrong way to do this, there are four threaded pieces on the underside of the bulge that go through holes in the hood. the retainer should snap into it's designated place on the hood itself.
Next, just thread the four nuts on the underside of the hood and tighten them down with your 10mm wrench.
and all attached!
*again, you might be able to source the nuts at a hardware store and save yourself some dough since the dealer charges $2.20 a piece, i am not sure what the threads are for these at this time. You will need FOUR (4).
this is the bulge piece fully assembled with the guide and plate, all attached to the hood:
Ok, here is where i delineated from the Factory OEM way of doing things...
as stated above, i had some trouble with the rivets. the first time, one went in fine and the other one tightened down only about half way. i used the Dremel and lopped it off, ordered 3 more and gave it a shot. i had the same problem with the next one, and i went out and bought a new rivet tool, a nice one that cost some $$. tried it again, same results. tried it one last time, same results. so, i went to the hardware store (Ace, Home Depot, Lowes) and i couldn't find any rivets long enough to go through the bulge, guide, and plate. so, instead of buying more from the dealer and waiting another week for perhaps the same results, i cut the good one off and started from scratch. i went up to Ace (any hardware store should do) and found some hex head button head bolts that were small enough to fit through the holes and long enough as well. i got them in stainless since this would be exposed to the elements, although i did paint them with some flat black paint to conceal them behind the plate. i also picked up some lock washers and nuts to hold them in.
so, i slid the little bolts through the plate, guide and then carefully through the bulge piece,
took a small flat head screwdriver and put it through the plate screen to put some pressure on the bolt head while i threaded on the nut and washer below. i then held on to the bolt from below with some Vice Grips and tightened the nut on the bolt, securing all pieces together.
sounds like a lot of work, but it really isn't, i'm just being thorough. i also, plugged the drain holes with some JB Weld because in the winter i noticed a lot of ice build up on my engine that i wasn't too keen about.
the next departure from the recommended assembly was the "protector" pieces. i don't have any pictures of these really, but some were little rubber "feet" looking things and others were just strips of clear vinyl with an adhesive backing. some i couldn't really figure out where they went so i pretty much junked them. i believe they are to keep a dampening barrier between the bulge and the hood so the bulge piece doesn't move around and wear the paint off and start to rust the hood. what i found to be a good alternative is to run a thin, (or sometimes moderately thick) bead of RTV around the edge of the bulge opening on the hood and various other spots that seem to make contact with each other; i think (and this is only MY opinion) that this should be sufficient for keeping the parts from rubbing (again, mind out of the gutter!
). if you have doubts, you can always take off the four nuts that secure the bulge piece and check it once in awhile to make sure it's still doing a good job "protecting" your hood.
so now, some common questions i came up with about what was needed and what was re-used from your old hood, install tips, etc.
1. you obviously need the parts i listed above from Toyota. Parts re-used from the old hood are:
-your hinges and the 12mm bolts that secure the hood to the hinges.
-your washer sprayer nozzle thing-a-ma-bobbers.
-tubing from washer sprayer nozzle thing-a-ma-bobbers to your washer pump or whatever it attaches to, i can't remember right now
-the protective rubber piece that is on the front part of the underside of the hood (see picture), and possibly some new push tabs to hold it in (i broke all of mine taking this piece off the old hood).
-if you have a bug deflector, i guess you'll have to figure out how to put that on the new hood, i left mine off.
2. A tip when putting the hood on: put down some tape on the fenders to keep anything from being scratched. i have a couple that need wet sanding now from some "oopsies" when fitting it the first time. also, have a couple friends help you out. one person on each side of the hood holding it and a third to thread and tighten the bolts is optimal.
3. getting it to fit right. you can loosen the bolts on the hinges to fit the hood side to side so you don't have super small or super huge panel gaps. for the front of the hood, you can use the little rubber stoppers under the hood to raise and lower the hood a little bit if it's off up or down in the front.
4. before you slam the hood down for the first time, test fit it gently to make sure the hood latch is aligned with the hood. mine was perfect, but you never know, and it would be a shame to get to this point and have a mishap!
5. one other tip. the threaded pieces on the bulge are screw type things that dig into the fiberglass of the bulge piece and the other side is the threaded piece for the nuts to hold it on the hood. when i test fit mine, i went to take that piece out, and instead of the nut loosening, the entire screw portion came out of the bulge piece. to fix this, i put some JB Weld in each hole and then screwed the threaded pieces in and left overnight. now they are solidly in there and don't come out when i loosen the nuts on the bulge piece, the way it should work.
That's it! that's all i can think of right now. if i have something to add later i will, or if you think of something i've missed please feel free to add to this as well.
misc pics that may help:
bulge nuts:
close up view of the inside of the bulge without the guide and plate installed:
this is the back of the bulge with two of the "protectors" installed, there are two little "feet" areas on the back that meet with the hood, this is where i used RTV for added protection:
the underside of the bulge:
another pic of how i jerry rigged the plate and guide with the button cap bolt:
another stunning view of the bottom of the bulge piece where the button cap bolt (or rivet) goes through, and my great JB Weld job of the drain hole.
OEM BABY!
did i forget anything?
Trending Topics
04-26-2018, 12:20 PM
#8
Contributing Member
I wish we could get these PHOTOS back to display?
Also, part #'s here show some extra stuff, or maybe they are wrong?
Also, part #'s here show some extra stuff, or maybe they are wrong?
- Hood Bulge x1(7618135901), Hood Bulge Plate x1(7619235010),
- Hood Air Intake Guide x1(7618235020), Protector x4(7618312030),
- Protector x2(7618412020), Protector x1(7618535010),
- Retainer x1(7618735010), Protector x4(7556721030),
- Screw x1(9016745005), Rivets x2(9026904054),
- Flange Nuts x5(9017906324)
04-26-2018, 02:11 PM
#9
Registered User
The good news is: you can! 
Well, if you use Google Chrome or Firefox you can. Other web browsers may also have the photobucket fix too, but I have not looked in to it.
For Firefox, you will need to add this browser extension. It works very well. I can see all of the pictures you cannot see right now.
https://addons.mozilla.org/en-US/fir...otobucket-fix/
For Google Chrome you will need to add this browser extension. This extension is made by the same people who made the Firefox version.
https://chrome.google.com/webstore/d...bifiaedg?hl=en
04-26-2018, 04:21 PM
#10
...For Google Chrome you will need to add this browser extension. This extension is made by the same people who made the Firefox version.
https://chrome.google.com/webstore/d...bifiaedg?hl=en...
https://chrome.google.com/webstore/d...bifiaedg?hl=en...
For those whose pics are still on Photobucket and have no backups, download them now and upload to new photo host.

Thread
Thread Starter
Forum
Replies
Last Post
ashamsuddin
General Vehicle Related Topics (Non Year Related)
17
01-13-2023 03:17 AM
kawazx636
The Classifieds GraveYard
34
10-06-2021 03:03 PM
TheBFA
Solid Axle Swaps, All Years
8
02-15-2020 06:55 AM


