Electric Fan with Variable Speed Controller Installed
 06-12-2005, 05:21 AM
#1

Electric Fan with Variable Speed Controller Installed
First of all, what I bought:
FK-35 Variable Speed Fan Controller Kit, $109: LINK
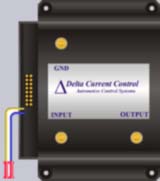
This controller is something I ran across on another forum. Being an engineer, I know that by changing the speed of the fan depending on the difference in temperature of the coolant versus the desired temperature is MUCH better than a simple cycling of "ON" and "OFF" to maintain temperature. This varaible speed controller is a very similar technology that I use in everyday work to control pump speeds based on desired delivery. Also, this allows for a "soft start" with low amperage draw at startup. The controller can also be hooked up w/ an AC lead that keeps the speed at a minimum of 50%, and can also be hooked up to continue to cool after the ignition is off if desired. It comes preset for a control temperature of 180*, and other selectable temperatures are 158*, 166*, 194*, and 202*. The kit that I purchased comes w/ the controller, the heat sensor, all wiring, and instructions w/ illustrations. The controller can be mounted anywhere up by the firewall w/ the supplied wiring. It's about the size of a deck of cards. It's also a sealed unit, but since I already had the wire, I mounted it up by the Brake Master Cylinder on the firewall.
2000 Volvo S80 Electric Fan (eBay):

Very similar in looks to the Taurus Fan, I got this one simply because the shroud seemed to be a little bit larger and fit our radiators better. This turned out to be a moot point due to the way that I mounted it. The Taurus Fan (either 1-speed or 2-speed or any other similar fan) could easily be substituted here. The volvo fan is 17" tall and 24" wide and 3" deep and is stock on models V70, S60, S80, & S70. The 1994/95 Taurus/Sable Fans seem to be the most similar to the one that I used. The 1991-1993 Taurus/Sable Fans appear to be the same thing with just a different shroud. Since the OEM Toyota shroud is reused, the donor shourd shape doesn't matter.
Assorted Hardware:
(4) 1/4" x 3/4" long Zinc Bolts
(4) 1/4" Zinc Nuts
(8) 1/4" Zinc Flat Washers
(12) 5/16" Zinc Flat Washers
Install:
I removed my stock fan and shroud. The fan is held on by 4 nuts on the pulley studs. Take the top two off, tap the ignition to spin it over, then remove the other two. Remove the 4 bolts holding the stock shroud on the radiator. Remove the upper radaitor hose and pull the shroud out. You'll spill a little coolant here, but not too bad as long as the engine is cool. Now put (3) 5/16" Zinc Flat Washers on each stud, then followed by the OEM nut and torque the nuts back down when you get all 4 on w/ their washers that are used for spacer. THIS IS VERY IMPORTANT since this is what continues to hold the pulley on!
Take the Volvo Fan and use a hax saw, cutoff wheel, dremel, etc, to remove all the "tabs" that are sticking out around the edges and above the main body of the shroud. This cleans up the electric fan shroud so that it will fit nicely in the OEM Toyota shroud. Remove the control box on the fan (if it comes w/ one) so that you'll have a direct connection to the fan itself - VERY IMPORTANT.
Take your OEM Toyota stock shroud, flip it over so that the edges that normally seal against the radiator are facing up, then lay the electric fan w/ shroud in the OEM shroud - also with the sealing edges facing up, so that it's essentially "nested" inside the stock OEM Toyota shroud. Figure out where you want the electric fan to be mounted (I put mine as high as possible for water crossings, leaving a 2" gap at the bottom of the stock OEM Toyota shroud) and also make sure that the electric fan shroud isn't any "deeper" than the stock shroud. If the electric fan shroud looks like it would be too "deep" and prevent the reinstallation of the stock OEM Toyota shroud, then use the dremel or cutoff wheel to trim the "sealing edge" back away from the radiator so that the stock OEM Toyota shroud will touch the radiator and make the air seal and not the electric fan shroud.

To retain the electric fan shroud to the OEM shroud, I drilled (4) 5/16" holes through both of them while holding them in place. I then used (4) 1/4" x 3/4" long bolts w/ a flat washer on the head and the nut and tightened them down. Two of the holes were in the "top" of the shrouds and can been seen standing at the truck w/ the hood open (see the pics - the zinc/silver hex-head bolts on top of the shroud are the ones that I installed). The other two went in the bottom of the shroud, one on each side just to hold the bottom into place snugly against the stock OEM Toyota shroud. You may need/want to cut out some slots in the bottom of the donor shroud so that the air can still flow from your stock shroud through the slots and to the electric fan. If you want, you can also remove the lower lip of the donor shroud completely. The more you remove, the better air flow you will get from the lower section of the radiator and the more efficient the fan will be at cooling. I didn't do either of these and I'm still getting sufficient cooling.

I mounted the Controller on the Firewall Pinch-Weld up by the Brake Master Cylinder. The wires were easy to run w/ only 7 total to run. One set of (+) & (-) from the battery to the controller, one set of (+) & (-) from the controller to the fan leads, one from the temp sensor to the controller, one IGN lead to keep it from running w/ the vehicle off, and one for the AC relay to trigger the 50% minimum speed when the AC is on. Oh, and the temp sensor is a sealed type that is prewired and just inserts between the radiator fins - very simple to install.

Overall, I'm very pleased w/ the install. The fan is nice and quiet and doesn't run when not needed on the highway and the speed is varied according to the need. It's a big difference in the sound of the engine w/ the parasitic fan removed due to the reduced noise. The response seems to be improved as expected.
Total install took about 2 hours, but that was with the problems that I had w/ the Volvo Fan Controller that came on it and to also figure all this out. With a good understanding of what to do and with a little planning, this could easily be done in an hour.

FK-35 Variable Speed Fan Controller Kit, $109: LINK
This controller is something I ran across on another forum. Being an engineer, I know that by changing the speed of the fan depending on the difference in temperature of the coolant versus the desired temperature is MUCH better than a simple cycling of "ON" and "OFF" to maintain temperature. This varaible speed controller is a very similar technology that I use in everyday work to control pump speeds based on desired delivery. Also, this allows for a "soft start" with low amperage draw at startup. The controller can also be hooked up w/ an AC lead that keeps the speed at a minimum of 50%, and can also be hooked up to continue to cool after the ignition is off if desired. It comes preset for a control temperature of 180*, and other selectable temperatures are 158*, 166*, 194*, and 202*. The kit that I purchased comes w/ the controller, the heat sensor, all wiring, and instructions w/ illustrations. The controller can be mounted anywhere up by the firewall w/ the supplied wiring. It's about the size of a deck of cards. It's also a sealed unit, but since I already had the wire, I mounted it up by the Brake Master Cylinder on the firewall.
2000 Volvo S80 Electric Fan (eBay):
Very similar in looks to the Taurus Fan, I got this one simply because the shroud seemed to be a little bit larger and fit our radiators better. This turned out to be a moot point due to the way that I mounted it. The Taurus Fan (either 1-speed or 2-speed or any other similar fan) could easily be substituted here. The volvo fan is 17" tall and 24" wide and 3" deep and is stock on models V70, S60, S80, & S70. The 1994/95 Taurus/Sable Fans seem to be the most similar to the one that I used. The 1991-1993 Taurus/Sable Fans appear to be the same thing with just a different shroud. Since the OEM Toyota shroud is reused, the donor shourd shape doesn't matter.
Assorted Hardware:
(4) 1/4" x 3/4" long Zinc Bolts
(4) 1/4" Zinc Nuts
(8) 1/4" Zinc Flat Washers
(12) 5/16" Zinc Flat Washers
Install:
I removed my stock fan and shroud. The fan is held on by 4 nuts on the pulley studs. Take the top two off, tap the ignition to spin it over, then remove the other two. Remove the 4 bolts holding the stock shroud on the radiator. Remove the upper radaitor hose and pull the shroud out. You'll spill a little coolant here, but not too bad as long as the engine is cool. Now put (3) 5/16" Zinc Flat Washers on each stud, then followed by the OEM nut and torque the nuts back down when you get all 4 on w/ their washers that are used for spacer. THIS IS VERY IMPORTANT since this is what continues to hold the pulley on!
Take the Volvo Fan and use a hax saw, cutoff wheel, dremel, etc, to remove all the "tabs" that are sticking out around the edges and above the main body of the shroud. This cleans up the electric fan shroud so that it will fit nicely in the OEM Toyota shroud. Remove the control box on the fan (if it comes w/ one) so that you'll have a direct connection to the fan itself - VERY IMPORTANT.
Take your OEM Toyota stock shroud, flip it over so that the edges that normally seal against the radiator are facing up, then lay the electric fan w/ shroud in the OEM shroud - also with the sealing edges facing up, so that it's essentially "nested" inside the stock OEM Toyota shroud. Figure out where you want the electric fan to be mounted (I put mine as high as possible for water crossings, leaving a 2" gap at the bottom of the stock OEM Toyota shroud) and also make sure that the electric fan shroud isn't any "deeper" than the stock shroud. If the electric fan shroud looks like it would be too "deep" and prevent the reinstallation of the stock OEM Toyota shroud, then use the dremel or cutoff wheel to trim the "sealing edge" back away from the radiator so that the stock OEM Toyota shroud will touch the radiator and make the air seal and not the electric fan shroud.
To retain the electric fan shroud to the OEM shroud, I drilled (4) 5/16" holes through both of them while holding them in place. I then used (4) 1/4" x 3/4" long bolts w/ a flat washer on the head and the nut and tightened them down. Two of the holes were in the "top" of the shrouds and can been seen standing at the truck w/ the hood open (see the pics - the zinc/silver hex-head bolts on top of the shroud are the ones that I installed). The other two went in the bottom of the shroud, one on each side just to hold the bottom into place snugly against the stock OEM Toyota shroud. You may need/want to cut out some slots in the bottom of the donor shroud so that the air can still flow from your stock shroud through the slots and to the electric fan. If you want, you can also remove the lower lip of the donor shroud completely. The more you remove, the better air flow you will get from the lower section of the radiator and the more efficient the fan will be at cooling. I didn't do either of these and I'm still getting sufficient cooling.
I mounted the Controller on the Firewall Pinch-Weld up by the Brake Master Cylinder. The wires were easy to run w/ only 7 total to run. One set of (+) & (-) from the battery to the controller, one set of (+) & (-) from the controller to the fan leads, one from the temp sensor to the controller, one IGN lead to keep it from running w/ the vehicle off, and one for the AC relay to trigger the 50% minimum speed when the AC is on. Oh, and the temp sensor is a sealed type that is prewired and just inserts between the radiator fins - very simple to install.
Overall, I'm very pleased w/ the install. The fan is nice and quiet and doesn't run when not needed on the highway and the speed is varied according to the need. It's a big difference in the sound of the engine w/ the parasitic fan removed due to the reduced noise. The response seems to be improved as expected.
Total install took about 2 hours, but that was with the problems that I had w/ the Volvo Fan Controller that came on it and to also figure all this out. With a good understanding of what to do and with a little planning, this could easily be done in an hour.
Last edited by bamachem; 06-14-2005 at 06:48 AM.
 06-12-2005, 06:33 AM
#4
Contributing Member
Join Date: Jun 2004
Location: Richmond, Va
Posts: 4,218
Likes: 0
Received 0 Likes
on
0 Posts
Originally Posted by waskillywabbit

I'm drooling for some pics as all that shroud flipping stuff is a bit confusing to picture.
So when are you driving down to supervise the install here?


Trending Topics
06-12-2005, 04:17 PM
#8
Contributing Member
Join Date: Jan 2003
Posts: 10,916
Likes: 0
Received 0 Likes
on
0 Posts

Nice work Andy. I am really digging that variable controller. It just makes sense. If my ON/OFF FLX210 monster craps out, I will definitely be taking this route.
Last edited by rimpainter.com; 06-12-2005 at 04:18 PM.
06-12-2005, 05:09 PM
#10
Thanks!
So far it works great. Temp needle builds nice and fast and then pegs about a needle-width below half way on the gauge. Doesn't matter if I'm going down the interstate or sitting in traffic w/ the AC on. Either way, the needle doesn't budge. The fan is a pretty sweet mod and there's a VERY noticable difference in engine response. So much so that now w/ the 4.56's and the electric fan, the ONLY way that I can tell that the Supercharger is gone is the nice V8-ish sound of the engine w/o the SC whine and the roar of the parasitic fan. Now all I hear is the THROATY groan of the 3.4L breathing through the open deckplate.
Me Likes. Me Likes LOTS.
06-12-2005, 05:16 PM
#11
Originally Posted by bamachem
Thanks!
So far it works great. Temp needle builds nice and fast and then pegs about a needle-width below half way on the gauge. Doesn't matter if I'm going down the interstate or sitting in traffic w/ the AC on. Either way, the needle doesn't budge. The fan is a pretty sweet mod and there's a VERY noticable difference in engine response. So much so that now w/ the 4.56's and the electric fan, the ONLY way that I can tell that the Supercharger is gone is the nice V8-ish sound of the engine w/o the SC whine and the roar of the parasitic fan. Now all I hear is the THROATY groan of the 3.4L breathing through the open deckplate.
Me Likes. Me Likes LOTS.
So far it works great. Temp needle builds nice and fast and then pegs about a needle-width below half way on the gauge. Doesn't matter if I'm going down the interstate or sitting in traffic w/ the AC on. Either way, the needle doesn't budge. The fan is a pretty sweet mod and there's a VERY noticable difference in engine response. So much so that now w/ the 4.56's and the electric fan, the ONLY way that I can tell that the Supercharger is gone is the nice V8-ish sound of the engine w/o the SC whine and the roar of the parasitic fan. Now all I hear is the THROATY groan of the 3.4L breathing through the open deckplate.
Me Likes. Me Likes LOTS.
Oh yeah, how about let's install a bodylift on mine too! Better yet, let's get those tire carriers and have a wrenching weekend!
06-12-2005, 05:18 PM
#12
Originally Posted by dragr1
Awesome, so if I buy this stuff and a case of beer and drive to Knoxville for a weekend you'll help with my install? Oh yeah, how about let's install a bodylift on mine too! Better yet, let's get those tire carriers and have a wrenching weekend!
Oh yeah, how about let's install a bodylift on mine too! Better yet, let's get those tire carriers and have a wrenching weekend! Nothing to the fan install or the body lift...we'll kill two with one weekend!
06-12-2005, 05:21 PM
#13
1. sure. it would only take an hour or so to pull your junk and put this in. very very easy installation. much easier being able to use the stock shroud as a mounting system.
2. sure. a body lift only took me about an hour and a half to put in. w/ two of us, it would be under an hour. we could do the fan mod and the body lift in an evening and still have plenty of time to drink some beer when we're done.
3. at this point, i'm collecting some info on them, as many pics as possible, and probally just going to come up w/ my own version. i'm confident that i have the mounting system and hinges figured out. next is to source a good, safe latch system. once i get that figured out, i'll get a sketch on paper and get measurements, then i'll make a CAD file w/ detail drawings of the hinges and mounting points and the latch system. at that point, i'll get one made and test it.
06-12-2005, 05:23 PM
#14
Originally Posted by waskillywabbit
Yo! Tuscaloosa is a LOT closer! Nothing to the fan install or the body lift...we'll kill two with one weekend!
Nothing to the fan install or the body lift...we'll kill two with one weekend!
06-12-2005, 05:27 PM
#15
Originally Posted by waskillywabbit
Yo! Tuscaloosa is a LOT closer! Nothing to the fan install or the body lift...we'll kill two with one weekend!
Nothing to the fan install or the body lift...we'll kill two with one weekend! Which year Tauras fans work? Part #?
06-12-2005, 05:32 PM
#16
Just look for one that looks like that Volvo fan. DON'T get the two speed. With the variable speed controller, the two speed fan is not needed. Just get a Volvo S80 fan or the Taurus/Sable single speed fan.
06-12-2005, 05:33 PM
#17
Originally Posted by dragr1
Yes it is, dang we need a 3 day weekend, install on Friday, drink beer on Friday night, and wheel on Saturday!
Which year Tauras fans work? Part #?
Which year Tauras fans work? Part #?
https://www.yotatech.com/forums/show...ght=taurus+fan
06-12-2005, 05:34 PM
#18
Originally Posted by bamachem
Just look for one that looks like that Volvo fan. DON'T get the two speed. With the variable speed controller, the two speed fan is not needed. Just get a Volvo S80 fan or the Taurus/Sable single speed fan.
In a junkyard how would I tell the one/two speed fans apart? What years?
06-12-2005, 05:37 PM
#19
Originally Posted by waskillywabbit
06-12-2005, 05:38 PM
#20
Originally Posted by dragr1
In a junkyard how would I tell the one/two speed fans apart? What years?
Can't be hard to find.


