Cup Holder Mod '99-'02 in '96-'98
 12-20-2007, 11:12 AM
#1
Cup Holder Mod '99-'02 in '96-'98
As promised I have added the Cup Holder Mod. I want to thank Bob_98SR5 for his original mod and the details it provided. I tried to find it to reference it here but the link seems to be dead. I will edit this write up if I get more information.
The original write up was for using the stock OEM parts from the first flight 3rd gen 4runners and was an EXCELLENT starting point for me. I opted for more of a 'plug and play' concept. Bob also relocated his switches from the 98 console to his drivers dash utilizing the OEM cutout mounts. Super idea but I have future uses for mine so decided to relocate those items to the shifter console.
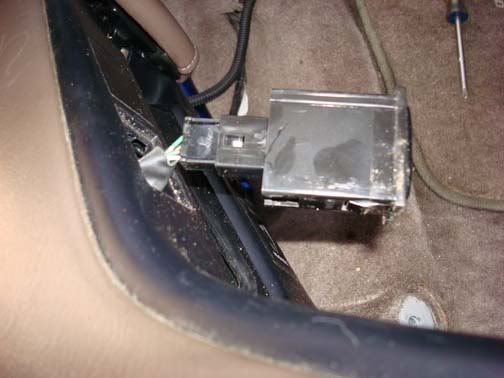
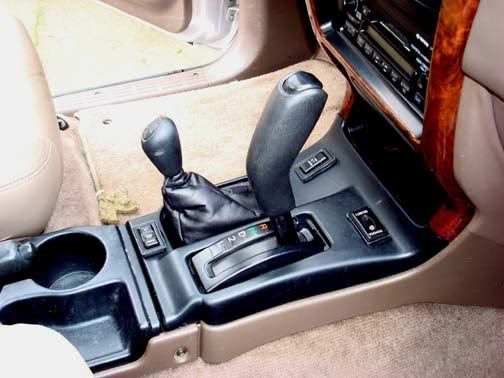
The dreaded Flight 1 OEM configuration
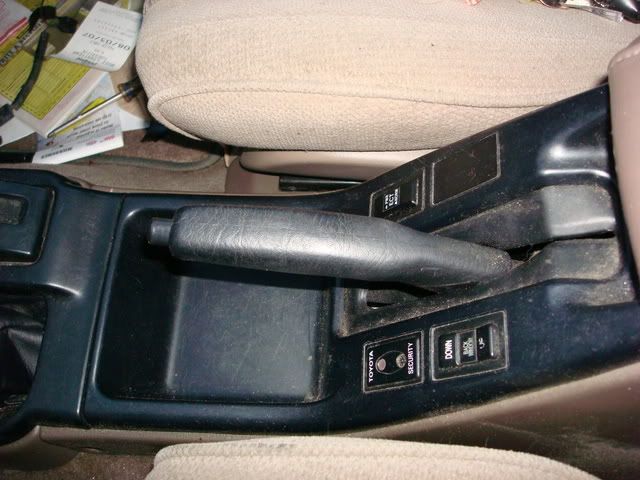
My '98 SR5 had the Toyota security system installed along with the Rear Window and ECT select switches which would need to be relocated. Viewed from the passenger side
NOTE: It is not necessary but I removed my seats to better facilitate removal and installation of the center consoles. This can be accomplished with the seats installed.
First order of business is to gather up the parts and tools. Basic hand tools that you have on hand will do just fine, no special bits or service aids.
#2 Phillips
10 mm socket
12mm socket
Ratchet handle
12” extension to clear the console bucket.
Utility knife w/ sharp new blades
Diagonal pliers
10 mm open end wrench
Channel lock pliers
Dremel with cutter and saw blade
Jig saw
Med point sharpie
120 grit sand paper
Small wire ties
Plastic adhesive
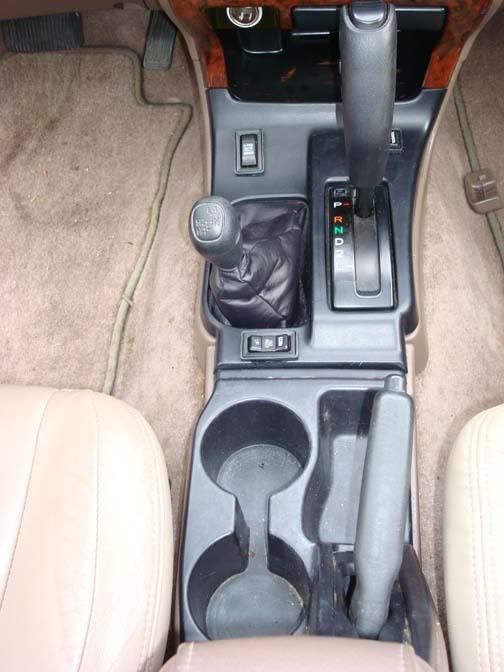
From a 99-02 4runner:
Center Console
Center console mount plate
e-brake handle assembly
e-brake tub (not required but nice)
I would recommend that first set the e-brake as high as it will go. If your vehicle is a 4x4 place the 4x shift lever forward and remove the handle.
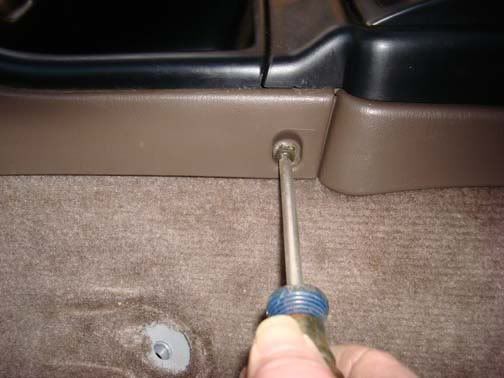
Remove the Center console attachment screws located just aft of the shifter console, one on each side.
Remove the two console bucket bolts using 10mm socket and extention
If equipped with a rear heater, remove the heat selector knob. It will just pull straight off.
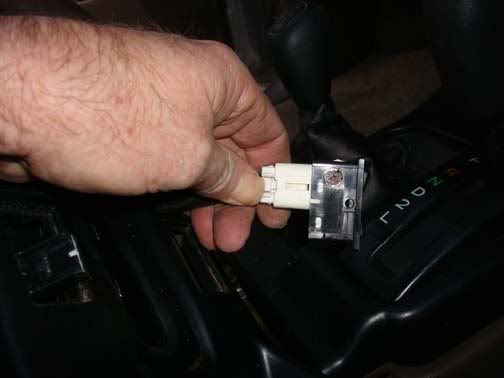
If you desire you can remove the rear window switch and the ECT switch (if so equipped) . Pop the two switches out and find the small release tab for the connector. Press the tab down and pull the switch from the connector.
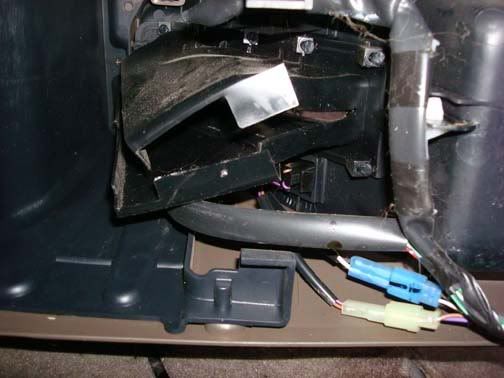
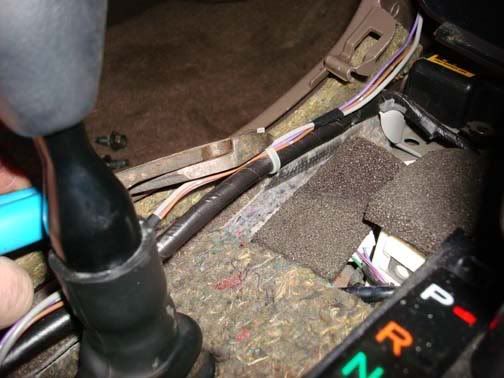
Grasp the console with both hands and it should slide backwards enough to clear the heater control lever. Lift slightly and push forward. You will need to rotate the console to clear the shifter on an Automatic. (That’s another reason I removed my seats). If you still have your switches connected be careful when you twist the console to remove it. Beneath you will find the connectors. Most of Toyota connectors will have a tab for you to depress to release them. The two small connectors for the Toyota security system are PITA. You will need a very small flat tip screw driver or a small awl. I inserted a large jewelers screwdriver into the connector where there is a small ridge, lifted slightly and the connector was easy to pull apart. Took a few tries to figure out the best way to get it free.
The first connector under the console to release is the rear heater fan control wire.
Next find the Security connectors and disconnect them.
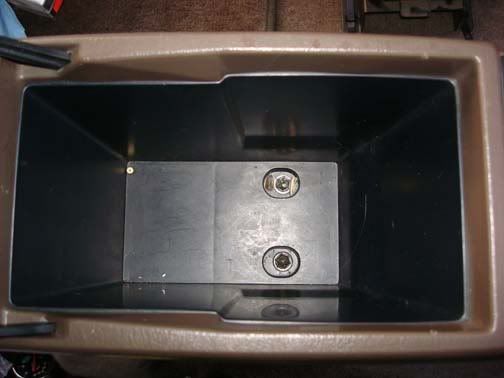
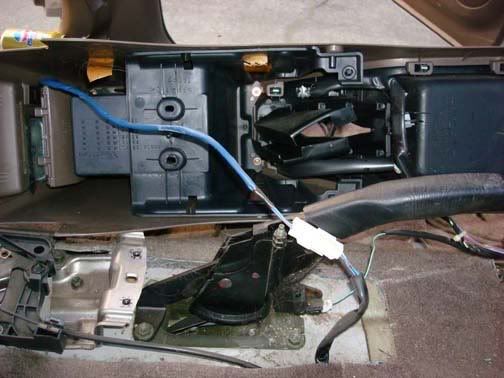
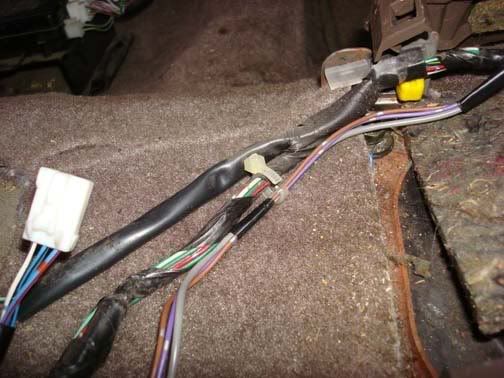
Now that the console is free remove it to the side. We can now see the e-brake mounting in the e-brake tub as well as the console center mount.
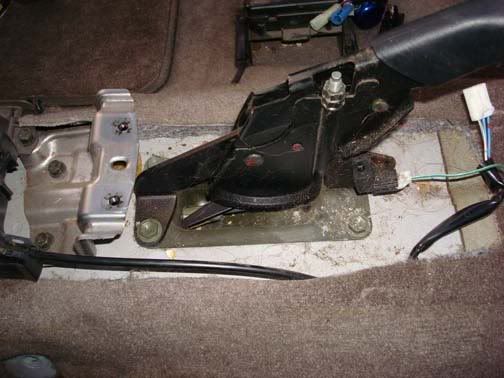
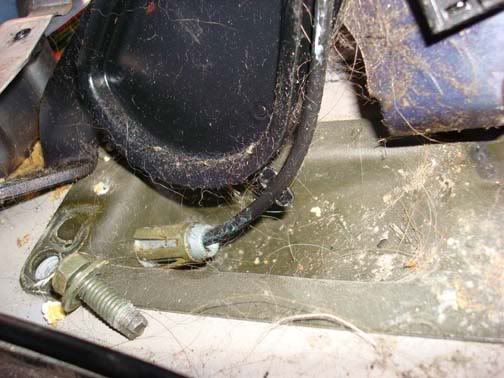
Just forward of the e-brake bracket is the electrical connector for the e-brake. Disconnect this wire. Make sure your wheels are chocked and release the e-brake. Remove the two mount bolts for the e-brake bracket.
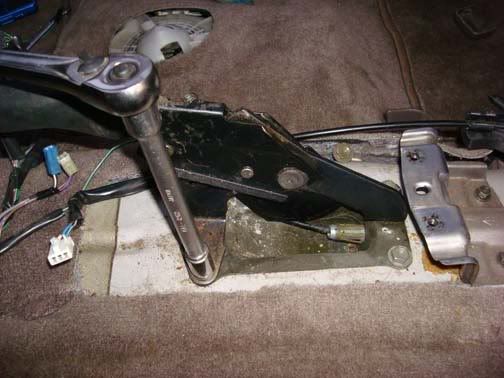

This will free up the cable and provide you direct access to the e-brake retainer clip. Using a flat blade screwdriver, bend the retainer slightly open enough to allow the cable to come out of the cable groove.
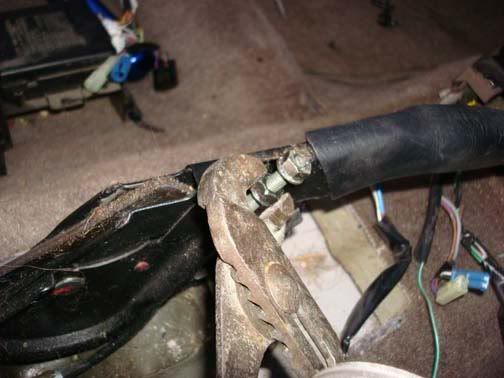
With the cable loose, use your channel lock pliers and 10 mm wrench and loosen the top lock nut on the cable. Once that is removed the second nut will easily spin off. Try to make a note of the distance down the cable where the nut is located. This is the adjustment for the e-brake.
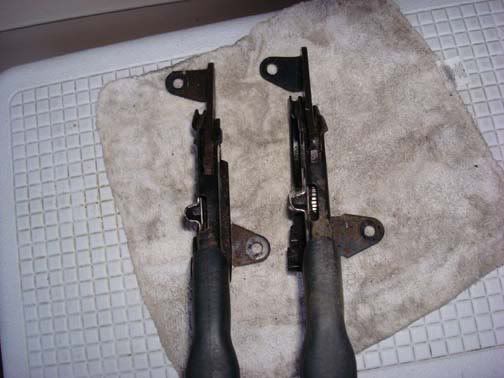
The e-brake is now ready to be set aside. This is what the two e-brake brackets look like side by side. The ’98 is to the left and the ’00 is to the right. Notice that the forward bracket mount is longer. Toyota used the in place mounting points for both e-brake brackets.
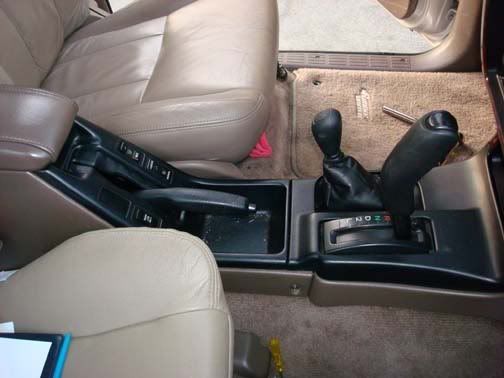
Next you need to determine if you are going to mount your switches in the drivers dash area or relocate them to the shifter console. I chose to mount mine in the shifter console so the remaining portions of this write will be dealing with that install option.
The original write up was for using the stock OEM parts from the first flight 3rd gen 4runners and was an EXCELLENT starting point for me. I opted for more of a 'plug and play' concept. Bob also relocated his switches from the 98 console to his drivers dash utilizing the OEM cutout mounts. Super idea but I have future uses for mine so decided to relocate those items to the shifter console.
The dreaded Flight 1 OEM configuration
My '98 SR5 had the Toyota security system installed along with the Rear Window and ECT select switches which would need to be relocated. Viewed from the passenger side
NOTE: It is not necessary but I removed my seats to better facilitate removal and installation of the center consoles. This can be accomplished with the seats installed.
First order of business is to gather up the parts and tools. Basic hand tools that you have on hand will do just fine, no special bits or service aids.
#2 Phillips
10 mm socket
12mm socket
Ratchet handle
12” extension to clear the console bucket.
Utility knife w/ sharp new blades
Diagonal pliers
10 mm open end wrench
Channel lock pliers
Dremel with cutter and saw blade
Jig saw
Med point sharpie
120 grit sand paper
Small wire ties
Plastic adhesive
From a 99-02 4runner:
Center Console
Center console mount plate
e-brake handle assembly
e-brake tub (not required but nice)
I would recommend that first set the e-brake as high as it will go. If your vehicle is a 4x4 place the 4x shift lever forward and remove the handle.
Remove the Center console attachment screws located just aft of the shifter console, one on each side.
Remove the two console bucket bolts using 10mm socket and extention
If equipped with a rear heater, remove the heat selector knob. It will just pull straight off.
If you desire you can remove the rear window switch and the ECT switch (if so equipped) . Pop the two switches out and find the small release tab for the connector. Press the tab down and pull the switch from the connector.
Grasp the console with both hands and it should slide backwards enough to clear the heater control lever. Lift slightly and push forward. You will need to rotate the console to clear the shifter on an Automatic. (That’s another reason I removed my seats). If you still have your switches connected be careful when you twist the console to remove it. Beneath you will find the connectors. Most of Toyota connectors will have a tab for you to depress to release them. The two small connectors for the Toyota security system are PITA. You will need a very small flat tip screw driver or a small awl. I inserted a large jewelers screwdriver into the connector where there is a small ridge, lifted slightly and the connector was easy to pull apart. Took a few tries to figure out the best way to get it free.
The first connector under the console to release is the rear heater fan control wire.
Next find the Security connectors and disconnect them.
Now that the console is free remove it to the side. We can now see the e-brake mounting in the e-brake tub as well as the console center mount.
Just forward of the e-brake bracket is the electrical connector for the e-brake. Disconnect this wire. Make sure your wheels are chocked and release the e-brake. Remove the two mount bolts for the e-brake bracket.
This will free up the cable and provide you direct access to the e-brake retainer clip. Using a flat blade screwdriver, bend the retainer slightly open enough to allow the cable to come out of the cable groove.
With the cable loose, use your channel lock pliers and 10 mm wrench and loosen the top lock nut on the cable. Once that is removed the second nut will easily spin off. Try to make a note of the distance down the cable where the nut is located. This is the adjustment for the e-brake.
The e-brake is now ready to be set aside. This is what the two e-brake brackets look like side by side. The ’98 is to the left and the ’00 is to the right. Notice that the forward bracket mount is longer. Toyota used the in place mounting points for both e-brake brackets.
Next you need to determine if you are going to mount your switches in the drivers dash area or relocate them to the shifter console. I chose to mount mine in the shifter console so the remaining portions of this write will be dealing with that install option.
Last edited by Ritzy4Runner; 12-20-2007 at 11:17 AM.
 12-21-2007, 09:45 AM
#3
Cup holder Mod Pt 2
Next you will need to separate the wire bundles. Toyota usually binds them in plastic sleeves and wire ties. Once again you need to decide how you are going to route your wires for the switches. Find the wire ties and using the diagonal pliers, cut the wire ties off. Be careful not to cut your wires!
Now begins some serious modification. Using both the old console and the new console, you will need to mark the edges of the new console with the base edge outline of the old console. There are differences between the contours. Lay the old console against the side of the new one. Line up the top edges and ends of the two. You will see the �99+ will be taller then the flight 1 console. You may need some assistance with holding the two together. Use a marker and trace the bottom edge of the old console. Do this to both sides. They should be very similar.
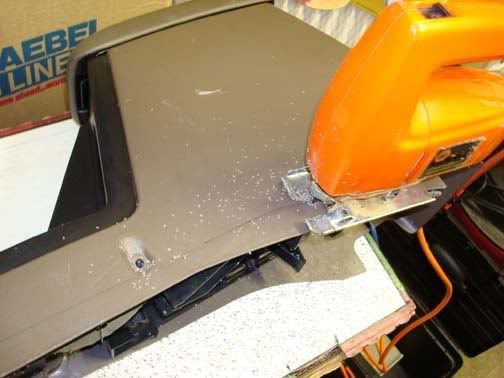
Now you will be at the point of �no return�. Using the jig saw with a medium tooth blade, cut the edges off both sides and trim up using your utility knife leaving a nice clean edge.
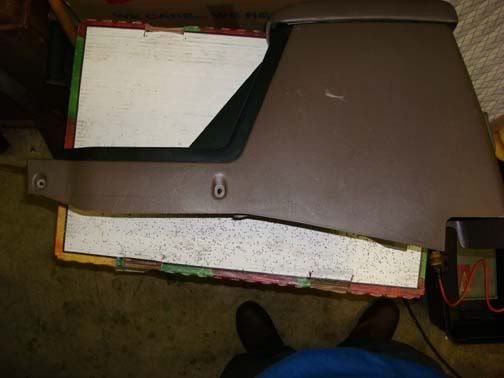
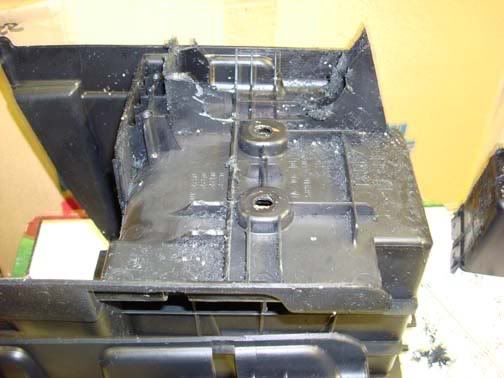
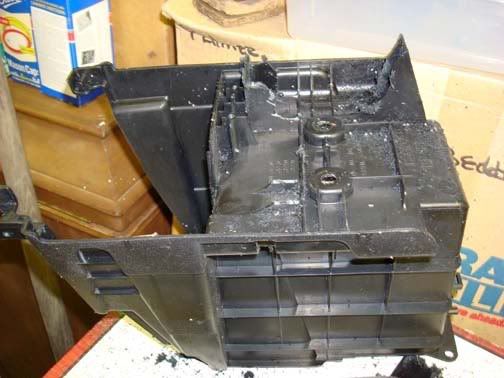
Remove the console bucket from the console as you will be doing some modifications to the support ribbing so it will fit over the center hump and allow you to secure it in place. Here is what they look like next to each other.
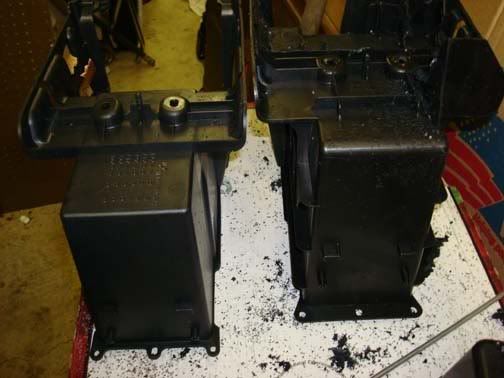
As you can see the two buckets are different in both size and construction.
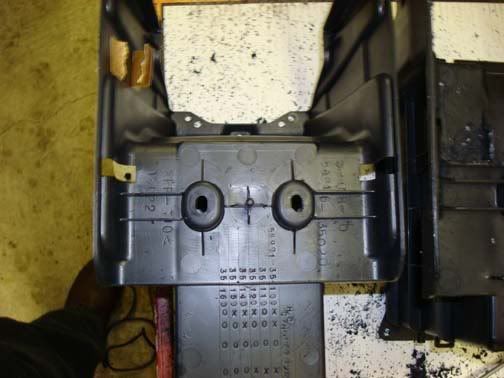
There are numerous support fins along the bottom of the bucket. You will need to identify the ones that impair the placing of the console on the center hump. What I did was to mount the new center bracket and then use the console bucket and line it up with the mounting holes. You can see where you need to trim away plastic fins in order for the assembled console to mount properly. Just take your time and trim away all obstructive flanges and fins.
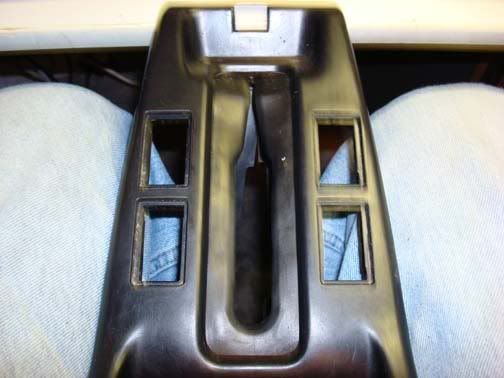
Once you have a completed bucket reinstall it in the console. Next we are going to begin the mod of the old center console switch mounts for placement in the shifter bezel.
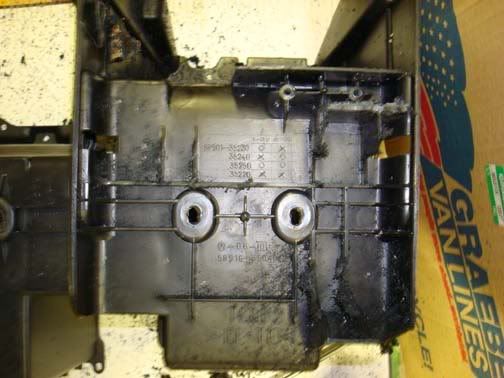
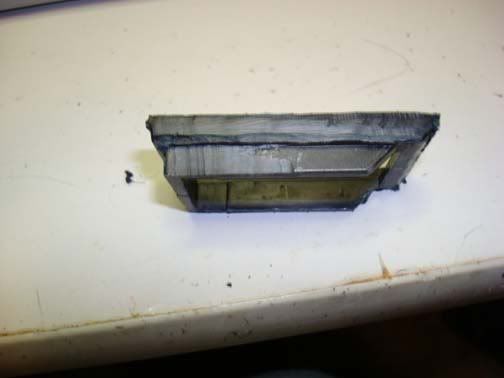
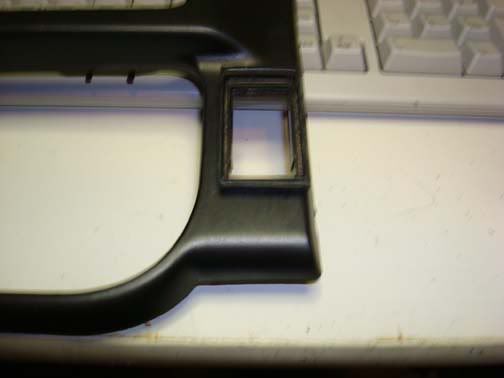
The OEM configuration for the �96-�98 had 4 locations for switches, two on either side of the e-brake.
The underside of the console shows the support fins for the switch mounts. When I removed the switch mounts I trimmed the underside support fins off but in hindsight, I should have left them intact as they are useful to mounting the switches and helping to keep them in place. My mistake will help you!
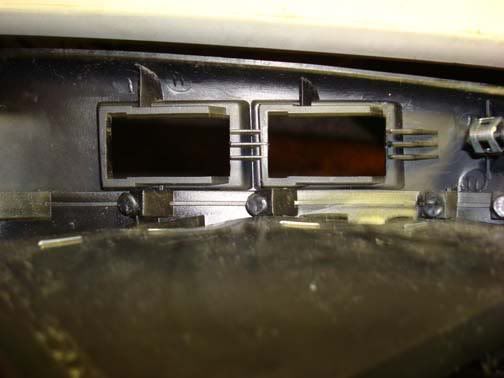
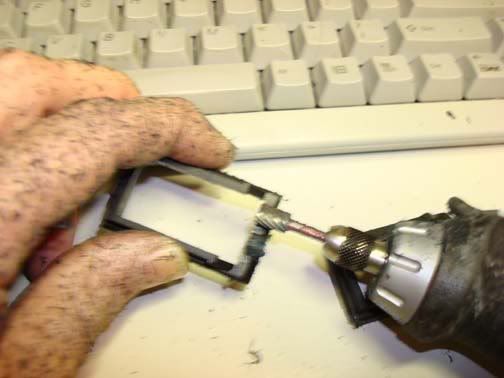
Using a Dremel tool with a metal cutting wheel, I begin by cutting the outer edge of the switch mounts. Leave about an 1/8th of an inch around the mount until you free the mounts from the console.
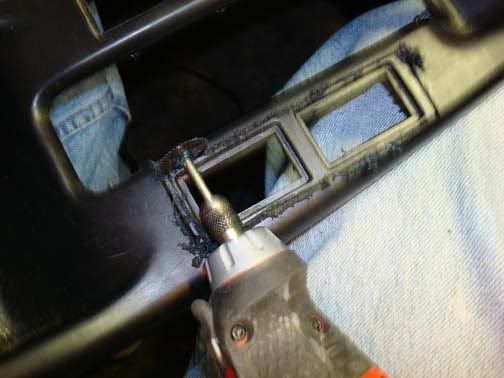
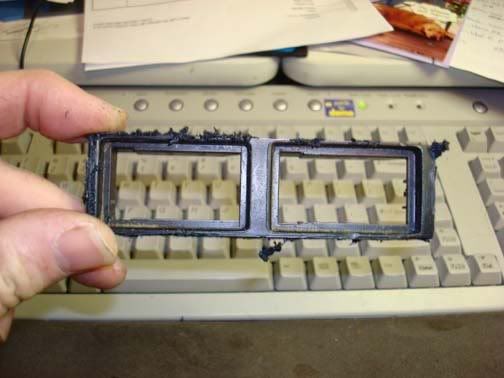
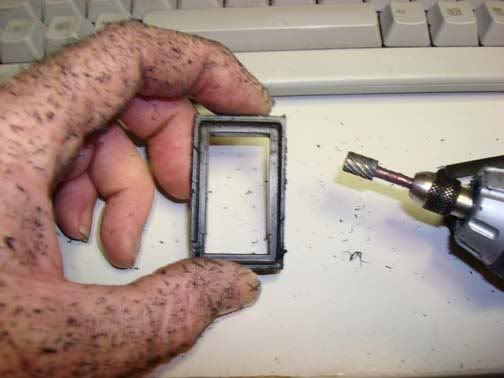
Separate the mounts into individual mounts and trim the edges.
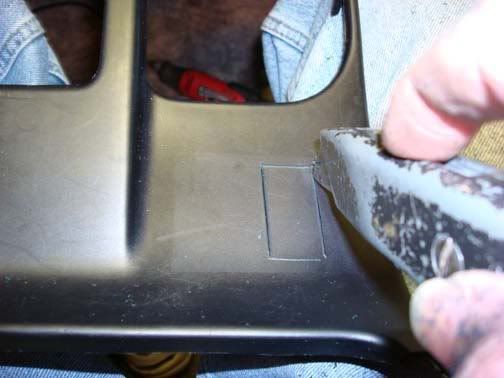
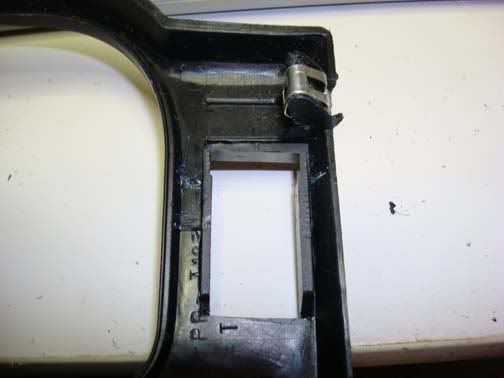
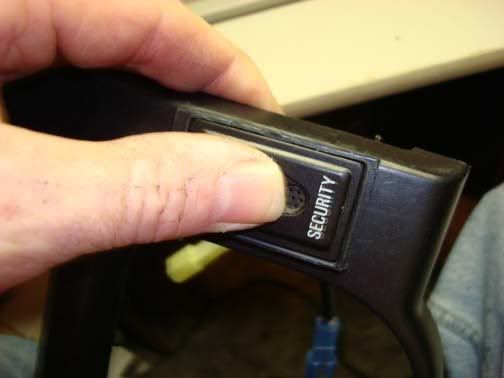
I needed to mount three switches in my shifter bezel, the Toyota Security Indicator, the ECT switch and the Rear Window switch. The two actual switches were the challenge. The longest being the ECT. There are several locations that these would look really cool on the shifter bezel but you need to remember that there are mechanical impedances along with wiring under that bezel and space is minimal. Check clearances carefully. I finally ended up with the ECT switch near the top left corner, the Security ID sideways in the upper right corner and the window switch near the back edge, also sideways.
The ideal location for the Window switch was going to put it over the snap down of the shifter bezel so I had to move it slightly. Once again, be sure to check for enough clearance BEFORE you cut the holes!
Take the switch mount and lay it in the selected location. Trace out the inside of the switch mount on the bezel. Make this outline again about 1/16th of an inch around the outer edge of your first trace. Using the utility knife, make a scratch mark along the tracing. Continue remarking with the knife until you begin to cut through the plastic.
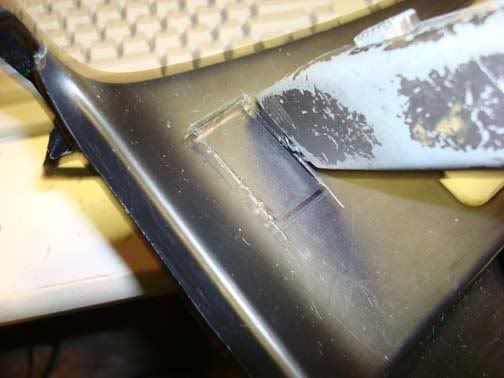
Trim the opening and then trial fit the switch mount.
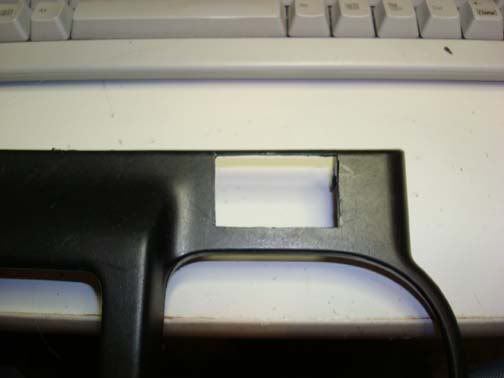
One other thing to remember when you cut out the switch mounts, the switch mounts have notches in them. This is so the switches will mount in one direction. Remember this or you end up trying to shave the switch to make it fit correctly.
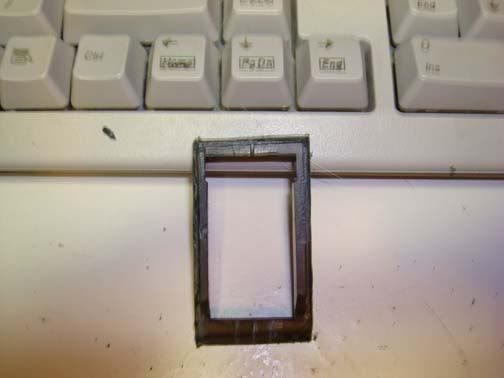
Trail fit the switch to ensure a correct fit. Make adjustments until the switch snaps in to place.
Mark and cut out the remaining opening for as many switches ad you need to mount or can fit into the shifter bezel. I had to use a plastic adhesive to hold the switch mounts in place. I attribute this to removing the switch mount support fins during the cut out phase. If you leave some of the fins, the switches may snap in completely all around and hold the mounts in place. I just didn�t want to have them popping loose at the wrong time, so securing them with adhesive is recommended. Set this aside for at least 12 hours or at least overnight.
When mounting the ECT switch in the upper left location, I had to remove a plastic cover mounting which was where two connectors were located and fixed in place to prevent movement under the shifter bezel. The length of the ECT switch necessitated this modification. It was difficult at best removing them which also required removing the mounting clip for another connector. These can be relocated under the bezel to prevent movement and accommodate the switch. You can then move and reattach the connectors using small plastic wire ties. Once you are satisfied with the install of the switches, remove them, slip the shifter bezel over the shifter and 4 WD selector lever, routing the connector wires through their appropriate mount, snap the bezel into position, install the lever knob, attach the connectors to their respective switches, then snap them into position. Test the switches for proper operation and your done!
Hope this helps anyone who is contemplating this mod. I will be happy to answer any questions you may have. Enjoy!
Next you will need to separate the wire bundles. Toyota usually binds them in plastic sleeves and wire ties. Once again you need to decide how you are going to route your wires for the switches. Find the wire ties and using the diagonal pliers, cut the wire ties off. Be careful not to cut your wires!
Now begins some serious modification. Using both the old console and the new console, you will need to mark the edges of the new console with the base edge outline of the old console. There are differences between the contours. Lay the old console against the side of the new one. Line up the top edges and ends of the two. You will see the �99+ will be taller then the flight 1 console. You may need some assistance with holding the two together. Use a marker and trace the bottom edge of the old console. Do this to both sides. They should be very similar.
Now you will be at the point of �no return�. Using the jig saw with a medium tooth blade, cut the edges off both sides and trim up using your utility knife leaving a nice clean edge.
Remove the console bucket from the console as you will be doing some modifications to the support ribbing so it will fit over the center hump and allow you to secure it in place. Here is what they look like next to each other.
As you can see the two buckets are different in both size and construction.
There are numerous support fins along the bottom of the bucket. You will need to identify the ones that impair the placing of the console on the center hump. What I did was to mount the new center bracket and then use the console bucket and line it up with the mounting holes. You can see where you need to trim away plastic fins in order for the assembled console to mount properly. Just take your time and trim away all obstructive flanges and fins.
Once you have a completed bucket reinstall it in the console. Next we are going to begin the mod of the old center console switch mounts for placement in the shifter bezel.
The OEM configuration for the �96-�98 had 4 locations for switches, two on either side of the e-brake.
The underside of the console shows the support fins for the switch mounts. When I removed the switch mounts I trimmed the underside support fins off but in hindsight, I should have left them intact as they are useful to mounting the switches and helping to keep them in place. My mistake will help you!
Using a Dremel tool with a metal cutting wheel, I begin by cutting the outer edge of the switch mounts. Leave about an 1/8th of an inch around the mount until you free the mounts from the console.
Separate the mounts into individual mounts and trim the edges.
I needed to mount three switches in my shifter bezel, the Toyota Security Indicator, the ECT switch and the Rear Window switch. The two actual switches were the challenge. The longest being the ECT. There are several locations that these would look really cool on the shifter bezel but you need to remember that there are mechanical impedances along with wiring under that bezel and space is minimal. Check clearances carefully. I finally ended up with the ECT switch near the top left corner, the Security ID sideways in the upper right corner and the window switch near the back edge, also sideways.
The ideal location for the Window switch was going to put it over the snap down of the shifter bezel so I had to move it slightly. Once again, be sure to check for enough clearance BEFORE you cut the holes!
Take the switch mount and lay it in the selected location. Trace out the inside of the switch mount on the bezel. Make this outline again about 1/16th of an inch around the outer edge of your first trace. Using the utility knife, make a scratch mark along the tracing. Continue remarking with the knife until you begin to cut through the plastic.
Trim the opening and then trial fit the switch mount.
One other thing to remember when you cut out the switch mounts, the switch mounts have notches in them. This is so the switches will mount in one direction. Remember this or you end up trying to shave the switch to make it fit correctly.
Trail fit the switch to ensure a correct fit. Make adjustments until the switch snaps in to place.
Mark and cut out the remaining opening for as many switches ad you need to mount or can fit into the shifter bezel. I had to use a plastic adhesive to hold the switch mounts in place. I attribute this to removing the switch mount support fins during the cut out phase. If you leave some of the fins, the switches may snap in completely all around and hold the mounts in place. I just didn�t want to have them popping loose at the wrong time, so securing them with adhesive is recommended. Set this aside for at least 12 hours or at least overnight.
When mounting the ECT switch in the upper left location, I had to remove a plastic cover mounting which was where two connectors were located and fixed in place to prevent movement under the shifter bezel. The length of the ECT switch necessitated this modification. It was difficult at best removing them which also required removing the mounting clip for another connector. These can be relocated under the bezel to prevent movement and accommodate the switch. You can then move and reattach the connectors using small plastic wire ties. Once you are satisfied with the install of the switches, remove them, slip the shifter bezel over the shifter and 4 WD selector lever, routing the connector wires through their appropriate mount, snap the bezel into position, install the lever knob, attach the connectors to their respective switches, then snap them into position. Test the switches for proper operation and your done!
Hope this helps anyone who is contemplating this mod. I will be happy to answer any questions you may have. Enjoy!
 .
.
Trending Topics
01-05-2008, 09:00 AM
#9
Registered User
Join Date: Dec 2007
Location: Chattanooga, TN
Posts: 64
Likes: 0
Received 0 Likes
on
0 Posts

 01-05-2008, 11:01 AM
#11
Registered User
Join Date: Apr 2007
Location: San Diego, CA
Posts: 366
Likes: 0
Received 0 Likes
on
0 Posts
FYI, I had to do NO trimming on my car with the rear heat option. Yes, it raised the center console in the back (towards the back seats) by about an inch but it fits perfectly otherwise. There are no gaps anywhere and I actually like the higher height. The only thing I had to do was cut holes in the bottom of the storage area for the bolts to go back in. This was only because I didn't have the 99+ bracket.
01-06-2008, 07:30 PM
#12
Trimming the edge of the 99+ console does make for a better fit and puts the entire console level and at the same height as it was originally designed. It also allows the installation of the center bin with the OEM screws when you use the 99+ bracket in place of the 96-98 bracket. This way you get a perfect no mod, no drilling fit. All you have to do is unbolt the old bracket and using the same mounting bolts just bolt up the new bracket. Put the new console in place as described in my write up and its done, perfect fit and you don't have to worry about proper fitting of the new console bin by having to drill new mounting holes. Also if you drill out the bin for mounting the console to the bracket, you risk having it crack and break loose as the OEM fitment is designed to be strong using the moulded mounting holes.

Thread
Thread Starter
Forum
Replies
Last Post
TheBFA
Solid Axle Swaps, All Years
8
02-15-2020 06:55 AM


