
 03-30-2016, 11:17 AM
Last edit by: IB Advertising
See related guides and technical advice from our community experts:
- Toyota Tacoma How to Replace Oxygen O2 Sensors<br>Step by step intructions for do-it-yourself repairs.

Changing Oxygen Sensor when nuts are rusted
11-22-2009, 07:26 AM
#1
Registered User
Thread Starter

Join Date: Nov 2009
Posts: 6
Likes: 0
Received 0 Likes
on
0 Posts
Changing Oxygen Sensor when nuts are rusted
This is a simple post on changing your O2 sensor when you look at the nuts and wonder....how in the world am I going to get those off!!! lol This job was done on a 1997 4 Runner SR5. These instructions can be used for either sensor. For those who don't know where an O2 sensor is located, crawl under your vehicle under the front passenger side door and find your exhaust pipe. You will see the catalytic converter on the exhaust. It has a heat shield on the bottom of it with holes all over it. On either side of the converter you will have an O2 sensor. (Look for wires going to the exhaust pipe) The upstream sensor (Bank 1 Sensor 1) is toward the front of vehicle. The downstream sensor (Bank 1 Sensor 2) is toward the back.
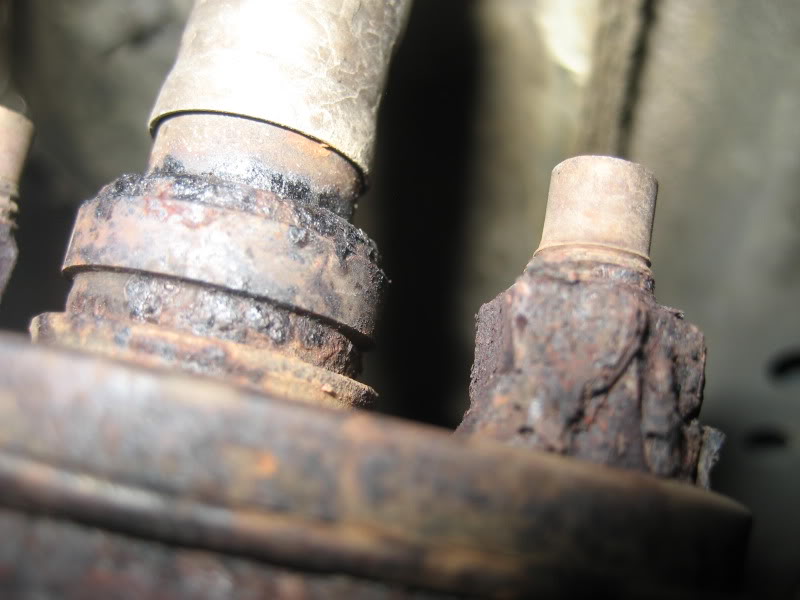
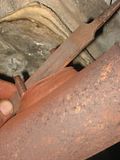
These are sooo rusted you can actually see the threads of the bolt stud.
First off, I recommend soaking the nuts in some sort of penetrating oil for at least 15 minutes. I used PB Blaster. It works extremely well. Then I used a small pair of vice grips and gently but firmly locked onto the nut and slowly removed it.
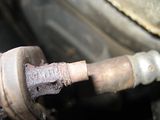
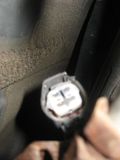
After you remove it, it's time to unplug it. There is a push tab on the back of the plug attatched to the vehicle. Just push it firmly and pull. You might use a small set of pliers here to make sure you're pushing it hard enough. Mine came out without pliers though.
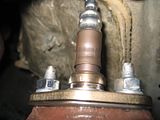
Once you get the O2 sensor off you can then start cleaning the surface area that the new sensor gasket mates to. You will have to remove ALL of the old sensor gasket which will more than likely be rusted to the mounting surface. I used a paint scraper to scrape it. I also used a wire brush and metal file to remove the old gasket. This is the most time consuming (at least for me) part of the job. It took me about an hour. I wanted to make sure I had a smooth mounting surface.
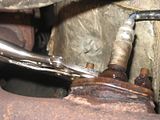
If you stick your finger into the O2 hole it should feel smooth and you shouldn't feel a lip around the hole. The mounting surface should be completely flat. You have to use your finger feel the mounting surface because you can't see it that well. A small sharp chisel would work well here but I didn't have one so I improvised with a small dull knife. Once you are happy with your mounting surface you should clean the threads of the mounting posts with a thread cutter. M8x1.25 is the thread count and size. You will need this when you buy the replacement nuts and lock washers. After I was satisfied with the mounting surface I cleaned it with a rag soaked in Isopropyl Alcohol (rubbing alcohol).

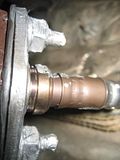
Next just install your new O2 sensor and tighten it down. Make sure you put anti-seize on the studs.
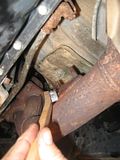
Once you get it installed it's time to plug it back in. I used some dielectric grease and kinda forced it into the female plug holes just for good measure.
Once it is plugged in, if you didn't buy stainless nuts, I would recommend coating your new nuts and washers with the anti-seize to help keep them from rusting.
And there you have it! If you were changing it due to a thrown code, your engine light will go out after a few miles of driving! Hope this helped!! And finally, here is a pic of the nut I removed;
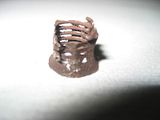
These are sooo rusted you can actually see the threads of the bolt stud.

First off, I recommend soaking the nuts in some sort of penetrating oil for at least 15 minutes. I used PB Blaster. It works extremely well. Then I used a small pair of vice grips and gently but firmly locked onto the nut and slowly removed it.

After you remove it, it's time to unplug it. There is a push tab on the back of the plug attatched to the vehicle. Just push it firmly and pull. You might use a small set of pliers here to make sure you're pushing it hard enough. Mine came out without pliers though.
Once you get the O2 sensor off you can then start cleaning the surface area that the new sensor gasket mates to. You will have to remove ALL of the old sensor gasket which will more than likely be rusted to the mounting surface. I used a paint scraper to scrape it. I also used a wire brush and metal file to remove the old gasket. This is the most time consuming (at least for me) part of the job. It took me about an hour. I wanted to make sure I had a smooth mounting surface.


If you stick your finger into the O2 hole it should feel smooth and you shouldn't feel a lip around the hole. The mounting surface should be completely flat. You have to use your finger feel the mounting surface because you can't see it that well. A small sharp chisel would work well here but I didn't have one so I improvised with a small dull knife. Once you are happy with your mounting surface you should clean the threads of the mounting posts with a thread cutter. M8x1.25 is the thread count and size. You will need this when you buy the replacement nuts and lock washers. After I was satisfied with the mounting surface I cleaned it with a rag soaked in Isopropyl Alcohol (rubbing alcohol).

Next just install your new O2 sensor and tighten it down. Make sure you put anti-seize on the studs.

Once you get it installed it's time to plug it back in. I used some dielectric grease and kinda forced it into the female plug holes just for good measure.

Once it is plugged in, if you didn't buy stainless nuts, I would recommend coating your new nuts and washers with the anti-seize to help keep them from rusting.

And there you have it! If you were changing it due to a thrown code, your engine light will go out after a few miles of driving! Hope this helped!! And finally, here is a pic of the nut I removed;

 11-23-2009, 03:57 PM
#7
Registered User
Thread Starter
Join Date: Nov 2009
Posts: 6
Likes: 0
Received 0 Likes
on
0 Posts
Yeah...Factory lock nuts might be better but these nuts were factory lock nuts I took off...lol! Just wanted to add, I purchased my Denso O2 sensors from Amazon.com and that was the cheapest I could find. I got my rear for $84.33 and front $64.83 shipped. Not to shabby!!! Hope you all enjoyed the writeup....more to come! U-Joints next!!!
Last edited by rjkjoe; 11-23-2009 at 04:17 PM.
Trending Topics
11-24-2009, 05:27 AM
#8
Contributing Member


BTW the fastener industry does make stainless steel locknuts too for you guys in the rust belt.
 They might be a little hard to find though. If you use regular nuts with lockwashers make sure you check them down the road for tightness. A good engineer I used to work with that had experience with the Penske racing team once told me lock washers do nothing, but I don't know, they might help some. There is lots of extra movement with exhaust fasteners because of the extreme temp swings (outside temp to maybe 1200 F and back again, once or twice a day)
Last edited by mt_goat; 11-24-2009 at 05:34 AM.
11-24-2009, 07:14 AM
#9
Registered User
You don't get it. Leave the anti-seize off and corrosion sets in the first winter and locks it better than any stinkin' lockwasher or lock nuts. Then, when it's time to change, just squeeze those nuts with your pliers and they crumble right off. Piece of cake. Why do you think the factory avoids any use of anti-sieze? Get with the modern application of Japanese fastener technology. It called Fastener Regulation Assisted by Corrosion--FRAC.
11-24-2009, 07:54 AM
#10
Registered User
fyi: if you can't be bothered to deal with this, my local muffler shop charged me a half hour labor, $45 to torch and bust off the old nuts, clean up the threads, and drop in the new O2. i had the one for a 95, not an 88, so i had to splice in the 4 wires and heat shrink'em myself.
11-26-2009, 04:29 AM
#11
Registered User

Join Date: Nov 2009
Location: Virginia
Posts: 1
Likes: 0
Received 0 Likes
on
0 Posts
Great write up
Outstanding write up. I replaced my forward sensor on my 1997 4Runner last night. Both nuts were severely corroded, but with a shot of PB Blaster and a mini torch to heat them up, the vice grips made some headway and I was able to replace the nuts with new ones from the dealer ($3 per nut). I even replaced the nuts to the rear oxygen sensor (sensor 2/bank 2) to make a change out easier in the future.
Anti-seize and dielectric grease --- modern marvels.
Thanks!
Anti-seize and dielectric grease --- modern marvels.
Thanks!
04-25-2010, 02:44 PM
#12
Registered User

Join Date: Apr 2009
Posts: 4
Likes: 0
Received 0 Likes
on
0 Posts
Excellent explanation.
I'm printing it out to help me replace the rear sensor on our 97 4Runner. Thanks too for the nut sizes - I'm picking them up before splitting off the old ones.
Thanks very much for the fine effort!
I'm printing it out to help me replace the rear sensor on our 97 4Runner. Thanks too for the nut sizes - I'm picking them up before splitting off the old ones.
Thanks very much for the fine effort!
04-26-2010, 05:01 PM
#13
Registered User
Were you looking over my shoulder and taking notes yesterday when I did mine? Oh wait, I guess not, this is an old post. You described it perfectly though. The 12mm nuts were so degraded I was able to drive an old 8mm socket over them and back them off. I replaced them with some stainless steel nylock nuts which I picked up from a local marine store. A most excellent and detailed writeup though. Well done!
04-26-2010, 06:25 PM
#14
Registered User
Thread Starter
Join Date: Nov 2009
Posts: 6
Likes: 0
Received 0 Likes
on
0 Posts
Thanks for your compliments. I have a suggestion for using nylock nuts for this application. I would be afraid the heat from the exhaust would melt the nylon from the nuts and render them useless. You may want to check them in a week or so! Just a thought!
04-27-2010, 09:34 AM
#16
You don't get it. Leave the anti-seize off and corrosion sets in the first winter and locks it better than any stinkin' lockwasher or lock nuts. Then, when it's time to change, just squeeze those nuts with your pliers and they crumble right off. Piece of cake. Why do you think the factory avoids any use of anti-sieze? Get with the modern application of Japanese fastener technology. It called Fastener Regulation Assisted by Corrosion--FRAC.
the O2 sensor or AF sensor has a finite life. and it just so happens to coincide with the most common lifetime of the nuts holding it on.
they are designed to be rendered to dust over time, for lack of better reason. i had to use
a chisel and chip my nuts off.
plus: any use of anti seize compound in that area, so close to the sensor
external air pickups, in such a hot place, 'could' make burn-off vapors skew the ambient air reading.
Last edited by BigBallsMcFalls; 04-27-2010 at 09:35 AM.
04-27-2010, 09:51 AM
#17
Contributing Member
Never heard of those, do you have some reference for info on that? The calibration that I've done on wide band sensors required you to have ambient air inside the exhaust pipe or to remove the sensor for calibration, there were no external air pickups.
Last edited by mt_goat; 04-27-2010 at 10:02 AM.
04-27-2010, 02:15 PM
#18
all o2 or a/f sensors need to sample clean air,
It operates by measuring the difference in oxygen between the exhaust gas and the external air
see those holes on the outside ? those are for outside air. some sensors
suck it in via the gap in wire insulation.
http://www.sjmautotechnik.com/troubl...ic/o2const.jpg
it is also why fording streams can kill an o2 or a/f sensor if they
don't dry out correctly or get mud caked on them
Last edited by BigBallsMcFalls; 04-27-2010 at 02:22 PM.
04-27-2010, 05:19 PM
#19
Contributing Member
huh ? google how o2 sensors work.
all o2 or a/f sensors need to sample clean air,
It operates by measuring the difference in oxygen between the exhaust gas and the external air
see those holes on the outside ? those are for outside air. some sensors
suck it in via the gap in wire insulation.
http://www.sjmautotechnik.com/troubl...ic/o2const.jpg
it is also why fording streams can kill an o2 or a/f sensor if they
don't dry out correctly or get mud caked on them


