Body Lift Installed *pics*
 04-16-2006, 09:17 AM
#1
Contributing Member
Thread Starter
Join Date: Apr 2004
Location: Charleston, SC
Posts: 309
Likes: 0
Received 0 Likes
on
0 Posts
Body Lift Installed *pics*
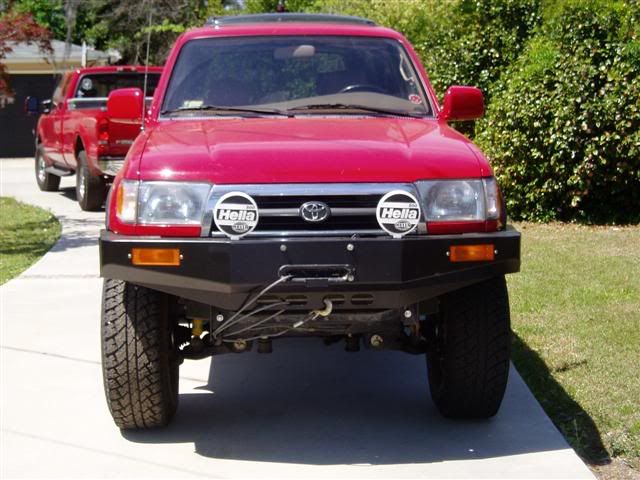
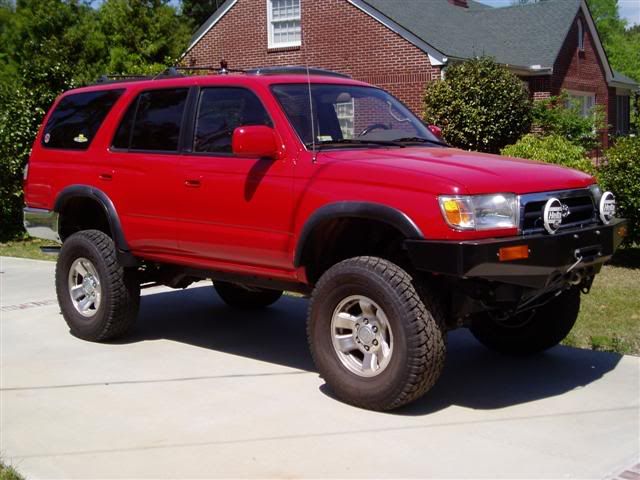
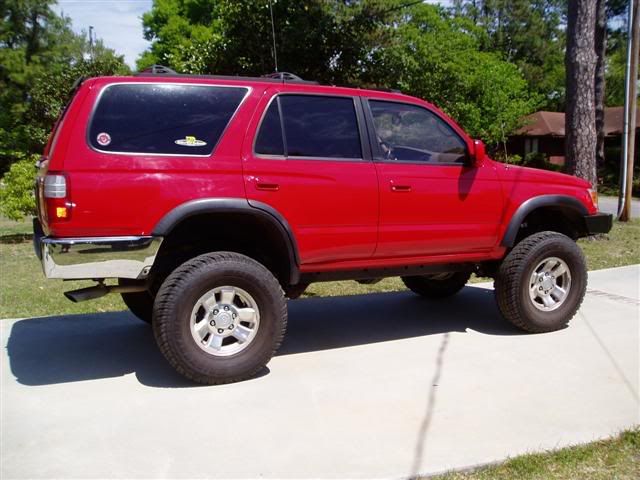
I finally got around to installing my 4Crawler 2" body lift. I want to say thanks to Roger Brown at 4Crawler for a quality product and fast customer service. Now I just need to fill the gaps in the wheel wells and get my exhaust re-routed. I am going to start building my rear bumper this summer, so I am not going to put my hitch back on.
 04-16-2006, 09:23 AM
#2
Registered User
Looks great! Hey, did you torque the hardware? I was just reading on the 4Crawler instructions about 20-30 ft. lbs. and it just doesn't sound like much. I didn't use a torque wrench, but I'm thinking I torqued them down twice that.
04-16-2006, 09:35 AM
#3
Contributing Member
Join Date: Oct 2005
Location: Smoky San Diego
Posts: 2,346
Likes: 0
Received 0 Likes
on
0 Posts
Nice work! You even got your front bumper moved up 
It's interesting that you mention that 4crawler's site says only 20-30 #'s Spindleshanks. I cranked on mine pretty good since the OEM nuts were a PITA to get off.
It's interesting that you mention that 4crawler's site says only 20-30 #'s Spindleshanks. I cranked on mine pretty good since the OEM nuts were a PITA to get off.
04-16-2006, 09:56 AM
#5
Contributing Member
Join Date: Jul 2005
Location: Socal
Posts: 1,963
Likes: 0
Received 0 Likes
on
0 Posts
Nice...
Just a quick question off-topic since your truck is the third 3rd gen I've seen to do this: take off the front and rear mud guards. Why did you do this? It just looks a little off to me since the front and rear mud guards match up to the SR5 flare. The other one I can remember is Northfacer...
Just a quick question off-topic since your truck is the third 3rd gen I've seen to do this: take off the front and rear mud guards. Why did you do this? It just looks a little off to me since the front and rear mud guards match up to the SR5 flare. The other one I can remember is Northfacer...

Trending Topics
04-16-2006, 01:59 PM
#8
Contributing Member
Thread Starter
Join Date: Apr 2004
Location: Charleston, SC
Posts: 309
Likes: 0
Received 0 Likes
on
0 Posts
I did torque them to the specs on his site, better safe than sorry. Yes I did move up the bumper, but I think I am going to redo the brackets with 3/8", I don't think that 3/16" is going to be strong enough with the added height of the brackets. Regarding the mud flaps, I took off the running board and bought the front flaps from a member on here a few years ago. I tore them off last reay when I got the 4Runner stuck at my friends hunt club and just decided to take the rear ones off too because I figured they would eventually get torn off. The install didn't take very long, I'd say not much over an hour with air tools and my little bro helping. Thanks for the comments guys, I have just a little more follow up work to do to getting it looking right.
Last edited by HarrisonP; 04-16-2006 at 02:00 PM.
 04-16-2006, 05:53 PM
#11
Contributing Member
Thread Starter
Join Date: Apr 2004
Location: Charleston, SC
Posts: 309
Likes: 0
Received 0 Likes
on
0 Posts
Yes it is an auto and I did not run into any problems. I just loosened the nut on the shifter linkage before I lifted it up, then once the lift was done I tightened it back up and made sure that it shifted properly. I also have the 9th and 10th body mounts sitting in my garage, but will have to wait until next weekend to put those on (I ran out of time this weekend and all of my friends were back in town for Easter).
04-17-2006, 04:45 AM
#13
Contributing Member
Thread Starter
Join Date: Apr 2004
Location: Charleston, SC
Posts: 309
Likes: 0
Received 0 Likes
on
0 Posts
Actually when I got the 4Runner a few years back the paint was in horrible condition. The guy kept the things in mechanically perfect condition, the paint was the only thing that needed work. I brought it back to life with some rubbing compound and mother's wax, but the clear coat was peeling on the hood. It got so bad that I had it repainted at the beginning of this summer. The guy knew my dad and did the tailgate of the red Superduty in the background, so I got it done pretty cheap. Thanks
04-17-2006, 07:20 AM
#15
Contributing Member
Thread Starter
Join Date: Apr 2004
Location: Charleston, SC
Posts: 309
Likes: 0
Received 0 Likes
on
0 Posts
Originally Posted by SC4Runner
Damn that thing looks big!
 . BTW do you still have the BL on yours?
Last edited by HarrisonP; 04-17-2006 at 07:21 AM.
 04-03-2008, 05:24 PM
#17
Registered User
Join Date: Jan 2008
Posts: 65
Likes: 0
Received 0 Likes
on
0 Posts
How many inches did you lift it with bl. Awesome height....What size of tires on your 4Runner?
4X4snowRunner
1998 4Runner SR5 V6
front suspension:
OME882
OMEn91s
5mm trim spacer
sonoransteel tapered 1" diff. drop
rear suspension:
OME891
OMEn86
5mm trim spacer
sonoransteel adjustable trac/panhard bar
265/75/16 Geolandar i/T
Borla Exhaust System
K&N Drop in Filter
Deck Plate
4X4snowRunner
1998 4Runner SR5 V6
front suspension:
OME882
OMEn91s
5mm trim spacer
sonoransteel tapered 1" diff. drop
rear suspension:
OME891
OMEn86
5mm trim spacer
sonoransteel adjustable trac/panhard bar
265/75/16 Geolandar i/T
Borla Exhaust System
K&N Drop in Filter
Deck Plate
Last edited by 4X4snowRunner; 04-03-2008 at 05:27 PM.


