Another HID Bi-xenon Retrofit Install *PICS*
 08-18-2008, 07:40 AM
#1
A big thanks to Pdyebrasil for giving me yet another reason to blow more money on my 4Runner  (He was the first guy I saw do this mod to a 4Runner). Also, a big thanks to Pfdaxe for answering all the emails I sent him every time I ran into a snag. For more information on what they both did, check out this link: Click Me.
Oh and for more information on yet another FX Projector Retrofit I came across, check out WeCool.net: Click Me
For my own install, I followed Pfdaxe’s retrofit very closely. Here’s what I used:
Infiniti FX Bi-xenon Projectors
Acura TSX Lenses
Hella Gen 3 Ballasts
35W 4300K Philip D2S 85122+ Bulbs
H4 Plug-n-Play Wiring Kit -(ebay special)
Malibu Light Covers
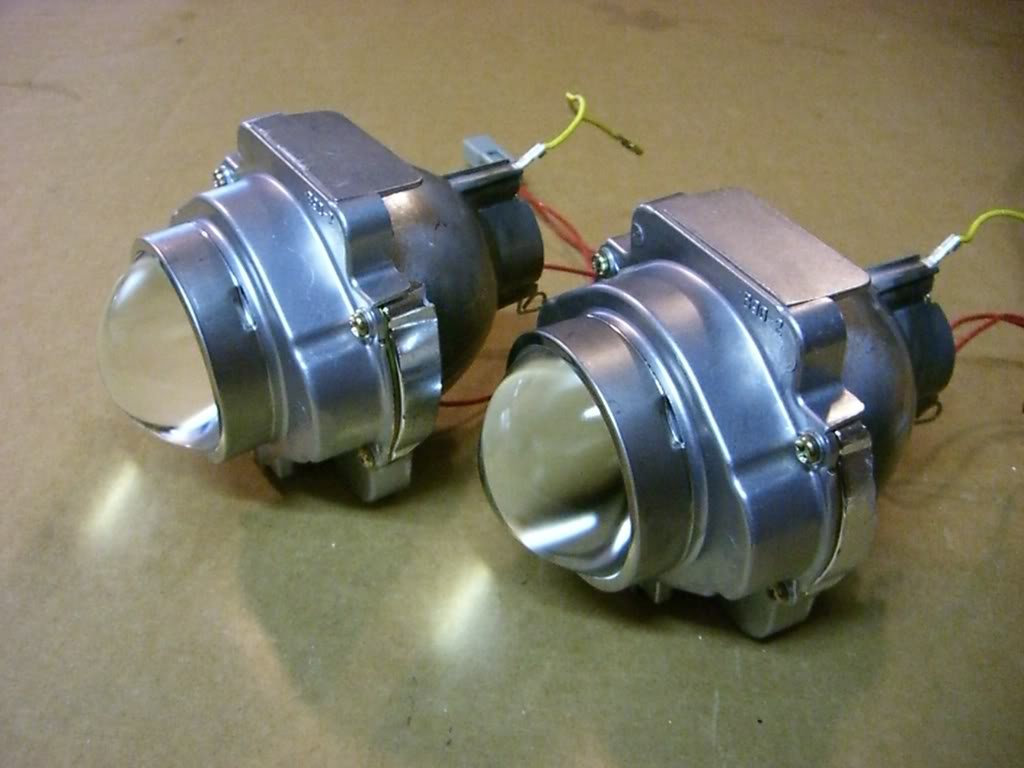
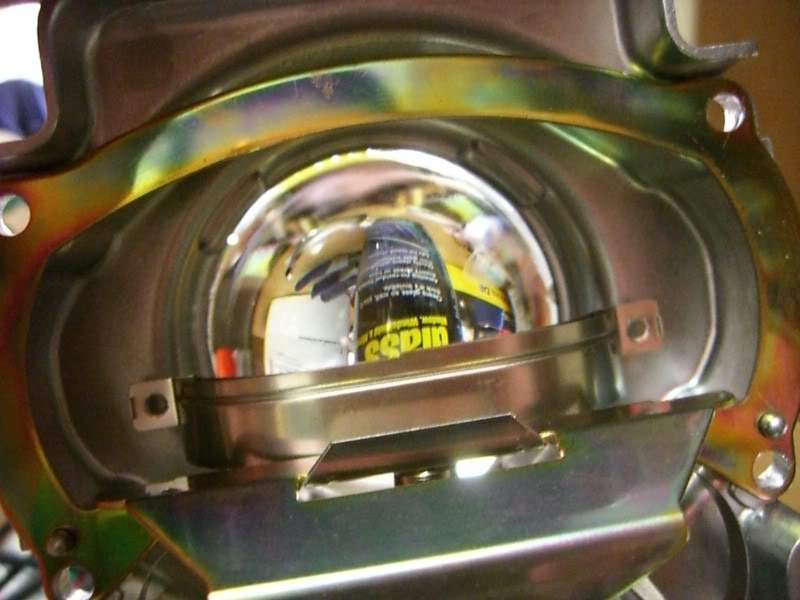
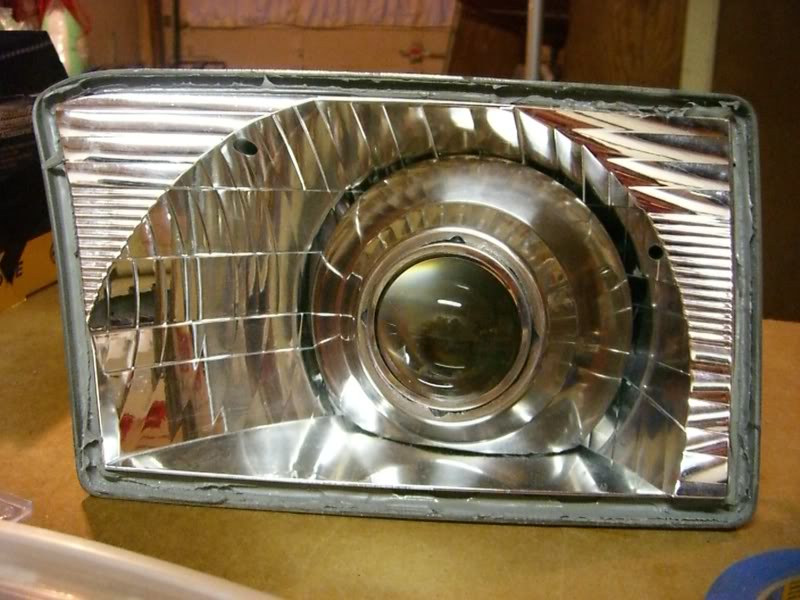
Stock Infiniti FX Bi-xenon Projectors:
Note, the yellow wires are not used.
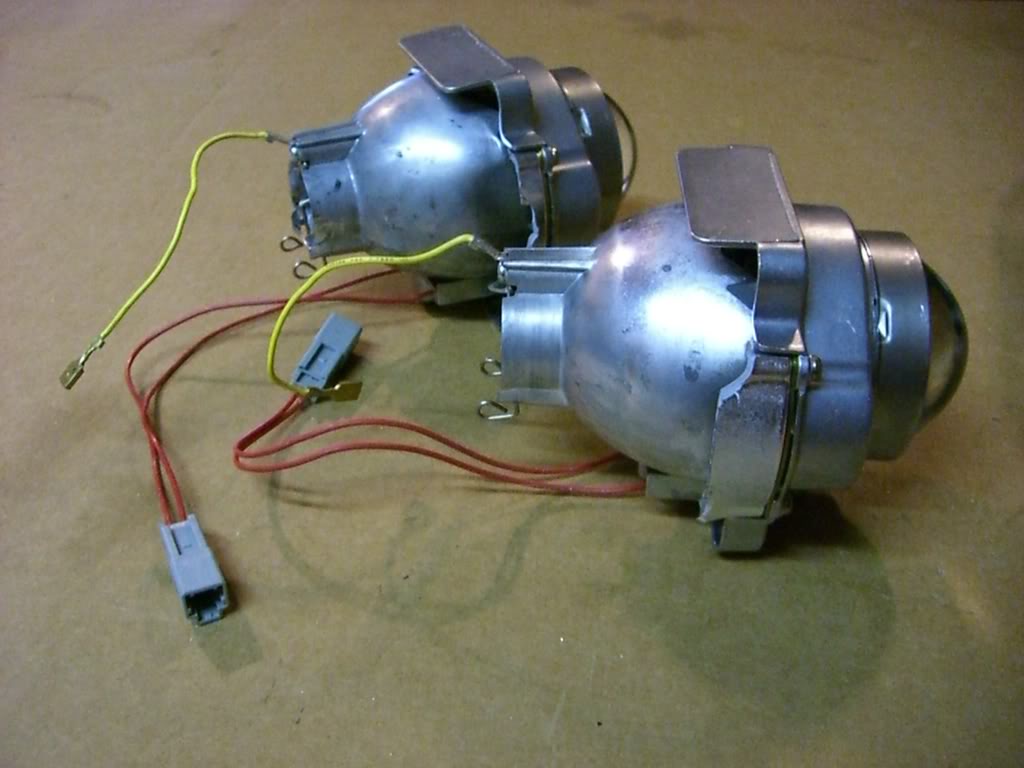
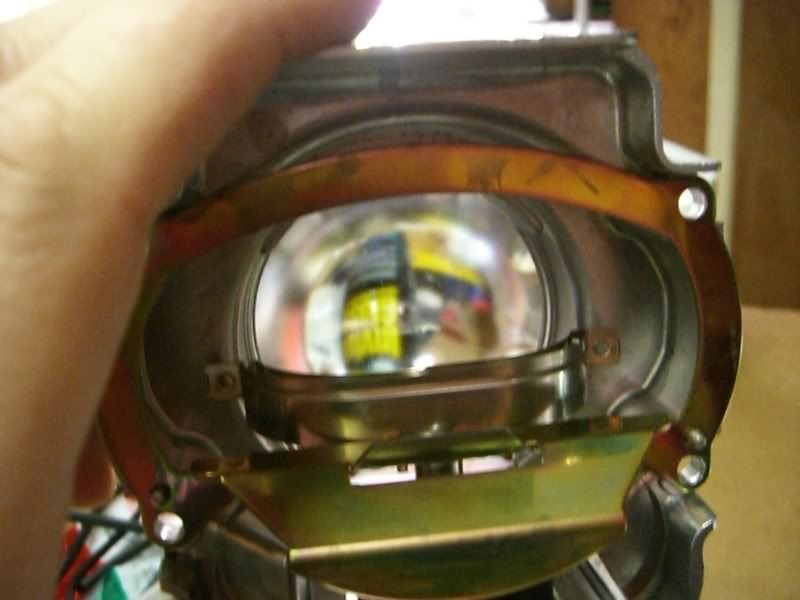
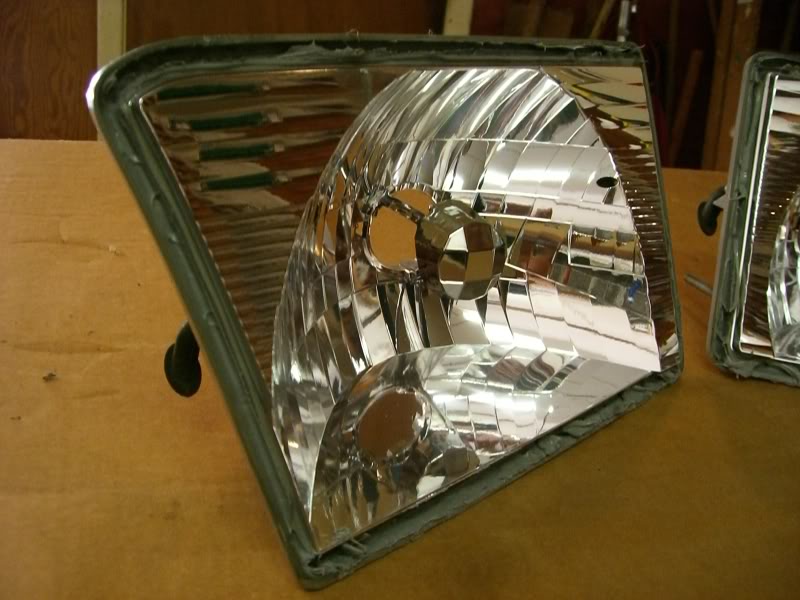
FX Lenses Removed:
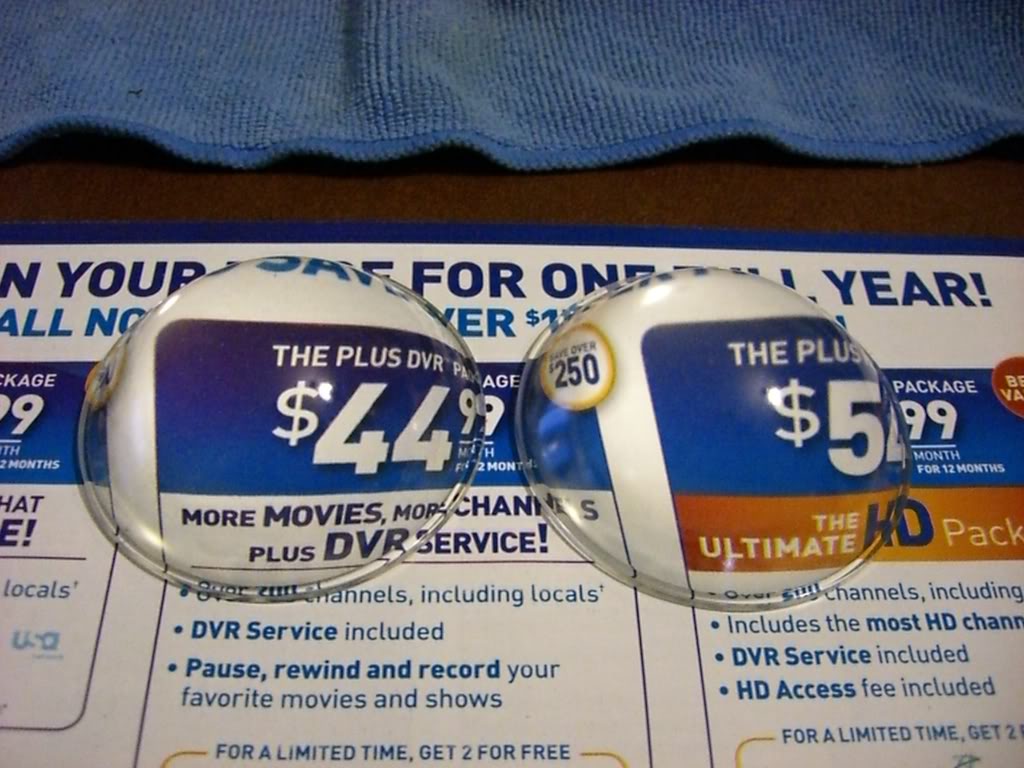
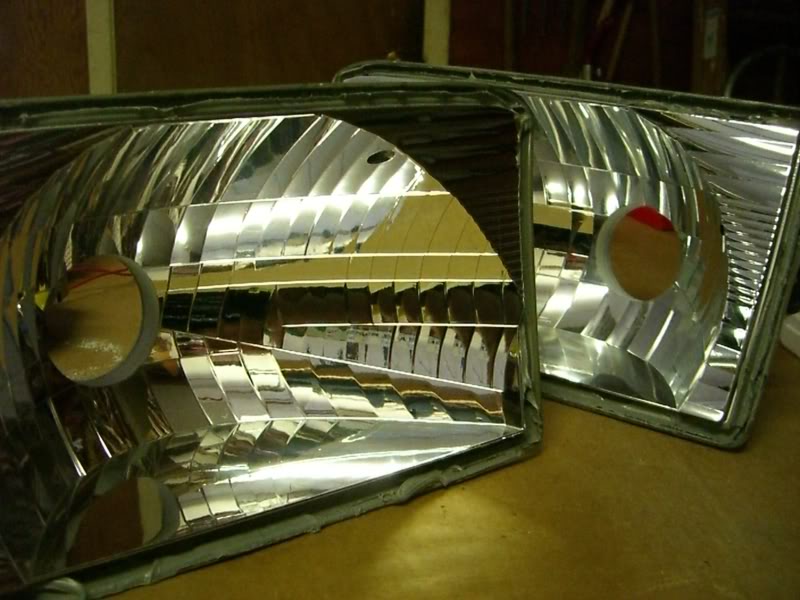
The above lenses appear very clear, but looks can be deceiving. So I purchased a set of stock Acura TSX Single Beam Projectors strictly for their truly clear lenses.
I then removed the TSX lenses and installed them into the FX Projectors. Although, the FX lenses I already had were considered the “clear” version by market standards (as seen in the picture above), when compared to that of the TSX lenses, the FX lenses left very little to be desired. The TSX lenses are so incredibly clear, that they make the FX lenses look like crap. Here are a few comparison shots of the FX and TSX lenses:
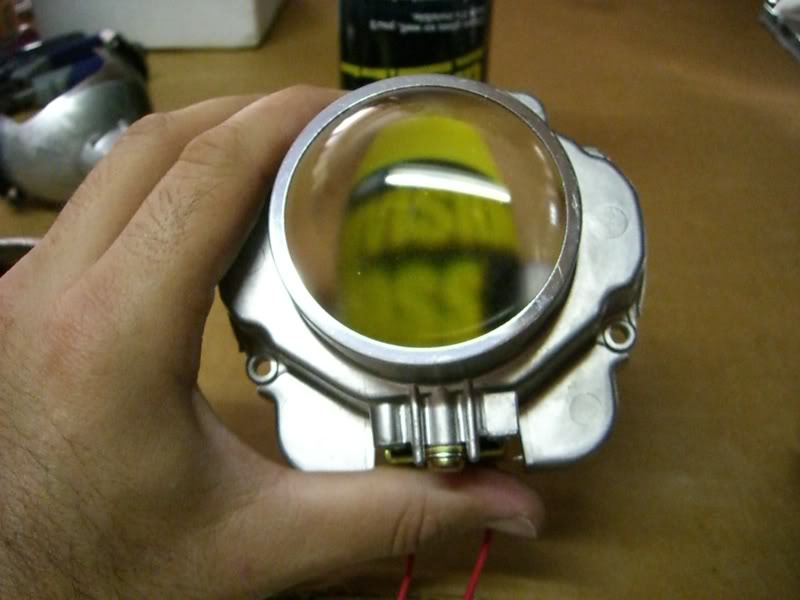
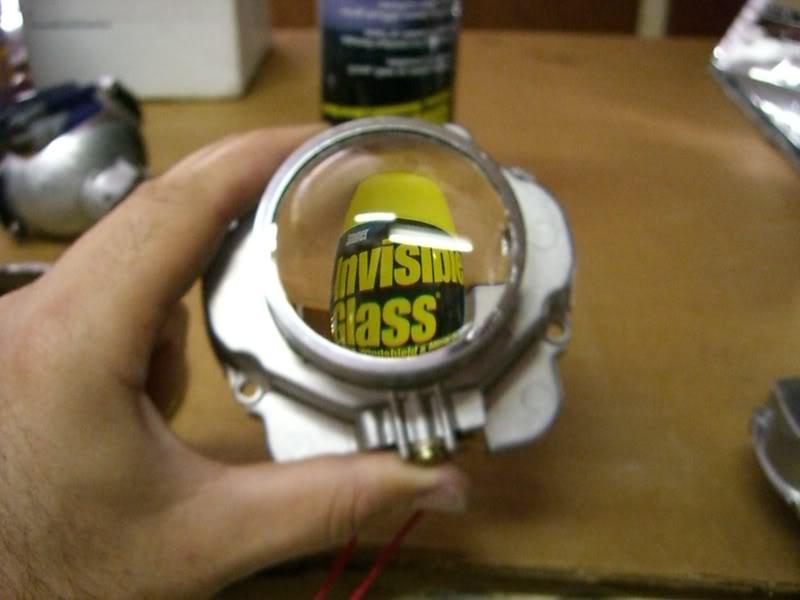
FX vs. TSX Lenses installed in FX Projectors:
FX vs. TSX Lenses installed in FX Projectors:
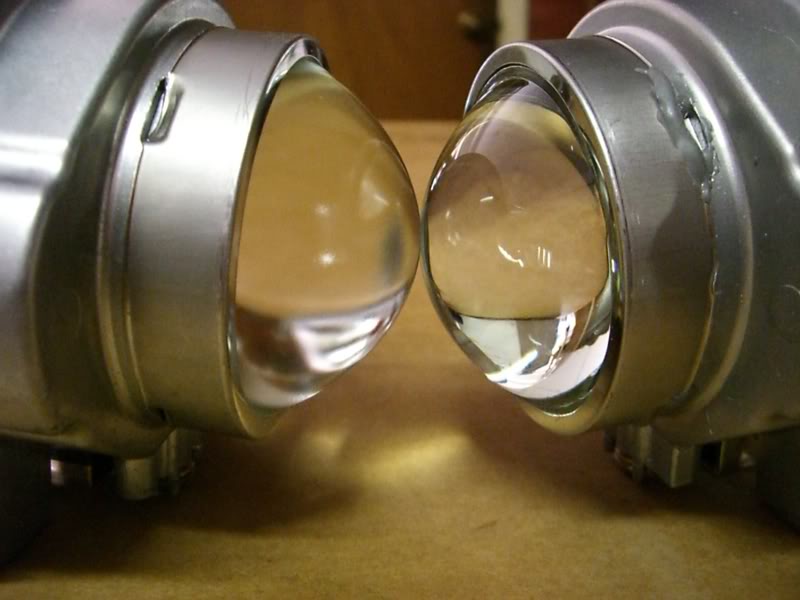
1st Comparison Shot:
FX:
TSX:
2nd Comparison Shot:
FX:
TSX:
I obtained both the pair of 35W 4300K Philip D2S 85122+ bulbs and Hella Gen3 Ballasts from YT member Pfdaxe. As for the PnP Wiring Kit, I purchased it directly from Ebay. It came with all the necessary wiring to retain proper function of my high beams with the newly installed FX projectors.
I attempted the Color O-ring Mod, but had mixed results. I simply could not find a large enough gasket to make this mod worth my time. So I scrapped it and moved on. For those interested in this Mod, visit HID Planet: Click Me
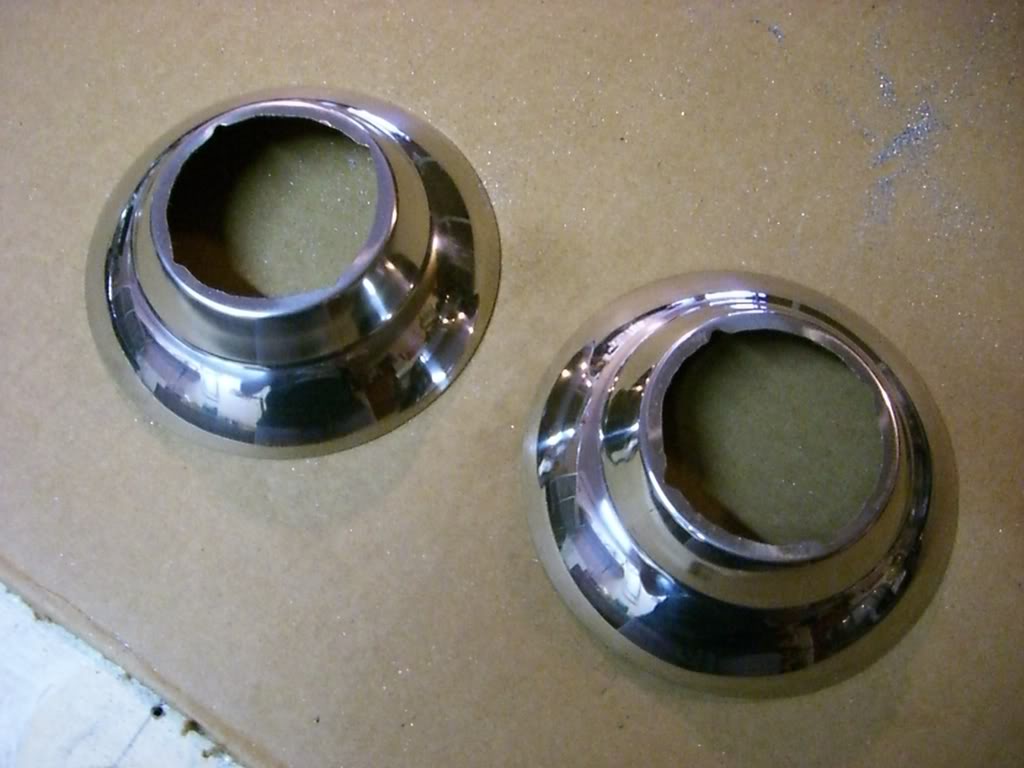
For the Malibu Light Covers, I went with Intermatic.com. I found that while they do not sell the entire Malibu light itself, they do offer individual replacement parts for it. (Which was great, considering I only needed the covers anyway.)
Stock Photo of the Entire Malibu Light:
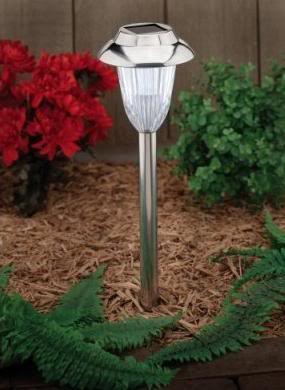
The Product Number for the entire light above is – LZ512SS found here: www.intermaticstore.com
Once you are there, click the "Parts" Tab at the bottom of the page. The first item in the list should be:
Light cover itself: Item # LZ512SSA
Description: SOLAR TOP-WHITE LED-INCLUDES BATTERY
Price per Cover: $6.25
I ordered 4 of these light covers (two extra in case I screwed the other 2 up) and had them at sitting at my front door in 3 days.
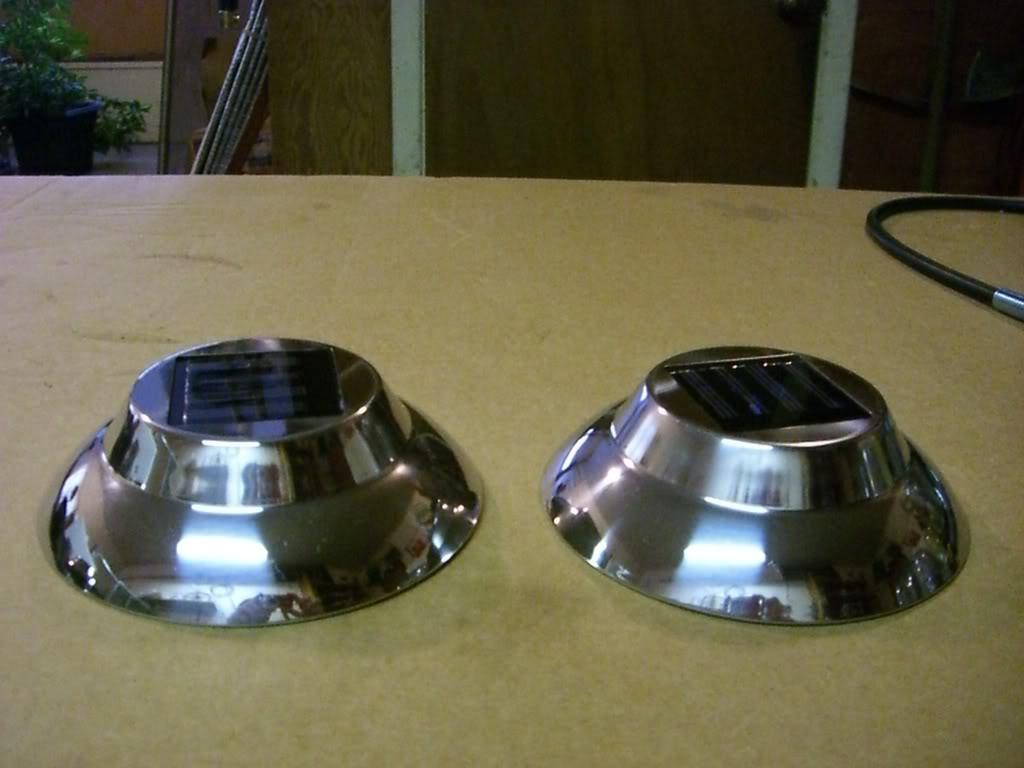
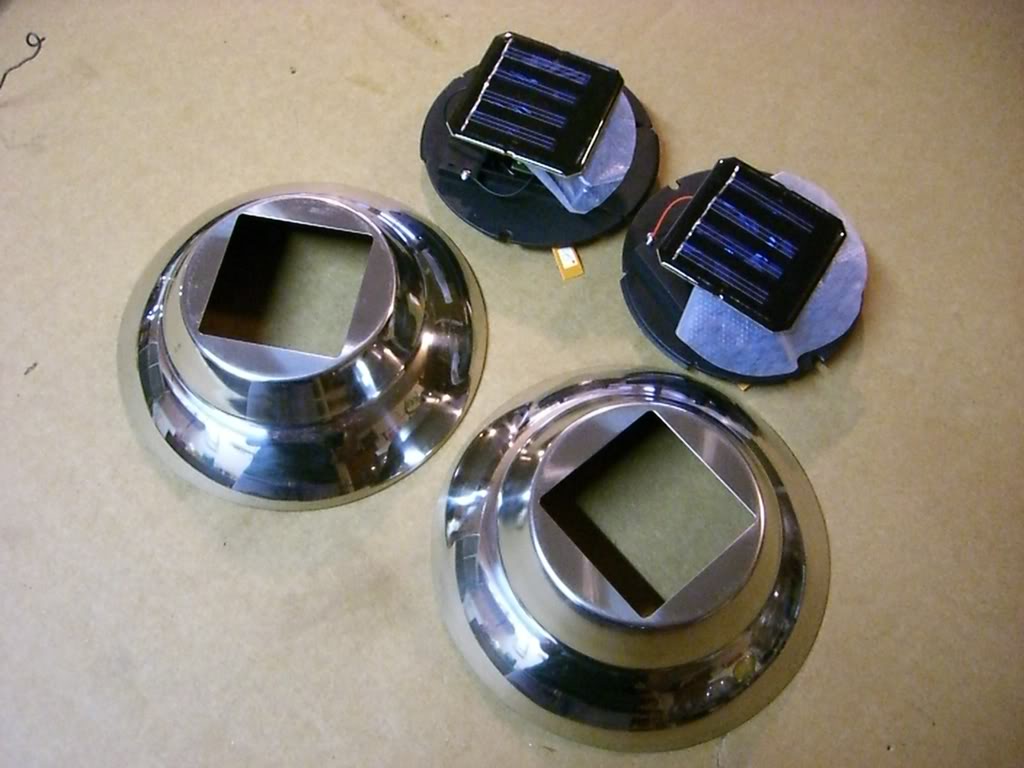
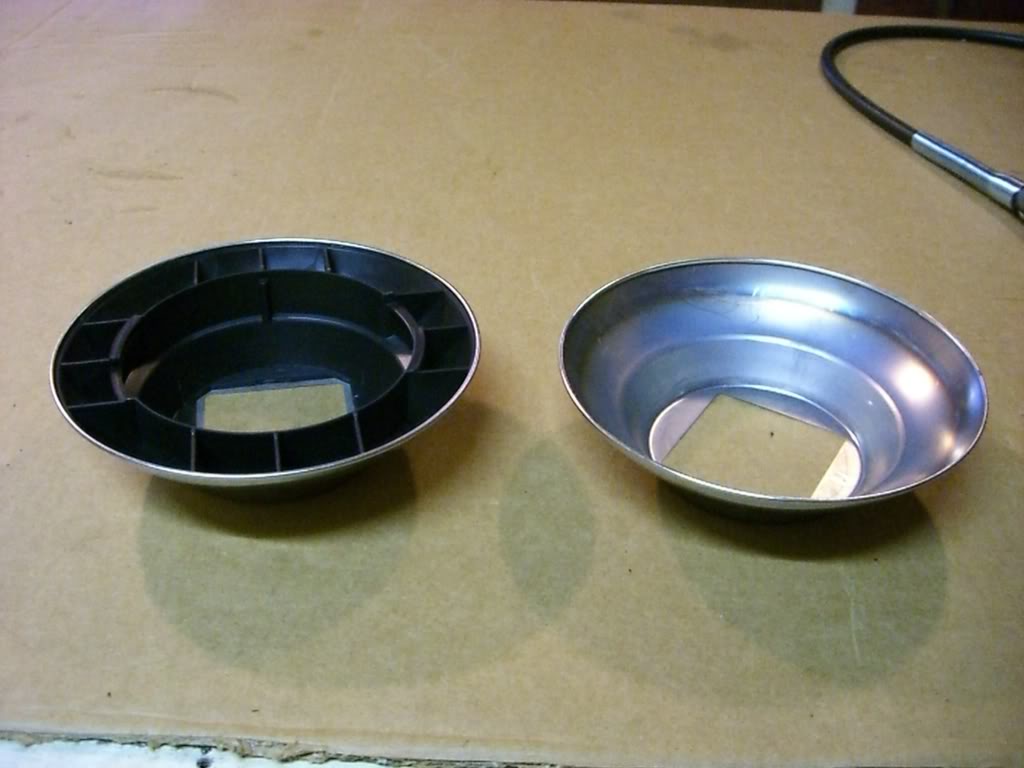
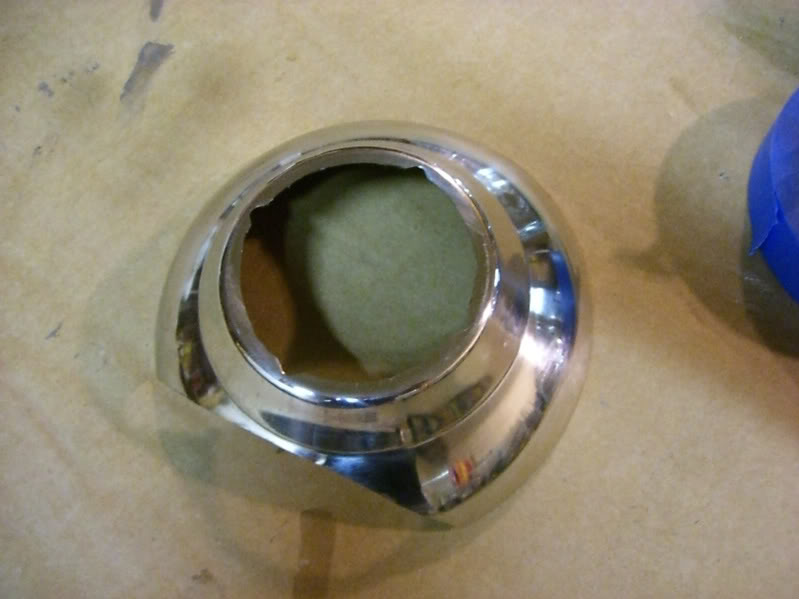
Here’s the process I took to convert the Malibu covers into Projector Shrouds:

I also purchased a 2nd pair of oem headlights to use in my 4Runner while I completed this retrofit on my existing headlights. Once I finished the retrofit, I swapped in my newly modified projector headlights and sold the donor lights.
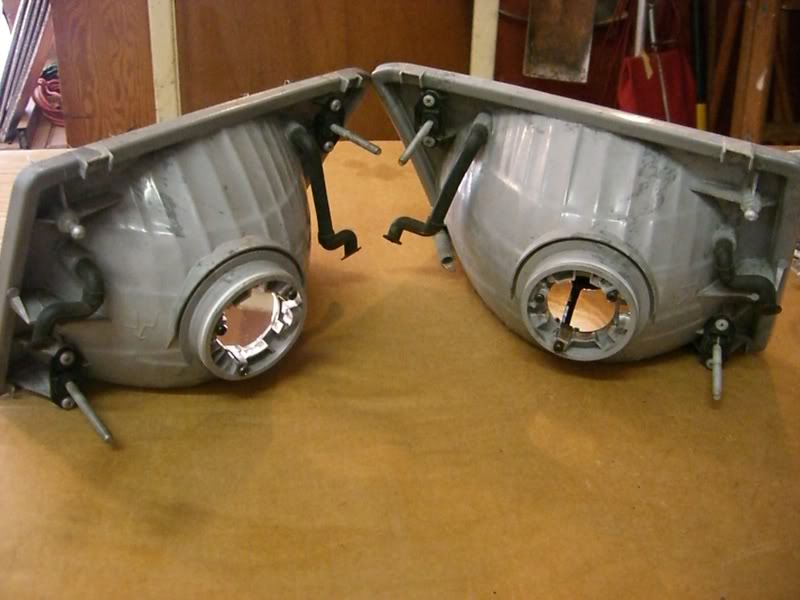
Stock Headlight Housings:
To remove the headlight glass, I baked each light individually in the oven at 350 degrees for 5 minutes. This process permitted the hardened glue to become very soft, which in turn, allowed me to take a flat head screwdriver and pry the glass off of the housing.
Glass & Bulb Cover removed from Driver side Headlight:
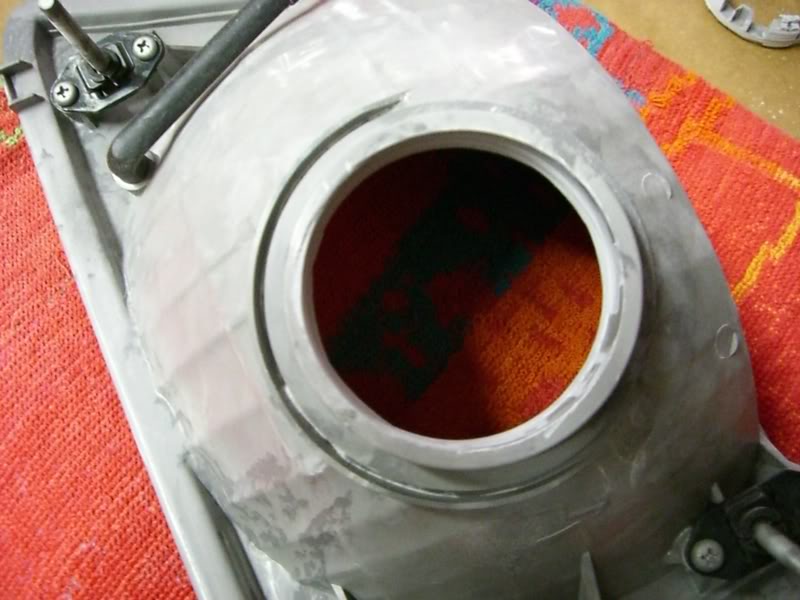
In order to fit the FX Projectors in these headlights, the rear opening needed to be enlarged. A 2-inch hole saw made for a quick cut:
Before Rear Opening was cut:
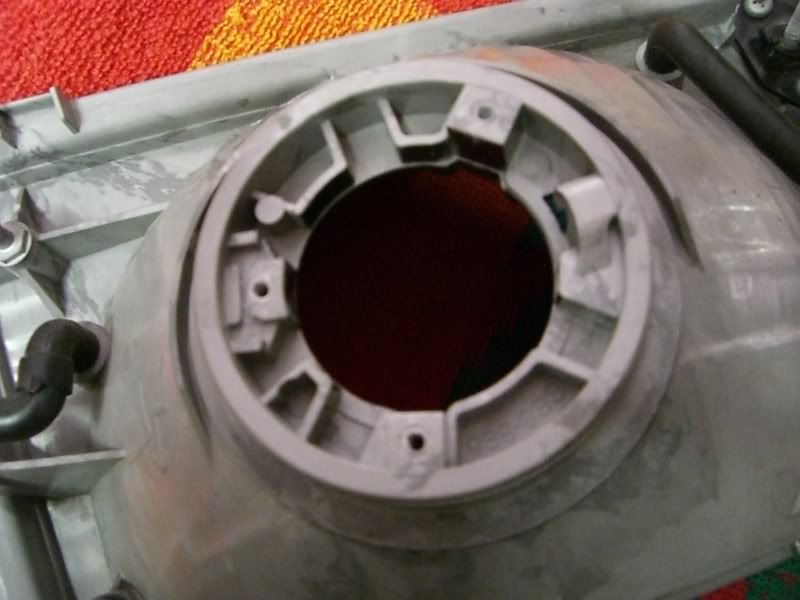
After Cuts were Made:
Projector Mounted with the Malibu Cover On:
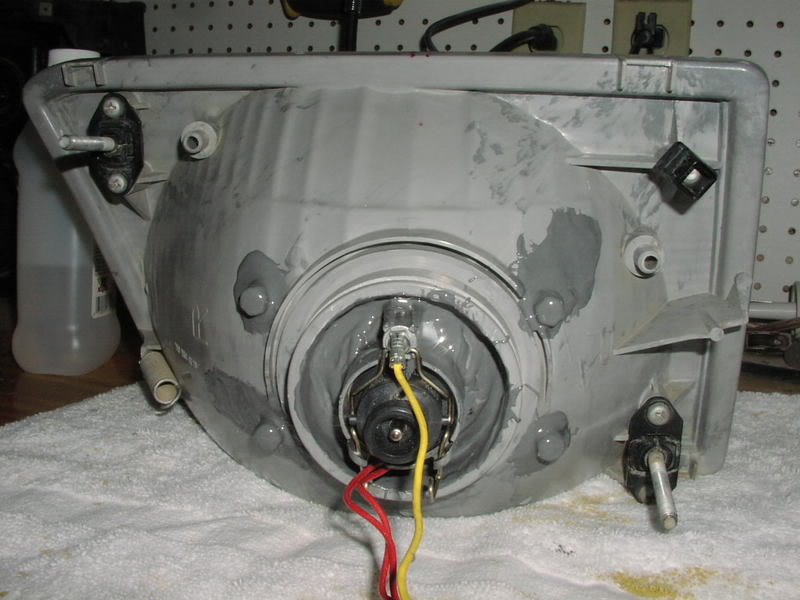
To secure the projector itself to the headlight, I drilled 4 small holes into the headlight and ran 4 long screws thru the projector mounting tabs and thru the holes in the headlight. Bolted them down on the backside of the headlight using lock washers, nuts, liquid thread locker and even some JB Weld to further seal them up.
Backside of Light:
Since I did not get a picture of the back of my finished lights, here is a picture I got from WeCool.net. I used JB Weld to cover my 4 bolts as they did, but instead of using JB Weld to fill in the gap around the back of the projector as this one below, I simply used clear RTV Silicone. Less dry time and easily removable if need be:
The following day, I individually baked each light again for 5 minutes at 350 degrees in order to reseal the glass to the housing. Upon removing each light from the oven, I then firmly pressed the glass back to the housing. After the housings cooled, I placed a thin bead of clear RTV silicone around each light where the glass joins the housing. This was done to further waterproof the housings. I also took the same silicone and placed a good amount of it on the backside of each headlight, where the projector pushed thru the hole, to further seal any small openings.
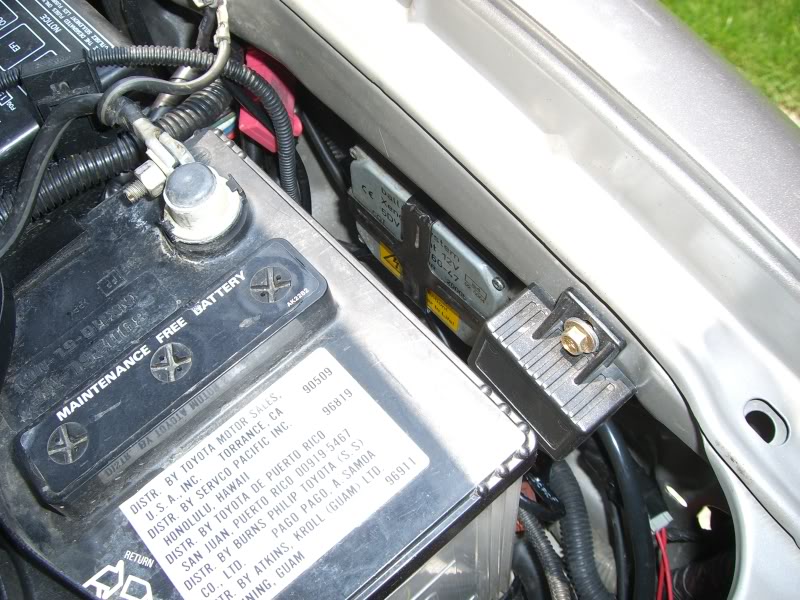
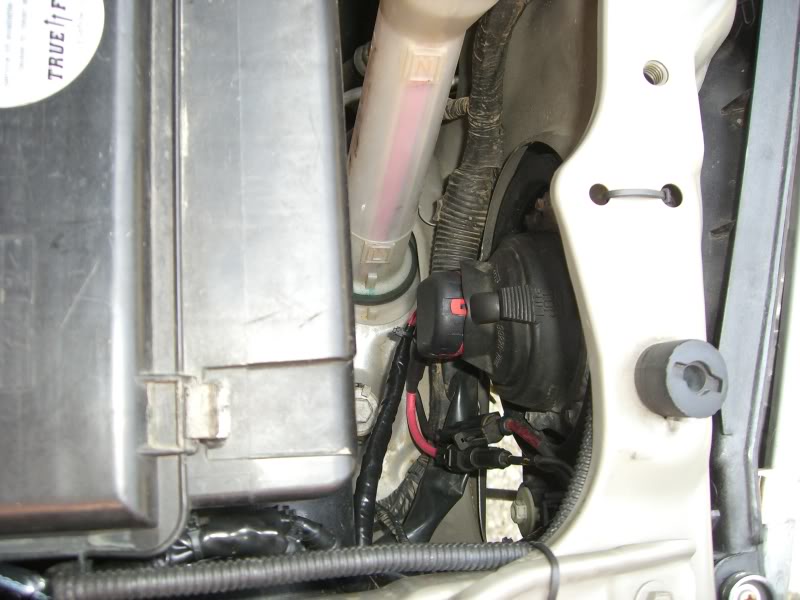
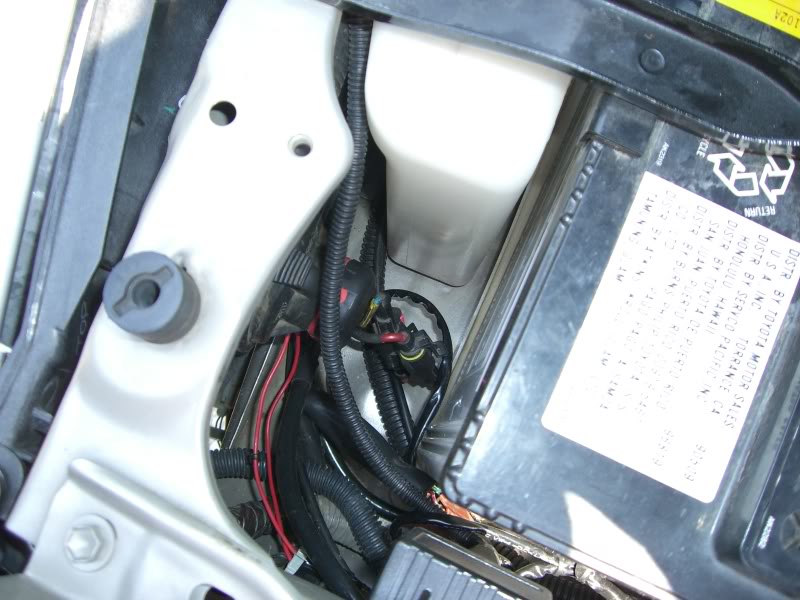
Finally, ran the wiring and mounted the Ballasts:
Ballasts Mounted in Engine Bay:
Passenger Side:
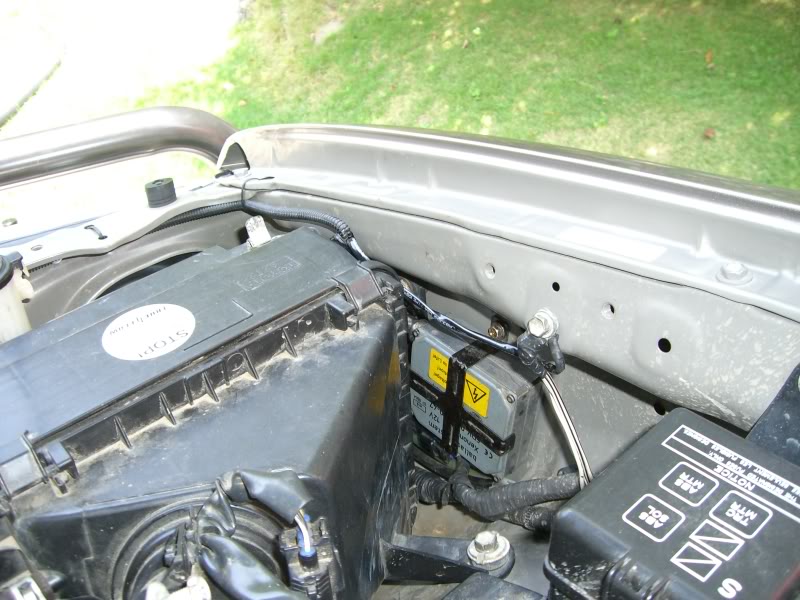
Driverside:
Bulbs Installed:
Passenger Side:
Driver Side:
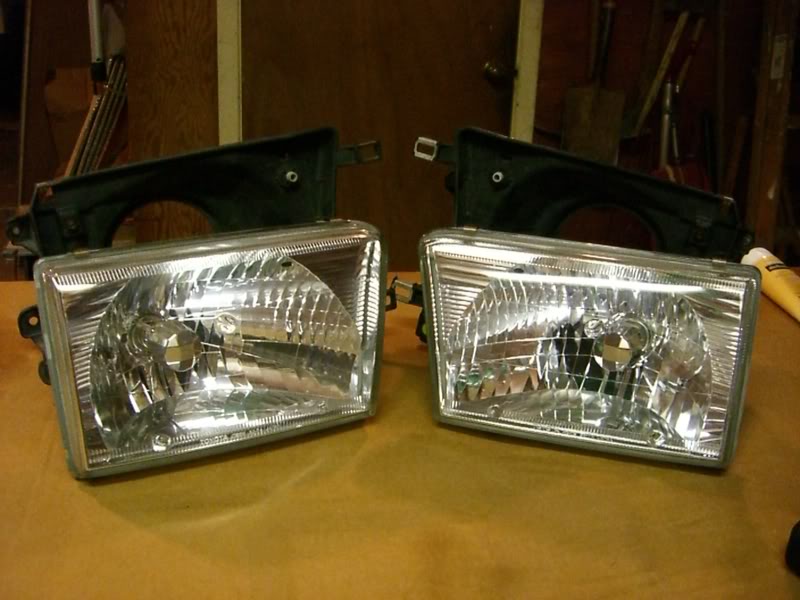
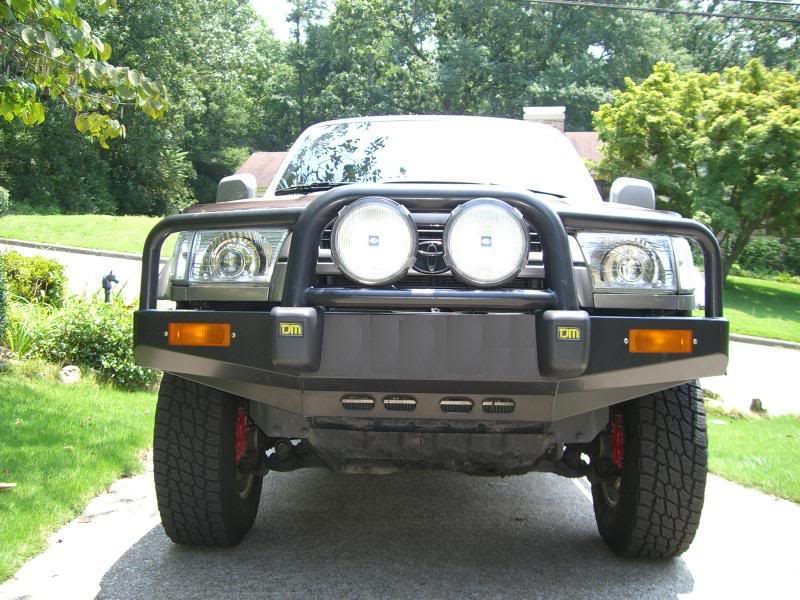
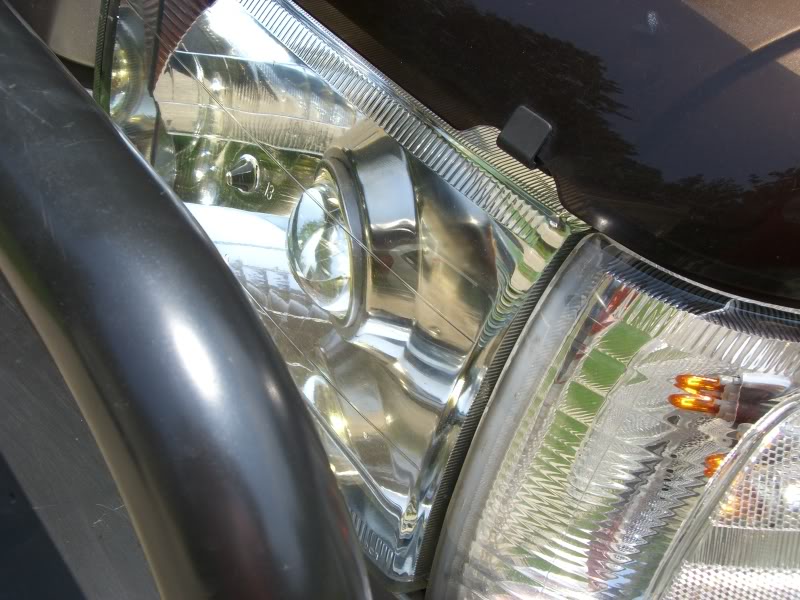
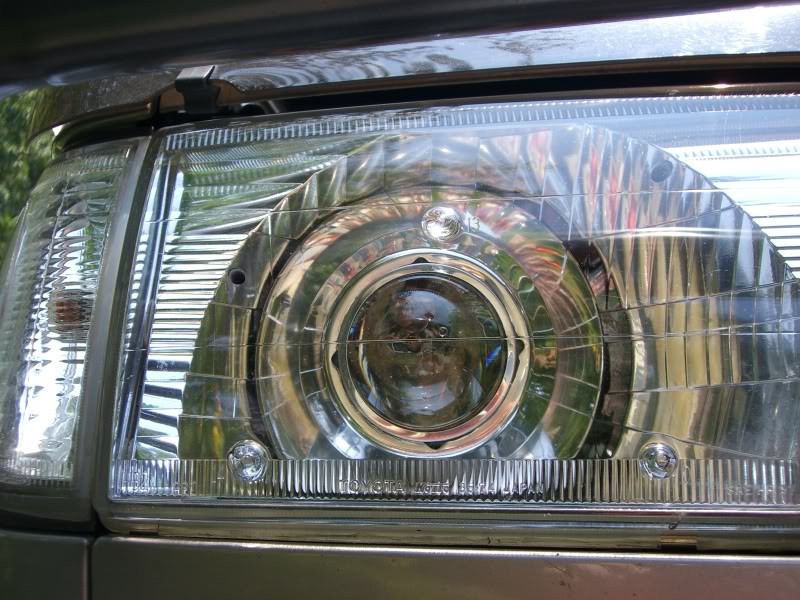
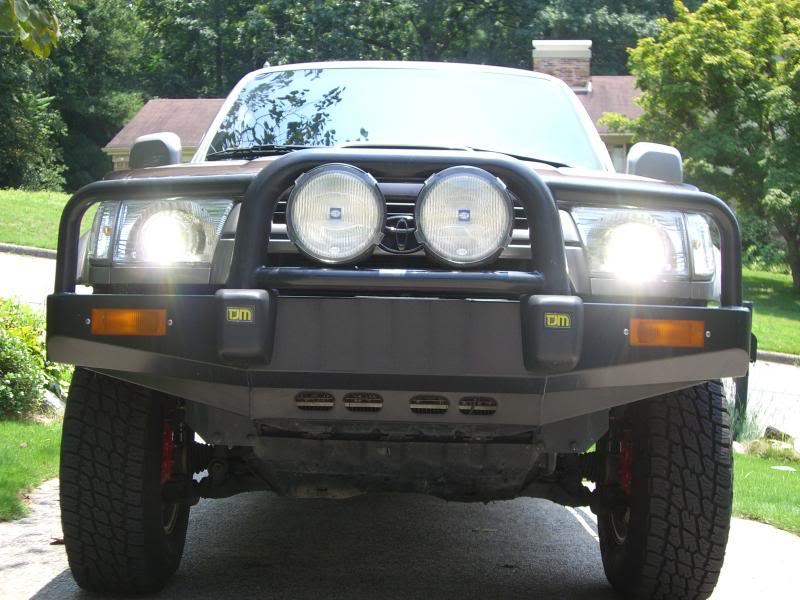
Head Lights Mounted:
(Please note, the headlights were not yet properly aimed when I took these photos.)

Aiming the headlights was effortless. I parked on a level surface, 25ft away from a wall and measured the distance from the center of the projector to the ground below. I took that measurement over to the wall and subtracted 2 inches. I marked this new measurement by placing a piece of tape horizontal on to the wall. Finally, I simply aligned the light cutoff on to the wall so it was even with the tape.
For more detailed information on aiming your headlights, check out this site: Click Me
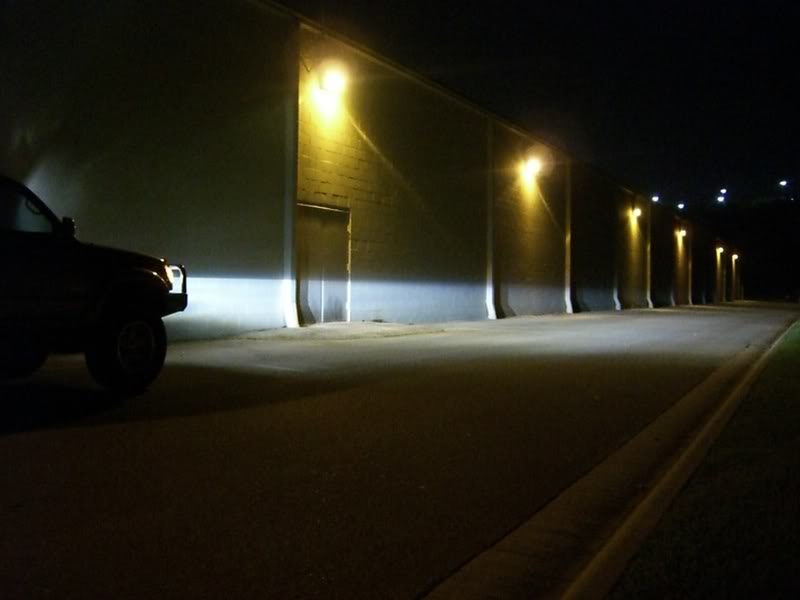
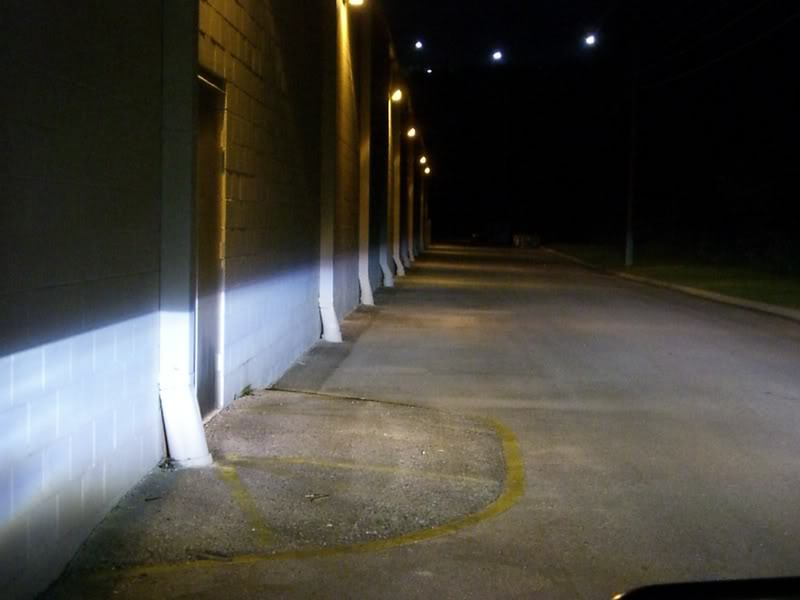
I have not taken any night shots yet, but the light output is a significant improvement over stock. The light cutoff, created by the projectors, is so sharp, it puts aftermarket PnP kits to shame. Although I personally have never been blinded at night by others running PnP kits, I simply prefer the “look and feel” of Projectors instead. IMO, projectors create a more professional appearance in both aesthetics and light intensity.
EDIT:
Here's a couple night shots:
Total Price for this Retrofit after everything was said and done…$285.00.
**PRICE LIST**
PURCHASED:
Donor Headlight - Driver..........35
Donor Headlight - Passenger....60
H4 Wiring Harness.............. ..30
2 Hella Gen3 Ballasts..............50
2 Phillip D2S H4 4300K Bulbs. ..50
2 Infiniti FX45 Projectors........75
2 Acura TSX Projectors..........150
4 Malibu Light Covers.............30
Total......................................$480.00
SOLD:
Donor Headlight - Driver.........58
Donor Headlight - Passenger...55
Acura TSX Projectors............55
Infiniti FX45 Lenses...............27
Total......................................$-195.00
Grand Total............................$285.00
There were no misc cost involved b/c I already had plenty of tape, RTV silicone, zip ties, dremel bits and what else just laying around the garage.
It was definitely worth it IMO.
**
(He was the first guy I saw do this mod to a 4Runner). Also, a big thanks to Pfdaxe for answering all the emails I sent him every time I ran into a snag. For more information on what they both did, check out this link: Click Me. Oh and for more information on yet another FX Projector Retrofit I came across, check out WeCool.net: Click Me
For my own install, I followed Pfdaxe’s retrofit very closely. Here’s what I used:
Infiniti FX Bi-xenon Projectors
Acura TSX Lenses
Hella Gen 3 Ballasts
35W 4300K Philip D2S 85122+ Bulbs
H4 Plug-n-Play Wiring Kit -(ebay special)
Malibu Light Covers
Stock Infiniti FX Bi-xenon Projectors:
Note, the yellow wires are not used.
FX Lenses Removed:
The above lenses appear very clear, but looks can be deceiving. So I purchased a set of stock Acura TSX Single Beam Projectors strictly for their truly clear lenses.
I then removed the TSX lenses and installed them into the FX Projectors. Although, the FX lenses I already had were considered the “clear” version by market standards (as seen in the picture above), when compared to that of the TSX lenses, the FX lenses left very little to be desired. The TSX lenses are so incredibly clear, that they make the FX lenses look like crap. Here are a few comparison shots of the FX and TSX lenses:
FX vs. TSX Lenses installed in FX Projectors:
FX vs. TSX Lenses installed in FX Projectors:
1st Comparison Shot:
FX:
TSX:
2nd Comparison Shot:
FX:
TSX:
I obtained both the pair of 35W 4300K Philip D2S 85122+ bulbs and Hella Gen3 Ballasts from YT member Pfdaxe. As for the PnP Wiring Kit, I purchased it directly from Ebay. It came with all the necessary wiring to retain proper function of my high beams with the newly installed FX projectors.
I attempted the Color O-ring Mod, but had mixed results. I simply could not find a large enough gasket to make this mod worth my time. So I scrapped it and moved on. For those interested in this Mod, visit HID Planet: Click Me
For the Malibu Light Covers, I went with Intermatic.com. I found that while they do not sell the entire Malibu light itself, they do offer individual replacement parts for it. (Which was great, considering I only needed the covers anyway.)
Stock Photo of the Entire Malibu Light:
The Product Number for the entire light above is – LZ512SS found here: www.intermaticstore.com
Once you are there, click the "Parts" Tab at the bottom of the page. The first item in the list should be:
Light cover itself: Item # LZ512SSA
Description: SOLAR TOP-WHITE LED-INCLUDES BATTERY
Price per Cover: $6.25
I ordered 4 of these light covers (two extra in case I screwed the other 2 up) and had them at sitting at my front door in 3 days.
Here’s the process I took to convert the Malibu covers into Projector Shrouds:
I also purchased a 2nd pair of oem headlights to use in my 4Runner while I completed this retrofit on my existing headlights. Once I finished the retrofit, I swapped in my newly modified projector headlights and sold the donor lights.
Stock Headlight Housings:
To remove the headlight glass, I baked each light individually in the oven at 350 degrees for 5 minutes. This process permitted the hardened glue to become very soft, which in turn, allowed me to take a flat head screwdriver and pry the glass off of the housing.
Glass & Bulb Cover removed from Driver side Headlight:
In order to fit the FX Projectors in these headlights, the rear opening needed to be enlarged. A 2-inch hole saw made for a quick cut:
Before Rear Opening was cut:
After Cuts were Made:
Projector Mounted with the Malibu Cover On:
To secure the projector itself to the headlight, I drilled 4 small holes into the headlight and ran 4 long screws thru the projector mounting tabs and thru the holes in the headlight. Bolted them down on the backside of the headlight using lock washers, nuts, liquid thread locker and even some JB Weld to further seal them up.
Backside of Light:
Since I did not get a picture of the back of my finished lights, here is a picture I got from WeCool.net. I used JB Weld to cover my 4 bolts as they did, but instead of using JB Weld to fill in the gap around the back of the projector as this one below, I simply used clear RTV Silicone. Less dry time and easily removable if need be:
The following day, I individually baked each light again for 5 minutes at 350 degrees in order to reseal the glass to the housing. Upon removing each light from the oven, I then firmly pressed the glass back to the housing. After the housings cooled, I placed a thin bead of clear RTV silicone around each light where the glass joins the housing. This was done to further waterproof the housings. I also took the same silicone and placed a good amount of it on the backside of each headlight, where the projector pushed thru the hole, to further seal any small openings.
Finally, ran the wiring and mounted the Ballasts:
Ballasts Mounted in Engine Bay:
Passenger Side:
Driverside:
Bulbs Installed:
Passenger Side:
Driver Side:
Head Lights Mounted:
(Please note, the headlights were not yet properly aimed when I took these photos.)
Aiming the headlights was effortless. I parked on a level surface, 25ft away from a wall and measured the distance from the center of the projector to the ground below. I took that measurement over to the wall and subtracted 2 inches. I marked this new measurement by placing a piece of tape horizontal on to the wall. Finally, I simply aligned the light cutoff on to the wall so it was even with the tape.
For more detailed information on aiming your headlights, check out this site: Click Me
I have not taken any night shots yet, but the light output is a significant improvement over stock. The light cutoff, created by the projectors, is so sharp, it puts aftermarket PnP kits to shame. Although I personally have never been blinded at night by others running PnP kits, I simply prefer the “look and feel” of Projectors instead. IMO, projectors create a more professional appearance in both aesthetics and light intensity.
EDIT:
Here's a couple night shots:
Total Price for this Retrofit after everything was said and done…$285.00.
**PRICE LIST**
PURCHASED:
Donor Headlight - Driver..........35
Donor Headlight - Passenger....60
H4 Wiring Harness.............. ..30
2 Hella Gen3 Ballasts..............50
2 Phillip D2S H4 4300K Bulbs. ..50
2 Infiniti FX45 Projectors........75
2 Acura TSX Projectors..........150
4 Malibu Light Covers.............30
Total......................................$480.00
SOLD:
Donor Headlight - Driver.........58
Donor Headlight - Passenger...55
Acura TSX Projectors............55
Infiniti FX45 Lenses...............27
Total......................................$-195.00
Grand Total............................$285.00
There were no misc cost involved b/c I already had plenty of tape, RTV silicone, zip ties, dremel bits and what else just laying around the garage.
It was definitely worth it IMO.
**
Last edited by Rock Slide; 09-16-2010 at 05:37 PM.
 08-18-2008, 09:33 AM
#5
Registered User
Join Date: Aug 2002
Location: Phoenix, AZ
Posts: 1,532
Likes: 0
Received 0 Likes
on
0 Posts
Looks familiar....lol
Great job! It came out very nice and I'm glad I could help. I'm in the process of changing my projectors. I'm retroing a set of TL's with ZKW lens and I'm also adding a CCFL halo angel eyes ring around the projector (BMW style). I'll post pics when complete
http://cgi.ebay.com/ebaymotors/ws/eB...246402536&rd=1
Trending Topics
08-23-2008, 04:06 PM
#8
Registered User
Join Date: Jun 2007
Location: Salt Lake City, UT
Posts: 442
Likes: 0
Received 0 Likes
on
0 Posts
Looks familiar....lol
Great job! It came out very nice and I'm glad I could help. I'm in the process of changing my projectors. I'm retroing a set of TL's with ZKW lens and I'm also adding a CCFL halo angel eyes ring around the projector (BMW style). I'll post pics when complete
http://cgi.ebay.com/ebaymotors/ws/eB...246402536&rd=1
Great job! It came out very nice and I'm glad I could help. I'm in the process of changing my projectors. I'm retroing a set of TL's with ZKW lens and I'm also adding a CCFL halo angel eyes ring around the projector (BMW style). I'll post pics when complete
http://cgi.ebay.com/ebaymotors/ws/eB...246402536&rd=1
Great job on the retrofit! Looks great. Did either of you use anything to fill in the space around the malibu covers?
08-23-2008, 04:13 PM
#9
Registered User

Join Date: Jan 2006
Location: MA
Posts: 1,101
Likes: 0
Received 0 Likes
on
0 Posts
Amazing stuff and I'm sure many with benefit from your thoroughness.
You are quickly becoming the 3rd gen poster child.
P.S. what ever became of your cracked rim situation?
You are quickly becoming the 3rd gen poster child.
P.S. what ever became of your cracked rim situation?
08-23-2008, 08:36 PM
#11
As for the cracked rim, it's sitting in my garage as we speak. Got a new rim on the 4Runner now. I learned the hard way what happens when you wheel rocks w/ aluminum wheels
. Granted, that has not stopped me from still doing it, I've just learned to pick my lines better. The wiring wasn't all that bad. It actually took more time to remove the airbox and battery (to mount the ballasts) than it did to run all the wiring and connect everything together.
Last edited by Rock Slide; 08-23-2008 at 08:43 PM.
08-24-2008, 04:22 AM
#12
Contributing Member
nice work looks great .... ive always wondered if taking apart the older frosted ones apart painting the housing black add the projectors and install the newer style clear glass part would look like
08-24-2008, 05:20 PM
#14
Registered User
Join Date: Aug 2008
Location: Moon Base
Posts: 111
Likes: 0
Received 0 Likes
on
0 Posts
Looks familiar....lol
Great job! It came out very nice and I'm glad I could help. I'm in the process of changing my projectors. I'm retroing a set of TL's with ZKW lens and I'm also adding a CCFL halo angel eyes ring around the projector (BMW style). I'll post pics when complete
http://cgi.ebay.com/ebaymotors/ws/eB...246402536&rd=1
Great job! It came out very nice and I'm glad I could help. I'm in the process of changing my projectors. I'm retroing a set of TL's with ZKW lens and I'm also adding a CCFL halo angel eyes ring around the projector (BMW style). I'll post pics when complete
http://cgi.ebay.com/ebaymotors/ws/eB...246402536&rd=1

Rockslide: How on earth did you get the projectors and ballasts for only 285, let alone with a set of lights?!?!?! I figured you must have spent over a grando! Nicely done, man.
 08-24-2008, 06:35 PM
#18
Contributing Member
Join Date: Mar 2003
Location: COTKU,Ontario,Canada
Posts: 11,334
Likes: 0
Received 0 Likes
on
0 Posts
Very sharp looking mod there... How does the plastic of those malibu lights stand up to the heat of the projectors? it looks to be just black styrene plastic... I want to see what the angle eyes looklike when you get there axeman..
08-24-2008, 07:07 PM
#20
 crazy aint it. Even installed a new ceiling fan in the guest bedroom 2wks ago too
That's tempting, but I'd have to charge you an arm and a leg. I put more time in this retro than I ever planned too. I could have done them much quicker, but with as busy as I stay, I was doing good just to get an hour's worth of work in on a Saturday! Might be a while, before I get around to doing another retro...
Thanks. Oh and there is no plastic involved in this retro. The covers themselves are a thin metal. That black plastic piece I removed from the inside of the cover is discarded.
Last edited by Rock Slide; 08-24-2008 at 07:09 PM.


