Whitelightinin's 87 4runner Build Up
 03-21-2013, 11:15 PM
#1
Registered User
Thread Starter

Join Date: Feb 2013
Location: Salt Lake City Utah
Posts: 22
Likes: 0
Received 0 Likes
on
0 Posts
Whitelightinin's 87 4runner Build Up
Wanted to start up a new build up to show off some of the projects that i have beed working on for my 87 4runner.
I've been pretty busy with this the last few weeks. First off i replaced a caliper and the brakes, then i replaced the radiator. I know not big projects, but i had new done them.
The second i was doing was trying to make the cab a little quieter. Instead of buying the expensive sound reductions stuff i got some all weather roofing material.
I had my buddy help me on this we took off the plastic panels then cleaned the 20 years of dirt out off the metal then glued on some of the roofing material. We then did this will all the doors and tailgate. I also put in some new plastic with some caulk. This seemed to work pretty well. I don't have carpet and am planning on putting in some bed liner so it won't be much better until that is done.
 03-21-2013, 11:41 PM
#2
Registered User
Thread Starter
Join Date: Feb 2013
Location: Salt Lake City Utah
Posts: 22
Likes: 0
Received 0 Likes
on
0 Posts
Okay here are the other photos of the lining.
Here is the soft top that i made from some canvas that i got at the army navy store. That is where this hooks on where the hard top bolts in, i put some grommets in the canvas and just bolt it right on. It's not quite as easy as the buttons, but it works.
the sides can be unbolted and it can be rolled up and attached to the top with bungee cords balls. This works really well and gives some sun protection, but it still has the sides open. Well i went with this rout for a few years and on long trips, or if it rained i would put the sides down. This left me with quite a large blind spot, also when people were in the back i felt like i was a coyote crossing the border. So i decided to put in some windows.
I got some clear vinyl and sewed some webbing around it to prevent tearing. the added some fabric and did a window fold to add some support. I don't know how to better describe this, but if you are interested in how just email me. Then using some 1in Velcro i sewed that to the inside of the sides and the bottom. This will allow me to roll up the window from the inside and not have it drag in the wind. I am attaching it withe the same ball bungee system.
And there is the finished product. i will get some more photos of it. also how do i attach more photos, it looks like i used up the full amount in the attachments. Is there an easier way to upload them besides attaching them.
If you have any questions or comments about this just let me know by a response or email.
Thanks for checking out my 4runner.
03-22-2013, 12:46 AM
#3

Welcome!
There is a howto in the "newbie tech" section for using off site photo hosting like photobucket.
Personally I just use the Album feature of the board here. You can get to yours by clicking your name above where it says "Welcome, whitelightnin'", on that screen it'll be located on the right hand side.
https://www.yotatech.com/members/whi...9;-albums.html
There is a file size limit 100k, and image size limit 800x600. But I think it works just fine for posting my photos.
You'll add an album, upload a pic, describe the pic, then on the viewing screen it will have a spot near the bottom with the "IMG" tag you copy and paste those into a forum post and the pictures will show up inline with the text.
If you need to provide a high resolution phot you can use the attach file method, you can make these show up inline by copying the link from the manage attachments dialog and inclosing that with the "IMG" tags.

 04-01-2013, 09:33 PM
#5
Registered User
Thread Starter
Join Date: Feb 2013
Location: Salt Lake City Utah
Posts: 22
Likes: 0
Received 0 Likes
on
0 Posts
quick release passenger seat lever
When i first got the 4runner i just thought that the passenger seat couldn't move due to there being no handle under the seat. Well it turns out that the cable under the seat broke. I tried to find a replacement and the cheapest i could find was $35 plus shipping. Well the thing about my cable was that the housing was good, and only the parts that connect under the seat were broke. Ater i took apart the middle housing i leaned that they are pretty much bicycle cables. Well i got some bike cables from a bike shop for $7 and then went down to the local motorcycle shop and got the stop balls that you sauter on for $2. After measuring the cables i sauntered on the balls to the new cables and was good to go. I would recommend keeping the cables long until you sauter the balls on. It is difficult put stuff on the cables if they separate at all.
Now it works great. I highly recommend this over buying one. I think it took an hour and a half to pull the seat out and take the cable off, get new parts and put it all back together.
Here is the seat moved and the interior of the housing with some lubrication on it to help slide.
let me know if you have questions or if this works for you.
Last edited by whitelightnin'; 04-01-2013 at 09:36 PM.
04-22-2013, 10:16 PM
#6
Registered User
Thread Starter
Join Date: Feb 2013
Location: Salt Lake City Utah
Posts: 22
Likes: 0
Received 0 Likes
on
0 Posts
I've been working on getting a roof basket on the top. Since the fiberglass tabs will break if there is any weight. i have been working on making one that will come off from the bed of the truck. I got the plates from the fab shop. I will have pictures soon. Here is the basket i have been working on. I have also bee thinking of putting a bike rack on the side of the vehicle. I will have drawings of this later. [IMG]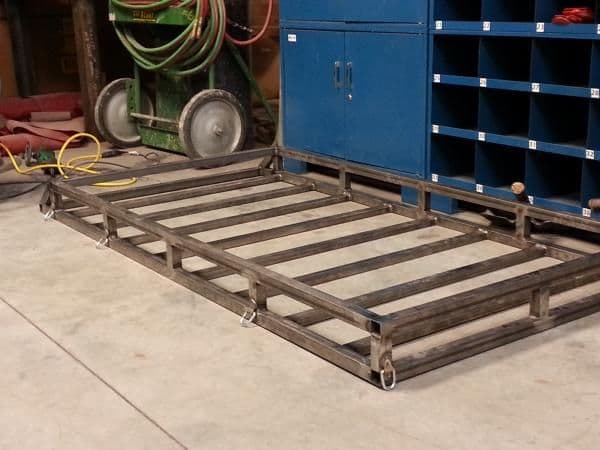 [/IMG]
[/IMG]
04-24-2013, 05:54 AM
#7
I've been working on getting a roof basket on the top. Since the fiberglass tabs will break if there is any weight. i have been working on making one that will come off from the bed of the truck. I got the plates from the fab shop. I will have pictures soon. Here is the basket i have been working on. I have also bee thinking of putting a bike rack on the side of the vehicle. I will have drawings of this later. [IMG][/IMG]
[/IMG]Trending Topics
05-01-2013, 10:57 AM
#8
Registered User
Thread Starter
Join Date: Feb 2013
Location: Salt Lake City Utah
Posts: 22
Likes: 0
Received 0 Likes
on
0 Posts
Got the rack back from the guy helping me weld it. Looks great as you can tell from the picture. I also got the plates back that will fit on the sides of the truck to support the rack. Those are drilled so now i just need to figure out where to put the extra bolt to hold onto the plates. Here are some photos of the updates.
Also i put some d rings on the sides to help with tie downs, but they rattle a lot. I am planning on putting a bed liner in the inside flooring, and i was just going to do the rack in the same bed liner. I was thinking Al's it seems good and reasonably priced. IF anyone has any other suggestion on how to paint to rack and stuff to put on the rings to quiet them let me know.

https://www.yotatech.com/members/whi...429-230203.jpg
Also i put some d rings on the sides to help with tie downs, but they rattle a lot. I am planning on putting a bed liner in the inside flooring, and i was just going to do the rack in the same bed liner. I was thinking Al's it seems good and reasonably priced. IF anyone has any other suggestion on how to paint to rack and stuff to put on the rings to quiet them let me know.
https://www.yotatech.com/members/whi...429-230203.jpg
Last edited by whitelightnin'; 05-01-2013 at 10:58 AM.
05-01-2013, 03:01 PM
#9
When i first got the 4runner i just thought that the passenger seat couldn't move due to there being no handle under the seat. Well it turns out that the cable under the seat broke. I tried to find a replacement and the cheapest i could find was $35 plus shipping. Well the thing about my cable was that the housing was good, and only the parts that connect under the seat were broke. Ater i took apart the middle housing i leaned that they are pretty much bicycle cables. Well i got some bike cables from a bike shop for $7 and then went down to the local motorcycle shop and got the stop balls that you sauter on for $2. After measuring the cables i sauntered on the balls to the new cables and was good to go. I would recommend keeping the cables long until you sauter the balls on. It is difficult put stuff on the cables if they separate at all.
Now it works great. I highly recommend this over buying one. I think it took an hour and a half to pull the seat out and take the cable off, get new parts and put it all back together.
Here is the seat moved and the interior of the housing with some lubrication on it to help slide.
let me know if you have questions or if this works for you.
Subscribed here...
I believe I found an easier fix and probable a cheaper one, just haven't gotten around to testing or trying it out. You can purchase a BMX cable with the same setup for about $6, you just have to custom length it to fit. Like I said i haven't tried it yet, but looking over all the parts they are pretty much the same. Beats the heck of the cost of $35.
That roof carrier is awesome. I like the design and it look pretty sturdy. Got keep an eye on how you mount that, I was wondering it there was away of making legs that would mount between the topper and side panel. Just an idea, we use to mount our CB radio antenna like that rather than drill holes in the truck.
05-01-2013, 05:25 PM
#11
Registered User
Thread Starter
Join Date: Feb 2013
Location: Salt Lake City Utah
Posts: 22
Likes: 0
Received 0 Likes
on
0 Posts
Subscribed here...
I believe I found an easier fix and probable a cheaper one, just haven't gotten around to testing or trying it out. You can purchase a BMX cable with the same setup for about $6, you just have to custom length it to fit. Like I said i haven't tried it yet, but looking over all the parts they are pretty much the same. Beats the heck of the cost of $35.
That roof carrier is awesome. I like the design and it look pretty sturdy. Got keep an eye on how you mount that, I was wondering it there was away of making legs that would mount between the topper and side panel. Just an idea, we use to mount our CB radio antenna like that rather than drill holes in the truck.
let me know if you get it or if you have any other questions.
05-01-2013, 09:05 PM
#12
whitelightnin', the fix I'm talking about is with a BMX type break kit I think. Here's a link so you could see what I am talking about.
http://www.time2shinebmx.com/Odyssey...les_p_309.html
I believe they work on the same concept. One cable to 2 cable pull.
http://www.time2shinebmx.com/Odyssey...les_p_309.html
I believe they work on the same concept. One cable to 2 cable pull.
05-01-2013, 09:42 PM
#14
Registered User
Thread Starter
Join Date: Feb 2013
Location: Salt Lake City Utah
Posts: 22
Likes: 0
Received 0 Likes
on
0 Posts
How i am going to attach it to the body.
I didn't want to drill holes into the sides of the truck and i didn't want to put holes in the shell where i could put bars or just bolts. I would like to keep the truck fairly original. Heven forbid i ever sell this, but if i do i don't want to give it to someone with a buch of holes and stuff like that.
Here are the pictures of the plates which will hold the bars to hold the basket.

and here is the view from the side.

As you can see the plates are bent so that they will fit the bend on the truck. There are 2 bolts holding on the plate. 1 of those is the original that is used for the shell and the other i drilled. and will use a similar bolt. This will be a little bit of a pain because i will have to reach my hand in to undo the nut, since it is not hooked to the truck. But one is near the cubby in the rear seats and the other is near the cargo area in the bed. I will have to drill a hole in the shell where i can put a bolt, but it shouldn't be a problem.
The drilled holes look natural and went really well.
The little plate that is bolted on will be where the tubing to the basket will be welded. i did this because if i wanted to take off the basket and the top was on i could just unbolt it and then take it off without unbolting the top.
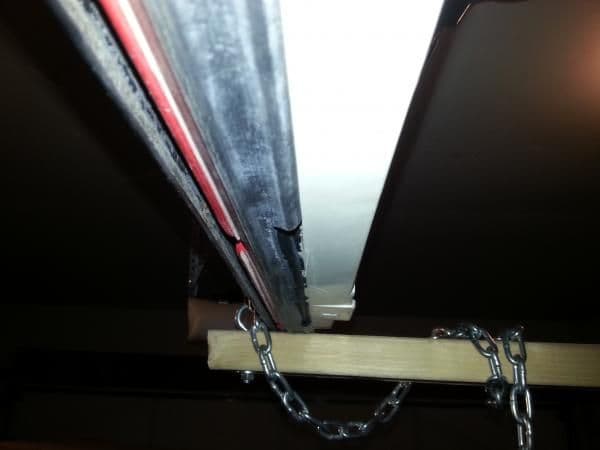
What i did here was that i trimmed the sealing on the shell with some scissor and box cutter. Now the plate will fit tight against the white part. This should allow the bolts on the top front to connect without much trouble.
Well i hope this allows you to see what i am going to try and do here.
Thanks for the responses.
I didn't want to drill holes into the sides of the truck and i didn't want to put holes in the shell where i could put bars or just bolts. I would like to keep the truck fairly original. Heven forbid i ever sell this, but if i do i don't want to give it to someone with a buch of holes and stuff like that.
Here are the pictures of the plates which will hold the bars to hold the basket.
and here is the view from the side.
As you can see the plates are bent so that they will fit the bend on the truck. There are 2 bolts holding on the plate. 1 of those is the original that is used for the shell and the other i drilled. and will use a similar bolt. This will be a little bit of a pain because i will have to reach my hand in to undo the nut, since it is not hooked to the truck. But one is near the cubby in the rear seats and the other is near the cargo area in the bed. I will have to drill a hole in the shell where i can put a bolt, but it shouldn't be a problem.
The drilled holes look natural and went really well.
The little plate that is bolted on will be where the tubing to the basket will be welded. i did this because if i wanted to take off the basket and the top was on i could just unbolt it and then take it off without unbolting the top.
What i did here was that i trimmed the sealing on the shell with some scissor and box cutter. Now the plate will fit tight against the white part. This should allow the bolts on the top front to connect without much trouble.
Well i hope this allows you to see what i am going to try and do here.
Thanks for the responses.
05-04-2013, 06:43 PM
#16
Registered User
Thread Starter
Join Date: Feb 2013
Location: Salt Lake City Utah
Posts: 22
Likes: 0
Received 0 Likes
on
0 Posts
I got the support plates in with the top on and they fit really good.
They look like they will work great. I will need to put the basket on top and measure what i the bars need to be. I will then then to cut some steel plates which will help suport the basket. If you know anyone in Salt Lake City that would be willing to help me out please let me know.
I am also working on putting some diamond plating in the back as the side panels, tail gate, and the back of the seats. I am planning on applying some diy bed liner to those, as well as the whole interior floor. I have done some reserch on that and i think i will use al's bed liner, it seems pretty good and will be about $100 per gallon.
If anyone has done the bed liner and the side panels and has any helpful hints let me know.
I don't start work for the summer until june 4th so i would like to get all of this done before then.
05-05-2013, 04:45 AM
#17
I got the support plates in with the top on and they fit really good.
They look like they will work great. I will need to put the basket on top and measure what i the bars need to be. I will then then to cut some steel plates which will help suport the basket. If you know anyone in Salt Lake City that would be willing to help me out please let me know.
I am also working on putting some diamond plating in the back as the side panels, tail gate, and the back of the seats. I am planning on applying some diy bed liner to those, as well as the whole interior floor. I have done some reserch on that and i think i will use al's bed liner, it seems pretty good and will be about $100 per gallon.
If anyone has done the bed liner and the side panels and has any helpful hints let me know.
I don't start work for the summer until june 4th so i would like to get all of this done before then.
They look like they will work great. I will need to put the basket on top and measure what i the bars need to be. I will then then to cut some steel plates which will help suport the basket. If you know anyone in Salt Lake City that would be willing to help me out please let me know.
I am also working on putting some diamond plating in the back as the side panels, tail gate, and the back of the seats. I am planning on applying some diy bed liner to those, as well as the whole interior floor. I have done some reserch on that and i think i will use al's bed liner, it seems pretty good and will be about $100 per gallon.
If anyone has done the bed liner and the side panels and has any helpful hints let me know.
I don't start work for the summer until june 4th so i would like to get all of this done before then.
The AL's liner is really good stuff. I used to be a sales rep for them. The owner is a great guy. You can get a hopper from them so you can easily spray everything rather than roll it. Would be alot easier to do that way.
05-06-2013, 02:02 PM
#18
Registered User
Thread Starter
Join Date: Feb 2013
Location: Salt Lake City Utah
Posts: 22
Likes: 0
Received 0 Likes
on
0 Posts
Looking good man. If I was closer I could help you out. My old man used to live in salt lake, he would help but you would have to drive to Moab now. Haha
The AL's liner is really good stuff. I used to be a sales rep for them. The owner is a great guy. You can get a hopper from them so you can easily spray everything rather than roll it. Would be alot easier to do that way.
The AL's liner is really good stuff. I used to be a sales rep for them. The owner is a great guy. You can get a hopper from them so you can easily spray everything rather than roll it. Would be alot easier to do that way.
IS this a good price. Also how easy is it to to spray in a color such as red.
I have never done anything like this before i was wondering what is should use to tape off the interior that i don't want sprayed. Also there are a buch of threaded holes where things the the seats bolt in. What should i do to those. I saw someone used golf tees. These seem like they would fall out of the hole when being sprayed.
Let me know what you think.
05-08-2013, 11:21 PM
#19
Registered User
Thread Starter
Join Date: Feb 2013
Location: Salt Lake City Utah
Posts: 22
Likes: 0
Received 0 Likes
on
0 Posts
FIrst Generation 4runner Bike Mount
For this basket i was wanting to weld some bike mounts on. I was going to 2 fork mounts on the top, but i was wanting to put 2 mounts on the side. This way it won't be so much weight so high up on the basket. They will be similar to this photo.

Mine will have the front tire off. I was thinking that the fork mount and handlebars will be parallel with the 4runner. Where as in the picture they are perpendicular. The trouble i am having with this is that not all rear tires will be the same height. So i'm not sure how to support the rest of the bike. The fork mount will be welded to the bars that will come up out of the plates in the pictures above.
Let me know if you have any ideas on what to do. I really like the idea of a bike rack on the side of the truck. I don't think that i want a gutter because then when the top off people will step on the gutter to get in the back. Let me know of ideas or anything you have seen.
also let me know if you have any ideas for bike mounts for the interior or exterior of the vehicle.
Thanks
Last edited by whitelightnin'; 05-09-2013 at 11:58 AM.
05-09-2013, 05:02 AM
#20
I should be able to get a 2 galon on the al's stuff for $200. It's a different name, but the guy said it was the same thing. It was for people trying to spray al's for a profession.
IS this a good price. Also how easy is it to to spray in a color such as red.
I have never done anything like this before i was wondering what is should use to tape off the interior that i don't want sprayed. Also there are a buch of threaded holes where things the the seats bolt in. What should i do to those. I saw someone used golf tees. These seem like they would fall out of the hole when being sprayed.
Let me know what you think.
I think thats a good price for the liner material.
As far as taping off. I usually use green painters masking tape and Old newspaper or plastic. For the threaded holes, you could use the golf tees, silicone tips from thread locker tubes, masking tape sticky side out. But whatever you use, you need to pull them out right after spraying.
I think the color will be just like spraying in black. It might look a little thin and transparent until you get another coat on top.
Cant wait to see some pics.


