Stanz's 1986 4Runner
 10-21-2012, 07:54 PM
#61
Stanz, ... the panels are SICK! I will have to use the 1/2"(actually .41" in reality) panel to support/act as a box in a way for my 10" JL Sub.... LOVE having it... BUT, don't want to box in there anymore if I can help it. RAD4runner and I are doing several mods, including lighting and stuff.. Anything you have to add, PLEASE, smack me down some nuggets of your experience on the panel stuff, ya? You're using more of a project board, right? I couldn't tell by the pic... It's 1/4" Birch?
NICE! LOVE THE RIG!!!!
NICE! LOVE THE RIG!!!!
Happy to share anything else. What are you questions? PM me your phone number if you'd prefer to talk it through.
 10-21-2012, 08:01 PM
#62
As for as low temp limit, it's rated down to -10 C (14 F). Top range is somewhere around 175 F. I live in Portland, so I will likely never see the gauge go down to 14 F, so it works for me. Since it was made originally for a pc, I think even 32 F would be on the low end for them.
10-22-2012, 12:54 AM
#63
Hey Stanz, ..... I'll PM Ya to get the digits, ......
BUT, for now, lol..........
Can I see pics of what you did on the sub? I was going to maybe mount it between the roll bars/set out to flush with the furthest in portion of the roll bars (more toward the bed)....... Anyway, I did a video on this on my build...
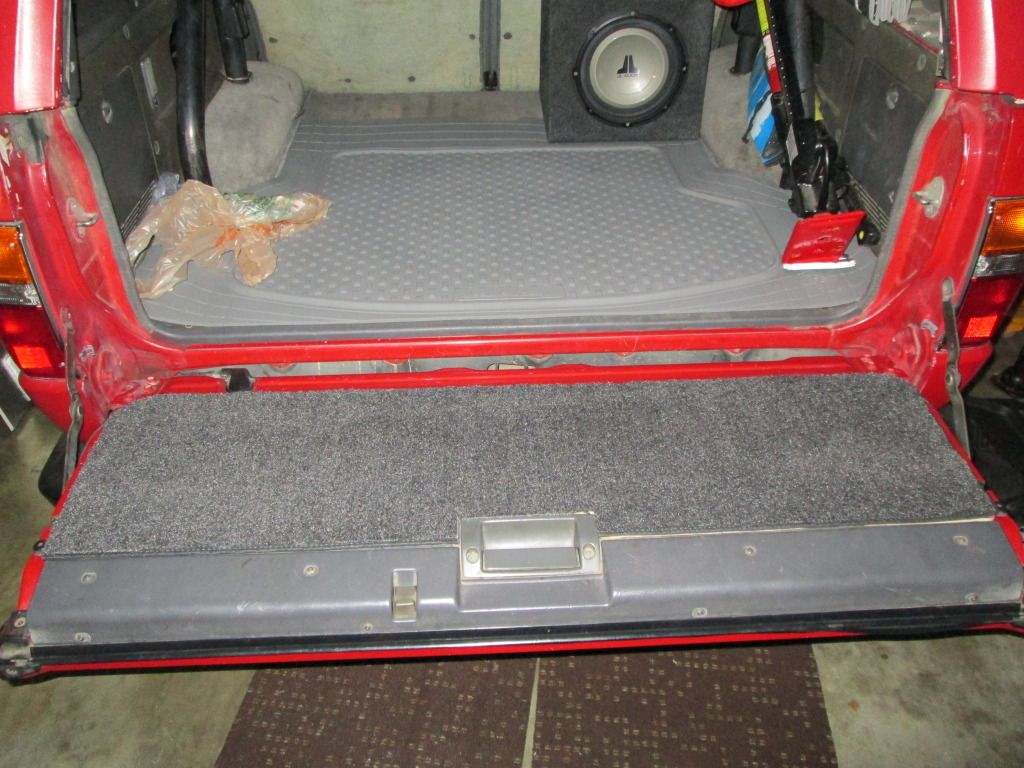
I just finished the rear gate panel resto(mostly finished, lol.... Still gotta glue the carpet down and edges with a hot knife and then border around some of it still... But it's bolted up).
LOVE the coated diamond plating..... PRICEY STUFF, ..... but TOUGH!
My other question about the sub is how to line the inside of the panel to adequately create a 'SUB BOX IN MY PANEL' factor! hahaha. First, ...what size sub? My JL is a 10".... Not super big... but loud, lol... Worried about big time rattling. Also, "Which side" to mount it... CUZ, well, the jack is right there at the rear, blocking beyond that, and also I'm wiring in a back window switch and 3 lights.... ALSO, hahaha...... I wanted to put it between the roll bar pillars bcuz then I could put bars in front of it so it can't be stolen easily with the top off?
BUT, for now, lol..........
Can I see pics of what you did on the sub? I was going to maybe mount it between the roll bars/set out to flush with the furthest in portion of the roll bars (more toward the bed)....... Anyway, I did a video on this on my build...
I just finished the rear gate panel resto(mostly finished, lol.... Still gotta glue the carpet down and edges with a hot knife and then border around some of it still... But it's bolted up).
LOVE the coated diamond plating..... PRICEY STUFF, ..... but TOUGH!
My other question about the sub is how to line the inside of the panel to adequately create a 'SUB BOX IN MY PANEL' factor! hahaha. First, ...what size sub? My JL is a 10".... Not super big... but loud, lol... Worried about big time rattling. Also, "Which side" to mount it... CUZ, well, the jack is right there at the rear, blocking beyond that, and also I'm wiring in a back window switch and 3 lights.... ALSO, hahaha...... I wanted to put it between the roll bar pillars bcuz then I could put bars in front of it so it can't be stolen easily with the top off?
10-22-2012, 07:35 PM
#64
Hey Stanz, ..... I'll PM Ya to get the digits, ......
BUT, for now, lol..........
Can I see pics of what you did on the sub? I was going to maybe mount it between the roll bars/set out to flush with the furthest in portion of the roll bars (more toward the bed)....... Anyway, I did a video on this on my build...
I just finished the rear gate panel resto(mostly finished, lol.... Still gotta glue the carpet down and edges with a hot knife and then border around some of it still... But it's bolted up).
LOVE the coated diamond plating..... PRICEY STUFF, ..... but TOUGH!
My other question about the sub is how to line the inside of the panel to adequately create a 'SUB BOX IN MY PANEL' factor! hahaha. First, ...what size sub? My JL is a 10".... Not super big... but loud, lol... Worried about big time rattling. Also, "Which side" to mount it... CUZ, well, the jack is right there at the rear, blocking beyond that, and also I'm wiring in a back window switch and 3 lights.... ALSO, hahaha...... I wanted to put it between the roll bar pillars bcuz then I could put bars in front of it so it can't be stolen easily with the top off?
 10-22-2012, 07:44 PM
#65
Registered User
iTrader: (1)
Join Date: Apr 2011
Location: Denver, CO
Posts: 235
Likes: 0
Received 0 Likes
on
0 Posts
Thanks for the input on the thermometer Stanz. I live in Colorado and would definitely see temps below freezing, but that gauge just looks so dang cool. I may have ot do it to mine anyway.
10-22-2012, 10:07 PM
#66
Registered User
Chef,
The size of your sub box will depend on your sub, and if you want a sealed or ported enclosure...
some reading material
http://www.bcae1.com/spboxnew2.htm
The size of your sub box will depend on your sub, and if you want a sealed or ported enclosure...
some reading material
http://www.bcae1.com/spboxnew2.htm
10-23-2012, 12:47 AM
#67
Stanz, ... that is brilliant, man! lol... Ok, maybe not brilliant, but I sure think it's a SICK IDEA AND APPLICATION THEREAFTER!  haha. Nice work, really.
Hey outsane, ... thanks alot, man. Don't wanna clutter up his thread too much, but it's a 10" JL Concave Sub...(No cone)....... It's in a box right that slides up against the back seat at that angle, ya know? >>>>

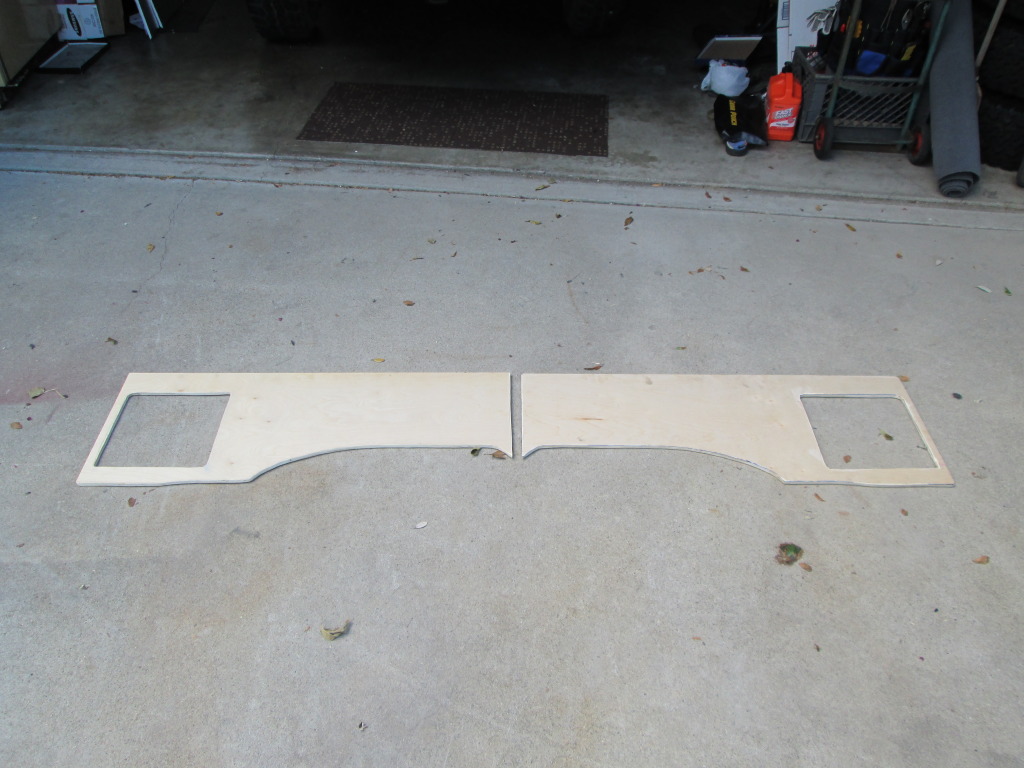
I'm trying to do my panels in .50" birch, Stanz, Outsane, etc.... (it's actually .41" in reality)... I cut them and the pocket doors already....... Lil concerned, since you used 5/16", that these might cause me a fitment problem....... (I guess you would say they're 7/16"??? lol) >>>
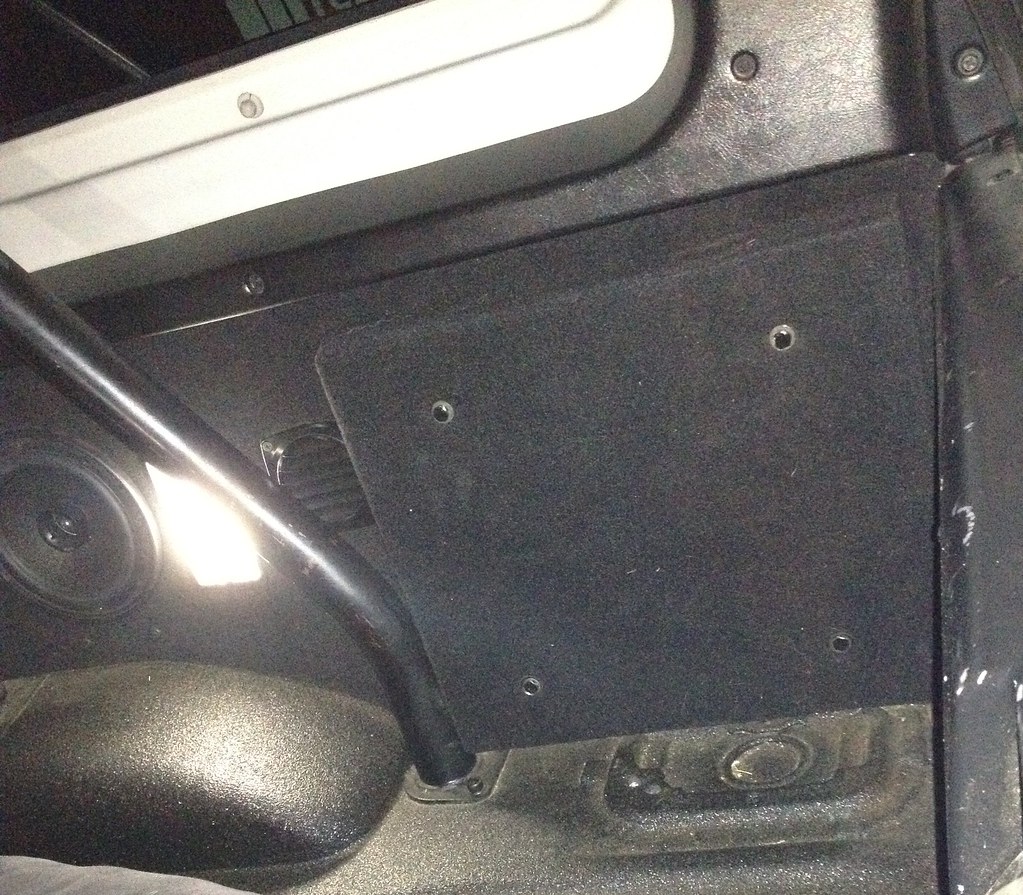
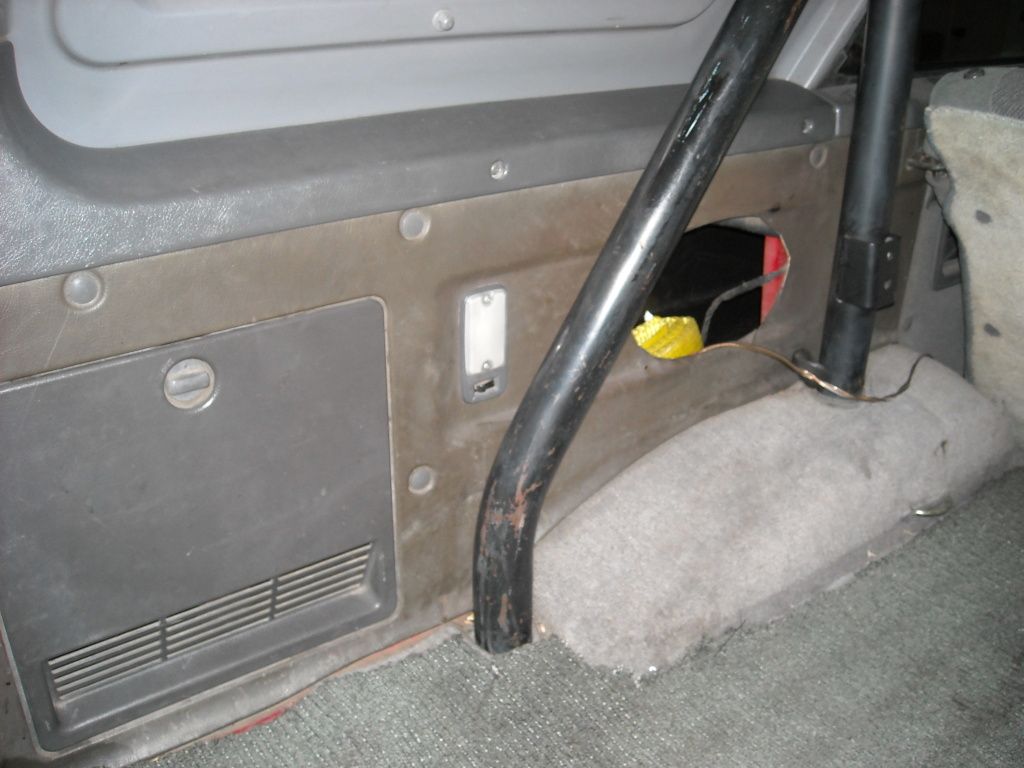
The area where the hole is in this picture(on the other side actually) is where I was going to plant the 10" JL.... It would probably fit without much problem... BUT, using the panel's insides as a box in a way... Not sure it would work out really well without LOTS of proper deadening, etc., right? >>
BUT, I'm really liking this idea of yours. That pocket is LARGE, lol. I'm just not sure that with the 'SOUND' i like, (crisp clean highs and good thump, but NOT shake the whole rig lows... Does it lose something in the enclosure? What size is it again? I'm not really understanding how it's mounted in that box you made.... Is the sub spaced off the panel I'm looking at... With speaker facing me.. BUT, kept away from the face of that outer most portion of the box with rings?
Also, what is that vent thing next to the box you made? Is that heat vents or a 4" speaker?? lol. Sorry, I'm tired... silly questions, I know haha.
haha.
haha. Nice work, really. Hey outsane, ... thanks alot, man. Don't wanna clutter up his thread too much, but it's a 10" JL Concave Sub...(No cone)....... It's in a box right that slides up against the back seat at that angle, ya know? >>>>
I'm trying to do my panels in .50" birch, Stanz, Outsane, etc.... (it's actually .41" in reality)... I cut them and the pocket doors already....... Lil concerned, since you used 5/16", that these might cause me a fitment problem....... (I guess you would say they're 7/16"??? lol) >>>
The area where the hole is in this picture(on the other side actually) is where I was going to plant the 10" JL.... It would probably fit without much problem... BUT, using the panel's insides as a box in a way... Not sure it would work out really well without LOTS of proper deadening, etc., right? >>
BUT, I'm really liking this idea of yours. That pocket is LARGE, lol. I'm just not sure that with the 'SOUND' i like, (crisp clean highs and good thump, but NOT shake the whole rig lows... Does it lose something in the enclosure? What size is it again? I'm not really understanding how it's mounted in that box you made.... Is the sub spaced off the panel I'm looking at... With speaker facing me.. BUT, kept away from the face of that outer most portion of the box with rings?
Also, what is that vent thing next to the box you made? Is that heat vents or a 4" speaker?? lol. Sorry, I'm tired... silly questions, I know
haha.
10-23-2012, 08:01 AM
#68
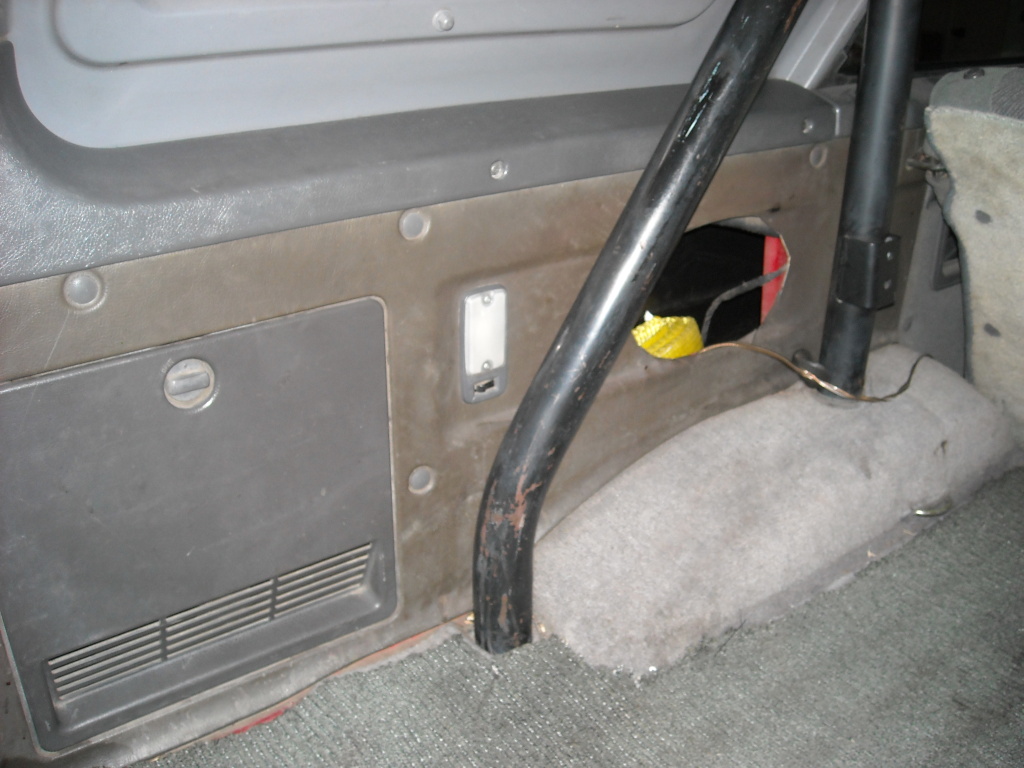
I mounted the sub first to a piece of 3/4 in plywood and then cut a round hole in the pass side panel for the sub to poke through. I used t-nuts on the backside of the plywood to allow 3 in bolts to screw in and secure the lid (makes the rear panel nice and tight).
I peel n seal on the inside panels for deadening. Additionally I decided to stuff the speaker enclosure area since I knew I wasn't going to have a perfect box like environment. I stuffed it with plastic drop cloths and cut up 'pool noodles' from the dollar store. Fills in the volume but doesn't absorb moisture. Rear panel is more deadened than a German luxury car.
That vent is for my amp. It's intended for a boat application (source: West Marine)
10-23-2012, 08:08 AM
#69
Registered User
Hey stanz i love what you did with your 4 runner! I have a 93 yota truck. Do you know if those bumpers you put on yours are compatible with that year of truck? I have been looking for bumpers but I cant seem to find what I want
10-23-2012, 08:43 AM
#71
Stanz, ... that is brilliant, man! lol... Ok, maybe not brilliant, but I sure think it's a SICK IDEA AND APPLICATION THEREAFTER! haha. Nice work, really.
Hey outsane, ... thanks alot, man. Don't wanna clutter up his thread too much, but it's a 10" JL Concave Sub...(No cone)....... It's in a box right that slides up against the back seat at that angle, ya know? >>>>
I'm trying to do my panels in .50" birch, Stanz, Outsane, etc.... (it's actually .41" in reality)... I cut them and the pocket doors already....... Lil concerned, since you used 5/16", that these might cause me a fitment problem....... (I guess you would say they're 7/16"??? lol) >>>

The area where the hole is in this picture(on the other side actually) is where I was going to plant the 10" JL.... It would probably fit without much problem... BUT, using the panel's insides as a box in a way... Not sure it would work out really well without LOTS of proper deadening, etc., right? >>
BUT, I'm really liking this idea of yours. That pocket is LARGE, lol. I'm just not sure that with the 'SOUND' i like, (crisp clean highs and good thump, but NOT shake the whole rig lows... Does it lose something in the enclosure? What size is it again? I'm not really understanding how it's mounted in that box you made.... Is the sub spaced off the panel I'm looking at... With speaker facing me.. BUT, kept away from the face of that outer most portion of the box with rings?
Also, what is that vent thing next to the box you made? Is that heat vents or a 4" speaker?? lol. Sorry, I'm tired... silly questions, I know haha.
haha. Nice work, really. Hey outsane, ... thanks alot, man. Don't wanna clutter up his thread too much, but it's a 10" JL Concave Sub...(No cone)....... It's in a box right that slides up against the back seat at that angle, ya know? >>>>
I'm trying to do my panels in .50" birch, Stanz, Outsane, etc.... (it's actually .41" in reality)... I cut them and the pocket doors already....... Lil concerned, since you used 5/16", that these might cause me a fitment problem....... (I guess you would say they're 7/16"??? lol) >>>
The area where the hole is in this picture(on the other side actually) is where I was going to plant the 10" JL.... It would probably fit without much problem... BUT, using the panel's insides as a box in a way... Not sure it would work out really well without LOTS of proper deadening, etc., right? >>
BUT, I'm really liking this idea of yours. That pocket is LARGE, lol. I'm just not sure that with the 'SOUND' i like, (crisp clean highs and good thump, but NOT shake the whole rig lows... Does it lose something in the enclosure? What size is it again? I'm not really understanding how it's mounted in that box you made.... Is the sub spaced off the panel I'm looking at... With speaker facing me.. BUT, kept away from the face of that outer most portion of the box with rings?
Also, what is that vent thing next to the box you made? Is that heat vents or a 4" speaker?? lol. Sorry, I'm tired... silly questions, I know
haha.
10-23-2012, 11:30 AM
#75
I mounted the sub first to a piece of 3/4 in plywood and then cut a round hole in the pass side panel for the sub to poke through. I used t-nuts on the backside of the plywood to allow 3 in bolts to screw in and secure the lid (makes the rear panel nice and tight).
I peel n seal on the inside panels for deadening. Additionally I decided to stuff the speaker enclosure area since I knew I wasn't going to have a perfect box like environment. I stuffed it with plastic drop cloths and cut up 'pool noodles' from the dollar store. Fills in the volume but doesn't absorb moisture. Rear panel is more deadened than a German luxury car. ( <<<< hahahahaha.... I just totally missed that... wow. GREAT one, man! )
That vent is for my amp. It's intended for a boat application (source: West Marine)
Just realized that I missed one your questions on sound. I never had a box for this one to compare. It sounds really good to me, not audiophile competition grade but much better than without. I have to close my sunroof if I crank it because it rattles it too much (in the good way)
Far as the Box........ I'm not sure I get exactly how you built it in to the other panel..... Are those 4 screws on the outside the 3" screws and they secure on the inside of the plywood panel with "T-NUTS"? THAT makes sense to me, haha... How big a sub and how much space around the portion of the speaker magnet so it could pump some air out the back? 1"? I KIND OF understand what you mean about the pool stix things... But plastic liner? What I don't get is how the SUB BOX is sealed off to IT'S LEFT, when facing it/IOW, what's in the void to the left to create that 'BOX' effect?
I'm sorry, Stanz... I really don't mean to be a PITA, .. I'm just a very visual learner... and, well, I can't see in there, so I wanna make sure I get it, as this would mean I need to grab another panel and create a different hole that I did.
Far as Peel and Seal, ... You did this all down the panel, how many layers thick? Did you use foil tape after you installed it, to seal off the edges where the tar is minimally exposed?
10-23-2012, 07:09 PM
#76
No worries. Hopefully the pictures below help. I was working fast and at night when I did a lot of this so I didn't take a picture each step of the way.
My sub is a 10 inch Polk Marine DVC sub. I applied the Peel n Seal to the inside of the metal rear quarter panel. Since Peel N Seal softens in summer heat and peels off of vertical surfaces, I recovered the edges with high end foil duct tape.
I then made a 3/4 plywood mounting plate that mounted flush to the backside of the inner bed rails (see picture below). Blocking off the rear cavity forward would have been a carpentry nightmare, so I cut up and taped together a bunch of pool noodles and jammed them in place, then sealed up around them with tape -- it's not a wood wall, but it's snug and does not absorb moisture.
http://www.flickr.com/photos/72188695@N05/8117932659/
The sub was too deep for the mounting so I stacked three mdf rings (glued & nailed) to space it out enough. I then made a lid with for the sub that was about an inch taller than the sub. Drilled a bunch of holes in the hard wood cover before covering it in carpet and only put three edges on the lid (bottom edge left open as a port).
To mount the lid, I used three in bolts that screw into the t-nuts shown below mounted to the back side of the sub mounting board -- allows for easy access without the fatigue wood screws create from repeated r&r.

As far as the plastic liner goes, I was looking to 'stuff' the opening. I talked to a stereo installer and he said if I wasn't going to build a proper box, I was better off filling the cavity with quilt batting -- that absorbs a ton of moisture. I found that if you open up a plastic drop cloth and then bunch it up you can achieve the same thing and not risk moisture absorption.
My sub is a 10 inch Polk Marine DVC sub. I applied the Peel n Seal to the inside of the metal rear quarter panel. Since Peel N Seal softens in summer heat and peels off of vertical surfaces, I recovered the edges with high end foil duct tape.
I then made a 3/4 plywood mounting plate that mounted flush to the backside of the inner bed rails (see picture below). Blocking off the rear cavity forward would have been a carpentry nightmare, so I cut up and taped together a bunch of pool noodles and jammed them in place, then sealed up around them with tape -- it's not a wood wall, but it's snug and does not absorb moisture.
http://www.flickr.com/photos/72188695@N05/8117932659/
The sub was too deep for the mounting so I stacked three mdf rings (glued & nailed) to space it out enough. I then made a lid with for the sub that was about an inch taller than the sub. Drilled a bunch of holes in the hard wood cover before covering it in carpet and only put three edges on the lid (bottom edge left open as a port).
To mount the lid, I used three in bolts that screw into the t-nuts shown below mounted to the back side of the sub mounting board -- allows for easy access without the fatigue wood screws create from repeated r&r.
As far as the plastic liner goes, I was looking to 'stuff' the opening. I talked to a stereo installer and he said if I wasn't going to build a proper box, I was better off filling the cavity with quilt batting -- that absorbs a ton of moisture. I found that if you open up a plastic drop cloth and then bunch it up you can achieve the same thing and not risk moisture absorption.
Last edited by stanz; 10-23-2012 at 07:20 PM.
10-23-2012, 10:24 PM
#78
Thanks, Stanz....
I'm still not sure I'm 100% clear as to where you put the wad of pool noodles, lol... But I'm guessing that either those or the waded up drop cloth thingymadoer wound up being the wall to the side, because, well, as you were saying, "It would be a carpentry nightmare" ... to build one in there. lol... I AGREE! lol.
I was thinking of doing it still in between the roll bars... Mainly cuz I like having that back door as storage... and will be putting an Inverter right there inside the door/below...(Possibly my second amp in there as well... I have a 600w RMS dual channel to my 10" JL Audio Sub)... AND, 120V plug sockets OUTSIDE the wood panel... etc.
SO, I guess I could still mount it like you did, risen from the added 3/4" MDF, coming out to nearly the edge of the in-between of the roll bars... Then If I secured a cut out of MDF behind each of the two support body pillars to either side.. Then bolt through the outer portion of the panels and added rings into the wood behind those two support body pillars...Seal the front and back of both Added MDF wedges with body seal... And line that pocket HEAVILY with Dynamat/RAAMat or the like, then an angled piece of 1/4" project board right against the Dynamat or whatever.... and the rest on either side with P&S or U-Seal.......... I think it'd work! hahahaha. ...... I'll be posting up a video of what I'm talking about, and I'm under way of pulling the panels from the back, etc, in my build thread(giving you props there, and HERE AS WELL THANKS, Stanz, for giving me your ideas.)
I am NOT decided that I WILL NOT put it where you did... It would work in either spot, I feel. Just have to decide which place is most practical for my set up... I FILL my rigs cargo area when I camp... BUT, I'll be freeing up a bit of space when I mount my Con-Ferr 60"x40" Portal CAGE to the roof... So that would make things not so tight in the rear... and again, either spot would work just fine. Just a matter of practical application, right?
I was thinking of tracing out templates for the cavity behind each of those support pillars... BUT, I think it would be easier to do them to the side, straight up and down.... Then just cut the curve for the rear by making a trace of the outer body panel. Does any of that make sense, man? It does in my head, but I realize it's not the most technologically accurate terminologies! hahaha.
BTW, .. my box has no vent. From what I've read and what my buddy told me today... "That's because the box is built to the 'EXACT' '1728' DIMENSIONS that a box would require to be the most accurate displacement possible.">>> ??? lol.
I'm still not sure I'm 100% clear as to where you put the wad of pool noodles, lol... But I'm guessing that either those or the waded up drop cloth thingymadoer wound up being the wall to the side, because, well, as you were saying, "It would be a carpentry nightmare" ... to build one in there. lol... I AGREE! lol.
I was thinking of doing it still in between the roll bars... Mainly cuz I like having that back door as storage... and will be putting an Inverter right there inside the door/below...(Possibly my second amp in there as well... I have a 600w RMS dual channel to my 10" JL Audio Sub)... AND, 120V plug sockets OUTSIDE the wood panel... etc.
SO, I guess I could still mount it like you did, risen from the added 3/4" MDF, coming out to nearly the edge of the in-between of the roll bars... Then If I secured a cut out of MDF behind each of the two support body pillars to either side.. Then bolt through the outer portion of the panels and added rings into the wood behind those two support body pillars...Seal the front and back of both Added MDF wedges with body seal... And line that pocket HEAVILY with Dynamat/RAAMat or the like, then an angled piece of 1/4" project board right against the Dynamat or whatever.... and the rest on either side with P&S or U-Seal.......... I think it'd work! hahahaha.
...... I'll be posting up a video of what I'm talking about, and I'm under way of pulling the panels from the back, etc, in my build thread(giving you props there, and HERE AS WELL THANKS, Stanz, for giving me your ideas.)I am NOT decided that I WILL NOT put it where you did... It would work in either spot, I feel. Just have to decide which place is most practical for my set up... I FILL my rigs cargo area when I camp... BUT, I'll be freeing up a bit of space when I mount my Con-Ferr 60"x40" Portal CAGE to the roof... So that would make things not so tight in the rear... and again, either spot would work just fine. Just a matter of practical application, right?
I was thinking of tracing out templates for the cavity behind each of those support pillars... BUT, I think it would be easier to do them to the side, straight up and down.... Then just cut the curve for the rear by making a trace of the outer body panel. Does any of that make sense, man? It does in my head, but I realize it's not the most technologically accurate terminologies! hahaha.
BTW, .. my box has no vent. From what I've read and what my buddy told me today... "That's because the box is built to the 'EXACT' '1728' DIMENSIONS that a box would require to be the most accurate displacement possible.">>> ??? lol.
10-24-2012, 07:41 AM
#80
Thanks! Oddly I don't have good answer for the line-x cost. That shop under bid the job then messed up the application so bad I had to get line-x corporate involved. The first ended up losing their franchise over it and corporate footed the bill for a full strip down and respray.
Last edited by stanz; 10-24-2012 at 07:46 AM.


