When you click on links to various merchants on this site and make a purchase, this can result in this site earning a commission. Affiliate programs and affiliations include, but are not limited to, the eBay Partner Network.
Sorry to hear about the rust. I feel your pain as I'm sure you've seen on my build thread. The unfortunate thing is that unless you have a scratch in the paint or the paint has just plain faded and peeled away, rust rarely starts on the outside. It typically gets in places from the inside through leaks or cracked seam sealer then just sits. It gets on the dust and dirt that naturally accumulates and never dries, and creeps into pinch welds. What this means is that by the time you see a bubble on the outside, the inside is usually more than ten times worse. Not trying to scare you, just trying to mentally prepare you so you can get it fixed right.
Here's my truck showing what was visible from the outside versus what was actually happening on the inside.
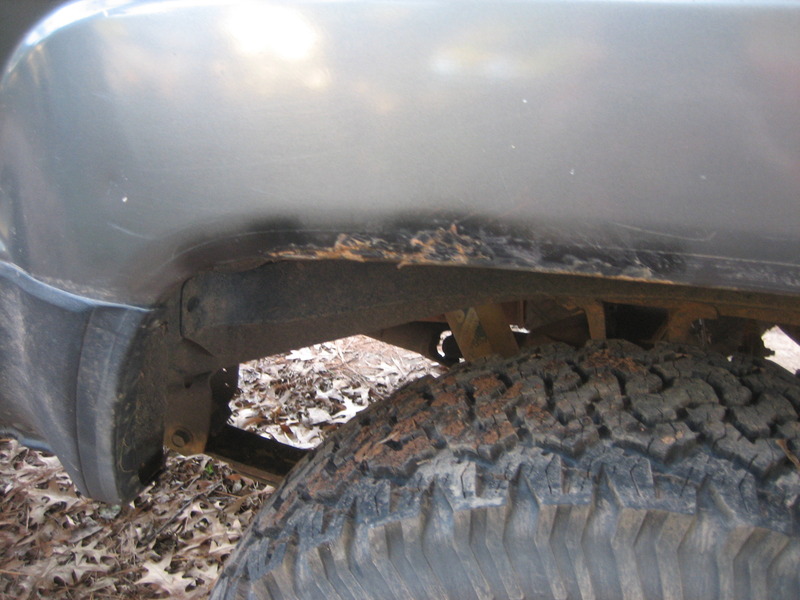
Back left wheelarch. Obvious rust but not as bad as some I've seen.
You can see that the rear half of it looks fine.
But cutting it open revealed this. 90% of it was rusting and it would only be a matter of a couple years before it all showed it's ugly face.
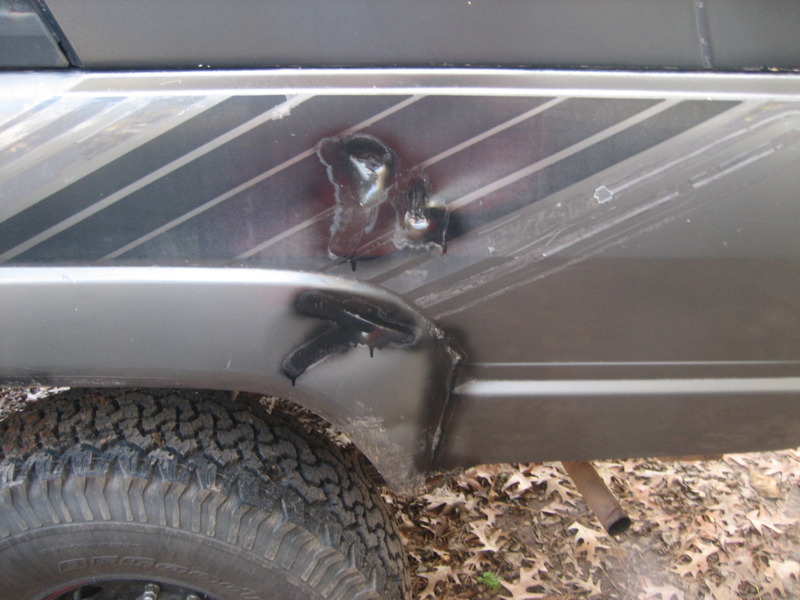
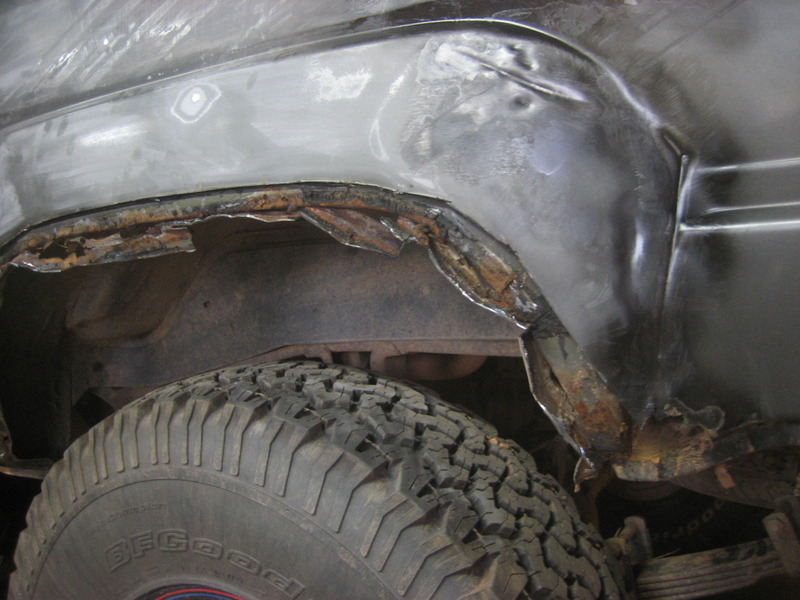
What you described above is what my passenger side quarter looks like, it looks 10 times worse inside than on the outside. Looking at the holes that I already have from the inside, I don't see any metal that is good enough to keep to try to patch, and even if I were able to, it's just a matter of time before it shows up again. At this point I'm thinking of just getting a new quarter panel from toyotafiberglass.com.
The driverside from what I can see looks good on the inside. I don't know if they purposely spray the inside of the quarter when painting these from the factory, or ifs just overspray, but for whatever reason the driverside looks like it has a thicker more even coat of paint on the inside, the passenger side looks like it hardly got any. I'm going to be removing the back seat and the rear side panels later in the week in preparation for my new carpet, I'll be able to get a better view of the inside of the quarters then and will post up some pics, I'm hoping I'll only have to replace the passengerside. Man, this rig is really starting to live up to my user name.
Lol I feel your pain, mine has rust around the wheel openings toyotafiberglass is a great product, I went with factory rear quarters from a wrecked 4R, also got the rockers, I couldn't get the fiberglass until August or I wouldof went that route
They will get the full treatment, from stripping, epoxy primer, rust encapsulation, and undercoat
That's good that you found a some good metal replacements, it's getting harder to find quarter panels that are worth salvaging anymore, seems like they are either full of rust, or all dented, lol. When you said you couldn't get fiberglass quarters until August, we're you talking about financially you couldnt buy them until then, or does toyota fiberglass have a waiting list on orders?
That's good that you found a some good metal replacements, it's getting harder to find quarter panels that are worth salvaging anymore, seems like they are either full of rust, or all dented, lol. When you said you couldn't get fiberglass quarters until August, we're you talking about financially you couldnt buy them until then, or does toyota fiberglass have a waiting list on orders?
Waiting list, had to send a deposit now to even get them then.
I love the glass parts but that time frame wont work with my restore.
I'm going to do a build thread soon, I'm doing a total rebuild off the frame with a color change
Thanks for the heads up on the waiting list for the fiberglass, that's something I'll have to take into consideration, I was hoping to have my body ready by summer :/
I'll have to keep an eye out for your build thread when you start one, sounds like you got a good project under way as well!
I was looking for a mount for my tablet so I could play my music library through my stereo, but I was having a hard time coming up with one that would work, most of them use a suction cup mounting system to the windshield, but my inclinometer is in the way. So I decided to try to make my own. I will use the track that the ashtray slides into to secure my tablet mount.
Here's some pics, it's still rough, I need to bevel the corners and clean it up. Then I will probably wrap it in some fake leather fabric I have.
I was a little concerned about the weight of my mount since I made it out of some 14 gauge sheetmetal, but since it slides really far into the dash it is really sturdy.
Thanks, it's still in the "rough" stages, tomorrow i will get it a cleaned up, corners rounded off, and painted. Overall I'm pretty happy with it, it's mounted just close enough that with my hand resting on the gear shift knob I can easily select different tracks or adjust the equalizer.
I'm going to make a cup holder out of my ashtray track. I love this idea though. Very neat
Ha, ha, thats where I got my idea from. I have an old 76-79' Ford pickups and I was on LMC Trucks.com looking for some parts and saw a cupholder like that on there, thought that was a pretty good idea, just tweaked it a little. I will eventually have cupholders in a new center console that I'm going to build, my plastic console is trashed.
Sorry to hear about the rust. I was reading one of Slackers threads and he does mention that it can take a while to get the panel made. Your tablet mount looks really good. I like how it is accessible.
Never thought about an ashtray drink holder. Looks like a great idea. I have been checking the boneyard trying to find a center console that would work for several different things and is easier said then done. I been checking all makes and models.
Your 5 speed knob shifter is hard to find. I like the look of the numbers behind the glass.
Hi Terry. Yeah it sounds like Cory and the guys at Toyota Fiberglass are really busy. I sent him an email asking how long of a wait and what the total cost of shipping me a quarter panel would be. He responded and let me know that it would be expensive to ship just a single panel do to the freight charges, crate charges and customs charges on top of the cost of buying the panel (it would be upwards of $750 for the quarter panel). If I were to buy multiple panels it would save me more in the long run because of all the other charges involved. So I'll be holding off on that, maybe I can find a good replacement used quarter panel, in the meantime I need to pull all the fender well moulding off and the rock chip protectors and really make sure there isn't any more rust lurking somewhere.
Hopefully I'll get the tablet holder finished today. I plan to build a center console similar to my last one in my 86' , but this one will replace the plastic around the shifter levers as well since mine are all cracked. I might add 2 cupholder to the next one, since I won't need the armrest, my new seats have armrest already. I'll have to wait on the console until I get the seats mocked up so I know how much room I have to work with.
I didn't know the shift knob was anything special, lol...Is it an SR5 only option?
Well I thought we were in for an early spring, the weather has been nice and the snow finally melting off... then this morning I woke up to this:
I finished my tablet holder. Upholstery is defiantly not my strong suit, I was getting really frustrated. I used some 3M spray on adhesive to apply the fabric, I added a little bit of foam just to cushion the tablet a little, it also made for a snug fit, I can turn it upside-down and the tablet won't slide out.
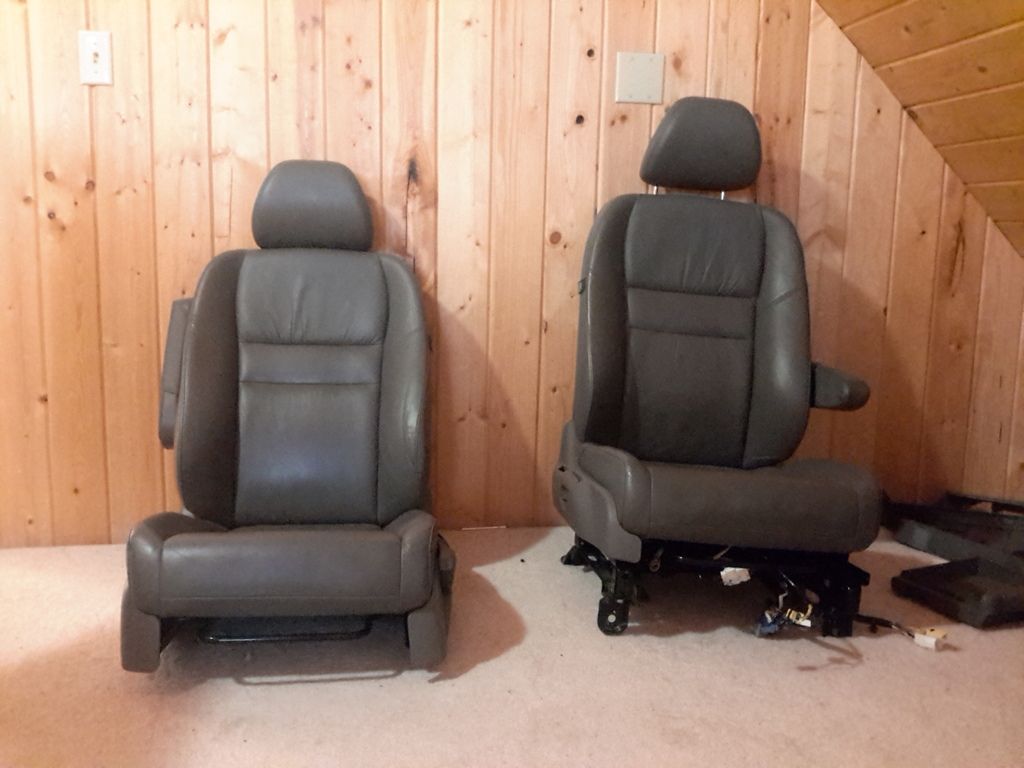
I also started working on my bucket seat, trying g to remove the extra bracket that adds additional height to the seat that I don't want. I bought two T30 torx head 3/8 drive sockets to remove the bolts, but they were so tight that it just twisted the torx head and ruined both of my sockets! I ended up using my grinder and cut the bolts of, it was a total pita, but at least now I can get my driver seat mocked up. My new carpet should be here friday. Here's a pic of the extra bracket I had to remove, now my seat will set closer to the floor and I will get my headroom back, lol.
And here's a pic showing the height difference of the driver's seat compared to the passenger seat after removing the unwanted braket.
Small update. The guy I bought my seats from had another rear bench seat out of a Durango for sale on Craigslist that looked like a closer color match to my front light grey bucket seats.
So I called him and he let me trade my dark grey for his light grey bench seat, got it home to compare them and it's a really close color match. This one has some suede at the top, but that's fine, I'm pretty happy with them. You can see how much darker the other bench seat was in the above pic compared to the ones below. Hope to get my carpet tomorrow!!
Do the rear seats fold down flush like the oem ones do? Curious I really like the option of a center console in the rear for my kids. Also what year are they from I guess 2000 up all make and models were required to have a car seat latch system
Do the rear seats fold down flush like the oem ones do? Curious I really like the option of a center console in the rear for my kids. Also what year are they from I guess 2000 up all make and models were required to have a car seat latch system
No, they fold differntly than oem. You can fold each seat back down flat like the center section/console, then you can tumble it forward towards the front seat, if that makes sense, (like in the 4th pic above your post)The reason is this was a middle bench seat, and it was to allow easier access to the 3rd row seat. The center section with the cupholder is stationary, it doesn't tumble forward. I'll go back and add pics when I get home from work tonight just to make it less confusing, lol. I'm not sure on the year, probably 98' and up. These are just like the ones out of my wife's wrecked 2002 durango. I have 2 kids, so having the cupholders is going to work out great! *EDIT, here's some pics of it folding up in stages*
Originally Posted by 84 yota dude
Is there enough room to fit that bench seat in the back?
Yeah there's room, I was a little worried because I forgot to measure my old seat first before picking this one up, but they both measure aprox 52" wide.
◆◆◆EDIT 4/13/16◆◆◆
AFER WORKING ON THE REAR SEATS I FIGURED OUT THAT THEY WILL NOT BE A DIRECT BOLT IN SWAP. THEY WILL SIT TO HIGH DUE TO THE CONTOUR OF THE TOYOTA FLOOR. HOWEVER THEY WILL BOLT IN WITH SOME MODIFICATIONS AND WILL FLIP FORWARD JUST LIKE THE ORIGINALS. I THINK THIS IS A GOOD OPTION SINCE DURANGO'S ARE PLENTIFUL COMPARED TO TRYING TO FIND A GOOD ORIGINALS SEAT OR PAYING AN AUTO UPHOLSTERY SHOP TO RECOVER THEM.
Just finished reading thread. This is an awesome build,great job man! I'm contemplating doing a 2nd gen rear seat swap,but I like those Durango seats a lot better!
 02-24-2016, 02:27 AM