Quest for a more bulletproof 22RE - 89 4runner engine build
 12-30-2014, 10:36 AM
#81
Registered User
Thread Starter
Join Date: Apr 2014
Location: Dallas, Tx
Posts: 415
Likes: 0
Received 0 Likes
on
0 Posts
I'll get the new IAC painted and installed back into the repainted throttle body tonight. The JB Weld patch on the upper plenum should be solidified by now, so I'll bolt it back on to the lower intake as well. I've got a ton of leftover bolts, but I may go ahead and stop in at ACE to see if I can't find some plugs for those back holes on the head. I've ordered some more break in oil as well as a Borla Turbo XL muffler that should be in by this weekend. So hopefully, everything will come together and I'll see if I can't get a tune out of this trombone.
I'm almost certainly going to have to buy a silicone reducer to go from the new AFM to the original intake as the sizes are a good 1/2" to 1" off. I'll also have to take my die grinder and open up the plastic spacer that goes into the AFM to ensure that the new 2" x 2.5" door is maximized. Potentially in the future I may sculpt some bondo-glass to smooth out the transition of the round into the rectangle, but that would be down the road.
I'm almost certainly going to have to buy a silicone reducer to go from the new AFM to the original intake as the sizes are a good 1/2" to 1" off. I'll also have to take my die grinder and open up the plastic spacer that goes into the AFM to ensure that the new 2" x 2.5" door is maximized. Potentially in the future I may sculpt some bondo-glass to smooth out the transition of the round into the rectangle, but that would be down the road.
 01-06-2015, 09:33 AM
#82
Registered User
Thread Starter
Join Date: Apr 2014
Location: Dallas, Tx
Posts: 415
Likes: 0
Received 0 Likes
on
0 Posts
It's Alive!
So I got the new IAC valve installed on the Throttle body, patched up the hole in the intake with some JB Weld, and double checked all of the sensors and rear block off plate to make sure there were no more leaks. I also got the TPS adjusted correctly from the previous position I had cheated it forward (and installed the allen head bolts for easy adjustment on the vehicle). I plugged the two holes in the head with some allen head set screws and some ultra grey. I then bolted the upper plenum back on and clamped down the new Supra / Cressidia MAF and got it plugged up. The intake is too long now to fit where it was before (also a contributing factor is that the new radiator sits higher), so I will most certainly have to swap the battery and intake sides or go buy some cheap spectre 3" flex intake line.
Anyway, now to the big news...I got it started up and adjusted the idle down from 2250 to 2K via the idle adjustment screw (adjusting this screw did absolutely nothing before). After it warmed up and the thermostat opened up, the new IAC valve dropped the idle down to about 1100. I've still got to figure out the intake, and use the jumper in the diagnostic port to drop the idle down to 850 so I can get the timing set perfectly, but the main thing is that she's running....and running correctly! I can't wait to drive her around and see how much more power and response all of the little upgrades have squeezed out of these 4 angry Japanese squirrels...I think it's going to be a vastly noticeable difference in performance and torque (and hopefully gas mileage although it's $1.74 a gallon right now in Texas).
I've also got to get the exhaust figured out as well as what I'm going to do in the interim with the intake fitment issue, but I'll keep everyone posted on the updates as I get to them.
01-08-2015, 01:35 PM
#85
Registered User
Thread Starter
Join Date: Apr 2014
Location: Dallas, Tx
Posts: 415
Likes: 0
Received 0 Likes
on
0 Posts
01-08-2015, 04:10 PM
#86

Hi joelsmithdesigns, I've had a lot of fun reading your thread it was very detailed! There are somethings I want to tell you however and I really hope you don't take it badly because that is not what I want.
About your valvetrain, it will make your engine less reliable. Higher spring pressures will wear out your cam and your rockers quicker, I suggest doing a yearly inspection on them and using an oil with high zinc content like diesel oil, used oil analysis have shown that shell rotella t-6 5w40 is a great oil with good additives, much better than many high dollar "racing'' oils. Also check retainer wear, you'll have to research it because I'm not too sure if what I'm going to write aplies to you but back in the day when I worked on hondas the titanium or chromoly (I don't remember) wore out much faster, people had to replace them at relatively short interval. Basically what I am saying is that your valvetrain is performance oriented, not reliability oriented, and when something is performance oriented it is made to be checked and replaced often.
Also about your oil pump, when you say ''high flow oil pump'', do you know if all they did was shim the spring to increase pressure? There had been misinformation for yeeeaaars where people would think increasing max oil pressure was better, which is not, what you want it more oil volume, i.e bigger surface area on the pump rotor, smoothing oil passages (not too smooth!) and radiusing corners (the ones on the timing cover help a lot). I am bringing this up because of the added space the oil has to travel through with your duel filter setup.
For reliability I would suggest fully blueprinting the block i.e. making sure everything falls within the exact tolerances the OEM would have wanted it to, because it is impossible on mass produced engine they add a ''that will do'' margin which you want to avoid. There are many blueprinting books from which I have learned a lot! Just by doing that, you will make your engine last much longer without buying parts like arp rod and main bolts which is totally useless for you application and only usefull above 6500rpms. I hope you re-bored the rods after installing the rod studs!!
Keep it up man!
Last edited by gillesdetrail; 01-08-2015 at 07:21 PM.
01-08-2015, 05:00 PM
#87
Also have a look at this, it seems to be more of an issue on aftermarket heads, but not on all of them, might be worth it to slightly enlarge the bolt hole
http://www.pirate4x4.com/forum/toyot...tarvation.html
And this for break-in
http://www.mototuneusa.com/break_in_secrets.htm
http://www.pirate4x4.com/forum/toyot...tarvation.html
And this for break-in
http://www.mototuneusa.com/break_in_secrets.htm
Last edited by gillesdetrail; 01-08-2015 at 05:28 PM.
01-08-2015, 05:55 PM
#88
Hi joelsmithdesigns, I've had a lot of fun reading your thread it was very detailed! There are somethings I want to tell you however and I really hope you don't take it badly because that is not what I want.
About your valvetrain, it will make your engine less reliable. Higher spring pressures will wear out your cam and your rockers quicker, I suggest doing a yearly inspection on them and using an oil with high zinc content like diesel oil, used oil analysis have shown that shell rotella t-6 5w40 is a great oil with good additives, much better than many high dollar "racing'' oils. Also check retainer wear, you'll have to research it because I'm not too sure if what I'm going to write aplies to you but back in the day when I worked on hondas the titanium or chromoly (I don't remember) wore out much faster, people had to replace them at relatively short interval. Basically what I am saying is that your valvetrain is performance oriented, not reliability oriented, and when something is performance oriented it is made to be checked and replaced often.
Also about your oil pump, when you say ''high flow oil pump'', do you know if all they did was shim the spring to increase pressure? There had been misinformation for yeeeaaars where people would think increasing max oil pressure was better, which is not, what you want it more oil volume, i.e bigger surface area on the pump gear, smoothing oil passages (not too smooth!) and radiusing corners (the ones on the timing cover help a lot). I am bringing this up because of the added space the oil has to travel through with your duel filter setup.
For reliability I would suggest fully blueprinting the block i.e. making sure everything falls within the exact tolerances the OEM would have wanted it to, because it is impossible on mass produced engine they add a ''that will do'' margin which you want to avoid. There are many blueprinting books from which I have learned a lot! Just by doing that, you will make your engine last much longer without buying parts like arp rod and main bolts which is totally useless for you application and only usefull above 6500rpms. I hope you re-bored the rods after installing the rod studs!!
Keep it up man!
 01-09-2015, 07:42 AM
#89
Registered User
Thread Starter
Join Date: Apr 2014
Location: Dallas, Tx
Posts: 415
Likes: 0
Received 0 Likes
on
0 Posts
About your valvetrain, it will make your engine less reliable. Higher spring pressures will wear out your cam and your rockers quicker, I suggest doing a yearly inspection on them and using an oil with high zinc content like diesel oil, used oil analysis have shown that shell rotella t-6 5w40 is a great oil with good additives, much better than many high dollar "racing'' oils.
Also check retainer wear, you'll have to research it because I'm not too sure if what I'm going to write aplies to you but back in the day when I worked on hondas the titanium or chromoly (I don't remember) wore out much faster, people had to replace them at relatively short interval. Basically what I am saying is that your valvetrain is performance oriented, not reliability oriented, and when something is performance oriented it is made to be checked and replaced often.
Also about your oil pump, when you say ''high flow oil pump'', do you know if all they did was shim the spring to increase pressure? There had been misinformation for yeeeaaars where people would think increasing max oil pressure was better, which is not, what you want it more oil volume, i.e bigger surface area on the pump rotor, smoothing oil passages (not too smooth!) and radiusing corners (the ones on the timing cover help a lot). I am bringing this up because of the added space the oil has to travel through with your duel filter setup.
"LC Engineering has continued the reputation for unsurpassed quality by offering the best oil pump you can buy for your engine - our exclusive Pro Oil Pump. We start with brand new oil pumps from Japan. Next, they are hand blueprinted, hard anodized and then reassembled by our technicians. This performance modification tightens the tolerances of the pump while increasing oil pressure and volume. This pump will deliver 20 lbs. at idle and 70 lbs. at higher rpms for the extended life of your engine. Extra protection for a street engine and a requirement for high output race engines. Comes with O-ring for installation. "
Being hard anodized and blueprinted, and starting with the highest quality Japanese parts means longevity. I don't think they would just shim a spring....these guys live and breathe 22R's and have commissioned multiple custom parts to be made just for them, including this oil pump. I also got their adjustable oil pump bypass to be able to adjust my oil pressure accordingly. I assume with the much increased volume of the dual remote filter setup and oil cooler, I would probably need to adjust the pressure at the pump to be able to compensate for the change in volume and flow.
For reliability I would suggest fully blueprinting the block i.e. making sure everything falls within the exact tolerances the OEM would have wanted it to, because it is impossible on mass produced engine they add a ''that will do'' margin which you want to avoid. There are many blueprinting books from which I have learned a lot! Just by doing that, you will make your engine last much longer without buying parts like arp rod and main bolts which is totally useless for you application and only usefull above 6500rpms. I hope you re-bored the rods after installing the rod studs!!
I understand you may consider ARP rod and main bolts as well as flywheel bolts and head studs to be overkill and completely useless in my application. I don't. I'm sure all of the original hardware would have easily lasted another 20 years as well, but I changed out every nut and bolt on the engine to Grade 8 SS as well, which you would probably also consider overkill and useless. I don't build engines every day and this is not something I probably plan on doing again in the near future. I was going for a slightly better than stock performance bulletproof 22RE in which I was able to research and choose every part and component on the motor, from the larger components like the Keith Black pistons and Spanish Head Casting all the way down to the Clevite 77 bearings and silicone vacuum hoses.
There's a thousand ways to set up a motor. This is the way I would have, and did set up mine. I probably spent twice as much time researching as I actually did wrenching, and constantly had to wait till payday to purchase the parts I needed as I wanted to get the best parts available, not just the ones I could afford at the time.
I'm very confident that some of the parts I put on here are overkill, and what some would consider a waste of money, but almost everything I did...I did for a reason that I can probably back with a good amount of research.
No offense taken on any of your comments, I was just trying to explain a little better why I did the things you were questioning.
01-09-2015, 10:18 AM
#90
There's a thousand ways to set up a motor. This is the way I would have, and did set up mine. I probably spent twice as much time researching as I actually did wrenching, and constantly had to wait till payday to purchase the parts I needed as I wanted to get the best parts available, not just the ones I could afford at the time.
I'm very confident that some of the parts I put on here are overkill, and what some would consider a waste of money, but almost everything I did...I did for a reason that I can probably back with a good amount of research.
No offense taken on any of your comments, I was just trying to explain a little better why I did the things you were questioning.
Here is a good article on plug reading that can help you fine tune the motor on timing and a/f once it is broken in.
http://www.4secondsflat.com/Spark_plug_reading.html
01-09-2015, 10:46 AM
#91
Registered User
Thread Starter
Join Date: Apr 2014
Location: Dallas, Tx
Posts: 415
Likes: 0
Received 0 Likes
on
0 Posts
I've read the article you mentioned about the break in as well as several others specifically regarding the proper break in and seating of the total seal gapless rings (quite a bit different than conventional rings), and plan on following as closely as possible to those instructions (except for using conventional oil after the break in - but that's because of the additives I'm putting in the synthetic for the first couple of oil changes).
01-11-2015, 10:53 AM
#92
Registered User
Thread Starter
Join Date: Apr 2014
Location: Dallas, Tx
Posts: 415
Likes: 0
Received 0 Likes
on
0 Posts
for a temporary fix, I went down and bought a flexible intake tube. I got all of that hooked up and started it up to see how well it would work. The power steering high pressure hose blew within 30 seconds of it firing up, so I've got a bit more work to do.
I'm going to completely flush the power steering system and make sure all of the air is out of the lines. If you didn't know, these toyotas don't use "power steering fluid" and instead use a Dextron III or Dextron VI "Automatic Transmission Fluid" or ATF. You shouldn't really mix the two as they are completely different formulas, and should only use the Red Dextron style ATF.
After I replace the blown hose, I will lift the front end off the ground a tiny bit so that the wheels can turn without any kind of load on them. From there, you disconnect the return hose on the Power Steering reservoir and put it into a jug or some other type of container. With the key in the ignition (so you can freely turn the wheel from lock to lock), you turn the wheel back and forth from totally right, to totally left, making sure that the reservoir never goes dry. Do this several times, and let the truck sit for about 30 minutes so that the foamed up bubbles will dissipate. Continue doing this until the fluid coming out of the return line is no longer dark, and appears to be clean ATF, and there is no longer any foam or bubbles showing up in the reservoir. That should be a complete flush of your Power Steering system, and patience is a virtue when trying to get every tiny bubble out of the system - it may take a good 1/2 a Saturday to totally bleed out the air in the system. Some of the later systems have a bleeder valve on top of the steering unit. If you're lucky, you can use this instead and it should take a lot less time.
01-16-2015, 11:23 AM
#94
Registered User
Thread Starter
Join Date: Apr 2014
Location: Dallas, Tx
Posts: 415
Likes: 0
Received 0 Likes
on
0 Posts
Getting the hoses swapped out and the power steering fully bled and flushed this weekend, and who knows, I may get the seats swapped out as well. Finally found a place that had the Borla in stock, so I ordered that and should be in Friday. I've got some other random construction and welding projects for this weekend, but I'll keep everyone posted on the progress.
01-19-2015, 08:18 AM
#95
Registered User
Thread Starter
Join Date: Apr 2014
Location: Dallas, Tx
Posts: 415
Likes: 0
Received 0 Likes
on
0 Posts
Flushing out the Power Steering system
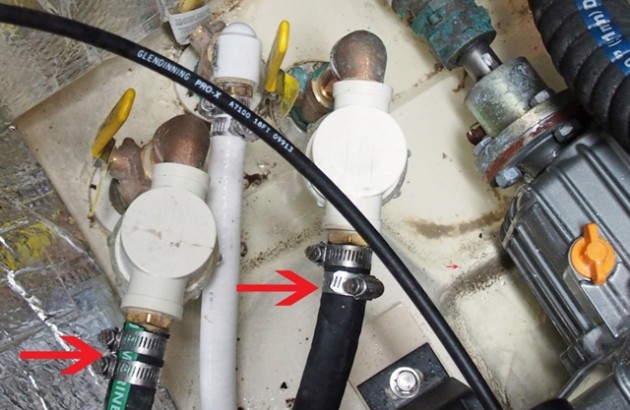
I was able to find the right type of high pressure power steering hose at my local Auto Zone and swapped out all of the hoses (3/8" and 5/8"). I double clamped the high pressure side of the system to hopefully keep them from popping off again.

I left the return line long and capped the hose fitting with a cap so I wouldn't leak fluid out of the reservoir while purging the system.

Put the return line in a milk jug and jacked up the front end so both tires were off the ground. I filled up the reservoir and (with the key in the ignition to unlock the steering, but not with the engine running) I slowly turned the wheels from lock to lock, making sure that the reservoir never went dry during the process.

it took a couple of hours of turning the wheels lock to lock, stopping for about 30 minutes and letting the air bubbles dissipate, and then starting again to fully flush out the system, but I'm fairly confident I got everything squared away. Here's the amount of fouled fluid (and probably a decent amount of excess) I pushed through the system.

Now that that's taken care of, and the Borla comes in Tuesday, I plan on driving the rig around the block a couple of times every night for about a week. That way if there's any other leaks or failures, I'm not stranded somewhere that would require a tow truck. If all goes well in the test runs, and after taking care of a few other minor details, I should be using her as my daily driver coming up shortly.
I'll probably start a new thread on my plate bumper and rear tire swing build, my air box / battery swap mods, and any other future modifications that I plan on doing, but I'll post the links here for anyone interested.
I left the return line long and capped the hose fitting with a cap so I wouldn't leak fluid out of the reservoir while purging the system.
Put the return line in a milk jug and jacked up the front end so both tires were off the ground. I filled up the reservoir and (with the key in the ignition to unlock the steering, but not with the engine running) I slowly turned the wheels from lock to lock, making sure that the reservoir never went dry during the process.
it took a couple of hours of turning the wheels lock to lock, stopping for about 30 minutes and letting the air bubbles dissipate, and then starting again to fully flush out the system, but I'm fairly confident I got everything squared away. Here's the amount of fouled fluid (and probably a decent amount of excess) I pushed through the system.
Now that that's taken care of, and the Borla comes in Tuesday, I plan on driving the rig around the block a couple of times every night for about a week. That way if there's any other leaks or failures, I'm not stranded somewhere that would require a tow truck. If all goes well in the test runs, and after taking care of a few other minor details, I should be using her as my daily driver coming up shortly.
I'll probably start a new thread on my plate bumper and rear tire swing build, my air box / battery swap mods, and any other future modifications that I plan on doing, but I'll post the links here for anyone interested.
Last edited by joelsmithdesigns; 01-19-2015 at 08:28 AM.
01-19-2015, 11:05 AM
#96
I learned that trick in the early 90's and I've needed to use it every now and then on both transmission and power steering hoses. http://features.boats.com/boat-conte...amps-properly/
Last edited by Odin; 01-19-2015 at 11:22 AM.
01-19-2015, 12:55 PM
#97
Registered User
Thread Starter
Join Date: Apr 2014
Location: Dallas, Tx
Posts: 415
Likes: 0
Received 0 Likes
on
0 Posts
Thanks again Odin,
01-28-2015, 08:55 AM
#98
Registered User
Thread Starter
Join Date: Apr 2014
Location: Dallas, Tx
Posts: 415
Likes: 0
Received 0 Likes
on
0 Posts
Still having surging idling issues
well I've taken her out to get gas and a good wash, and I'm still having issues with the idle surging up and down once she's warmed up and driving around. There's also a strange clanking noise when she's just idling at low RPM's. This might be the intake plenum hitting the fuel filter i relocated too close to it, but I'm not sure.
After hours of reading posts and possible issues I've determined that these are the potential issues:
1) Idle adjustment screw is set too high - when you brake at a light and your idle is set over 1K, the ECU cuts the fuel to the injectors (to save gas while braking)....your idle drops below 1K, then revs up and gets cut again - hence pulsing or surging idle. I originally had my LCE knurled Idle adjustment screw set above 1K, and fixed that.
2) TPS - it's possible that the TPS is not set correctly, and could cause this. I remember cleaning off the TPS with a rag, but anytime you have mechanical devices that read / send electrical impulses, it's pretty easy to get them contaminated - I plan on swapping out the one that is on there with the one from my '86 just to see if that effects it.
3) Idle Air Control Valve - just replaced this with a brand new part from Airtex Wells, so this shouldn't be the issue. Also, the initial startup revs up to the correct 1500-2K and then drops once the engine is warm, which it wasn't doing before and tells me the new IACV is working properly.
4) Coolant Temperature Sensor - this little sensor may be bad and could be telling the ECU that the engine is overheating and it needs to cut fuel to the injectors.
5) air in the Coolant system - I have heard that this can also cause the same issue as #4 because when the much warmer air hits the sensor it does the same thing. because I just replaced ALL of the heating hoses and the radiator, there's a better than good chance I need to "burp" my radiator and make sure that there are no leaks - even small ones that might not show coolant leaking.
6) AFM - I did just swap out the old AFM with the new Supra one with the guts re-soldered. There's a chance several things could be wrong here - I didn't advance the meter enough/too much to trick the injectors into squirting more fuel to make up for the increased air volume, or the spring tension could be off causing the door to "bounce" back and forth (aka surging / pulsing) at a stop. I will swap out the modified AFM and pull the one off my '86 for testing.
7) O2 Sensor - I did replace the O2 sensor with a Denso, so the first thing I'm planning on doing is disconnecting the battery to reset the ECU and see if that helps. I've also heard of an air leak before the O2 sensor causing this. I currently have a junkyard muffler clamped to the header, so the new Borla system getting welded up this weekend should take care of any leaks. Also, with such a short exhaust currently, there might not be enough back pressure in the system, and the O2 might be reading wrong (or I could have wired it up wrong, but that's doubtful since all of the wires were color coded)
8) Brake sensor wire - The Previous owner in all of his glorious intelligence put in a late model master cylinder and some other stuff. However, the wire / connector that normally plugs into the side of the booster / MC is currently just laying in the engine bay because the old style connector doesn't match up with the female connector on the MC. I'll have to scrounge a junkyard for the correct connector once I figure out what year, make, and model the MC is from.
9) Timing - Now that I have the initial air leaks in the plenum sorted, I need to recheck and set the timing correctly. Because of the performance mods I might have to advance it a little or retard it to accommodate.
10) Vacuum Lines / Vacuum switches - I deleted the EGR, PCV, and other hose coming from the intake, and replaced every vacuum line with silicone. There's a better than good chance that one of these hoses has a leak, or is hooked up incorrectly. I noticed a hiss from one of the vacuum switches constantly drawing in air through the little filter on it, so either it's hooked up incorrectly, or I should go ahead and remove the filter and have it pull air from the filter on the intake.
I have quite a bit of problem solving to do, and plan on doing each one separately from each other to see if one of them fixes the issue. Obviously getting the exhaust welded on this weekend will help, and I can easily disconnect the battery to reset the ECU. There are also several bulbs currently out in the dash, and I'm assuming that the check engine light is out. So, I'll either buy a code reader or go down to Pep Boys and have them check it to see if it is throwing any codes. Besides, what's the sense in having a computer control stuff in your rig if it can't tell you when one or more of those systems are screwed up.
Regardless, I'm sure it will be an interesting weekend, and I have a feeling this thing is going to sound like a beast with that big ol' 19" Borla finally welded up.
01-28-2015, 05:23 PM
#100
Registered User
Thread Starter
Join Date: Apr 2014
Location: Dallas, Tx
Posts: 415
Likes: 0
Received 0 Likes
on
0 Posts
Also, I don't have a girlfriend, dog, cocaine habit, child support payments, or any other huge drains on my finances other than student loans...so that helps too.


