Quest for a more bulletproof 22RE - 89 4runner engine build
 12-19-2014, 01:12 PM
#61
Registered User
Thread Starter
Join Date: Apr 2014
Location: Dallas, Tx
Posts: 415
Likes: 0
Received 0 Likes
on
0 Posts
I'm going to take the Intake off, tape up the TB hole and end going to the motor and fill it with smoke to see if it comes out anywhere....cheap hack, but sounds like it will work.
I've also seen people spray carburetor cleaner or starter fluid all over the intake until the motor revs up, and that's usually where your leak is. BUT, that would ruin my paint job and I don't want to run it any more until I get a few things figured out and fixed.
I've also seen people spray carburetor cleaner or starter fluid all over the intake until the motor revs up, and that's usually where your leak is. BUT, that would ruin my paint job and I don't want to run it any more until I get a few things figured out and fixed.
 12-20-2014, 10:32 PM
#63
Hi Joel, just read through your thread. Super good read and motor looks fab 
Hey if you're vacuum leak hunting, you can use propane as well. Won't leave a mark or mess with paint!
Hey if you're vacuum leak hunting, you can use propane as well. Won't leave a mark or mess with paint!
12-22-2014, 02:21 PM
#64
Registered User
Thread Starter
Join Date: Apr 2014
Location: Dallas, Tx
Posts: 415
Likes: 0
Received 0 Likes
on
0 Posts
found a local guy on Craigslist that may sell me an entire '89 upper plenum on the cheap, or even better, may trade for some of the other parts I have (like fully decked 81-84 head, timing cover, oil pan, etc)!
Finally picking her up from the shop today, been sick and out of town all weekend, which is no fun.
Finally picking her up from the shop today, been sick and out of town all weekend, which is no fun.
12-22-2014, 03:33 PM
#65
.....
because most people end up putting the wrong bolts behind the flywheel to hold on the cover, I went ahead and just left those off, and let the pins align the cover, finally sealing up after I bolted the trans up. Almost every engine I've torn down has the two bolts that hold the cover on completely marred and ground down by the flywheel because the people installing it didn't use the super thin head bolts that you're supposed to. I don't think it'll hurt a thing if they're not used, as long as your cover stays ligned up during the install until you can get the motor mounted to the tranny. In fact, I think there's less of a chance to screw up your flywheel and have a horrible grinding sound if the bolts that normally cause this aren't there.
....
I brought up the above excerpt because I am curious what bolts you are talking about. I'm eventually going to pull the engine to replace the rear main seal and transmission seal and clutch kit. So naturally, I wanted to touch upon the details of the bolts.
The part that piqued my curiosity was the sequence in which you say the bolts ought to be installed. I wasn't sure if the common error you describe was due to improper sequence of bolt installation, or just improper bolt installation usually because the wrong bolts get used during an ill-thought-out sequence. Not sure if it refers to the bolts that hold the clutch housing to the flywheel, or the pressure plate bolts.
Since I haven't read all the way through the build, I'm going to do that now, and most manuals don't go into the kind of detail you just did, but I'm pretty good at mentally keeping track of fine details during overhauls as well as keep track of the parts manually, like with the cardboard drawing with holes in it. I have very successfully changed the timing chain and many other things on a 22r.
12-23-2014, 04:52 AM
#66
Registered User
Thread Starter
Join Date: Apr 2014
Location: Dallas, Tx
Posts: 415
Likes: 0
Received 0 Likes
on
0 Posts
I brought up the above excerpt because I am curious what bolts you are talking about. I'm eventually going to pull the engine to replace the rear main seal and transmission seal and clutch kit. So naturally, I wanted to touch upon the details of the bolts.
The part that piqued my curiosity was the sequence in which you say the bolts ought to be installed. I wasn't sure if the common error you describe was due to improper sequence of bolt installation, or just improper bolt installation usually because the wrong bolts get used during an ill-thought-out sequence. Not sure if it refers to the bolts that hold the clutch housing to the flywheel, or the pressure plate bolts.
The part that piqued my curiosity was the sequence in which you say the bolts ought to be installed. I wasn't sure if the common error you describe was due to improper sequence of bolt installation, or just improper bolt installation usually because the wrong bolts get used during an ill-thought-out sequence. Not sure if it refers to the bolts that hold the clutch housing to the flywheel, or the pressure plate bolts.
The bolts I'm talking about aren't the ones that hold the clutch housing to the flywheel, or the pressure plate bolts. They're the "thin head" bolts that hold the flat metal plate (shaped like whatever transmission you have bolted up behind your motor) to the block. Once you get the rear main and seal installed, these two bolts, along with one or two dowel pins align and hold on the "transmission transition plate"? (sorry I don't know the term for it.) Then the flywheel and clutch are installed. Because the flywheel rotates extremely close to the block, if you use a standard bolt, the thick head (height wise) of the wrong bolt will rub against your flywheel and cause a "clattering" sound. Of the 3 motors I disassembled getting parts for this rebuild, all three had the wrong bolts with a much taller bolt head that was scrapped, mangled, or sheared when I got to them.
The bolts that bolt the clutch to the flywheel will be short 12 or 14 MM heads (I replaced them with grade 8 from my local Ace hardware). The bolts that will bolt the flywheel to the crank should be 16 or 17MM and ARP makes some indestructible ones if you wanted to swap your factory ones out. The two tiny bolts I'm referring to bolt directly into the block and should have a 12-14mm head that looks much shorter than normal. Of course you could always just use a grinder to take off some of the material from the top of a standard bolt head to ensure it won't rub the back of your flywheel.
12-23-2014, 05:46 AM
#67
Registered User
Thread Starter
Join Date: Apr 2014
Location: Dallas, Tx
Posts: 415
Likes: 0
Received 0 Likes
on
0 Posts
here's a better picture of the two bolts I was talking about

and here's a great explanation / resource for parts.
http://www.22reperformance.com/22RE_...ion_Parts.html
and here's a great explanation / resource for parts.
http://www.22reperformance.com/22RE_...ion_Parts.html
 12-27-2014, 06:40 PM
#69
here's a better picture of the two bolts I was talking about
and here's a great explanation / resource for parts.
http://www.22reperformance.com/22RE_...ion_Parts.html
and here's a great explanation / resource for parts.
http://www.22reperformance.com/22RE_...ion_Parts.html
12-28-2014, 08:52 AM
#70
Registered User
Great thread and attention to detail! I always thought there were no stainless fasteners comparable to grade 8 but see that 17-4 is under most conditions, take it that's what you used?
Was also under the impression that those seal sleeves were only able to fit in a used application where crank wear had already taken place. Went in without issue though? Did you use one on the rear main as well and might that be a cause for the oil leak? Hope it's an easy fix for you.
Was also under the impression that those seal sleeves were only able to fit in a used application where crank wear had already taken place. Went in without issue though? Did you use one on the rear main as well and might that be a cause for the oil leak? Hope it's an easy fix for you.
12-28-2014, 12:05 PM
#71
I have to catch up on my reading on your thread. Your work is awesome and a reference I will use when I start the rebuilt for my future project. I have an 85 block with machine work done so I will need to be wary as I will be using some 88 stuff and want fuel injection. I have an 88 4runner motor with bad mains as well. Just wanted to add information to your thread on bolts. Metrics have several thread pitches in the larger bolts and are sized by the mm of threaded part. Reasons why wrench size is not always consistent with bolt size is jis (Japanese Industrial Standard) bolts with a downsized head for clearance reasons.
https://www.google.com/search?q=jis+...utf-8&oe=utf-8
https://www.google.com/search?q=jis+...utf-8&oe=utf-8
12-29-2014, 03:20 AM
#72
Registered User
Thread Starter
Join Date: Apr 2014
Location: Dallas, Tx
Posts: 415
Likes: 0
Received 0 Likes
on
0 Posts
Great thread and attention to detail! I always thought there were no stainless fasteners comparable to grade 8 but see that 17-4 is under most conditions, take it that's what you used?
Was also under the impression that those seal sleeves were only able to fit in a used application where crank wear had already taken place. Went in without issue though? Did you use one on the rear main as well and might that be a cause for the oil leak? Hope it's an easy fix for you.
Was also under the impression that those seal sleeves were only able to fit in a used application where crank wear had already taken place. Went in without issue though? Did you use one on the rear main as well and might that be a cause for the oil leak? Hope it's an easy fix for you.
When disassembling the motor, I ripped through an entire box of ziplock bags and labeled each of them accordingly when putting the bolts in (i.e. power steering pump, AC pump, etc). I then spent about an hour and a half, as well as maybe $50 down at the local ACE hardware getting 8.8 SS metric bolts to match what was in each bag. (The dual row timing conversion kit came with all the associated bolts I needed for that) Most of them were fine thread 1.25 pitch, and most had a much larger head on them (original 14mm head bolts went up to 17mm head, 12mm went to 13mm, etc). Of course, some of them I had to cut and modify the length to get it exactly right, but that's why my favorite tool is a 5" angle grinder. For the important bolts I went with ARP. Head studs, Main bolts, flywheel, etc.
I did the "sleeve and seal" on both the front and the rear, and the crank I had didn't have excessive wear. They went on without too much trouble, and I used a wooden block and rubber mallet to coax them the rest of the way. With fresh seals, I wanted to make sure that the area they rubbed was a lot higher quality bearing metal like that of the sleeve and seal, which hopefully will extend the engine life.
When taking off the upper plenum to check for air leaks, I think I found the oil leak, but I won't be sure until I plug it. I bought the very high quality head casting from Spain that LCE sells....apparently, it has two tapped and threaded holes that I didn't use when bolting up the intake, and oil has been dumping out of the head through these holes. I'll probably get some allen or torx head bolts to plug them up, wash the engine with degreaser, and see if that doesn't fix the problem. Here's a shot of the un-capped holes.

Here's also a shot of the hack I did to the fuel line to keep from paying $180 at the stealership for a new fuel line from the filter to the fuel rail.
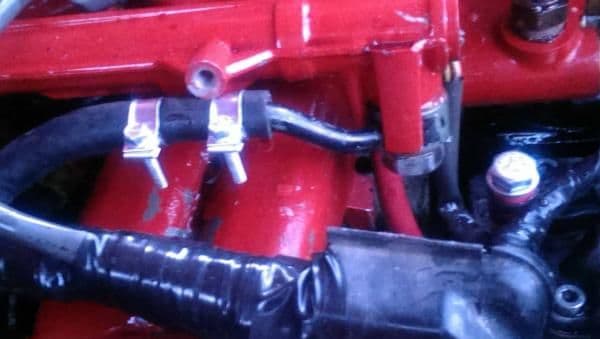
One of the upper plenum off...

and one of the cracked flange on my Idle Air Control Valve on the Throttle Body that I will be replacing shortly.
 12-29-2014, 03:57 AM
#73
Registered User
Thread Starter
Join Date: Apr 2014
Location: Dallas, Tx
Posts: 415
Likes: 0
Received 0 Likes
on
0 Posts
So my new Airtex Wells Idle Air Control Valve comes in today, which kind of ticks me off because I had paid for overnight shipping so that I'd have it by this last weekend, but with the holidays, I guess overnight doesn't really mean overnight. I also got a new Denso 4 wire upstream O2 sensor because the PO had simply cut the wires off the back of the old one to use it as a plug.
I took the upper plenum off and found out that it wasn't really bolted down well to the lower intake. I'm assuming that was one of the places air was leaking in, and also found a hole in the neck of the intake where I had used a die grinder to bore it out to match the TB spacer. I plugged that hole with some JB Weld - some of the best stuff to have in your tool box, and also from Texas.
I'm going to go ahead and take the TB down to the shop and sandblast it back to clean, re-prime and paint it as well as the new IAC, and re-install everything. I also found the original piece of metal that drives the Throttle position sensor when I was cleaning up my workbench, so I'll install that and put the one I currently have on there back on the '86 4Runner. From there I'll need to re-set the TPS, plug the oil leak, re-install the upper plenum, and see if I can't get this baby to idle at a grand like it's supposed to.
The shop I'm a member of (non-profit 501-3C) charges $50 a month, but has welders, mills, and all kinds of other tools, so I'll probably take the AFM I got out of a '91 Cressidia (also known as the supra AFM) down to the shop to unsolder a few of the wires, and re-solder the guts from my 22RE AFM back into it. Here are a few shots of comparison of how much more airflow you're able to get with the 2" x 2.5" door instead of the stock 2" x 2" door on the 22RE AFM. I'm not going to go into crazy detail about this upgrade as there are several good write-ups already on Yotatech.
Cressidia/Supra AFM on the left, stock 22RE on the right
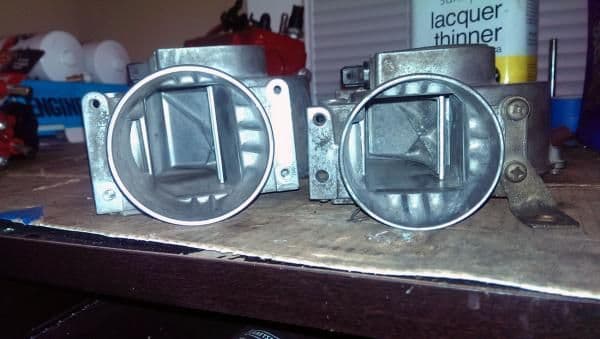
Stock 22RE on the left, Cressidia/ Supra on the right
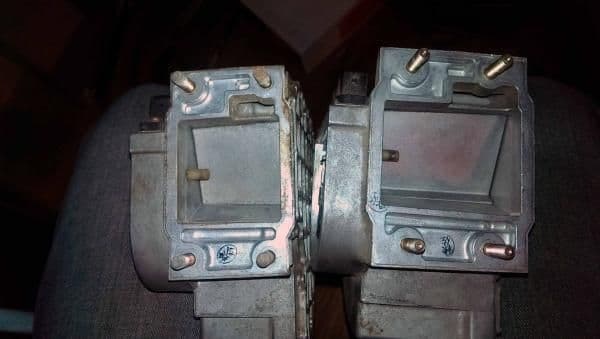
Here is a shot showing that the receptacles for the electronics are the same...

and highlighted are the 3 small wires you have to de-solder, and then re-solder to change out the electronic board from the 22RE into the Cressidia / Supra AFM.
With a bored throttle body, Venturi TB Spacer and bored intake, Oversized valves, Performance header and exhaust, the AFM becomes the choke point for getting more air into the engine. I know after doing the swap, you're supposed to advance the inside wheel 1-3 clicks depending on your altitude and how much richer you need your motor to run (1 click being low altitude, 3 being much richer), but I don't know which direction I'm supposed to cheat the clicks. Anyone with any knowledge or help would be appreciated.
I took the upper plenum off and found out that it wasn't really bolted down well to the lower intake. I'm assuming that was one of the places air was leaking in, and also found a hole in the neck of the intake where I had used a die grinder to bore it out to match the TB spacer. I plugged that hole with some JB Weld - some of the best stuff to have in your tool box, and also from Texas.
I'm going to go ahead and take the TB down to the shop and sandblast it back to clean, re-prime and paint it as well as the new IAC, and re-install everything. I also found the original piece of metal that drives the Throttle position sensor when I was cleaning up my workbench, so I'll install that and put the one I currently have on there back on the '86 4Runner. From there I'll need to re-set the TPS, plug the oil leak, re-install the upper plenum, and see if I can't get this baby to idle at a grand like it's supposed to.
The shop I'm a member of (non-profit 501-3C) charges $50 a month, but has welders, mills, and all kinds of other tools, so I'll probably take the AFM I got out of a '91 Cressidia (also known as the supra AFM) down to the shop to unsolder a few of the wires, and re-solder the guts from my 22RE AFM back into it. Here are a few shots of comparison of how much more airflow you're able to get with the 2" x 2.5" door instead of the stock 2" x 2" door on the 22RE AFM. I'm not going to go into crazy detail about this upgrade as there are several good write-ups already on Yotatech.
Cressidia/Supra AFM on the left, stock 22RE on the right
Stock 22RE on the left, Cressidia/ Supra on the right
Here is a shot showing that the receptacles for the electronics are the same...
and highlighted are the 3 small wires you have to de-solder, and then re-solder to change out the electronic board from the 22RE into the Cressidia / Supra AFM.
With a bored throttle body, Venturi TB Spacer and bored intake, Oversized valves, Performance header and exhaust, the AFM becomes the choke point for getting more air into the engine. I know after doing the swap, you're supposed to advance the inside wheel 1-3 clicks depending on your altitude and how much richer you need your motor to run (1 click being low altitude, 3 being much richer), but I don't know which direction I'm supposed to cheat the clicks. Anyone with any knowledge or help would be appreciated.
12-29-2014, 04:16 AM
#74
Registered User
Thread Starter
Join Date: Apr 2014
Location: Dallas, Tx
Posts: 415
Likes: 0
Received 0 Likes
on
0 Posts
Jeez! I can't imagine trusting someone with the task of disconnecting an engine from a transmission and having that same person disregard the thickness of the head of the bolt that goes in any place, let alone the one that gets shaven off by the flywheel. That's just outrageous. That's the "dust cover", AKA the "if the rear main seal leaks like crazy, let's keep it of of the clutch" plate. Thanks for the illustration. I do need that kind of thing to function.
12-29-2014, 04:21 AM
#75
Registered User
Thread Starter
Join Date: Apr 2014
Location: Dallas, Tx
Posts: 415
Likes: 0
Received 0 Likes
on
0 Posts
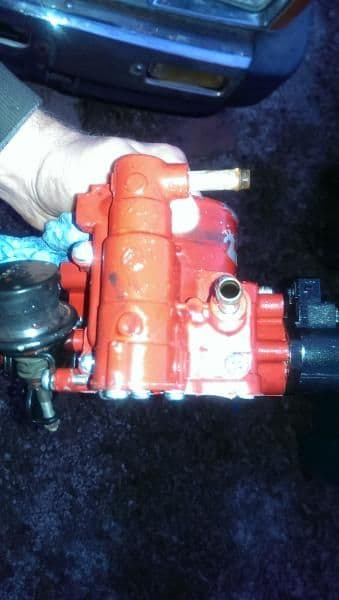
Just so everyone is aware, the Idle Air Control valve that I've been talking about is bolted to the Throttle Body as shown in the image below. It is hooked up to the heater lines and causes the engine to idle high during initial start up, until the thermostat opens, forcing antifreeze through it. This causes the mechanism inside to switch over and Idle down the engine as it is now "warmed" up. You can easily see how an issue with this little part being stuck open (or closed) would keep the engine idling high, even after the thermostat has kicked in and coolant is flowing properly. Just thought I'd point that out as I dropped $100 on a new one.
12-29-2014, 09:36 AM
#77
Registered User
Thread Starter
Join Date: Apr 2014
Location: Dallas, Tx
Posts: 415
Likes: 0
Received 0 Likes
on
0 Posts
Hi Muddpigg,
I'm using the bored out 22RE late model TB that LCE sells, and probably won't install the upgraded AFM until I know that the motor is running right. It would be a headache to fix a few things while tampering with a few more.
I've heard about swapping out the TB for a different one, but I'm sort of trying not to mix and match parts as that (along with the PO's ignorance) was the cause of the motor blowing the first time.
12-29-2014, 11:21 AM
#78
Sounds best to fix one before adding other variables in the equation.
I'm still up in the air about the supra throttle body swap. Seems lately I'm either short on time or have time and short on cash. 60mm vrs 58mm really isn't much and honestly would probably net the increases in response and air flow. Honestly feel like the LCE option would be best but will see. Also want to swap AFM with battery. Really liked the box you made on a previous rig.
Been since 2006/7 since my injectors were cleaned and match. Like the bosch 4 hole upgrades like flamethrower sales. Might compliment the other mods.
12-29-2014, 11:45 AM
#79
Registered User
Thread Starter
Join Date: Apr 2014
Location: Dallas, Tx
Posts: 415
Likes: 0
Received 0 Likes
on
0 Posts
yeah, I'll probably do the battery / intake swap fairly quickly after I get it running right. I'm sure it can be done with some simple intake parts from pepboys and some wiring extensions. It will help a ton just to get the intake on the cool side of the motor not running over the radiator, even if it doesn't have a box. I'm wanting to fab up an air box that goes up to a passengers side snorkel eventually, but I'm sure it will work fine until then.
I eventually want to move the battery to the back, and do a dual setup - maybe even in a floor mounted box where the spare would normally be located. Of course all of that will have to come after a swing-gate spare carrier and rear plate bumper....so I'm a ways off.
I had my injectors cleaned, but still think I need to richen up the mixture a click or two when I install the AFM to match all of the other upgrades.
12-30-2014, 10:31 AM
#80
Registered User
Thread Starter
Join Date: Apr 2014
Location: Dallas, Tx
Posts: 415
Likes: 0
Received 0 Likes
on
0 Posts
Well, I dropped by the shop last night to see if I couldn't sandblast all of the parts back to new. Their main compressor was down and the smaller backup didn't eat enough Wheaties to push the media-blaster, so I couldn't get much done on that end.
However, there's an entire room at the shop where people build circuit boards, radios, open source electronics and other things, so I decided to go ahead and swap out the internals of the AFMs I had brought to sandblast.
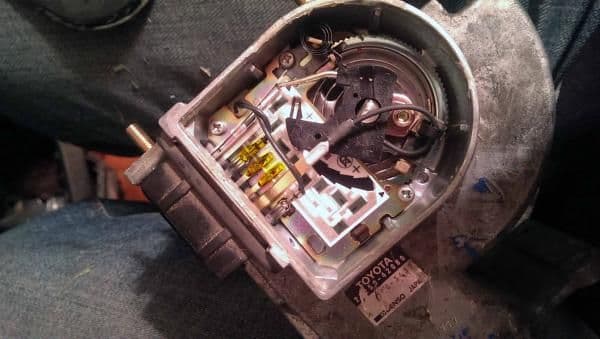
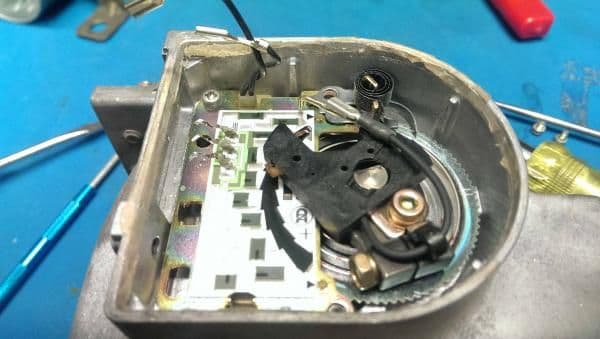
Its really straight forward, the cap is held in with a bead of clear silicone you have to cut away, then pry up. There are three small wires that need to be desoldered so you can remove the plug receptacle. Then you remove the internals, and swap them with the others. I did make sure to make several indexing marks before I started that would show me the; fully closed position, fully open position, position of the spring cog relative to the body of the unit, and spring cog relative to the stop. This would ensure that I would be able to get everything back to normal once the change had taken place, and I could slightly bump the sensor forward to allow the injectors to be tricked into thinking there was more air coming in than before so they would run a little rich in comparison to the increase in air volume. Here are some shots of the process, I tried to circle any marks I made to show anything relevant.
Supra / Cressidia AFM with wires desoldered
22RE before starting

22RE with wires desoldered

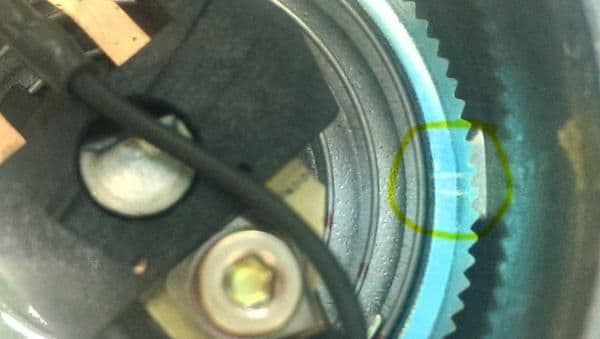
Mark made before I swapped internals, and as you can see, it's cheated slightly forward to richen the mixture

Mark made to index the spring cog to the spring cog stop

Mark made to index the spring cog to the overall housing of the AFM (to maintain proper spring tension after changeout.
Resoldered 22RE wires

Colorcoded Overall shot of the finished product showing wires hooked back up, yellow for the initial indexing marks, etc. (minus the cap being siliconed back in place)

However, there's an entire room at the shop where people build circuit boards, radios, open source electronics and other things, so I decided to go ahead and swap out the internals of the AFMs I had brought to sandblast.
Its really straight forward, the cap is held in with a bead of clear silicone you have to cut away, then pry up. There are three small wires that need to be desoldered so you can remove the plug receptacle. Then you remove the internals, and swap them with the others. I did make sure to make several indexing marks before I started that would show me the; fully closed position, fully open position, position of the spring cog relative to the body of the unit, and spring cog relative to the stop. This would ensure that I would be able to get everything back to normal once the change had taken place, and I could slightly bump the sensor forward to allow the injectors to be tricked into thinking there was more air coming in than before so they would run a little rich in comparison to the increase in air volume. Here are some shots of the process, I tried to circle any marks I made to show anything relevant.
Supra / Cressidia AFM with wires desoldered
22RE before starting
22RE with wires desoldered
Mark made before I swapped internals, and as you can see, it's cheated slightly forward to richen the mixture
Mark made to index the spring cog to the spring cog stop
Mark made to index the spring cog to the overall housing of the AFM (to maintain proper spring tension after changeout.
Resoldered 22RE wires
Colorcoded Overall shot of the finished product showing wires hooked back up, yellow for the initial indexing marks, etc. (minus the cap being siliconed back in place)


