photoguy's 95 4Runner Build-up thread
 03-12-2012, 07:42 AM
#1
Registered User
Thread Starter
photoguy's 95 4Runner Build-up thread
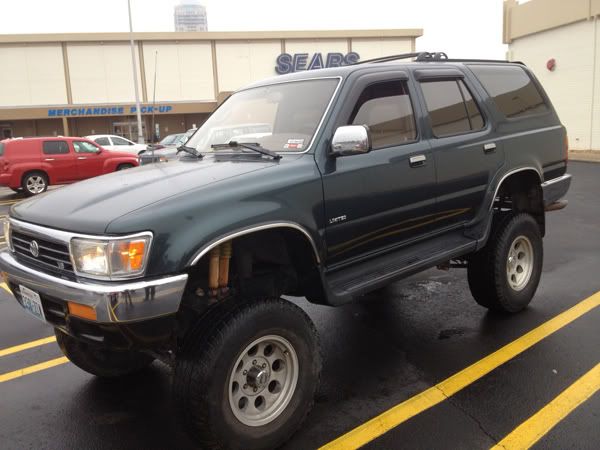
So. It's not a "build-up".......yet. For now I am fixing the PO's stupid suspension, taking the 3" BL off, new rotors and calipers, wheel bearings, gotta fix the rear drums as the passenger side is oh so elegantly leaking brake fluid, as well as general small personalization. Can't buy fancy extras until it's a solid DD.....
So. Let us begin this journey of the mind through my 4Runner build thread...
So. Let us begin this journey of the mind through my 4Runner build thread...
 03-12-2012, 08:51 AM
#2
Registered User
Thread Starter
$25 alternative to crappy looking running boards.
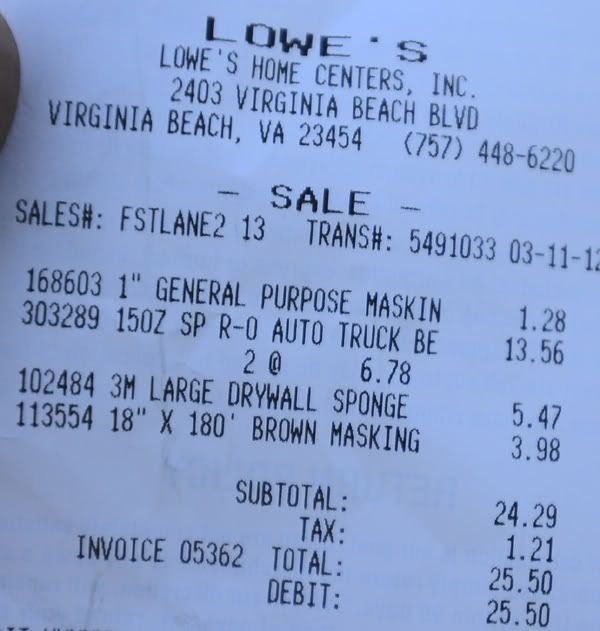
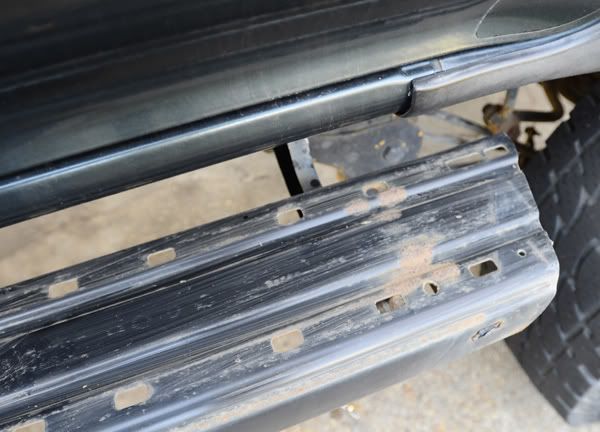
So. Let me first say that this is not my idea of a good permanant alternative to nerf bars or sliders. The metal is cheap and these things are good for nothing more than a step into the truck..... BUT. . . . I can't be dropping money on nerf bars or sliders until I get the important stuff done. SO, a clever more visibly appealing look must be found. ON A BUDGET. Enter the $25 alternative to crap looking running boards.
As she sat with the running boards fully attached. Ends caps, plastic top piece, the whole running board shabang.
I started thinking about how badly I wanted to just pull that whole damn thing off of there, to heck with the complaining from the girlfriend and her kid every time they got in.... this is a man's ride.... I won't have crappy stock running boards on it. . . . So.... I started pulling them off:
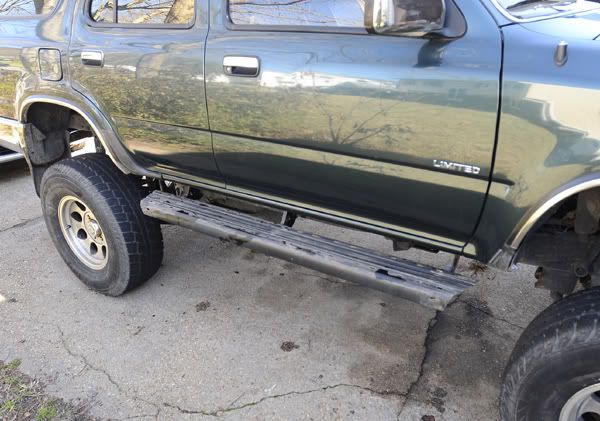
Then I realized that, well, I kinda liked the look of them on their own like this, a sorta interesting fix to pulling them off completly, which I am not a big fan of that look..... nerf bars are my preferred look.... but I can't afford those at the moment when I need to be putting money into making this thing a solid DD before bumpers and nerf bars and the like.
So, I did some thinkin..... How can I make these 'kinda corroded lookin' things' purty and last on their own without dropping any real money(I figured $40 was a fair limit) until I can afford sliders or nerf bars?????
Enter my plan:
 ...
... 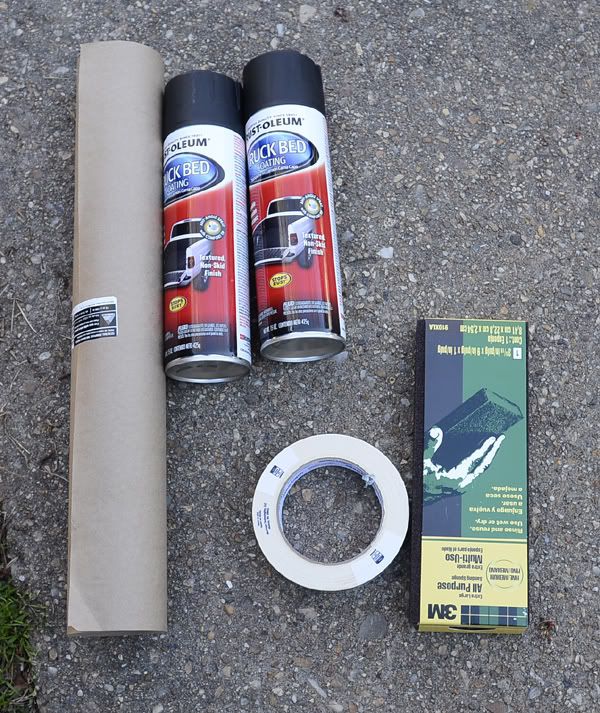
My biggest concern when deciding to keep them on was making sure they wouldn't be slick when it rained. While it's probably not Line-X gritiness, any kind of bed liner in a can SHOULD do the job I figured. Plus it'll give a better look than boring flat black paint would have.
I sanded them down with the drywall sponge a bit to give this stuff something to hold to. I used the drywall sponge because well, it's spongy, it'll push itself down into those curves the RB's have in them, I didn't want to go through sheets/chunks of sand paper And it's cheap and reusable for future whatevers I get myself into. . . . .
I figured two things, one, these aren't permanant, which led into two, so if the bed liner flakes at all, I can just spray a little more over it and it'll make do for the six months at most that I need these things to last. . . . Also took a wire brush to the more corroded spots like this (I didn't take pictures of the post wire brush corrosion....sorry)
I warshed'em all down so there wasn't any dirt and crap left on them, laid out a couple strips of the paper, taped it down and together, since there was a nice little breeze, and coated them in bed liner:

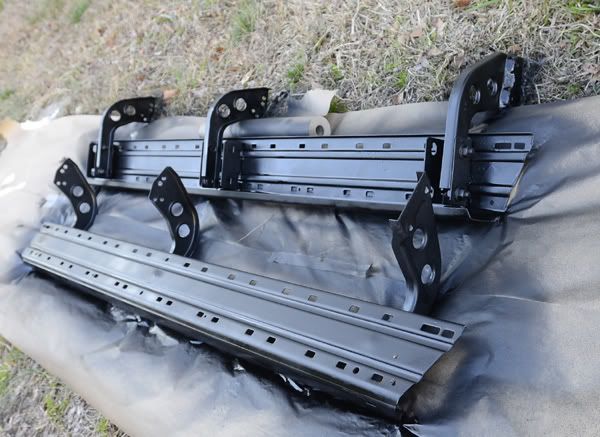
They are drying covered up on the porch now, I'll post up a photo later today or tomorrow when I stick them back on the truck.
Like I said, not a permanant thing by any means. But it's gotta look WAY better than crappy plasticy running boards. We'll see later today when they go back on!
As she sat with the running boards fully attached. Ends caps, plastic top piece, the whole running board shabang.
I started thinking about how badly I wanted to just pull that whole damn thing off of there, to heck with the complaining from the girlfriend and her kid every time they got in.... this is a man's ride.... I won't have crappy stock running boards on it. . . . So.... I started pulling them off:
Then I realized that, well, I kinda liked the look of them on their own like this, a sorta interesting fix to pulling them off completly, which I am not a big fan of that look..... nerf bars are my preferred look.... but I can't afford those at the moment when I need to be putting money into making this thing a solid DD before bumpers and nerf bars and the like.
So, I did some thinkin..... How can I make these 'kinda corroded lookin' things' purty and last on their own without dropping any real money(I figured $40 was a fair limit) until I can afford sliders or nerf bars?????
Enter my plan:
... My biggest concern when deciding to keep them on was making sure they wouldn't be slick when it rained. While it's probably not Line-X gritiness, any kind of bed liner in a can SHOULD do the job I figured. Plus it'll give a better look than boring flat black paint would have.
I sanded them down with the drywall sponge a bit to give this stuff something to hold to. I used the drywall sponge because well, it's spongy, it'll push itself down into those curves the RB's have in them, I didn't want to go through sheets/chunks of sand paper And it's cheap and reusable for future whatevers I get myself into. . . . .
I figured two things, one, these aren't permanant, which led into two, so if the bed liner flakes at all, I can just spray a little more over it and it'll make do for the six months at most that I need these things to last. . . . Also took a wire brush to the more corroded spots like this (I didn't take pictures of the post wire brush corrosion....sorry)
I warshed'em all down so there wasn't any dirt and crap left on them, laid out a couple strips of the paper, taped it down and together, since there was a nice little breeze, and coated them in bed liner:
They are drying covered up on the porch now, I'll post up a photo later today or tomorrow when I stick them back on the truck.
Like I said, not a permanant thing by any means. But it's gotta look WAY better than crappy plasticy running boards. We'll see later today when they go back on!
03-12-2012, 09:11 AM
#4
Registered User
Thread Starter
Removing the triple-shock jump ready set-up . . .
I'm not a big fan of riding in tanks. Well, I've never actually ridden in one, and it would probably be a totally bad-ass experience the first few times, but, for the sake of my euphamism here, I am not a big fan of riding in tanks.... though how cool would it be to have a turret mounted to the top of my 4runner. . . . .
Here's the point. The guy before me, or before him, or whatever, installed a really unnessacary suspension set-up on what is now my 4runner. The thing rides as if the axles were connected directly to the frame. ULTRA rough, i.e. tank statement. (it's all full circle. . . . .) I really doubt they were actually jumping this thing, and that's the only thing anyone has deemed needed for a set-up like this:
 . .
. . 
So, not knowing any better 100% I posted up my inquiry as to why I had almost a whole car's worth of shocks on one tire here on yotatech, thread can be found here.
General decision..... the top two shocks can go. As can the hoop. Along with some other stuff that I have yet to do, but this post is merely about the shocks; we'll get to the T-bars and control arm/CV angles later once I have actually tackled them and have something to post about.
So.... Off they went.
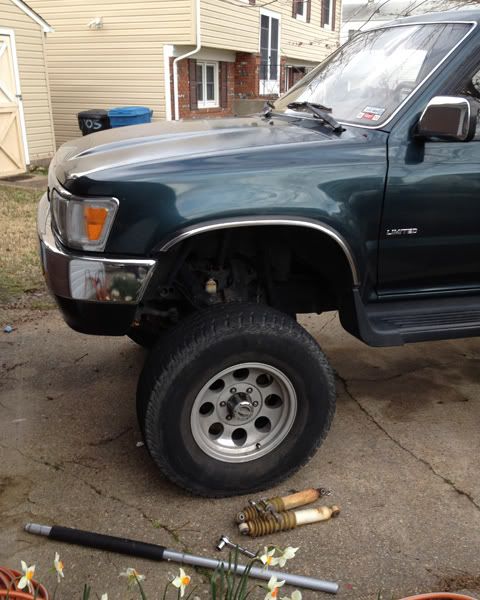
I really think they look so much better without the big dumb yellow(of all colors, really???) shocks staring out at me. Though, I think they were long term planning with the yellow boots, I mean, from a distance it matches the corrosion on the white part of the shock quite nicely, eh????
So, much, still, to do. But the exciting thing is that I am starting to DO THINGS to it, rather than just plotting and researching and hoping.
Body lift is HOPEFULLY coming off on the 23rd of March. Gotta find the replacement parts for a reasonable price, but a guy here on yotatech, 4linked, says he has a full shop we can do it in. Talk about speeding up the process.
Here's to a slow but sure resurrection of what I hope will be one fine lookin' well runnin' Yota Runner when I get done with it!
Here's the point. The guy before me, or before him, or whatever, installed a really unnessacary suspension set-up on what is now my 4runner. The thing rides as if the axles were connected directly to the frame. ULTRA rough, i.e. tank statement. (it's all full circle. . . . .) I really doubt they were actually jumping this thing, and that's the only thing anyone has deemed needed for a set-up like this:
. . So, not knowing any better 100% I posted up my inquiry as to why I had almost a whole car's worth of shocks on one tire here on yotatech, thread can be found here.
General decision..... the top two shocks can go. As can the hoop. Along with some other stuff that I have yet to do, but this post is merely about the shocks; we'll get to the T-bars and control arm/CV angles later once I have actually tackled them and have something to post about.
So.... Off they went.
I really think they look so much better without the big dumb yellow(of all colors, really???) shocks staring out at me. Though, I think they were long term planning with the yellow boots, I mean, from a distance it matches the corrosion on the white part of the shock quite nicely, eh????
So, much, still, to do. But the exciting thing is that I am starting to DO THINGS to it, rather than just plotting and researching and hoping.
Body lift is HOPEFULLY coming off on the 23rd of March. Gotta find the replacement parts for a reasonable price, but a guy here on yotatech, 4linked, says he has a full shop we can do it in. Talk about speeding up the process.
Here's to a slow but sure resurrection of what I hope will be one fine lookin' well runnin' Yota Runner when I get done with it!
03-12-2012, 09:20 AM
#5
Registered User
Thread Starter
 . . . I thought I made that clear in my post of my loathing for the way they look. . . . ha. It's just. . . . yucky.
03-12-2012, 09:42 AM
. . . I thought I made that clear in my post of my loathing for the way they look. . . . ha. It's just. . . . yucky.
03-12-2012, 09:42 AM
#7
Registered User
Thread Starter
Wouldn't know, I am waiting on my wheel bearings so I can replace a caliper that keeps seizing up, along with the original rotors, new brakes (as if that needs to be said) and the wheel bearings. I don't trust that caliper enough to even take it down the road. I'm worried it'll lock up again and I'll have to drag the damn tire just to get it back up the street. Better safe than sorry.
But I can feel the difference just sitting in it while it's parked in the driveway. . . . . ok, maybe not, but I'm being positive and half-full minded. . .
Trending Topics
03-12-2012, 10:05 AM
#9
Registered User
Thread Starter
Dude. I can't even begin to explain how much I love that movie. Qoute-laden and hilarious.
Your sig. says you have 2.25 piping, I'm guessing that comes back from a set of headers??? I am going to need to replace the exhaust system on this thing sooner than later, what ya got and how much did you pay for it???
"YOU TOLD ME YOU WERE COMBING YOUR HAIR!!!!! . . . . In the bathroom for hours, the water's running. . . . ."
Sorry. . . . . . . . . . . . getting distracted. Great movie.
Your sig. says you have 2.25 piping, I'm guessing that comes back from a set of headers??? I am going to need to replace the exhaust system on this thing sooner than later, what ya got and how much did you pay for it???
"YOU TOLD ME YOU WERE COMBING YOUR HAIR!!!!! . . . . In the bathroom for hours, the water's running. . . . ."
Sorry. . . . . .
. . . . . . getting distracted. Great movie.
Last edited by photoguy2354; 03-12-2012 at 10:38 AM.
03-27-2012, 06:00 AM
#10
Registered User
Thread Starter
So taking those shocks off made a HUGE difference. I got the wheel bearing kits in and started tearing apart the driver side, however I don't think I had any of those cone washers that are supposed to pop out when you take the hub off???? still trying to figure that one out. Doing a write-up for the passenger side once I get everything 100% figured out on the driver side.
03-27-2012, 06:23 AM
#11
Cone washer or split dowel not the same thing as a race.
They should be there if you have drive flanges or manual hubs.
WARN hubs don't use them.
FSM shows diagram
www.ncttora.com/fsm
:wabbit2:
They should be there if you have drive flanges or manual hubs.
WARN hubs don't use them.
FSM shows diagram
www.ncttora.com/fsm
:wabbit2:
03-27-2012, 07:16 AM
#12
Registered User
Thread Starter
Warn hubs are what's on there now. I had to read your post like three times in a row to wrap my head around what you meant. . . I read it al first as "don't use WARN hubs" I was like, but that's what I have, and I can't afford new parts right now, haha.
So, do I have "races" on my 4runner????? A couple of yota posts I found mention them, but, I don't think they came in your wheel bearing kit, wabbit, and therefore I am guessing I don't have or need a "race." I suppose the right answer here is Google. I'm on it.
So, that's good news then, I was worried something was yet again done wrong by the PO. I would have this thing re-assembled, but my father was sure that I needed to take my hub to a machine shop to get the cones popped out and that I shouldn't use a hammer and punch. I went home to look up the missing washers and great cone removal debate, since I haven't done this yet. I'm slowly learning that my pops doesn't remember Yota's quite as well as he thinks he does. He'll tell me something and I have to carefully dodge arguing with him. haha.
Anyways, gonna pop the old cones out tonight, re-assemble everything and hit the passenger side tomorrow afternoon with a fellow photog friend in tow, try to make sure everything is SUPER well documented and FINALLY get a write-up done on this site.
Looking forward to having this thing on the road, FINALLY!!!! Next project is the rear drum brakes, for the sake of even braking, and then........ taking the body lift off!!!!!
Also, as a warning. . . . . .STAY OUT OF NORTHERN TOOL!!!!!!!!!!! They are really good at pricing things affordably, and have a good way of making all the tools and toys in there seem like something you can't live without. I went in to get a 54mm socket for the locking nuts, and spent almost 40 mins walking around picking things up thinking "oh, I could really use this to get things done way faster" only to go and put it back like 5 mins later thinking, 'But I really can't afford it. . . . .' It's so much worse when you realize that your father still has the air compressor you thought he sold a couple years back. pnuematic tools? ah. How great life would be with them. He has nail guns and contstruction tools, but no wrenches or anything useful to the mechanical world.
Last edited by photoguy2354; 03-27-2012 at 07:24 AM.
03-31-2012, 07:27 AM
#13
Registered User
Coming along nicely
I like you're running board modification.
Mine came off within a day of buying mine Looked like I got a lift almost haha.
What are some of your other plans for the 'Runner?
I like you're running board modification.
Mine came off within a day of buying mine
Looked like I got a lift almost haha.What are some of your other plans for the 'Runner?

Thread
Thread Starter
Forum
Replies
Last Post
RedRunner_87
95.5-2004 Tacomas & 96-2002 4Runners (Build-Up Section)
84
06-01-2021 01:51 PM
jon.r
General Vehicle Related Topics (Non Year Related)
8
07-11-2015 03:34 PM
crashburnoveride
86-95 Trucks & 4Runners
1
07-10-2015 06:39 AM


