Grego92's Retroactive and Current Build Up
 03-19-2012, 09:01 PM
#1
Registered User
Thread Starter
iTrader: (4)
Join Date: May 2010
Location: People's Republic of California
Posts: 720
Likes: 0
Received 15 Likes
on
12 Posts
Grego92's 1992 4x4 Dlx 22RE Build Up
1992 4x4 DLX 22RE - 189,000 Miles - Purchased it brand new in 1992 when I got out of the Army and back home to Cali.
Wanted to do a build-up so I can get a little more help than the general boards....makes sense that if people see the project from the start they can probably give better advice and input.
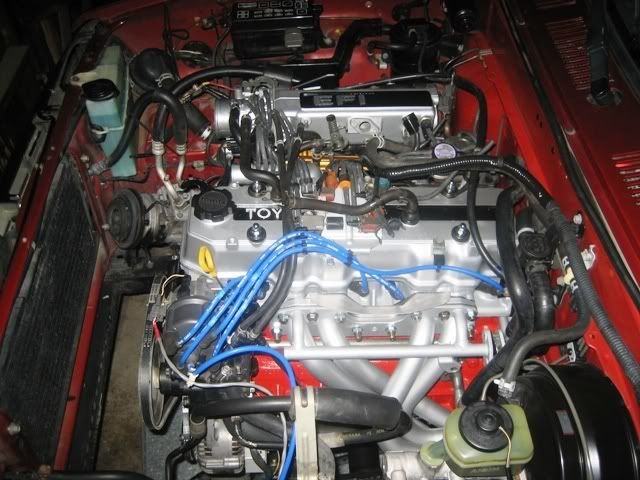
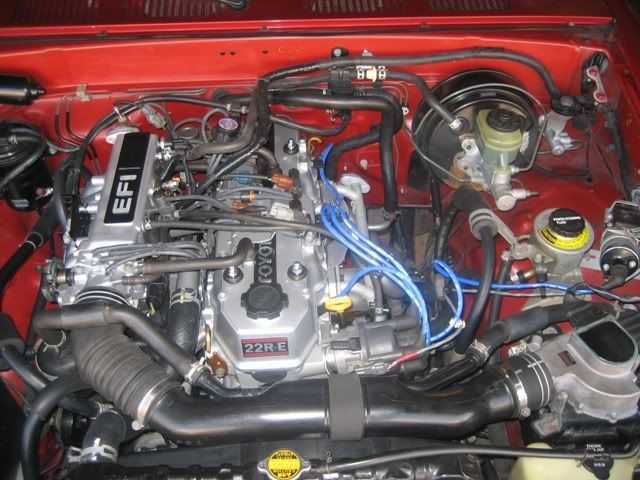
This was my first full rebuild and it took me about 6 months but I finally finished my rebuild on my 22RE and have about 160 Miles on it. The mileage keeps getting better so that's a relief. I guess everything still working in drags down the mpg.
My current plans are to finish my interior and then install my bilstein shocks and zuk mod springs, and then start restoring a can-back that I bought off craigslist for $250. THEN, hopefully I can go back to kayak fishing! and of course keep the mods going as I see/think of them....
I couldn't have done my engine rebuild without all the posts on this board, specially the build-ups and seeing how others were doing it. It all started with wanting to fix an oil leak and do a timing chain change....well, you know how that goes if you join yotatech! So here's some photos during my build.....
(Going to keep adding photos in short spurts so I don't lose anything)
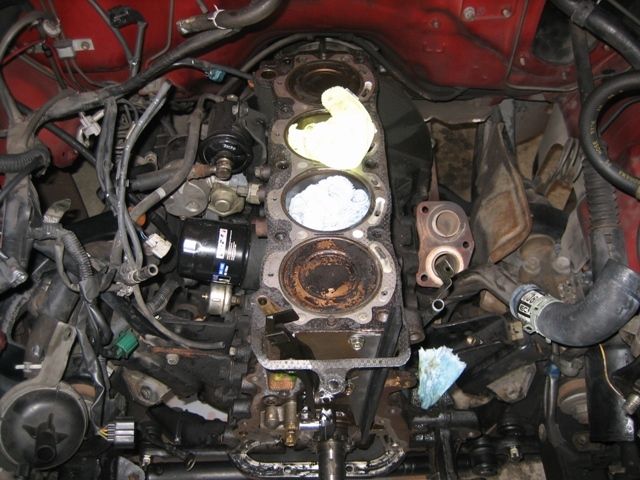
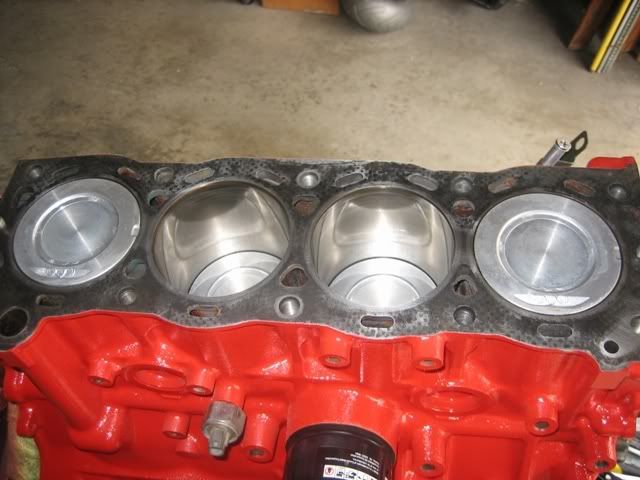
The beginning...doesn't look too bad
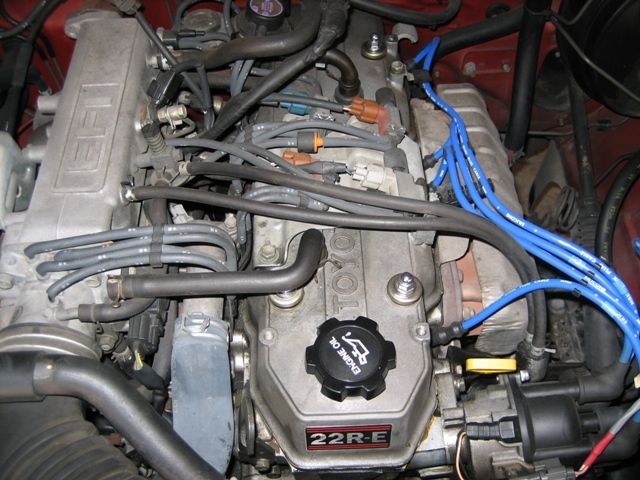
TDC
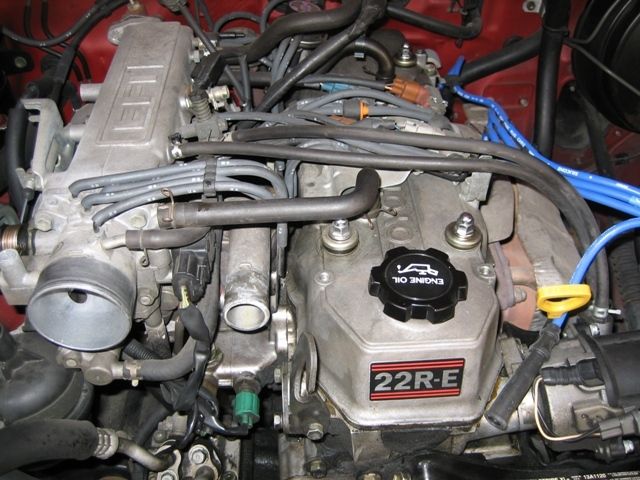
Ahhh....some of the caked on oil mess, notice the black oil covered alternator and rusty looking green coolant in the bucket.....
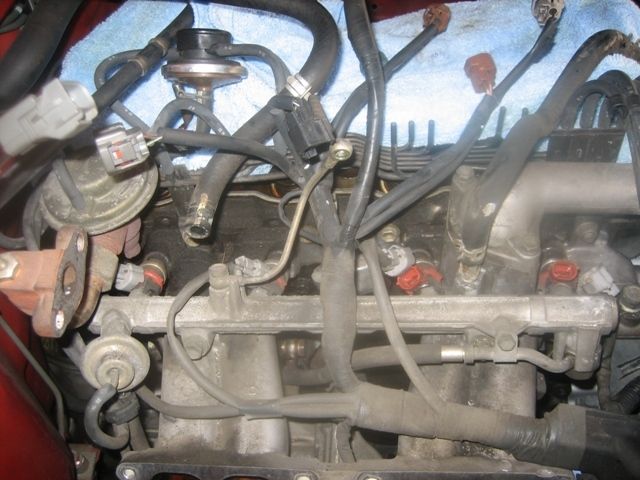
Head Off, not bad....
Getting ready to take fuel rail and injectors out (They were sent off to Witchhunter for rebuild/testing/cleaning)
My buddy Ron helping me pull the engine out
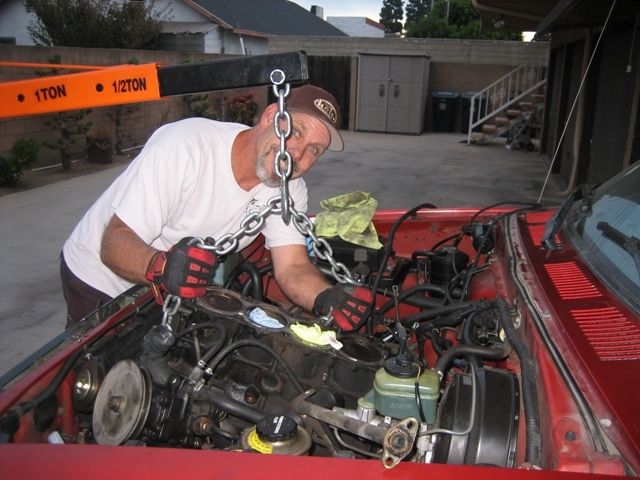
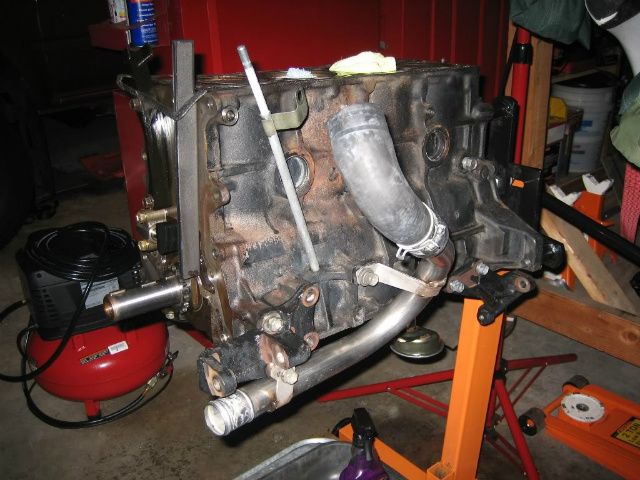
Engine out
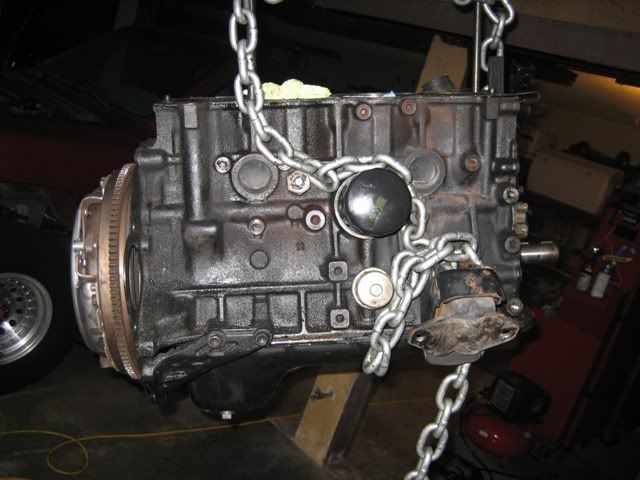
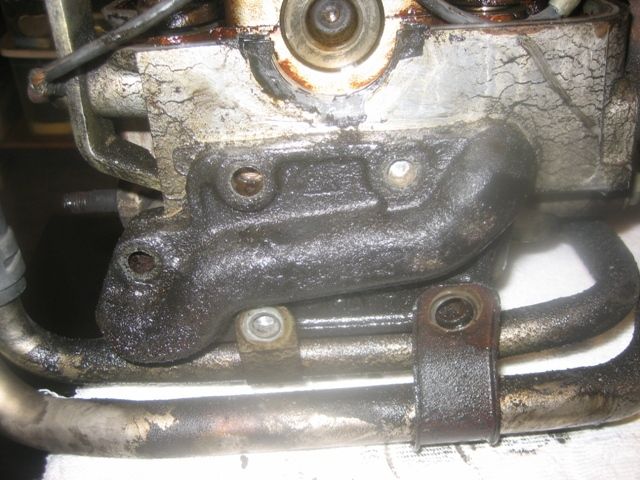
A little oily mess back there
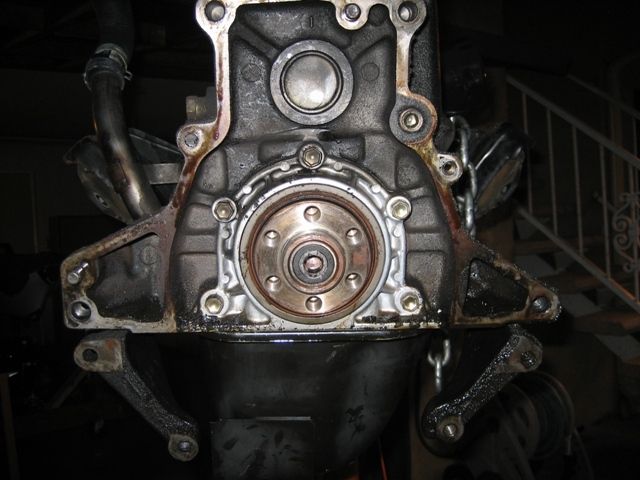
On the stand and seeing how the steel guide rail fits
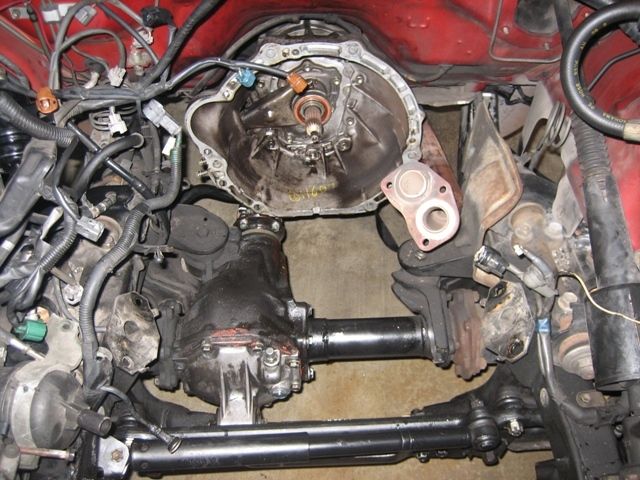
Empty bay
Head and intake
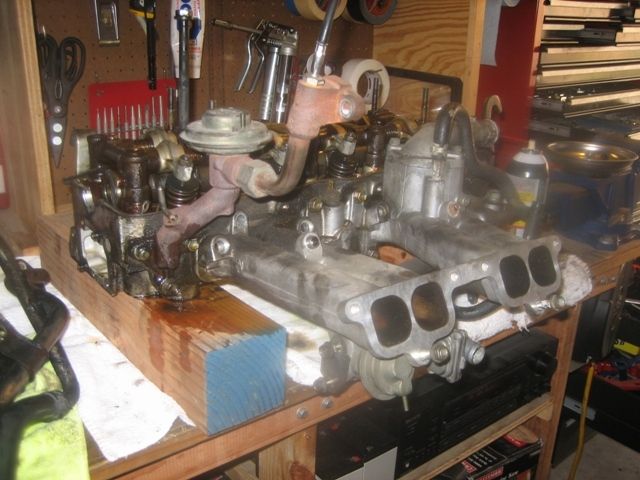
The head
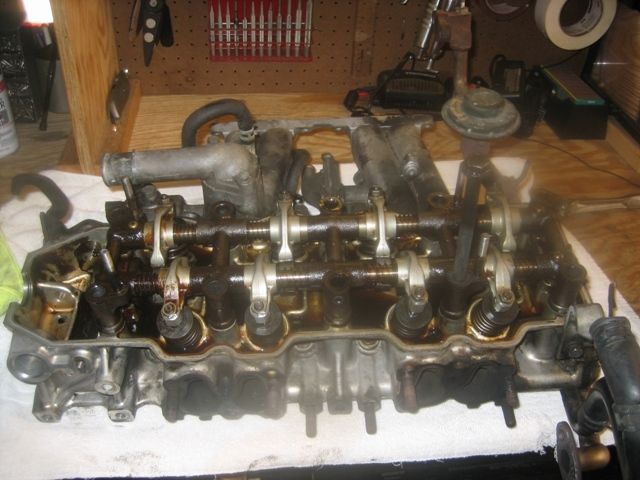
Looks like I found one of my leaks from the rear half moon....it was a mess back there
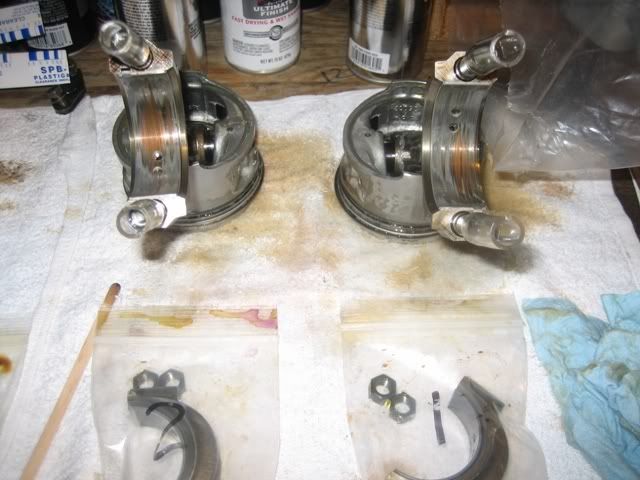
BAAAD Bearings...all mains and rods looked like that (had the chocolate milk syndrome about 7 years ago and looks like the mechanic didn't change the bearings....but ran all those years! gotta love the 22RE!!!)
Fast forward....
Wanted to do a build-up so I can get a little more help than the general boards....makes sense that if people see the project from the start they can probably give better advice and input.
This was my first full rebuild and it took me about 6 months but I finally finished my rebuild on my 22RE and have about 160 Miles on it. The mileage keeps getting better so that's a relief. I guess everything still working in drags down the mpg.
My current plans are to finish my interior and then install my bilstein shocks and zuk mod springs, and then start restoring a can-back that I bought off craigslist for $250. THEN, hopefully I can go back to kayak fishing! and of course keep the mods going as I see/think of them....
I couldn't have done my engine rebuild without all the posts on this board, specially the build-ups and seeing how others were doing it. It all started with wanting to fix an oil leak and do a timing chain change....well, you know how that goes if you join yotatech! So here's some photos during my build.....
(Going to keep adding photos in short spurts so I don't lose anything)
The beginning...doesn't look too bad
TDC
Ahhh....some of the caked on oil mess, notice the black oil covered alternator and rusty looking green coolant in the bucket.....
Head Off, not bad....
Getting ready to take fuel rail and injectors out (They were sent off to Witchhunter for rebuild/testing/cleaning)
My buddy Ron helping me pull the engine out
Engine out
A little oily mess back there
On the stand and seeing how the steel guide rail fits
Empty bay
Head and intake
The head
Looks like I found one of my leaks from the rear half moon....it was a mess back there
BAAAD Bearings...all mains and rods looked like that (had the chocolate milk syndrome about 7 years ago and looks like the mechanic didn't change the bearings....but ran all those years! gotta love the 22RE!!!)
Fast forward....
Last edited by Grego92; 03-25-2012 at 03:57 PM.
 03-19-2012, 09:54 PM
#2
Registered User
Thread Starter
iTrader: (4)
Join Date: May 2010
Location: People's Republic of California
Posts: 720
Likes: 0
Received 15 Likes
on
12 Posts
Things I did during the rebuild
1.Sent the block and complete head to Perfect Engine in Los Angeles, Ca. Cylinders only needed honing and nothing wrong with the head or rocker assembly.
2. Purchased a new 268 cam from engnbldr.com
3. New OSK timing kit (but used the steel guide rail from engnbldr.com)
4. New Aisin timing cover from amazon.com
5. Sent the crank for checking and needed to be ground down .010/.010. Thanks to Chef (Mark) for giving me the info to his machinist!
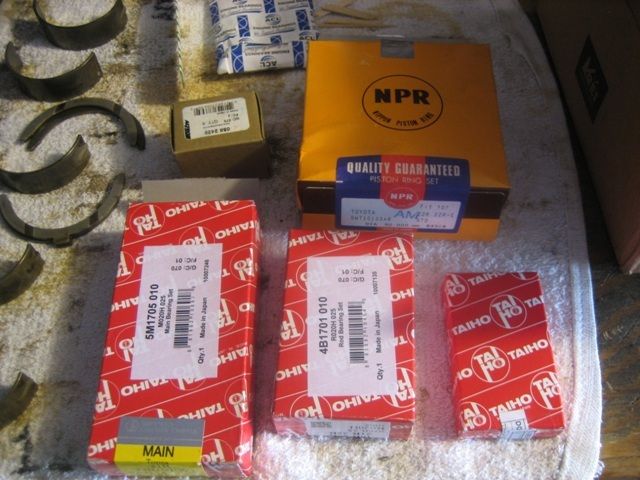
6. New Taiho rod/main/thrust bearings to match the .010.
7. New NPR Piston kit w/rings (Perfect Engine asked what I was using so they would know how to hone the cylinders)
8. New Aisin water pump
9. New Aisin oil pump
10. New crank pulley from Rockauto.com (the original one already had a sleeve placed on it and it also had a deep groove, so rather than putting a new sleeve I replaced the whole thing)
11. New Toyota engine gasket kit and used all Toyota seals that weren't included in the kit (ie. tranny input or is it output seal? behind the throw out bearing, crank seal, black fipg, red fipg, etc....)
12. Fresh Toyota red coolant
13. New Bando belts
14. AFE dry air filter
15. Injectors and cold start sent to Witchhunter
16. New NGK Plugs and Wires
17. New Denso Cap and Rotor
18. Case of Toyota oil filters
19. Broke the cam and engine in with 5W 30 oil and Lucas break-in additive
20. New Toyota radiator hoses, all 3 of them
21. Sent the radiator out for boiling/cleaning
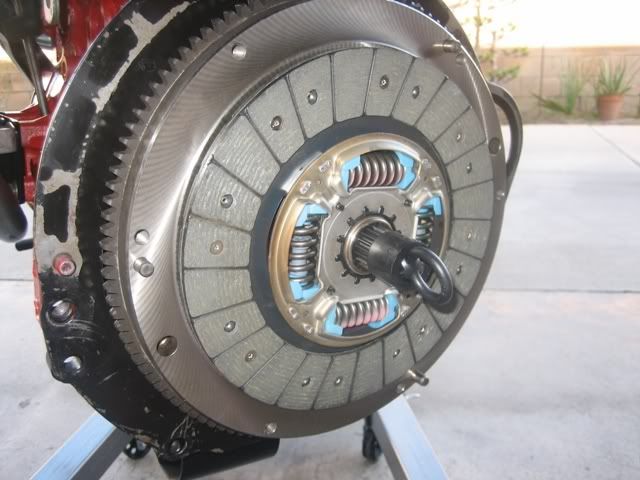
22. New Aisin clutch kit
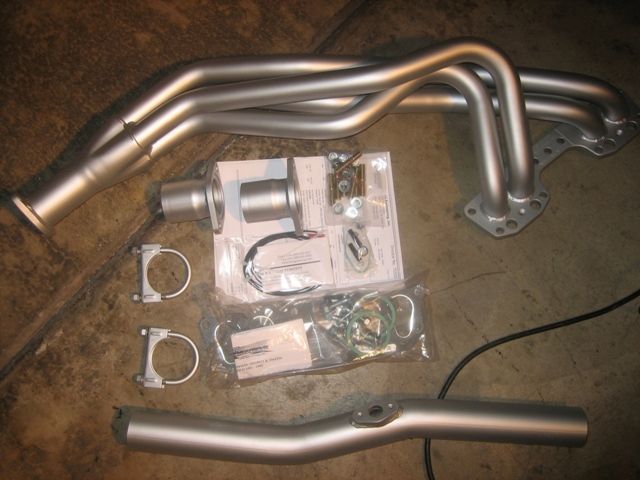
23. New direct fit LCE header (ditched the clamps and had it welded at a muffler shop)
24. New direct fit Pacesetter exhaust (ditched the clamps and had it welded at a muffler shop) Still using the original CAT
25. New aftermarket motor and transmission mounts
26. New Aisin Master and Slave clutch cylinders
27. New brushes for the alternator
28. New starter contacts
Plus many many new bolts direct from Toyota. I didn't want to re-use some of them and some weren't even originals (past mechanic work). All the timing cover bolts were replaced with oem ones.
Currently working on the interior while I keep breaking in the engine....
1.Sent the block and complete head to Perfect Engine in Los Angeles, Ca. Cylinders only needed honing and nothing wrong with the head or rocker assembly.
2. Purchased a new 268 cam from engnbldr.com
3. New OSK timing kit (but used the steel guide rail from engnbldr.com)
4. New Aisin timing cover from amazon.com
5. Sent the crank for checking and needed to be ground down .010/.010. Thanks to Chef (Mark) for giving me the info to his machinist!
6. New Taiho rod/main/thrust bearings to match the .010.
7. New NPR Piston kit w/rings (Perfect Engine asked what I was using so they would know how to hone the cylinders)
8. New Aisin water pump
9. New Aisin oil pump
10. New crank pulley from Rockauto.com (the original one already had a sleeve placed on it and it also had a deep groove, so rather than putting a new sleeve I replaced the whole thing)
11. New Toyota engine gasket kit and used all Toyota seals that weren't included in the kit (ie. tranny input or is it output seal? behind the throw out bearing, crank seal, black fipg, red fipg, etc....)
12. Fresh Toyota red coolant
13. New Bando belts
14. AFE dry air filter
15. Injectors and cold start sent to Witchhunter
16. New NGK Plugs and Wires
17. New Denso Cap and Rotor
18. Case of Toyota oil filters
19. Broke the cam and engine in with 5W 30 oil and Lucas break-in additive
20. New Toyota radiator hoses, all 3 of them
21. Sent the radiator out for boiling/cleaning
22. New Aisin clutch kit
23. New direct fit LCE header (ditched the clamps and had it welded at a muffler shop)
24. New direct fit Pacesetter exhaust (ditched the clamps and had it welded at a muffler shop) Still using the original CAT
25. New aftermarket motor and transmission mounts
26. New Aisin Master and Slave clutch cylinders
27. New brushes for the alternator
28. New starter contacts
Plus many many new bolts direct from Toyota. I didn't want to re-use some of them and some weren't even originals (past mechanic work). All the timing cover bolts were replaced with oem ones.
Currently working on the interior while I keep breaking in the engine....
Last edited by Grego92; 04-28-2012 at 01:38 PM.
03-25-2012, 03:49 PM
#3
Registered User
Thread Starter
iTrader: (4)
Join Date: May 2010
Location: People's Republic of California
Posts: 720
Likes: 0
Received 15 Likes
on
12 Posts
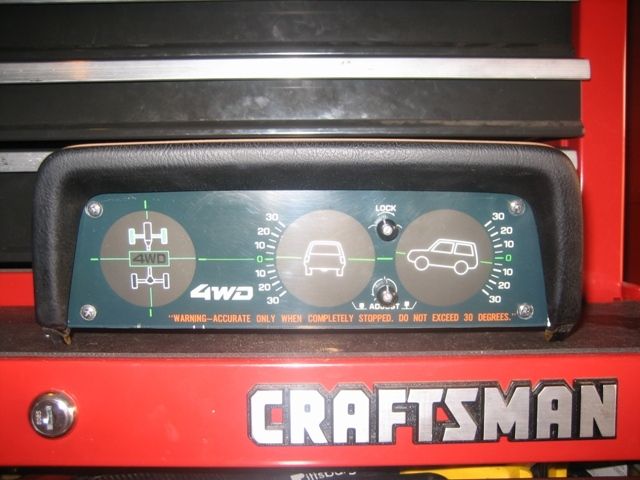
Found an inclinometer from a Tercel at the yard yesterday for $15. Trying to figure out the best place to put it, the 2nd gen dash isn't flat like the 1st gen so makes it kind of difficult.
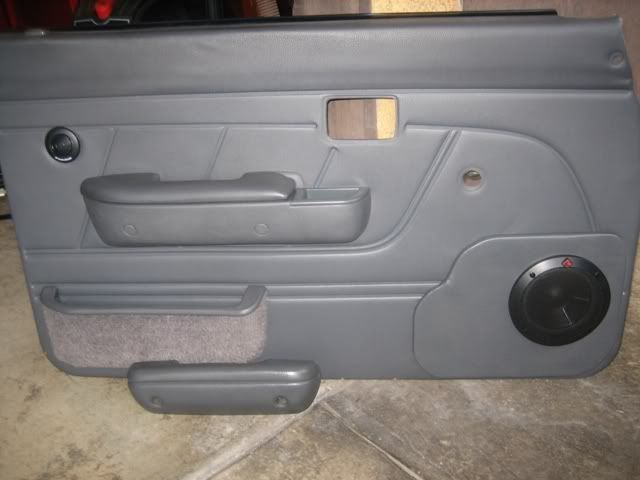
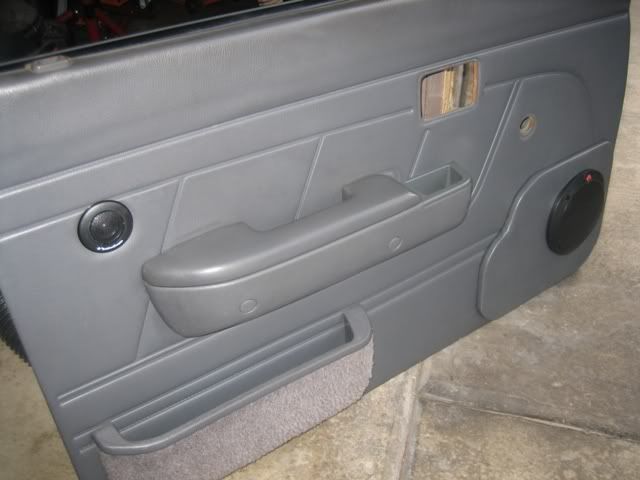
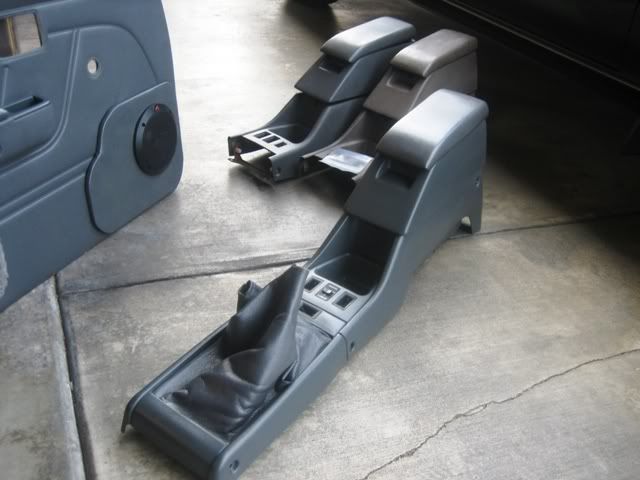
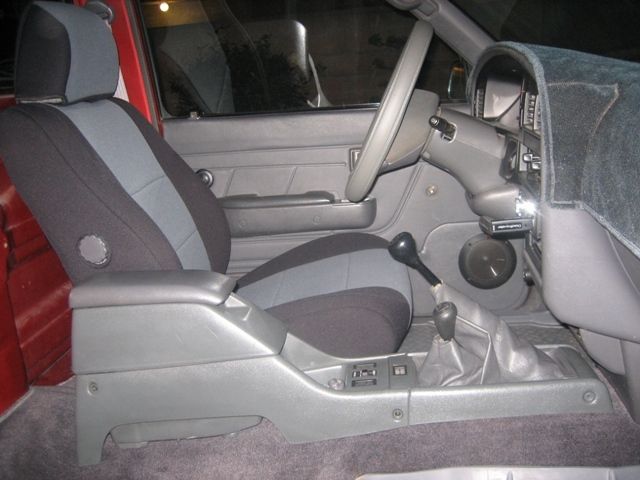
Today I finished installing Fat Mat in the interior. Definitely makes a difference in quieting things down. Very happy with the result. Bought 100sq. ft but only used about 70 sq. ft. and I doubled up on the floor and firewall.
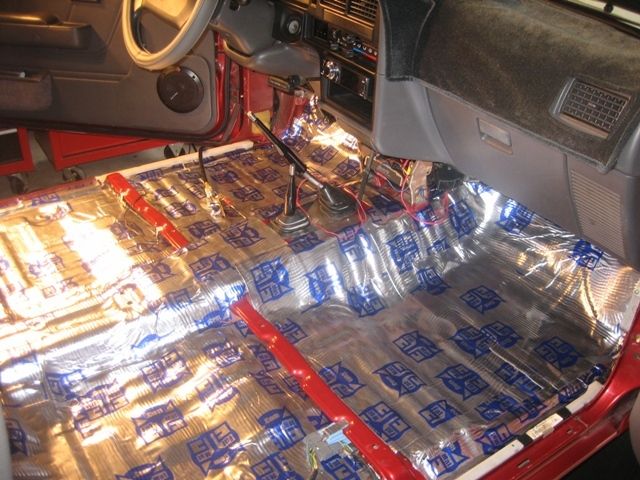
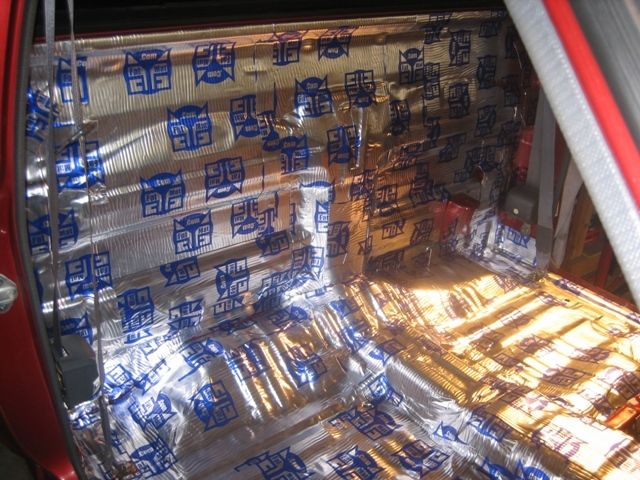
Today I finished installing Fat Mat in the interior. Definitely makes a difference in quieting things down. Very happy with the result. Bought 100sq. ft but only used about 70 sq. ft. and I doubled up on the floor and firewall.
04-01-2012, 09:45 AM
#4
Registered User
Thread Starter
iTrader: (4)
Join Date: May 2010
Location: People's Republic of California
Posts: 720
Likes: 0
Received 15 Likes
on
12 Posts
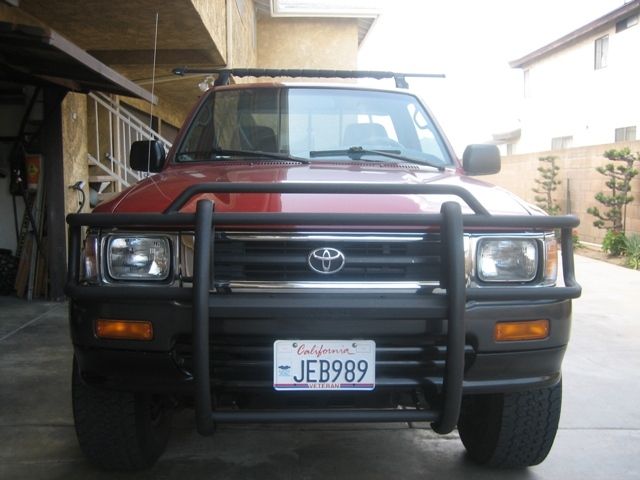
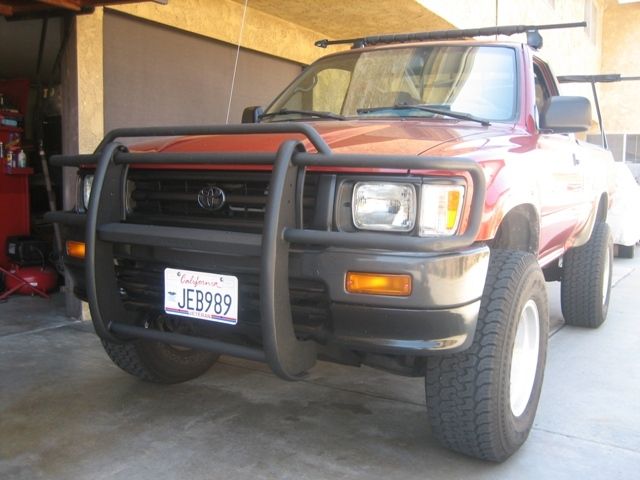
Found a WAAG brush guard off a 4runner at the yard the other day for $43 and thought it would look good once I get my can-back on. I think the WAAG was a factory add-on option for certain year 2nd Gen 4runners. There was very little rust on this so I prepped it with a wire wheel/sand paper, etching primer, and then duplicoplor bed armor. That stuff is messy! but it turned out nice.
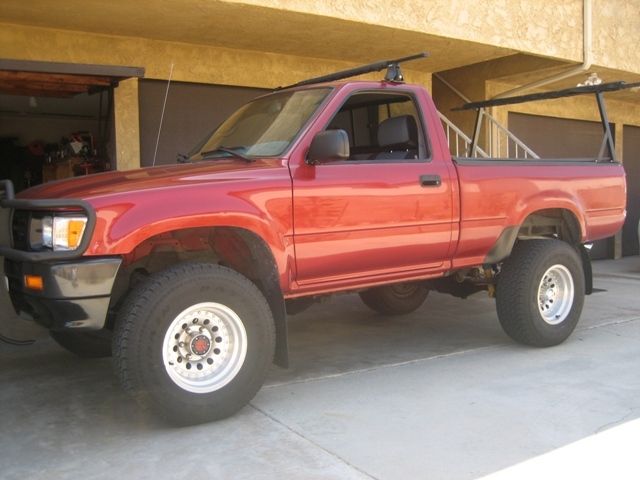
Also added manual 4runner mirrors, I think this is a good upgrade to the car-like looking mirrors that it came with. Really makes it look more like a truck in my opinion. The factory mirrors aren't much bigger than my 90' camry mirrors.
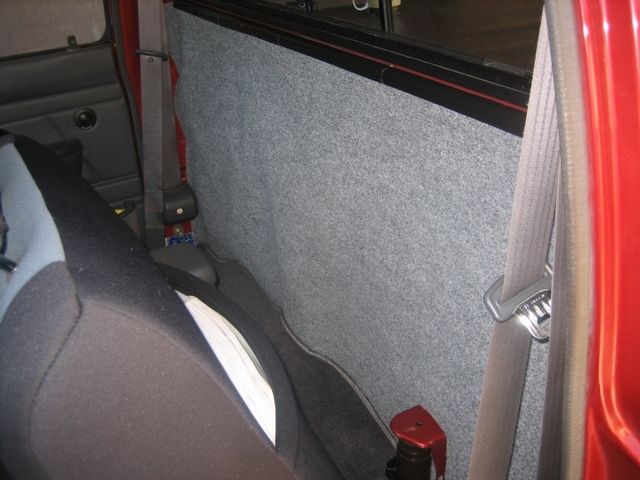
Also added a piece of marine carpet I had laying around to the rear cab wall to cover up the fat-mat sound insulation and hopefully it would add some more sound dampening. It turned out real nice and I haven't even used any glue yet, just black duct tape at the top to hold it in place until I figure out what type of glue to use and maybe find some edge trimming to give it a cleaner look.
EDIT:
SOLD
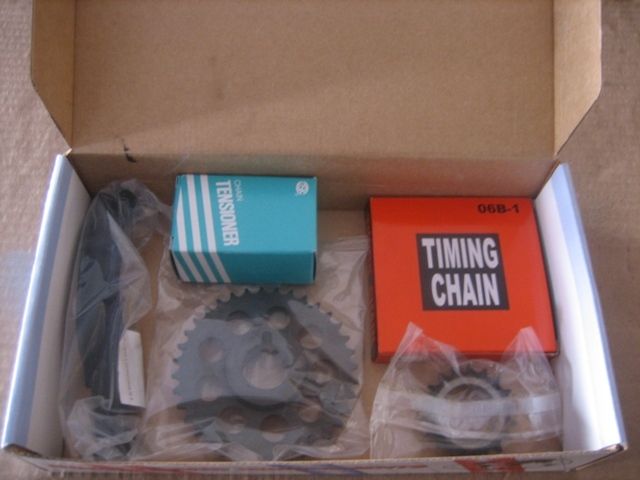
Forgot to mention I'm selling a timing kit (minus dirver's side steel guide rail), oil pump, water pump, timing cover, and head bolts for $75 (I know it's a steal price, but I'll never use it and hopefully it will help someone get on the road who's in a tight budget), plus whatever shipping is via UPS. I will only send to U.S. and payment via paypal. I bought all the stuff from engnbldr, but decided to go all OEM. They may have grease prints from me picking them up, but nothing was ever installed. The Oil Pump I already installed the crank seal ( I have pictures) and I do not have the box for that item. All gaskets that came with the parts are included. Again, I used the steel guide rail so that is not included. I have additional pictures of everything if you are interested.
Oil pump is in same box as water pump.

No steel guide rail
Also added manual 4runner mirrors, I think this is a good upgrade to the car-like looking mirrors that it came with. Really makes it look more like a truck in my opinion. The factory mirrors aren't much bigger than my 90' camry mirrors.
Also added a piece of marine carpet I had laying around to the rear cab wall to cover up the fat-mat sound insulation and hopefully it would add some more sound dampening. It turned out real nice and I haven't even used any glue yet, just black duct tape at the top to hold it in place until I figure out what type of glue to use and maybe find some edge trimming to give it a cleaner look.
EDIT:
SOLD
Forgot to mention I'm selling a timing kit (minus dirver's side steel guide rail), oil pump, water pump, timing cover, and head bolts for $75 (I know it's a steal price, but I'll never use it and hopefully it will help someone get on the road who's in a tight budget), plus whatever shipping is via UPS. I will only send to U.S. and payment via paypal. I bought all the stuff from engnbldr, but decided to go all OEM. They may have grease prints from me picking them up, but nothing was ever installed. The Oil Pump I already installed the crank seal ( I have pictures) and I do not have the box for that item. All gaskets that came with the parts are included. Again, I used the steel guide rail so that is not included. I have additional pictures of everything if you are interested.
Oil pump is in same box as water pump.
No steel guide rail
Last edited by Grego92; 04-18-2012 at 12:52 PM.
04-04-2012, 07:36 PM
#5
Registered User
Thread Starter
iTrader: (4)
Join Date: May 2010
Location: People's Republic of California
Posts: 720
Likes: 0
Received 15 Likes
on
12 Posts
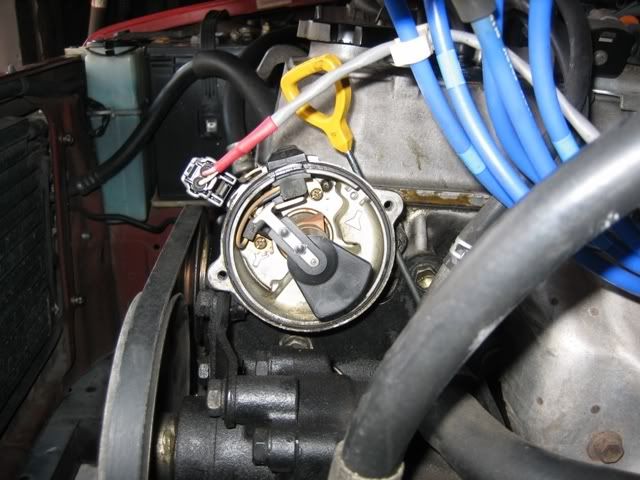
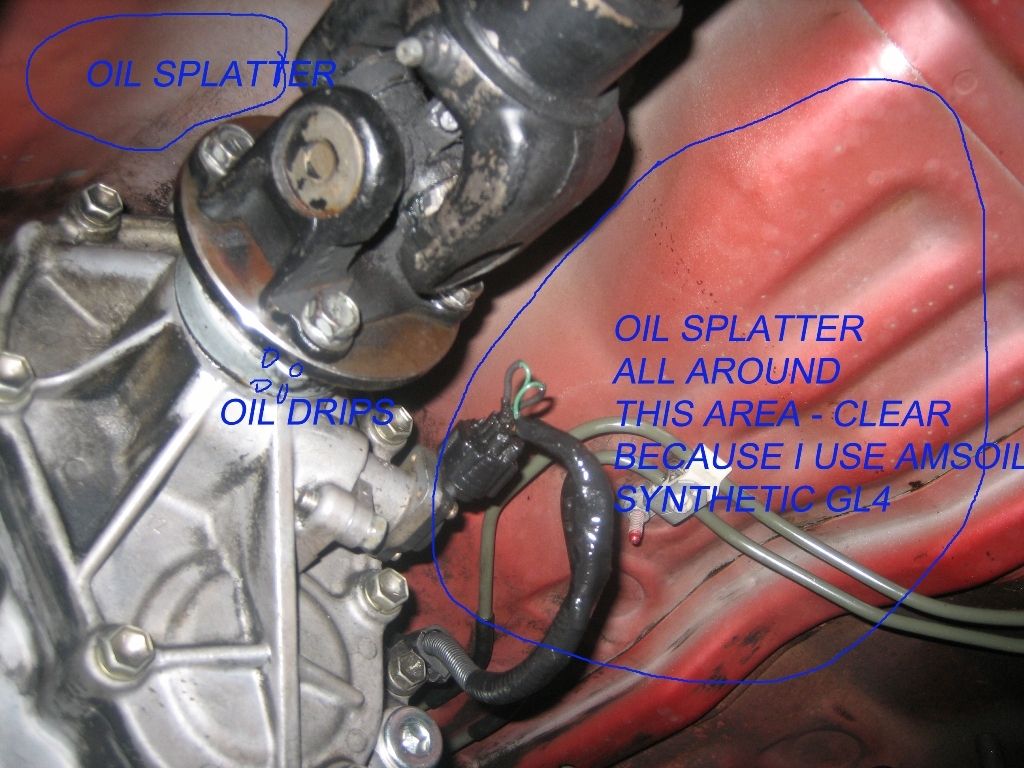
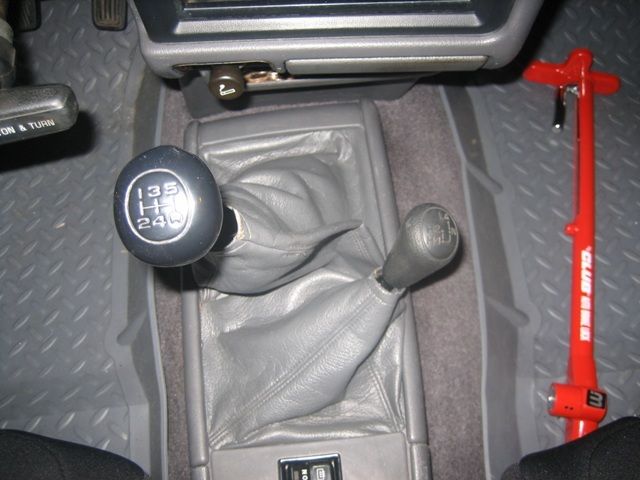
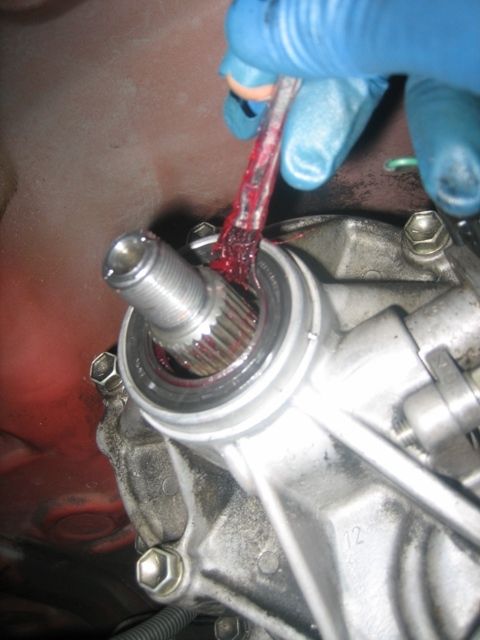
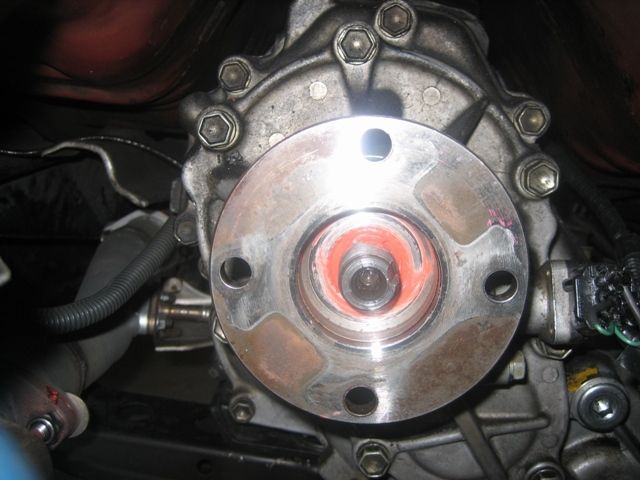
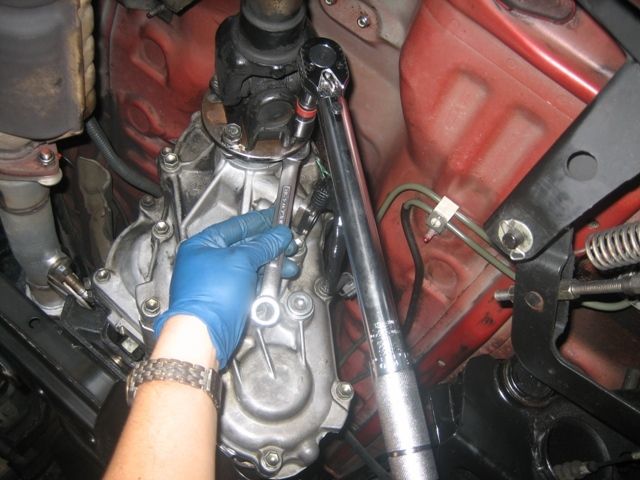
My "how to" replace the transfer case output seal. Took about 2 1/2 hours while taking photos.
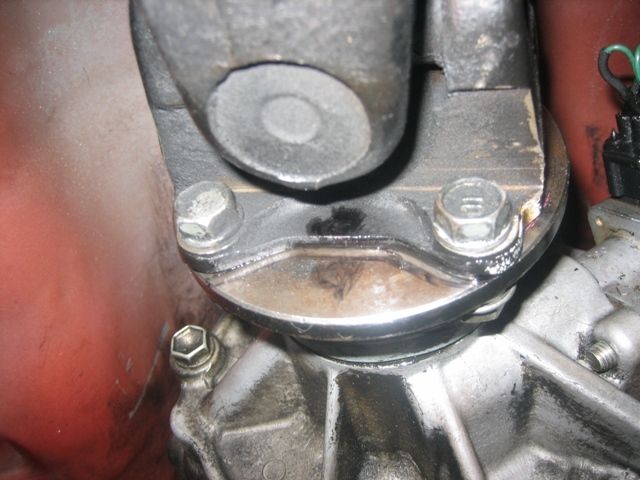
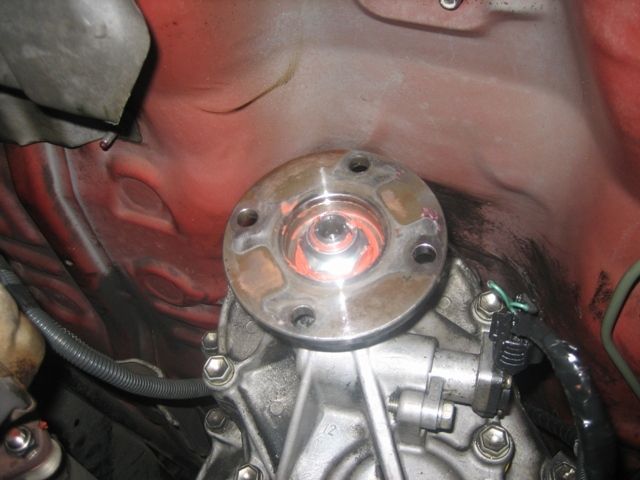
If you have fluid splatter like below then this may solve your problem.
1. I put the tranny in gear, locked the hubs, and put it in L4. Set the parking break.
2. I put a little mark so I could generally know the bolt holes were matched up the same way when I removed it. (don't know if you need to or not)
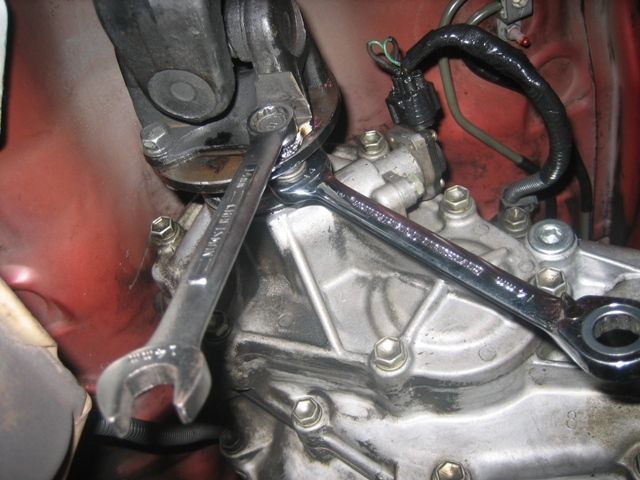
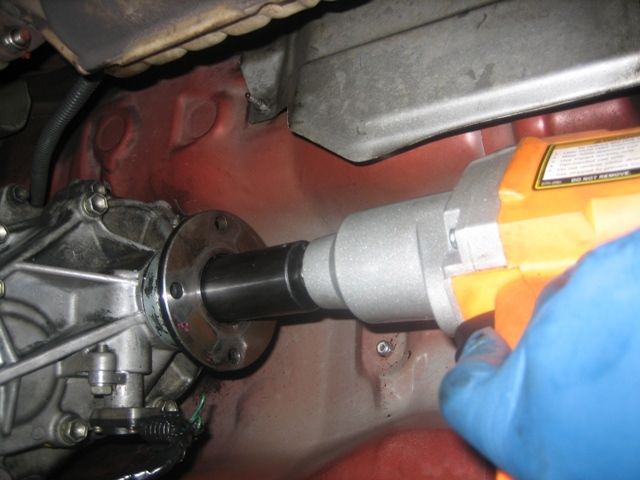
3. Using two 14mm wrenches and a ratchet and 14mm socket I removed the bolts.
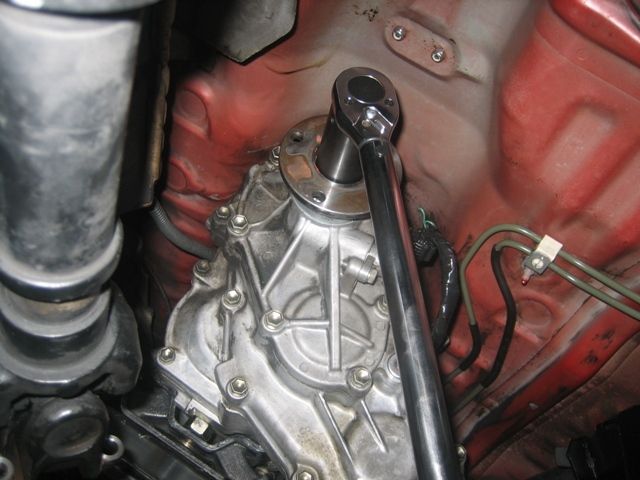
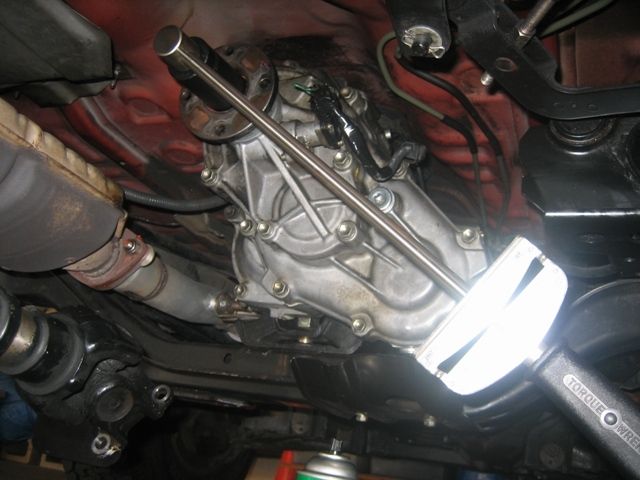
4. Used a jack stand to hold the shaft up and in place.
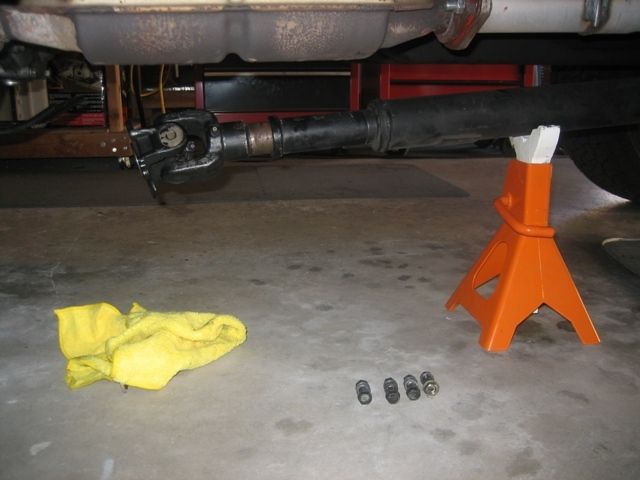
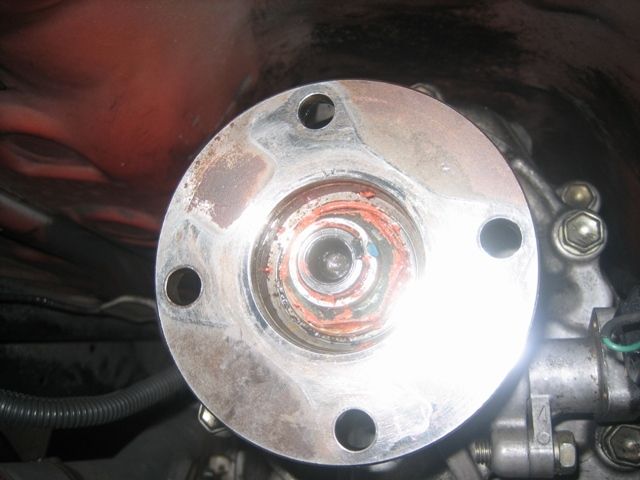
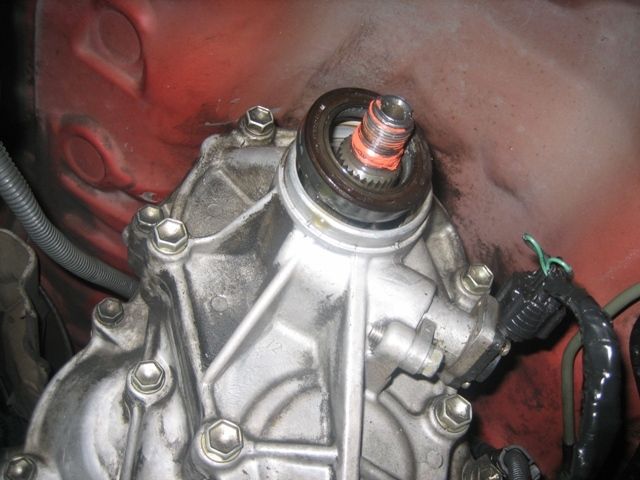
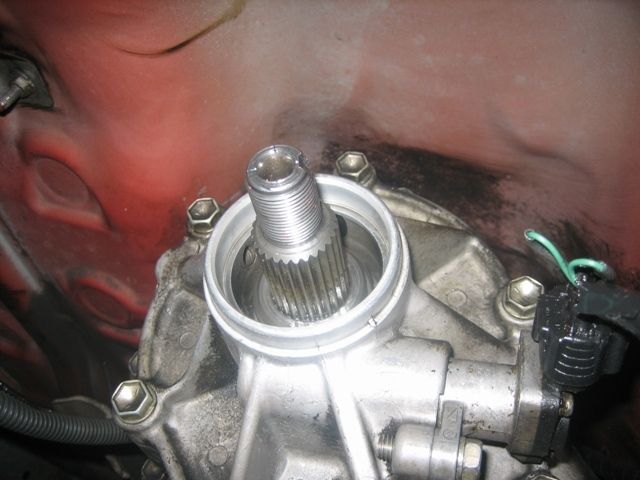
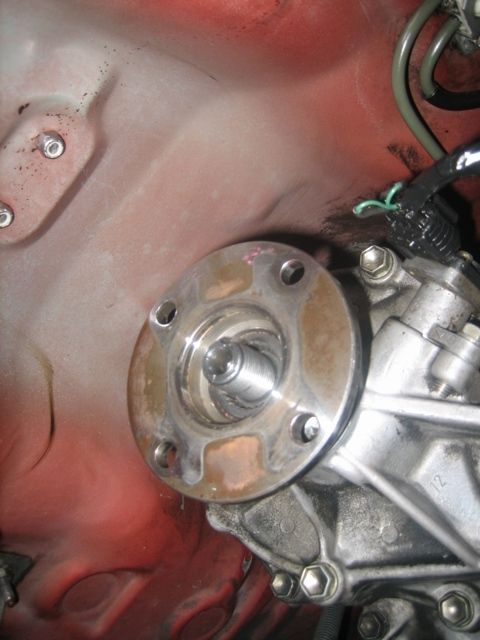
5. This is how it looks after removing the shaft.

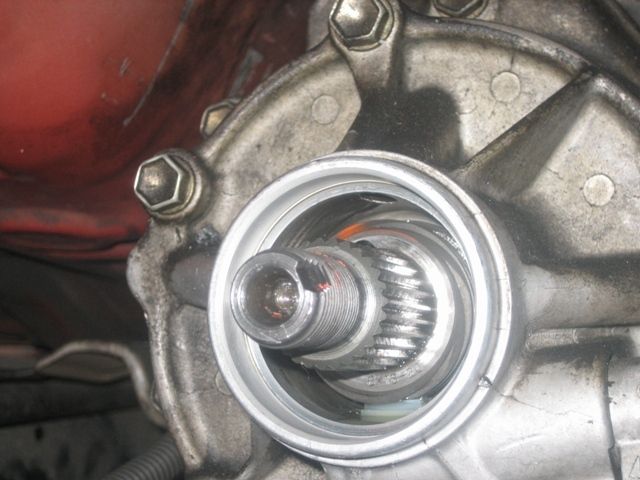
6. Using a small blade screw driver I undid the stake in the nut as best I could. Then used an impact wrench and 30MM socket it came off real easily.
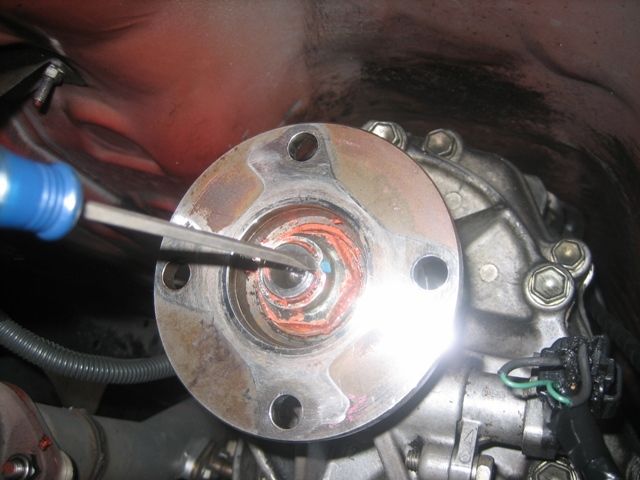
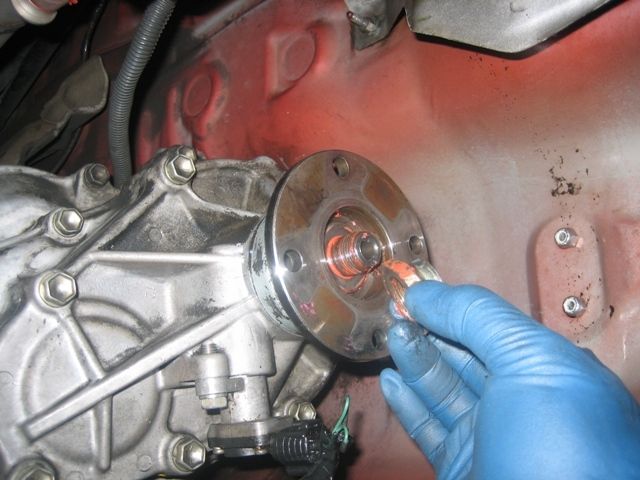
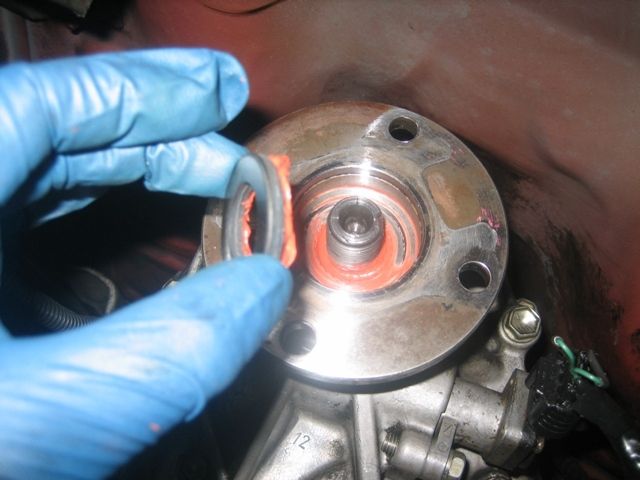
7. Then grab a screw driver or a tiny pry bar and get the washer out.
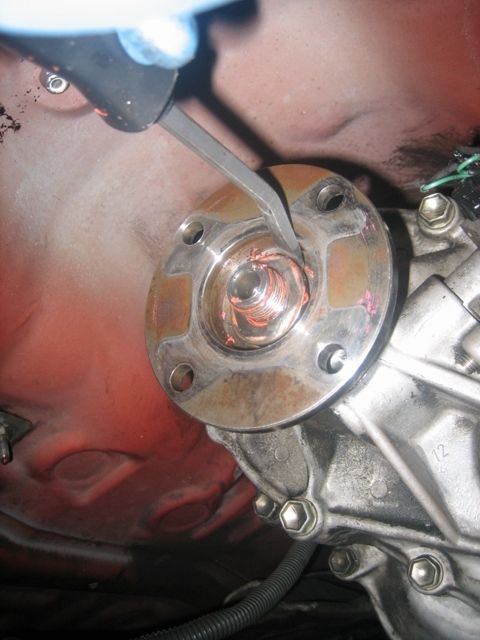

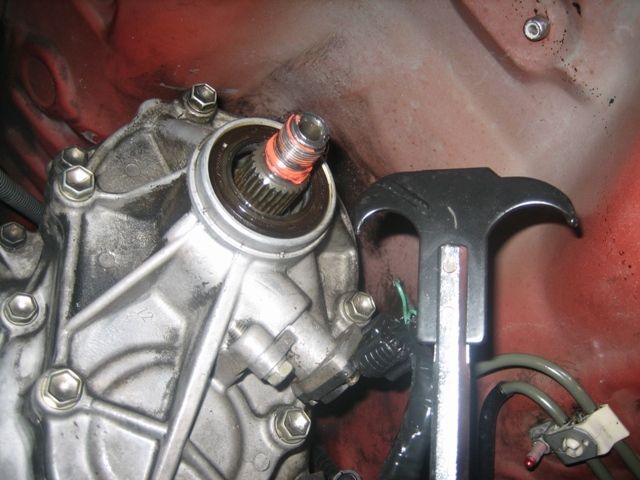
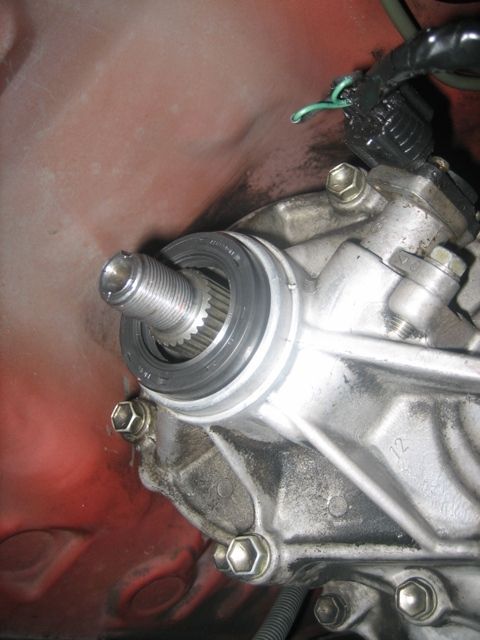
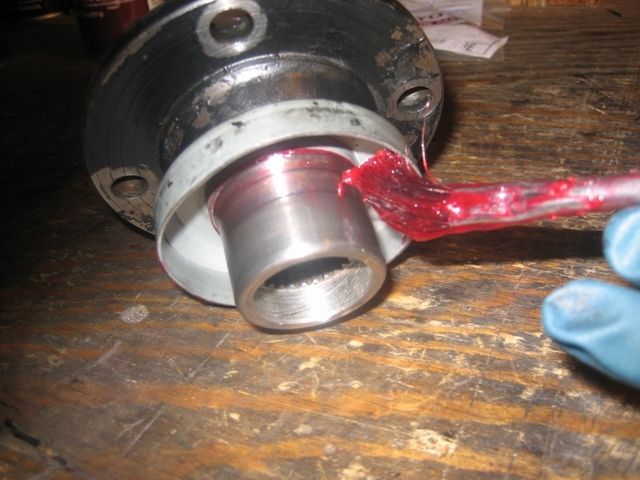
8. Then wiggle/pull off the companion flange. (A little fluid will come out so have a rag handy directly below it)

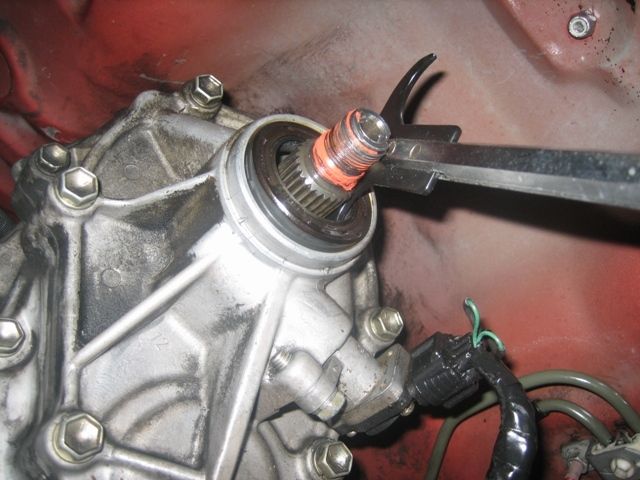
9. Now get the seal out. I used a little seal puller. Have your rag handy again below it as more fluid will come out.
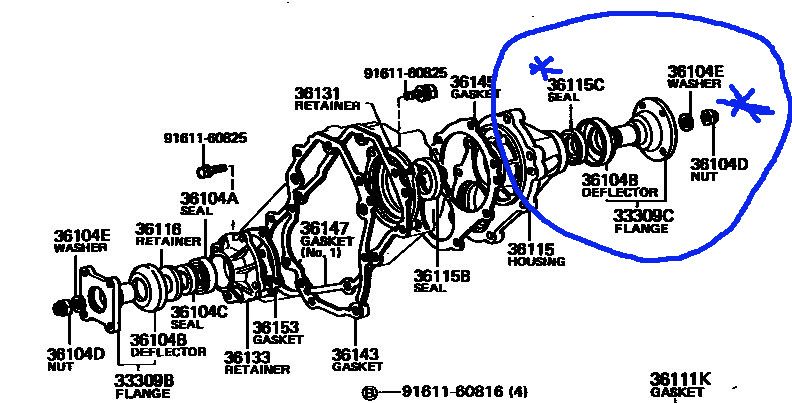
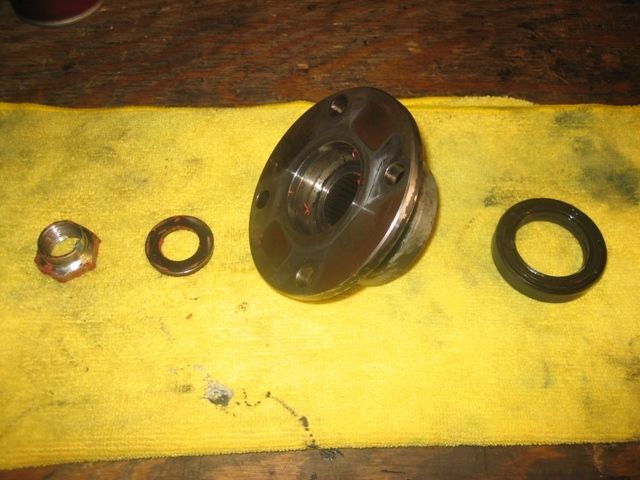
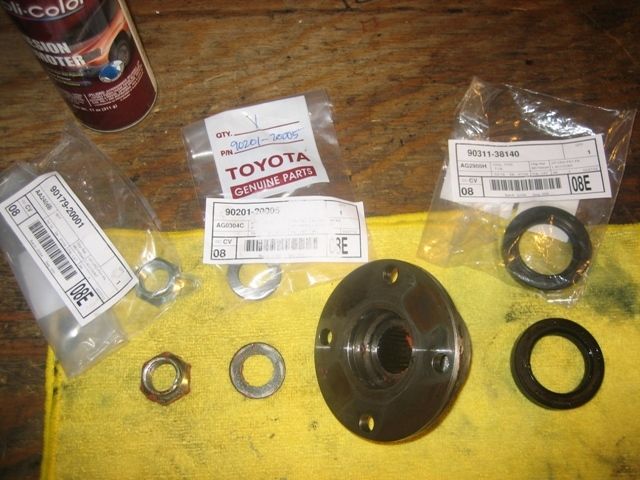
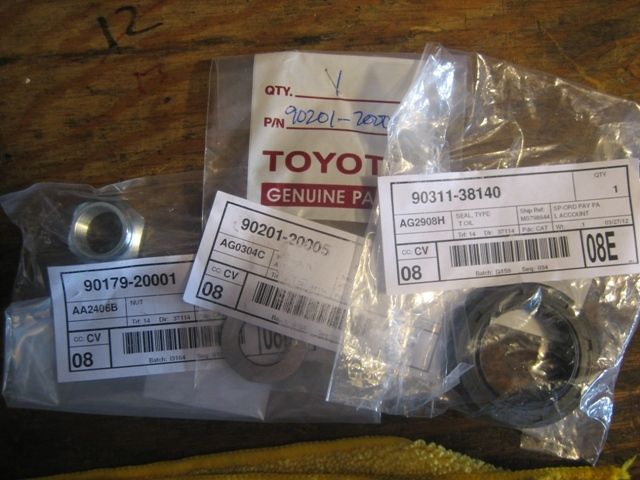
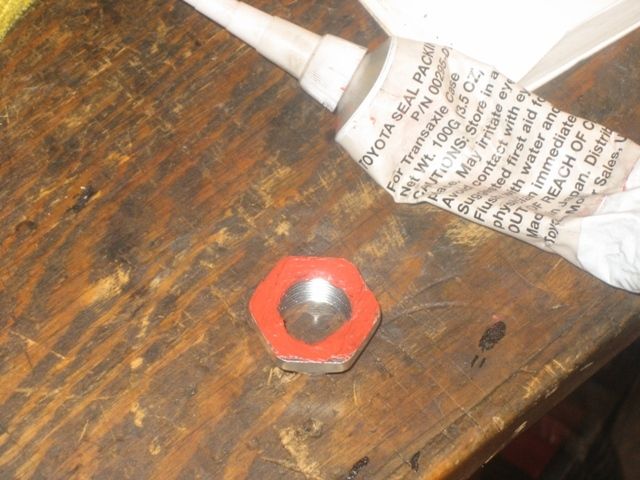
10. Here are the four parts you've just removed. Also, you can see the part numbers of the OEM replacement parts. The nut and washer were definitely re-usable, but since I already bought new ones I used them and kept the old ones as spares.
The approximate price of the items from the dealer are: Seal - $6.50, Nut - $4.30, Washer - $2.20
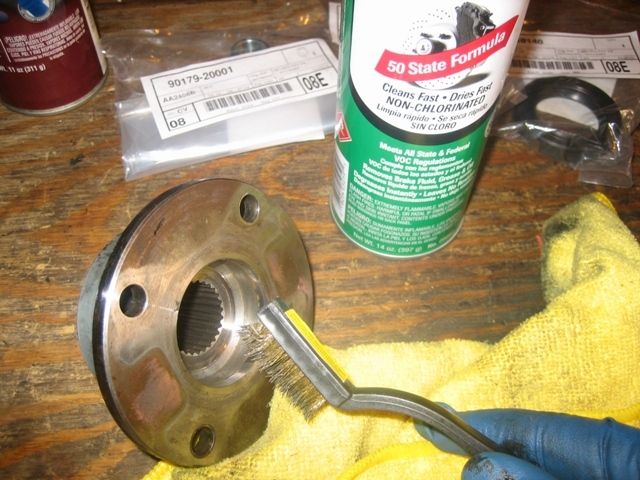
11. Using a brass brush and carb cleaner, I cleaned all the old toyota red fipg off of the companion flange.
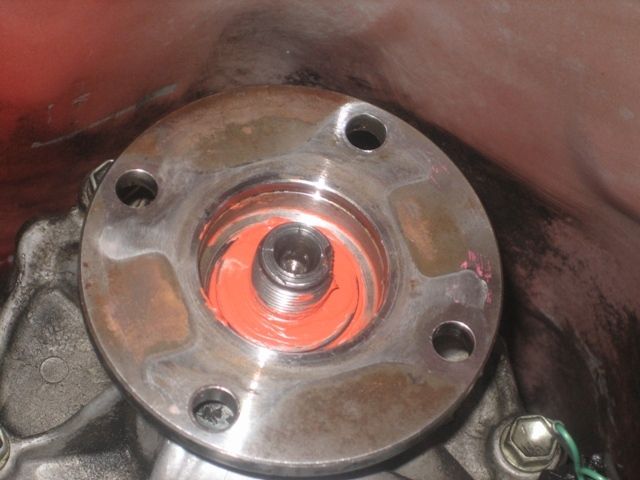
12. Cleaned off all the old fipg from the...whatever you call it.
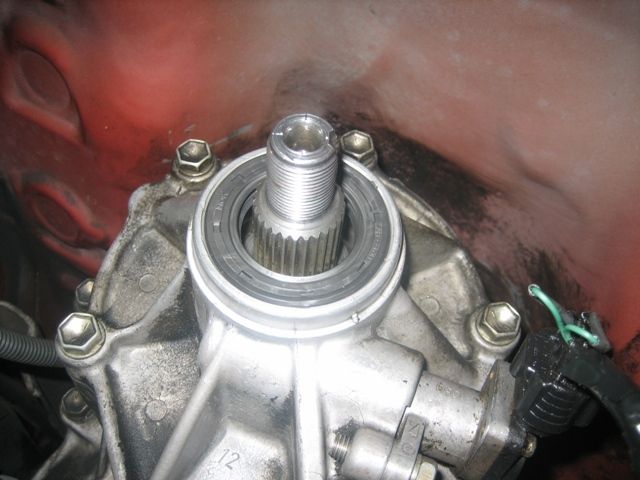
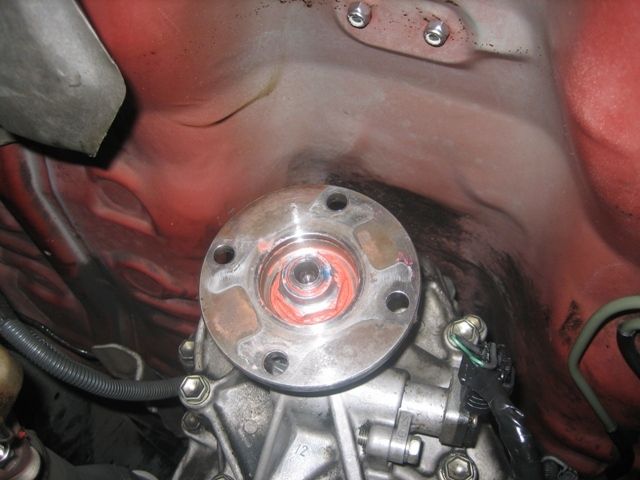
13. Here's a good shot of the area where you stake the nut so you know what you're dealing with. It's actually a pretty big divot.
14. Put the new seal in using a big socket or carefully tapping it in evenly with whatever you have. Don't forget to put some grease on the inside, I did so had to use a brush to coat it.
15. I put some grease on the companion flange area that meets the new seal. On mine you could see the two lines from from the seal as it spins around it but there wasn't a groove. Then put it in the same general way you pulled it out.
16. Grab your toyota red fipg (or whatever you're going to use) and put a good amount inside that concave area that's created by the companion flange and the spindle thingy.
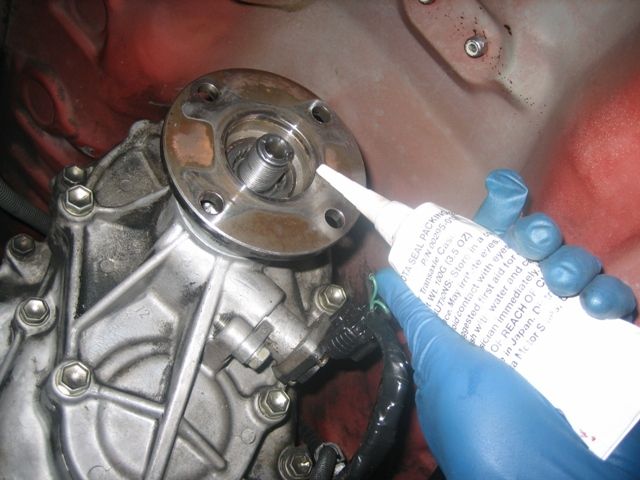
17. Grab the washer and put some fipg on side that goes on first (more or less just packing more fipg in the same area. Then I put some on the other side of the washer and the back side of the nut. In hindsight, I don't think putting more fipg on the washer or nut matters much, but someone mentioned it in another thread so I did.
18. Grab your torque wrench and the 30MM socket and torque to 90 FT LBS.
19. Now stake the new nut or re-stake the old nut. I had a hard time because of the angle I had, but managed to get it done ok. I also squirted in some loctite for good measure.
20. Now put the shaft back in place and the four bolts. Torque to 54 FT LBS. I have other vehicles to drive so I let the fipg dry for over 24 hours before driving. I don't know how long you need to wait, if any.
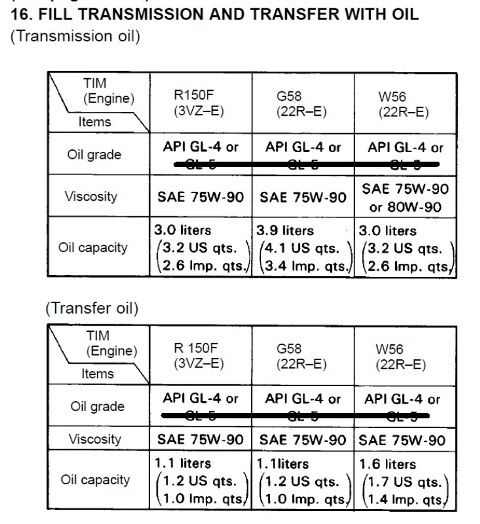
If you need to replace the fluid that was lost during the leak, the below is from the online pickup manual (Page MT-24). I lined out the "GL 5" since most agree that GL 4 is the way to go. Some popular synthetic brands that are used are Amsoil, Redline, and Royal Purple.
If you have fluid splatter like below then this may solve your problem.
1. I put the tranny in gear, locked the hubs, and put it in L4. Set the parking break.
2. I put a little mark so I could generally know the bolt holes were matched up the same way when I removed it. (don't know if you need to or not)
3. Using two 14mm wrenches and a ratchet and 14mm socket I removed the bolts.
4. Used a jack stand to hold the shaft up and in place.
5. This is how it looks after removing the shaft.
6. Using a small blade screw driver I undid the stake in the nut as best I could. Then used an impact wrench and 30MM socket it came off real easily.
7. Then grab a screw driver or a tiny pry bar and get the washer out.
8. Then wiggle/pull off the companion flange. (A little fluid will come out so have a rag handy directly below it)
9. Now get the seal out. I used a little seal puller. Have your rag handy again below it as more fluid will come out.
10. Here are the four parts you've just removed. Also, you can see the part numbers of the OEM replacement parts. The nut and washer were definitely re-usable, but since I already bought new ones I used them and kept the old ones as spares.
The approximate price of the items from the dealer are: Seal - $6.50, Nut - $4.30, Washer - $2.20
11. Using a brass brush and carb cleaner, I cleaned all the old toyota red fipg off of the companion flange.
12. Cleaned off all the old fipg from the...whatever you call it.
13. Here's a good shot of the area where you stake the nut so you know what you're dealing with. It's actually a pretty big divot.
14. Put the new seal in using a big socket or carefully tapping it in evenly with whatever you have. Don't forget to put some grease on the inside, I did so had to use a brush to coat it.
15. I put some grease on the companion flange area that meets the new seal. On mine you could see the two lines from from the seal as it spins around it but there wasn't a groove. Then put it in the same general way you pulled it out.
16. Grab your toyota red fipg (or whatever you're going to use) and put a good amount inside that concave area that's created by the companion flange and the spindle thingy.
17. Grab the washer and put some fipg on side that goes on first (more or less just packing more fipg in the same area. Then I put some on the other side of the washer and the back side of the nut. In hindsight, I don't think putting more fipg on the washer or nut matters much, but someone mentioned it in another thread so I did.
18. Grab your torque wrench and the 30MM socket and torque to 90 FT LBS.
19. Now stake the new nut or re-stake the old nut. I had a hard time because of the angle I had, but managed to get it done ok. I also squirted in some loctite for good measure.
20. Now put the shaft back in place and the four bolts. Torque to 54 FT LBS. I have other vehicles to drive so I let the fipg dry for over 24 hours before driving. I don't know how long you need to wait, if any.
If you need to replace the fluid that was lost during the leak, the below is from the online pickup manual (Page MT-24). I lined out the "GL 5" since most agree that GL 4 is the way to go. Some popular synthetic brands that are used are Amsoil, Redline, and Royal Purple.
Last edited by Grego92; 04-06-2012 at 05:25 PM.
04-19-2012, 02:00 PM
#6
Registered User
Join Date: Jan 2011
Posts: 73
Likes: 0
Received 0 Likes
on
0 Posts
well i already have a timing chain kit and water pump ready to go in but what about the oil pump willing to separate and ship to me? 95630 CA...
Your rig is super clean, good job on the rebuild man.
Your rig is super clean, good job on the rebuild man.
04-19-2012, 03:21 PM
#7
Trending Topics
04-19-2012, 06:43 PM
#10
Registered User
Join Date: Jul 2010
Location: Moose Jaw Sk, Canada
Posts: 47
Likes: 0
Received 0 Likes
on
0 Posts
Great clean work.
I also think the pickup mirrors are small. What year 4-runner did you get yours off of and was it a direct swap?
Good luck on future projects.
I also think the pickup mirrors are small. What year 4-runner did you get yours off of and was it a direct swap?
Good luck on future projects.
04-20-2012, 12:15 PM
#11
Registered User
Thread Starter
iTrader: (4)
Join Date: May 2010
Location: People's Republic of California
Posts: 720
Likes: 0
Received 15 Likes
on
12 Posts
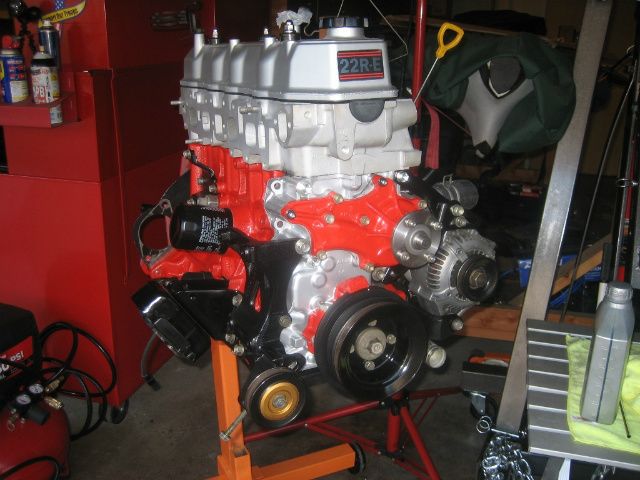
Thanks guys. Just trying to keep this truck in the best shape that I can as I'll never sell it. It was my first ever vehicle, bought it brand new off the lot. It's just a weekend truck now for when I go kayak fishing or just plain fishing so at most it sees some beach sand when I launch the yak from the surf.
I had the undercarriage hot water pressure washed about 4 years ago. There's a place that puts it on a 60 degree ramp and then goes at it. I had multiple leaks that were just making a mess down there and I couldn't tell where they were coming from so that's what I had done. I think they're all taken care of now.
The side view mirros came from 90' 4runner. Seems like most of them are auto and chromed. I think mine came from the very base model that had black manual ones.
Haven't done much but did convert my front grill to black. After sanding I used Duplicolor adhesion promoter and Duplicolor black trim paint. I still have the rear smitty tube bumper and wheels to convert to black. My bumper is actually one of a kind...it was a demo model that never went into production. It has 3 lateral tubes on each side of the license plate rather than only two and has a slight curve on the ends. I'll post a pic when I'm done sand blasting the chrome and using the duplicolor bed armor on it.
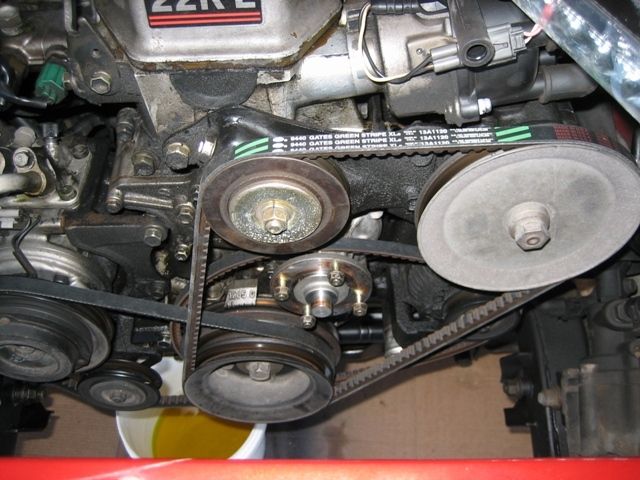
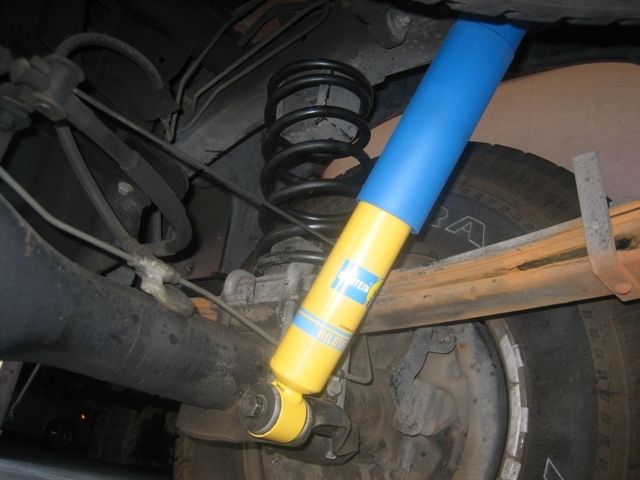
Finally did the no-cut Zuk mod and installed my rear Bilstein shocks. I used 13" long 125lb springs which gave me a 1.5" rake without my normal load. I was hoping for only a 1" rake but I'm happy with it. My normal load when driving is about 50lbs of gear, 14 galllons of water (100lbs?) for my wash down setup, and a 60lb kayak. And hopefully driving back I have an ice chest filled with a 30lb yellowtail, white seabass, or halibut! I'm pretty sure I'll be level with that load.

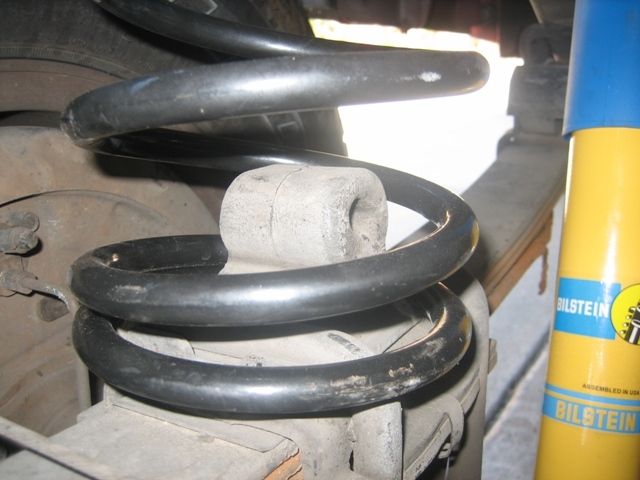
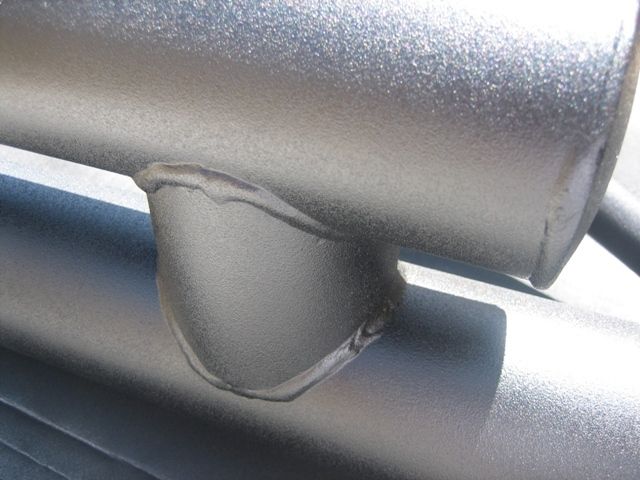
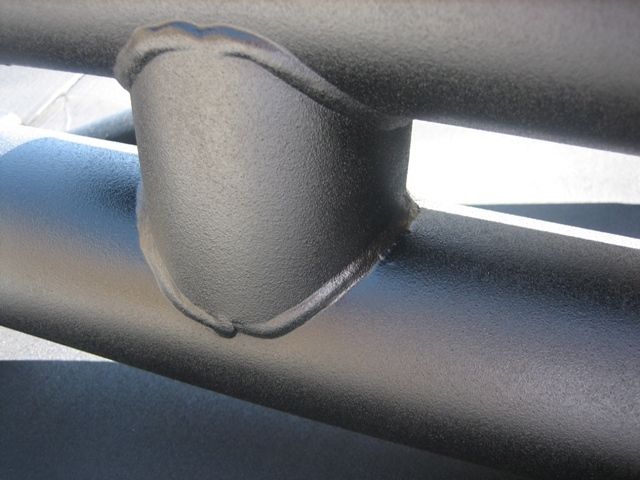
My bump stops look different than everyone elses? The one's I've seen on the board are more traingular, mine are an odd shape. Nonetheless they seem to work fine and no noise or slipping around once they settled in the position they are in, in the photos.

I had the undercarriage hot water pressure washed about 4 years ago. There's a place that puts it on a 60 degree ramp and then goes at it. I had multiple leaks that were just making a mess down there and I couldn't tell where they were coming from so that's what I had done. I think they're all taken care of now.
The side view mirros came from 90' 4runner. Seems like most of them are auto and chromed. I think mine came from the very base model that had black manual ones.
Haven't done much but did convert my front grill to black. After sanding I used Duplicolor adhesion promoter and Duplicolor black trim paint. I still have the rear smitty tube bumper and wheels to convert to black. My bumper is actually one of a kind...it was a demo model that never went into production. It has 3 lateral tubes on each side of the license plate rather than only two and has a slight curve on the ends. I'll post a pic when I'm done sand blasting the chrome and using the duplicolor bed armor on it.
Finally did the no-cut Zuk mod and installed my rear Bilstein shocks. I used 13" long 125lb springs which gave me a 1.5" rake without my normal load. I was hoping for only a 1" rake but I'm happy with it. My normal load when driving is about 50lbs of gear, 14 galllons of water (100lbs?) for my wash down setup, and a 60lb kayak. And hopefully driving back I have an ice chest filled with a 30lb yellowtail, white seabass, or halibut! I'm pretty sure I'll be level with that load.
My bump stops look different than everyone elses? The one's I've seen on the board are more traingular, mine are an odd shape. Nonetheless they seem to work fine and no noise or slipping around once they settled in the position they are in, in the photos.
Last edited by Grego92; 04-20-2012 at 12:29 PM.
04-20-2012, 12:23 PM
#12
Registered User
Thread Starter
iTrader: (4)
Join Date: May 2010
Location: People's Republic of California
Posts: 720
Likes: 0
Received 15 Likes
on
12 Posts
Oh yeah, I changed the headlights out also since I had the grill off. If you take the grill off you'll find out it's a pain in the ass and will likely bust some of the plastic clips, I had to replace all of mine. So not wanting to do that again in the near future I did the headlights while I had it out. Used GE Nighthawks, they are definitely brighter than the standard halogens and more white light.
Last edited by Grego92; 04-20-2012 at 12:28 PM.
04-20-2012, 12:33 PM
#13
Registered User
Join Date: Jan 2011
Posts: 73
Likes: 0
Received 0 Likes
on
0 Posts
Not a fan of how that coil sits on the spring plate. You going to make a seat for it? What are those springs out of?
You've inspired me to pressure wash the underbody of my new beauty. I think i'll just bring some ramps to the pressure washing place and get dirty.
You've inspired me to pressure wash the underbody of my new beauty. I think i'll just bring some ramps to the pressure washing place and get dirty.
04-20-2012, 08:35 PM
#14
Registered User
Thread Starter
iTrader: (4)
Join Date: May 2010
Location: People's Republic of California
Posts: 720
Likes: 0
Received 15 Likes
on
12 Posts
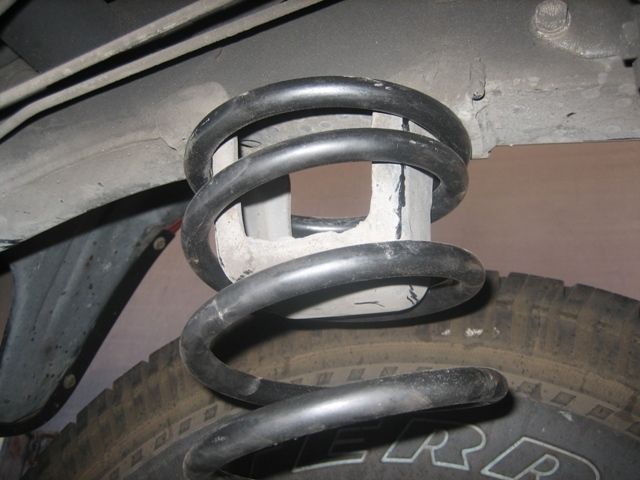
I hear you, I'm not really a fan of it either  . There's nothing to keep it from sliding to one side or the other except like you mentioned a bracket to be made. The pressure is still downward but I am a little concerned about it. I wonder what others have done to keep them in an ideal position.
They are the Black Magic springs that a lot of the guys are buying off of ebay.
I think I'll post a question in the open forum and see if others think I might have issues in the long run with it sitting that way.
. There's nothing to keep it from sliding to one side or the other except like you mentioned a bracket to be made. The pressure is still downward but I am a little concerned about it. I wonder what others have done to keep them in an ideal position.They are the Black Magic springs that a lot of the guys are buying off of ebay.
I think I'll post a question in the open forum and see if others think I might have issues in the long run with it sitting that way.
 04-21-2012, 09:30 AM
#16
clean work. i like it that you used mostly oem parts. they are better and well worth the extra cost. plus if you didnt know. all oem parts come with one year warranty from date of purchase
04-22-2012, 01:05 PM
#17
Registered User
Thread Starter
iTrader: (4)
Join Date: May 2010
Location: People's Republic of California
Posts: 720
Likes: 0
Received 15 Likes
on
12 Posts
Hey Mark, yup we gotta meet up sometime soon at the yard with the "Ese's" lol
Toytech....yours was one of the no-cut zuk mods I was looking at thanks for stopping by. I noticed your springs had a pigtail at the end so it sat better than mine. Any opinion on whether mine will be alright? I'm getting zero response from the open board....guess it's not controversial enough to warrant attention It doesn't look like it it but its really set well on one of the clamps and isn't budging.
Toytech....yours was one of the no-cut zuk mods I was looking at thanks for stopping by. I noticed your springs had a pigtail at the end so it sat better than mine. Any opinion on whether mine will be alright? I'm getting zero response from the open board....guess it's not controversial enough to warrant attention
It doesn't look like it it but its really set well on one of the clamps and isn't budging.
04-22-2012, 09:10 PM
#18
we both used different springs so that might be why mine sat differently. imo as long as the spring isnt pushing on the rubber bump stop i wouldnt worry about it. if it is pushing on the rubber. it might tear the rubber bump right off. if you want it center a little better. you can weld some tabs on top of the u bolt to keep the spring from sliding or moving
04-28-2012, 01:36 PM
#19
Registered User
Thread Starter
iTrader: (4)
Join Date: May 2010
Location: People's Republic of California
Posts: 720
Likes: 0
Received 15 Likes
on
12 Posts
Thanks for the input Toyotech....I'm just going to keep an eye on it for now and make sure no pressure goes onto the rubber bump stop. I hardly do any off-road anyhow anymore, just some dirt trails to the camp grounds and beach sand.
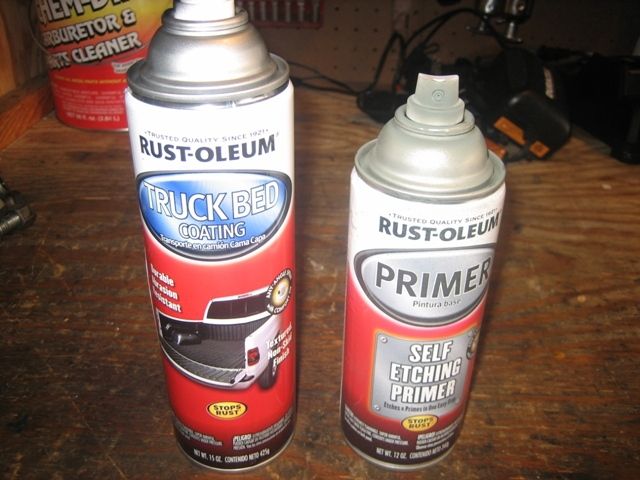
I finished up my rear bumper today. Sanded all the rust off and sanded/scuffed up all the chrome. It was not fun work. Decided to use the Rustoleum products this time since I used the dupli-color bed armor on the brush guard. I can tell you the Rustoleum seems to be a better quality, goes on smoother, goes on easier, less messy spray and more focused, and better spray coverage. I would only use the Rustoleum stuff if I were to do anymore bed armor type painting.
The other benefit was that it lowered the rake from the zuk mod by almost a half inch, very happy about that so now I only have about an inch rake without my normal load.
Can you see something funny about the "TOYOTA" decal? The "A" is smaller than the rest . Long story short, the original one looked like crap after all these years. I went onto ebay and ordered the one from the guy that claims he provides them to the dealers because certain colors aren't made anymore (silver metallic being one of them). I checked some the toyota sites and sure as heck certain colors were about $35 and others were over $80. I suspect the $80 ones were still oem ones, and the $35 were from this guy or some other aftermarket party. On ebay they are $30 so I went ahead and ordered it and was very happy with it, I can believe that he supplies them to the dealers. The problem was that I screwed up "A" when putting it on.  . Not wanting to spend another $30 I purchased another one from someone else on ebay who said his was OEM quality $15.....NOT! His stuff is crap, not metallic like OEM, and about 1/4" smaller than OEM. So now I got this jacked up looking "A" that I need to replace.
I also replaced the tailgate handle with a factory OEM one. The aftermarket chrome one didn't work all that well.
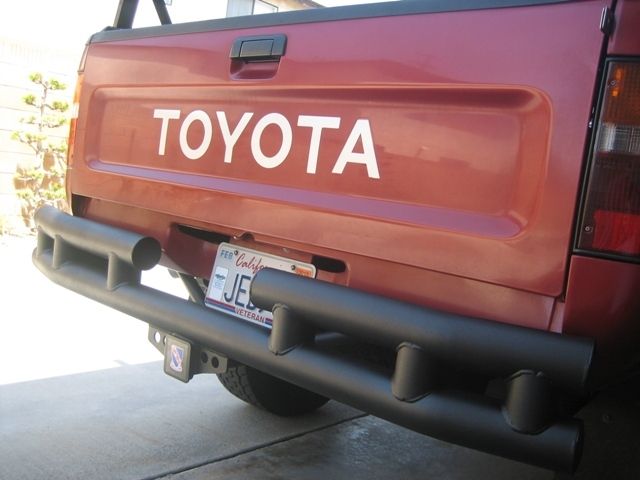
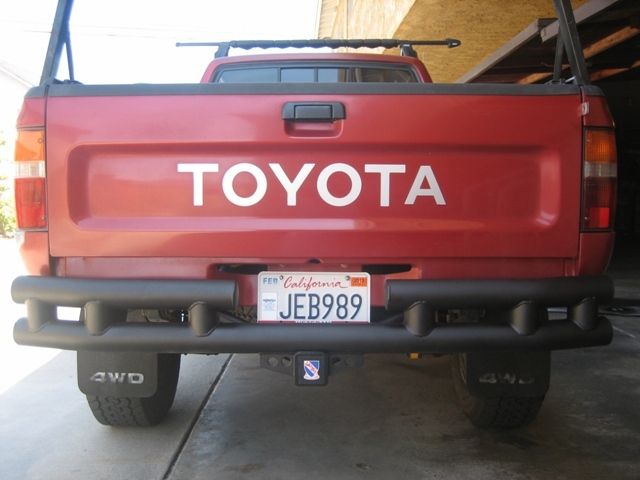
I finished up my rear bumper today. Sanded all the rust off and sanded/scuffed up all the chrome. It was not fun work. Decided to use the Rustoleum products this time since I used the dupli-color bed armor on the brush guard. I can tell you the Rustoleum seems to be a better quality, goes on smoother, goes on easier, less messy spray and more focused, and better spray coverage. I would only use the Rustoleum stuff if I were to do anymore bed armor type painting.
The other benefit was that it lowered the rake from the zuk mod by almost a half inch, very happy about that
so now I only have about an inch rake without my normal load. Can you see something funny about the "TOYOTA" decal? The "A" is smaller than the rest
. Long story short, the original one looked like crap after all these years. I went onto ebay and ordered the one from the guy that claims he provides them to the dealers because certain colors aren't made anymore (silver metallic being one of them). I checked some the toyota sites and sure as heck certain colors were about $35 and others were over $80. I suspect the $80 ones were still oem ones, and the $35 were from this guy or some other aftermarket party. On ebay they are $30 so I went ahead and ordered it and was very happy with it, I can believe that he supplies them to the dealers. The problem was that I screwed up "A" when putting it on. . Not wanting to spend another $30 I purchased another one from someone else on ebay who said his was OEM quality $15.....NOT! His stuff is crap, not metallic like OEM, and about 1/4" smaller than OEM. So now I got this jacked up looking "A" that I need to replace.I also replaced the tailgate handle with a factory OEM one. The aftermarket chrome one didn't work all that well.
 hahaha. HEY, you saidddddd! lol. JK, .... maybe I'll just pack up the Sawzall and stop by ...I mean, the Burgers and stop by for some grillin?
  haha
haha


