Falx's '86 4Runner Tortoise Build Up
 02-07-2013, 10:36 PM
#1
Registered User
Thread Starter
So, it's about time I get around to this, since I'm actually about to get rolling on this build.
The Backstory!
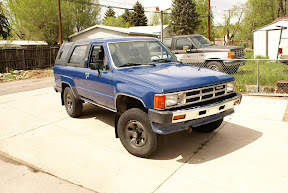
I got my lovely little 'Runner back in '04 for next to nothing. It had 104k miles on it, I'm the second owner, and come to find out, when we got it home, the timing chain had stretched and cut through the water pump.
My cousin is a mechanic at the local Yota dealership (15+ years) and is a Toyota fanatic himself, so he got me a deal on the parts and helped me change out the water pump and associated internals. To make a long story short, it was a no-go and after much tinkering, it was decided that I needed to rebuild or replace the motor.
Then it sat for 5 years being that I was a starving student.

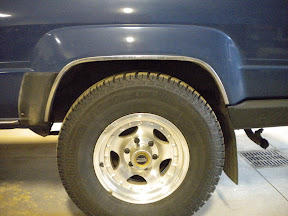
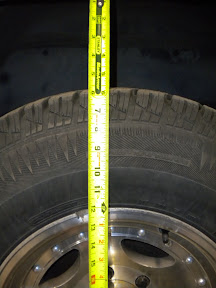
My mother, being the amazing woman she is, funded a rebuilt 22RE from a local shop for about $1,400 (+core), and it ran well enough since. I tried to get new tires, but two wheels would balance, due to being bent, so I decided to hit up the ol' Craigslist for some rims, and ended up with some decent tires to go with.
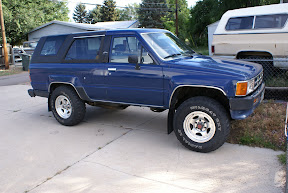
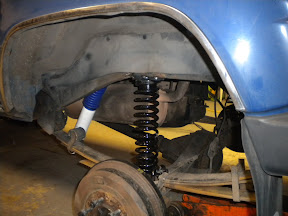
Fast-forward one year and one typically squatty rear end, a YotaTech search, and a ZukMod later, I've got a nice restored stance.


And, another year, I've already been having issues with the rebuild burning oil, it started idling funny where the engine would rev from about 400-1200 RPM, and eventually I have to jump the test clip to get the fuel pump to run because the elctronics seem to keep cutting it off, and it had been running hot.
Yada Yada, so on and so forth, I popped the head gasket, and it's been sitting sice 2010. I put roughly 2k miles on it in the 9 years that I've owned it.
The Build!
I'd been wanting to do a V8 swap for a while, and as luck would have it, I found a 302 on Craigslist for $125. Then, with my tax refund, I bought a master install kit, starter, and oil pan from Northwest Off-Road, as well as some parts from Jegs, water pump, gasket kit, blue valve covers, and a pulley set.

I probably should have inspected the engine better, as it needs some love, machining, and some rebuilding, so again, the project sits.
And now, as tax time approaches, I am ramping up to get some more parts, and possibly buy a fully built and dyno'd 302 as I'm not sure I want to rebuild the one I have since I really don't have that much free time.
I still need:
NWOR want's $735 for their headers and $490 for the radiator, so I am looking at alternatives. I've read AFCO makes a good crossflow radiator for <$200, and I am kind of stuck on the headers.
I was looking at some Hedman headers, which are considerably cheaper shortys, but I'm not sure of clearances or anything yet. It may have to wait until I get the engine in the bay and can measure.
Full Disclosure: I'm slow, but will update this thread as I actually start to do things. Hooyah!
The Backstory!
I got my lovely little 'Runner back in '04 for next to nothing. It had 104k miles on it, I'm the second owner, and come to find out, when we got it home, the timing chain had stretched and cut through the water pump.
My cousin is a mechanic at the local Yota dealership (15+ years) and is a Toyota fanatic himself, so he got me a deal on the parts and helped me change out the water pump and associated internals. To make a long story short, it was a no-go and after much tinkering, it was decided that I needed to rebuild or replace the motor.
Then it sat for 5 years being that I was a starving student.
My mother, being the amazing woman she is, funded a rebuilt 22RE from a local shop for about $1,400 (+core), and it ran well enough since. I tried to get new tires, but two wheels would balance, due to being bent, so I decided to hit up the ol' Craigslist for some rims, and ended up with some decent tires to go with.
Fast-forward one year and one typically squatty rear end, a YotaTech search, and a ZukMod later, I've got a nice restored stance.
And, another year, I've already been having issues with the rebuild burning oil, it started idling funny where the engine would rev from about 400-1200 RPM, and eventually I have to jump the test clip to get the fuel pump to run because the elctronics seem to keep cutting it off, and it had been running hot.
Yada Yada, so on and so forth, I popped the head gasket, and it's been sitting sice 2010. I put roughly 2k miles on it in the 9 years that I've owned it.
The Build!
I'd been wanting to do a V8 swap for a while, and as luck would have it, I found a 302 on Craigslist for $125. Then, with my tax refund, I bought a master install kit, starter, and oil pan from Northwest Off-Road, as well as some parts from Jegs, water pump, gasket kit, blue valve covers, and a pulley set.
I probably should have inspected the engine better, as it needs some love, machining, and some rebuilding, so again, the project sits.
And now, as tax time approaches, I am ramping up to get some more parts, and possibly buy a fully built and dyno'd 302 as I'm not sure I want to rebuild the one I have since I really don't have that much free time.
I still need:
- Engine (maybe?)
- Headers
- Radiator
- Air Cleaner
- A trip to the muffler shop
- Ball Joint Spacers (also maybe?)
NWOR want's $735 for their headers and $490 for the radiator, so I am looking at alternatives. I've read AFCO makes a good crossflow radiator for <$200, and I am kind of stuck on the headers.
I was looking at some Hedman headers, which are considerably cheaper shortys, but I'm not sure of clearances or anything yet. It may have to wait until I get the engine in the bay and can measure.
Full Disclosure: I'm slow, but will update this thread as I actually start to do things. Hooyah!
Last edited by Falx; 02-08-2013 at 05:15 AM. Reason: Picasa+BBCode=Suck
 02-07-2013, 10:39 PM
#2
Registered User
Thread Starter
I think by the end of this thing, I will have at least one engine to part with, lest I rebuild it in my spare time. Also, the 22RE's EFI bits and bobbles, various 302 parts: extra valve covers, stock oil pan, if'n it doesn't make it to a scrap pile.
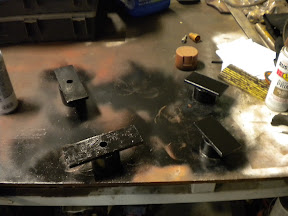
Also, NWOR sent me two motor mount sets, if someone wants the extra.
Oh, and my Picasa Album for the Toylet, as I lovingly call it some days: here
Also, NWOR sent me two motor mount sets, if someone wants the extra.
Oh, and my Picasa Album for the Toylet, as I lovingly call it some days: here
Last edited by Falx; 02-07-2013 at 10:41 PM. Reason: add album link
02-09-2013, 01:47 AM
#4
Registered User
Thread Starter
I find myself in need of something to keep my hands busy, so I may start pulling things apart this weekend. With some pictures maybe.
I'm also contemplating OBA if I can fit a York compressor in the engine bay.
And find a serpentine clutch.
I may have to go spend a day at the Pull n Pay.
I'm also contemplating OBA if I can fit a York compressor in the engine bay.
And find a serpentine clutch.
I may have to go spend a day at the Pull n Pay.
Last edited by Falx; 02-10-2013 at 02:51 PM.
02-10-2013, 12:03 PM
#5
Hi Falx, glad that you started a build thread on your 4runner! I look forward to seeing what parts you decide to go with on your 302 build as I am always looking to upgrade and change things on my 4runner that I'm not quite satisfied with (such as my radiator and stock exhaust manifolds). It's nice to see another 86' (302) 4runner on the forum!
Last edited by rustED; 02-10-2013 at 12:41 PM.
02-10-2013, 02:18 PM
#6
Registered User
Thread Starter
Hi Falx, glad that you started a build thread on your 4runner! I look forward to seeing what parts you decide to go with on your 302 build as I am always looking to upgrade and change things on my 4runner that I'm not quite satisfied with (such as my radiator and stock exhaust manifolds). It's nice to see another 86' (302) 4runner on the forum!
At the moment, I am looking at these Flowtech headers or these Summit Racing ones.
As far as the radiator goes, this is the one I'm looking at, granted, figuring out how I will manage to mount it is another issue.
In other news, I spent the day rolling around in the back of the truck today figuring out what I want to do inside. One of the interior panels in the back was broken, so I ripped it out a while back. I think I will pull out the other one and replace them with sheetmetal, with dynamat on the back to prevent vibrations.


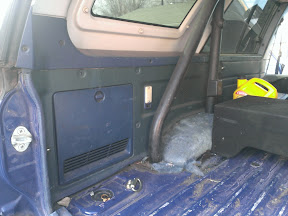
I think I am going to pull out the back seat and build up that indent to get a nice, evenly flat floor from the front seats, back. Ulitmately, I'd like to get my sub box out of the back and maybe build the subs into the open space in the side panels or maybe into the floor where the back seat was if I can finagle enought cu.ft. of air space and keep it flat.
Of course they are unnecessary, but I like my music.
But, back to the floor, I wonder if I can panel up the back in sheetmetal of some sort (back door too), and get it all Line-X coated.
I'm kind of just typing out my thoughts on the whole thing.
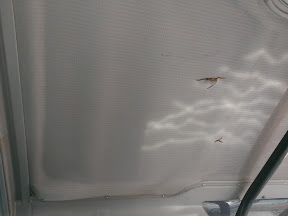
I'm also wondering you all wonderful folks know an easy answer to a torn headliner in the back.
And, finally, I put more photos in the album, right over here, because I don't think anyone would like me if I put every single photo I take into this thread.
02-10-2013, 10:29 PM
#7
Super Moderator
Staff
iTrader: (1)
Join Date: Aug 2008
Location: Anderson Missouri
Posts: 11,788
Likes: 0
Received 21 Likes
on
19 Posts
Looking forward to seeing your build come along. Somewhere on here I seen a thread where someone shows how to replace the headliner that you are speaking of. I need to do the same to mine. When I find that thread again I will post a link to it for you.
Trending Topics
02-11-2013, 12:03 AM
#8

I saw that headliner re-do also, but I don't remember if these are foam on board or foam on shell. I looks like fabric on foam on the shell, judging by the sag. But the way the holes look it might have the board backing. Poke yer finger up in one of them holes and we'll know. 
For an easy fix you just ignore it, for a hillbilly fix they make iron on patches, for a semi repair you could use a bit of hem tape, for a full redoo you gotta pull all that trim down.
Hem tape repair #1 (aka heat bondable something), pull the busted backer board down as best you can and squirt some hot glue on it so it's stable. Pick out the foam under the tear. Cut a piece of cardboard that fits the hole. Spray glue tack some hem tape to cover the whole cardboard surface. Wedge "patch" inside of the area you removed the foam from. Take a sheet of AL foil and an iron(like fer cloths), protect the iron from any melt thru with the foil. Start on the center of one of the triangle shaped fabric sections and work to the edge stretching as you go. Proceed to an adjacent section and repeat iron press and stretch.
If you take your time your should be able to get a pretty tight seam.
#2 is basicly the same but skips all the fiddly stuff and won't come out as good. Start with the Iron and foil and put the heat fusible stuff on the outside.
#3 is alot like a total recover. remove all the trim pull down the liner, peel the fabric off, patch the backer, patch the foam. Lay out the fabric and line the rips up as beest as you can get them and apply the fusible stuff. Re glue the fabric to foam and reassemble.
#3 will come out the best, but #1 should be pretty close if you take enough time at it. #2 could be pretty good if you have enough overlap at the front or back of the panel to steal some fabric from, you can use the fusible stuff and make a patch that matchs.
*edit* I got my numbers jumbled up there..
Last edited by Co_94_PU; 02-11-2013 at 12:06 AM.
02-11-2013, 12:27 AM
#9
Super Moderator
Staff
iTrader: (1)
Join Date: Aug 2008
Location: Anderson Missouri
Posts: 11,788
Likes: 0
Received 21 Likes
on
19 Posts
Here is the link. Doesnt look to bad at all to do.
Link>>> https://www.yotatech.com/forums/f116/1st-gen-4runner-canopy-headliner-replacement-how-251771/
Link>>> https://www.yotatech.com/forums/f116/1st-gen-4runner-canopy-headliner-replacement-how-251771/
 02-11-2013, 05:25 AM
#11
Registered User
Thread Starter
I saw that headliner re-do also, but I don't remember if these are foam on board or foam on shell. I looks like fabric on foam on the shell, judging by the sag. But the way the holes look it might have the board backing. Poke yer finger up in one of them holes and we'll know.
For an easy fix you just ignore it, for a hillbilly fix they make iron on patches, for a semi repair you could use a bit of hem tape, for a full redoo you gotta pull all that trim down.
Hem tape repair #1 (aka heat bondable something), pull the busted backer board down as best you can and squirt some hot glue on it so it's stable. Pick out the foam under the tear. Cut a piece of cardboard that fits the hole. Spray glue tack some hem tape to cover the whole cardboard surface. Wedge "patch" inside of the area you removed the foam from. Take a sheet of AL foil and an iron(like fer cloths), protect the iron from any melt thru with the foil. Start on the center of one of the triangle shaped fabric sections and work to the edge stretching as you go. Proceed to an adjacent section and repeat iron press and stretch.
If you take your time your should be able to get a pretty tight seam.
#2 is basicly the same but skips all the fiddly stuff and won't come out as good. Start with the Iron and foil and put the heat fusible stuff on the outside.
#3 is alot like a total recover. remove all the trim pull down the liner, peel the fabric off, patch the backer, patch the foam. Lay out the fabric and line the rips up as beest as you can get them and apply the fusible stuff. Re glue the fabric to foam and reassemble.
#3 will come out the best, but #1 should be pretty close if you take enough time at it. #2 could be pretty good if you have enough overlap at the front or back of the panel to steal some fabric from, you can use the fusible stuff and make a patch that matchs.
*edit* I got my numbers jumbled up there..
Here is the link. Doesnt look to bad at all to do.
Link>>> https://www.yotatech.com/forums/showthread.php?t=251771
Link>>> https://www.yotatech.com/forums/showthread.php?t=251771
I was thinking of fabbing up a mount to replace the cluster and mounting all new gauges, speedo, tach, oil pressure, fuel, fuel pressure, and engine temp (if I can swing it).
 02-12-2013, 12:19 PM
#13
I'm getting excited to get her running again and better than ever. As far as the headers go, I may have to dry fit the engine and measure my clearances and then try to find actual dimensions on the various headers.
At the moment, I am looking at these Flowtech headers or these Summit Racing ones.
As far as the radiator goes, this is the one I'm looking at, granted, figuring out how I will manage to mount it is another issue.
At the moment, I am looking at these Flowtech headers or these Summit Racing ones.
As far as the radiator goes, this is the one I'm looking at, granted, figuring out how I will manage to mount it is another issue.
Hopefully those headers will work for you, they dump out similiar to a set that I had and hit the frame, I end up using stock exhaust manifolds, here is a link to my build and a comparison pic of the headers and stock manifolds:
https://www.yotatech.com/forums/f199...73/index4.html
Last edited by rustED; 02-12-2013 at 12:22 PM.
02-12-2013, 12:53 PM
#14
Registered User
Thread Starter
Hi Falx. I was checking out that radiator that you have linked, it looks like that would be a good fit, the price is definately hard to beat! I might have to look into getting me one before summer hits! My toyota V6 rad that I'm using does the job, but barely, especially when just creeping around in the summer heat, lol. Just curious how thick your electric fan is, it's hard to tell from the pic.
Hopefully those headers will work for you, they dump out similiar to a set that I had and hit the frame, I end up using stock exhaust manifolds, here is a link to my build and a comparison pic of the headers and stock manifolds:
https://www.yotatech.com/forums/f199...73/index4.html
Hopefully those headers will work for you, they dump out similiar to a set that I had and hit the frame, I end up using stock exhaust manifolds, here is a link to my build and a comparison pic of the headers and stock manifolds:
https://www.yotatech.com/forums/f199...73/index4.html
As for the radiator, until I (have time to) take measurements, I was also looking at one that is a little shorter and a little wider.
We've had a lot going on at work, which leaves me zero time to work on the truck. It also doesn't help that the truck is in one part of town, and I work in another, and live in another.
02-13-2013, 06:21 PM
#15
Registered User
Thread Starter
After doing some measuring, it looks like I can get away with a 27" wide (overall) radiator, which would normally interfere with the air intake tube just to the left (DS) of the stock radiator, so long as the core width is around 22" wide since the opening behind the grill is roughly 22" wide.
However, the more V8 savvy people I've been talking to keep telling me "Oh, you'll need a 4-core radiator to run that 302!", which is a little disconcerting, since apparently 4-core (or more correctly apparently, "4 row") radiators are rare and crazy expensive. Some even making NWOR's $490 radiator look inexpensive.
All the radiators I've looked at recently within the dimensions I would like that tote themselves as fancy aluminum, racing, circle track, etc. for less than $500 seem to almost all be 2 row radiators.
Now, I do believe rustED's '86 has the V6 rad, which (unconfirmed) I read is only a 1 row, which he says does the job, but barely.
Here are the three radiators I am looking at buying...
AFCO N-Series Racing Radiator - $190 - 22" x 19" x ?" Overall - Unknown Rows - Aluminum
The internet says good things about AFCO, but the internet can be a liar and a scary place.
Griffin Thermal Products Circle Track Radiator - $186 - 27.5" x 16" x 3" Overall - 22.5" x 16" x 2.25" Core - 2 Row - Aluminum
Griffin's website claims this radiator is good up to 400hp
Mishimoto Performance Aluminum Radiator - $289 - 27.5" x 18" x 2.5" Overall - 24.5" x 16.75" x 2" Core - 3 Row - Aluminum
I've never heard of Mishimoto personally, but it's 3 rows... yay?
All of these are crossflow, again, I've been told that a crossflow is better than a downflow, but I'm not really knowledgeable with radiators outside of how they basically work.
It also brings me to that the Mishi is narrower, and seeing as rustED has to cut and mount his radiator further from the engine, it makes me wonder if I can mount the radiator basically stock, against the inside surface in the engine compartment and mount the fan on the grille-side of the radiator to push air through it. I'm planning on doing an electric water pump, but until the pieces of the puzzle come together, I don't know what my clearances will be.
Sorry, I totally overlooked this question previously. It's 4" deep, which again, is me jumping the gun, and may come back to bite me in the ass.
Anyone that knows more than me is encouraged to tell me that I'm stupid., or you can wait to see how I finish this and learn from my mistakes! Ha.
However, the more V8 savvy people I've been talking to keep telling me "Oh, you'll need a 4-core radiator to run that 302!", which is a little disconcerting, since apparently 4-core (or more correctly apparently, "4 row") radiators are rare and crazy expensive. Some even making NWOR's $490 radiator look inexpensive.
All the radiators I've looked at recently within the dimensions I would like that tote themselves as fancy aluminum, racing, circle track, etc. for less than $500 seem to almost all be 2 row radiators.
Now, I do believe rustED's '86 has the V6 rad, which (unconfirmed) I read is only a 1 row, which he says does the job, but barely.
Here are the three radiators I am looking at buying...
AFCO N-Series Racing Radiator - $190 - 22" x 19" x ?" Overall - Unknown Rows - Aluminum
The internet says good things about AFCO, but the internet can be a liar and a scary place.
Griffin Thermal Products Circle Track Radiator - $186 - 27.5" x 16" x 3" Overall - 22.5" x 16" x 2.25" Core - 2 Row - Aluminum
Griffin's website claims this radiator is good up to 400hp
Mishimoto Performance Aluminum Radiator - $289 - 27.5" x 18" x 2.5" Overall - 24.5" x 16.75" x 2" Core - 3 Row - Aluminum
I've never heard of Mishimoto personally, but it's 3 rows... yay?
All of these are crossflow, again, I've been told that a crossflow is better than a downflow, but I'm not really knowledgeable with radiators outside of how they basically work.
It also brings me to that the Mishi is narrower, and seeing as rustED has to cut and mount his radiator further from the engine, it makes me wonder if I can mount the radiator basically stock, against the inside surface in the engine compartment and mount the fan on the grille-side of the radiator to push air through it. I'm planning on doing an electric water pump, but until the pieces of the puzzle come together, I don't know what my clearances will be.
Anyone that knows more than me is encouraged to tell me that I'm stupid., or you can wait to see how I finish this and learn from my mistakes! Ha.
02-17-2013, 06:25 PM
#16
Registered User
Thread Starter
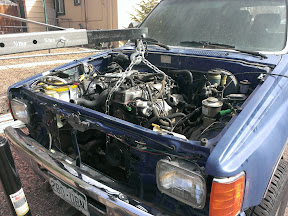
I spent my weekend unscrewing things, and one of my trips to the pull n' pay, I saw this:

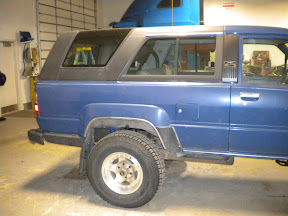
The Toylet's current state of being:
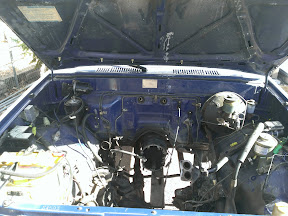
Now I just need to decide what I'm going to do with the 22RE. I may take my time and rebuild it then sell it.
Looking at the space in here, I may do some BJ spacers and a diff drop, plus a short body lift, maybe just one inch.
The Toylet's current state of being:
Now I just need to decide what I'm going to do with the 22RE. I may take my time and rebuild it then sell it.
Looking at the space in here, I may do some BJ spacers and a diff drop, plus a short body lift, maybe just one inch.
02-18-2013, 06:35 PM
#17
Now, I do believe rustED's '86 has the V6 rad, which (unconfirmed) I read is only a 1 row, which he says does the job, but barely.
Here are the three radiators I am looking at buying...
AFCO N-Series Racing Radiator - $190 - 22" x 19" x ?" Overall - Unknown Rows - Aluminum
The internet says good things about AFCO, but the internet can be a liar and a scary place.
Griffin Thermal Products Circle Track Radiator - $186 - 27.5" x 16" x 3" Overall - 22.5" x 16" x 2.25" Core - 2 Row - Aluminum
Griffin's website claims this radiator is good up to 400hp
Mishimoto Performance Aluminum Radiator - $289 - 27.5" x 18" x 2.5" Overall - 24.5" x 16.75" x 2" Core - 3 Row - Aluminum
I've never heard of Mishimoto personally, but it's 3 rows... yay?
It also brings me to that the Mishi is narrower, and seeing as rustED has to cut and mount his radiator further from the engine, it makes me wonder if I can mount the radiator basically stock, against the inside surface in the engine compartment and mount the fan on the grille-side of the radiator to push air through it. I'm planning on doing an electric water pump, but until the pieces of the puzzle come together, I don't know what my clearances will be.
Sorry, I totally overlooked this question previously. It's 4" deep, which again, is me jumping the gun, and may come back to bite me in the ass.
After driving my 4runner today on some old logging roads I'm definately going to be upgrading my radiator, and probably my electric fan setup. I ended up coming to a dead end on this logging road where a tree had fell across the road, and had nowwhere to turn around, so I ended up backing out about a 1/4 mile, I got stuck once (the snow was like a foot deep and I got out of the tracks that I was following and endup digging in) anyway all that backing up (with only the airflow from my electric fans) and reving that 302 when I got stuck, she started to run hot and I had to shut it off and let it cool down awhile... a little frustrating. Driving forward in first and second gear just putting around the temp was fine, but it was like 32* out, if it had been summer I know it would have started to run hot. So I will be doing some upgrades in the near future.
I think I may upgrade my fans first, they are only dual 10" fans and are basically only drawing air through the center portion of the radiator, and not drawing anything through the top and bottom portion. I need to find the thinest fan, but that provides the most amount of radiator coverage. I was on a pretty tight budget at the time, now it's time for me to go back and work out the bugs, lol. I just thought I'd share, I don't want to give anyone the wrong impression that a toyota V6 radiator will work flawlessly for a V8 swap.
I'm curious on how well a "pusher" style fan setup that you describe in front of the rad would work, I have heard of people doing it and have heard arguements both for and against it. I'm also curious about the electric water pump and if you would gain any clearance over a traditional style water pump. I was unable to even mount my radiator in the stock mounting location due to the clearance issues with the mechanical water pump. Keep up the good work, I look forward to seeing what you come up with!
02-18-2013, 06:57 PM
#18
Registered User
Thread Starter
After driving my 4runner today on some old logging roads I'm definately going to be upgrading my radiator, and probably my electric fan setup. I ended up coming to a dead end on this logging road where a tree had fell across the road, and had nowwhere to turn around, so I ended up backing out about a 1/4 mile, I got stuck once (the snow was like a foot deep and I got out of the tracks that I was following and endup digging in) anyway all that backing up (with only the airflow from my electric fans) and reving that 302 when I got stuck, she started to run hot and I had to shut it off and let it cool down awhile... a little frustrating. Driving forward in first and second gear just putting around the temp was fine, but it was like 32* out, if it had been summer I know it would have started to run hot. So I will be doing some upgrades in the near future.
I think I may upgrade my fans first, they are only dual 10" fans and are basically only drawing air through the center portion of the radiator, and not drawing anything through the top and bottom portion. I need to find the thinest fan, but that provides the most amount of radiator coverage. I was on a pretty tight budget at the time, now it's time for me to go back and work out the bugs, lol. I just thought I'd share, I don't want to give anyone the wrong impression that a toyota V6 radiator will work flawlessly for a V8 swap.
I'm curious on how well a "pusher" style fan setup that you describe in front of the rad would work, I have heard of people doing it and have heard arguements both for and against it. I'm also curious about the electric water pump and if you would gain any clearance over a traditional style water pump. I was unable to even mount my radiator in the stock mounting location due to the clearance issues with the mechanical water pump. Keep up the good work, I look forward to seeing what you come up with!
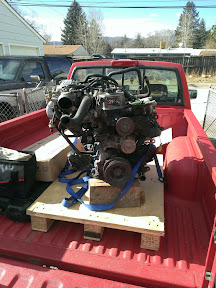
Over the weekend, I was peering into the empty abyss of my engine bay, and I think I probably boned myself on the fan. Typical me getting too excited.
I think this weekend I'll dry-fit the pan, timing cover and water pump onto the Windsor block I have and dry-fit that whole mess into the truck and take some measurements, maybe draw it out so I know how to proceed.
02-21-2013, 05:22 AM
#19
Registered User
Thread Starter
Hooray for being unprepared for an actual snowfall and RWD!

It's nights like last night, where I didn't quite make it in the driveway, that make me miss my Toyota.
Albeit, I'm lucky I made it across town without getting stuck... Thanks, Momentum!
It's nights like last night, where I didn't quite make it in the driveway, that make me miss my Toyota.
Albeit, I'm lucky I made it across town without getting stuck... Thanks, Momentum!
02-23-2013, 12:45 PM
#20
Registered User
Thread Starter
Well, my original intent of keeping it mostly stock, lift-wise, has sailed.

I put the new bellhousing on and tried fitting in the engine with the NWOR oil pan, and there's no way that'll work without a lift. (I didn't take a picture of the fitment with the oil pan) My concern now is that with an IFS lift, BJ spacers and such, does that move the steering damper down? Because the front of the oil pan sits on it without even being close to mountable.
So, I pulled the pan, dry fit the engine in there and now I see that I have next to no room for the radiator itself, and no room at all for an electric fan, so further planning is required.


I may need to forego the electric pump and do a short-style mechanical pump.
I put the new bellhousing on and tried fitting in the engine with the NWOR oil pan, and there's no way that'll work without a lift. (I didn't take a picture of the fitment with the oil pan) My concern now is that with an IFS lift, BJ spacers and such, does that move the steering damper down? Because the front of the oil pan sits on it without even being close to mountable.
So, I pulled the pan, dry fit the engine in there and now I see that I have next to no room for the radiator itself, and no room at all for an electric fan, so further planning is required.
I may need to forego the electric pump and do a short-style mechanical pump.


