Dutchbelly's 1988 4runner Build-up
 05-05-2011, 12:49 AM
#21
Super Moderator
Staff
iTrader: (1)
Join Date: Aug 2008
Location: Anderson Missouri
Posts: 11,788
Likes: 0
Received 21 Likes
on
19 Posts
I was looking in your thread and may have missed it, but did you get the wiring to the tail lights? The easiest I would think would be to disconnect it on the drivers side rear compartment where your jack and rear washer bottle/bag is.
That one fuel line you mentioned in previous post. Its the return to the tank, my wife truck, it came disconnected while she was going down the road and it moves alot of fuel. I didnt get the clamp on it right and it came looses. Make note of it when you go to put it back together later. It can be a fire hazard.
You may have gotten it, but the fuel line to the front of the fuel filter will need disconnected. Im pretty sure that is the one that connects body to engine. I went back and edited this post, Im not sure if it will need disconnected at this time, just may need to look into it.
Your wiring from the tranny which has your 02 sensor, and tranny/transfer case, will be one long wire. It stays with the body.
I think you got it, but the brake lines behind the right front tire. Good place to seperate body and frame.
The steering rod I disconnect it when the body is coming off. Should be easy for you as you can stop the lift and seperate it easier. Same as putting it back, I feel is probably the hardest part of all of this.
Looks like you got it. If I can think of anything else, I will post. Good luck and looking forward to seeing the body off. Once you get past this milestone, you will feel so much more comfortable about putting it back together. I really feel your confidence will soar.
Last edited by Terrys87; 05-05-2011 at 05:35 AM.
 05-05-2011, 05:39 PM
#22
Registered User
Thread Starter
Join Date: Apr 2011
Location: Southern Ontario
Posts: 428
Likes: 0
Received 0 Likes
on
0 Posts
@Twisted
Yeah it is a lot of rust. Where I live they throw a ton of salt on the roads during winter, and the body's on these trucks just don't stand a chance. This one's been sitting since I think the po said 97 so pretty much everything on the underside caught the cancer, too. It was the reason I decided to just take the whole thing apart. It was either do this, or buy a southern truck with no rust for much more money and I'm not a big fan of buying things I haven't seen first.
Thanks for the checklist. It's a manual, so that rules out tranny lines, unless I'm missing something I'm unaware of. I was there tonight, and looked for the ground at the back of the head, I'm thinking I must've disconnected it earlier and forgotten to take note of it, so I'm glad you mentioned it. And yes, I'm leaving all the wiring with the engine for now because it seemed easier to do it that way until I have the body off. Still not sure if that was the best strategy, but I'm sticking to it. I'm trying to leave parts on either the body or the frame instead of taking them off completely and having to label everything and store it.
Thanks for the checklist. It's a manual, so that rules out tranny lines, unless I'm missing something I'm unaware of. I was there tonight, and looked for the ground at the back of the head, I'm thinking I must've disconnected it earlier and forgotten to take note of it, so I'm glad you mentioned it. And yes, I'm leaving all the wiring with the engine for now because it seemed easier to do it that way until I have the body off. Still not sure if that was the best strategy, but I'm sticking to it. I'm trying to leave parts on either the body or the frame instead of taking them off completely and having to label everything and store it.
05-05-2011, 06:08 PM
#23
well your doing great and look like you are getting everything.
the only thing else i can think of now is. mine has a wire tht goes from the ground terminal to the body. remove th bolt at the body and you can lay the wire over the engine.
i dont know if you got tht wire or not dont remember seeing it. posted
the only thing else i can think of now is. mine has a wire tht goes from the ground terminal to the body. remove th bolt at the body and you can lay the wire over the engine.
i dont know if you got tht wire or not dont remember seeing it. posted
05-05-2011, 08:04 PM
#24
Registered User
Thread Starter
Join Date: Apr 2011
Location: Southern Ontario
Posts: 428
Likes: 0
Received 0 Likes
on
0 Posts
@Terry
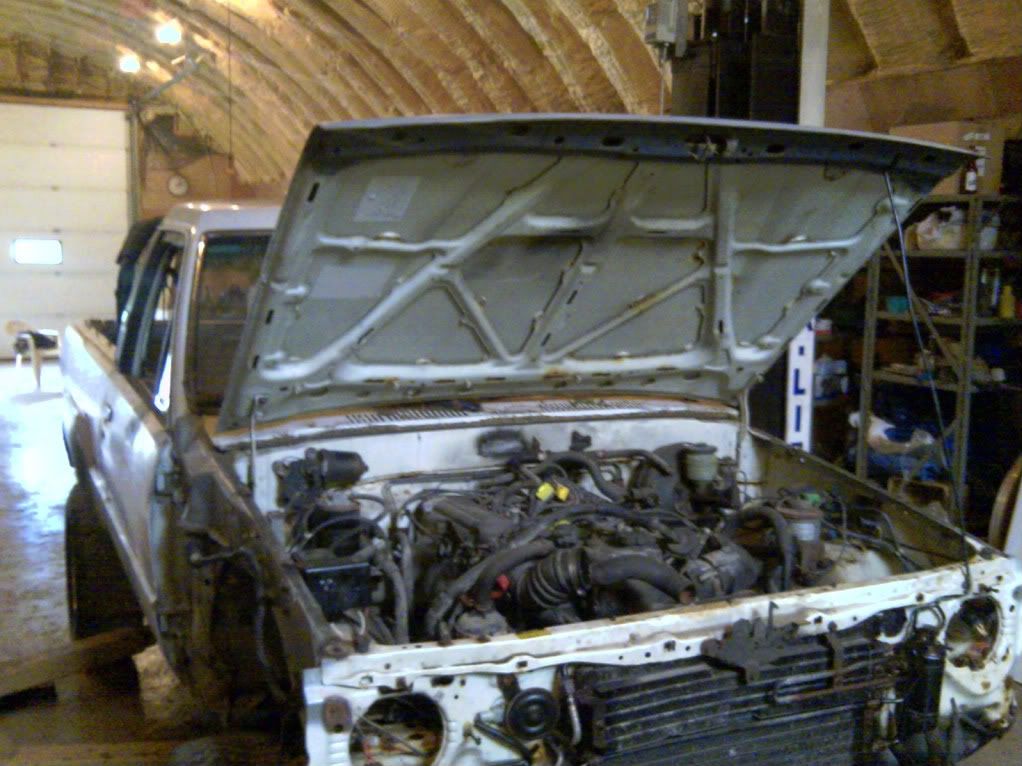
I haven't actually seen a reason for disconnecting wiring for the tail lights yet. Isn't all the light wiring connected to the body? Or does it attach to the frame at some point? I did a slow walk underneath the truck today, and aside from the rubber lines to the gas tank which I'll pull just before the lift, there doesn't seem to be anything connected from body to frame, so if I've missed something hopefully I find it when I inch the body up. Speaking of which, My rockers seem pretty solid, would you (or anyone else) say I'd be safe to lift the body with the hoist from the rocker seams? I might take the tailgate hood and doors off just to make it lighter for when I'm moving it around, and doing it before the lift means its easier on the rocker seams. Oh, and I don't have any pics from tonight because my phone was dead, but I broke free all the body mount bolts, and got about 3 off the hard way before I remembered I wouldn't be reusing them, and then just cut the rest off with a grinder, so I should be in good shape to lift the body either tomorrow night or Saturday, as I was hoping.
05-06-2011, 03:38 AM
#25
Super Moderator
Staff
iTrader: (1)
Join Date: Aug 2008
Location: Anderson Missouri
Posts: 11,788
Likes: 0
Received 21 Likes
on
19 Posts
The wiring can be disconnected under the pasenger seat. From there it runs along the inside frame on passenger side and has 2 connections at the gas tank, 1 for the float level and 1 for power to the fuel pump, then on along the frame the wire assembly is connected with clips on the frame running up to the spare tire area.
You should be able to lift the rubber flap under the passenger wheel well that attaches to the body and covers the frame and see a couple or from underneath by the spare tire area.
It looks like your rockers are solid so it would proabably be ok to lift there. I went and looked at your father in laws lift, and the lifting pads I would might try and cut some wood and try putting the pads between the rockers and frame.
You have the truck really light weight now with top and interior off s I would say either way would be ok.
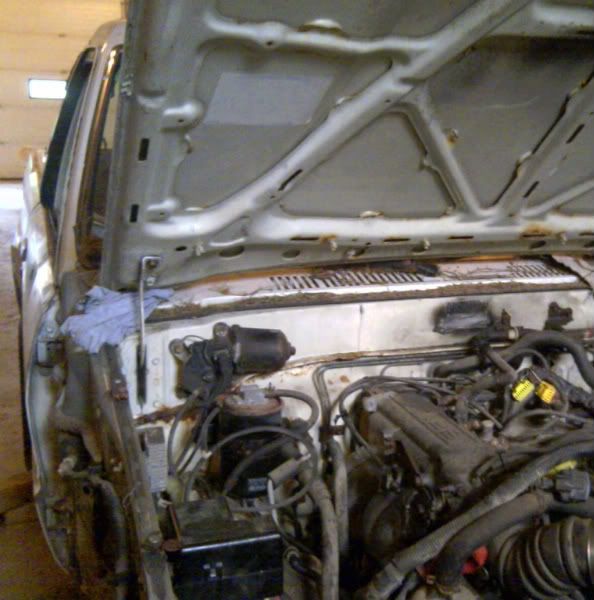
Twisted is right. That ground wire between the head and firewall has gotten me a couple of times just replacing a head gasket.
Looking forward to tomorrow or Saturday. Just watch the weight balance ratio from front to back. Removing the body will make things alot easire for working on it.
What all you have planned when getting the body off? One thing I would look into is your spare tire lift assembly. Mine was really corroded up. There are 2 bolts on top of the frame that I am not sure you can get to with the body on. Took it out and let soak in diesel and oil and worked several times. Works like a champ.
Making good progress.
You should be able to lift the rubber flap under the passenger wheel well that attaches to the body and covers the frame and see a couple or from underneath by the spare tire area.
It looks like your rockers are solid so it would proabably be ok to lift there. I went and looked at your father in laws lift, and the lifting pads I would might try and cut some wood and try putting the pads between the rockers and frame.
You have the truck really light weight now with top and interior off s I would say either way would be ok.
Twisted is right. That ground wire between the head and firewall has gotten me a couple of times just replacing a head gasket.
Looking forward to tomorrow or Saturday. Just watch the weight balance ratio from front to back. Removing the body will make things alot easire for working on it.
What all you have planned when getting the body off? One thing I would look into is your spare tire lift assembly. Mine was really corroded up. There are 2 bolts on top of the frame that I am not sure you can get to with the body on. Took it out and let soak in diesel and oil and worked several times. Works like a champ.
Making good progress.
05-08-2011, 11:29 AM
#26
Registered User
Thread Starter
Join Date: Apr 2011
Location: Southern Ontario
Posts: 428
Likes: 0
Received 0 Likes
on
0 Posts
The Lift
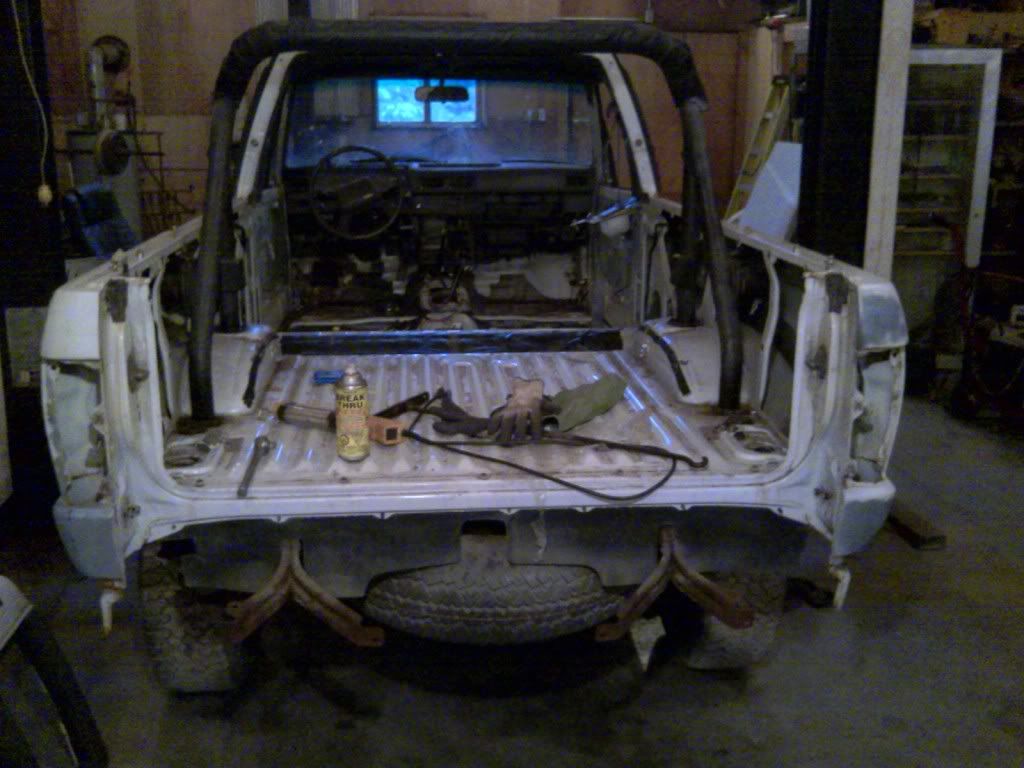
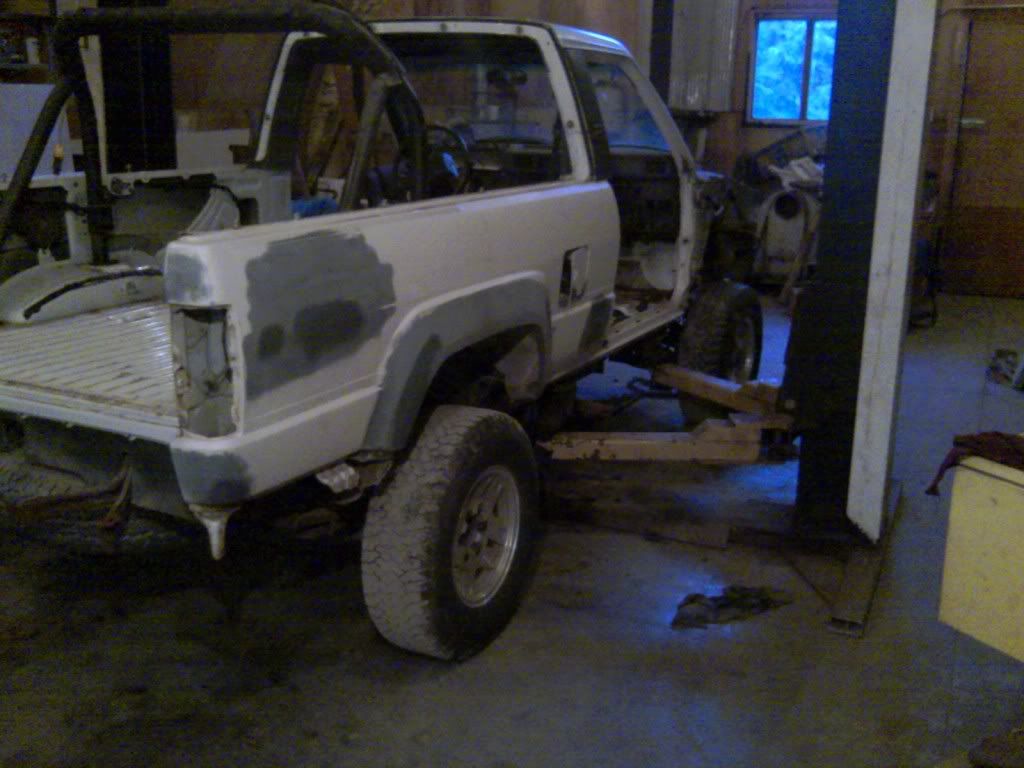
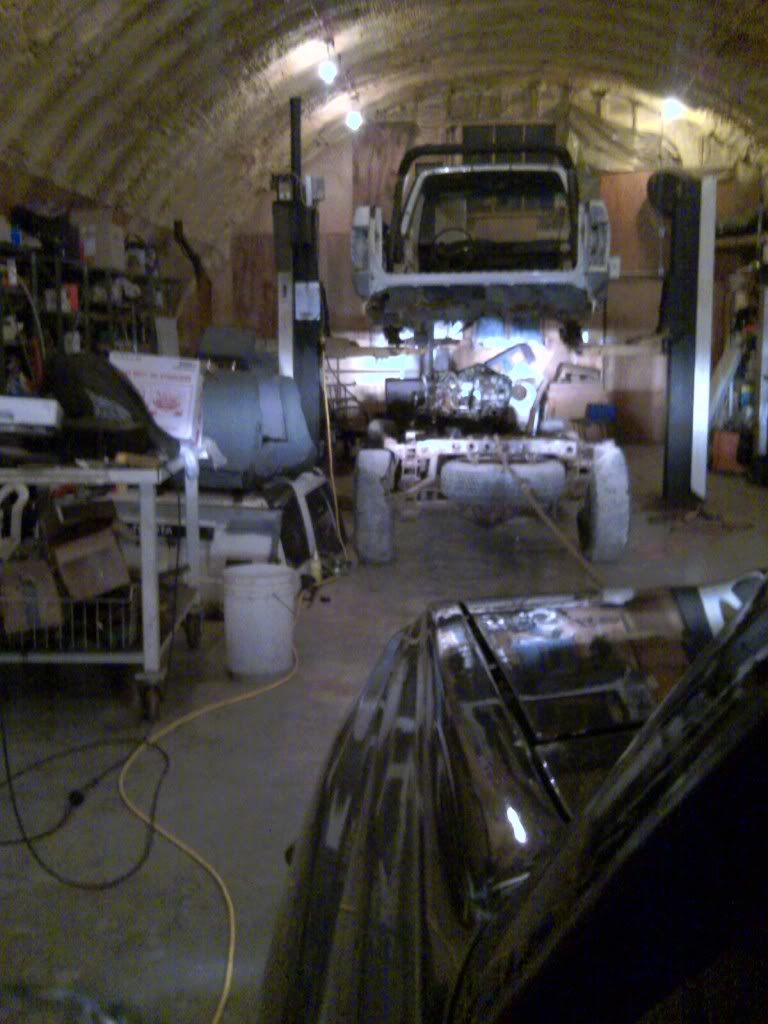
So I got a ton done Friday/Saturday, but probably didn't take as many pics as I should have, but here's what I did get:
I decided to play it safe and take off as much weight as I could to save stress on the rocker seams.
I threw rags under the corners of the hood to protect things when I took out the bolts.
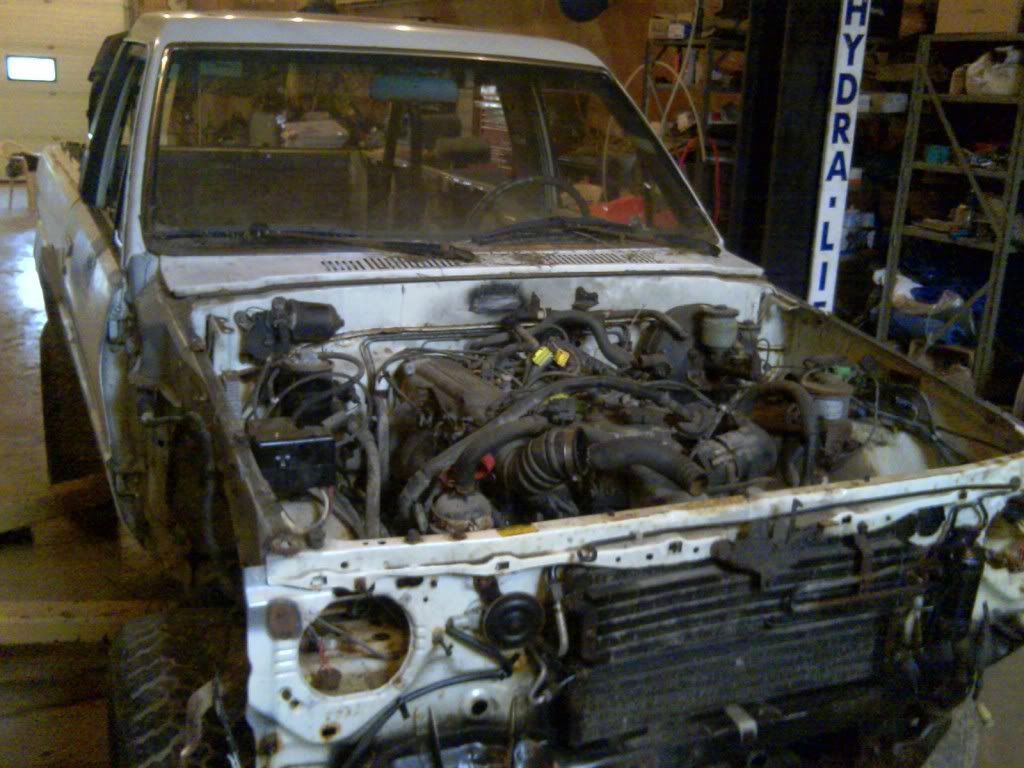
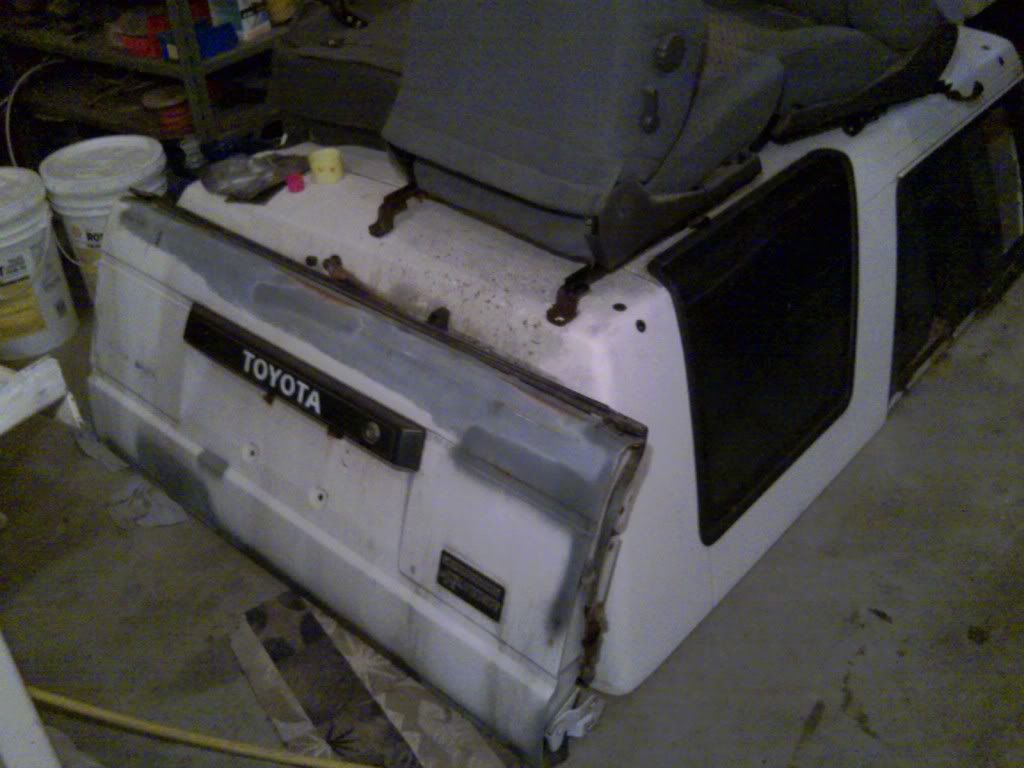
Hood off. I then started to take the tailgate off. There was a wiring clip inside the driver side rear quarter panel near where the jack is stored.
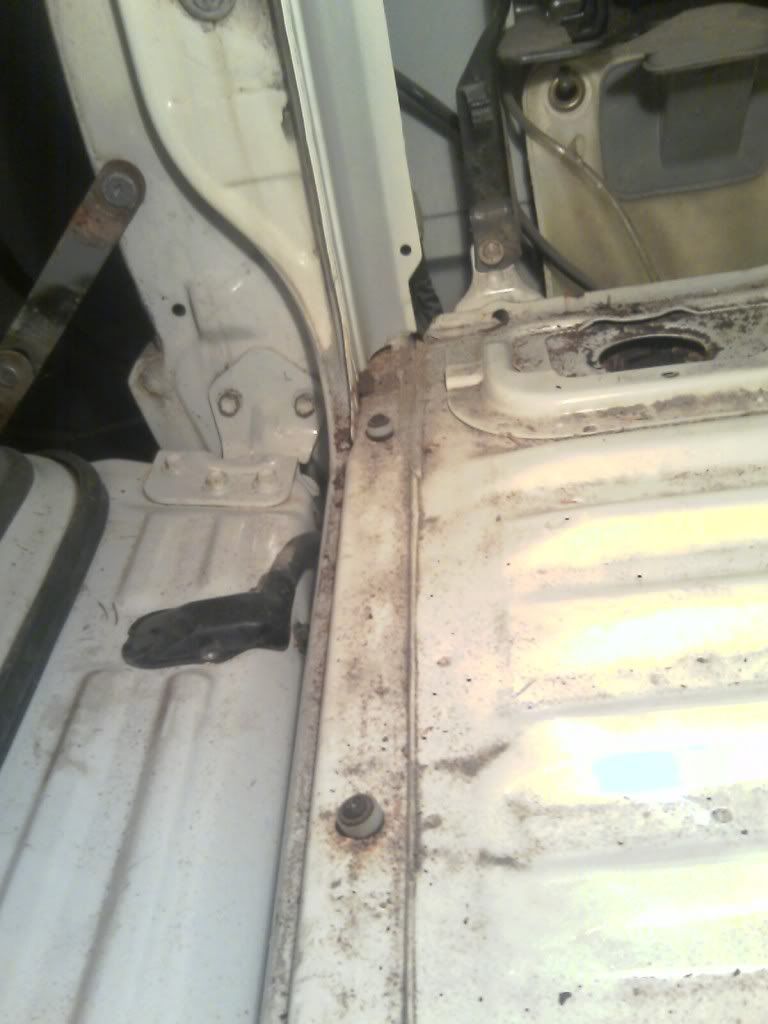
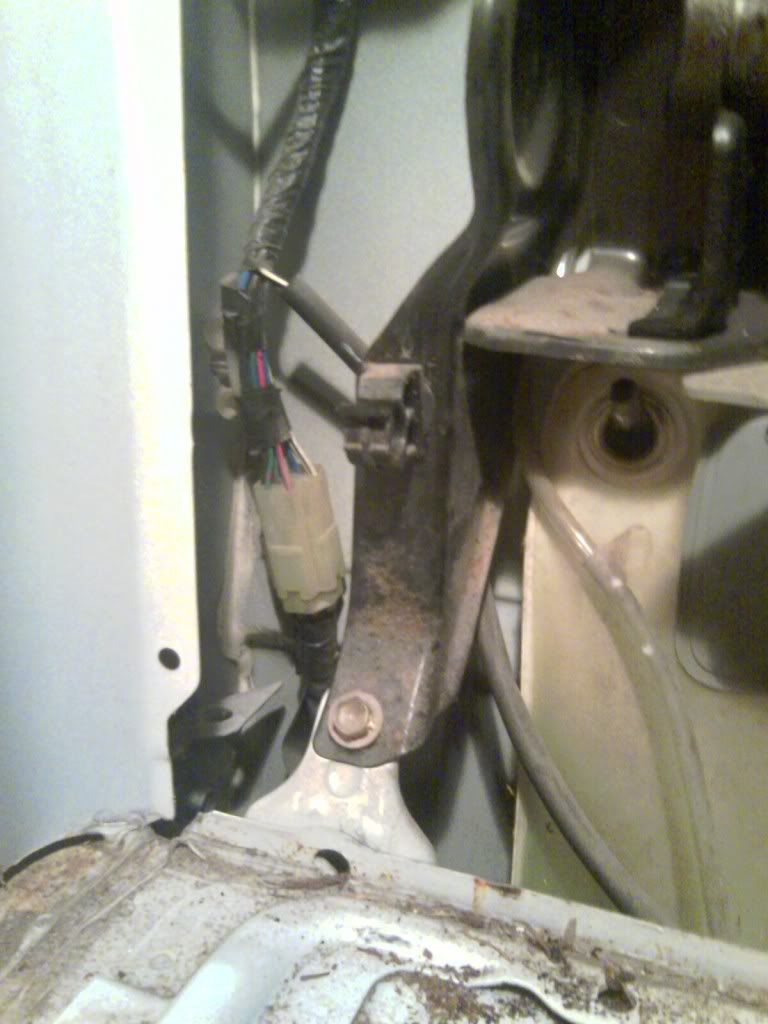
After that was disconnected I pulled the wire down through the hole in the bottom of the panel so it just dangled from the tailgate. now all I had to do was pop the bolts to the hinges and the tailgate support arms.
Holding the tailgate close to vertical made it easier to remove because of the spring bar that helps take the tailgate weight.
My parts are starting to pile up.
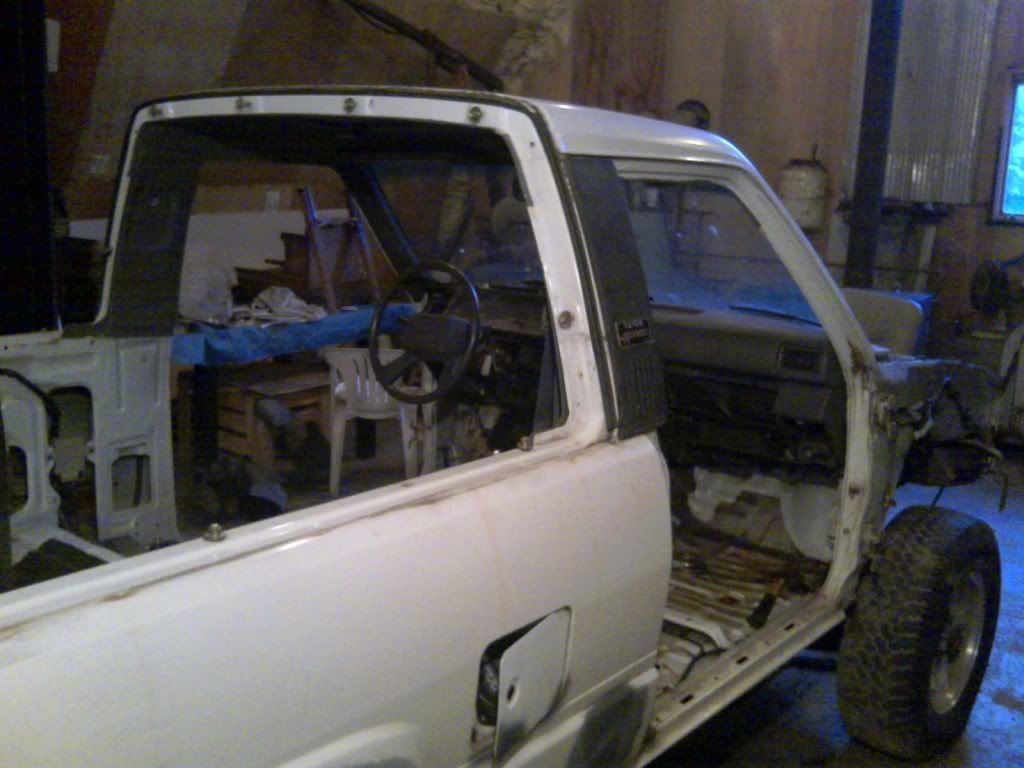
I then popped both doors off. It looked like the hinge pins were welded in, so I just took out the pin for the door's stabilizer (I don't know the real name for it) and took out the bolts that fastened the hinges to the door, leaving the hinges on the body. I'm going to have fun trying to align the hood and doors later, I'm sure.
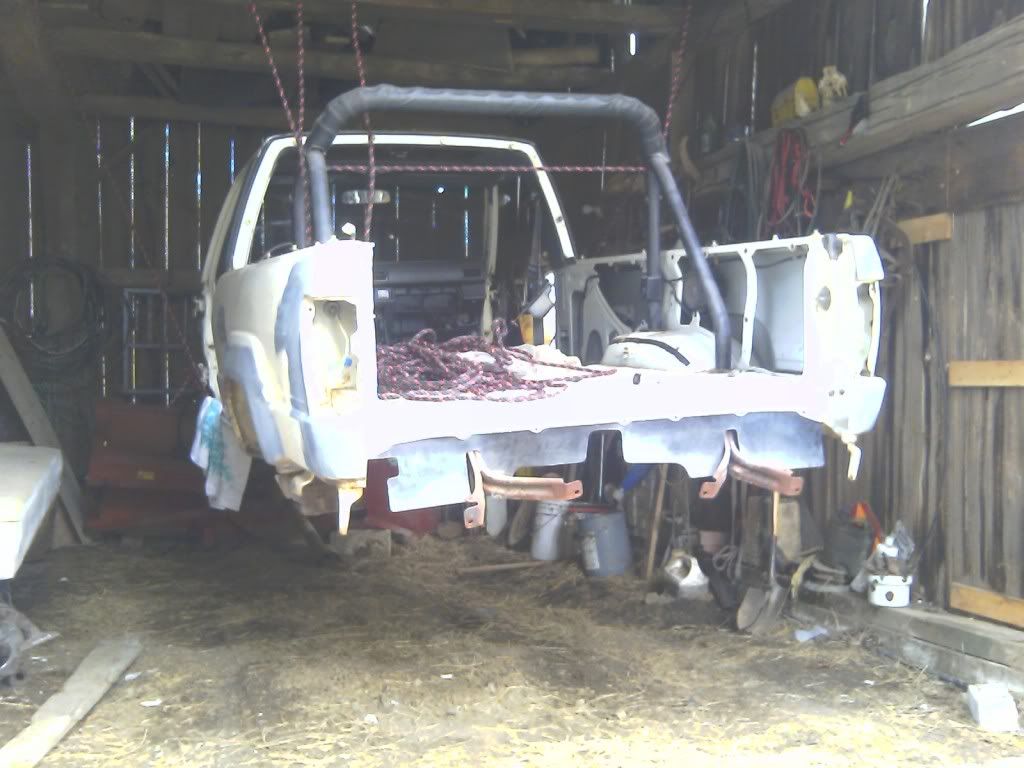
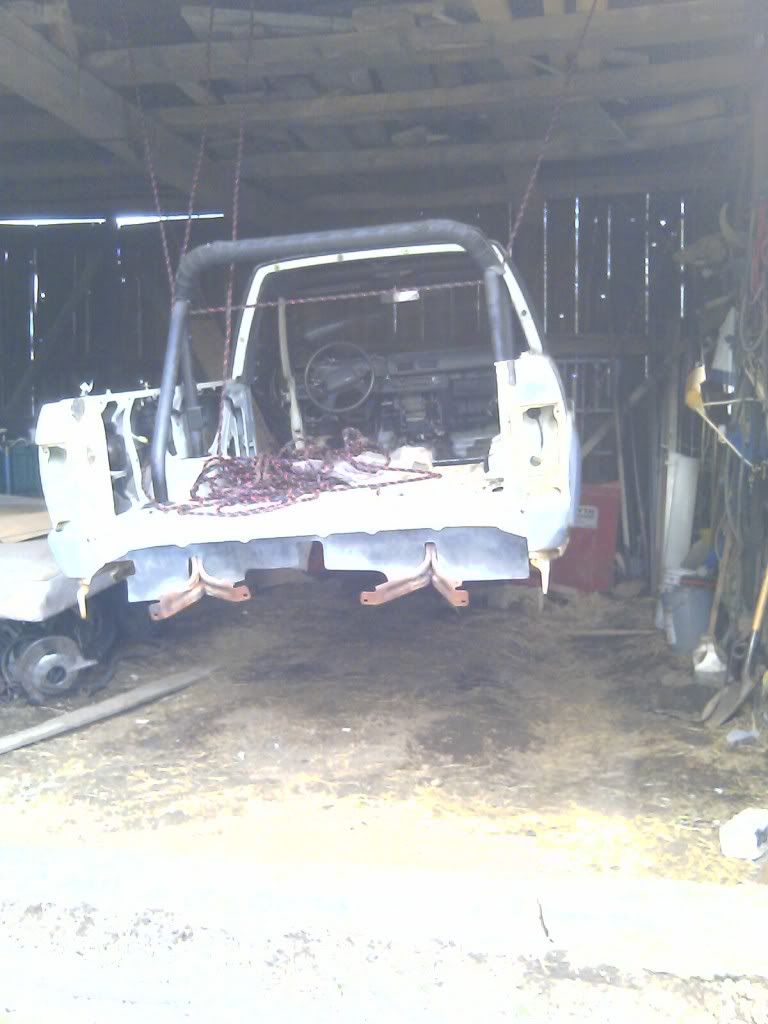
I started lifting the body slowly, checking for clearance every inch or so, and other than the shifter for the transfer case, everything went smoothly lifting straight up. Until I realized I'd missed unhooking the fuel filler and vent lines. I had stretched them, but not broken anything yet, thankfully. I loosened the gear clamps and they popped so easily because of the tension on them, that I'm actually happy I unhooked them during the lift.
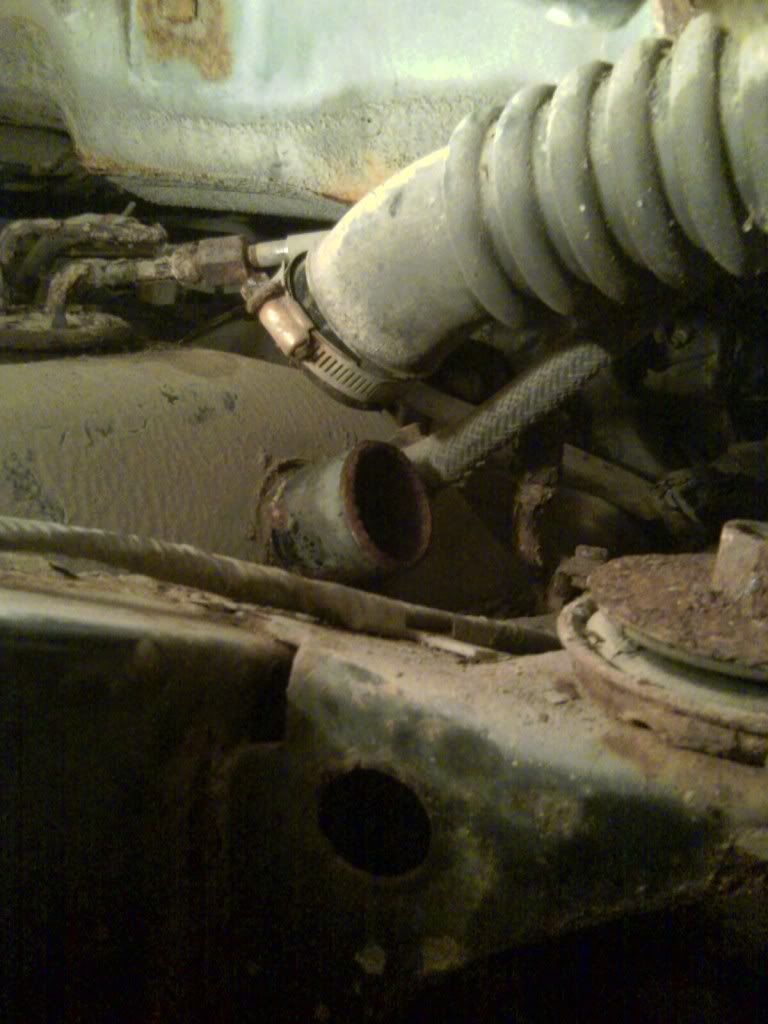
As you can see I'll be investing in a new fuel pump. These lines are rotted.
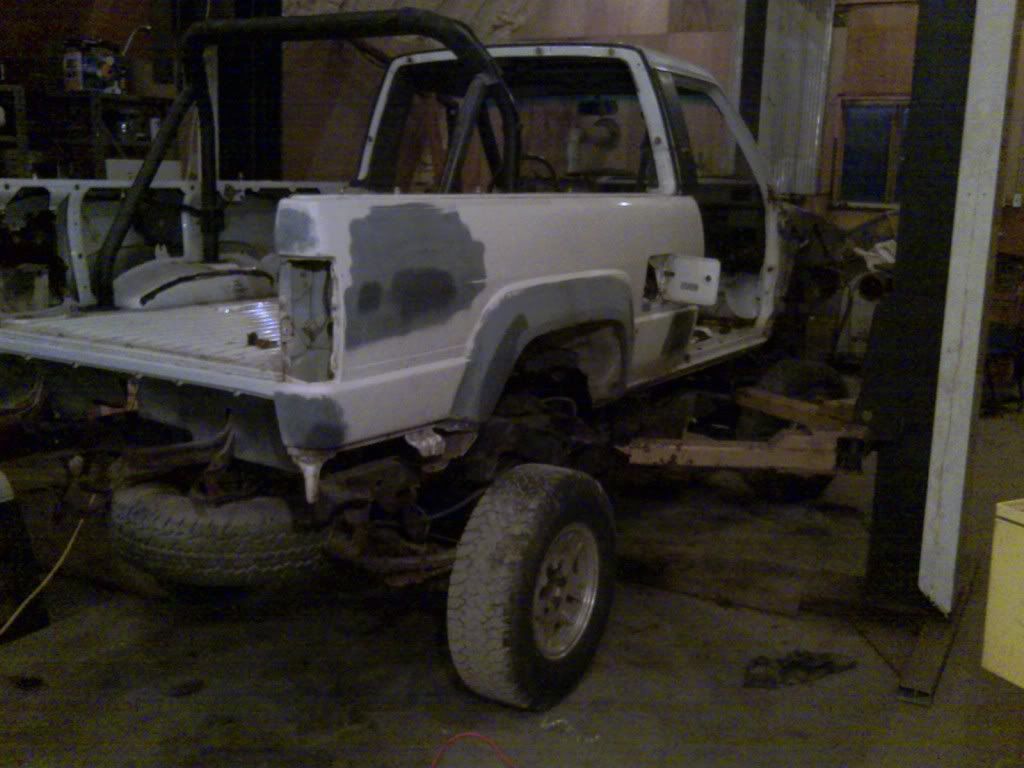
15mins and a couple inches later
Everything is still going smoothly. I had to shift the body a bit to the passenger side to clear the transfer case shifter but everything else was clear.

Sorry about the quality of the pics, it was dark by this point, and there wasn't enough light in the shop for my camera phone.
Checking for clearance/missed connections here. Everything still seems ok.
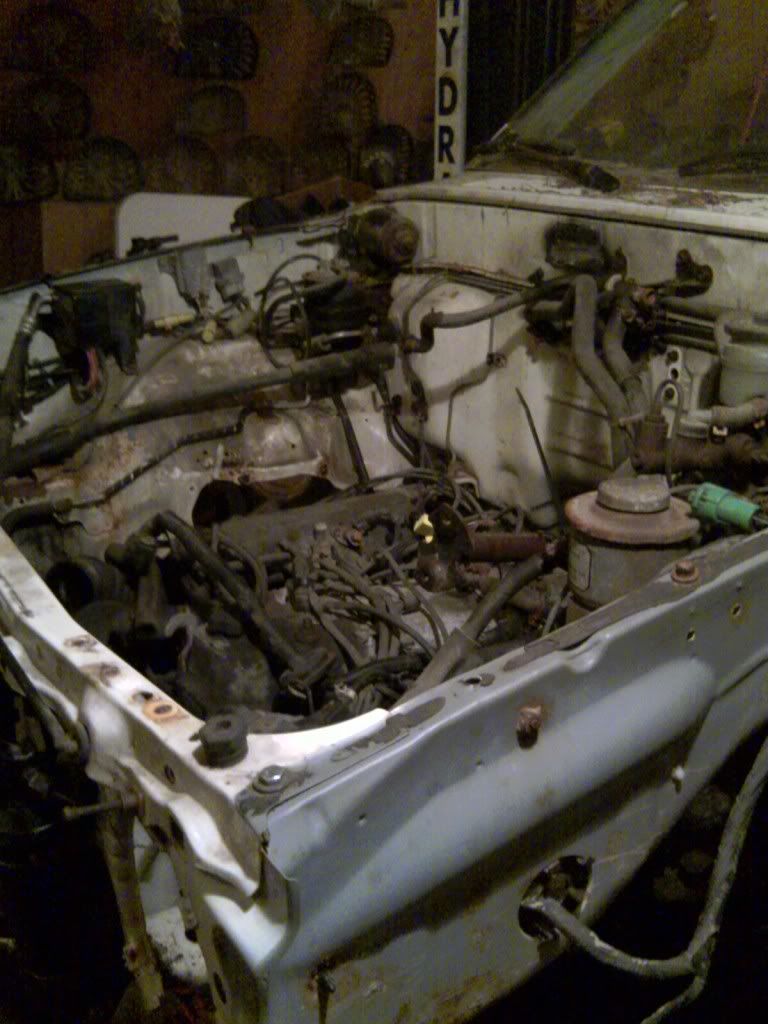
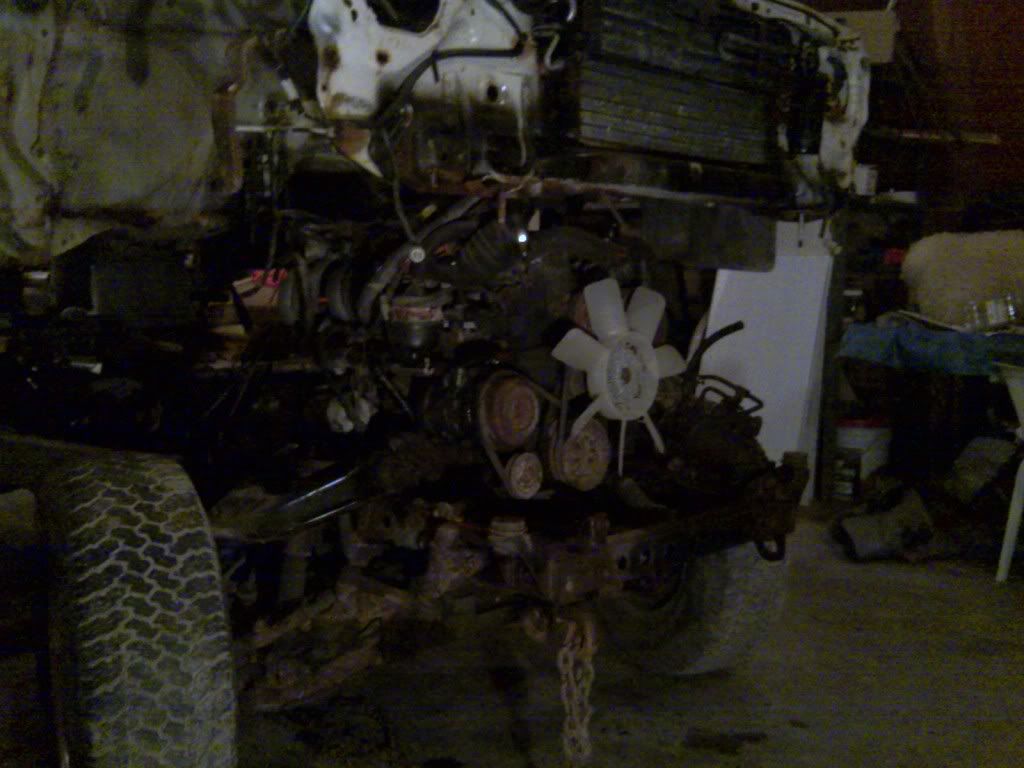
 There wasn't a ton of room around the engine, but I don't think I even scraped anything during the lift.
I did have to tie wrap my steering shaft up and out of the way, and guide the power steering lines a bit.
 Another grainy pic. I wish I'd brought a better camera for the night, but my wife tends to not trust me with delicate things.
Probably more pics than you need to see, but I haven't gotten bored of looking at this yet.
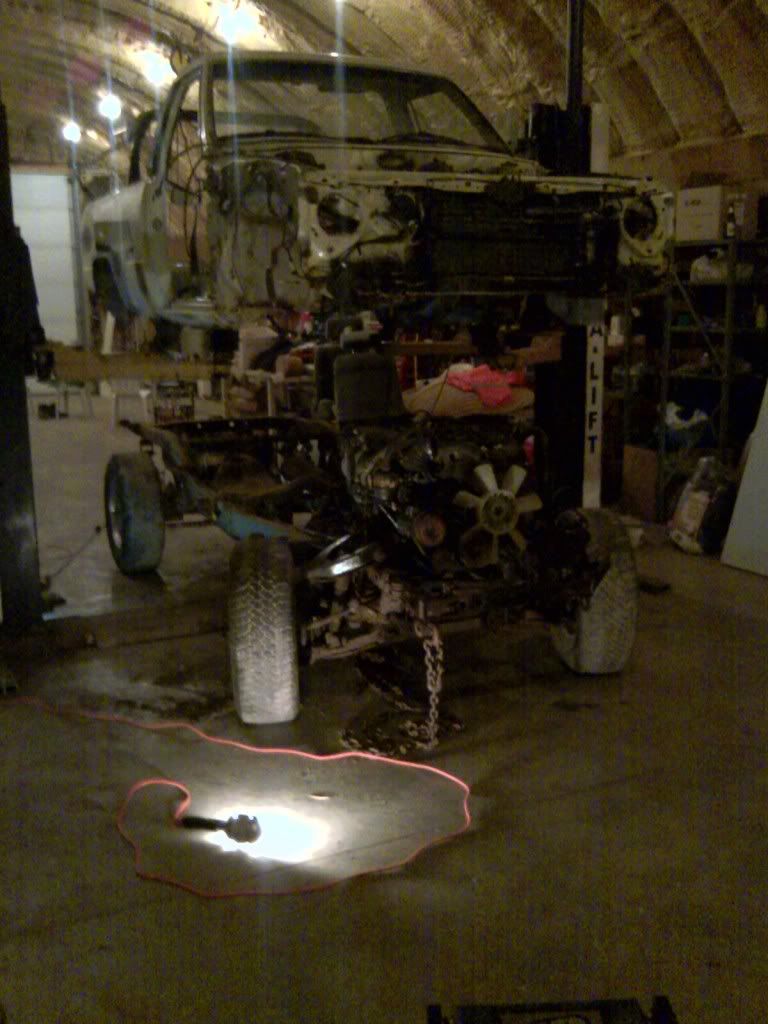
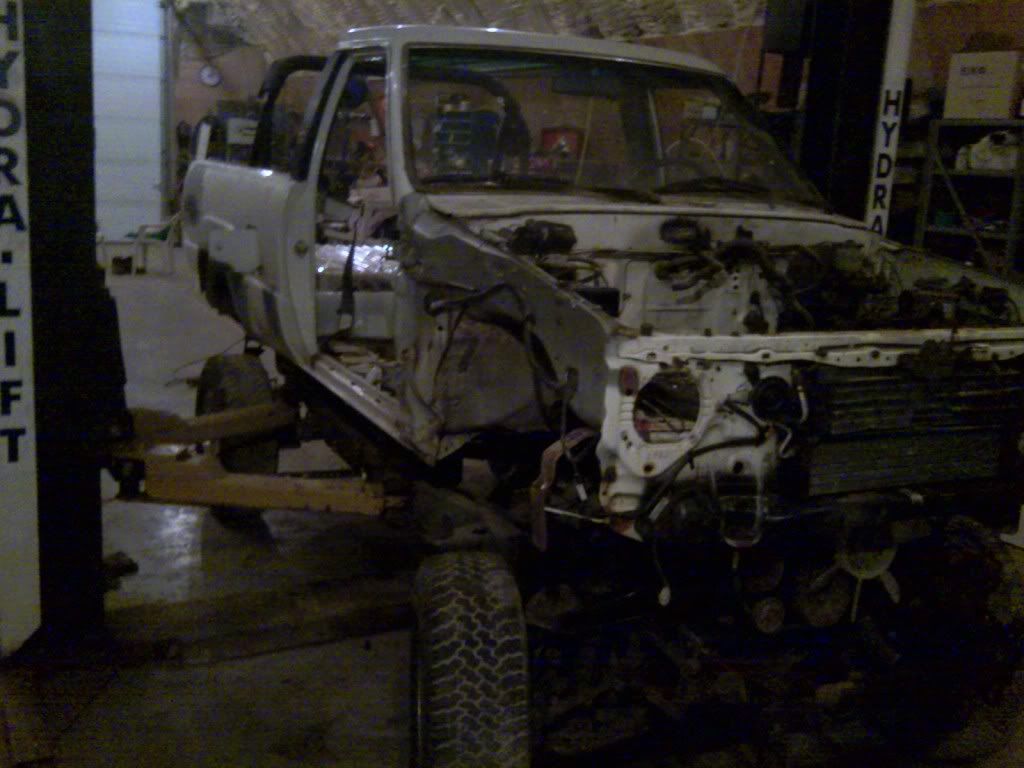
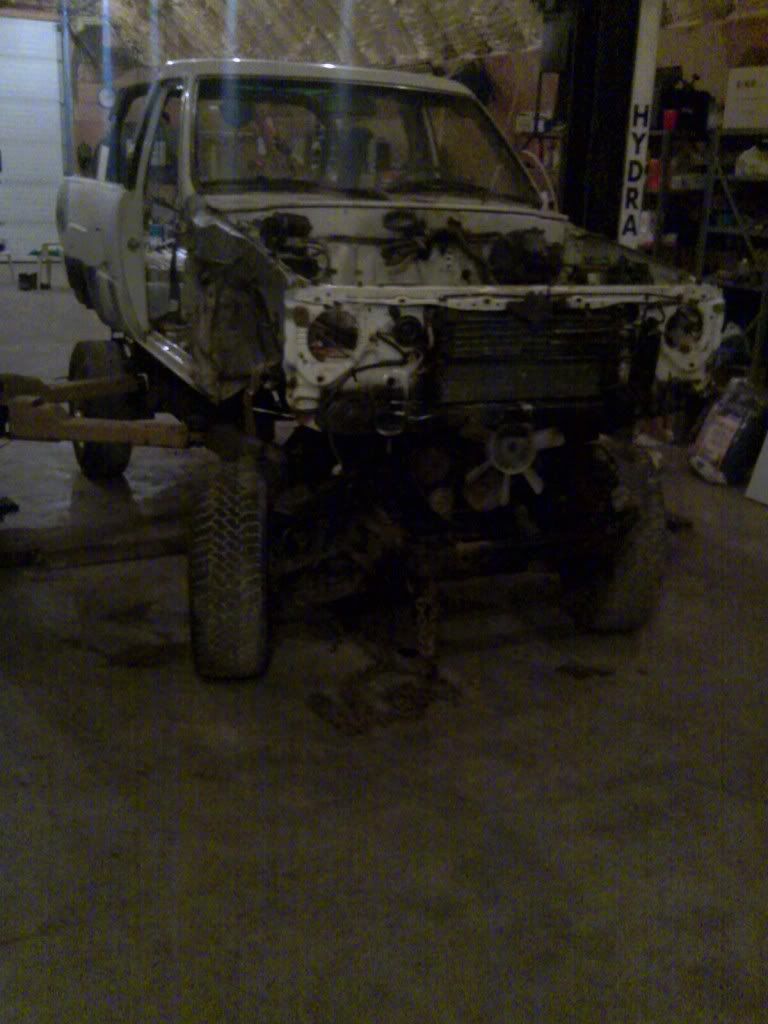
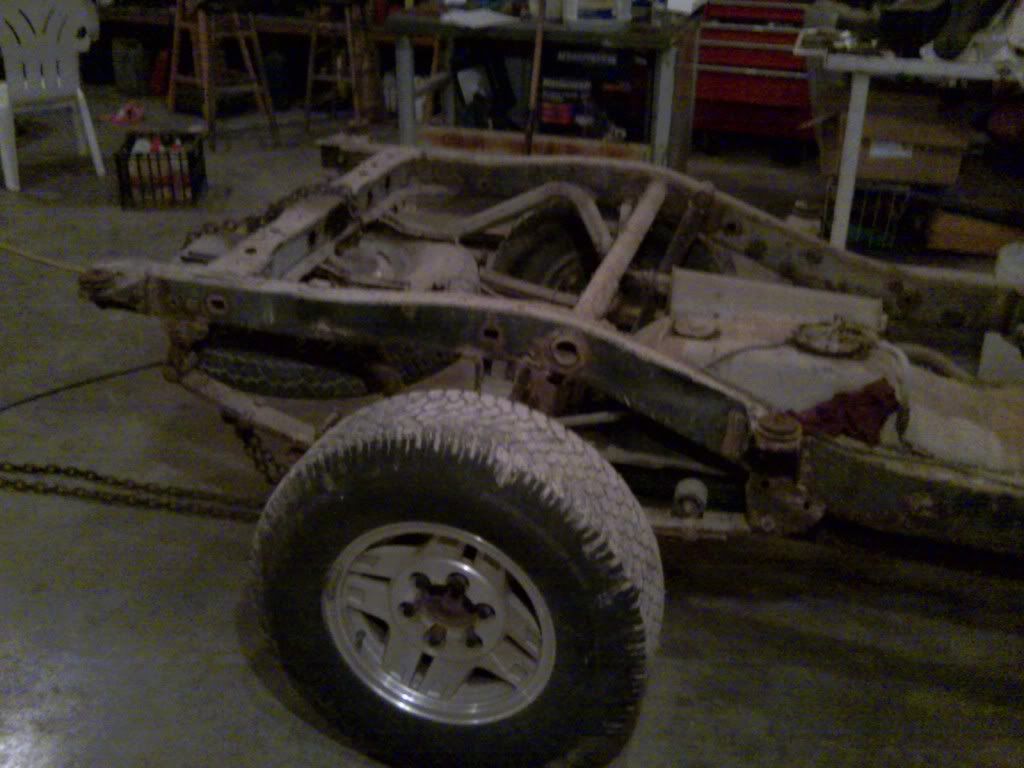
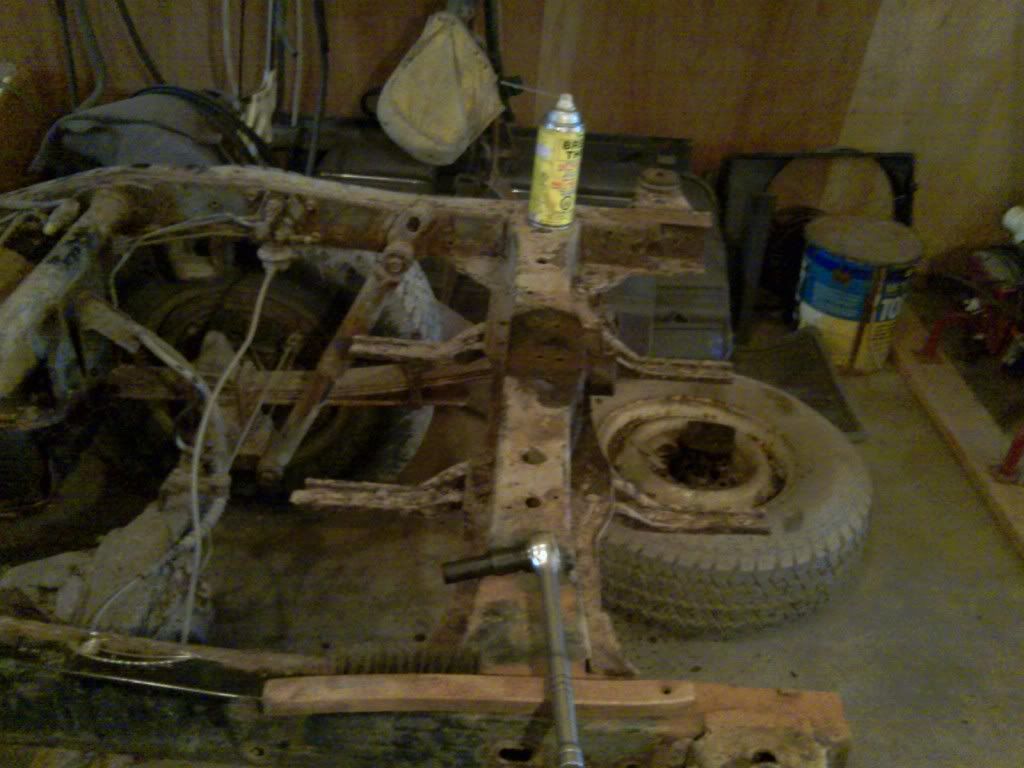
This is about as high as I put her before pulling out the frame. Better safe than sorry.
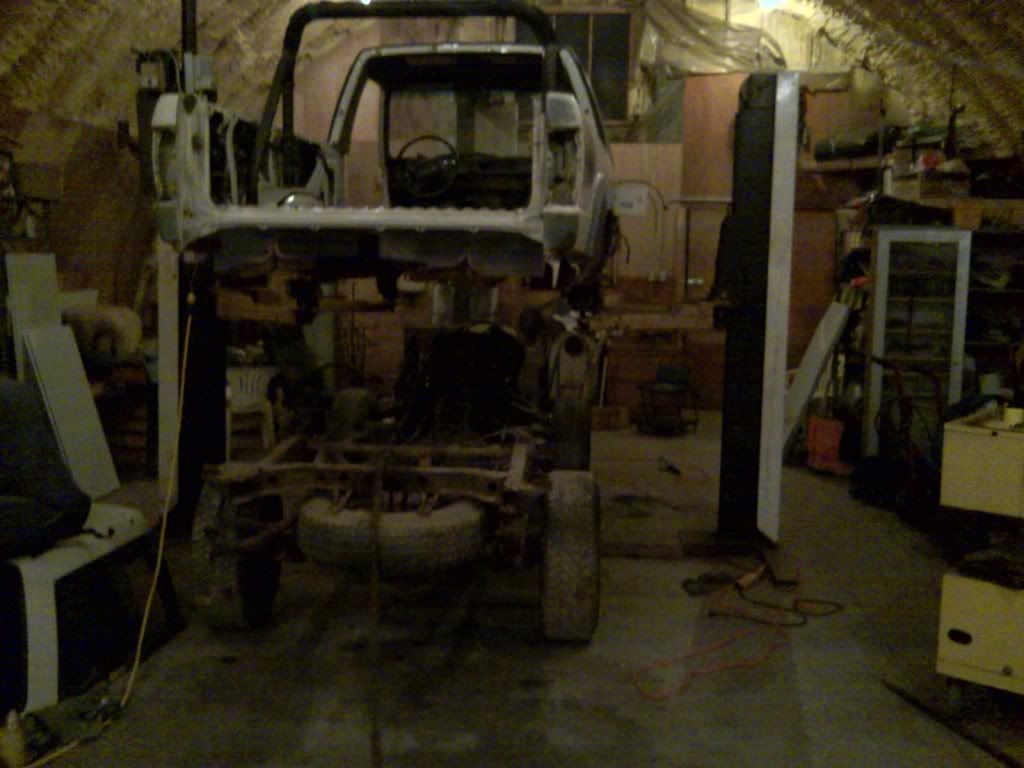
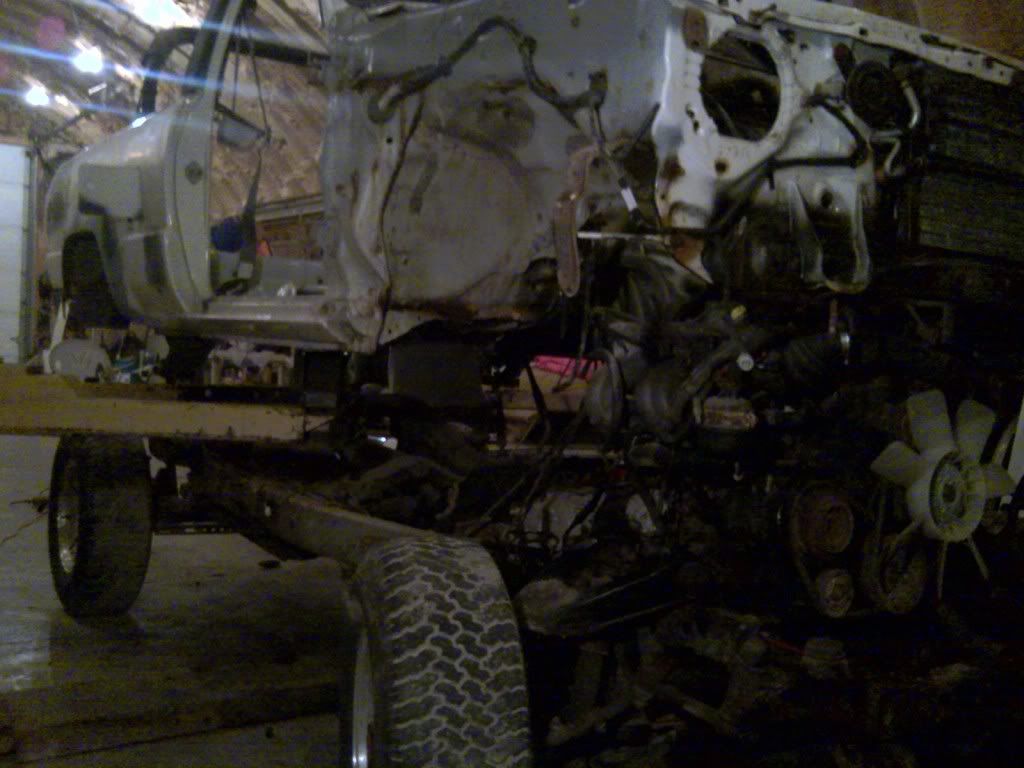
It just seemed right to use my other 4runner to pull the frame out of this one.
During the pull

I get a kick out of this one. Every once in a while my dog would think that I was going to drive home while I was working on this 4runner, and hop in so I didn't leave without him. Probably not going far with just a truck body. Wish the pic wasn't so grainy.
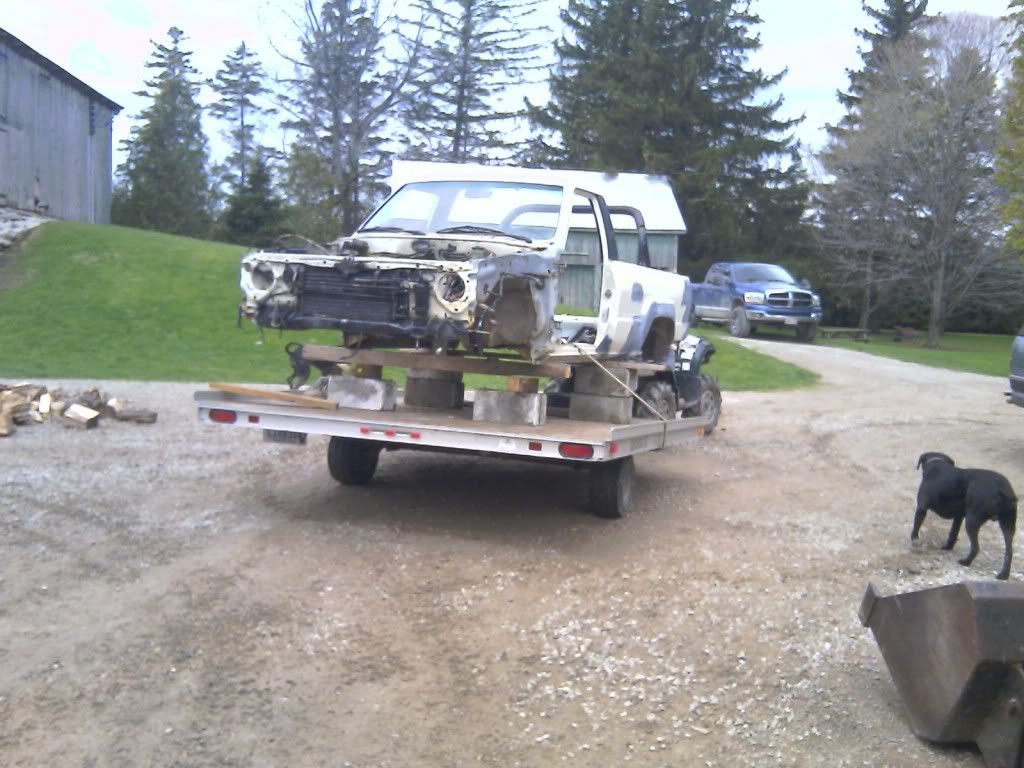
This is the next day, Saturday. We loaded it up on a trailer and pulled out the body to store while I worked on the frame.
We weren't sure how to get the body off the trailer easily because the storage shed isn't that big, so we ended up deciding to hang it:
I didn't get much else done on Saturday.
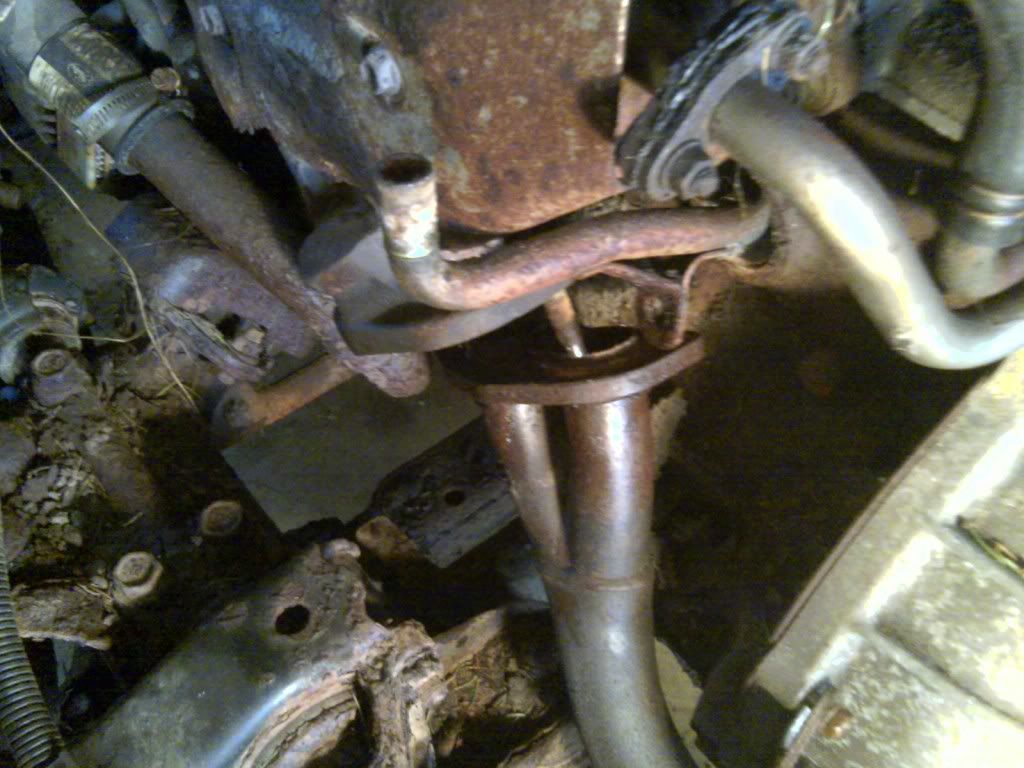
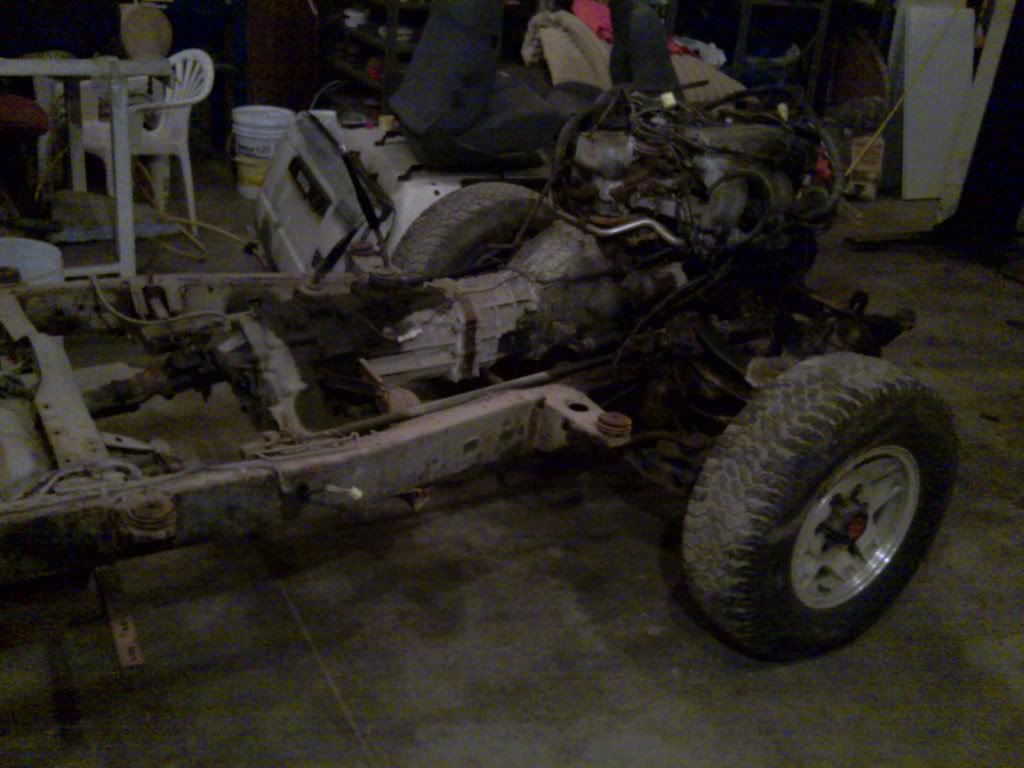
Started disconnecting the exhaust
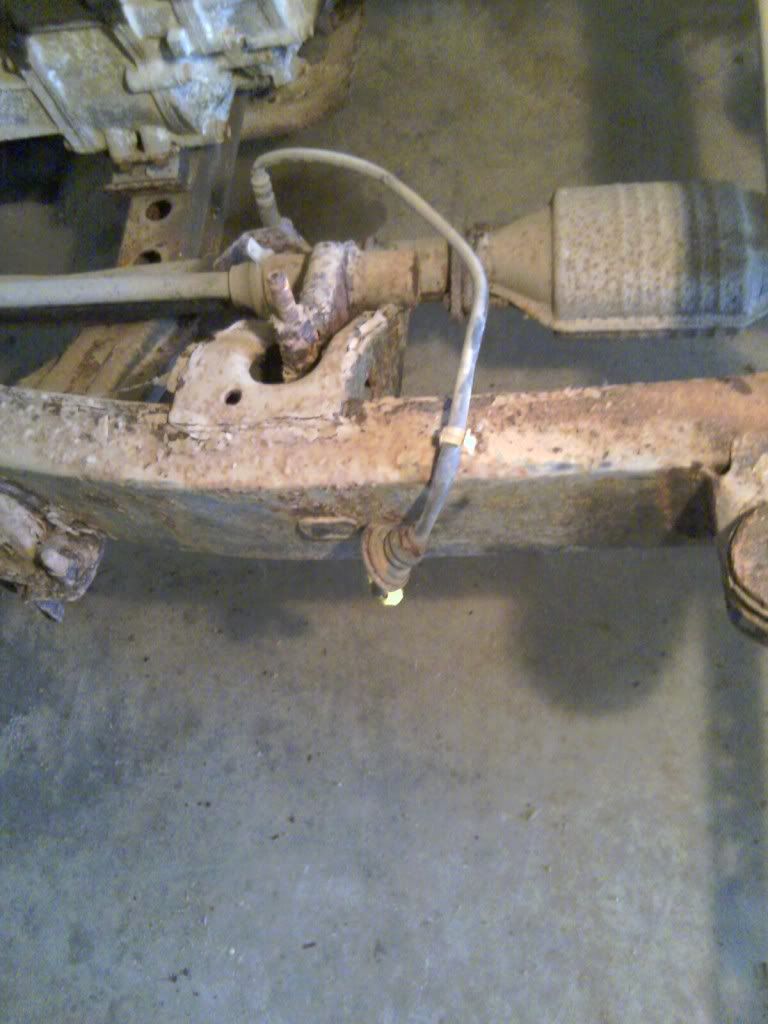
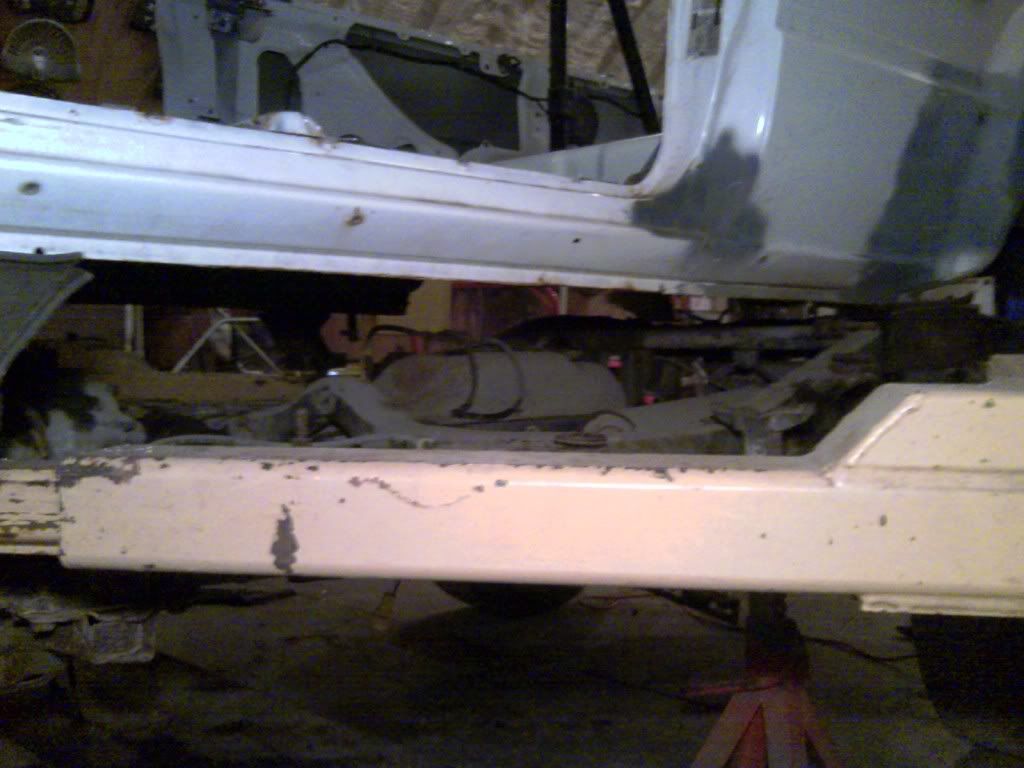
If you look at pics like this one, the frame looks horrible. It's actually surprisingly in good shape. Once you scrape off the surface dirt and some rust the frame is still solid. I'll get a pic of it before I paint it, and after I've cleaned the dirt off later.
I also took off the spare tire carrier. Snapped 2 bolts right away, and the third one threaded out fine.
You may have noticed I'm back parallel parked against the side of the shed again now that I'm done using the hoist.
I'll end with my favourite pic so far:
I decided to play it safe and take off as much weight as I could to save stress on the rocker seams.
I threw rags under the corners of the hood to protect things when I took out the bolts.
Hood off. I then started to take the tailgate off. There was a wiring clip inside the driver side rear quarter panel near where the jack is stored.
After that was disconnected I pulled the wire down through the hole in the bottom of the panel so it just dangled from the tailgate. now all I had to do was pop the bolts to the hinges and the tailgate support arms.
Holding the tailgate close to vertical made it easier to remove because of the spring bar that helps take the tailgate weight.
My parts are starting to pile up.
I then popped both doors off. It looked like the hinge pins were welded in, so I just took out the pin for the door's stabilizer (I don't know the real name for it) and took out the bolts that fastened the hinges to the door, leaving the hinges on the body. I'm going to have fun trying to align the hood and doors later, I'm sure.
I started lifting the body slowly, checking for clearance every inch or so, and other than the shifter for the transfer case, everything went smoothly lifting straight up. Until I realized I'd missed unhooking the fuel filler and vent lines. I had stretched them, but not broken anything yet, thankfully. I loosened the gear clamps and they popped so easily because of the tension on them, that I'm actually happy I unhooked them during the lift.
As you can see I'll be investing in a new fuel pump. These lines are rotted.
15mins and a couple inches later
Everything is still going smoothly. I had to shift the body a bit to the passenger side to clear the transfer case shifter but everything else was clear.
Sorry about the quality of the pics, it was dark by this point, and there wasn't enough light in the shop for my camera phone.
Checking for clearance/missed connections here. Everything still seems ok.
There wasn't a ton of room around the engine, but I don't think I even scraped anything during the lift.I did have to tie wrap my steering shaft up and out of the way, and guide the power steering lines a bit.
Another grainy pic. I wish I'd brought a better camera for the night, but my wife tends to not trust me with delicate things.Probably more pics than you need to see, but I haven't gotten bored of looking at this yet.
This is about as high as I put her before pulling out the frame. Better safe than sorry.
It just seemed right to use my other 4runner to pull the frame out of this one.
During the pull
I get a kick out of this one. Every once in a while my dog would think that I was going to drive home while I was working on this 4runner, and hop in so I didn't leave without him. Probably not going far with just a truck body. Wish the pic wasn't so grainy.
This is the next day, Saturday. We loaded it up on a trailer and pulled out the body to store while I worked on the frame.
We weren't sure how to get the body off the trailer easily because the storage shed isn't that big, so we ended up deciding to hang it:
I didn't get much else done on Saturday.
Started disconnecting the exhaust
If you look at pics like this one, the frame looks horrible. It's actually surprisingly in good shape. Once you scrape off the surface dirt and some rust the frame is still solid. I'll get a pic of it before I paint it, and after I've cleaned the dirt off later.
I also took off the spare tire carrier. Snapped 2 bolts right away, and the third one threaded out fine.
You may have noticed I'm back parallel parked against the side of the shed again now that I'm done using the hoist.
I'll end with my favourite pic so far:
05-08-2011, 02:53 PM
#28
Registered User
Thread Starter
Join Date: Apr 2011
Location: Southern Ontario
Posts: 428
Likes: 0
Received 0 Likes
on
0 Posts
Next steps
Thanks Twisted. I'm at home today, taking the day off from working, and now I'm sitting here itching to get back at it. Next steps will be stripping down the frame, painting it, replacing all the brake and fuel lines, and getting the working engine I have swapped out with the one that's on it that isn't working. Judging from what I've seen so far I'll be getting all new brake calipers rotors, drums, and pads, and probably a new fuel pump. A few of the things I'd hoped to do with everything apart will have to get put on hold because of the money being needed for other things. I did some quick snooping on ebay, looks like at least 100 bucks per brake caliper, I think rotors and drums for all four corners will be at least 250 bucks with the hardware kits, the body lift kit will be at least 100 bucks, new rad probably 50-100 bucks. It would be stupid not to put in a new clutch too, so that'll be probably $150 bucks. Then there's the cost of replacement exhaust pipes, welding supplies to lift the drivetrain brackets, and paint. There are bound to be other things I haven't even thought of. It's going to be a fair amount of money and time invested, but I'm pretty devoted to making this truck run without taking anything from my daily driver. I'm ballparking it at 1000 bucks and a couple weeks work on the drivetrain and frame before I even turn my attention to the paint job. Probably $500 minimum just to paint the thing and spray bed liner in the thing myself, and I haven't even touched the cost of stainless steel for bumpers, stereo equipment, or new tires. So realistically the stereo, tires and bumpers will have probably wait for a while, and I'm going to have to learn how to flare brake and fuel lines quickly.
05-08-2011, 04:05 PM
#30
Registered User
Thread Starter
Join Date: Apr 2011
Location: Southern Ontario
Posts: 428
Likes: 0
Received 0 Likes
on
0 Posts
Flaring
Do the fittings on these trucks require a double flare or a bubble flare? I'm seeing a couple vids on youtube saying you can make a bubble flare with a regular double flare tool, but I'm not sure I'd be able to tell the difference from my rusted out brake lines. I'm thinking I should replace all the brake lines with new ones before I get too far into the frame restoration, before I end up forgetting which line goes where.
05-09-2011, 06:41 AM
#31
Super Moderator
Staff
iTrader: (1)
Join Date: Aug 2008
Location: Anderson Missouri
Posts: 11,788
Likes: 0
Received 21 Likes
on
19 Posts
Great job on getting the body off. I did see one thing I need to add to my body swap post, the gas tank fill pipe. I didnt even think of that.
Having a lift would be so nice. Being able to get to everything like frame, lines clutch will be so much easier. The money thing sure does put a damper on build projects, but there is always something that can be done for free or cheap til the cash frees up for parts. Cleaning is a big one.
Im not sure which type of connection is needed for the lines, but the flare is really easy once you do it once or twice. Just do some practicing on a piece of tube, and you will be a pro in no time.
All in all, how do you feel about taking the body off? Not as scary as you might have thought at the beginning. You will feel pretty confident when you go back to put it back on. I think it is actually easier to put it back togheter as you know where everyting goes and you wont have to be working with rusted, busted, stripped bolts.
Great job, looking forward to your progress.
05-09-2011, 08:24 AM
#32
Registered User
Thread Starter
Join Date: Apr 2011
Location: Southern Ontario
Posts: 428
Likes: 0
Received 0 Likes
on
0 Posts
Thanks for the encouragement Terry. I spent so much time picking over things before the lift and worrying about missing anything that I was quite surprised with how smoothly the actual lift went. I guess it's like most things in life: preparation is everything. I didn't even think about the filler lines either, I just happened to hear them grunt as I was stretching them out during the lift, stopped everything and poked my face everywhere with a flashlight till I saw them. They pretty much pulled themselves off after I loosened the gear clamps because they were stretched close to their max. Not a suggested way to do this, but made for an easy disconnect. I hear you on the money thing. I'll be trying to do as you say: balancing out tasks that cost money with tasks like cleaning that don't.
I did some reading through other yotatech posts, sounds like the brake lines all use double flared ends, I'm sure I'll get the hang of them after I pick up a good flaring tool, and I'll have to look into whether I can buy brake lines with metric fittings on the ends. I called up a local shop and asked them to give me a price on all new calipers, rotors, drums and rear cylinders, and I'm dreading finding out what the number will be, especially since I forgot to ask him to price out the pads, shoes and rear hardware kits, too. Prices are always cheaper on ebay, but the shipping will kill me because I'm in Canada.
All in all I feel really good about the body lift, you're completely on the money. Not as scary as I thought, and at this point I'm more worried about swinging the finances than I am about my ability to complete the project. I'm not looking forward to pulling out all the seized bolts though. Good luck with your own 4runner, I'll be looking forward to your progress, as well. Seeing that white runner with the grey primer patches in your pics reminded me of my own, despite your body work looking much cleaner.
05-10-2011, 08:32 AM
#34
Registered User
Thread Starter
Join Date: Apr 2011
Location: Southern Ontario
Posts: 428
Likes: 0
Received 0 Likes
on
0 Posts
I know the pickups have more body mounts than the 4runners because of the cab/box, I'd assume they'd be the same mounts though. I'll probably just buy my own kit, think they go for about 100 bucks or so. I just got my prices back from the auto shop in town here, and it was much better than I was expecting. I was assuming around 1000 bucks for the brake system if I had to replace everything. They priced a pair of rotors for 50 bucks, pads for 40 bucks, calipers at 120 bucks a piece before the core rebate, brake hoses at 17 bucks each, drums at 90 bucks for a pair. Brake shoes for 30 bucks, wheel cylinders at 25 bucks a piece, and brake drum hardware kit for 15 bucks. All in the whole list came to $590 before taxes, so I'll probably just replace everything in one shot instead of trying to pair half new parts with half old rusted parts.
05-10-2011, 12:02 PM
#35
Super Moderator
Staff
iTrader: (1)
Join Date: Aug 2008
Location: Anderson Missouri
Posts: 11,788
Likes: 0
Received 21 Likes
on
19 Posts
For all new hardware, doesnt sound too bad. Do one end at a time and you wont have to cough it all up at once. But either way it still hurts giving up the cash.
I bought some rocker panels from Wolf Steel and they area Canadian company and was worried shipping would keep me from buying anything from them and was surprised at how resonable it was. That was North going South to the border, dont know about South going North. I would still check and see what it would cost for like ebay.
You are right, our trucks look quite simialar. Ilike your color of interior and condition better. But thanks for the compliment on my body work. I have worked hard at it.
Looking forward to your progress.
05-11-2011, 07:52 PM
#36
Registered User
Thread Starter
Join Date: Apr 2011
Location: Southern Ontario
Posts: 428
Likes: 0
Received 0 Likes
on
0 Posts
Slowing down
I'm not making much progress this week, ball season started so I've only been able to work on the truck once so far, but I'll update anyway.
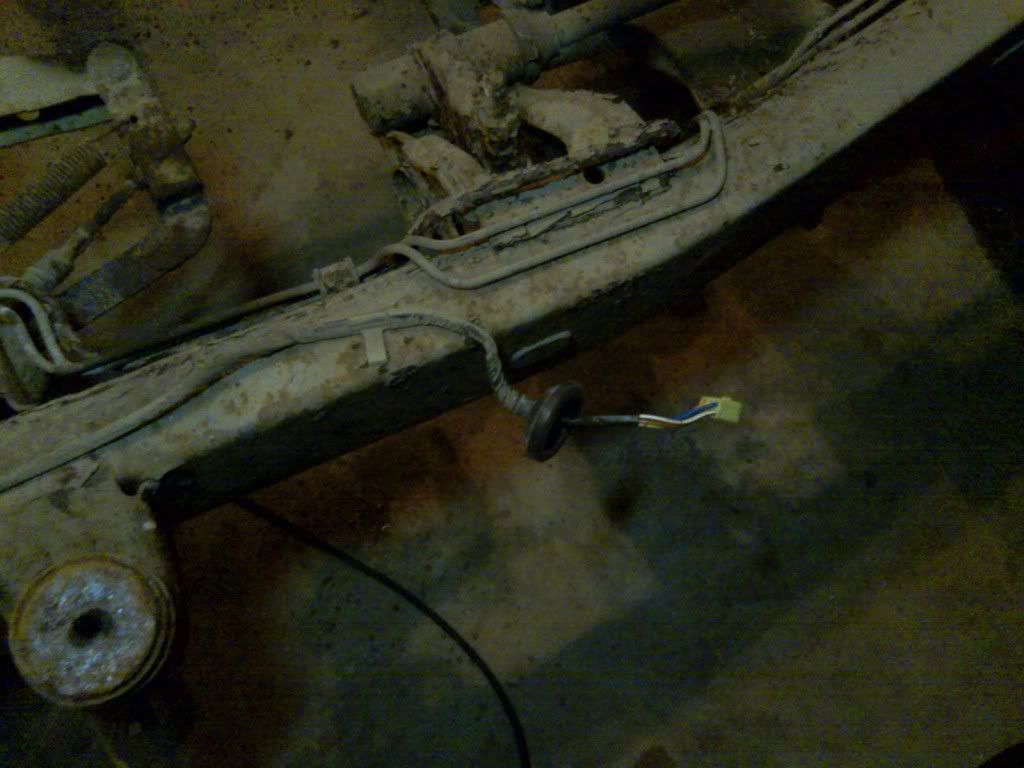
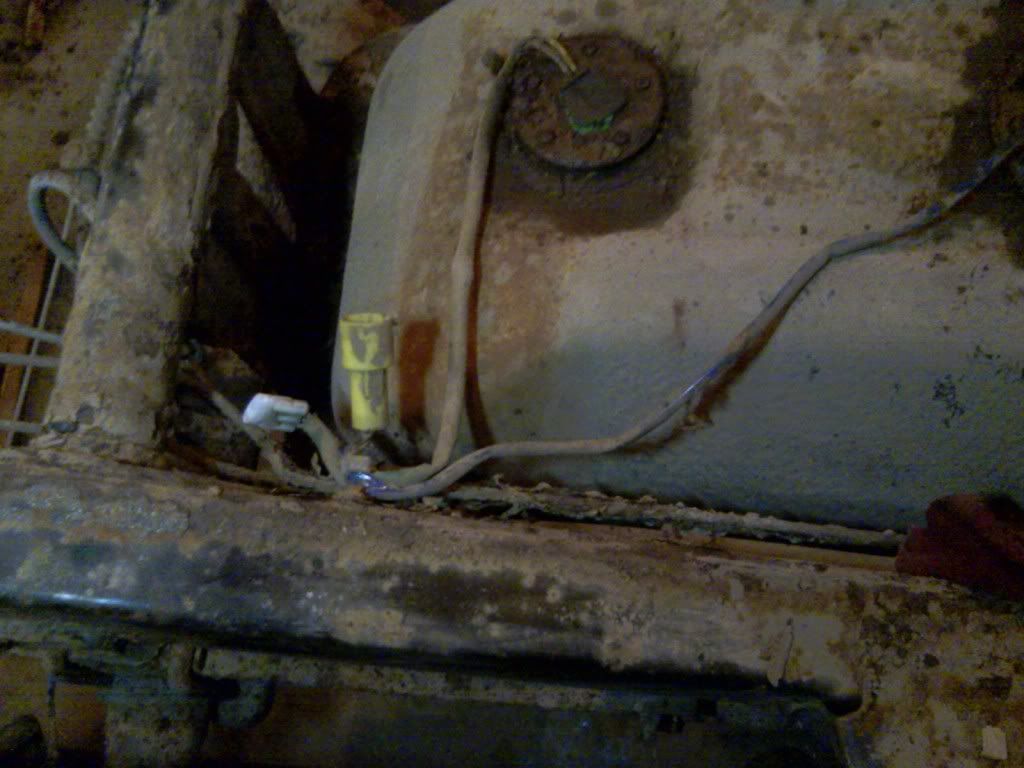
I'm taking pretty much everything off so I can clean the frame and repaint it, starting with this wiring harness that used to pass up through the floor under the passenger seat, and along the frame back to the fuel pump:
there are a pair of clips here going to the sending unit and fuel pump. I'm prepping to take the gas tank off, so I removed the wires:
I'm thinking when I reinstall all the wires and lines again I'll shim them up off the frame in the gap that will be there after I lift the body, so sediments can't build up like they have.
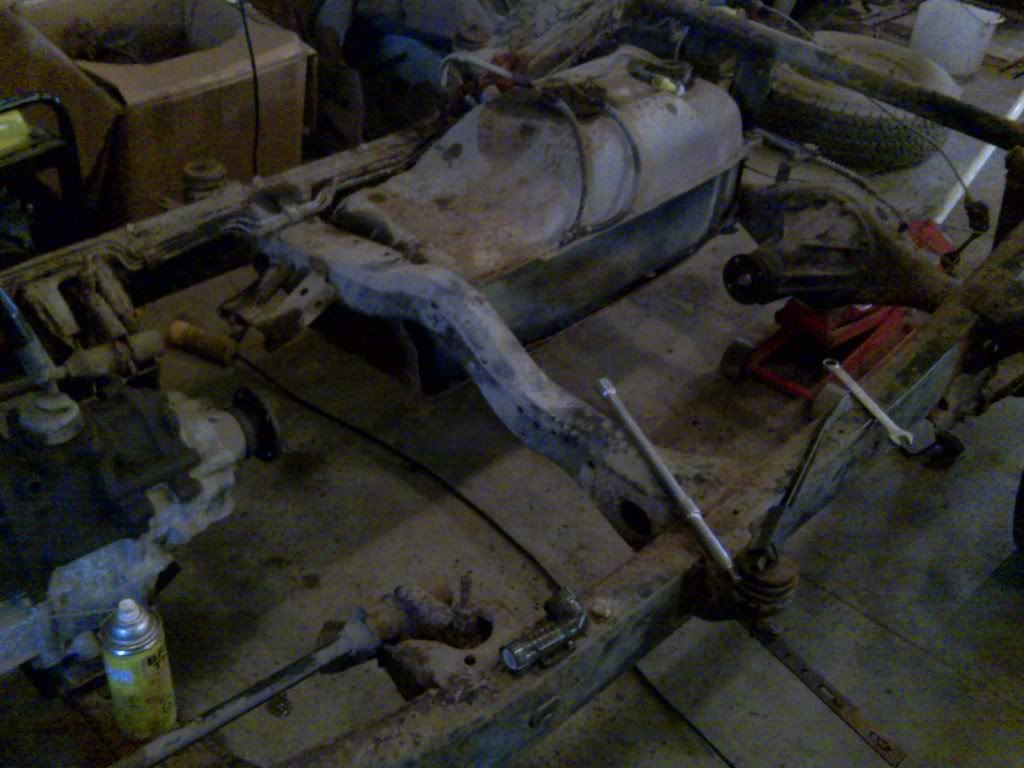
I took the drive shaft out so I could get to the nuts for the guard/tank easier. The good thing about stripping things down like this: If something's in your way you just take it off entirely. Five of the six bolts for the gas tank guard came out fine.
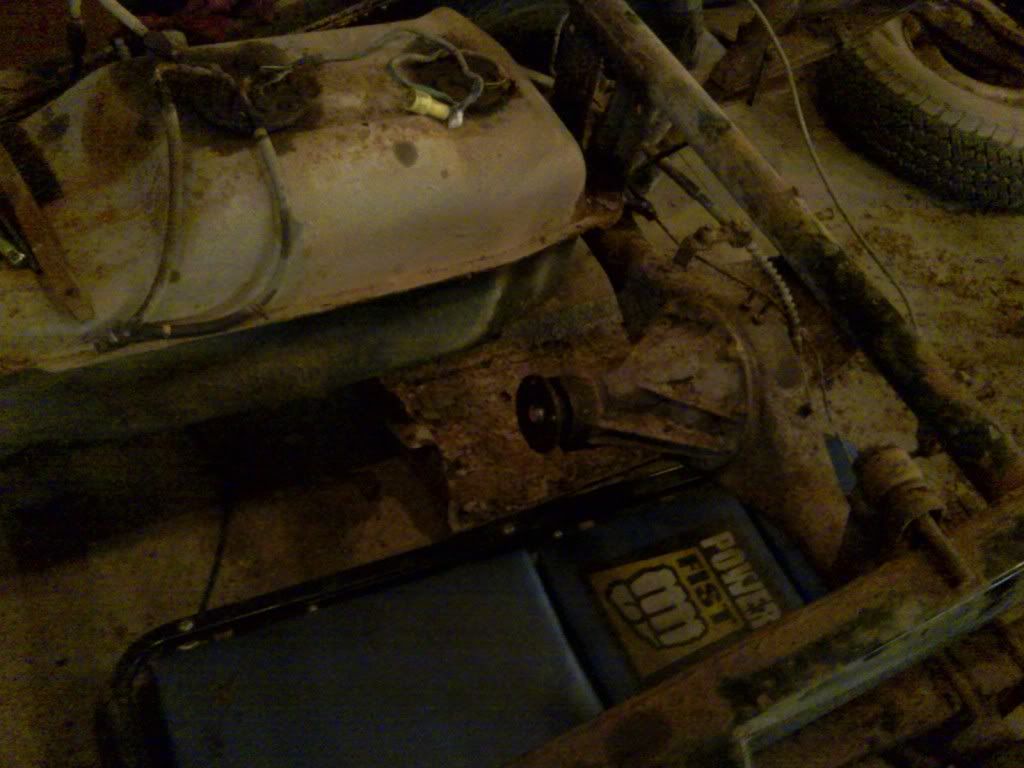
You can see the rusty guard beside the creeper there. I'll likely not be reusing it.
I had said in a previous post that the frame wasn't as bad as it looked in the pics. When you look at it even in real life it looks completely rust covered, but after a minute or two with a rag:
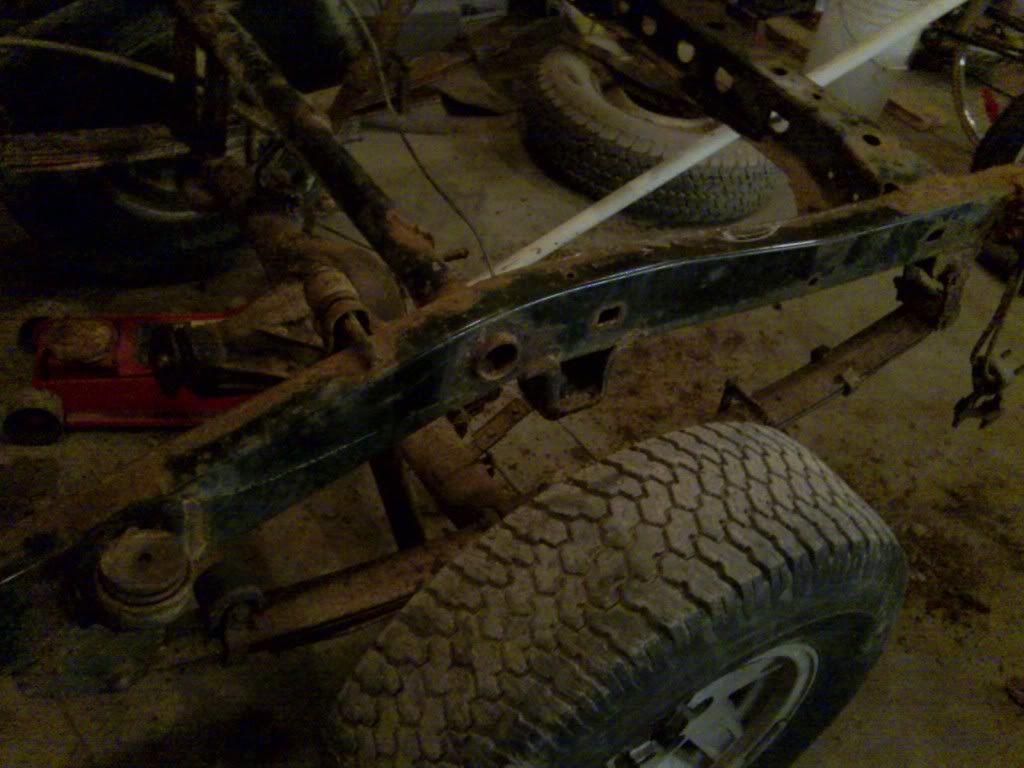
Still not perfect, but much better than it seems before being wiped down. I wasn't expecting as much of the factory paint to still be there. The bolts holding the gas tank in were rusted pretty tight, took me a long time to get them out without snapping them all off, but I finally did get it removed.
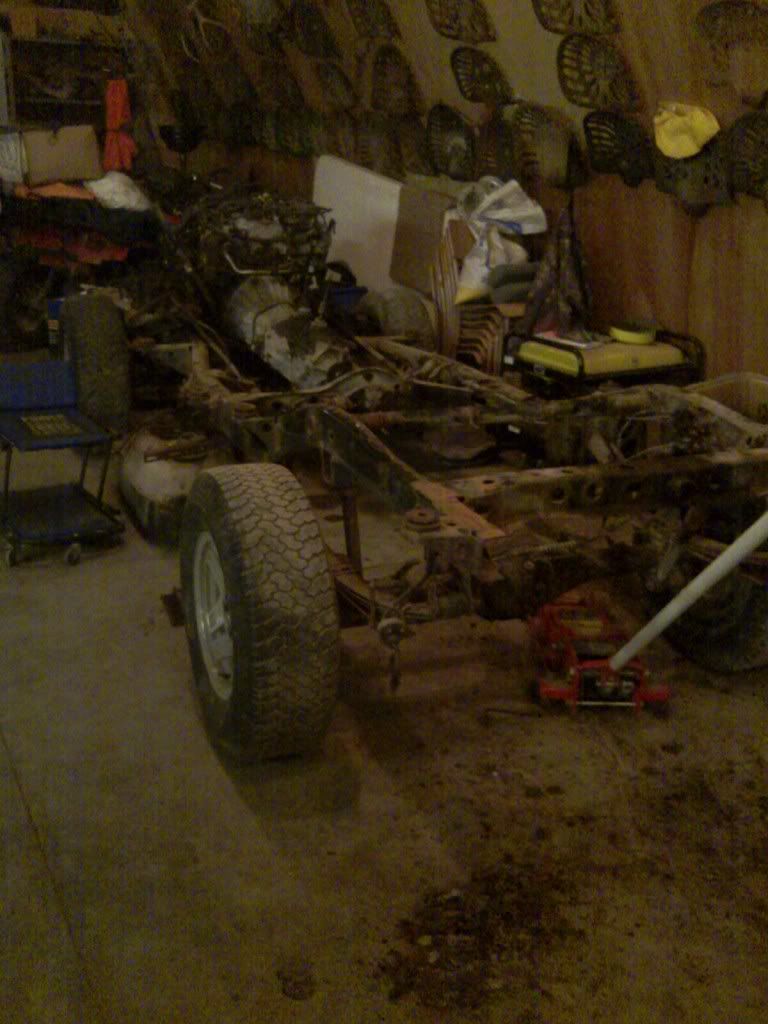
That's as far as I've gotten. I keep wishing I could get a day off to put in some solid hours on it, but I only really have time for a couple hours on any given evening. The gas tank was pretty much half full still, made me wish it was still useable after seeing the price on the pumps today. I'm hoping to get all the lines and random things off the frame before the weekend, during which I'm planning on taking off the engine and tranny. After that point I'll actually start building a truck instead of just pulling off rusty pieces every night.
I'm taking pretty much everything off so I can clean the frame and repaint it, starting with this wiring harness that used to pass up through the floor under the passenger seat, and along the frame back to the fuel pump:
there are a pair of clips here going to the sending unit and fuel pump. I'm prepping to take the gas tank off, so I removed the wires:
I'm thinking when I reinstall all the wires and lines again I'll shim them up off the frame in the gap that will be there after I lift the body, so sediments can't build up like they have.
I took the drive shaft out so I could get to the nuts for the guard/tank easier. The good thing about stripping things down like this: If something's in your way you just take it off entirely. Five of the six bolts for the gas tank guard came out fine.
You can see the rusty guard beside the creeper there. I'll likely not be reusing it.
I had said in a previous post that the frame wasn't as bad as it looked in the pics. When you look at it even in real life it looks completely rust covered, but after a minute or two with a rag:
Still not perfect, but much better than it seems before being wiped down. I wasn't expecting as much of the factory paint to still be there. The bolts holding the gas tank in were rusted pretty tight, took me a long time to get them out without snapping them all off, but I finally did get it removed.
That's as far as I've gotten. I keep wishing I could get a day off to put in some solid hours on it, but I only really have time for a couple hours on any given evening. The gas tank was pretty much half full still, made me wish it was still useable after seeing the price on the pumps today. I'm hoping to get all the lines and random things off the frame before the weekend, during which I'm planning on taking off the engine and tranny. After that point I'll actually start building a truck instead of just pulling off rusty pieces every night.
05-12-2011, 04:13 AM
#38
Super Moderator
Staff
iTrader: (1)
Join Date: Aug 2008
Location: Anderson Missouri
Posts: 11,788
Likes: 0
Received 21 Likes
on
19 Posts
I broke a couple of gas tank bolts, they usually rust up pretty good. I think I am still missing one, but there is enough bolts there that it will do fine with out it.
The wiring harness just lays in the clips and goes in really easy. You wont have to worry about getting it back in the right place.
Your frame will clean up easy. I used a wire brush on a drill. Also some parts store sell a rust and paint remover. It is brownish/purple drill attachment. I tried to find one on their website and couldnt. It does a great job on removing scaley rust.
Your project has been moving along quite well. You will probably be surprised at how fast it will come along. But I hear you, sure would be nice to have more time on projects. But even an hour or two a day makes a difference.
05-12-2011, 08:30 AM
#39
Registered User
Thread Starter
Join Date: Apr 2011
Location: Southern Ontario
Posts: 428
Likes: 0
Received 0 Likes
on
0 Posts
I plan on using a wire bell on a grinder, as I'm much more used to grinders than drills; find them more stable. I've thrown around the idea of actually sandblasting the frame, but I'm still leaning towards just wirebrushed, primed, probably rocker guarded and painted.
I gave my parts supplier the green light on the brake parts. He said they should be in tomorrow, which makes it a possibility I could get more done this weekend. I was going to just do it a bit at a time, but my hours have been steady and my wife put in a bunch of overtime last week, so she said go ahead and get it all at once. I'm pretty sure she was that agreeable about the expense because she's hoping if I get the truck on the road she might actually see me some nights. Suits me just fine, I'm really hoping to have this thing on the road early enough to get in some top-off drives during the summer. Glad I sat down to post this, I just remembered I'll have to pick up a flaring tool and a bunch of steel brake line.
I gave my parts supplier the green light on the brake parts. He said they should be in tomorrow, which makes it a possibility I could get more done this weekend. I was going to just do it a bit at a time, but my hours have been steady and my wife put in a bunch of overtime last week, so she said go ahead and get it all at once. I'm pretty sure she was that agreeable about the expense because she's hoping if I get the truck on the road she might actually see me some nights. Suits me just fine, I'm really hoping to have this thing on the road early enough to get in some top-off drives during the summer. Glad I sat down to post this, I just remembered I'll have to pick up a flaring tool and a bunch of steel brake line.


