the dragons 88 runner buildup/rebuild
 07-21-2012, 11:48 PM
#21
Super Moderator
Staff
iTrader: (1)
Join Date: Aug 2008
Location: Anderson Missouri
Posts: 11,788
Likes: 0
Received 21 Likes
on
19 Posts
Mine was a broken easy out in the oil sending unit. What my machine shop did was weld a nut to the sending unit shaft. He put a washer between the block and the broken shaft. Maybe your shop could try something like that.
You will be surprised at how much more you get done with a to do list. When you are actually out working on it, alot of things slip your mind. It makes a differemce.
As far as the rear of your drivers fender, I havent had much luck on being able to get on straightened back out after a door has pushed it in, but they are fairly reasonable to get replaced. On the core support a come along works well also. I have used a bottle jack and cut some 2x4 to length and rigged it to the fire wall and used slow gentle pressure to push it out. It is a balancing act.
Core support doesnt look like it needs to come out to much. I had to replace my core support on my 86 and it is bolted in. I know another guy that his is bolted in and has been for 5 years and never a problem. I am not going to have mine welded in as it makes pulling the drive train so much easier.
I am looking for a sewing machine for me to learn on doing seats. I havent tried patching, but could see where the levi patch could help. Interior work is my next learning step on these this winter. I plan on taking some old seats and cut the covers stitching and use them as a pattern. Kind of like they did in the old days when you could go in a Wal-Mart or K-Mart and buy shirt patterns. Having it done is expensive and interior shops sell the material for a cheap price. Got to be a better way of doing it.
 07-22-2012, 07:32 PM
#22
Registered User
Thread Starter
As far as the rear of your drivers fender, I havent had much luck on being able to get on straightened back out after a door has pushed it in, but they are fairly reasonable to get replaced. On the core support a come along works well also. I have used a bottle jack and cut some 2x4 to length and rigged it to the fire wall and used slow gentle pressure to push it out. It is a balancing act.
Core support doesnt look like it needs to come out to much. I had to replace my core support on my 86 and it is bolted in. I know another guy that his is bolted in and has been for 5 years and never a problem. I am not going to have mine welded in as it makes pulling the drive train so much easier.
I am looking for a sewing machine for me to learn on doing seats. I havent tried patching, but could see where the levi patch could help. Interior work is my next learning step on these this winter. I plan on taking some old seats and cut the covers stitching and use them as a pattern. Kind of like they did in the old days when you could go in a Wal-Mart or K-Mart and buy shirt patterns. Having it done is expensive and interior shops sell the material for a cheap price. Got to be a better way of doing it.
personal note get dash cover!
07-23-2012, 08:31 PM
#24
Registered User
Thread Starter
something i found on Ebay cup holder fit under an after market radio mounts in what would be an empty pocket for junk to be tossed in
Universal-Car-Single-Double-Din-Radio-Pocket-Kit-w-Drink-Cup-Holder storage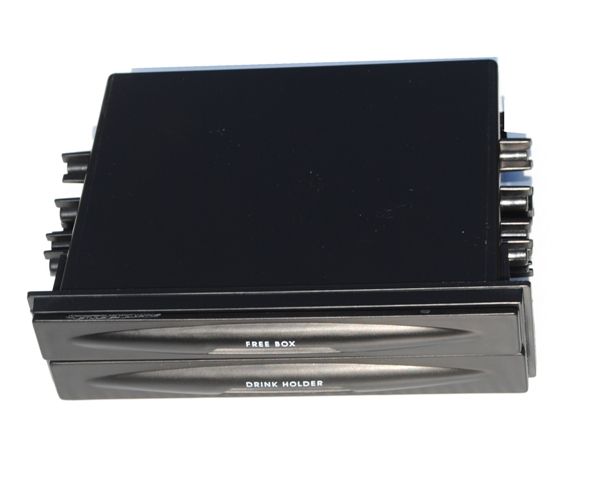
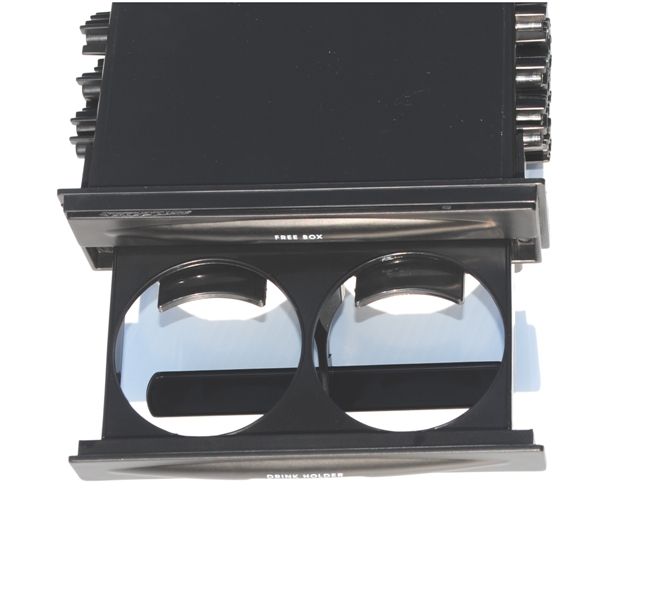
Universal-Car-Single-Double-Din-Radio-Pocket-Kit-w-Drink-Cup-Holder storage
07-23-2012, 08:59 PM
#25
Registered User
Thread Starter
best news short of buying the runner doctor ordered my wound vac off
 now im not slinging around a 5Lb weight off my shoulder with a tube attached to my foot IM FREE!! still have a small hole but its healing
07-23-2012, 09:43 PM
now im not slinging around a 5Lb weight off my shoulder with a tube attached to my foot IM FREE!! still have a small hole but its healing
07-23-2012, 09:43 PM
#26
Registered User
Join Date: Mar 2009
Location: (LSD) Lower Slower Delaware
Posts: 1,169
Likes: 0
Received 0 Likes
on
0 Posts
Dragon, nice runner, looks like you got some work, remember the most important thing is have fun doing the build and take your time, I got two builds one a 87 pickup and a 89 runner, most of the work in on the runner, looks like the same rust areas....
Good luck and be safe,......Bill
Good luck and be safe,......Bill
07-23-2012, 11:46 PM
#27
Super Moderator
Staff
iTrader: (1)
Join Date: Aug 2008
Location: Anderson Missouri
Posts: 11,788
Likes: 0
Received 21 Likes
on
19 Posts
something i found on Ebay cup holder fit under an after market radio mounts in what would be an empty pocket for junk to be tossed in
Universal-Car-Single-Double-Din-Radio-Pocket-Kit-w-Drink-Cup-Holder storage
Universal-Car-Single-Double-Din-Radio-Pocket-Kit-w-Drink-Cup-Holder storage
07-24-2012, 12:28 AM
#28
Registered User
Thread Starter
RMP8080, oh i plan on enjoying every moment of it even if its just cleaning bolts! ive been stuck on my rear in a chair for 5 years im chewin the titanium bit right now foot isnt quite healed totally but look out once doc says it is its so DANG close!
07-25-2012, 04:12 AM
#29
Super Moderator
Staff
iTrader: (1)
Join Date: Aug 2008
Location: Anderson Missouri
Posts: 11,788
Likes: 0
Received 21 Likes
on
19 Posts
5 years, Ouch!! I bet you are chomping at the bits. Accident? I was bed ridden for 2 weeks one time and that was about all I could handle. Hope things get better soon.
I would say count on a good 10% of build time just cleaning and prepping. Alot dont factor that in and that does add into. That is something that can always be done when waiting for parts or funds.
I would say count on a good 10% of build time just cleaning and prepping. Alot dont factor that in and that does add into. That is something that can always be done when waiting for parts or funds.
07-25-2012, 10:54 AM
#30
Registered User
Thread Starter
i had diabetes related bone infection (ostiomyalitus) which to head it off the doctor did a 1/4 tarsal amputation so i cant count to 20 anymore
 other factors came in an it just didnt want to heal so i got to sit.. till it healed
 April of this year the hole could hold 2 half dollars in it an be flush with the surface of the foot i got a skin graft spent 2 weeks in a nursing home (my 3rd graft)
yup i expect that i think this weekend im gonna pull that driver fender off so it wont ruin the door any further i can do most of that sitting on a kitchen stool :-D
Last edited by Cyberhorn The Dragon; 07-25-2012 at 10:57 AM.
07-28-2012, 04:54 AM
#31
08-01-2012, 12:18 PM
#33
Registered User
Thread Starter
another note for myself:
make sure to fix the factory crimp connections for the fuel injectors before putting engine back in see terrys thread for location an what to look for
make sure to fix the factory crimp connections for the fuel injectors before putting engine back in see terrys thread for location an what to look for
08-01-2012, 07:33 PM
#35
Registered User
Thread Starter
also my shifter is bumping the transfer case shifter when i put it into reverse is this the bushings in the cups down in the trany?
will be posting a couple picts i pulled the drivers fender so i can actually open the door fully an the inner fender is definitely gona need some tugging an hammering to straighten it out
08-01-2012, 07:38 PM
#36
Registered User
Thread Starter
yep gona need some pulling

sprayed some pen oil on the backs of the bolts. still snapped one bolt at the bottom of the fender (two next to each other) an broke the one holding the air box top to the radiator core darn things :-|

sprayed some pen oil on the backs of the bolts. still snapped one bolt at the bottom of the fender (two next to each other) an broke the one holding the air box top to the radiator core darn things :-|
08-02-2012, 06:24 AM
#37
Super Moderator
Staff
iTrader: (1)
Join Date: Aug 2008
Location: Anderson Missouri
Posts: 11,788
Likes: 0
Received 21 Likes
on
19 Posts
Busted a few of them bolts myself. I would suggest getting a come along on the front of the inner core support and take a piece of 2x4 over the inner fender and a big freaking hammer and try tapping it out. Maybe a jack on the firewall. It doesnt have to be perfect as you will have quite a bit of leeway for the feder.
Hope doc says your foot is getting better.
Hope doc says your foot is getting better.
08-02-2012, 11:24 AM
#38
Registered User
Thread Starter
Busted a few of them bolts myself. I would suggest getting a come along on the front of the inner core support and take a piece of 2x4 over the inner fender and a big freaking hammer and try tapping it out. Maybe a jack on the firewall. It doesnt have to be perfect as you will have quite a bit of leeway for the feder.
Hope doc says your foot is getting better.
Hope doc says your foot is getting better.
i will figure something out MUHAHAHAHA
foot is doing well, i shouldnt have been on it to do the fender but agh! pulls on hair an forgets shaved self bald tired of the bozo the clown hair the hole in my foot is down to 2mm x 2mm nearly no depth YAY
 08-02-2012, 07:34 PM
#39
Registered User
Thread Starter
gah never have i had so many bolts break
1 13mm
2 12mm
2 10mm
also broke the plastic clip end of the hood cable (*&^%# badwords)
all involved with the components attached to the drivers fender im gona be drilling a lot of those out yuck
the aftermarket cruise control wasnt hooked up only one wire was i suspect it doesnt function anyone happen to know how hard it is to pull a factory one an put it in?
Last edited by Cyberhorn The Dragon; 08-02-2012 at 07:37 PM.
08-04-2012, 08:30 AM
#40
Super Moderator
Staff
iTrader: (1)
Join Date: Aug 2008
Location: Anderson Missouri
Posts: 11,788
Likes: 0
Received 21 Likes
on
19 Posts
I feel your frustrations on the broken bolts. Got a few to ake care of myself. I have been trying to build up a factory cruise control but am having to do it in bits and pieces. I am not sure, but am wondering if the wiring harness has to support it as if there may be two types of harness for these trucks. One with cruise control and one without. I could be wrong. My 86 had it but that harness was toast. I am considering aftermarket.
Its looking better.
Its looking better.


