duckhead's 91 pickup teardown and rebuild
 03-21-2016, 05:20 PM
#61
Registered User
Thread Starter

Join Date: Jun 2015
Location: WI
Posts: 147
Likes: 0
Received 0 Likes
on
0 Posts
Haha Hey TN Five-0! I wished there was!!! Too busy on this end for the next 2 months to get anything done  I have a few odds and ends I started but didn't finish. I could post pics but I like to post when they're done that way it's easy to follow.
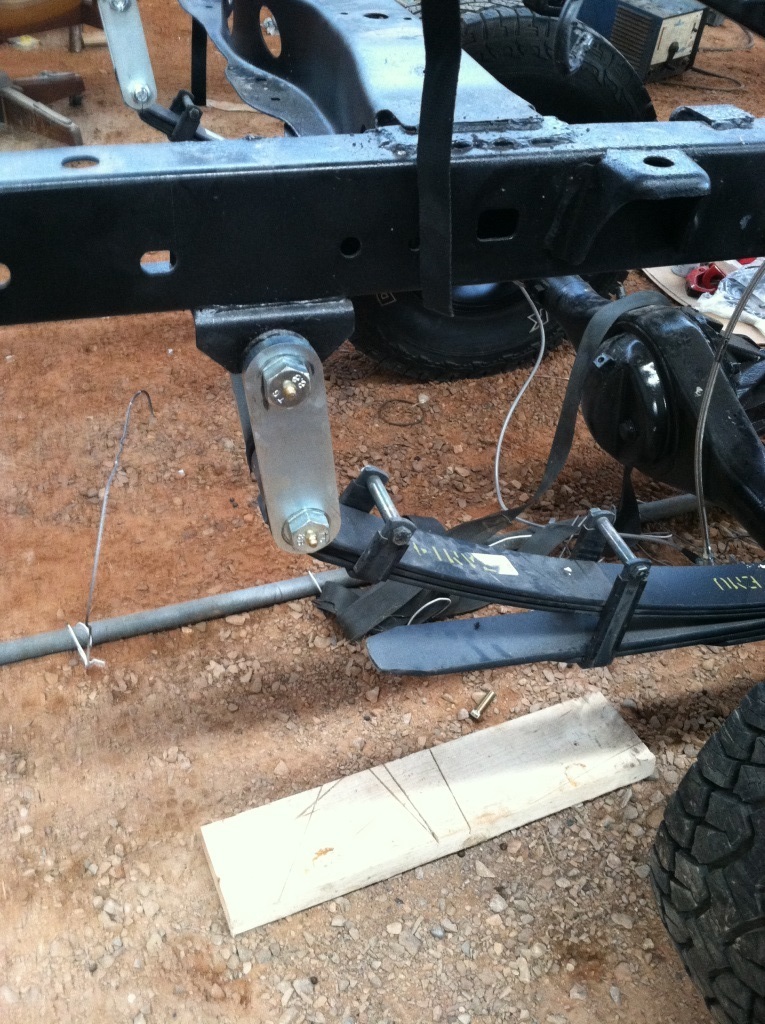
I did try to mount my front Rancho shocks and well... those didn't work either Too short and here's some pics. Also forgot about the passenger side bump stop mount on the frame. With these larger shocks they rub up against the tube. I'll have to grind that back a bit and repaint... Yes it's true the cab will push the frame down a little... but I would like a little more play so I don't risk yanking the rod out.
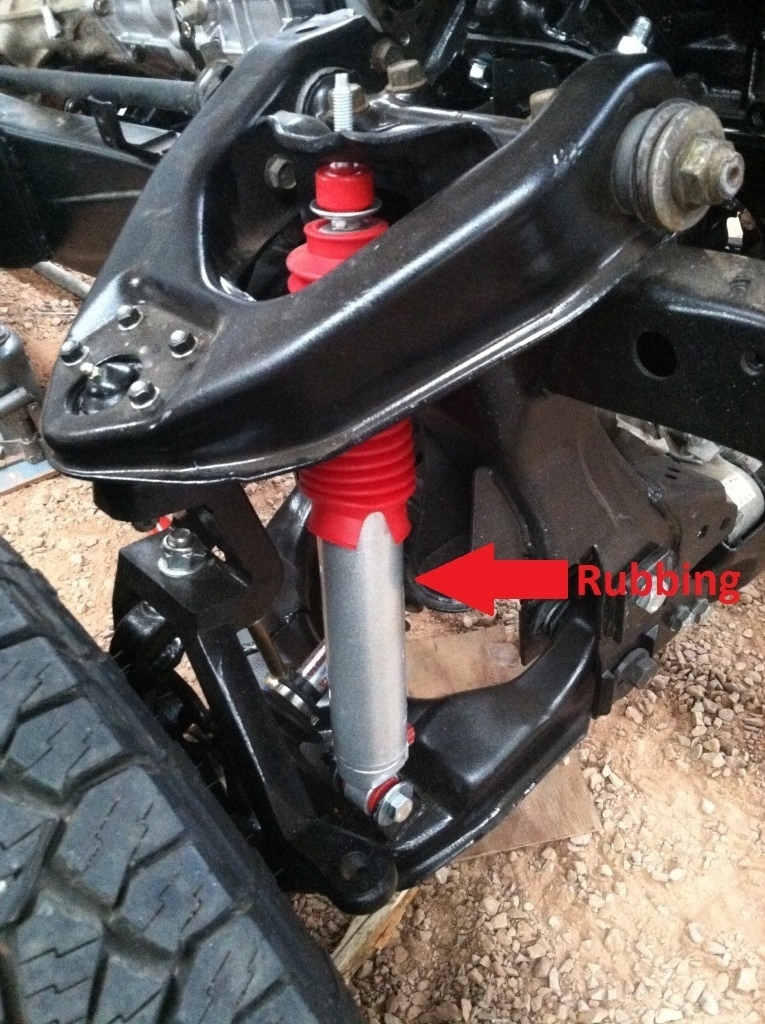
The bilstein 5100 and pro comps are both about an inch longer than the rancho's for this truck model. Strange Rancho made everything so short when compared to other vendors. An alternative would be front shocks for a Kijang SUV. The valving would be different so I wasn't sure if this was what I wanted to do. I ended up getting a younger rep to work with me over the phone and was able to return them for in-store credit which is great. The last thing I do to this truck will be the shocks OME are too stiff... Billies are also pretty stiff on these trucks I heard... I may go back to the Rancho's because I've read great things about how soft they are but I may also look into the hydraulic shocks...
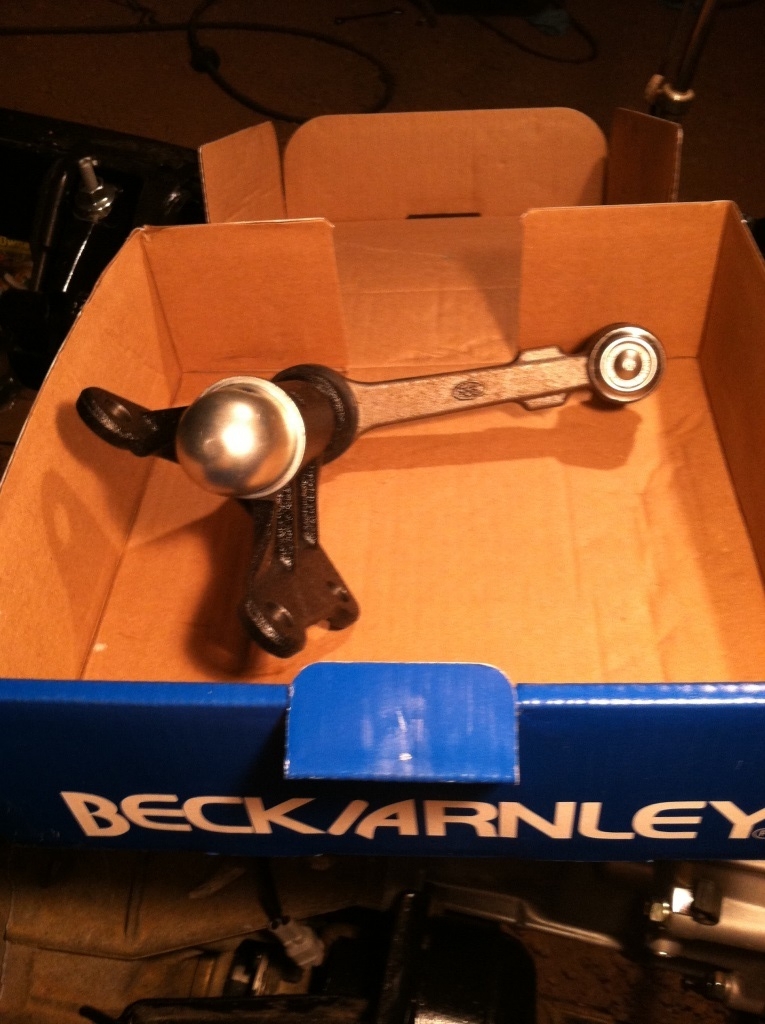
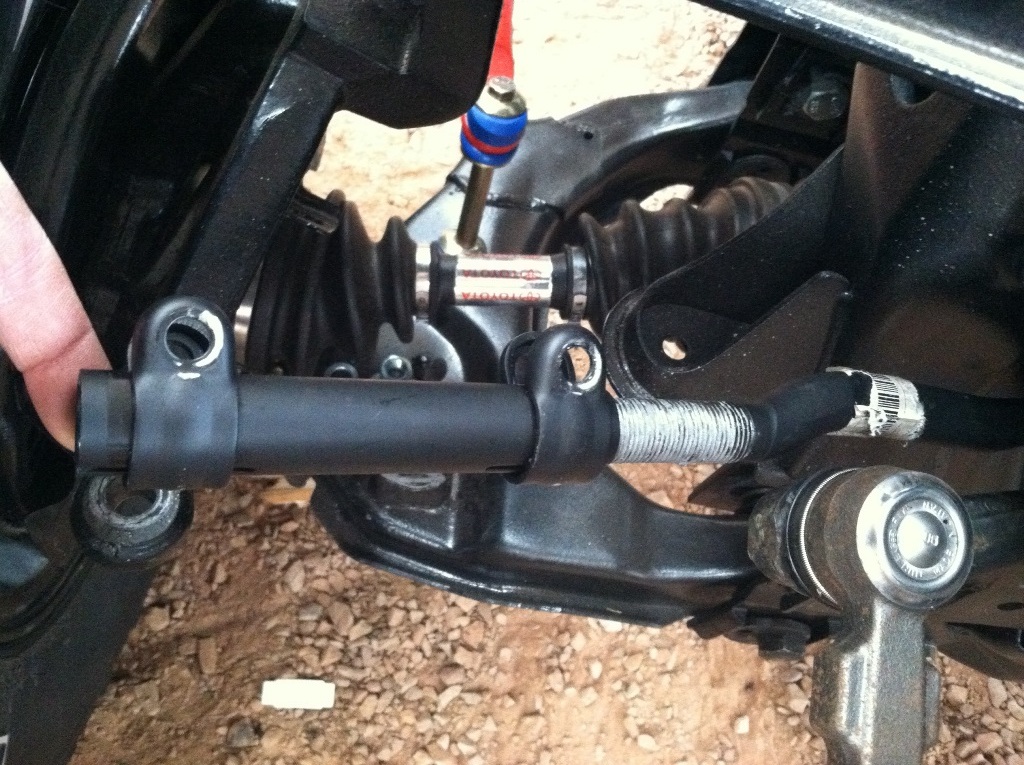
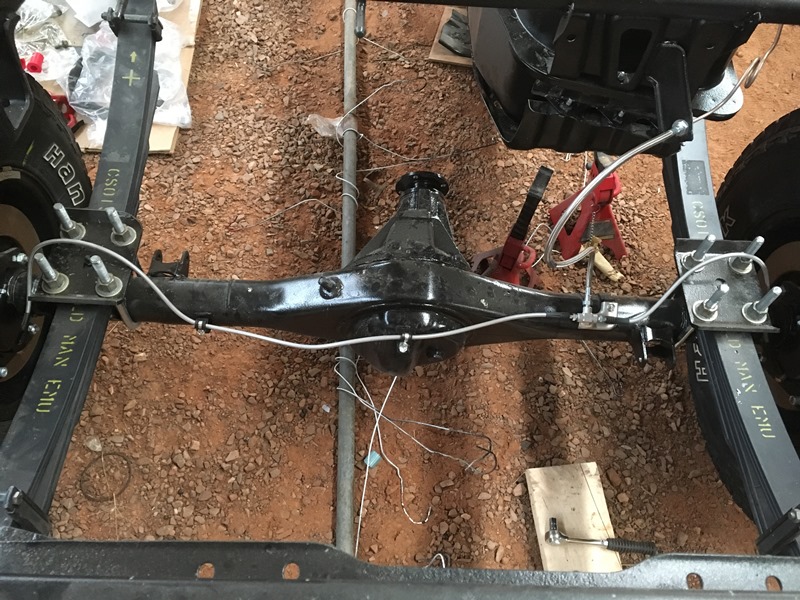
I did put in my linkage...
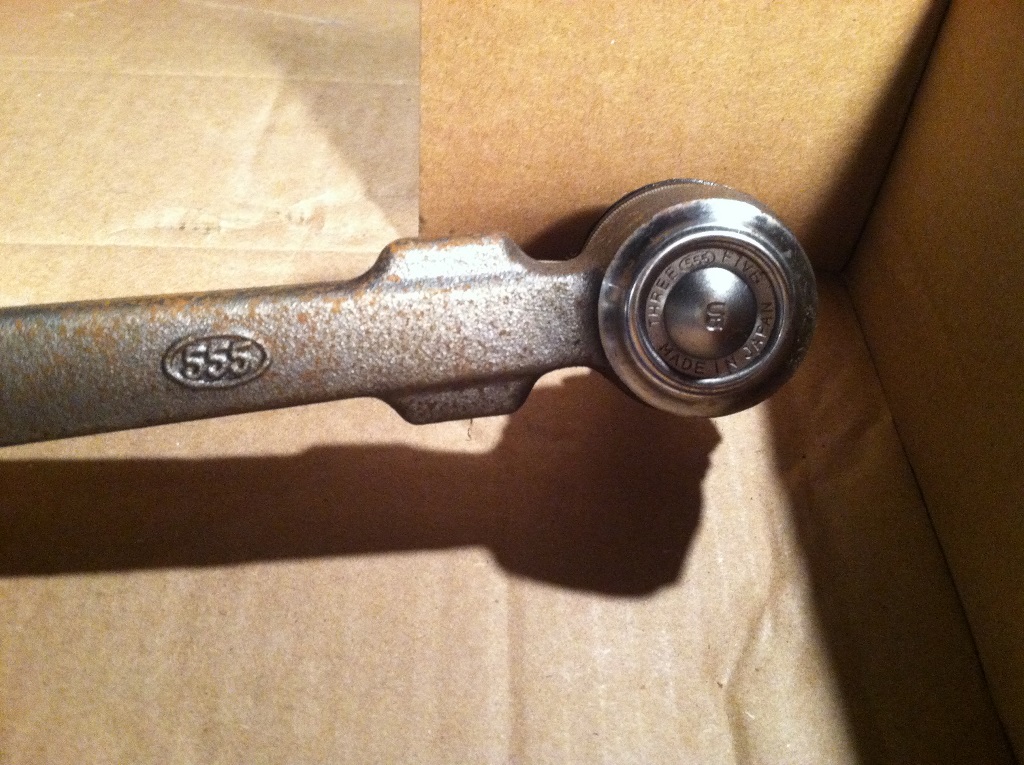
Beck/Arnley idler arm 1014228. It does say 555 but as the story goes... could easily be a reman. It does say made in japan though... Why no zerk?!
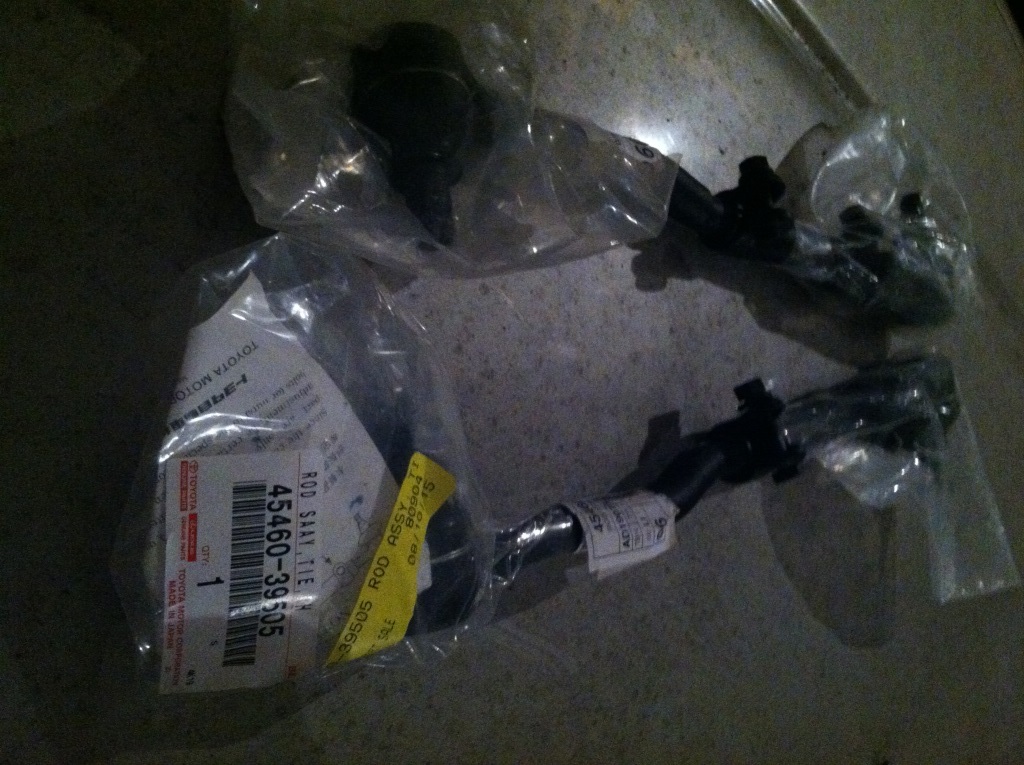
Put complete tie rod assemblies from Toyota on
Part # 45460-39505
Then I took them completely apart to neversieze everything...
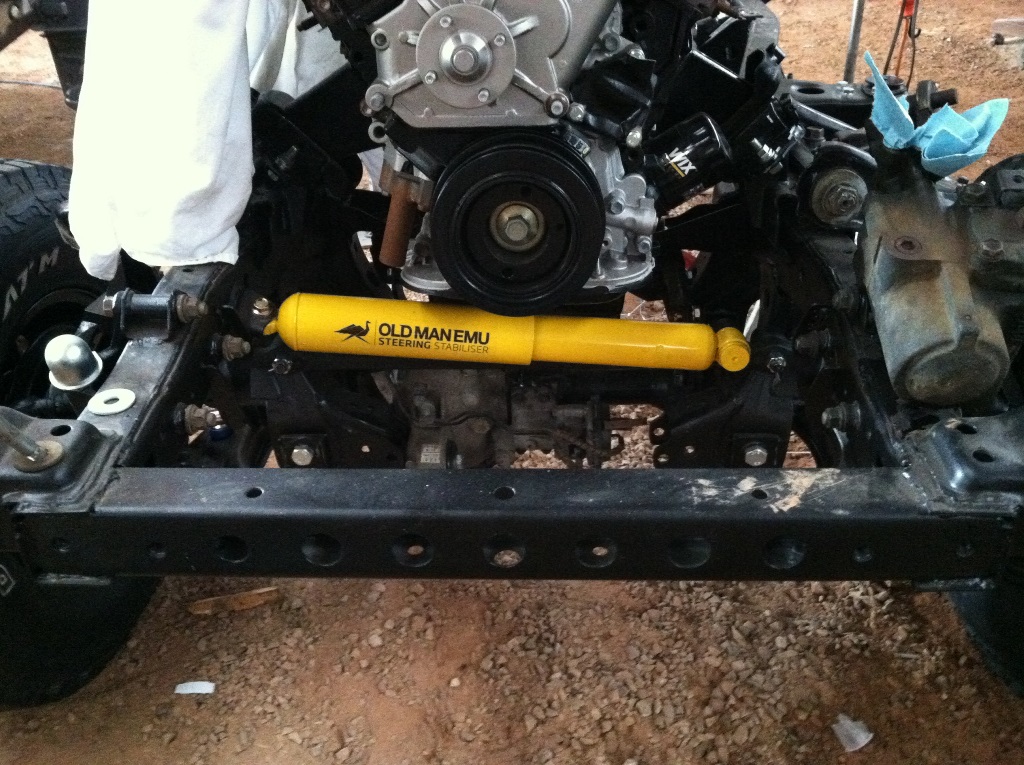
Then used some of that in-store credit on an OME SD33 steering stabilizer
I have a few odds and ends I started but didn't finish. I could post pics but I like to post when they're done that way it's easy to follow.I did try to mount my front Rancho shocks and well... those didn't work either
Too short and here's some pics. Also forgot about the passenger side bump stop mount on the frame. With these larger shocks they rub up against the tube. I'll have to grind that back a bit and repaint... Yes it's true the cab will push the frame down a little... but I would like a little more play so I don't risk yanking the rod out.

The bilstein 5100 and pro comps are both about an inch longer than the rancho's for this truck model. Strange Rancho made everything so short when compared to other vendors. An alternative would be front shocks for a Kijang SUV. The valving would be different so I wasn't sure if this was what I wanted to do. I ended up getting a younger rep to work with me over the phone and was able to return them for in-store credit which is great. The last thing I do to this truck will be the shocks
OME are too stiff... Billies are also pretty stiff on these trucks I heard... I may go back to the Rancho's because I've read great things about how soft they are but I may also look into the hydraulic shocks...I did put in my linkage...
Beck/Arnley idler arm 1014228. It does say 555 but as the story goes... could easily be a reman. It does say made in japan though... Why no zerk?!


Put complete tie rod assemblies from Toyota on
Part # 45460-39505

Then I took them completely apart to neversieze everything...

Then used some of that in-store credit on an OME SD33 steering stabilizer

 03-24-2016, 09:26 AM
#62
Registered User
Thread Starter
Join Date: Jun 2015
Location: WI
Posts: 147
Likes: 0
Received 0 Likes
on
0 Posts
Been shopping junk yards and craigslist for a while with no luck. Anybody have or know anyone that has a 99 4runner ECU for a manual transmission they wanna sell? Donor's an auto so if anyone has any info I'd appreciate it! I put up a thread in the classifieds too...
https://www.yotatech.com/forums/f12/...cu-m-t-294209/
EDIT: Found one! But thanks to those who kept an eye out.
https://www.yotatech.com/forums/f12/...cu-m-t-294209/
EDIT: Found one! But thanks to those who kept an eye out.
Last edited by duckhead; 06-09-2016 at 05:50 PM.
03-26-2016, 05:07 PM
#63
Registered User
Thread Starter
Join Date: Jun 2015
Location: WI
Posts: 147
Likes: 0
Received 0 Likes
on
0 Posts
Snuck in a day on the truck today Worked on the brakes...
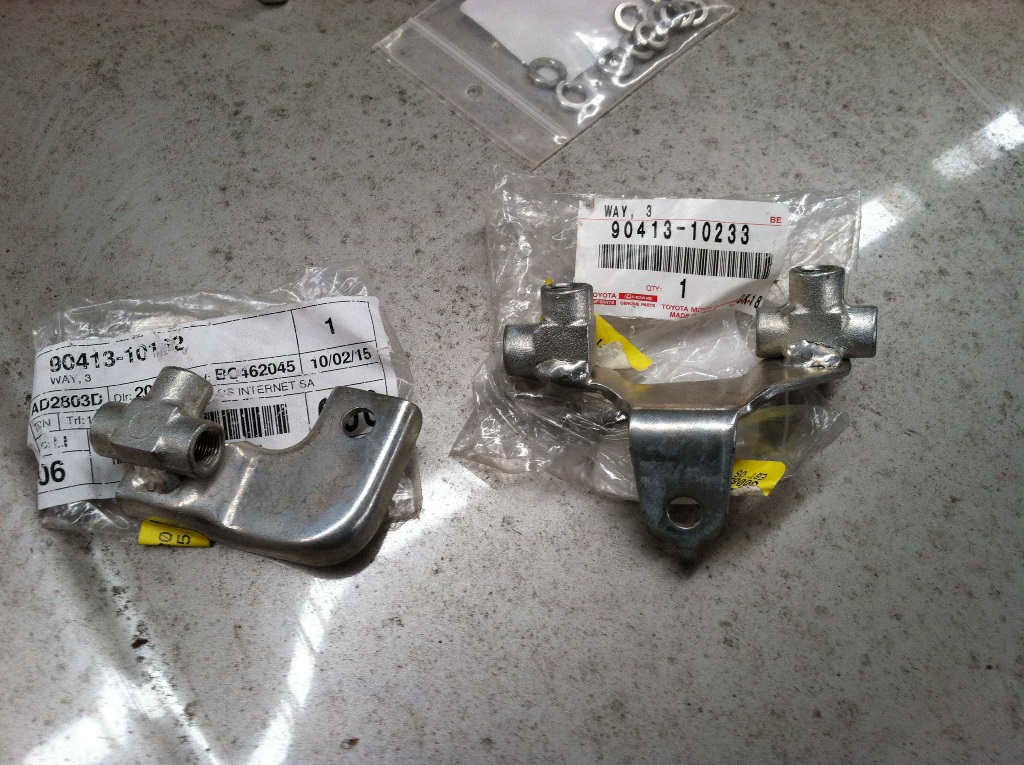
Put new tees in...
Front - 90413-10233
Rear - 90413-10162
Bought the stainless steel brake line kit from Marlin Crawler... They don't come with a washer to seat them in the mounts. They do come with new mounting tabs but I don't think it's necessary. Just use the old mounting locations on the frame. I went to the local hardware store and bought some 5/8" machine bushings. Basically washers but not as wide. Here's the kit from Marlin but ignore the steel lines. I was initially going to use these for the fronts but they're not exactly formed correctly. I ended up making my own.
Bought nickel-copper line off of amazon
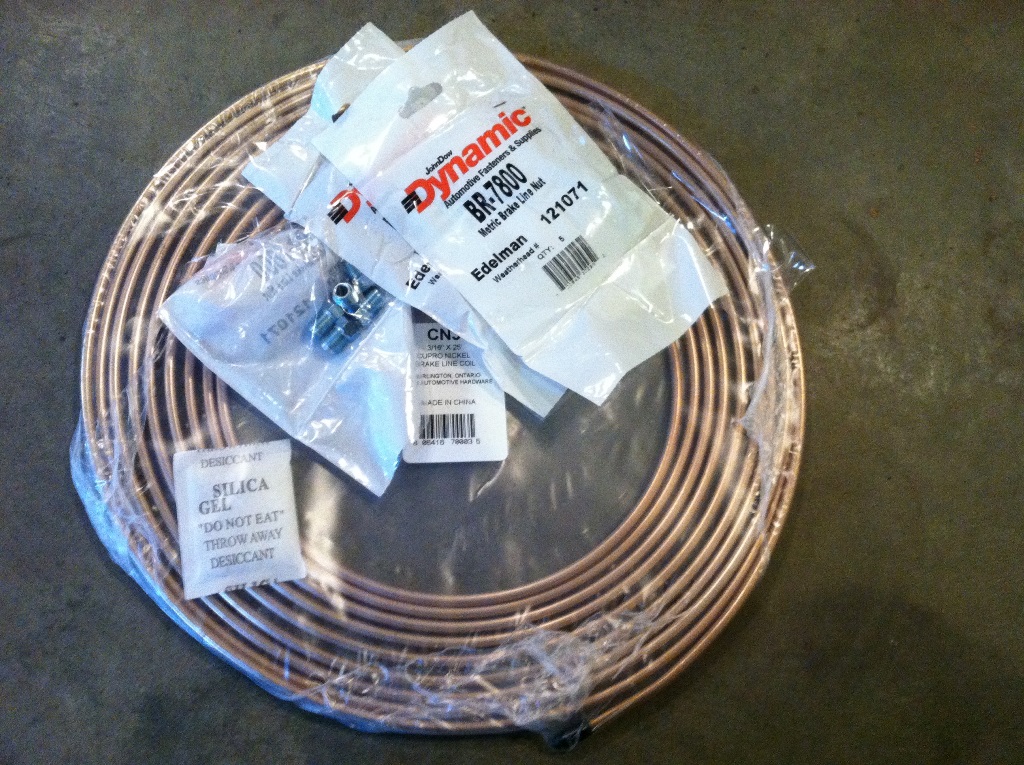
My original lines had some plastic around the line for added protection. I bought some thick walled heat shrink tubing to try and replicate... I think it turned out pretty good. I found it best to make the bends and then put the tubing on. Lots of twisting will get the tubing right where you want it.
Heat shrink snaked up on the caliper line
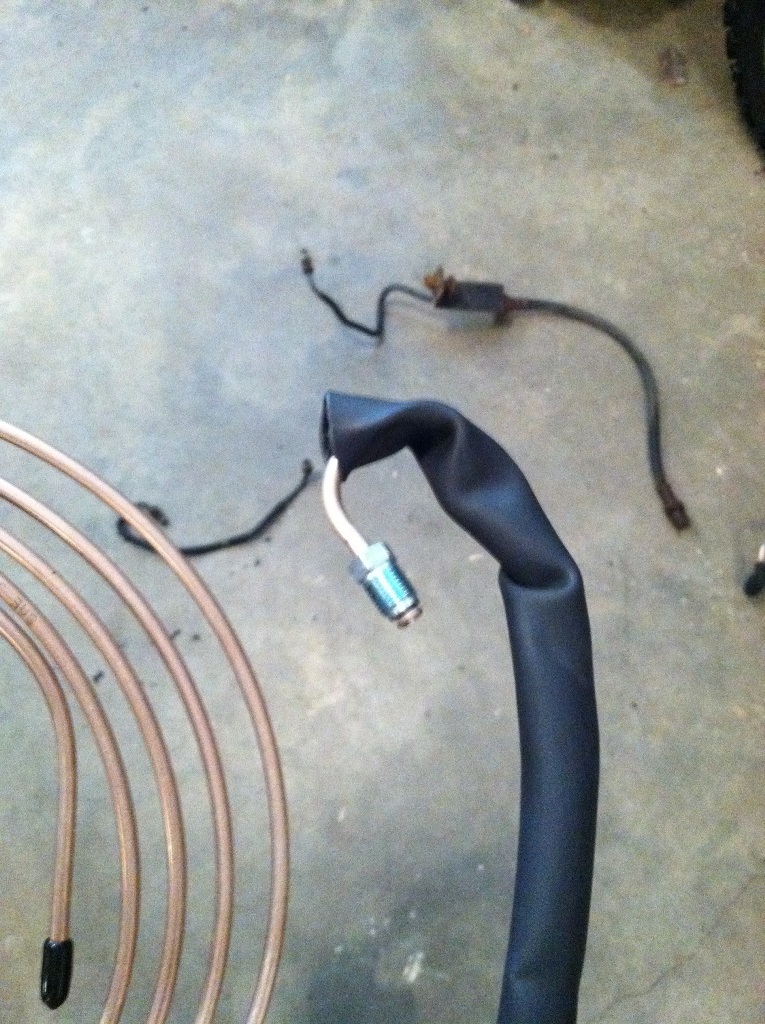
All shrunk on

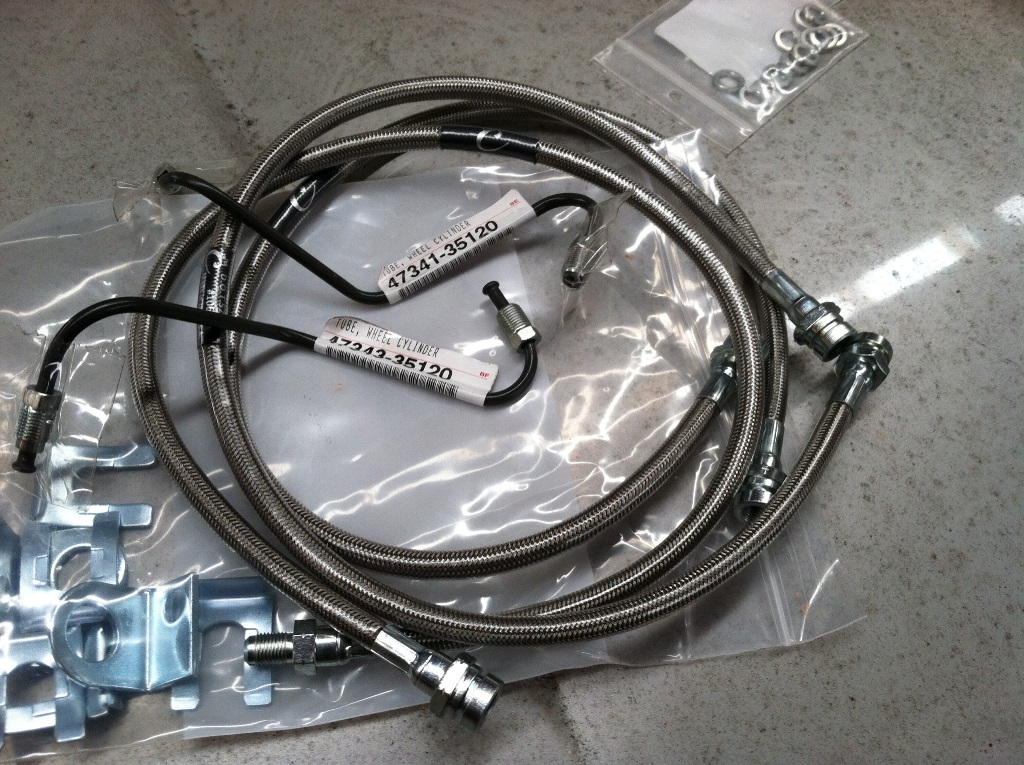
And here they are installed with the stainless lines
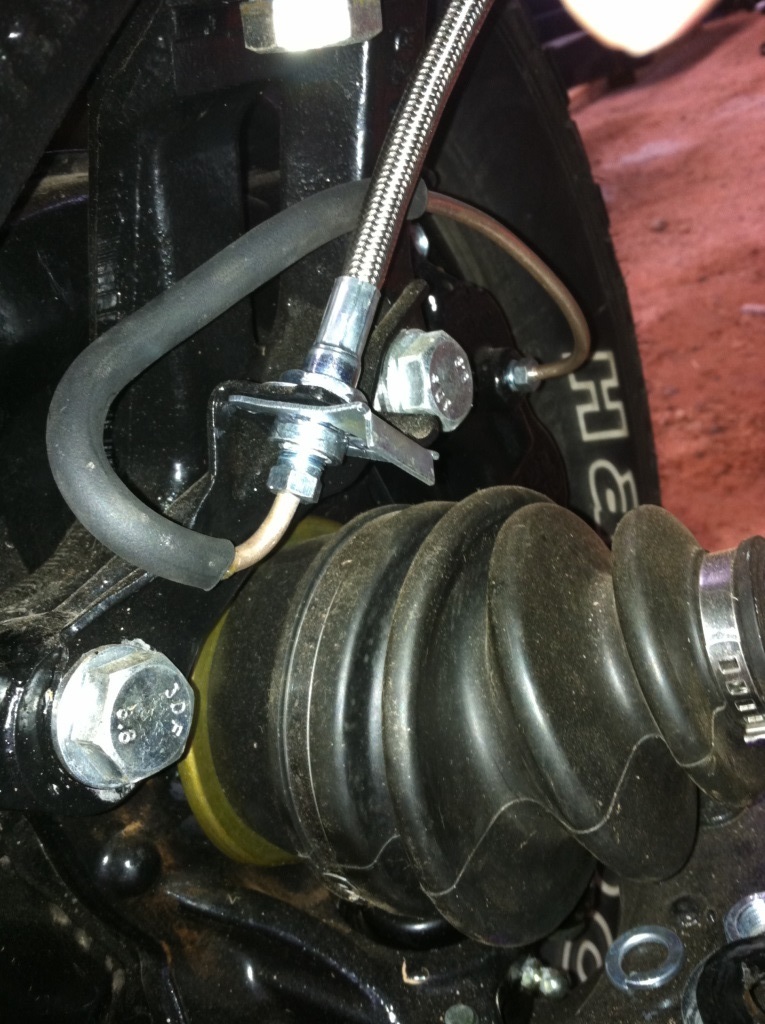
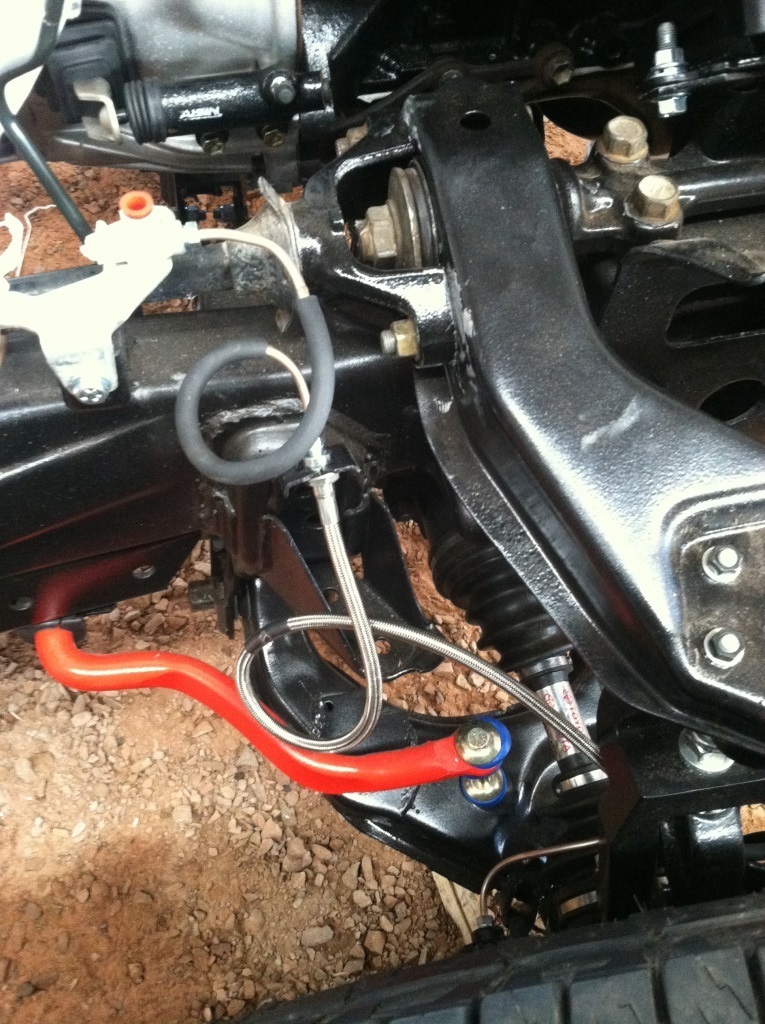
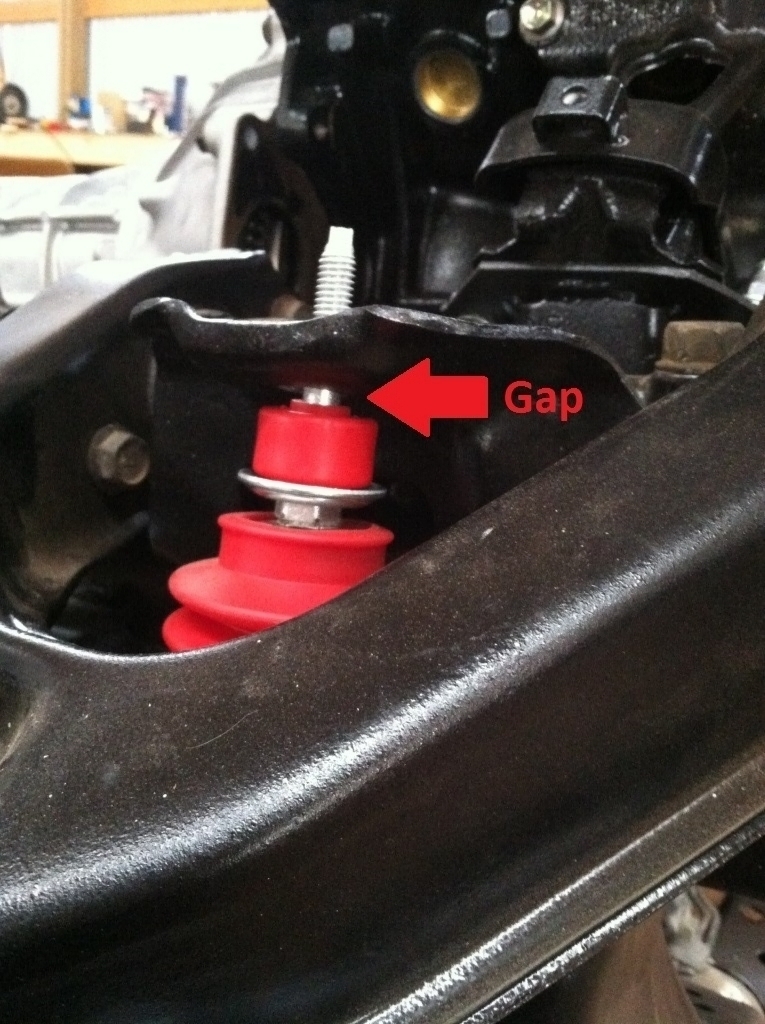
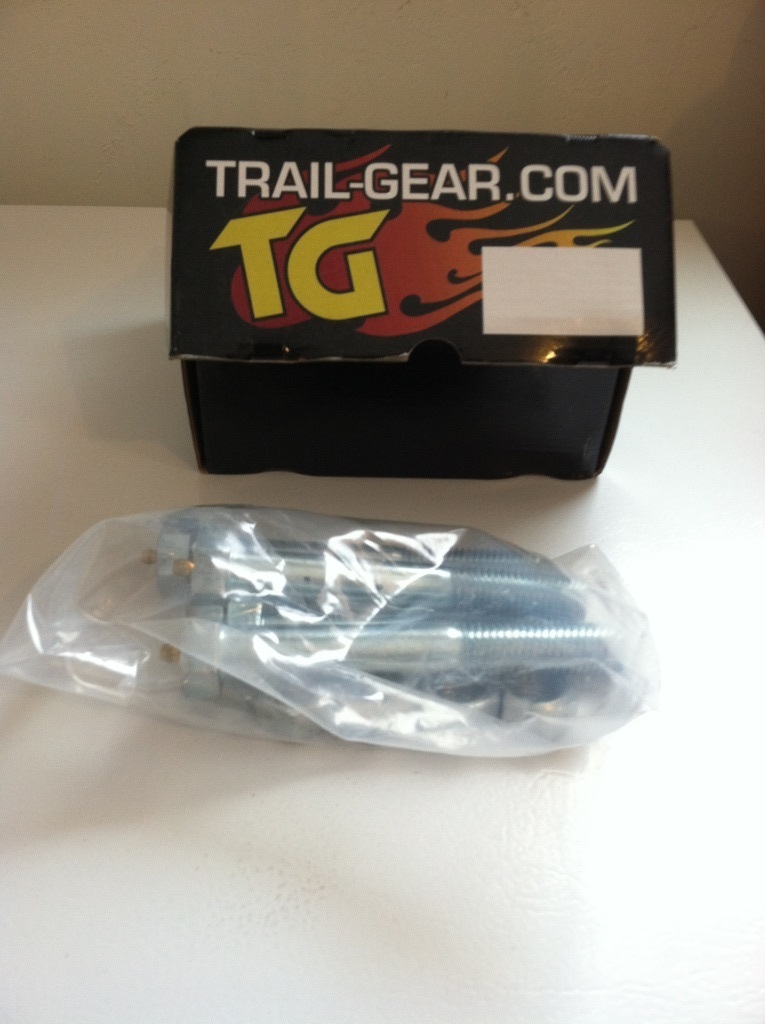
Got the 130mm zerk'd bolts from TG to replace the Marlin 120's. Perfect fit! Marlin sent spacers a while back so that cleaned up the gaps. They also sent some longer bushings. The two long bushings wouldn't fit but a combo of 1 long and 1 short worked great and shortened that gap too.
TG bolts
Bushings installed with a much smaller gap between the two..
Everything installed including tires! Look at that awful shackle angle Might have to fix that. Will see what happens when everything gets dropped on the frame. It was like this before with the skyjacker springs... You can also see the stainless TG lines and the Marlin line going to the new brake junction on the rear. I didn't bolt everything to the axle yet.

Worked on the brakes...Put new tees in...
Front - 90413-10233
Rear - 90413-10162

Bought the stainless steel brake line kit from Marlin Crawler... They don't come with a washer to seat them in the mounts. They do come with new mounting tabs but I don't think it's necessary. Just use the old mounting locations on the frame. I went to the local hardware store and bought some 5/8" machine bushings. Basically washers but not as wide. Here's the kit from Marlin but ignore the steel lines. I was initially going to use these for the fronts but they're not exactly formed correctly. I ended up making my own.
Bought nickel-copper line off of amazon


My original lines had some plastic around the line for added protection. I bought some thick walled heat shrink tubing to try and replicate... I think it turned out pretty good. I found it best to make the bends and then put the tubing on. Lots of twisting will get the tubing right where you want it.
Heat shrink snaked up on the caliper line

All shrunk on

And here they are installed with the stainless lines


Got the 130mm zerk'd bolts from TG to replace the Marlin 120's. Perfect fit! Marlin sent spacers a while back so that cleaned up the gaps. They also sent some longer bushings. The two long bushings wouldn't fit but a combo of 1 long and 1 short worked great and shortened that gap too.
TG bolts

Bushings installed with a much smaller gap between the two..

Everything installed including tires! Look at that awful shackle angle
Might have to fix that. Will see what happens when everything gets dropped on the frame. It was like this before with the skyjacker springs... You can also see the stainless TG lines and the Marlin line going to the new brake junction on the rear. I didn't bolt everything to the axle yet.

 03-26-2016, 05:55 PM
#64

Maybe you already went over this in a previous post. But are those new toyota cv driveshafts? If so, did you get them from the dealership?
Also killer work on those brake lines
Also killer work on those brake lines
03-27-2016, 04:39 PM
#65
Registered User
Thread Starter
Join Date: Jun 2015
Location: WI
Posts: 147
Likes: 0
Received 0 Likes
on
0 Posts
43430-35012-84
The online place even paid for the return shipping so I got the full $150 back on my 2 cores.
Thanks for the compliment on the brake lines. They turned out great and I shouldn't have any rust issues ever again with em!
03-27-2016, 07:16 PM
#66
Awesome, thanks for the part number. Did you get them from here? Cause I was going to ask about the shipping too.
http://www.toyotaoempartswarehouse.c...ota/4343035022
http://www.toyotaoempartswarehouse.c...ota/4343035022
03-28-2016, 03:37 PM
#67
Registered User
Thread Starter
Join Date: Jun 2015
Location: WI
Posts: 147
Likes: 0
Received 0 Likes
on
0 Posts
Awesome, thanks for the part number. Did you get them from here? Cause I was going to ask about the shipping too.
http://www.toyotaoempartswarehouse.c...ota/4343035022
http://www.toyotaoempartswarehouse.c...ota/4343035022
I'll save ya some time though as well as $13
 Shipping is another story tho
http://toyotaparts.bochtoyotasouth.c...a/434303501284
As always, make sure you do your DD to find the best rate and heck... If you find somewhere cheaper... I'd love to know!
 06-05-2016, 07:51 AM
#69
Registered User
Thread Starter
Join Date: Jun 2015
Location: WI
Posts: 147
Likes: 0
Received 0 Likes
on
0 Posts
Me either 4runners, me either! FINALLY able to get back at it more consistently now!
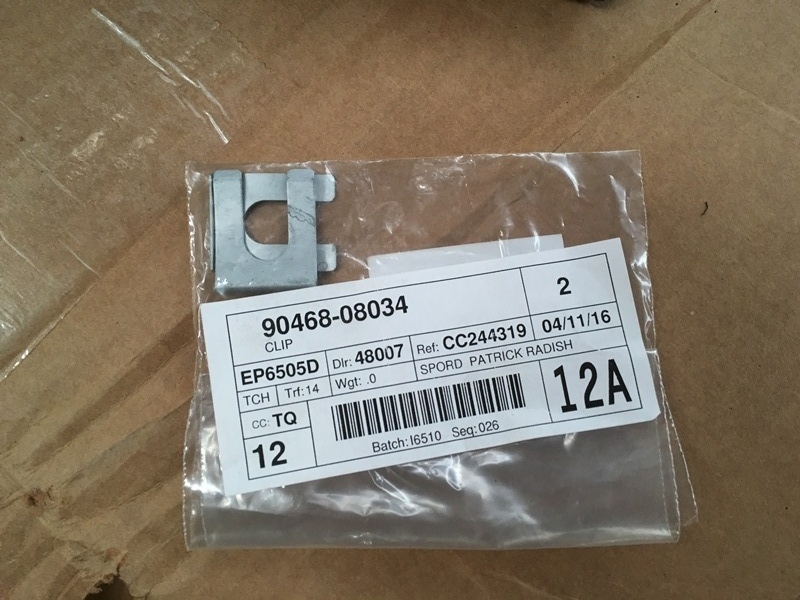
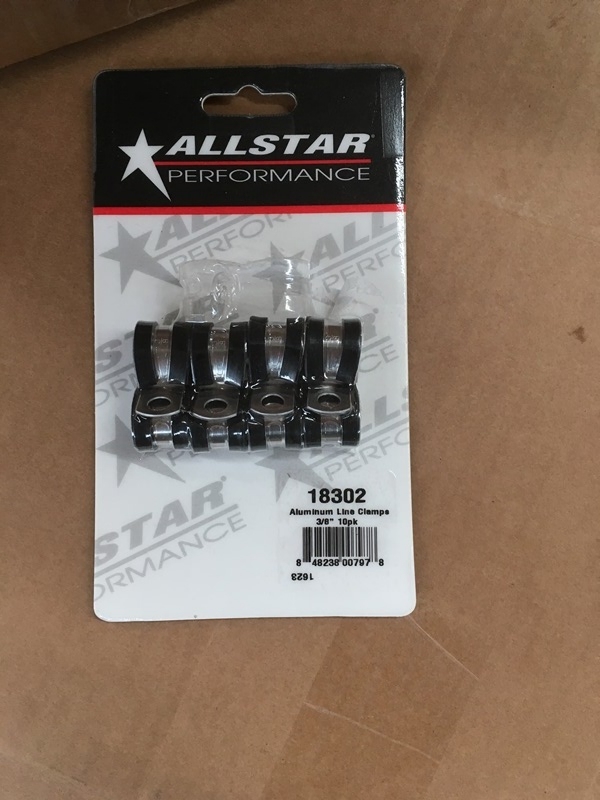
Finished dressing up the brake and fuel lines on the frame. If anyone gets the Stainless steel lines from Marlin the line clips didn't fit on the frame mounts. They're too thick so I looked at my old OEM ones I pulled from the frame. They looked much thinner so I ordered some from the dealer. Only issue was the gap wasn't wide enough so I took the die grinder to it to open it up a bit. Worked great
Brake clips - 90468-08034
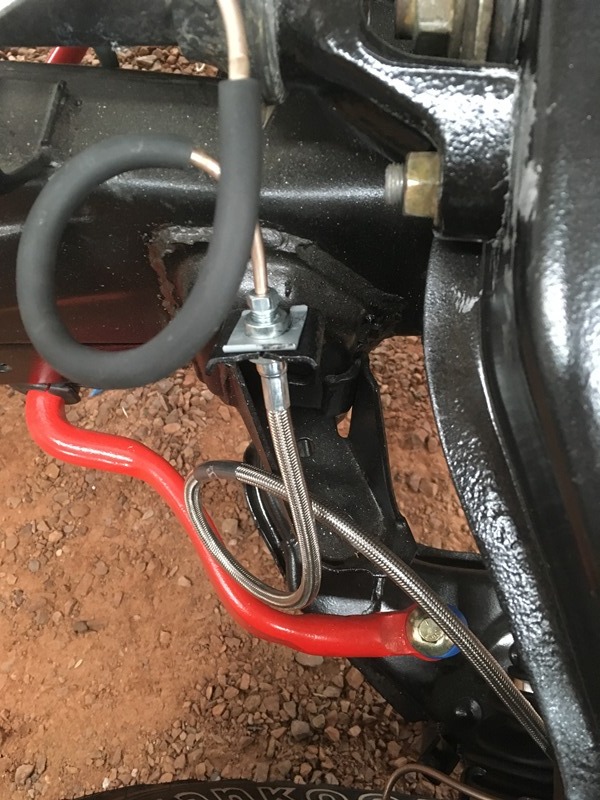
For the rear stainless lines I bought some 3/8" aluminum line clamps from amazon but probably could have went 1/4" because they're not real tight.
I ended up buying new OEM fuel hard lines. My line clamps were also in pretty rough shape so I bought new ones
Rear fuel tube part # 77252-35220
Front fuel tube part # 77251-35660
Grab bag of all the parts...
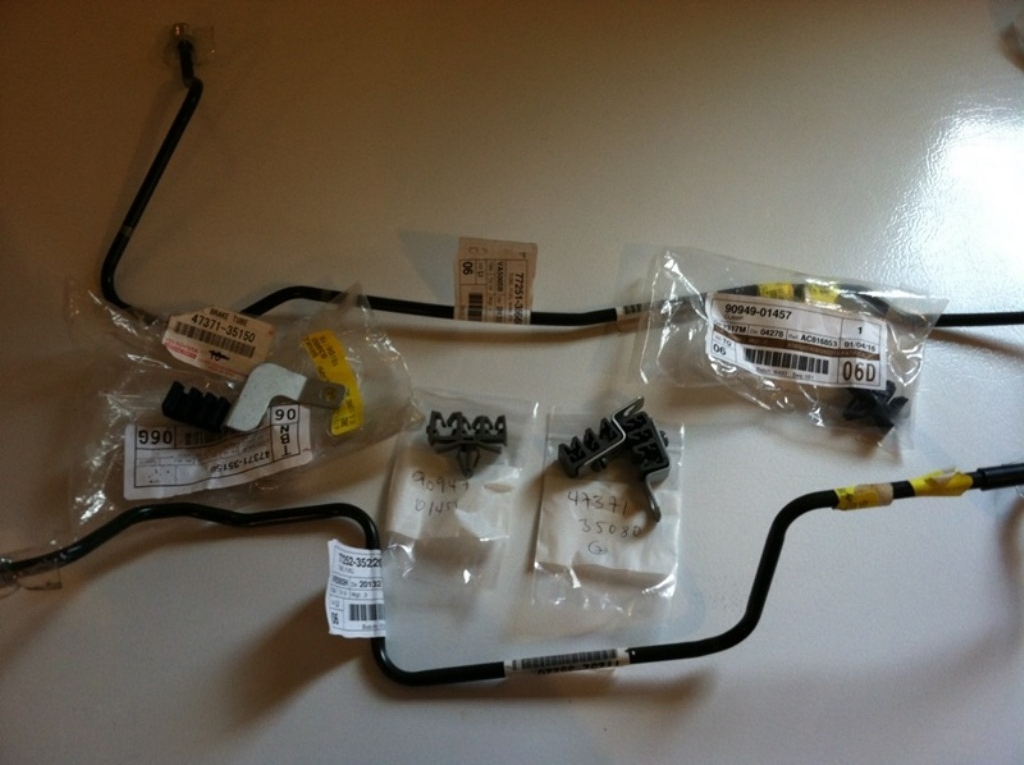
#1 Fuel tube - 23091-35020
#2 Clamp - 47371-35150
#3 Clamp - 90949-01459
#4 Clamp - 47373-35050
#5 Clamp - 47371-35080 (2 of them)
#6 Clamp/Shield - 90949-01289
#7 Clamp - 90949-01576 (I used this one because it fit better than the one the IPB calls for)
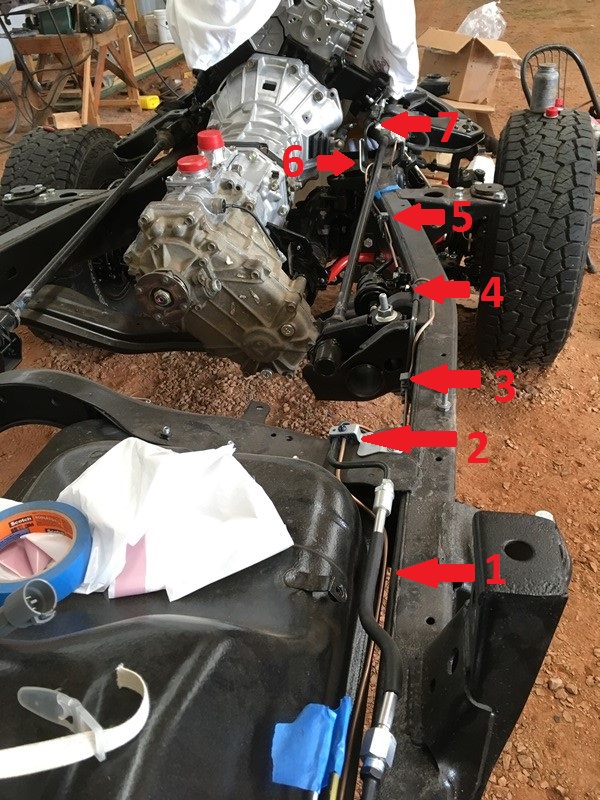
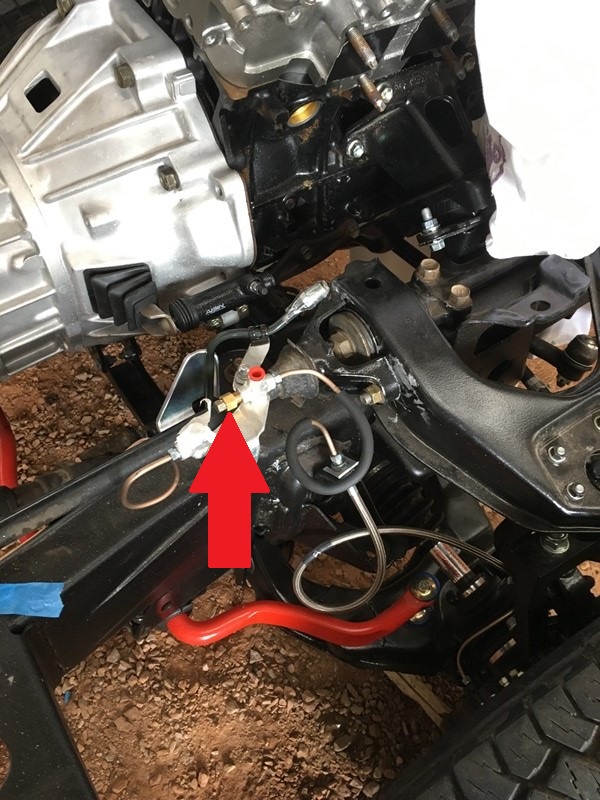
Instead of making a brake line plug I went to NAPA and picked up some weatherhead parts. I couldn't find a metric flared plug anywhere so I went metric to SAE.
Weatherhead 1443 - metric to SAE
Weatherhead 131x3 - SAE plug
Finished dressing up the brake and fuel lines on the frame. If anyone gets the Stainless steel lines from Marlin the line clips didn't fit on the frame mounts. They're too thick so I looked at my old OEM ones I pulled from the frame. They looked much thinner so I ordered some from the dealer. Only issue was the gap wasn't wide enough so I took the die grinder to it to open it up a bit. Worked great
Brake clips - 90468-08034


For the rear stainless lines I bought some 3/8" aluminum line clamps from amazon but probably could have went 1/4" because they're not real tight.


I ended up buying new OEM fuel hard lines. My line clamps were also in pretty rough shape so I bought new ones
Rear fuel tube part # 77252-35220
Front fuel tube part # 77251-35660
Grab bag of all the parts...

#1 Fuel tube - 23091-35020
#2 Clamp - 47371-35150
#3 Clamp - 90949-01459
#4 Clamp - 47373-35050
#5 Clamp - 47371-35080 (2 of them)
#6 Clamp/Shield - 90949-01289
#7 Clamp - 90949-01576 (I used this one because it fit better than the one the IPB calls for)

Instead of making a brake line plug I went to NAPA and picked up some weatherhead parts. I couldn't find a metric flared plug anywhere so I went metric to SAE.
Weatherhead 1443 - metric to SAE
Weatherhead 131x3 - SAE plug
 06-06-2016, 06:04 AM
#70
Registered User
Thread Starter
Join Date: Jun 2015
Location: WI
Posts: 147
Likes: 0
Received 0 Likes
on
0 Posts
I worried about my "fabrication skills" with the crossover pipe so I shipped it out to ToyOnlySwaps. Well... the fab as well as the time. Lots piling up as usual so I'm having them do the harness too. Sorry everyone, was hoping to make another wiring harness write-up but it's gotta get done.
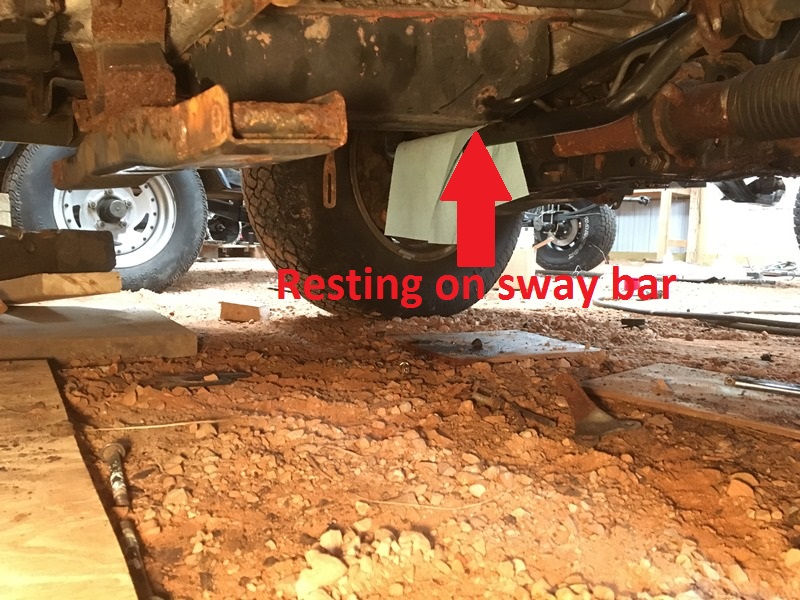
For those pulling the crossover pipe out of their donor... Easiest way, in my opinion, would be to remove the transmission. The cooler pipes were rusted on with this vehicle and I couldn't break them loose so it stayed. Not sure if an engine pull would be the next best thing but I wanted to use it for reference during the swap.
I ended up pulling the passenger side exhaust and intake manifold out, disconnected the driveshafts, dropped the rear of the transmission as far as I could, and then jacked up both sides of the body to get enough room for the pipe to roll over the transmission and exit the passenger side. This was after many many failed attempts doing other things. If you can remove the sway bar, maybe the transmission would drop further making more room. Of course on this donor vehicle, it was rusted solid so the transmission would only lower as far as the sway bar before resting on it. I came close to taking a cutting wheel to it but things worked out in the end. Surprisingly, a hell of a job and I'm glad it's out of the way but this was my experience here. Maybe there's an easier way. Here's a few pics...
Air box removed
Upper intake removed
Passenger side studs were getting in the way when moving the pipe around. This was why it was removed. Many of the nuts wouldn't break loose so I think there was around 7 studs from the manifolds and the xover pipe that came completely out.

Passenger side manifold gone
Transmission dropped
And the pipe is finally coming off the side
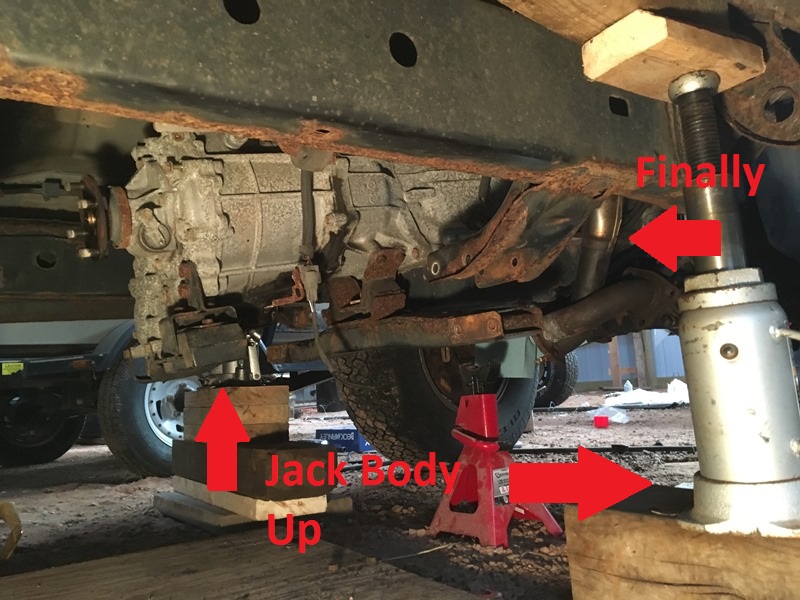
I only removed the front 3 body mount nuts when I jacked it up (near bumper and next two down the line). This picture shows I needed to have quite a bit of movement. It took a bit but something shifted and it moved another few inches up. This ended up being the steering shaft coming out of its sleeve. When I lowered it I put the shaft back into the sleeve so it could be controlled when I pushed it out of my barn...
For those pulling the crossover pipe out of their donor... Easiest way, in my opinion, would be to remove the transmission. The cooler pipes were rusted on with this vehicle and I couldn't break them loose so it stayed. Not sure if an engine pull would be the next best thing but I wanted to use it for reference during the swap.
I ended up pulling the passenger side exhaust and intake manifold out, disconnected the driveshafts, dropped the rear of the transmission as far as I could, and then jacked up both sides of the body to get enough room for the pipe to roll over the transmission and exit the passenger side. This was after many many failed attempts doing other things. If you can remove the sway bar, maybe the transmission would drop further making more room. Of course on this donor vehicle, it was rusted solid so the transmission would only lower as far as the sway bar before resting on it. I came close to taking a cutting wheel to it but things worked out in the end. Surprisingly, a hell of a job and I'm glad it's out of the way but this was my experience here. Maybe there's an easier way. Here's a few pics...
Air box removed

Upper intake removed

Passenger side studs were getting in the way when moving the pipe around. This was why it was removed. Many of the nuts wouldn't break loose so I think there was around 7 studs from the manifolds and the xover pipe that came completely out.

Passenger side manifold gone

Transmission dropped

And the pipe is finally coming off the side

I only removed the front 3 body mount nuts when I jacked it up (near bumper and next two down the line). This picture shows I needed to have quite a bit of movement. It took a bit but something shifted and it moved another few inches up. This ended up being the steering shaft coming out of its sleeve. When I lowered it I put the shaft back into the sleeve so it could be controlled when I pushed it out of my barn...

Last edited by duckhead; 06-09-2016 at 05:46 PM.
06-07-2016, 05:59 PM
#71
Registered User
Thread Starter
Join Date: Jun 2015
Location: WI
Posts: 147
Likes: 0
Received 0 Likes
on
0 Posts
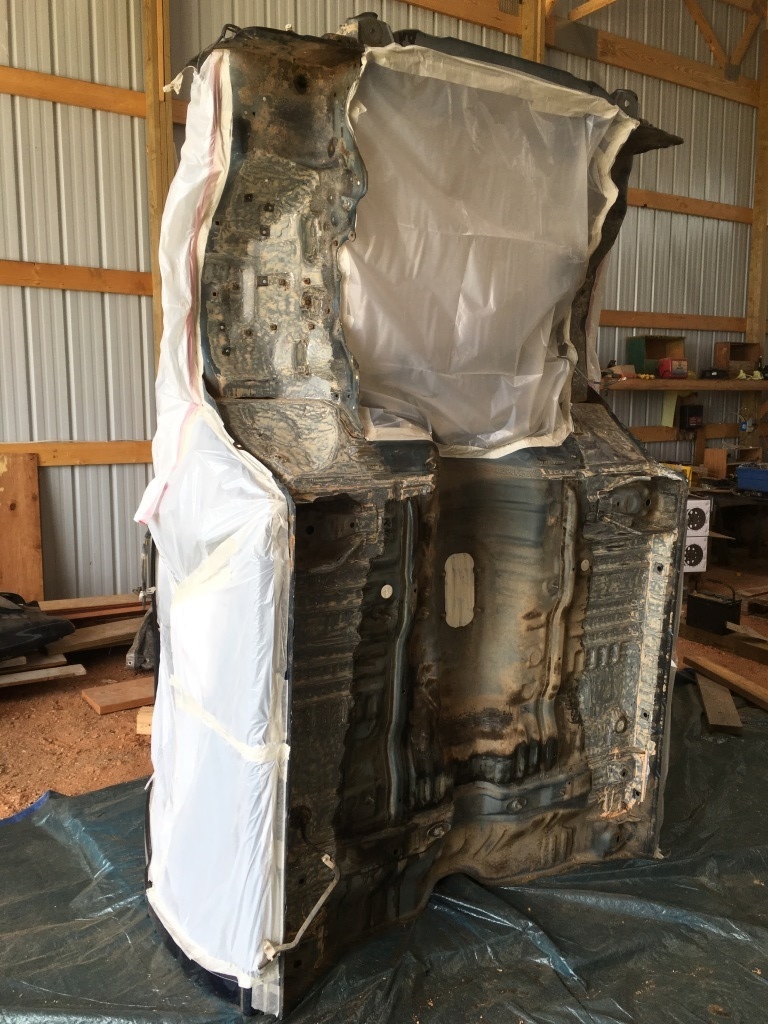
I moved on to the bottom of the cab. I put some greyboard insulation for cushion and stood the cab up on end;
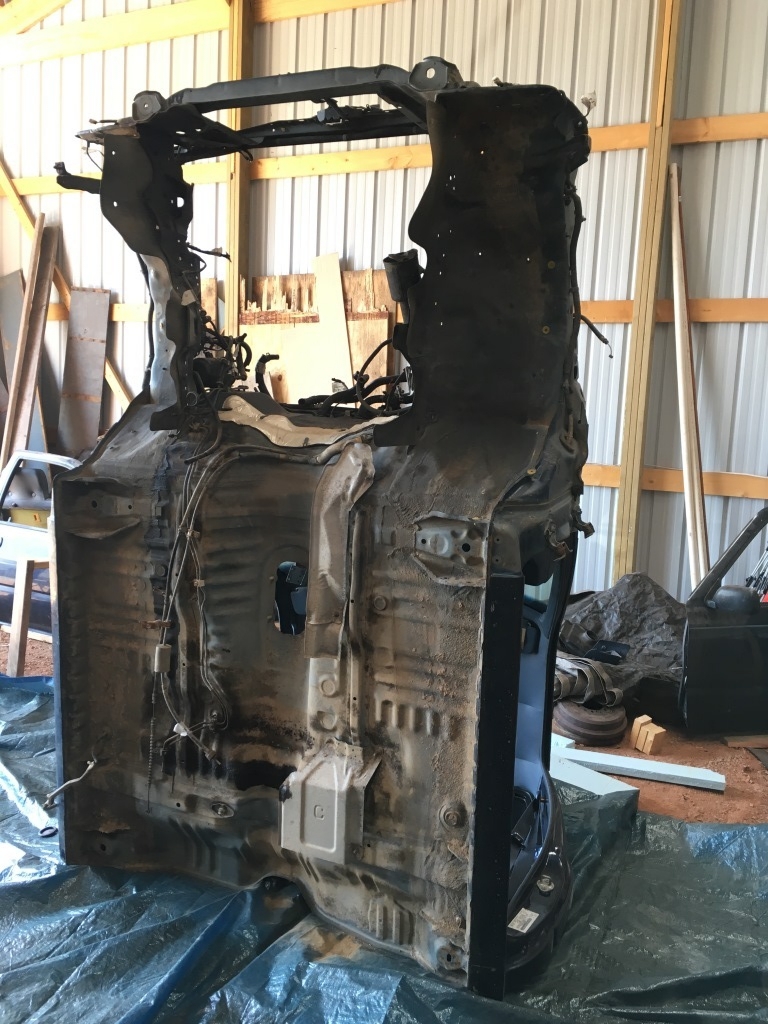
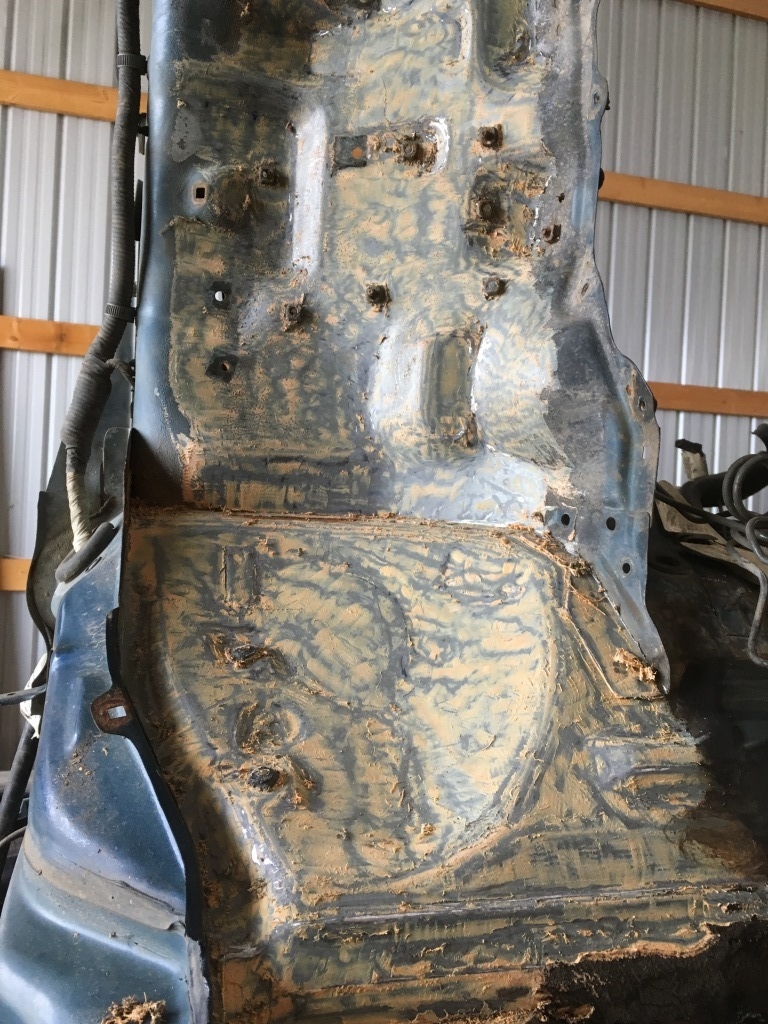
I started removing parts of the undercoating and it looked like this;
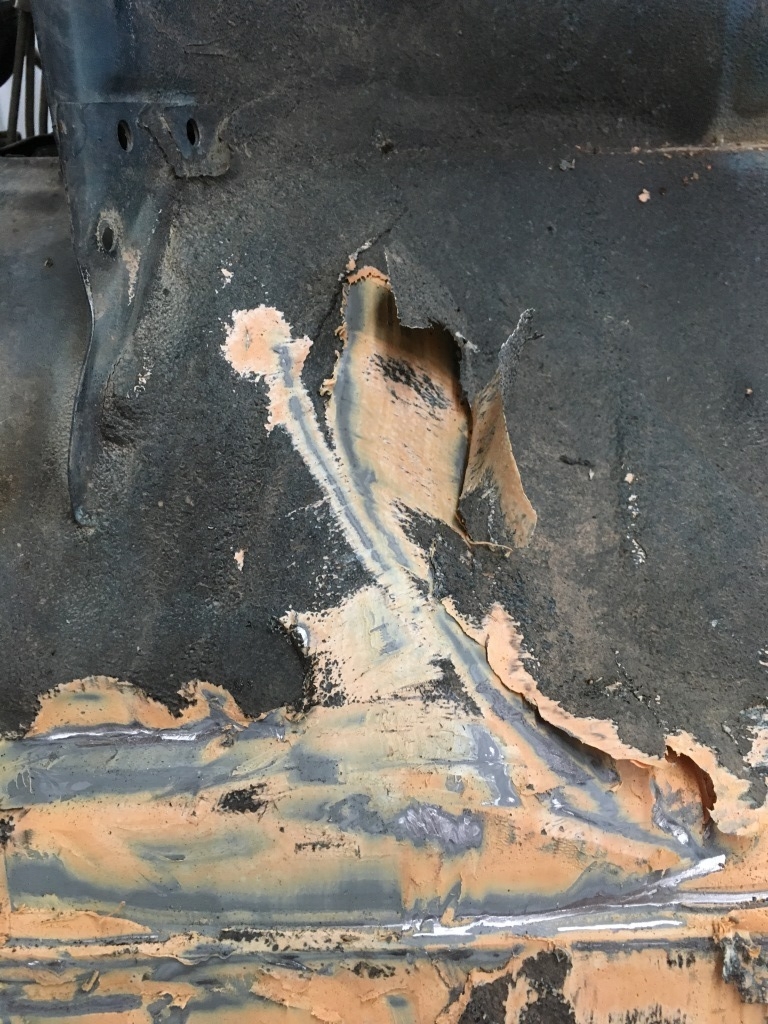
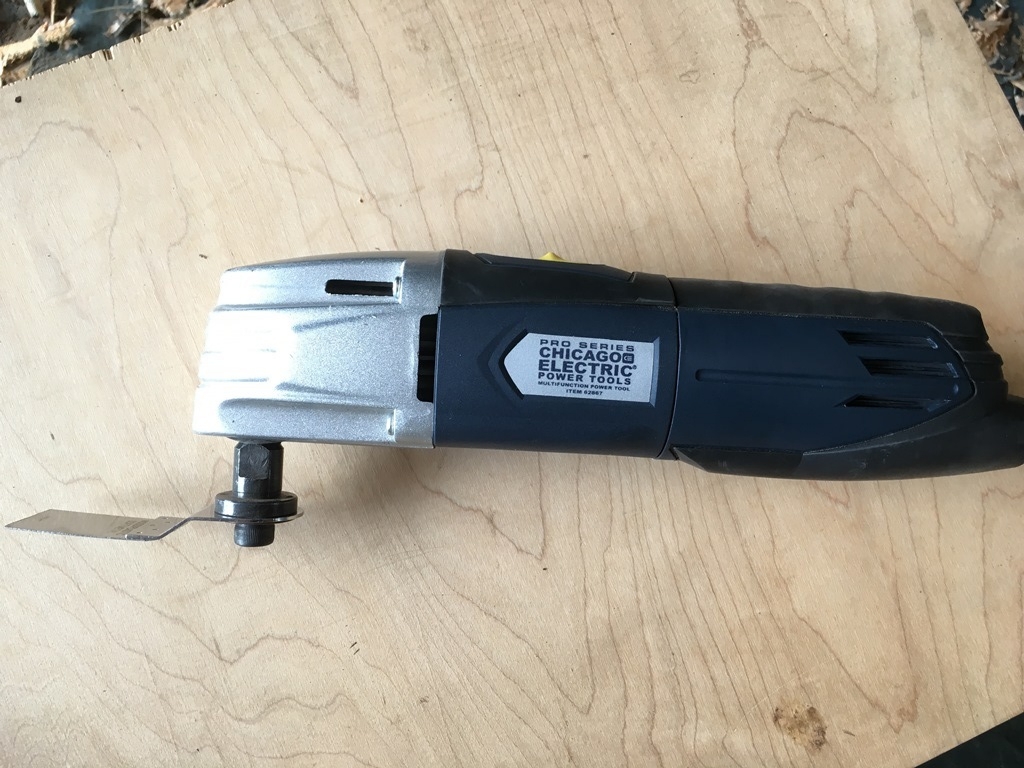
The paint was perfect with no issues. I called the Masterseries reps and my local body shop and both said to leave it and paint over the old undercoating. It wasn't crusty and hard but.... I worried there would be a spot I couldn't see rusting underneath. I went back and forth quite a few times but decided to strip it all. Ooooh boy.... My little sandblaster wouldn't go through it. I looked on the web for ideas and found great reviews with an oscillating tool from harbor freight so I went and picked one up with a coupon for around $25. Plus I resharpened the blades with my grinder.
This was the best thing I used. Needle scaler wouldn't work because my undercoating was too soft. Wire wheel cup on my grinder worked but the coating smoked and smelled. Health concerns made me stop. That and I didn't feel like it was working that great. This was when I switched to the above.
When part of it's skinned out it looks like this;
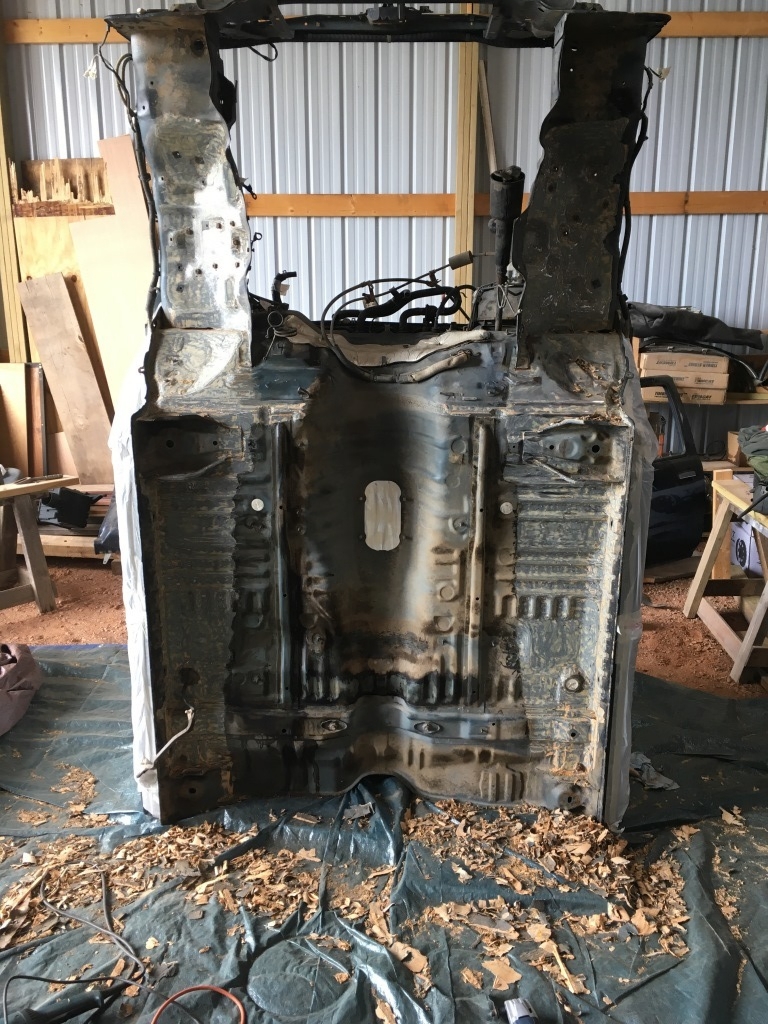
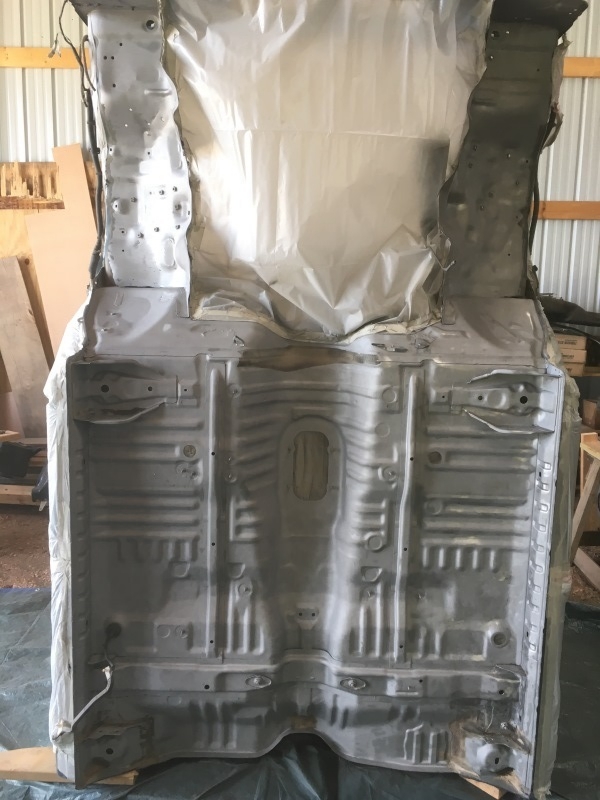
And here's the mess after it's all stripped. It was nice they didn't cover the whole bottom cuz this was a tedious process.
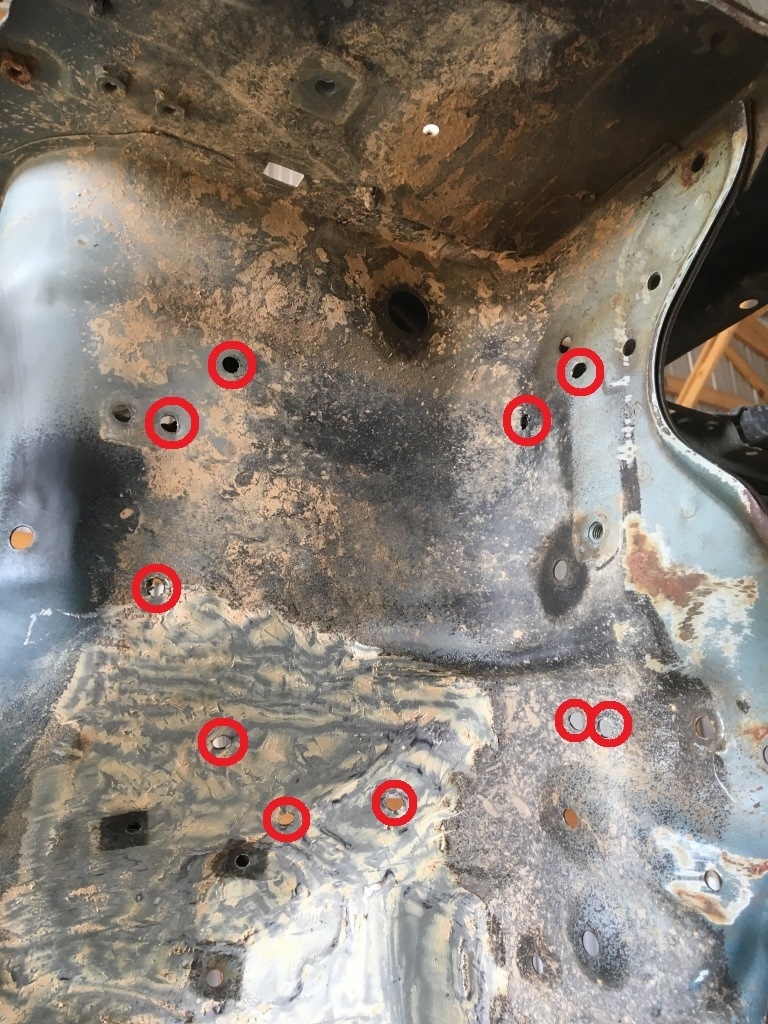
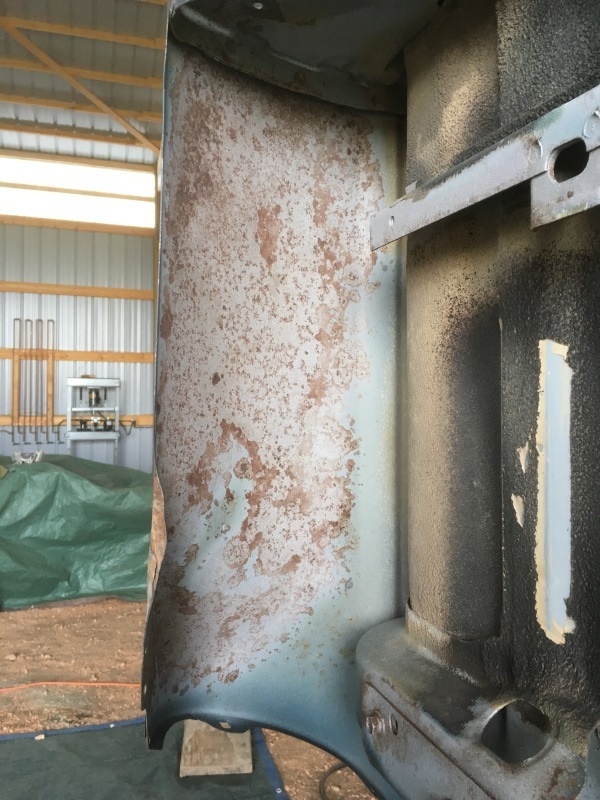
My old battery pan was like many of the others. Rusted as hell... Once the undercoating was stripped the spot welds were visible on the exterior so I drilled them out. Looking at the pics and trying to remember from earlier... I'm almost sure their were 10 spot welds. I circled them in red.
And here's the rusty SOB out of the engine bay;

Taped it up and ready to blast and paint!!! Trash bags worked great Later found some plastic for the engine bay.
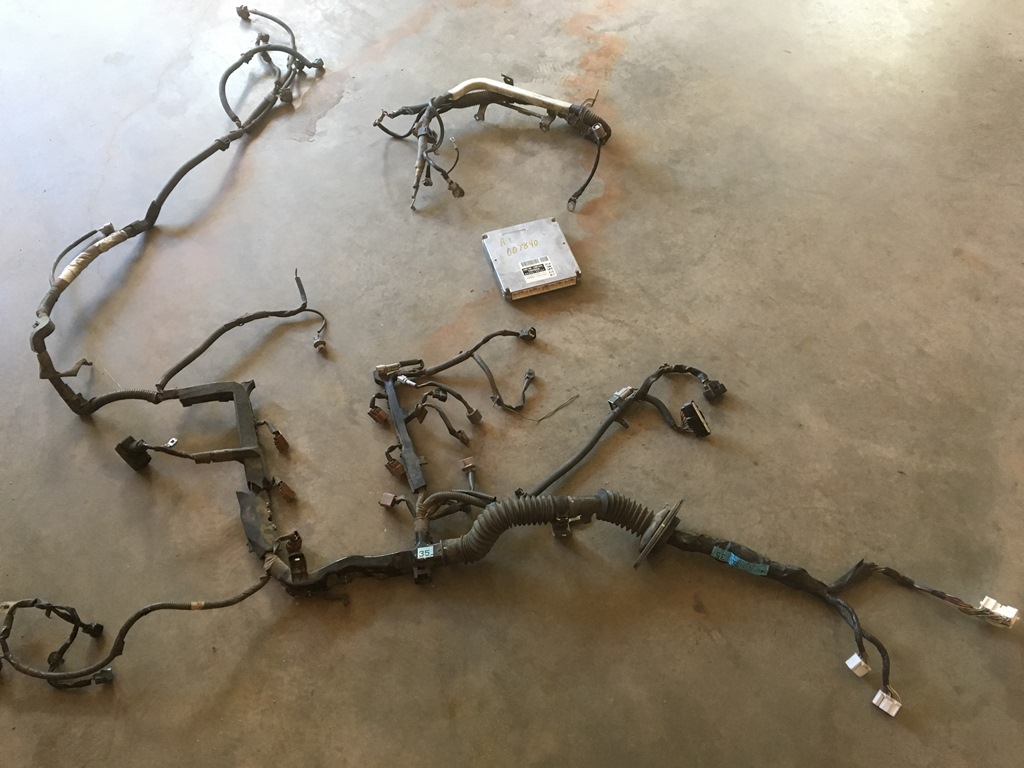
I also found a computer!!! 2000 manual 4runner came out on car-part and I got it for a steal... $50 Because it was so cheap I asked for the engine harness which was $100.
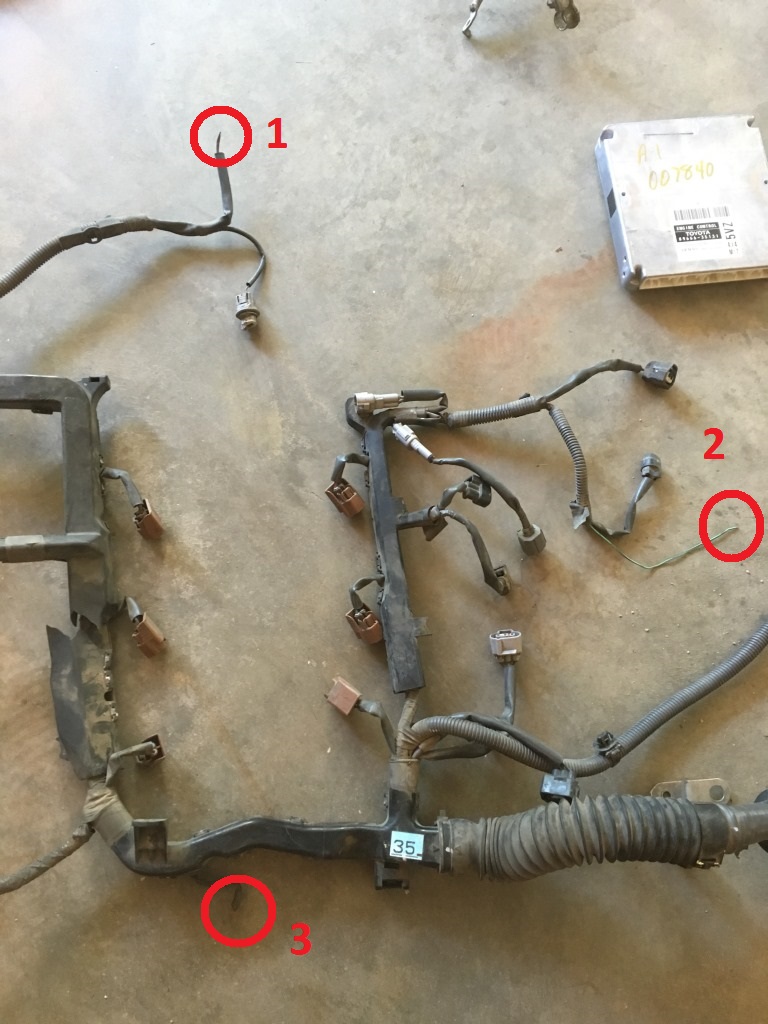
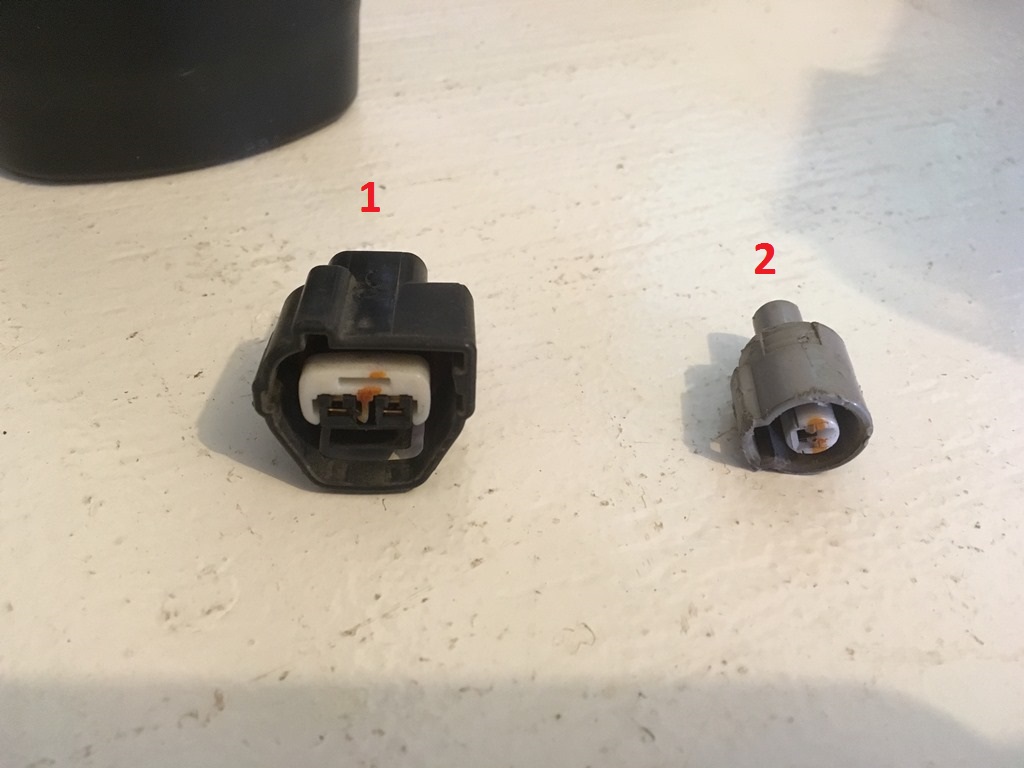
But... junkyard workers will be junkyard workers and they pulled out three plugs. They did send two of them which are 1 and 2 in the below picture. Number 3 wasn't sent but I think it was a ground???? Anyone know anything and feel like pointing me in the right direction I'd appreciate it I haven't bothered trying to track them down on the donor vehicle yet because I'm not at that point yet.

I started removing parts of the undercoating and it looked like this;

The paint was perfect with no issues. I called the Masterseries reps and my local body shop and both said to leave it and paint over the old undercoating. It wasn't crusty and hard but.... I worried there would be a spot I couldn't see rusting underneath. I went back and forth quite a few times but decided to strip it all. Ooooh boy....
My little sandblaster wouldn't go through it. I looked on the web for ideas and found great reviews with an oscillating tool from harbor freight so I went and picked one up with a coupon for around $25. Plus I resharpened the blades with my grinder. 
This was the best thing I used. Needle scaler wouldn't work because my undercoating was too soft. Wire wheel cup on my grinder worked but the coating smoked and smelled. Health concerns made me stop. That and I didn't feel like it was working that great. This was when I switched to the above.
When part of it's skinned out it looks like this;

And here's the mess after it's all stripped. It was nice they didn't cover the whole bottom cuz this was a tedious process.

My old battery pan was like many of the others. Rusted as hell... Once the undercoating was stripped the spot welds were visible on the exterior so I drilled them out. Looking at the pics and trying to remember from earlier... I'm almost sure their were 10 spot welds. I circled them in red.

And here's the rusty SOB out of the engine bay;

Taped it up and ready to blast and paint!!! Trash bags worked great
Later found some plastic for the engine bay.
I also found a computer!!! 2000 manual 4runner came out on car-part and I got it for a steal... $50
Because it was so cheap I asked for the engine harness which was $100. 
But... junkyard workers will be junkyard workers and they pulled out three plugs. They did send two of them which are 1 and 2 in the below picture. Number 3 wasn't sent but I think it was a ground???? Anyone know anything and feel like pointing me in the right direction I'd appreciate it
I haven't bothered trying to track them down on the donor vehicle yet because I'm not at that point yet.
 06-07-2016, 09:51 PM
#72
Love how you put up so much info in each post!
06-09-2016, 08:48 AM
#73
Registered User
Thread Starter
Join Date: Jun 2015
Location: WI
Posts: 147
Likes: 0
Received 0 Likes
on
0 Posts
Thanks yota dude! Figured it might help someone else some day
So the blasting is over. Feels great to have that out of the way. Just gotta paint it. Using the oscillating tool alone wasn't enough for the compressor my sand blaster uses. I used a grinder with a wire wheel cup to get the large areas and a small course drill attachment for the narrow spots. Touching up with the wire wheel was much better than trying to take it all off from the beginning. Still wasn't a whole lot of fun though I didn't take many pics during this process because it's just a bunch of sand blasting.
Surprisingly... My bed is shot I didn't know the seams were in such terrible shape. I say that loosely. I know others have beds that are falling apart. For me, this won't work for my end goal. I don't want a continuous patch/paint job. I made a call to Corey and he currently has a 2 year wait I don't have a choice so I'll be getting put in line for a fiberglass bed. The guy in PA went out of business and retired so he wasn't an option. I'll use this metal bed in the interim but won't be putting alot of work into it.
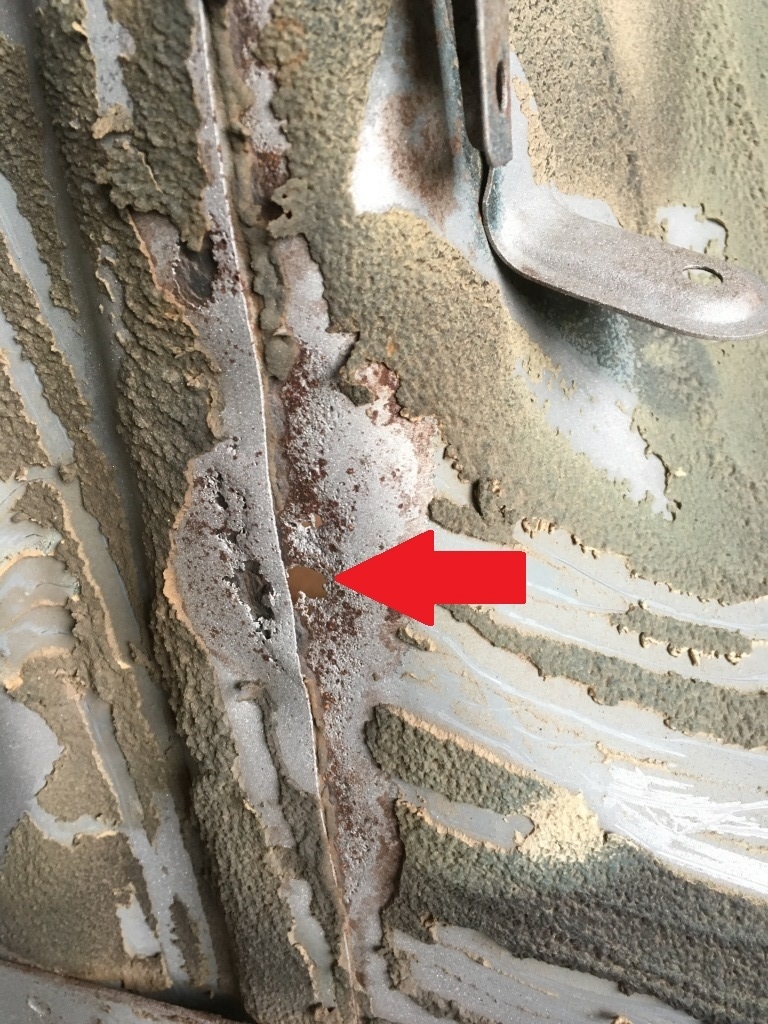
Here's the hole on the seam I blew through. There's some pretty good rust along a third of the seam.
And because of this... That's as far as the prep work I'm gonna give to the bed. For you minimalists, this will be for you I'm going to paint it as is to see how the Masterseries paints holds up... IN THE NAME OF SCIENCE!!! 
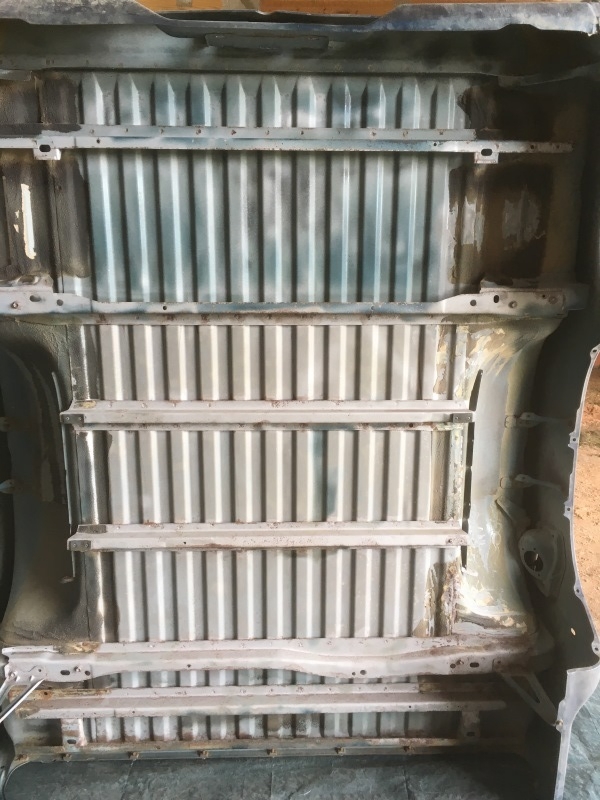
And here's the cab bottom. Left undercoating along seam in transmission well just to see how it holds up with the paint as an experiment. There wasn't any rust under any of the undercoat but better to be safe than sorry. Left the undercoating on at rear of cab near body mount locations...
So the blasting is over. Feels great to have that out of the way. Just gotta paint it. Using the oscillating tool alone wasn't enough for the compressor my sand blaster uses. I used a grinder with a wire wheel cup to get the large areas and a small course drill attachment for the narrow spots. Touching up with the wire wheel was much better than trying to take it all off from the beginning. Still wasn't a whole lot of fun though
I didn't take many pics during this process because it's just a bunch of sand blasting. Surprisingly... My bed is shot
I didn't know the seams were in such terrible shape. I say that loosely. I know others have beds that are falling apart. For me, this won't work for my end goal. I don't want a continuous patch/paint job. I made a call to Corey and he currently has a 2 year wait I don't have a choice so I'll be getting put in line for a fiberglass bed. The guy in PA went out of business and retired so he wasn't an option. I'll use this metal bed in the interim but won't be putting alot of work into it.Here's the hole on the seam I blew through. There's some pretty good rust along a third of the seam.

And because of this... That's as far as the prep work I'm gonna give to the bed. For you minimalists, this will be for you
I'm going to paint it as is to see how the Masterseries paints holds up... IN THE NAME OF SCIENCE!!! 

And here's the cab bottom. Left undercoating along seam in transmission well just to see how it holds up with the paint as an experiment. There wasn't any rust under any of the undercoat but better to be safe than sorry. Left the undercoating on at rear of cab near body mount locations...

Last edited by duckhead; 06-09-2016 at 05:46 PM.
06-10-2016, 07:43 PM
#74
Registered User
Thread Starter
Join Date: Jun 2015
Location: WI
Posts: 147
Likes: 0
Received 0 Likes
on
0 Posts
Well it's painted and boy does it look pretty I almost don't wanna shoot undercoat on it Business as usual... metal prepped with a few sponge brushes (they begin to tear and fall apart), sprayed 2 coats silver, then sprayed 2 coats AG111 black. No problems on the undercoat. Paint isn't cured yet but it doesn't rub off. Will scratch with nail once cured.
Now I know why scammers, who don't do the necessary prep work, paint the bottoms before they sell a vehicle. It looks great! Don't think I'd buy a vehicle with a freshly painted bottom unless there was a before picture.
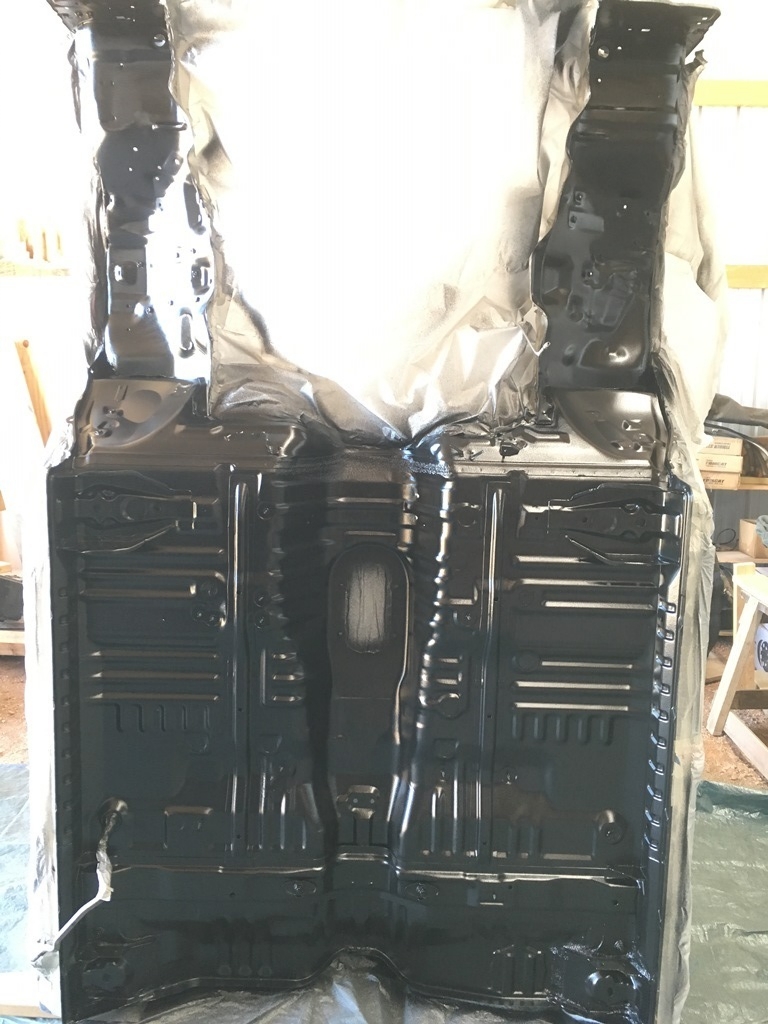
Undercoating is next! Going to only shoot the cab. Not worth sticking the money in the bed...
I almost don't wanna shoot undercoat on it Business as usual... metal prepped with a few sponge brushes (they begin to tear and fall apart), sprayed 2 coats silver, then sprayed 2 coats AG111 black. No problems on the undercoat. Paint isn't cured yet but it doesn't rub off. Will scratch with nail once cured. Now I know why scammers, who don't do the necessary prep work, paint the bottoms before they sell a vehicle. It looks great! Don't think I'd buy a vehicle with a freshly painted bottom unless there was a before picture.


Undercoating is next! Going to only shoot the cab. Not worth sticking the money in the bed...
Last edited by duckhead; 06-10-2016 at 07:44 PM.
06-10-2016, 09:01 PM
#75
Bummer! What about maybe buying a bed from another state? That'd be quicker than 2 years I'd say haha
 06-13-2016, 05:11 PM
#77
Registered User
Thread Starter
Join Date: Jun 2015
Location: WI
Posts: 147
Likes: 0
Received 0 Likes
on
0 Posts
I thought about this but then I weighed how hard it would be to find a decent bed without rust. I honestly thought my bed was in great shape underneath so I'd bust a vessel if I spent the time and money shipping/traveling to pickup a bed up only to find holes rusted through somewhere. Up here it would only be a matter of time before the rust chewed through it anyway The truck will look like crap for a couple of years with the old bed but the idea of a rust free bed for the rest of my life sounds pretty great
06-13-2016, 05:55 PM
#78
Registered User
Thread Starter
Join Date: Jun 2015
Location: WI
Posts: 147
Likes: 0
Received 0 Likes
on
0 Posts
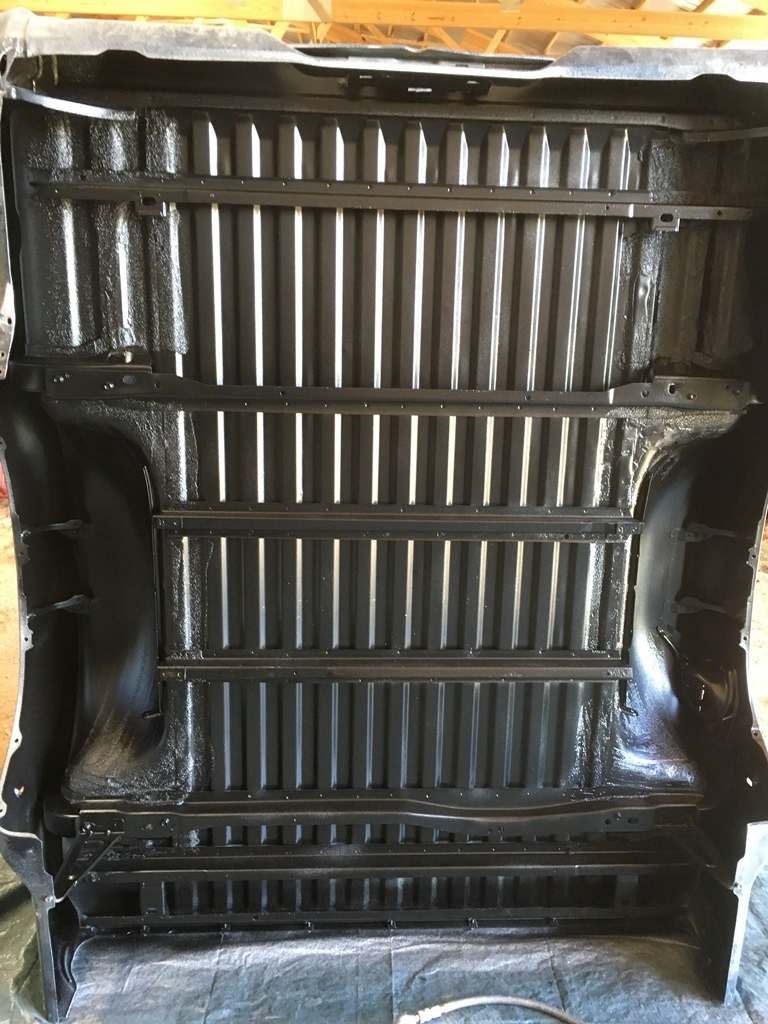
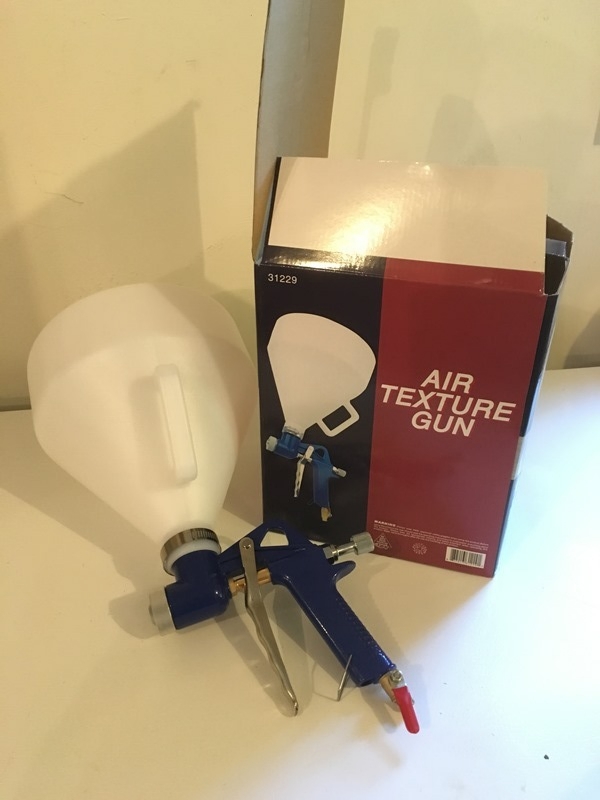
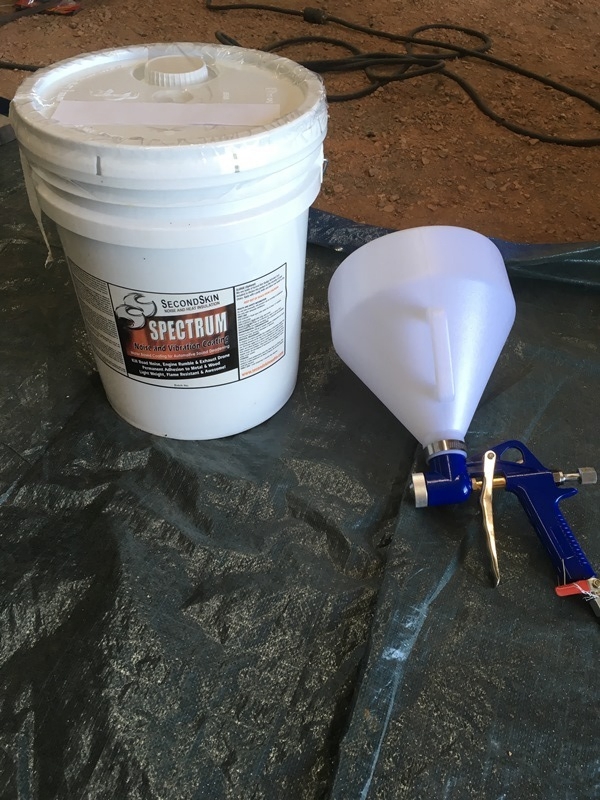
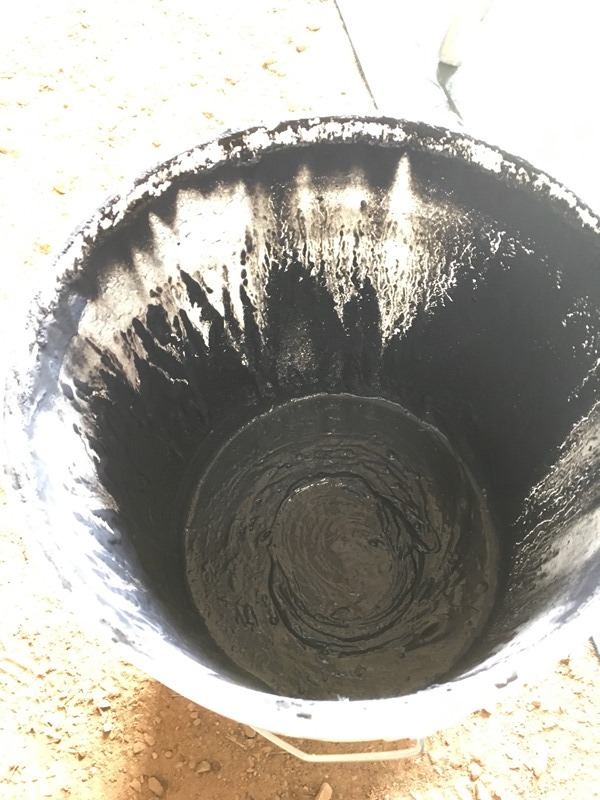
Knocked out the undercoat. Nice to do something where humidity has no effect on the outcome! I bought a "mud gun" or air texture gun as the box calls it to spray it. This is similar to the gun Al's Liner sells except this cost me around $23 on Amazon for the same exact thing Here's the gun
I researched and shopped for a long time. I had no idea what I wanted to go with. Even now I'm not sure if I went the right route. It was down to 3m Body Shutz, Dynatron Dyna-Pro (3m product), or Second Skin Spectrum. I juggled these in the shopping cart for weeks before the summer. I decided on Second Skin because they had a 20% off during... May day I think? Can't remember but I would never pay full price. They have sales pretty often. Just gotta keep your eyes peeled. I went 5 gallons because I had the intention of doing the bed too. Well you all know the story there... The bed didn't get a drop and I shot almost all of it on the cab. Way more than their recommended 3mm thick Didn't wanna waste it. Once open, rep told me it only lasts 60 days. Second skin also has excellent customer service btw
I taped off some seams that had a little rust. I didn't want to cover them up so trapped moisture could feed the cancer... I know, I used a "rust inhibitor" but I don't wanna tempt fate.
I used a 5 gallon bucket to hold the gun. Worked good later on. In this picture I loaded it up thinking I would shoot an entire gallon Yah that didn't happen. Had to pour it back in the bucket.
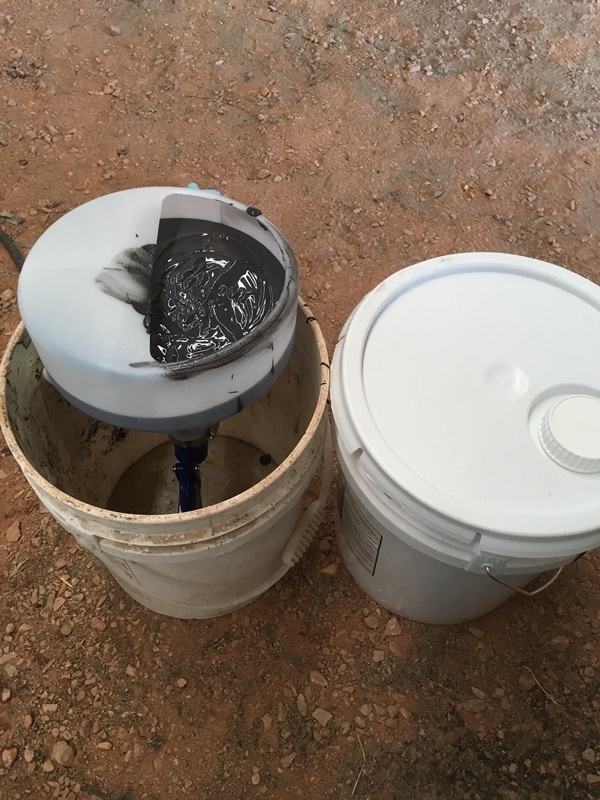
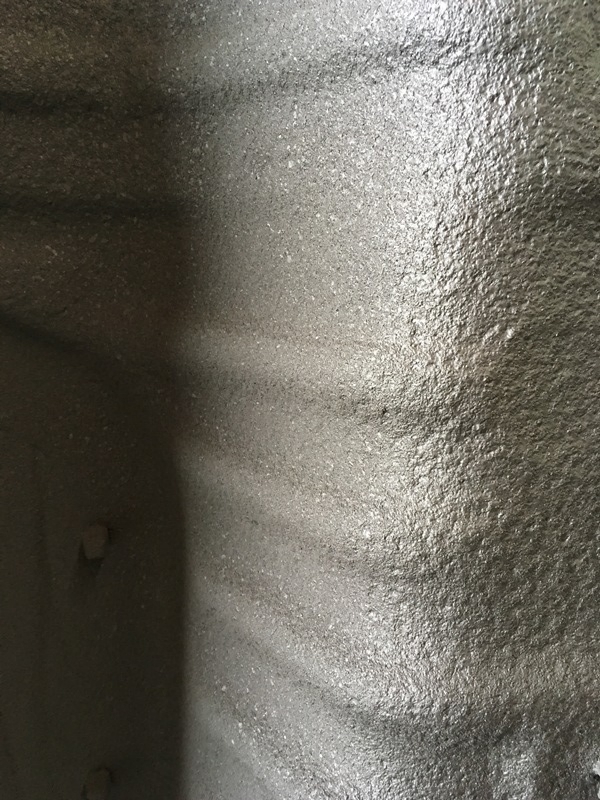
I used the 4.0 mm nozzle and don't think I'd recommend anything bigger if anyone goes this route. It really sprays out of it and looks great. I think a half to 3/4 gallon is safe bet for a single coat but 3/4 is quite heavy. Here's a wet coat from the beginning. I think this is my second at maximum half gallon... Keep in mind of the coverage area I'm doing.
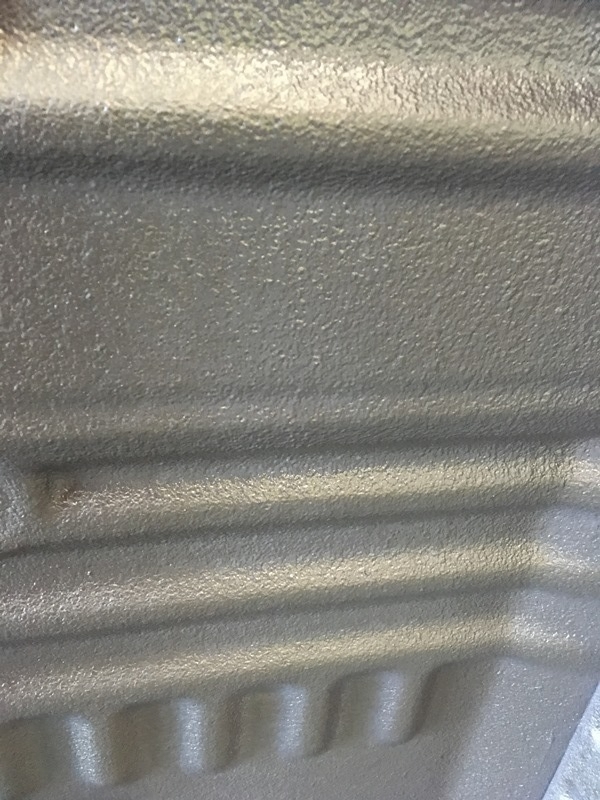
I really liked this look but wanted to get this moving. I started spraying heavier (1/2 to 3/4) and this is the texture I got. Looks alot like the orange peel that monsta-liner gives. This pic looks glossy because it's still wet. It dries a flat black...
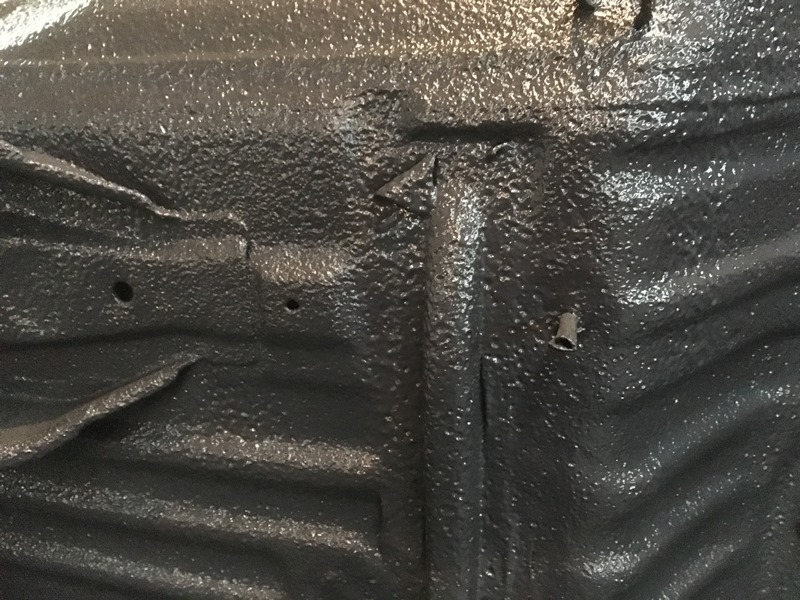
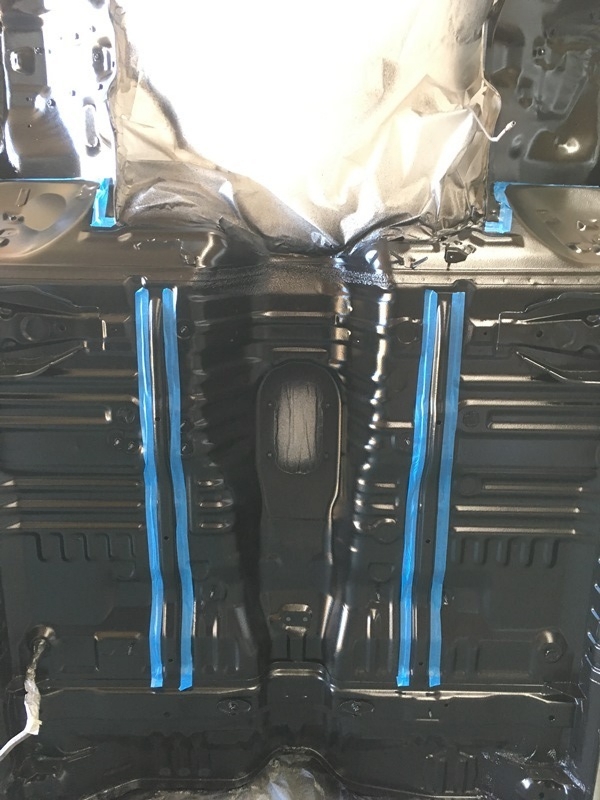
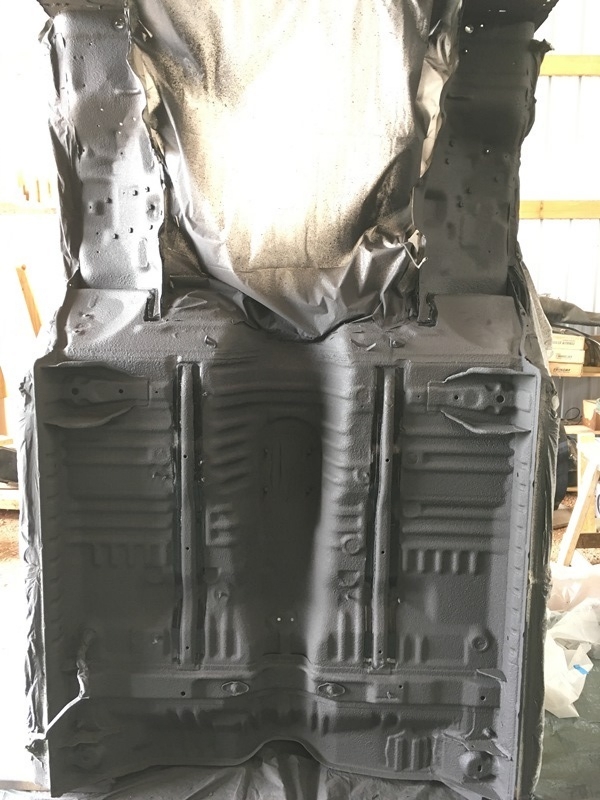
But I personally liked the look of the first picture better so I layed 2 coats out and "fogged" it. Held it away further and sprayed lighter coats. This brought it back to the other texture and here it is
And here's the finished product
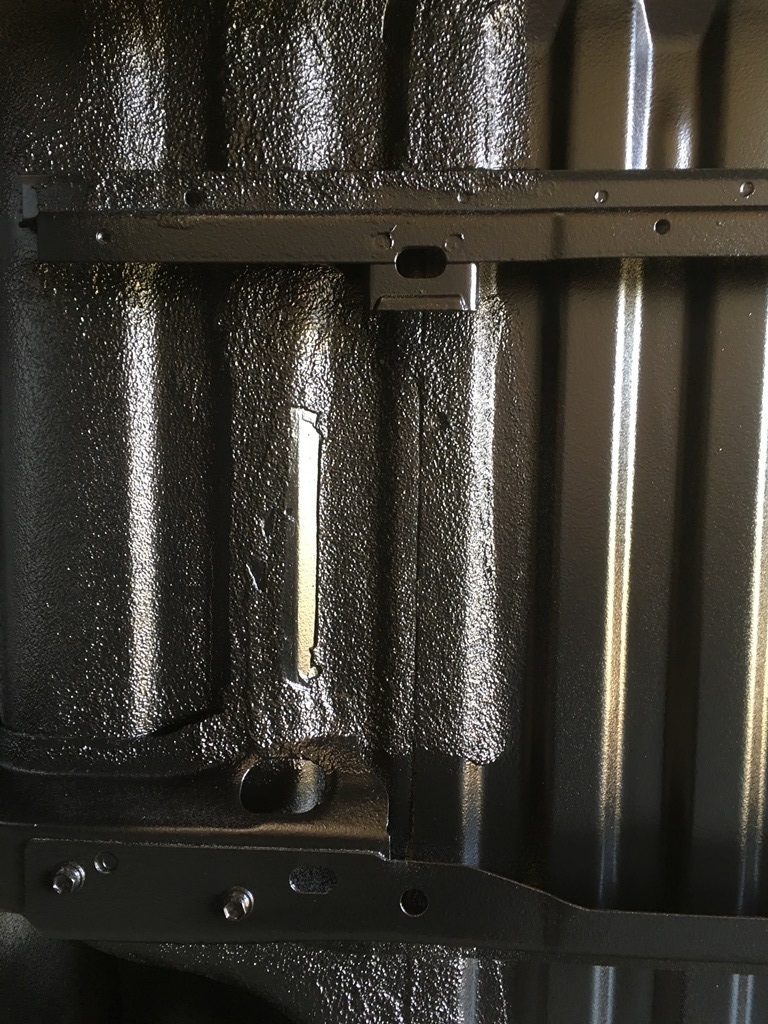
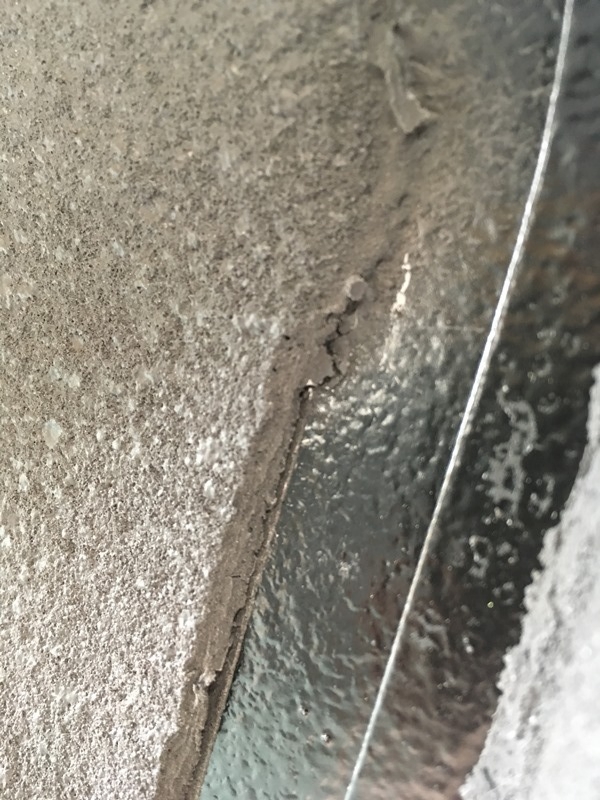
I forgot to remove the tape from the seams while it was still wet. The first layer gripped tight, but the other layers I added on afterwards peeled a bit with the tape. I almost shat myself... I did this in 2 days which is okay. I talked to Second Skin and they pointed it out that I should have removed the tape while it was still wet. Obviously... But he said not to worry. Just take some of my leftover and seal up the separations and he said there shouldn't be an issue. This picture will give you and idea what I was talking about as well as the thickness I put on.
So I used my finger to apply it along the whole "seam" like caulk. Worked good. No need for gloves... water based and nontoxic
I probably have a gallon left over to do my front fenders and maybe the inner part of my doors if I feel motivated. Here's the leftover
Gonna let it cure and then I'll drop it to take everything out of the engine bay in preparation to send it to the paint shop....
Here's the gun
I researched and shopped for a long time. I had no idea what I wanted to go with. Even now I'm not sure if I went the right route. It was down to 3m Body Shutz, Dynatron Dyna-Pro (3m product), or Second Skin Spectrum. I juggled these in the shopping cart for weeks before the summer. I decided on Second Skin because they had a 20% off during... May day I think? Can't remember but I would never pay full price. They have sales pretty often. Just gotta keep your eyes peeled. I went 5 gallons because I had the intention of doing the bed too. Well you all know the story there... The bed didn't get a drop and I shot almost all of it on the cab. Way more than their recommended 3mm thick
Didn't wanna waste it. Once open, rep told me it only lasts 60 days. Second skin also has excellent customer service btw 
I taped off some seams that had a little rust. I didn't want to cover them up so trapped moisture could feed the cancer... I know, I used a "rust inhibitor" but I don't wanna tempt fate.

I used a 5 gallon bucket to hold the gun. Worked good later on. In this picture I loaded it up thinking I would shoot an entire gallon
Yah that didn't happen. Had to pour it back in the bucket.
I used the 4.0 mm nozzle and don't think I'd recommend anything bigger if anyone goes this route. It really sprays out of it and looks great. I think a half to 3/4 gallon is safe bet for a single coat but 3/4 is quite heavy. Here's a wet coat from the beginning. I think this is my second at maximum half gallon... Keep in mind of the coverage area I'm doing.

I really liked this look but wanted to get this moving. I started spraying heavier (1/2 to 3/4) and this is the texture I got. Looks alot like the orange peel that monsta-liner gives. This pic looks glossy because it's still wet. It dries a flat black...

But I personally liked the look of the first picture better so I layed 2 coats out and "fogged" it. Held it away further and sprayed lighter coats. This brought it back to the other texture and here it is

And here's the finished product

I forgot to remove the tape from the seams while it was still wet. The first layer gripped tight, but the other layers I added on afterwards peeled a bit with the tape. I almost shat myself... I did this in 2 days which is okay. I talked to Second Skin and they pointed it out that I should have removed the tape while it was still wet. Obviously...
But he said not to worry. Just take some of my leftover and seal up the separations and he said there shouldn't be an issue. This picture will give you and idea what I was talking about as well as the thickness I put on.
So I used my finger to apply it along the whole "seam" like caulk. Worked good. No need for gloves... water based and nontoxic
I probably have a gallon left over to do my front fenders and maybe the inner part of my doors if I feel motivated. Here's the leftover

Gonna let it cure and then I'll drop it to take everything out of the engine bay in preparation to send it to the paint shop....
07-01-2016, 08:46 PM
#80
Registered User
Thread Starter
Join Date: Jun 2015
Location: WI
Posts: 147
Likes: 0
Received 0 Likes
on
0 Posts
Thanks shoes! Been really busy the last month... Hoping to have some time to drill down on this. Got a few things moving... Nice to get moving on the 3.4 swap. But boy... parts got expensive reeeeal quick.
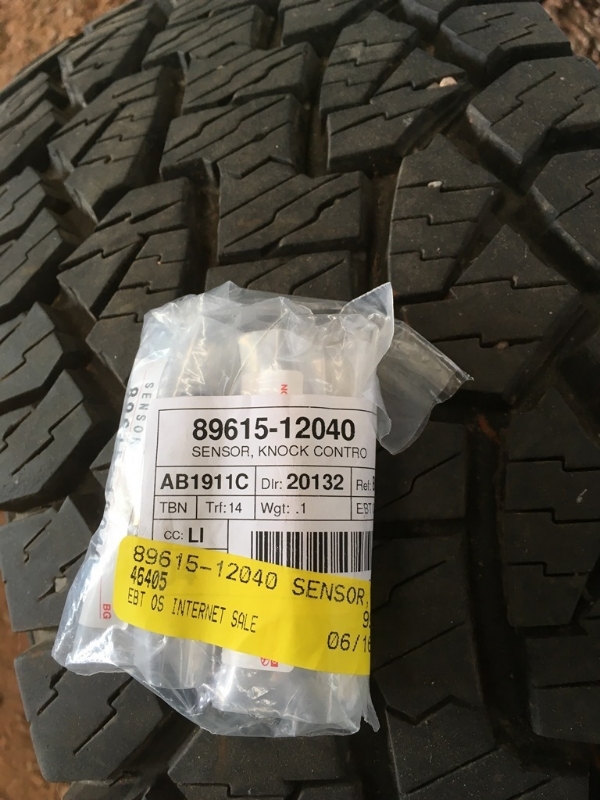
I bought a couple knock sensors from rockauto. Airtex Wells were the brand and it said "marked Denso." Here I thought Airtex was a repackager like Beck Arnley and these were Denso sensors Apparently that note is supposed to mean that the part works if the sensors are Denso on the vehicle. Pays to ask questions before you order I suppose They took em back and then I bought genuine Toyota sensors. I didn't want to but for a little more I'm hoping to avoid tearing apart the intake anytime soon. For all I know the donor sensors had 200k miles on them which is why I didn't reuse them. Against better judgement I tried to reuse the knock sensor wires  Do yourself a favor and just order the $20 wires and replace them. They'll likely be brittle and break... which is what I read in other posts. Not sure what I was thinking.
Knock sensors (2) - 89615-12040
Knock sensor wire - 82219-34010

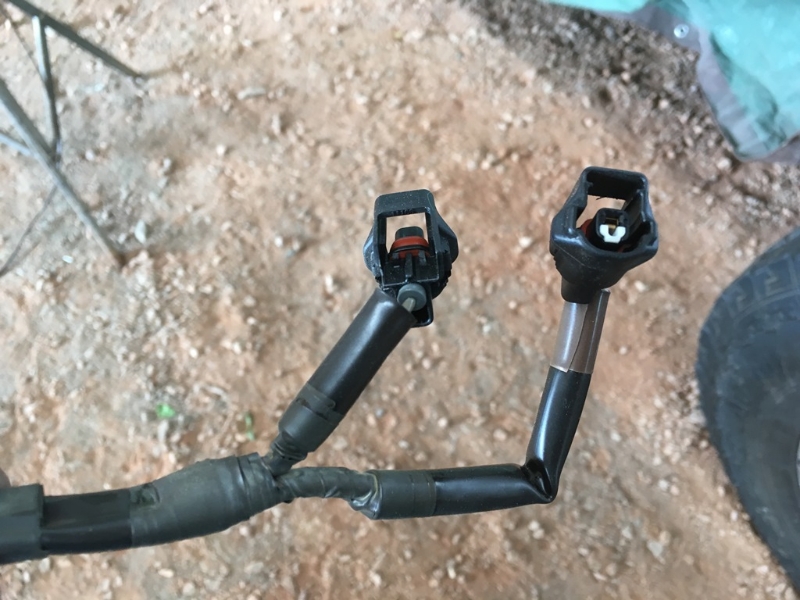
Here's the old one. Both clips broke when removing from donor vehicle. I suppose I could have just bought the plugs but I didn't price that out.
Installed with the new gaskets in place
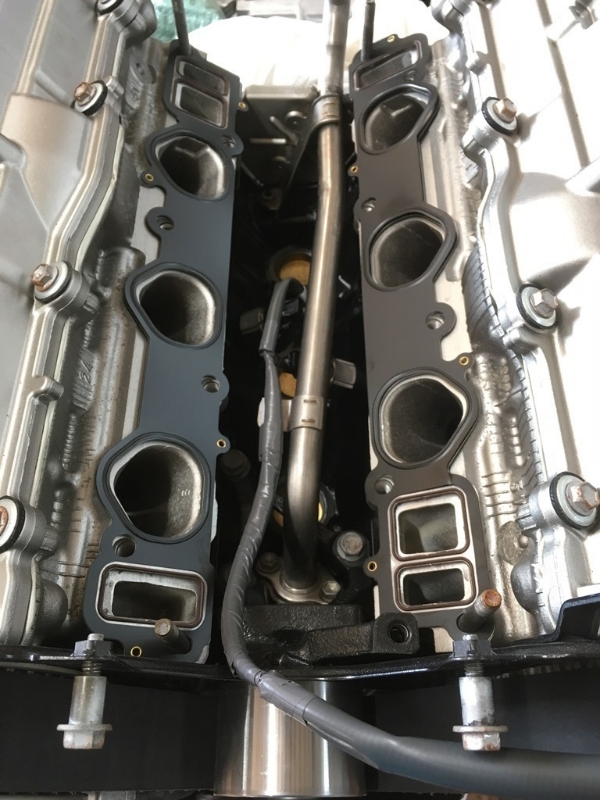
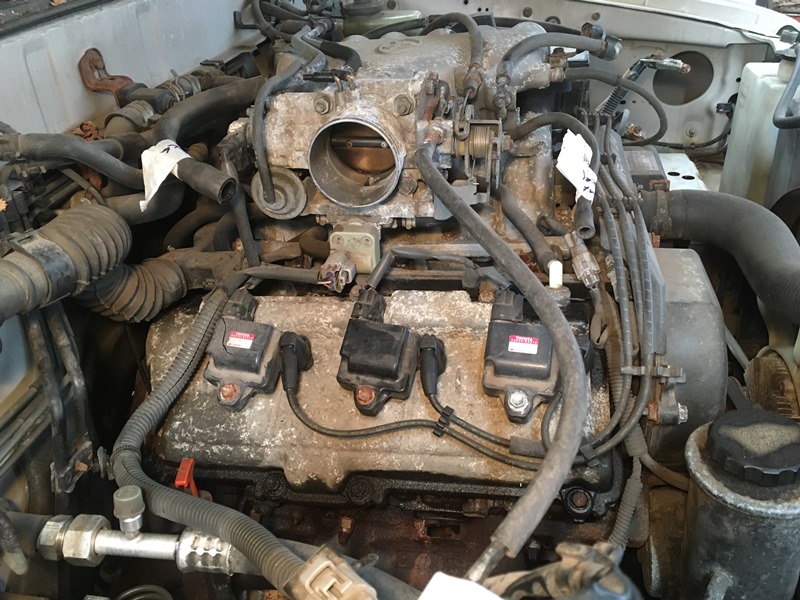
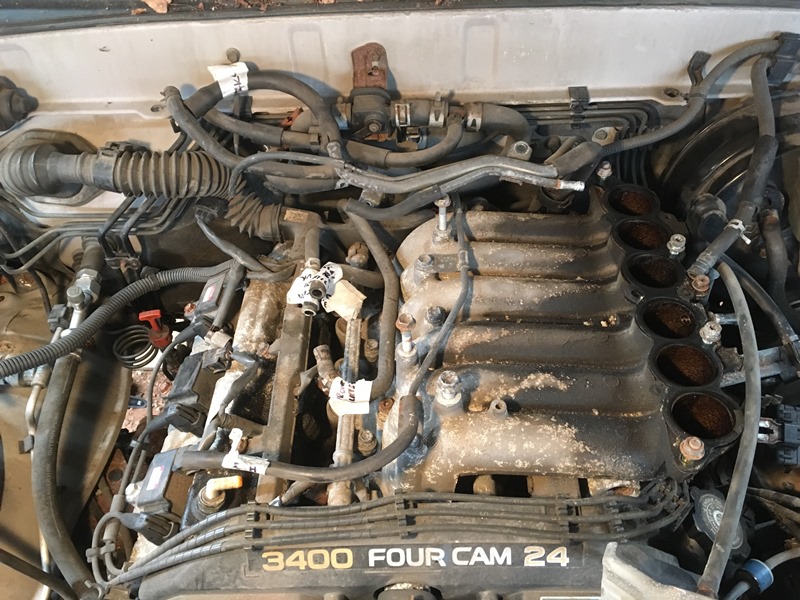
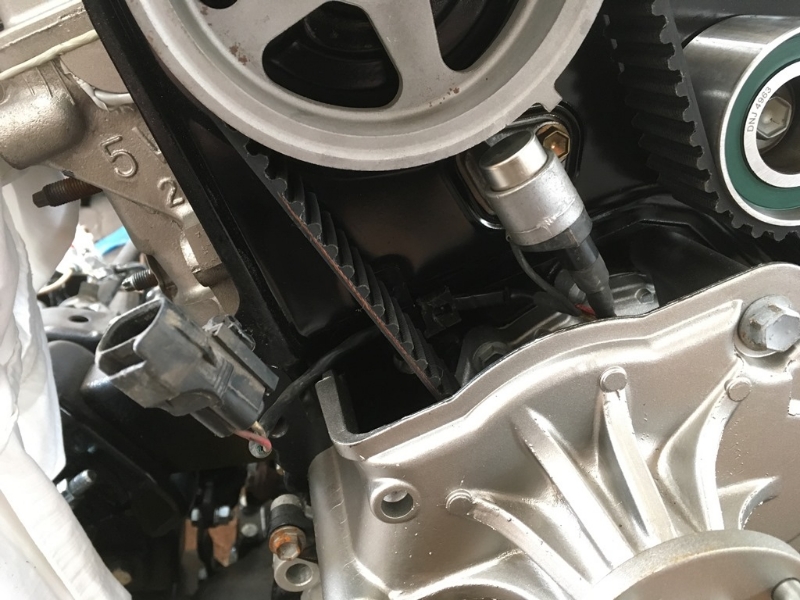
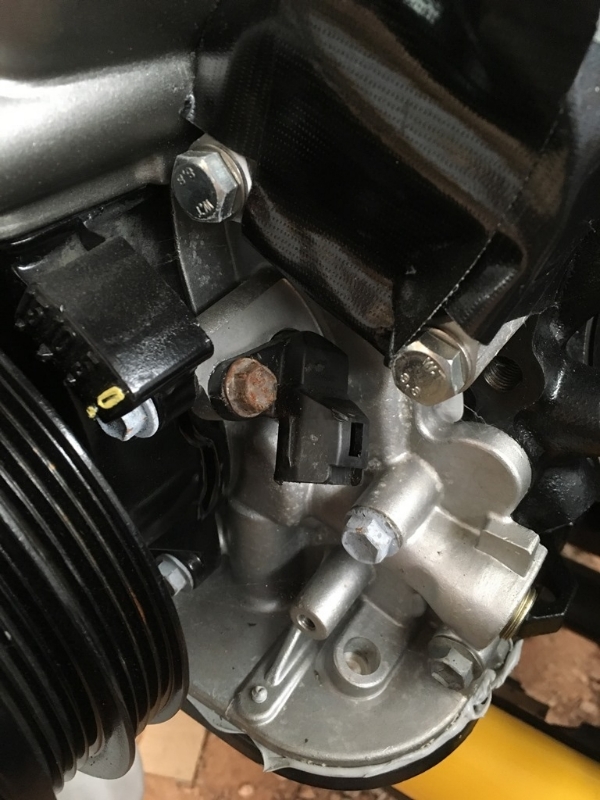
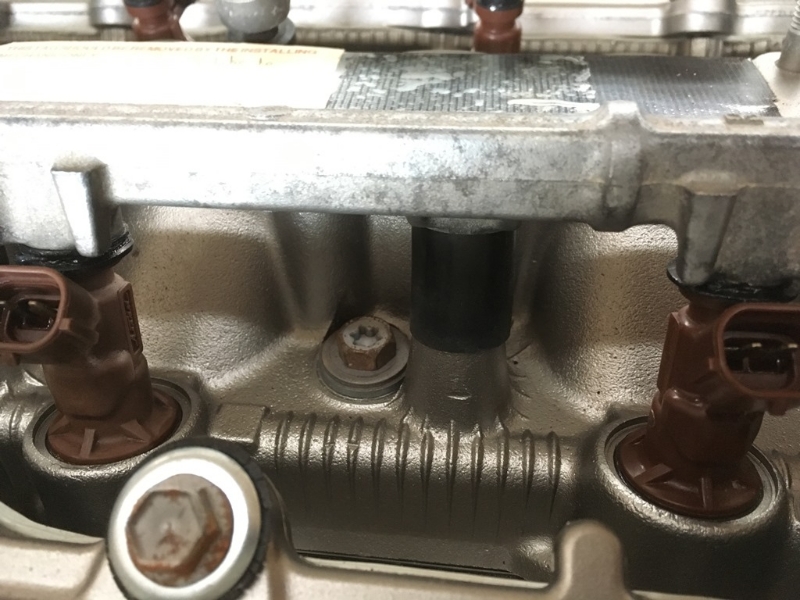
Position sensors need to be swapped over to the new motor. New ones a bit expensive so reused donor's. They're really easy to replace if they do go bad. Very accessible. Sensors are at center of next two pics.
Behind timing cover
Below thermostat. Make a note of those shiny grade 8.8 bolts for the thermostat housing. I'll touch base on that later.
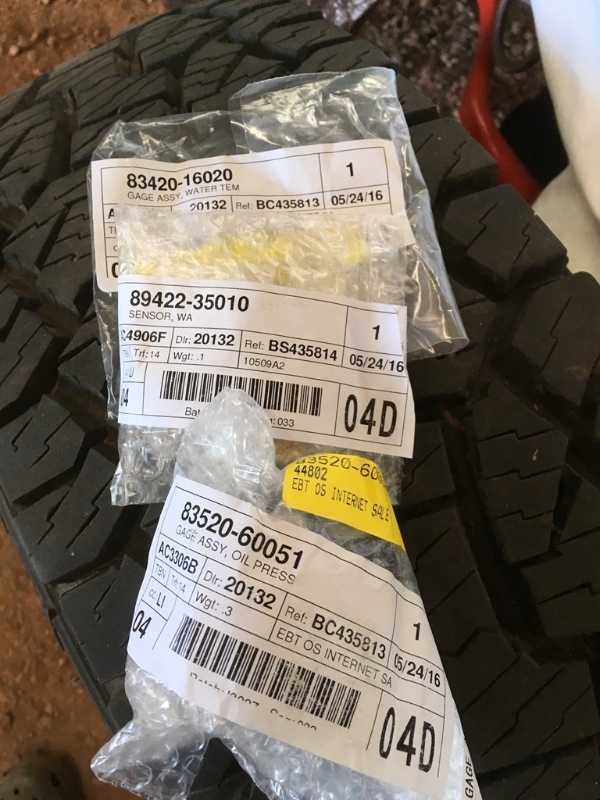
I put new water temp senders in. I also put a T100 oil pressure sender in because it's compatible with the 91 pickup and the 2000 4runner engine harness will plug into it with no need to splice
Temp sender gauge (rear intake) - 83420-16020
Temp sender (front pass side intake)- 89422-35010
Oil pressure sender - 83520-60051
I sent in the donor injectors to Cruzin Performance out of Michigan. Awesome guy to deal with and great customer service. Fast too Based on the results, the injectors were fine. Not much to improve on but at least I know they're good to go. This is how they come back. He sends back the used parts in a different bag to show they were replaced.
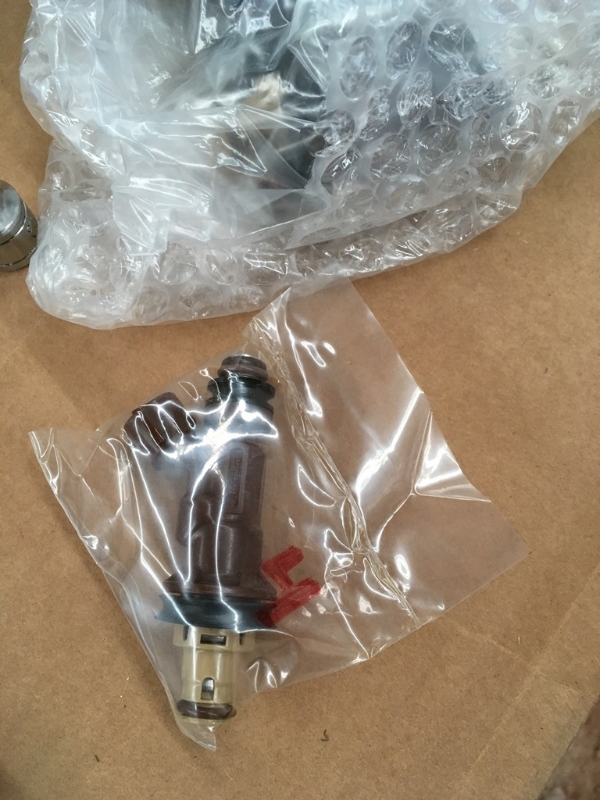
Put em in and put the fuel rails on.
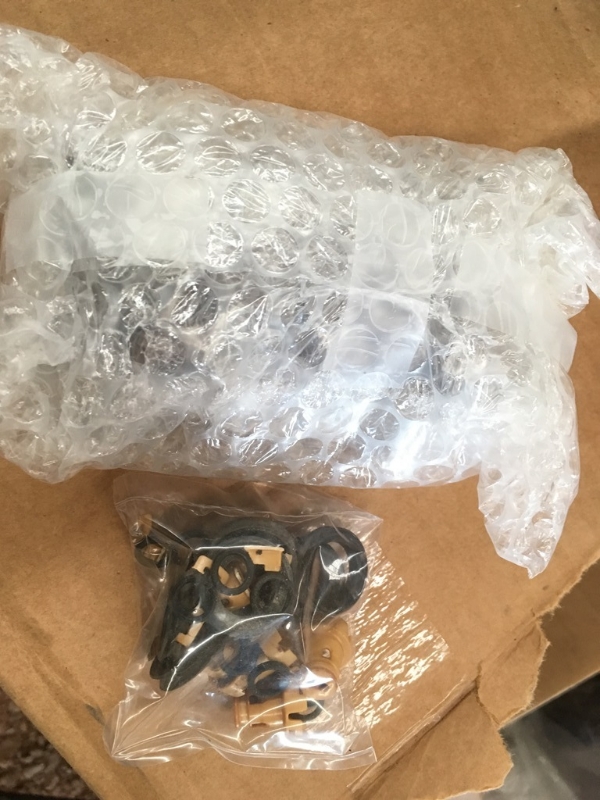
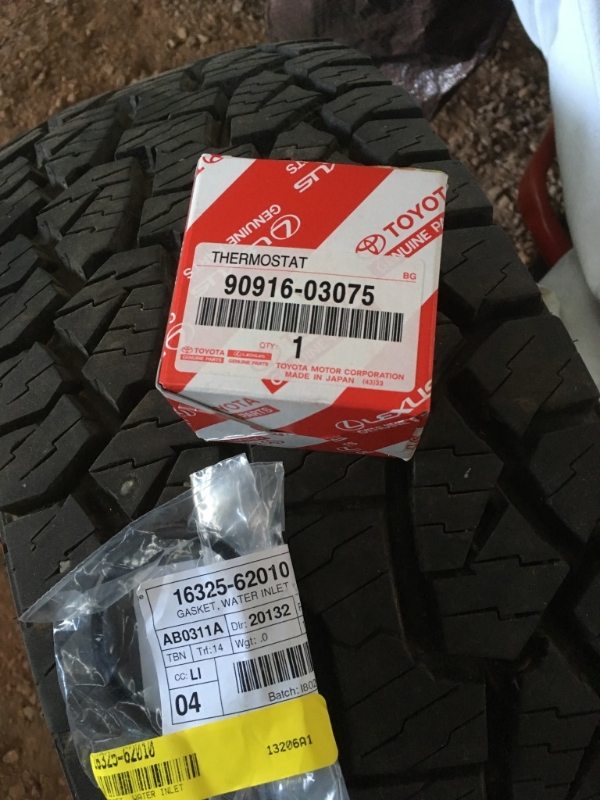
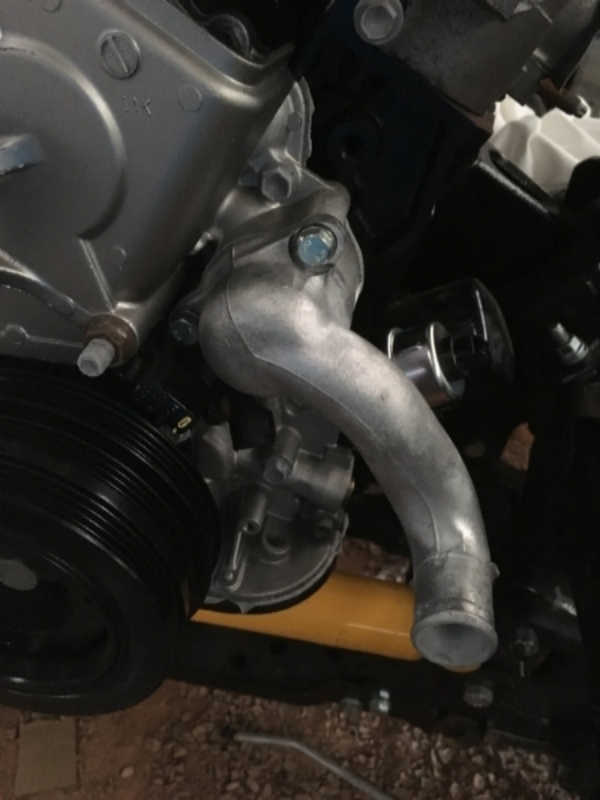
New thermostat and gasket
Thermostat - 90916-03075
Gasket - 16325-62010
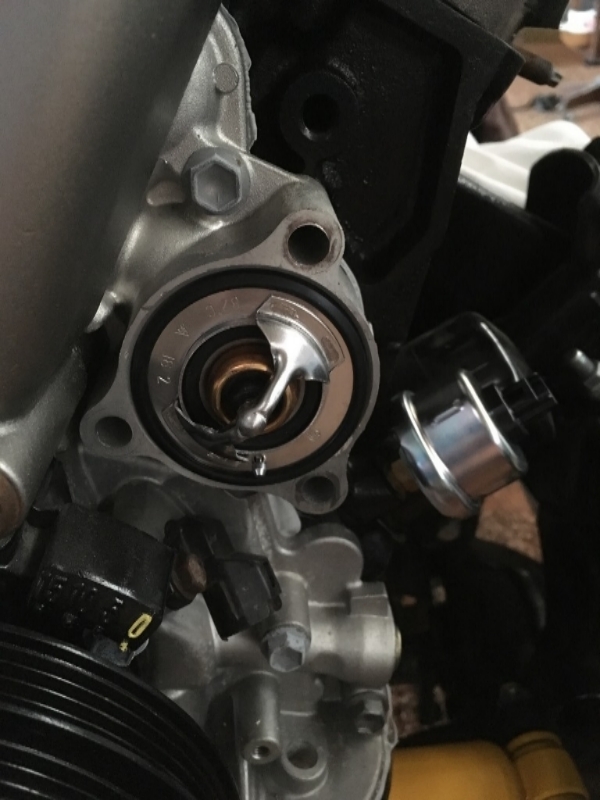
Jiggle pin at the 6'o'clock per the FSM. Donor vehicle actually had it at the 3'o'clock position which surprised me.
Thermostat housing from the donor vehicle had quite a bit of corrosion where the hose fit over it. I'll see how it holds up.
Sandblasted it
Then wire brushed it back to health for that shine
Here's the corrosion I was talking about. Looks a bit worse in person
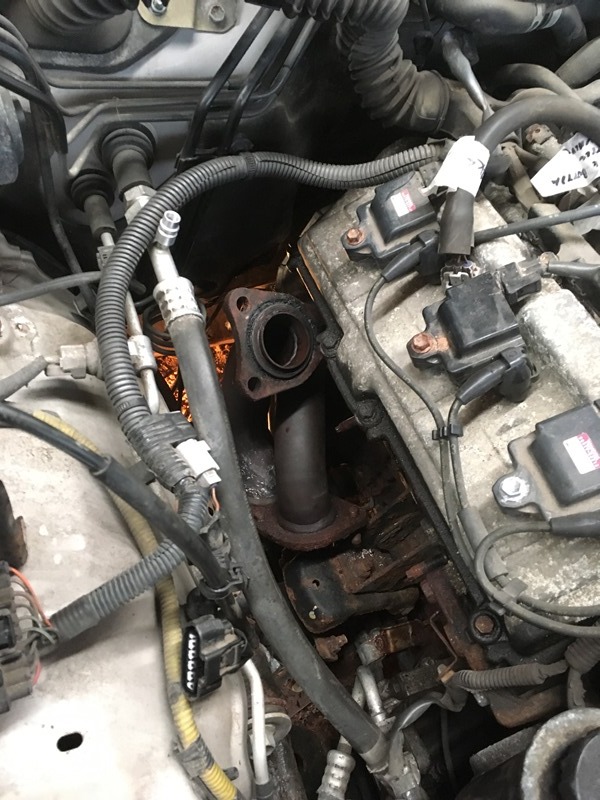
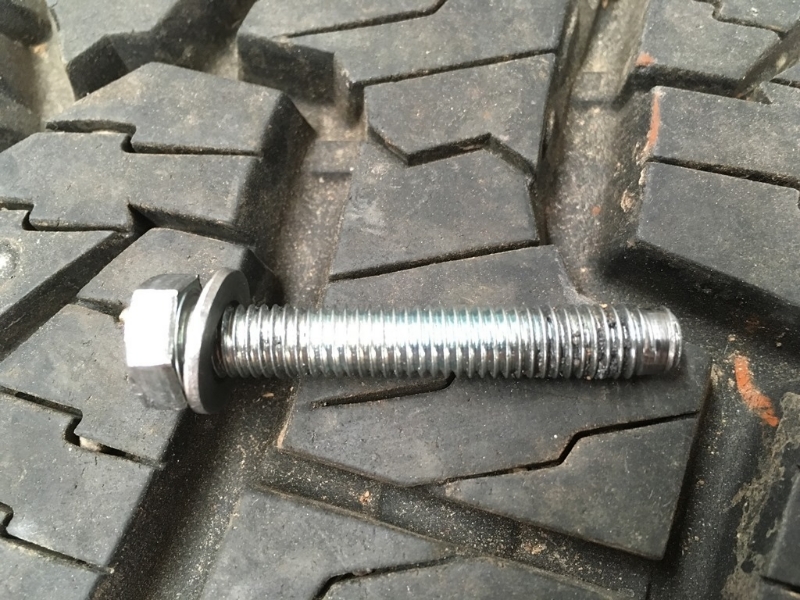
Remember those shiny bolts I told you to keep in mind? Well I installed the housing/coolant intake pipe with them. They were supplied with the motor despite the factory setup having studs so why not right?
I began torquing to the FSM specs... 14 ft-lbs. Bottom two clicked over fine. I got to the top one and it spun... and spun... and spun... This engine was pretty damn expensive to experience a stripped hole. I ended up calling Denny and have to admit... Relatively abrasive when there's something wrong. Got the bolt out and was kind of shocked. Hard to torque when it's only grabbed by 3ish threads. I didn't even think about checking fitment because... well... I assumed The gunk on the threads is anti-seize.
Something doesn't seem right here
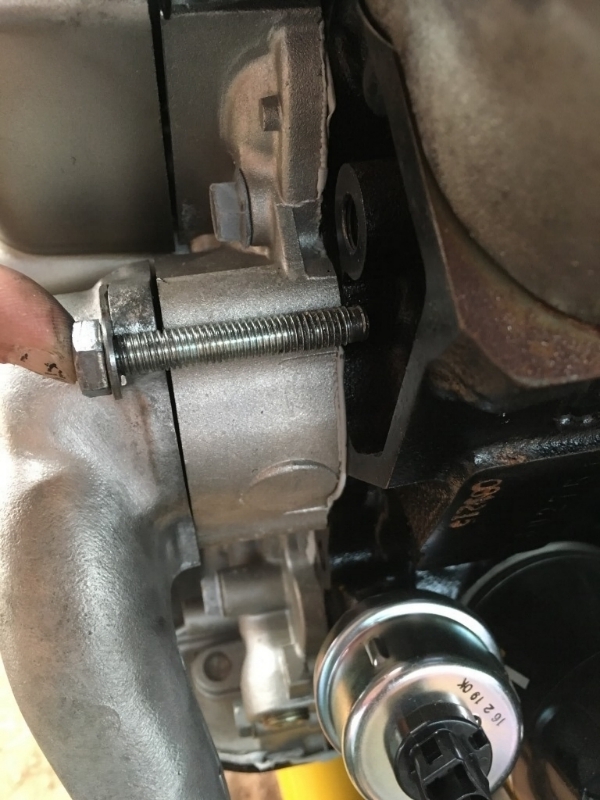
Needless to say the bolts are short. I'm hoping I can salvage the hole by tapping it. Factory studs will be at the dealer on Tuesday next week. Longer bolts would probably work but I'd rather put studs on because they have to fit.
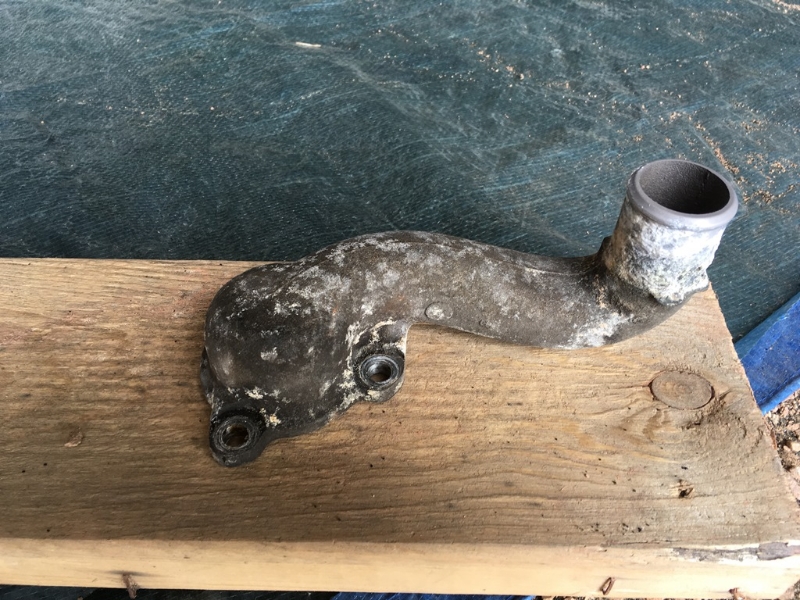
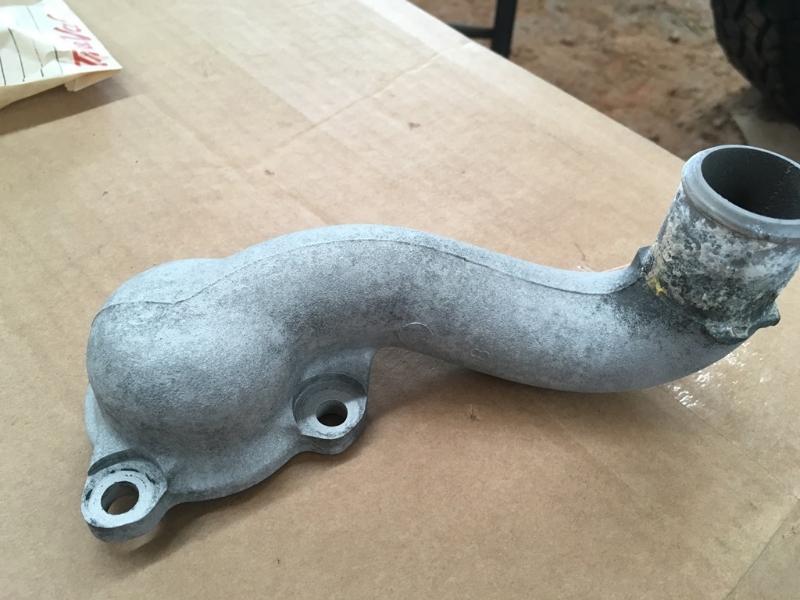
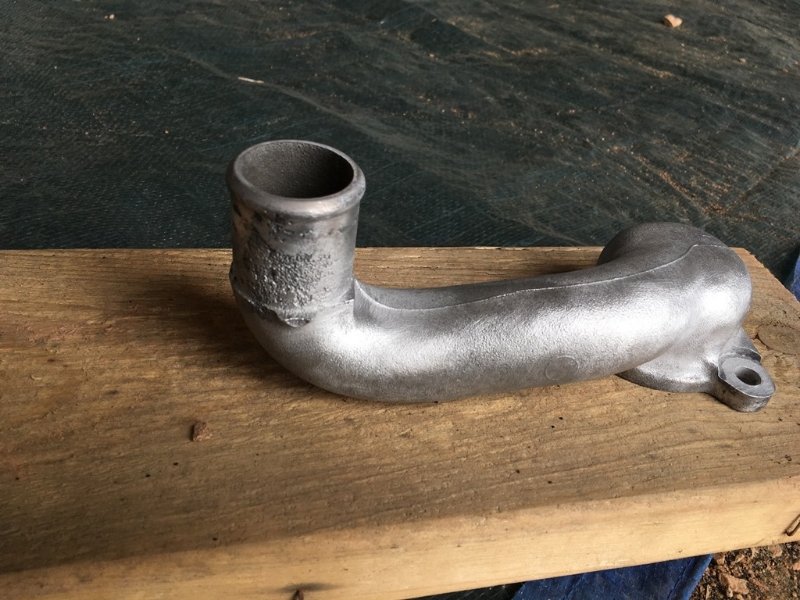
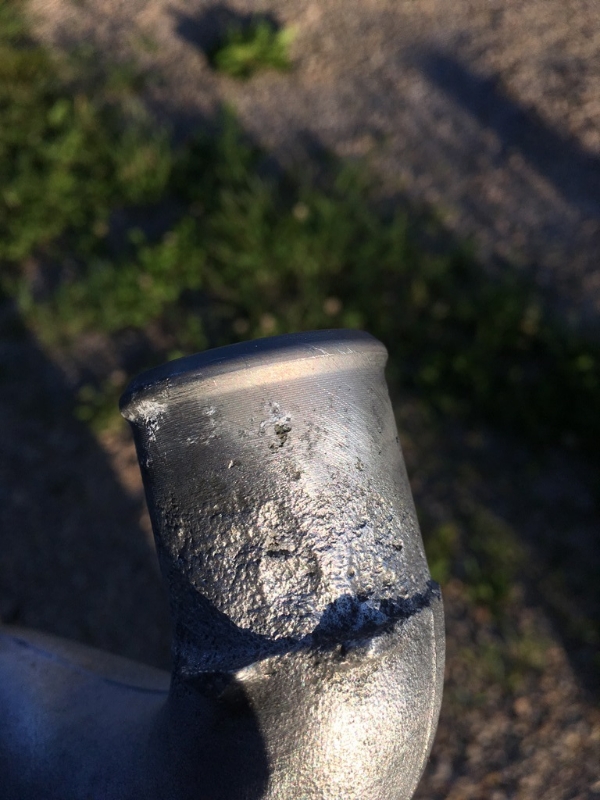
The outlet pipe on the top of the manifold... Well I messed that up I over-torqued the pipe with the one that came with the motor. Cracked the side of the tube mount. I thought no worries, I have a donor vehicle with another. Used no leverage on the donor part but same crack. I didn't see it but after the first dud, the gasket actually deformed when I over-torqued the first  The gaskets aren't the metal OEM ones. Anyway, my carelessness lost me some money on a new tube and a OEM gasket. They'll come in on Tuesday as well.
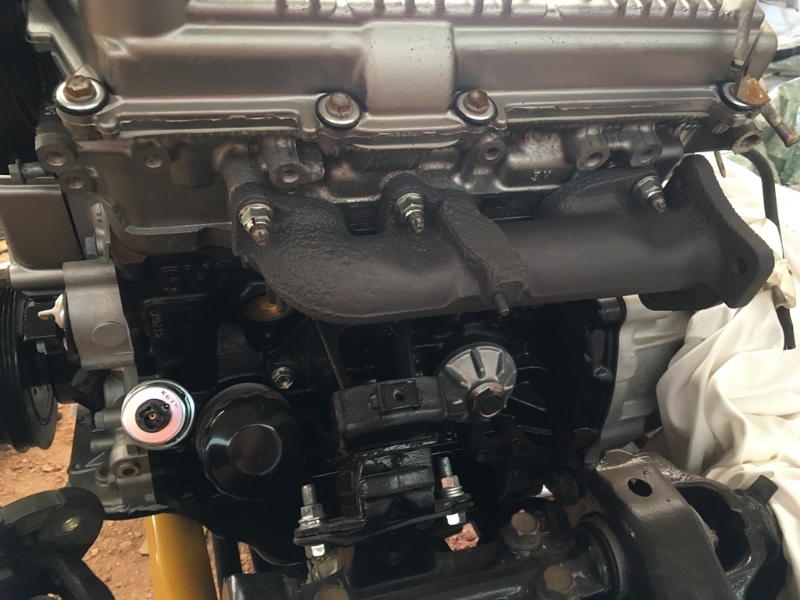
Next was the manifolds from the donor. Pretty deep corrosion on them but they'll get the job done.
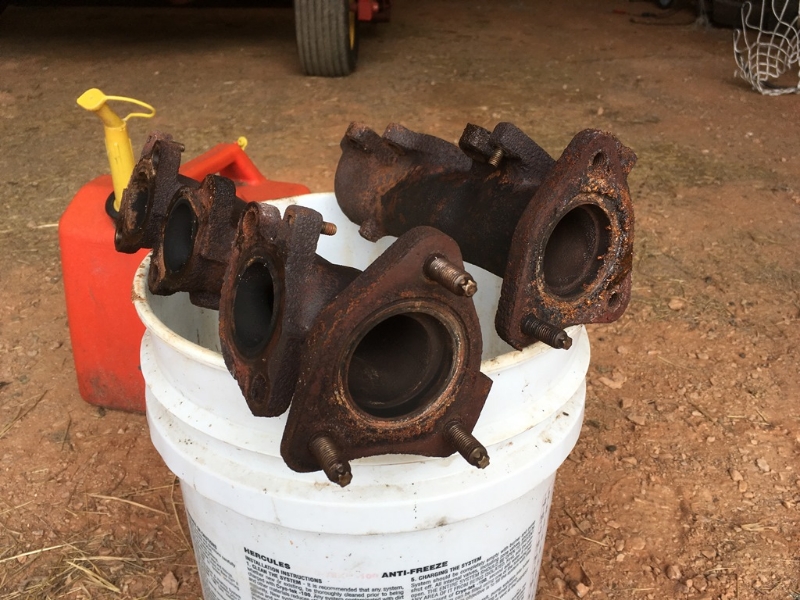
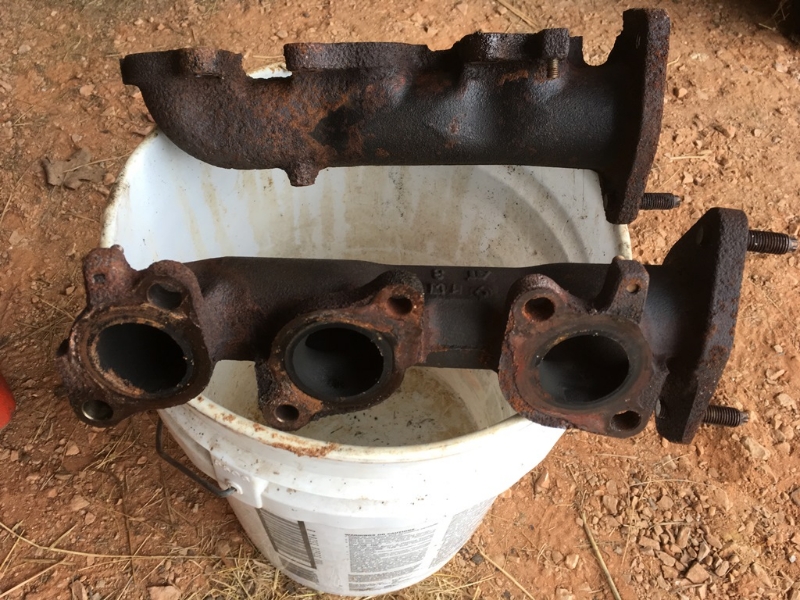
Used some gasoline and diesel fuel to scrub them a bit with a wire brush. I got them as clean as I could and then sand blasted them. The original paint was really difficult to get off so I tried some oven cleaner. Didn't work. I then took them to a machine shop and got them shaved. Here's what they looked like when I dropped them off. The manifold with flash rust is the one I hit with oven cleaner. Note the studs for the heat shield in the pic. They're a good reference point for post shave.
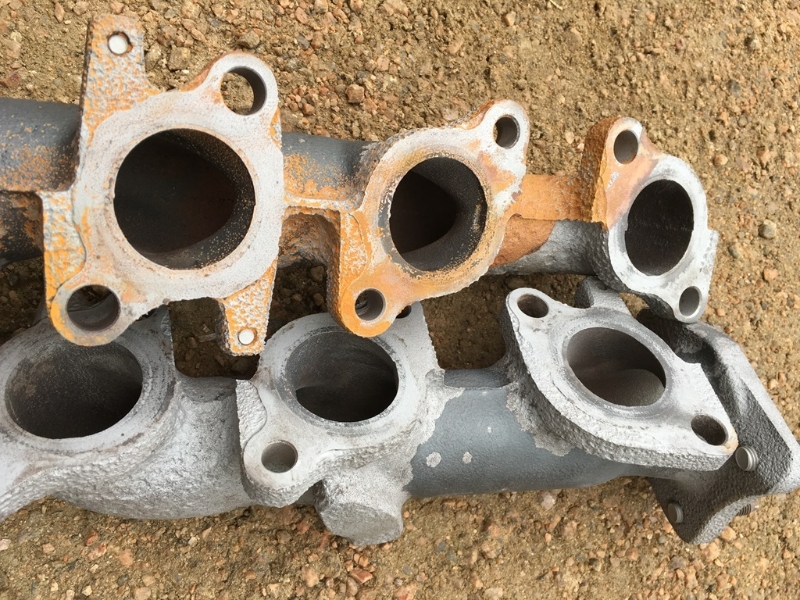
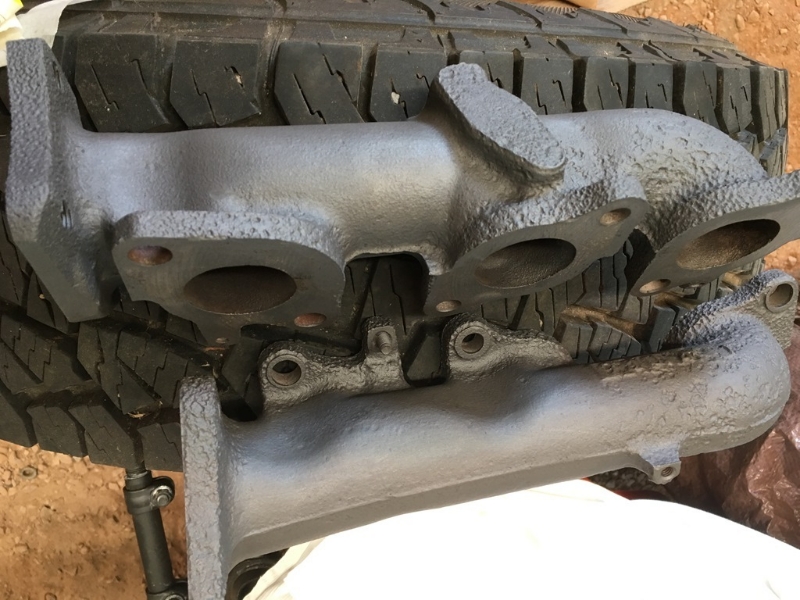
Once I got them back from the machine shop I sandblasted most of that old paint off down to bare metal. There was a little bit left but I've read others painting over old paint with good results. I got tired of sand blasting I went with POR high heat paint for the manifolds.
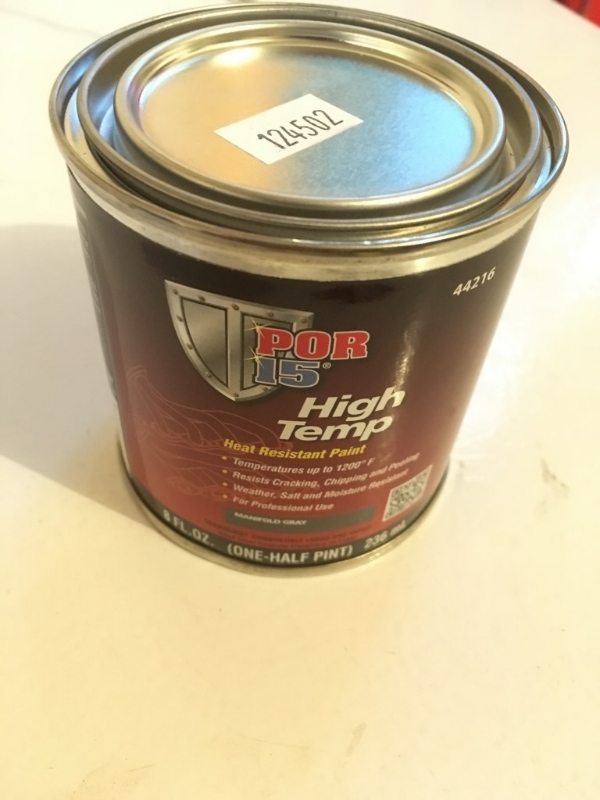
This little bit of paint goes a long way. I swear you could do 20 manifolds with this little can. I used a foam brush and it worked great. The POR rep said not to metal etch but that didn't make sense to me. Sure they're the professionals but what happens if I miss some rust? It's not like the POR15 so the rust will bubble through. At least that was my logic. Time will tell... I baked it for 30 minutes in the oven. Not alot of smoke just some chemical smell. Here's the manifolds painted and baked.
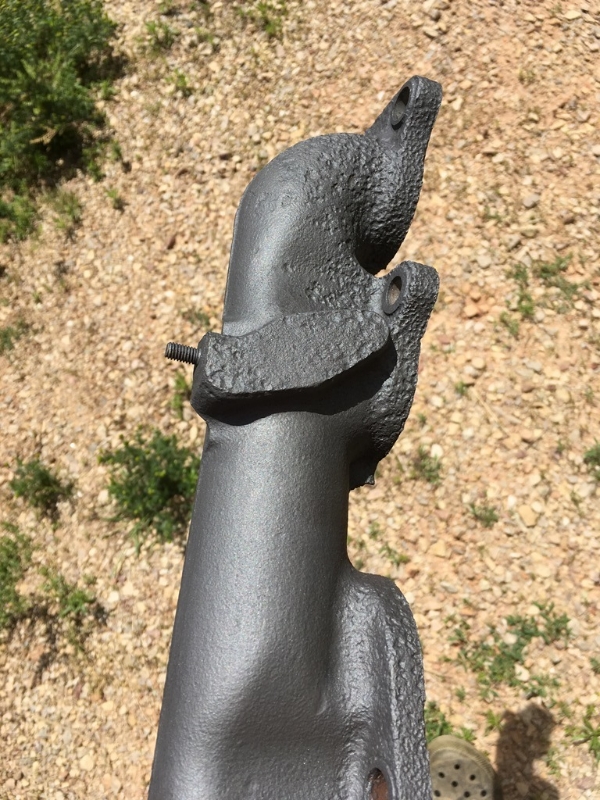
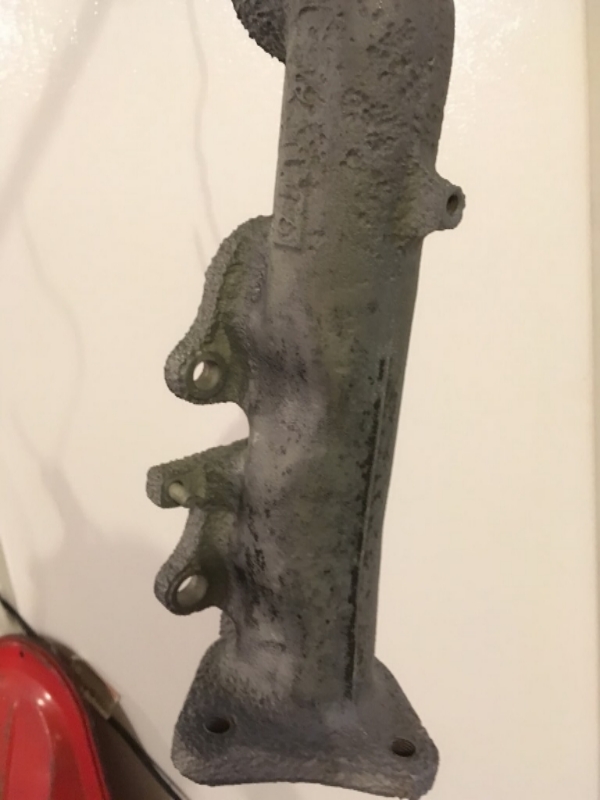
And here's where the stud I noted comes into play. That manifold needed a bit of work. You can see they shaved it down to that stud. Glad I ended up getting this done.
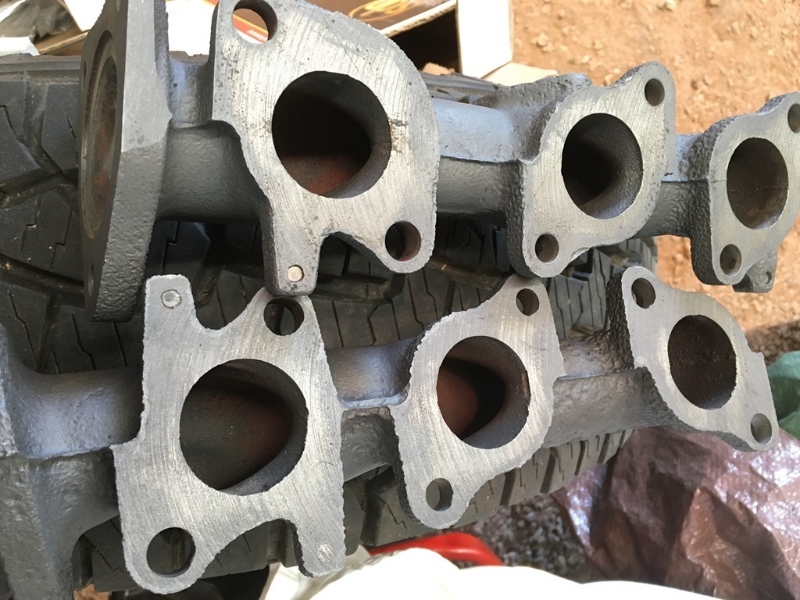
Put the supplied manifold gaskets on...
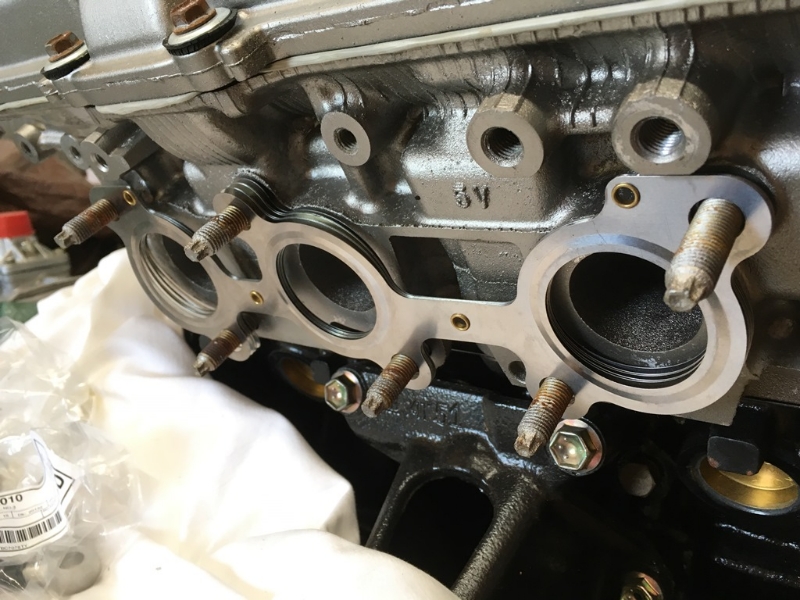
And new manifold nuts
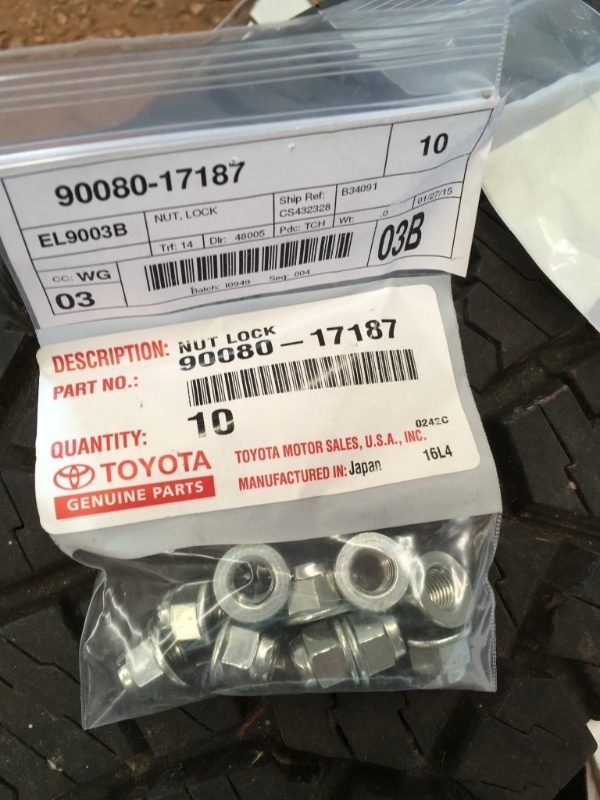
After the manifold nuts were rusted onto the studs from the donor, I bought some nickel neversieze which is good to 2400 degrees and slapped it on the studs. Installed the manifolds and good to go!
I bought a couple knock sensors from rockauto. Airtex Wells were the brand and it said "marked Denso." Here I thought Airtex was a repackager like Beck Arnley and these were Denso sensors
Apparently that note is supposed to mean that the part works if the sensors are Denso on the vehicle. Pays to ask questions before you order I suppose They took em back and then I bought genuine Toyota sensors. I didn't want to but for a little more I'm hoping to avoid tearing apart the intake anytime soon. For all I know the donor sensors had 200k miles on them which is why I didn't reuse them. Against better judgement I tried to reuse the knock sensor wires Do yourself a favor and just order the $20 wires and replace them. They'll likely be brittle and break... which is what I read in other posts. Not sure what I was thinking.Knock sensors (2) - 89615-12040
Knock sensor wire - 82219-34010


Here's the old one. Both clips broke when removing from donor vehicle. I suppose I could have just bought the plugs but I didn't price that out.

Installed with the new gaskets in place

Position sensors need to be swapped over to the new motor. New ones a bit expensive so reused donor's. They're really easy to replace if they do go bad. Very accessible. Sensors are at center of next two pics.
Behind timing cover

Below thermostat. Make a note of those shiny grade 8.8 bolts for the thermostat housing. I'll touch base on that later.

I put new water temp senders in. I also put a T100 oil pressure sender in because it's compatible with the 91 pickup and the 2000 4runner engine harness will plug into it with no need to splice
Temp sender gauge (rear intake) - 83420-16020
Temp sender (front pass side intake)- 89422-35010
Oil pressure sender - 83520-60051

I sent in the donor injectors to Cruzin Performance out of Michigan. Awesome guy to deal with and great customer service. Fast too
Based on the results, the injectors were fine. Not much to improve on but at least I know they're good to go. This is how they come back. He sends back the used parts in a different bag to show they were replaced. 

Put em in and put the fuel rails on.

New thermostat and gasket
Thermostat - 90916-03075
Gasket - 16325-62010

Jiggle pin at the 6'o'clock per the FSM. Donor vehicle actually had it at the 3'o'clock position which surprised me.

Thermostat housing from the donor vehicle had quite a bit of corrosion where the hose fit over it. I'll see how it holds up.

Sandblasted it

Then wire brushed it back to health for that shine

Here's the corrosion I was talking about. Looks a bit worse in person

Remember those shiny bolts I told you to keep in mind? Well I installed the housing/coolant intake pipe with them. They were supplied with the motor despite the factory setup having studs so why not right?

I began torquing to the FSM specs... 14 ft-lbs. Bottom two clicked over fine. I got to the top one and it spun... and spun... and spun...
This engine was pretty damn expensive to experience a stripped hole. I ended up calling Denny and have to admit... Relatively abrasive when there's something wrong. Got the bolt out and was kind of shocked. Hard to torque when it's only grabbed by 3ish threads. I didn't even think about checking fitment because... well... I assumed The gunk on the threads is anti-seize.
Something doesn't seem right here

Needless to say the bolts are short. I'm hoping I can salvage the hole by tapping it. Factory studs will be at the dealer on Tuesday next week. Longer bolts would probably work but I'd rather put studs on because they have to fit.
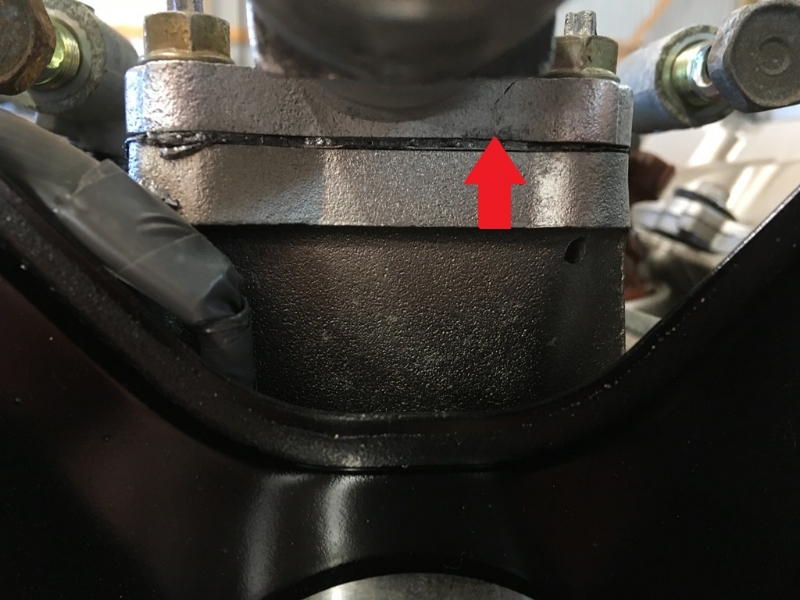
The outlet pipe on the top of the manifold... Well I messed that up
I over-torqued the pipe with the one that came with the motor. Cracked the side of the tube mount. I thought no worries, I have a donor vehicle with another. Used no leverage on the donor part but same crack. I didn't see it but after the first dud, the gasket actually deformed when I over-torqued the first The gaskets aren't the metal OEM ones. Anyway, my carelessness lost me some money on a new tube and a OEM gasket. They'll come in on Tuesday as well.
Next was the manifolds from the donor. Pretty deep corrosion on them but they'll get the job done.


Used some gasoline and diesel fuel to scrub them a bit with a wire brush. I got them as clean as I could and then sand blasted them. The original paint was really difficult to get off so I tried some oven cleaner. Didn't work. I then took them to a machine shop and got them shaved. Here's what they looked like when I dropped them off. The manifold with flash rust is the one I hit with oven cleaner. Note the studs for the heat shield in the pic. They're a good reference point for post shave.

Once I got them back from the machine shop I sandblasted most of that old paint off down to bare metal. There was a little bit left but I've read others painting over old paint with good results. I got tired of sand blasting
I went with POR high heat paint for the manifolds.

This little bit of paint goes a long way. I swear you could do 20 manifolds with this little can. I used a foam brush and it worked great. The POR rep said not to metal etch but that didn't make sense to me. Sure they're the professionals but what happens if I miss some rust? It's not like the POR15 so the rust will bubble through. At least that was my logic. Time will tell... I baked it for 30 minutes in the oven. Not alot of smoke just some chemical smell. Here's the manifolds painted and baked.


And here's where the stud I noted comes into play. That manifold needed a bit of work. You can see they shaved it down to that stud. Glad I ended up getting this done.

Put the supplied manifold gaskets on...

And new manifold nuts

After the manifold nuts were rusted onto the studs from the donor, I bought some nickel neversieze which is good to 2400 degrees and slapped it on the studs. Installed the manifolds and good to go!


