chosenchange 1985 pickup build
 11-19-2014, 07:29 PM
#1
Registered User
Thread Starter
Join Date: Feb 2010
Location: Medford Oregon
Posts: 205
Likes: 0
Received 0 Likes
on
0 Posts
chosenchange 1985 pickup build
Well I am a few weeks into the early stages of my build. I acquired a 1985 2wd ex cab truck by trading an sks. It seemed alright from what I understand it was an old man that had purchased the truck new and ran it till 200k miles. He then sold it to some high school kid and it took the kid 1 month to blow the head gasket and do some serious tweaker wiring. He had wired a huge system in it and tried to run actuators in the doors and a huge security system. It basically looked like a nest of wiring with all the main components resting on it under the dash. More vamp clips then I have ever seen. He then sold it to the guy I traded with. I like that most all the truck is untainted and has a perfect interior and a perfect unmolested frame and a body that is pretty straight.
 11-19-2014, 07:48 PM
#2
Registered User
Thread Starter
Join Date: Feb 2010
Location: Medford Oregon
Posts: 205
Likes: 0
Received 0 Likes
on
0 Posts
ready set .... build
So I started the build and pulled the interior and got it bagged and tagged as I want to start out fresh from beginning to end with out any problems plus I want to run my new wiring behind everything.[IMG]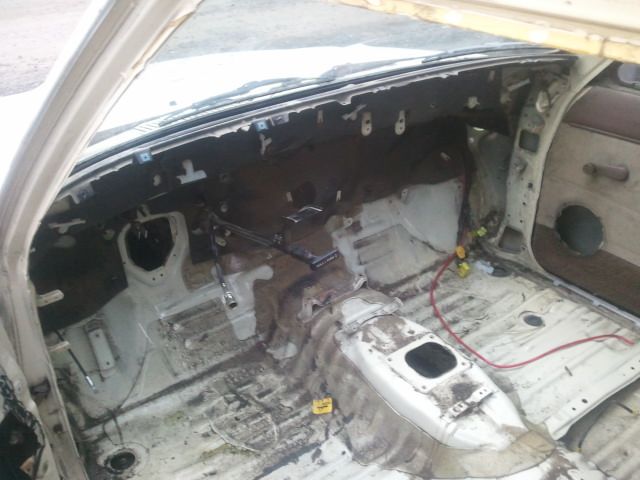 [/IMG]
I also got that motor out. It has an auto tranny now but I am getting rid of that for sure!!
[IMG] [/IMG]
now the motor is in the garage to start off the winter with something to work on.

Turns out it has a blown head gasket and who knows what else but it will start with a full engine build. I figure to get it all broke down and take the block and head to the shop to have it decked magna fluxed and make sure they are both useable for the build.
 [/IMG]
I also got that motor out. It has an auto tranny now but I am getting rid of that for sure!!
[IMG]
 [/IMG]
now the motor is in the garage to start off the winter with something to work on.

Turns out it has a blown head gasket and who knows what else but it will start with a full engine build. I figure to get it all broke down and take the block and head to the shop to have it decked magna fluxed and make sure they are both useable for the build.
Last edited by chosenchange; 11-19-2014 at 08:05 PM.
11-19-2014, 08:19 PM
#3
Registered User
Thread Starter
Join Date: Feb 2010
Location: Medford Oregon
Posts: 205
Likes: 0
Received 0 Likes
on
0 Posts
I got lucky as when i traded for the truck it came with 3 manual transmissions out of other 2wd trucks. I took those into the local toyota transmission guy who gave me a 325 dollar credit toward a new trans and transfer case. so out of pocket will be 450 for that. He uses all marlin parts and a friend already uses one from him and it seems pretty legit. I also came up on a straight axle out of an 85 that is pretty clean. It needs full rebuild but the housing is in good shape as well as the knuckles. the balls have some minor pitting but i plan on jb welding those and sanding it down and polishing. is tarted cleaning out the axle. It has a welded 4 10 diff but i am going to step up to 4.88s anyway.
[IMG]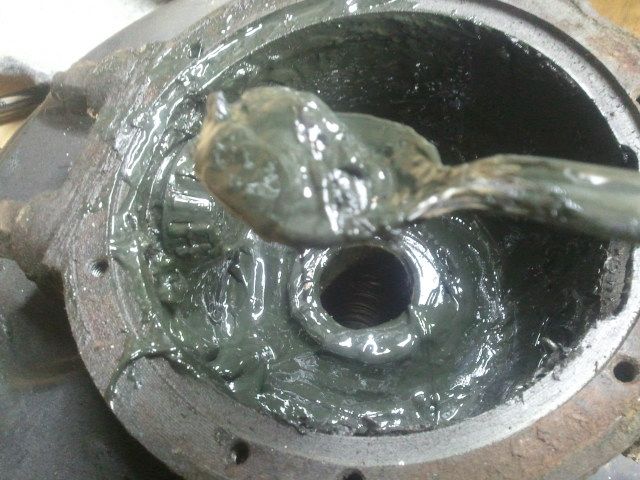 [/IMG]
[IMG]
 [/IMG]
Last edited by chosenchange; 11-19-2014 at 08:20 PM.
11-20-2014, 03:03 AM
#4
Super Moderator
Staff
iTrader: (1)
Join Date: Aug 2008
Location: Anderson Missouri
Posts: 11,788
Likes: 0
Received 21 Likes
on
19 Posts
I like following deep rebuilds and looks like you are into one. It is nice to be able to go thru one and fix several issues along the way. Looking forward to your build.
11-22-2014, 06:57 PM
#6
Registered User
Thread Starter
Join Date: Feb 2010
Location: Medford Oregon
Posts: 205
Likes: 0
Received 0 Likes
on
0 Posts
yep the 4x's here are pretty rough and seem to be made of gold since they want 4 gs for a stock straight axle with 350xxx on them and a tweaker highschool hack job. Ill take my work over any of theirs. It won't be the fastest build as I have three kids and a wife. Im making 450 car payments toward parts each month so it will come along. thanks for the add
11-23-2014, 01:05 AM
#7
Registered User
Thread Starter
Join Date: Feb 2010
Location: Medford Oregon
Posts: 205
Likes: 0
Received 0 Likes
on
0 Posts
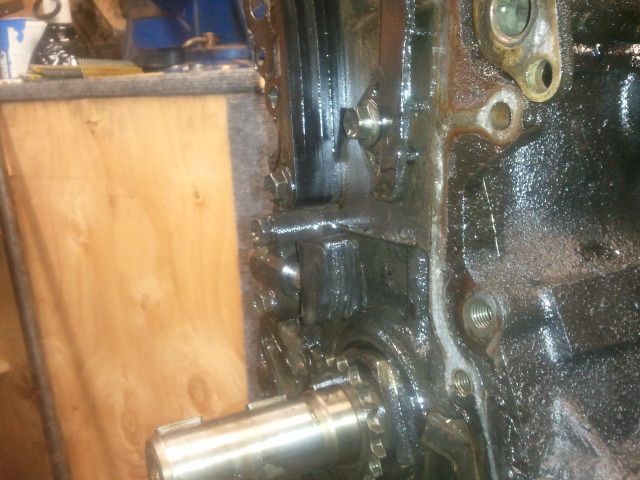
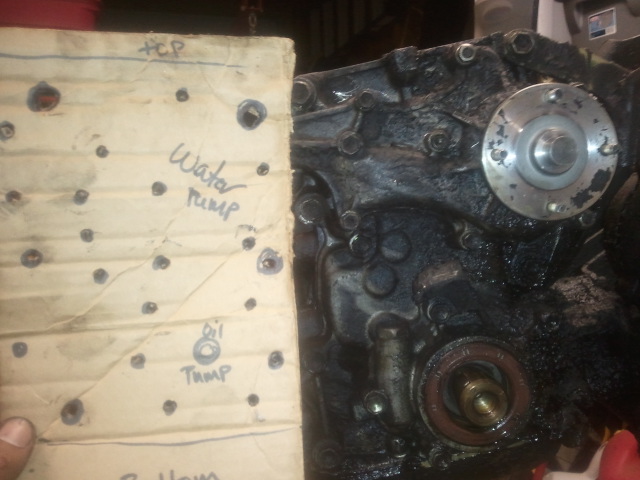
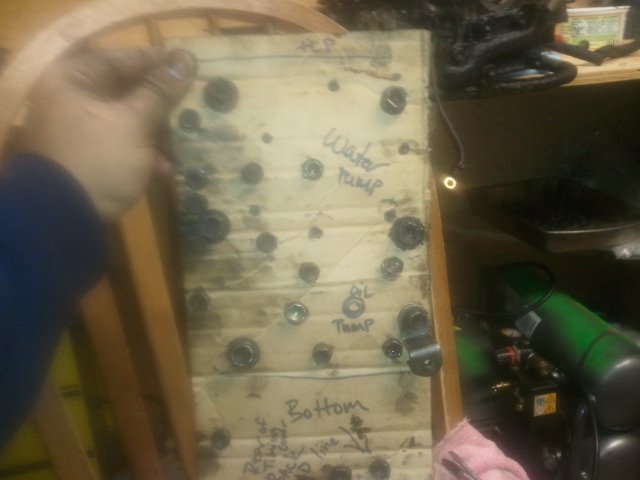
I broke down the top end of the engine tonight. This is the first 22re that I have rebuilt. It is much nicer to have the motor on the stand rather then in the truck, a back saver for sure. I do have 22r experience and I know the block is fairly similar if not the same. I removed the throttle body after taking a picture and then moved on to take the intake manifold off and realized that there is a hidden bolt just under the thermostat housing. tricky Toyota!! Then after that it is pretty much the same process as the 22r. The timing chain cover was next. There was some good ol' chain rubbin that was going on in here on this one. The guides were broke and the tensioner had serious rub about half way through and there was some pretty good chain rash on the timing chain. I am going to get a new cover as the groves are pretty deep. I also plan on using the metal guides when I replace it.
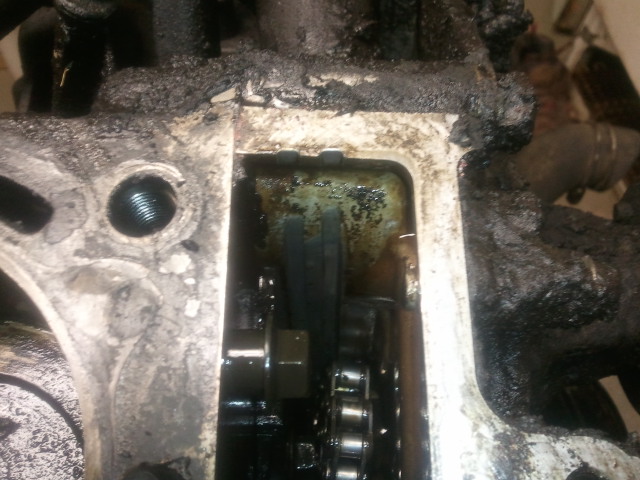
I learned from some one on Yotatech here to use some card board to lay out the bolt pattern for the timing cover and it sure does work well. I wish I would have done this before it sure makes organization much more simple. I will be replacing the bolts but at least this way I know what order and where they go. Last time I did this I received all the bolts in a bag and it was kind of a pain to get them where they needed to go. There are quiet a few different sizes and lengths to figure out.
Sorry some of the pictures need to be retaken as my phone was getting a little dirty. I will retake and edit some of them later when the lighting is better. If I remember too.
I pulled the head and it seems alright. I will prep the head, block and axle and have it ready for the machine shop. I am hoping that I can do that next month. I am planning on buying the master kit from www.engbldr.com. They not only are state local for me but they also beat LC Engineering'a price by quite a bit. I am doing the machine work on the block and head first so I can order the correct size rings. I am hoping to run oversize valves and heavy duty spring kit. I also think I am going to go with the crawler cam they offer. I guess I will have to go through LC Engineering for the header. I guess I also need to come up on a tacome MAF though?? Not sure on that yet.
The 4th cylinder in the block had a little bit of scoring so I assume I will have to bore the block.
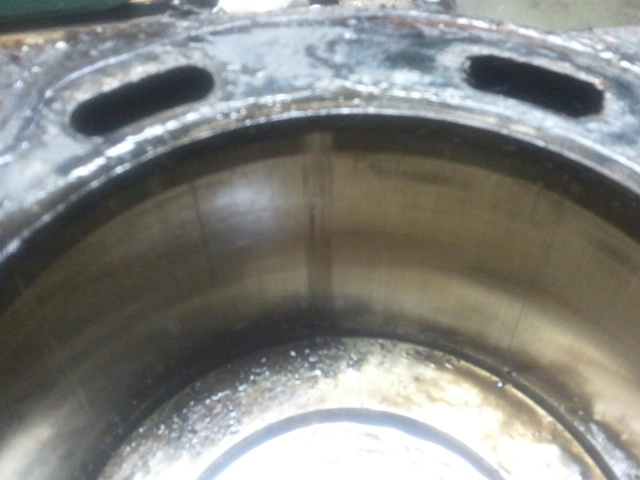
I will be boring as little as I possible can out of the walls as I want it to stay reliable with the chance to do this again if need be. I will finish breaking everything down to bare block sometime pretty soon. Progress is good!!
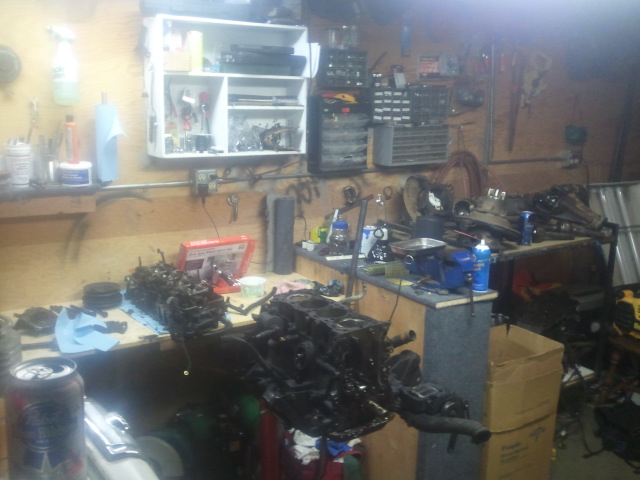
I got a garage full of all sorts of toyota parts!!


I learned from some one on Yotatech here to use some card board to lay out the bolt pattern for the timing cover and it sure does work well. I wish I would have done this before it sure makes organization much more simple. I will be replacing the bolts but at least this way I know what order and where they go. Last time I did this I received all the bolts in a bag and it was kind of a pain to get them where they needed to go. There are quiet a few different sizes and lengths to figure out.


Sorry some of the pictures need to be retaken as my phone was getting a little dirty. I will retake and edit some of them later when the lighting is better. If I remember too.
I pulled the head and it seems alright. I will prep the head, block and axle and have it ready for the machine shop. I am hoping that I can do that next month. I am planning on buying the master kit from www.engbldr.com. They not only are state local for me but they also beat LC Engineering'a price by quite a bit. I am doing the machine work on the block and head first so I can order the correct size rings. I am hoping to run oversize valves and heavy duty spring kit. I also think I am going to go with the crawler cam they offer. I guess I will have to go through LC Engineering for the header. I guess I also need to come up on a tacome MAF though?? Not sure on that yet.
The 4th cylinder in the block had a little bit of scoring so I assume I will have to bore the block.

I will be boring as little as I possible can out of the walls as I want it to stay reliable with the chance to do this again if need be. I will finish breaking everything down to bare block sometime pretty soon. Progress is good!!
I got a garage full of all sorts of toyota parts!!

Trending Topics
11-24-2014, 12:08 AM
#8
Super Moderator
Staff
iTrader: (1)
Join Date: Aug 2008
Location: Anderson Missouri
Posts: 11,788
Likes: 0
Received 21 Likes
on
19 Posts
85-95 the blocks are the same. 84 and older blocks are different. A quick way that I check to see which block it is, on the passenger side, there is a place for the fuel filter and the knock sensor for the 85 and newer blocks. There are several other ways but this works for me. 84s and older wont have these bolt holes for them.
There are a handful of parts that will interchange but I would suggest treating each motor (84/85) as two complete different motors. Timing Chains and cover look similar but are different for example.
Your block will need bored a little with that groove in it. On a head, I have them checked and if it needs more then $150, I just buy a new head. A new head can be bought for $250ish. Machine work can add up quick on a head. Shaving, water ports being eaten out, valves, camshaft needing replaced...
Last edited by Terrys87; 11-24-2014 at 12:15 AM.
11-24-2014, 04:55 PM
#9
Registered User
Thread Starter
Join Date: Feb 2010
Location: Medford Oregon
Posts: 205
Likes: 0
Received 0 Likes
on
0 Posts
thanks for the block info. I was actually going with a new cam and over sized valves anyway. I am probably just going to have the shop do it. Where do you recommend I find a new head? It seems like everywhere I look they are right in the 4-500 range. I am obviously looking in the wrong areas. I am shooting for a very reliable engine and want to boost the performance a little. I like the 22r(e) for its reliability and know that I will not be pulling any major horses out of it. Any recommendations at this point are greatly accepted. Unless I am way off base I am planning on the engbldrs rebuild kit with the over sized valves and the crawler cam. I also will now be boring and decking the block with the hopes I can send in the dimensions after its done for the rings. Is there really any reason to change out the pistons if they are good? Is there any performance increase? If I purchase the throttle body off a newer toy will that increase airflow and is that a recommended upgrade? I am not new to mechanic work but I hear so many different opinions and options and it is very hard to figure out where the best gains are. I do spend a lot of research time so I am not just asking because I am to lazy to look these up.
11-24-2014, 05:04 PM
#10
Registered User
Thread Starter
Join Date: Feb 2010
Location: Medford Oregon
Posts: 205
Likes: 0
Received 0 Likes
on
0 Posts
oh never mind on the head. I found the new head with the os valves on engbldr for 448 and free shipping I am probably going to buy that. I may be able to sell the head I have to recover a few dollars of cost. It is in good condition and I used the ruler to see if it was warped and It does not seem to be. maybe I can get a 100 out of it.
12-05-2014, 02:26 AM
#11
Super Moderator
Staff
iTrader: (1)
Join Date: Aug 2008
Location: Anderson Missouri
Posts: 11,788
Likes: 0
Received 21 Likes
on
19 Posts
One member on here liked the head he found on ebay. Don't remember the brand and he said he got more horse power out of it. Here is a thread https://www.yotatech.com/forums/f199...k-home-260142/ I know the guy personally and have driven his runner. It has power!!!! I think he has the engine builder head, LCE Header and the rv cam.
If the motor does not need bored, I would stay with the stock pistons myself. The AFM off of an 82 Supra is a direct plug in AFM. It has a slightly larger bore so you would need to run a new air pipe. Usually when people do the 82 Supra AFM, they do the battery/intake swap to shorten the path of the air pipe and air flow restrictions.
Some where on here is a thread to take the AFM off of a Cressida that has the same bore as the Supra and what is needed to make it work. I think I have it in one of my threads some where and if I find it I will post a link to it.
It is possible to get a lot more power out of these motors. HiLux shocked me at the power he has.
Just re read your post and you are going to have it bored. With that groove you have and the boring, you will need to replace the pistons. Usually they will bore it .10, .20, .30 thousandths over size and you will need new pistons.
Last edited by Terrys87; 12-05-2014 at 02:29 AM.
12-05-2014, 06:37 AM
#12
Registered User
Thread Starter
Join Date: Feb 2010
Location: Medford Oregon
Posts: 205
Likes: 0
Received 0 Likes
on
0 Posts
yep I have asked a lot of members who have had the engnbldr parts and they all seem pleased with them. I am now going to purchase the performance head with o.s. valves and their crawler cam. thats 450 out the door and the machine work I had done one my 22r daily driver ran me 340 for the head new valves and a cam so it will be worth it. I will hope to get by with the minimum on the bore. I think I will just buy the whole kit there and ill be a total of 770. Thanks for the cressida info I will be chasing that info down as it seems hard to find 82 supra afms from my searching this morning. I will look harder though. I really cant make any moves until after Christmas anyway. This getting paid once a month and three kids money gets thin this time of year. But jan and feb are my best months for money to spend so I will hit it hard. Thank you alot for the info much appreciated.
12-06-2014, 12:42 AM
#13
Super Moderator
Staff
iTrader: (1)
Join Date: Aug 2008
Location: Anderson Missouri
Posts: 11,788
Likes: 0
Received 21 Likes
on
19 Posts
I got the joys of wife, kids, Christmas and all the joys of being broke half the time too. I know what you mean. I found that Cressida link>>>https://www.yotatech.com/forums/f198...l#post52216147
12-08-2014, 03:09 PM
#14
Registered User
Thread Starter
Join Date: Feb 2010
Location: Medford Oregon
Posts: 205
Likes: 0
Received 0 Likes
on
0 Posts
well a little bit of progress I stripped down the hubs from the donor axle and they seem to be in working order. They were all gross and banged up pretty bad. I sanded them down and used my die grinder to take out the big gashes and cleaned them up and painted them. My truck is going to be all white with what turns out to be Ford blue accessories. I thought it was rockstar blue but it is offically Ford blue. here are a few pictures. I am still going to sand the letters down and paint them white before I do the final clear over them. I hope it works out. I found I had to use self etching primer and then I went with 500 degree rated paint. It should do the trick. All of the springs and gears looked good in them.


 12-08-2014, 03:23 PM
#16
Registered User
Thread Starter
Join Date: Feb 2010
Location: Medford Oregon
Posts: 205
Likes: 0
Received 0 Likes
on
0 Posts
I will probably clean and prep the intake manifold and the throttle body to be painted this color on the motor as well. It may not be an exact match as the 2000 degree paint that is blue is just a shade off but it wont matter to much as Ill use the same paint for the parts that are in the motor area. I went to the machine shop on Friday and went over what I wanted done for the lower end. It will be 550. decked with a new timing cover, bearings, rings, rear main seal, freeze plugs, pistons and polished crank. he said he will give me a 100,000 warranty with no time limit as far as years. I am ok with that. It will be done sometime in January. Then February I will get the transmission and Transfer case for 600 with a 100,000 mile warranty as well. March will be the head and extras on the motor and April will be the 5.29s and hopefully a locker. Then June will be suspension time which could take a little bit. I am planning to do a disc conversion on the rear axle that I have out of a 91 4runner and high steer is going to be the summer time. Until each of these are done I am going to redo all of the heater seals and get all of that cleaned up and ready to go. I am going to change out the lights and dials on the gauges. I will also paint all my interior panels. I should be busy for the next few months for sure. Ill keep updating as I go.
 01-09-2015, 02:22 PM
#19
Super Moderator
Staff
iTrader: (1)
Join Date: Aug 2008
Location: Anderson Missouri
Posts: 11,788
Likes: 0
Received 21 Likes
on
19 Posts
Sounds like a great plan. There is plenty of things that can be done while waiting for funds and machine work that makes the truck more enjoyable later when you do get done.

Thread
Thread Starter
Forum
Replies
Last Post
GreatLakesGuy
The Classifieds GraveYard
8
09-04-2015 09:27 AM


