flg8r22's 1981 4x4 restoration Thread
 01-12-2011, 01:04 PM
#61
Registered User
Thread Starter
iTrader: (1)
Join Date: Oct 2010
Location: N of Okechobee Florida
Posts: 1,002
Likes: 0
Received 4 Likes
on
4 Posts
not so good, bad, and ugly
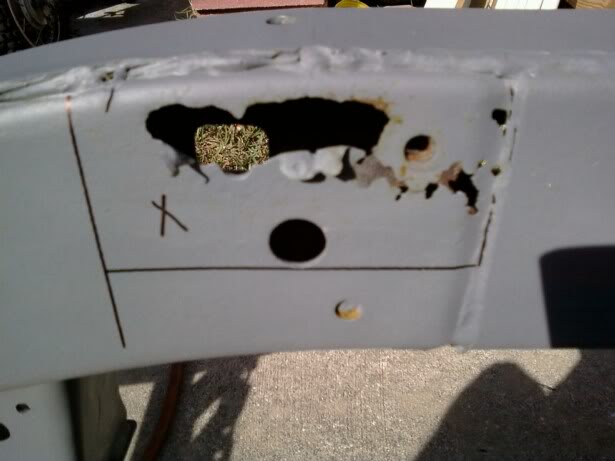
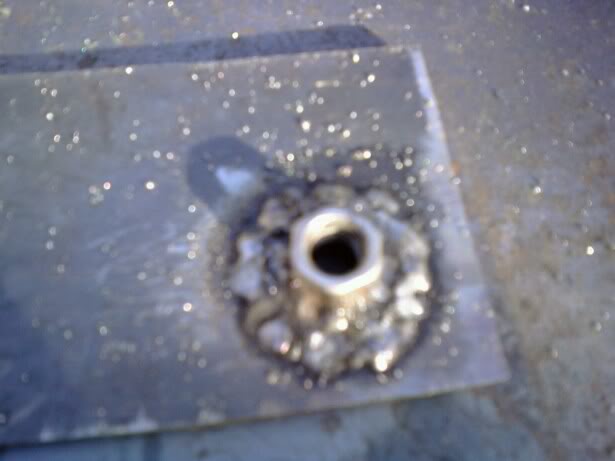
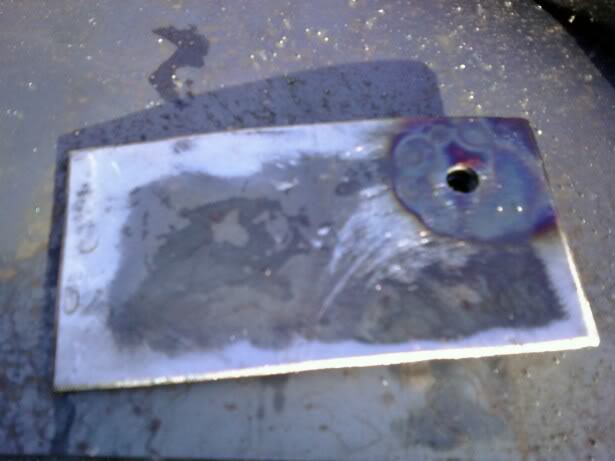
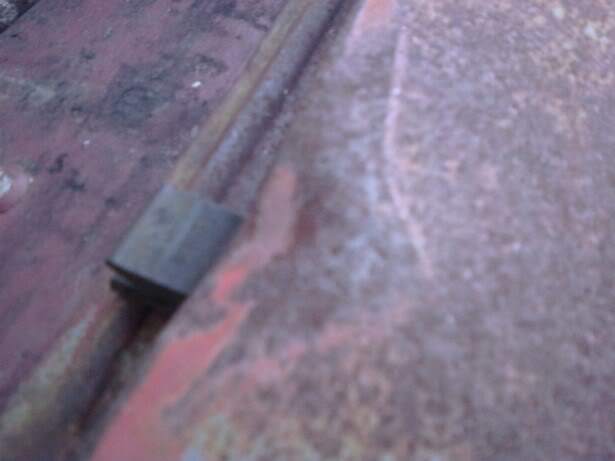
i had a few spare minutes and needed to patch an inside portion of the frame today so here it is.
cut out the bad section, cut a new piece from 1/8 stock.
drilled for the mount and welded the new nut on the backside.
pics are from my phone and it seems i lost the last few shots so i will get one of the finished product tomorrow since my phone has no flash. dude! i need some more practice for sure on the welder. check out the splatter-potomous

 01-13-2011, 07:03 AM
#64
Registered User
Thread Starter
iTrader: (1)
Join Date: Oct 2010
Location: N of Okechobee Florida
Posts: 1,002
Likes: 0
Received 4 Likes
on
4 Posts
nice! windows are over rated anyway . hopefully can get this 81 done in a reasonable amount of time. work on the rig has been slow since my "real job" has been busy.
. hopefully can get this 81 done in a reasonable amount of time. work on the rig has been slow since my "real job" has been busy.
01-14-2011, 01:24 AM
#65
Super Moderator
Staff
iTrader: (1)
Join Date: Aug 2008
Location: Anderson Missouri
Posts: 11,788
Likes: 0
Received 21 Likes
on
19 Posts
That 83 looks to be in solid condition. My parts truck is from Florida. NO RUST!! It was used for the front clip and tranny. Wish I could get a title for it. I did my 87 from the frame up and helped on an 89. I like seeing these projects from start to finish. You learn every nut and bolt and is quite satisfying when finished. Keep up the good work.
01-14-2011, 02:40 PM
#66
Registered User
Thread Starter
iTrader: (1)
Join Date: Oct 2010
Location: N of Okechobee Florida
Posts: 1,002
Likes: 0
Received 4 Likes
on
4 Posts
That 83 looks to be in solid condition. My parts truck is from Florida. NO RUST!! It was used for the front clip and tranny. Wish I could get a title for it. I did my 87 from the frame up and helped on an 89. I like seeing these projects from start to finish. You learn every nut and bolt and is quite satisfying when finished. Keep up the good work.
 . back to work on the 81 tomorrow. weather is supposed to be perfect!
and thanks for the words of encouragement, they do go a long way

 01-15-2011, 02:10 AM
#67
Super Moderator
Staff
iTrader: (1)
Join Date: Aug 2008
Location: Anderson Missouri
Posts: 11,788
Likes: 0
Received 21 Likes
on
19 Posts
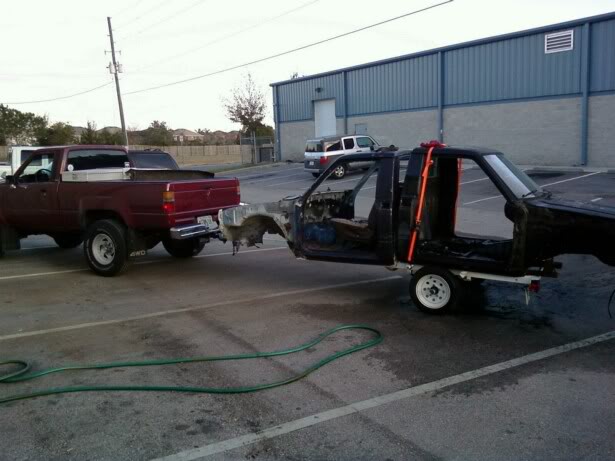
Those little trailers come in handy for parts runs to the carwash. I know what you mean by the wife sometimes "not happy". lol. That is another reason to keep moving forward. Looking like you will be reassembling here soon.
01-15-2011, 12:57 PM
#68
Registered User
Thread Starter
iTrader: (1)
Join Date: Oct 2010
Location: N of Okechobee Florida
Posts: 1,002
Likes: 0
Received 4 Likes
on
4 Posts
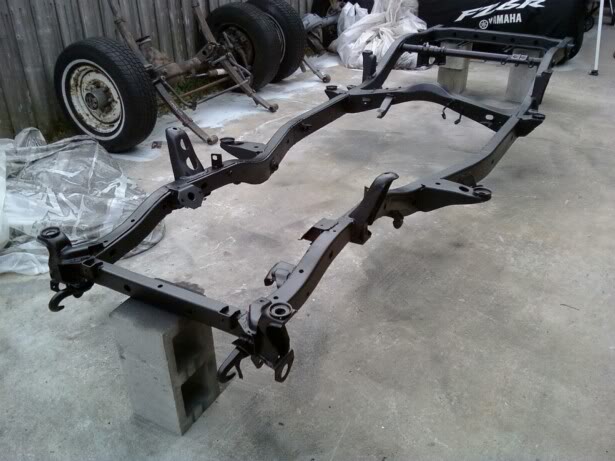
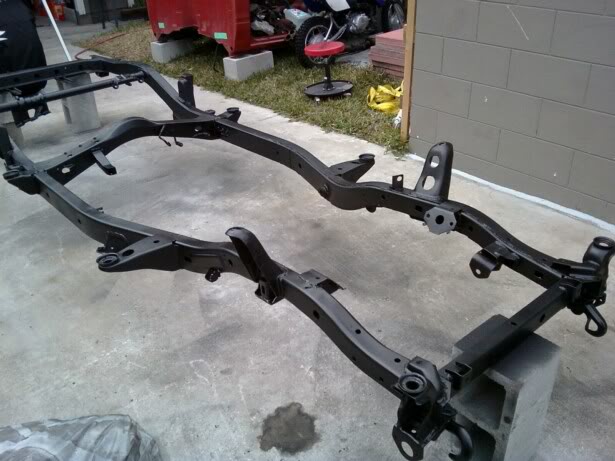
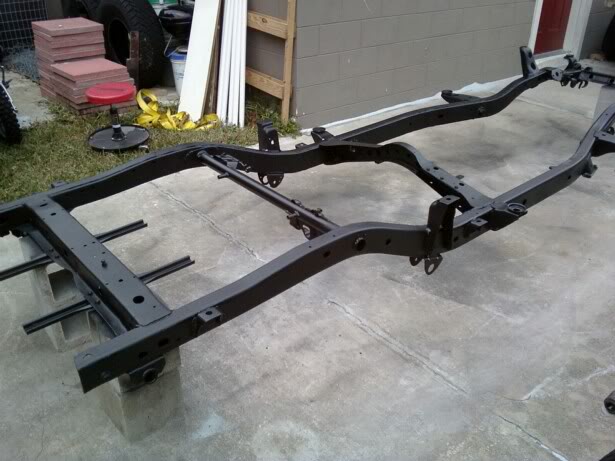
i had all the welding/patching done last night and it was ready for finish coat. i had considered painting the frame but then thought, i'd be pretty pissed off if i chipped it on the reassembly. then considered sending the frame to the powder coat dude down the road, but he wanted an arm and a leg. so i went with 3m undercoating right over the primer. i have used this stuff on all my 4 wheelers and even a couple boat trailers we have taken to the salt water and it has held up very well. so here is the finished product. still waiting for my bushing set to come in. but now i can hopefully start the cab floor and other misc body repair/replacements.

01-15-2011, 04:12 PM
#70
Registered User
iTrader: (3)
Join Date: Jun 2006
Location: Oregon
Posts: 230
Likes: 0
Received 0 Likes
on
0 Posts
Man that looks good! Thanks for sharing what you used on the frame. I have been debating for a couple months on what to use on my 83 frame when I get that far. I looked at chemical dipping it-5-600.00, then it would need top coat. Top coat could be powder coating (3-400) and the finish is not easy to clean up and touch up is impossible. I looked at Linex, but 5-600 for frame and would be taxtured; again hard to touch up. I looked at POR 15, but is not resistant to UV rays and the chemical stripping company told me it was garbage (not sure I agree since I haven't used it) I also looked at DTM (direct to metal) paint with and without primer.
I never thought about the 3M undercoating over the primer. I am going to investigate it and maybe go with that instead. Did you use a sandable primier or an epoxy sealer primer on the frame?
I never thought about the 3M undercoating over the primer. I am going to investigate it and maybe go with that instead. Did you use a sandable primier or an epoxy sealer primer on the frame?
 01-15-2011, 05:57 PM
#72
Registered User
Thread Starter
iTrader: (1)
Join Date: Oct 2010
Location: N of Okechobee Florida
Posts: 1,002
Likes: 0
Received 4 Likes
on
4 Posts
Man that looks good! Thanks for sharing what you used on the frame. I have been debating for a couple months on what to use on my 83 frame when I get that far. I looked at chemical dipping it-5-600.00, then it would need top coat. Top coat could be powder coating (3-400) and the finish is not easy to clean up and touch up is impossible. I looked at Linex, but 5-600 for frame and would be taxtured; again hard to touch up. I looked at POR 15, but is not resistant to UV rays and the chemical stripping company told me it was garbage (not sure I agree since I haven't used it) I also looked at DTM (direct to metal) paint with and without primer.
I never thought about the 3M undercoating over the primer. I am going to investigate it and maybe go with that instead. Did you use a sandable primier or an epoxy sealer primer on the frame?
I never thought about the 3M undercoating over the primer. I am going to investigate it and maybe go with that instead. Did you use a sandable primier or an epoxy sealer primer on the frame?
i used a sandable primer, the 3m undercoating cans say spray directly on bare metal or primed surfaces, so i figured i'd be ok. i have even used it on painted surfaces before and it adheres really well, and its so easy to touch up if needed. plus my home depot had it for 3.99 a can so the whole deal cost me less than 25 bones.
i still need to call you about that oil pressure gauge. is there a "no call" time, other than the middle of the night?
01-15-2011, 07:23 PM
#73
Registered User
iTrader: (3)
Join Date: Jun 2006
Location: Oregon
Posts: 230
Likes: 0
Received 0 Likes
on
0 Posts
The number I gave you is my cell, so anytime is a good time. 7:00 am until 10:00pm my time (Pacific) will work just fine.
I like the idea of 25.00 for a frame redo. SOunds better than a thousand or more. We have lot of bad weather here, so I may try and experiment with some differnet products, trying them on both primed and bare metal, then set them outside and see what happens with all the rain.
Man I miss the sun.
I like the idea of 25.00 for a frame redo. SOunds better than a thousand or more. We have lot of bad weather here, so I may try and experiment with some differnet products, trying them on both primed and bare metal, then set them outside and see what happens with all the rain.
Man I miss the sun.
01-23-2011, 11:18 AM
#76
Registered User
Thread Starter
iTrader: (1)
Join Date: Oct 2010
Location: N of Okechobee Florida
Posts: 1,002
Likes: 0
Received 4 Likes
on
4 Posts
thanks guys. the weather here has been crappy all week, either raining or freezing cold so i haven't got much done except for some body panel work. i'll try to post up some photos tomorrow.
01-23-2011, 01:42 PM
#77
Registered User
Thread Starter
iTrader: (1)
Join Date: Oct 2010
Location: N of Okechobee Florida
Posts: 1,002
Likes: 0
Received 4 Likes
on
4 Posts
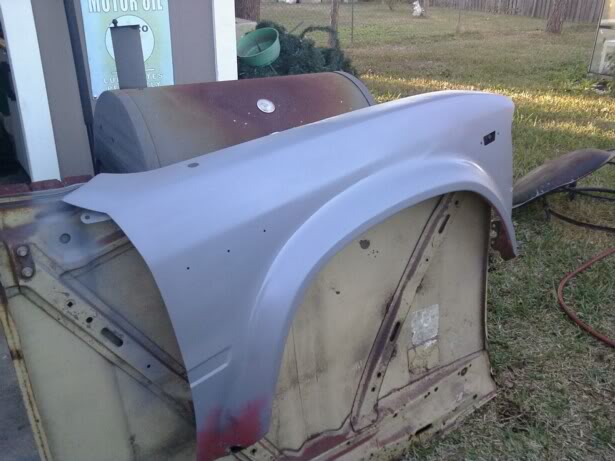
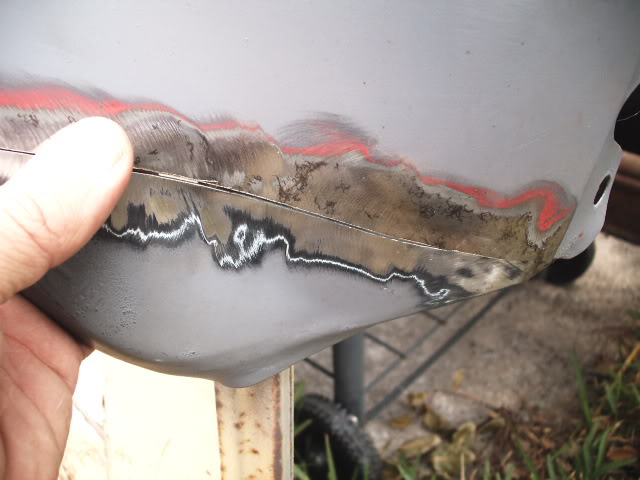
saved another piece of steel
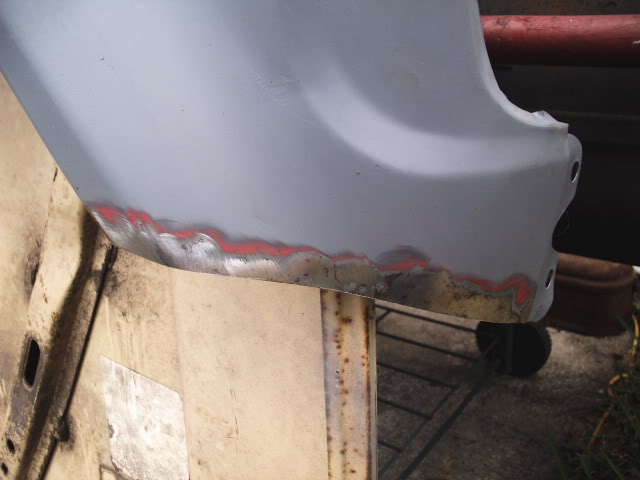
i worked on the passenger fender today. had a few pretty heavy dings in it and a crease on the top edge where it looked like someone closed the hood with a wrench on the fender.
i was careful with the propane torch just to heat the metal up enough to mold it better. the hammer and dolly set i got for christmas is now coming in handy. then removed the old decals and block sanded the fender for an hour or so. no filler just yet, im going to wait til the welding is done in case i get some warpage.
the previous owner had also cut the bottom front of the fenders for clearance. i'll be fixing that with a piece from an extra panel. also the lower cab side where the rust is all the way thru. sure am glad i have some extra panels around to cut up for the repairs as i will be welding those pieces on.
this fender is not ready for the recycler just yet
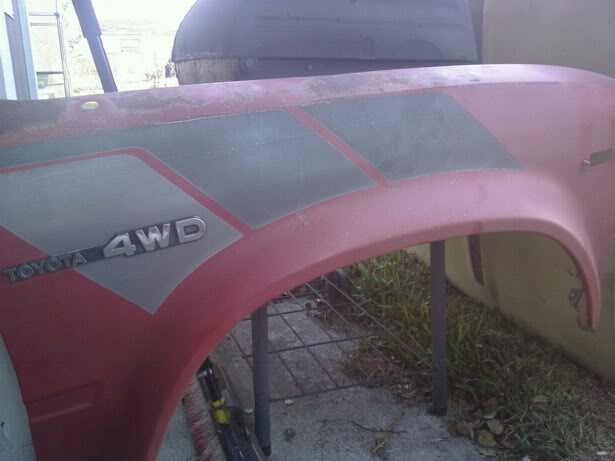
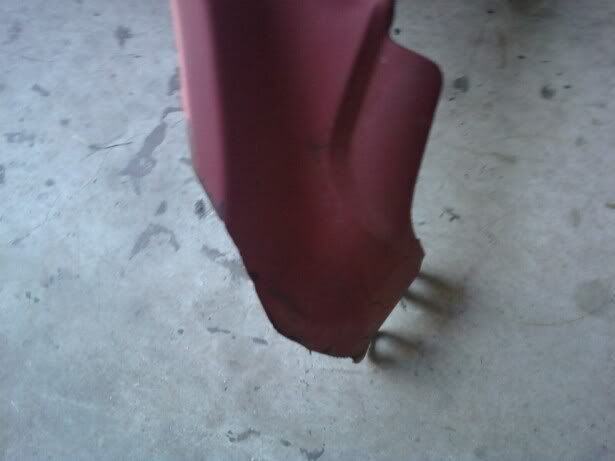
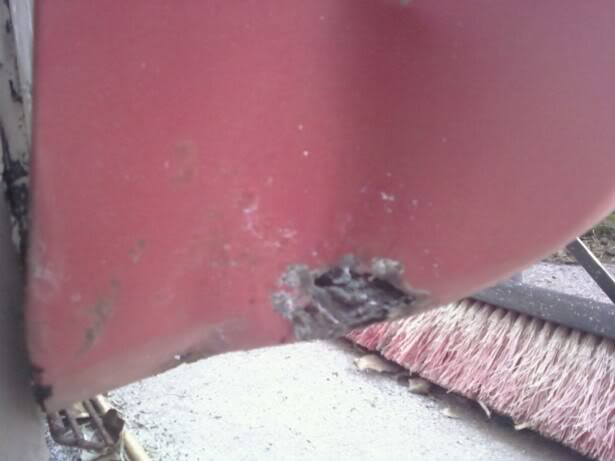
donor fender
with some primer on it, i can really see all the work to be done.
i was careful with the propane torch just to heat the metal up enough to mold it better. the hammer and dolly set i got for christmas is now coming in handy. then removed the old decals and block sanded the fender for an hour or so. no filler just yet, im going to wait til the welding is done in case i get some warpage.
the previous owner had also cut the bottom front of the fenders for clearance. i'll be fixing that with a piece from an extra panel. also the lower cab side where the rust is all the way thru. sure am glad i have some extra panels around to cut up for the repairs as i will be welding those pieces on.
this fender is not ready for the recycler just yet
donor fender
with some primer on it, i can really see all the work to be done.
Last edited by flg8r22; 01-23-2011 at 01:45 PM.
01-24-2011, 01:00 PM
#79
Registered User
Thread Starter
iTrader: (1)
Join Date: Oct 2010
Location: N of Okechobee Florida
Posts: 1,002
Likes: 0
Received 4 Likes
on
4 Posts
thanks man!
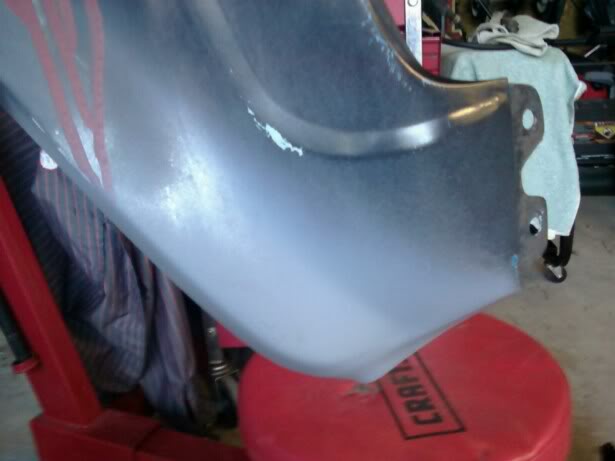
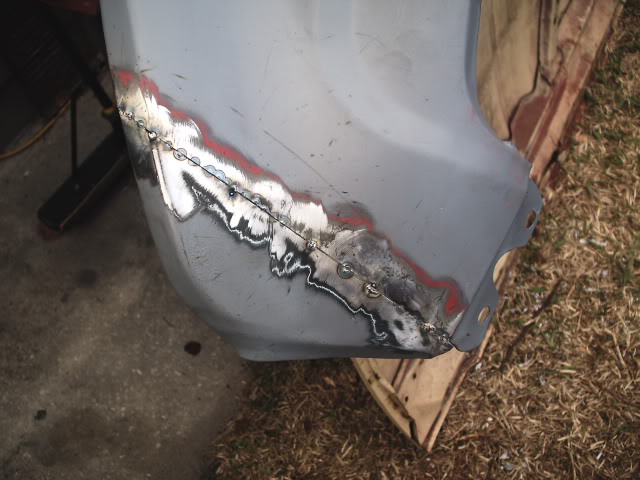
here is the progress for the day: cut the bad sections of the fender, lower right, and lower left, and also cut off the section from the donor fender. got it tacked up for the night. love the cool winter but hate the fact its gets dark at 5pm. too many explosives in the garage to be welding in there
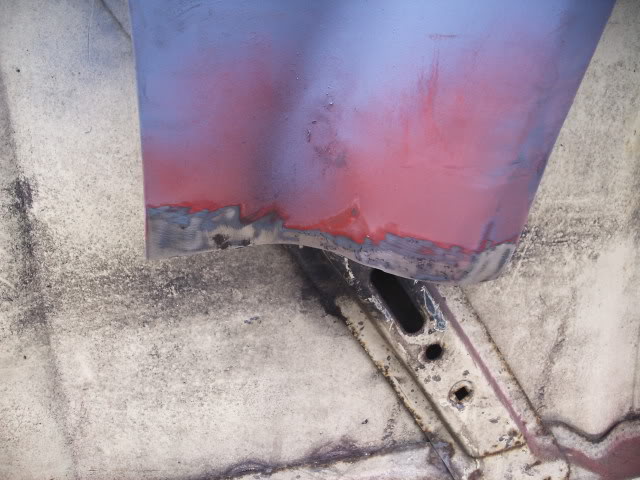
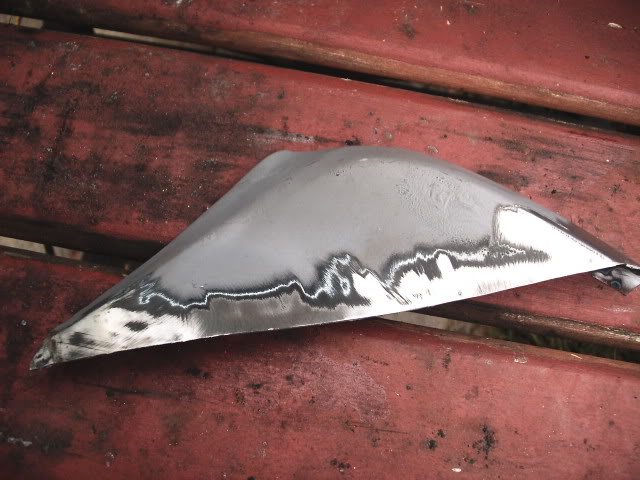

here is the progress for the day: cut the bad sections of the fender, lower right, and lower left, and also cut off the section from the donor fender. got it tacked up for the night. love the cool winter but hate the fact its gets dark at 5pm. too many explosives in the garage to be welding in there
Last edited by flg8r22; 01-24-2011 at 02:01 PM.
01-24-2011, 01:02 PM
#80
Registered User
Thread Starter
iTrader: (1)
Join Date: Oct 2010
Location: N of Okechobee Florida
Posts: 1,002
Likes: 0
Received 4 Likes
on
4 Posts
thanks man!
here is the progress for the day: cut the bad sections of the fender, lower right, and lower left, and also cut off the section from the donor fender. got it tacked up for the night. love the cool winter but hate the fact its gets dark at 5pm. too many explosives in the garage to be welding in there
holy double post!
Last edited by flg8r22; 01-24-2011 at 01:58 PM.


