1981 toyota pickup DLX Project
 11-23-2013, 01:32 PM
#21
Registered User
I wouldn't weld the diffs myself, espically the front, its going to be impossible to turn with the hubs locked, save for a spool in the rear and a locker in the front
 11-25-2013, 02:10 PM
#22

Thanks for the input, I have had mixed reviews about welded fronts, but I decided to do it since a lot of the people I wheel with are welded front and rear and yes turning radius is affected a lot but its not that bad. Even though it will be a street driver and a mild off-roader, I want all the traction I can get since I don't like big tires and I don't plan running more than 33''. Also, I always like to listen to other peoples opinions but when half the people say do it and the other half say not to, I prefer to experience it myself and have my own conclusions. Anyways the plan is to run e-locker next year.
12-26-2013, 02:55 PM
#23
So a lot has happened since last time, my old computer broke and now that I have a new one (thanks santa) so I can update.
The 4.10 diffs I got ended up being not good, they sat ouside for 2 months and needed a complete rebuild, so I got them exchanged for 4.37 welded diffs that I removed from the seller's vehicle, I only have one for now though, still waiting for the second one to start assembling the rear.
In the meantime I started assembling the front.


Moog front steering stabilizer, much beefier than the oem one.

Heavy duty DOM thick tube tie-rod with fj80 tie-rod ends

I welded this to my tie-rod from a cut-up original tie rod end.


After that I tried to rebuild my calipers but failed, so I decided to do a brake upgrade, I was recomended the tacoma brake upgrade so I got myself 96 + tacoma vented rotors, IFS hubs and 4 runner 4cyl calipers. For the rear I got a bracket for 93-97 buick regal rear calipers to use with my front soa solid discs. I got the front and rear hub machined down to 6'' 5/8 dia. to fit the rotors. I still need to buy rear calipers and get my 4runner 4cyl calipers rebuilt.


While I was waiting for my parts I started disassembling the motor, I was very eager to start this project!


Surprise!! build date 6/80 and has double row timing chain, however it has steel rockers?

transparent silicone-like pieces in my water pump housing, wtf?


The cylinder walls look great, not a single scratch, still has cross hatch. I know the motor used a loooot of oil though, I hope it came from the head and the fact that is was leaking everywhere because all of that will be taken care of, but I won't touch the bottom end. All I did was port match this oil pickup tube flange to the tube (didn't line up quite well), smoothed the rough edges and transition in the the oil pump passages, and I filled the cylinders with ATF and cleaned with brake cleaner many time to try and clean the rings. After all was cleaned I painted with chevy orange engine enamel.


I ordered a full gasket kit for the hybrid, and oversized 20r valves from engnbldr, great service, also got a gates waterpump from rockauto. Once I receive that, I will send my head out for machine work to fit the valves and change the guides before re-assembling it all.
So since I was still waiting for parts (rear diff and engine parts) I removed the body from the original frame, didn't go as well as I hoped but no damage has been done I then could remove the transmission more easily and scrap the frame. I put the cab on snowmobile rollers to slide it around, it's a lot better that way!


pics of the rotten old frame


I then proceeded to strip the interior of the cab and engine bay, since it's all I can do for now. Still waiting for the rear diff and engine parts, until then not much more progress can be done.
The 4.10 diffs I got ended up being not good, they sat ouside for 2 months and needed a complete rebuild, so I got them exchanged for 4.37 welded diffs that I removed from the seller's vehicle, I only have one for now though, still waiting for the second one to start assembling the rear.
In the meantime I started assembling the front.
Moog front steering stabilizer, much beefier than the oem one.
Heavy duty DOM thick tube tie-rod with fj80 tie-rod ends
I welded this to my tie-rod from a cut-up original tie rod end.
After that I tried to rebuild my calipers but failed, so I decided to do a brake upgrade, I was recomended the tacoma brake upgrade so I got myself 96 + tacoma vented rotors, IFS hubs and 4 runner 4cyl calipers. For the rear I got a bracket for 93-97 buick regal rear calipers to use with my front soa solid discs. I got the front and rear hub machined down to 6'' 5/8 dia. to fit the rotors. I still need to buy rear calipers and get my 4runner 4cyl calipers rebuilt.
While I was waiting for my parts I started disassembling the motor, I was very eager to start this project!
Surprise!! build date 6/80 and has double row timing chain, however it has steel rockers?
transparent silicone-like pieces in my water pump housing, wtf?
The cylinder walls look great, not a single scratch, still has cross hatch. I know the motor used a loooot of oil though, I hope it came from the head and the fact that is was leaking everywhere because all of that will be taken care of, but I won't touch the bottom end. All I did was port match this oil pickup tube flange to the tube (didn't line up quite well), smoothed the rough edges and transition in the the oil pump passages, and I filled the cylinders with ATF and cleaned with brake cleaner many time to try and clean the rings. After all was cleaned I painted with chevy orange engine enamel.
I ordered a full gasket kit for the hybrid, and oversized 20r valves from engnbldr, great service, also got a gates waterpump from rockauto. Once I receive that, I will send my head out for machine work to fit the valves and change the guides before re-assembling it all.
So since I was still waiting for parts (rear diff and engine parts) I removed the body from the original frame, didn't go as well as I hoped but no damage has been done
I then could remove the transmission more easily and scrap the frame. I put the cab on snowmobile rollers to slide it around, it's a lot better that way! pics of the rotten old frame
I then proceeded to strip the interior of the cab and engine bay, since it's all I can do for now. Still waiting for the rear diff and engine parts, until then not much more progress can be done.
12-30-2013, 01:26 PM
#24
A bit more work from the last few days, I had fun with my new dremel tool extension and went ahead and ported my oil pump and water pump passages. Not that these engines are known to have lubrication or cooling problems, I just wanted to do this for fun and since I plan on driving this thing hard, why not. It also gets me used to my dremel extension before I start on the head. I already port-matched the oil pickup tube which was slightly off, and I also plan on doing some in the block. I smoothed all the edges and blended the transitions thats all, I did not enlarge any passage so I wouldn't loose fluid velocity.
Before/after, note that the right side hole was already bigger before I touched it.


Behind those passages

Naked engine bay, I bought zinc primer and rust paint to paint it once it's all clean and sanded. This will be a project for when I will be waiting for parts/money. Note the original colour, cream white.

Today I received my transmission mount, v6 caliper front ceramic pads and hardware and buick regal rear ceramic pads and hardware. In the next couple days I should have the hubs on and pre-load set. Still waiting for parts so the engine bay may get a bit of work done to it.
Before/after, note that the right side hole was already bigger before I touched it.
Behind those passages
Naked engine bay, I bought zinc primer and rust paint to paint it once it's all clean and sanded. This will be a project for when I will be waiting for parts/money. Note the original colour, cream white.
Today I received my transmission mount, v6 caliper front ceramic pads and hardware and buick regal rear ceramic pads and hardware. In the next couple days I should have the hubs on and pre-load set. Still waiting for parts so the engine bay may get a bit of work done to it.
Last edited by gillesdetrail; 12-30-2013 at 01:29 PM.
12-30-2013, 05:32 PM
#25
Registered User

Join Date: Dec 2012
Location: rowe ma.
Posts: 8
Likes: 0
Received 0 Likes
on
0 Posts
Extremely glad to see you are trying to save this old yota.!!!!Most people would have spent the money from the scrap by now.I love the 1st & 2nd gen Toyota's.Please keep the pics. and the info coming. Great progress. if computers were not such a pita, for me anyways, I would post some pics. of my 1st & 2nd gen builds.Great work!!!!! 
01-04-2014, 02:30 PM
#27
So the hubs are installed, bearing pre-load done, and calipers have been modified to fit!
Here is what it looks like with the hubs and rotors installer, 1.5'' wider on each side (3'' more track total for the mathematically impared).
96 tacoma rotors, vented slotted and drilled, 296.8mm dia, brake fade should not be an issue.


I got the 12$ motor mount instead of the 60$ from rockauto.com. Knowing that you get what you pay for, I filled it with windshield eurethane to give it extra stiffness and durability. I have filled motor and tranny mounts with this eurethane on my past setups and after hundred of 1/8th mile passes (and tire warmup) there was no sign of wear, so it should last many years of abuse.
before

after

Not my cleanest work, but you try to do something clean with windshield eurethane, damn near impossible. I used the stiffest windshield eurethane available, but it still allows some flex.
Tacoma brake upgrade with v6 calipers
v6 4runner/pickup /t100 sw13b calipers vs solid axle 4cyl calipers


Picture that shows what I needed to grind to fit my wheels


What I grinded are cooling fins, no fluid goes through that, many people have to grind those down completely to fit their wheels, I was lucky not to.
Shiny new calipers are nice but shiny new red calipers are nicer

tomorrow or monday I should have them mounted up, I will post pics of that when its done.
Today I also wire-wheeled 80% of my engine bay, I should have it ready for primer and paint pretty soon, unless I receive my engine gasket and seal kit before that (ordered it on the 20th of december, should have it this week). Also still waiting for my &?*&% rear diff, the guy I bought it from was supposed to have it ready before christmas, looks like i'll need to waste another 70$ of fuel to drive up there and remove it myself from his truck and bring it down here...
Here is what it looks like with the hubs and rotors installer, 1.5'' wider on each side (3'' more track total for the mathematically impared).
96 tacoma rotors, vented slotted and drilled, 296.8mm dia, brake fade should not be an issue.
I got the 12$ motor mount instead of the 60$ from rockauto.com. Knowing that you get what you pay for, I filled it with windshield eurethane to give it extra stiffness and durability. I have filled motor and tranny mounts with this eurethane on my past setups and after hundred of 1/8th mile passes (and tire warmup) there was no sign of wear, so it should last many years of abuse.
before
after
Not my cleanest work, but you try to do something clean with windshield eurethane, damn near impossible
. I used the stiffest windshield eurethane available, but it still allows some flex.Tacoma brake upgrade with v6 calipers
v6 4runner/pickup /t100 sw13b calipers vs solid axle 4cyl calipers
Picture that shows what I needed to grind to fit my wheels
What I grinded are cooling fins, no fluid goes through that, many people have to grind those down completely to fit their wheels, I was lucky not to.
Shiny new calipers are nice but shiny new red calipers are nicer
tomorrow or monday I should have them mounted up, I will post pics of that when its done.
Today I also wire-wheeled 80% of my engine bay, I should have it ready for primer and paint pretty soon, unless I receive my engine gasket and seal kit before that (ordered it on the 20th of december, should have it this week). Also still waiting for my &?*&% rear diff, the guy I bought it from was supposed to have it ready before christmas, looks like i'll need to waste another 70$ of fuel to drive up there and remove it myself from his truck and bring it down here...
Last edited by gillesdetrail; 01-04-2014 at 02:33 PM.
01-04-2014, 04:12 PM
#28
If people want more info on the front brake conversion I have posted a complete how-to in this thread:
https://www.yotatech.com/forums/f114...l#post52154878
https://www.yotatech.com/forums/f114...l#post52154878
01-05-2014, 05:42 PM
#30
Thanks man I've always dreamed of it, now my dream is to find at least an OK bed.
here is what I did today:


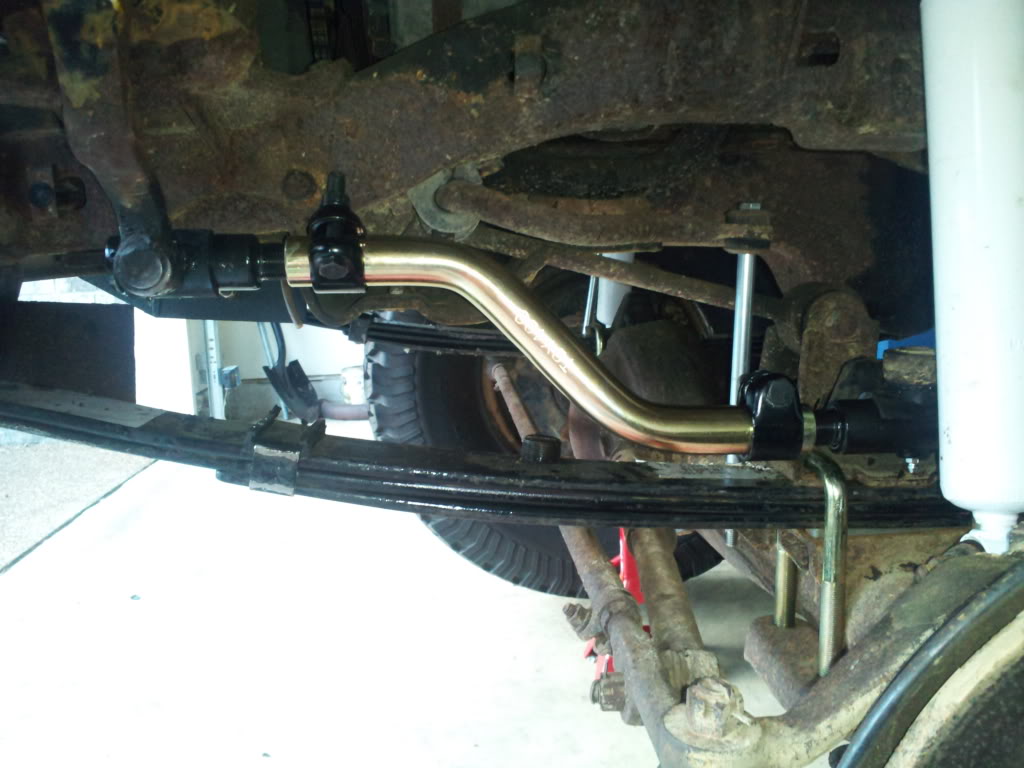
Front end pretty much complete appart from little details and shock absorbers. I noticed a little play in my drag link, do you guys think I need a drop drag link? I have 2.5'' of true lift total and I don't want more. Else I will just find a rebuild kit. As for shocks I will buy them when the chassis is complete so that I can find the correct length.

here is what I did today:
Front end pretty much complete appart from little details and shock absorbers. I noticed a little play in my drag link, do you guys think I need a drop drag link? I have 2.5'' of true lift total and I don't want more. Else I will just find a rebuild kit. As for shocks I will buy them when the chassis is complete so that I can find the correct length.
01-06-2014, 12:44 PM
#33
Ok good to know!
I'm glad you posted that since all I found after a quick search yesterday was drag links made for 4'' + lift and around 175$ or more. That pro comp bar was new? I'm heading out to the garage but when I come back I'll do more searching, if you however have a link that would be great.
I'm glad you posted that since all I found after a quick search yesterday was drag links made for 4'' + lift and around 175$ or more. That pro comp bar was new? I'm heading out to the garage but when I come back I'll do more searching, if you however have a link that would be great.
 01-14-2014, 04:22 PM
#36
So I FINALLY got my rear diff and I also received my gasket kit and oversize valves. The engnbldr kit looks like great quality, especially for the price.
I brought my 20r head to a local machine shop which was recomended to me, it was a great experience! The guy spent an hour talking to me and explaining all of what he wanted to do, all the race setups he has done over the years and told me many good stories. He has been in buisness since the 60's and it was great talking to him. He told me that he would take his time and treat my head like if it was his, he seemed as exited as I am to work on it which was pretty funny.
My rebuild kit, anyone know why I got 2 exhaust gaskets? Should I put both of just one?

My friend working with me rebuilding my powersteering pump with all new seals and gaskets


Timing cover painted with new water pump and ported oil pump.

Parts I got from toyota, original brake likes and yaris/corolla magnetic transmission drain plugs for my diffs.


Filled my front and rear diffs with arctic cat 80w90, will run this oil for a couple of km just to clean everything then flush it.

And there is it on all 4 wheels!


Right now I am looking for a header and p/s bracket. I am cleaning the transmission and transfer case and preparing it for paint, next week I should be installing everything on the frame, can't wait!
I brought my 20r head to a local machine shop which was recomended to me, it was a great experience! The guy spent an hour talking to me and explaining all of what he wanted to do, all the race setups he has done over the years and told me many good stories. He has been in buisness since the 60's and it was great talking to him. He told me that he would take his time and treat my head like if it was his, he seemed as exited as I am to work on it which was pretty funny.
My rebuild kit, anyone know why I got 2 exhaust gaskets? Should I put both of just one?
My friend working with me rebuilding my powersteering pump with all new seals and gaskets
Timing cover painted with new water pump and ported oil pump.
Parts I got from toyota, original brake likes and yaris/corolla magnetic transmission drain plugs for my diffs.
Filled my front and rear diffs with arctic cat 80w90, will run this oil for a couple of km just to clean everything then flush it.
And there is it on all 4 wheels!
Right now I am looking for a header and p/s bracket. I am cleaning the transmission and transfer case and preparing it for paint, next week I should be installing everything on the frame, can't wait!
 01-26-2014, 08:29 AM
#38
For the people following here is what went down in the last 2 weeks.
Still waiting for my head from the machinist, went back friday and left my flywheel there to be resurfaced. He said we was going to acid-dip the head this week-end and it should be finished next week, can't wait.
In the mean time I've stripped and painted my transmission and t-case


I also worked a bit on the intake manifold, I blended the entry to make a smooth curve instead of a 90 degree sharp edge, also enlarged the entry about 1mm diameter for anti-reversion. I ''ported'' about 3 inches into the runners to remove the casting flaws and left a 60 grit finish for turbulence and fuel atomisation. I'm not sure if that will make difference in fuel economy/cold start or performance but I don't care since I love doing this sort of stuff


I got myself a holley fuel pump with some russel fittings, got it used but never installed, and new timing chain tensioners too.

Then I started the cab work....what a dissapointment. If you think your truck floor was rusty, this might cheer you up. Keep in mind this truck has only seen east canadian winters from 1998-2012.
I removed the 3-4 sheets that were metal-screwed on the floor...

to discover the whole driver's side floor is rotten from the steering column all the way back. The parts that looks ''ok'' is not attached to the rockers anymore and is very soft. The passenger side is a bit better, but will need to be replaced too. Not sure if I keep the tunnel or not.


Gotta start somewhere so I began cutting.

This is what's left of my rockers. The white metal is what the previous owner added for re-inforcement back in 1997, the rust is, well, what used to be a rocker.


To end on a better note here is my 80% stripped engine bay, will be painted black.

Tomorrow I will be assembling the short block and installing it on the frame. When I get the flywheel and head I will install transmission and transfer case too. After that it's fuel and brake lines (in a week or two), then driveshafts and the frame portion is pretty much done appart from shocks, hand brake cable and rear brake setup.
For the floor pans I need all the advice I can get since I have never done that. I will be looking closely at what kawazx6 has done. I told corey (slacker) a while ago I would order his toyotafiberglass rockers but now I'm not sure if its the right choice, since I will need something to weld my floors to, but I may be wrong since I have never done fiberglass work. Corey if you read this is there a how-to somewhere on installing your rockers?
Still waiting for my head from the machinist, went back friday and left my flywheel there to be resurfaced. He said we was going to acid-dip the head this week-end and it should be finished next week, can't wait.
In the mean time I've stripped and painted my transmission and t-case
I also worked a bit on the intake manifold, I blended the entry to make a smooth curve instead of a 90 degree sharp edge, also enlarged the entry about 1mm diameter for anti-reversion. I ''ported'' about 3 inches into the runners to remove the casting flaws and left a 60 grit finish for turbulence and fuel atomisation. I'm not sure if that will make difference in fuel economy/cold start or performance but I don't care since I love doing this sort of stuff
I got myself a holley fuel pump with some russel fittings, got it used but never installed, and new timing chain tensioners too.
Then I started the cab work....what a dissapointment. If you think your truck floor was rusty, this might cheer you up. Keep in mind this truck has only seen east canadian winters from 1998-2012.
I removed the 3-4 sheets that were metal-screwed on the floor...
to discover the whole driver's side floor is rotten from the steering column all the way back. The parts that looks ''ok'' is not attached to the rockers anymore and is very soft. The passenger side is a bit better, but will need to be replaced too. Not sure if I keep the tunnel or not.
Gotta start somewhere so I began cutting.
This is what's left of my rockers. The white metal is what the previous owner added for re-inforcement back in 1997, the rust is, well, what used to be a rocker.
To end on a better note here is my 80% stripped engine bay, will be painted black.
Tomorrow I will be assembling the short block and installing it on the frame. When I get the flywheel and head I will install transmission and transfer case too. After that it's fuel and brake lines (in a week or two), then driveshafts and the frame portion is pretty much done appart from shocks, hand brake cable and rear brake setup.
For the floor pans I need all the advice I can get since I have never done that. I will be looking closely at what kawazx6 has done. I told corey (slacker) a while ago I would order his toyotafiberglass rockers but now I'm not sure if its the right choice, since I will need something to weld my floors to, but I may be wrong since I have never done fiberglass work. Corey if you read this is there a how-to somewhere on installing your rockers?
Last edited by gillesdetrail; 01-26-2014 at 08:34 AM.
01-26-2014, 04:33 PM
#40
yep , I have been following along ...
but you need more then just our rockers .... Have a look at my Trekker build . The new floors I built , Dave did , and did his own version . Maybe you'll figure out something as well
.
but you need more then just our rockers .... Have a look at my Trekker build . The new floors I built , Dave did , and did his own version . Maybe you'll figure out something as well
.
Last edited by slacker; 01-26-2014 at 04:35 PM.


