1978 Dually Flatbed Build
 09-28-2016, 07:05 PM
#1
Registered User
Thread Starter
1978 Dually Flatbed Build
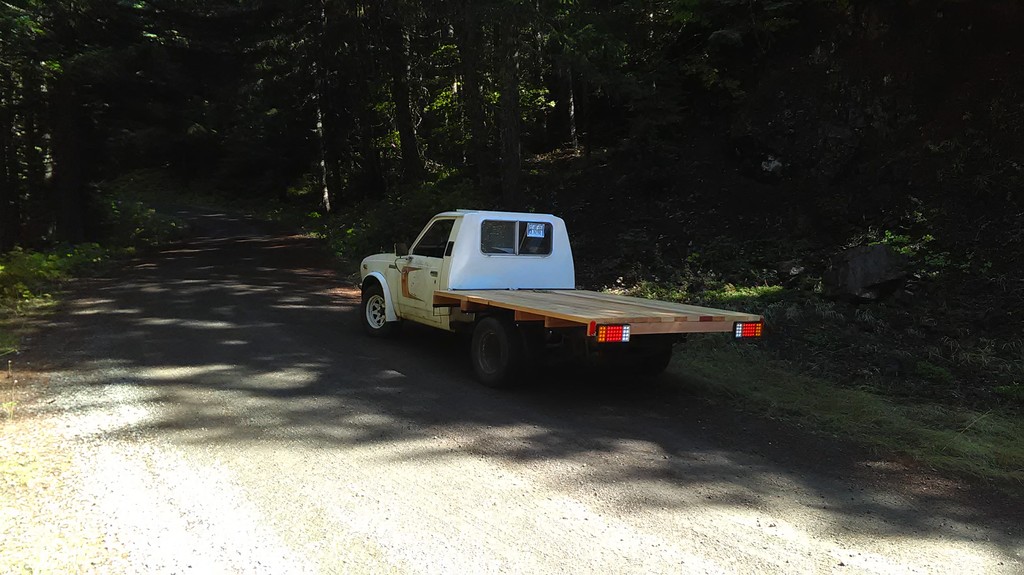
Thought I'd post here to show off my latest project.
This started out life as a 1978 Mirage Motorhome (well, if you want to split hairs it started out as a cab/chassis from toyota which was converted into a motorhome by mirage, but I digress). Me and a buddy picked it up together. The motorhome was pretty well garbage and the clutch slave was out. In addition some mice had taken to building a nest in the carburetor as it had been sitting at least 5 years.
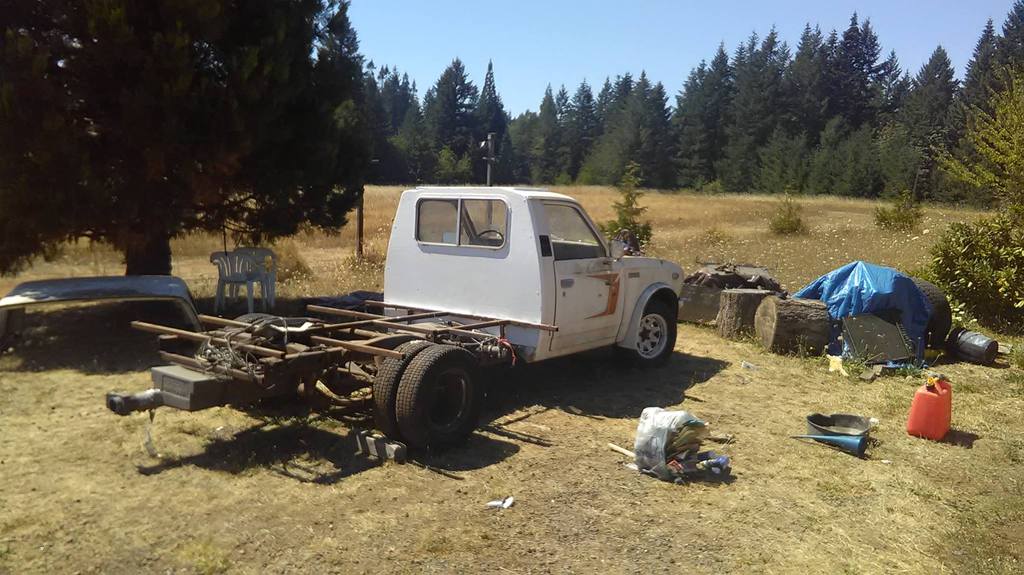
We parted out and then scrapped was what left of the motorhome. Amazingly we were able to get the 20r fired up with little issue. Since we've done a multitude of things including:
Mechanical-
New Clutch Master and Slave Cylinder
Cleaned the entire fuel system, new fuel filter
Desmogged and replaced all the vac lines that were left
New Starter
Body-
Got a temporary solution in place to patch the rear of the cab of the roof
Cleaned and painted the rear frame section
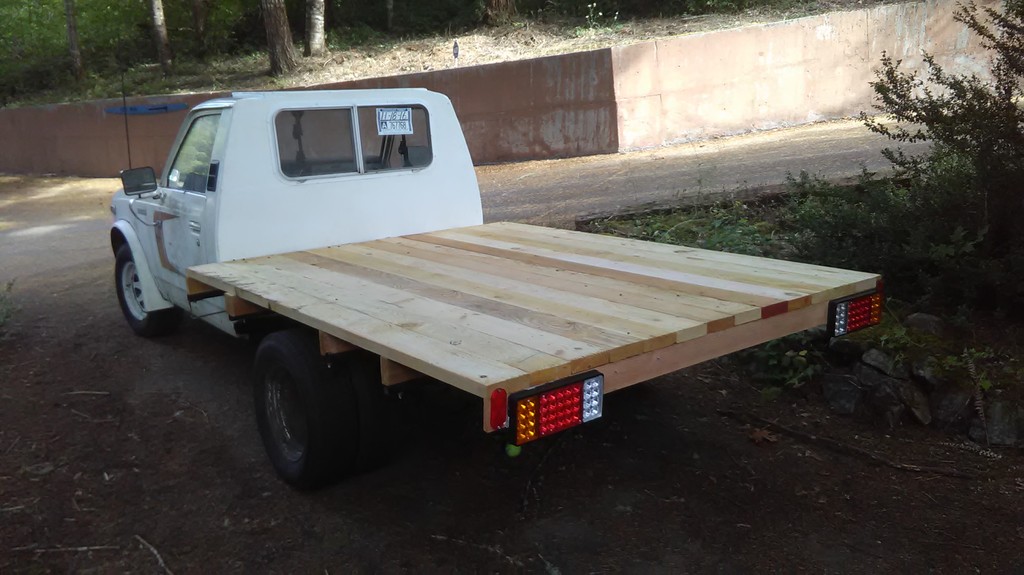
6x8 Flatbed complete with new lighting in the rear
Interior-
Custom seat out of a ford ranger
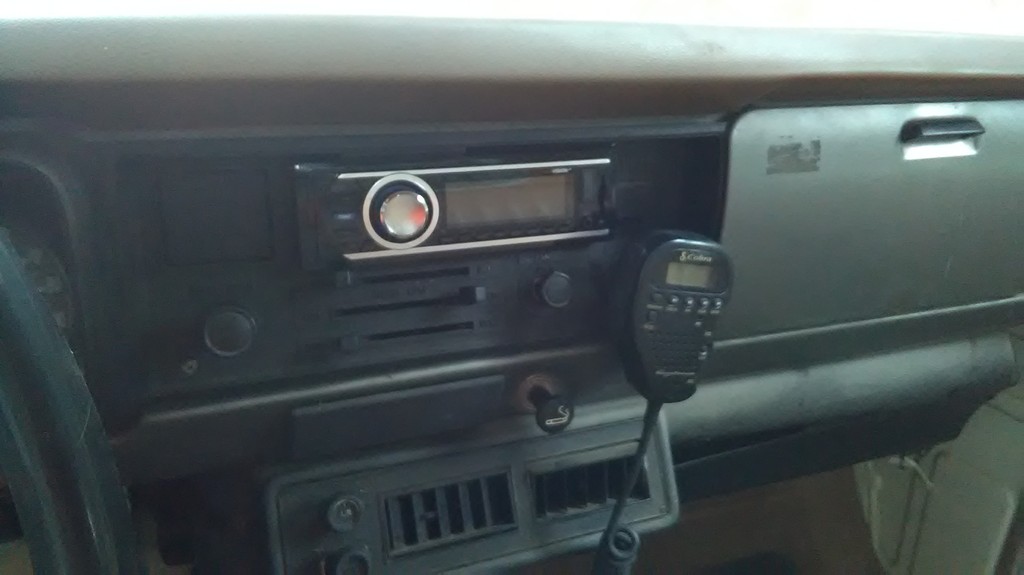
FM radio with bluetooth installed
Cobra CB Installed
Future Plans (In order of affordability/likeliehood they will get done)-
New Exhaust
Tires
Something more permanent for the cab
5-speed swap
4x4 Conversion with toyota 4wd front axle and actual dually rear axle
Engine Swap (Depending on other things)
And just a few pics of the progress so far
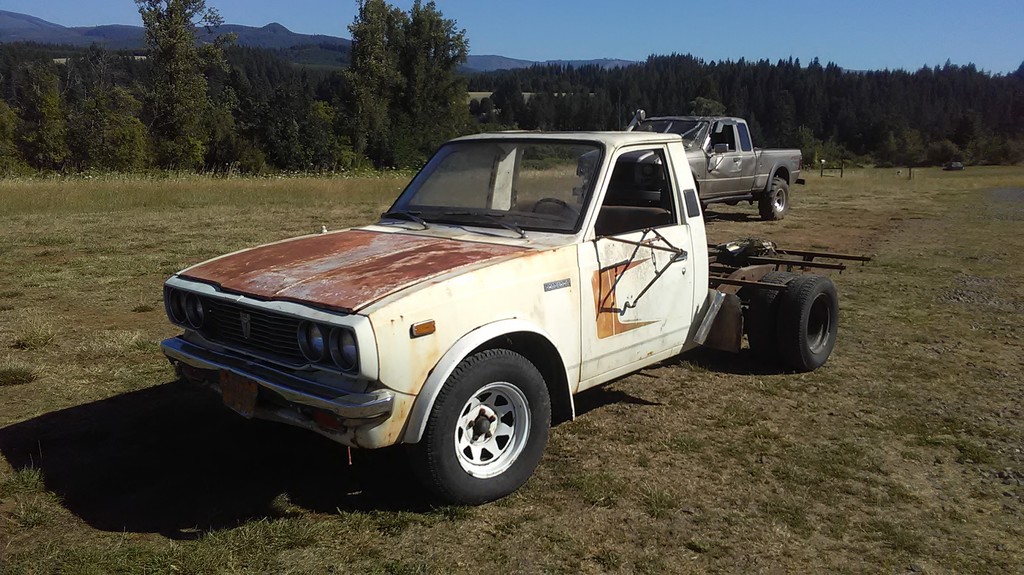
This started out life as a 1978 Mirage Motorhome (well, if you want to split hairs it started out as a cab/chassis from toyota which was converted into a motorhome by mirage, but I digress). Me and a buddy picked it up together. The motorhome was pretty well garbage and the clutch slave was out. In addition some mice had taken to building a nest in the carburetor as it had been sitting at least 5 years.
We parted out and then scrapped was what left of the motorhome. Amazingly we were able to get the 20r fired up with little issue. Since we've done a multitude of things including:
Mechanical-
New Clutch Master and Slave Cylinder
Cleaned the entire fuel system, new fuel filter
Desmogged and replaced all the vac lines that were left
New Starter
Body-
Got a temporary solution in place to patch the rear of the cab of the roof
Cleaned and painted the rear frame section
6x8 Flatbed complete with new lighting in the rear
Interior-
Custom seat out of a ford ranger
FM radio with bluetooth installed
Cobra CB Installed
Future Plans (In order of affordability/likeliehood they will get done)-
New Exhaust
Tires
Something more permanent for the cab
5-speed swap
4x4 Conversion with toyota 4wd front axle and actual dually rear axle
Engine Swap (Depending on other things)
And just a few pics of the progress so far


 11-12-2016, 12:45 PM
#5
Registered User
Thread Starter
Well not much to report lately as the truck has been running well. Still need to retune the carburetor but I'm holding off until I fix up the cooling system. Right now the truck does not warm up all the way. Guessing either the t-stat is faulty or there is not one in there. Going to replace pretty much everything except the radiator.
In the meantime I did build a couple storage boxes to sit under the flatbed. There is just not enough room behind the seat to store everything so I thought this was a good solution. In the pictures they look a little lower than they actually are- they do not extend below the frame in fact they are about a good 2" above it. Came out good I think.
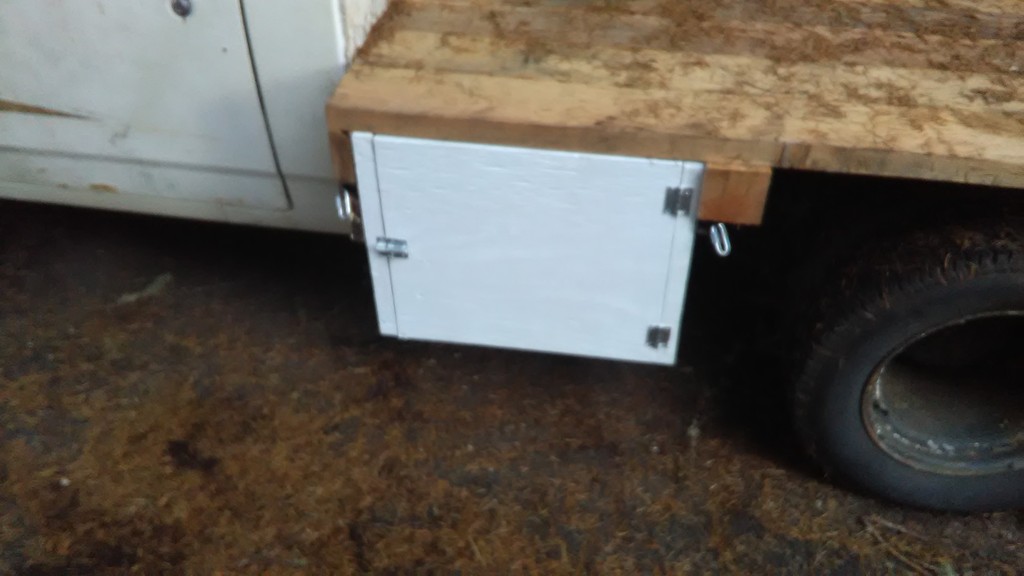
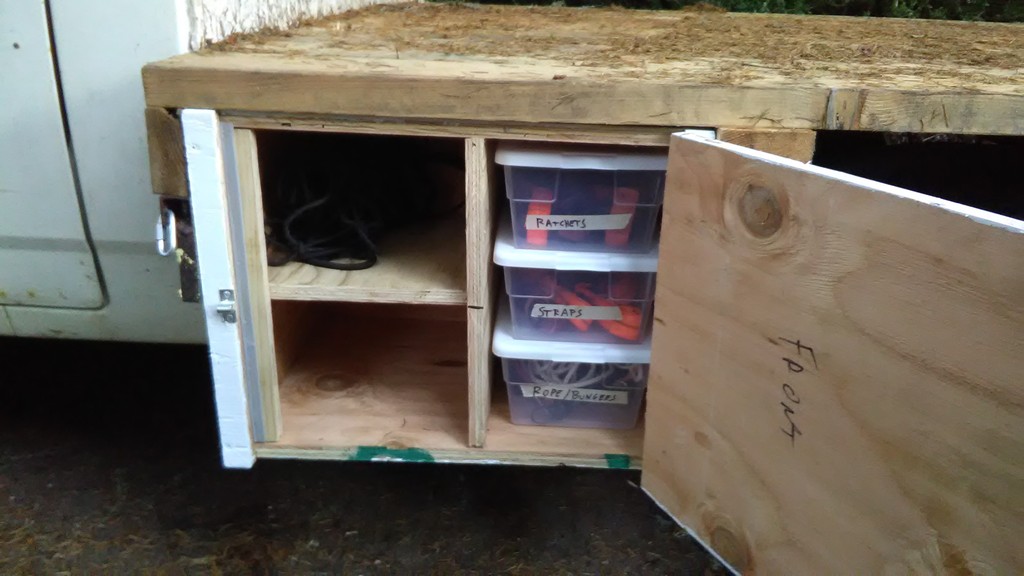
In the meantime I did build a couple storage boxes to sit under the flatbed. There is just not enough room behind the seat to store everything so I thought this was a good solution. In the pictures they look a little lower than they actually are- they do not extend below the frame in fact they are about a good 2" above it. Came out good I think.

 01-14-2017, 05:48 PM
#6
Registered User
Thread Starter
Well its been a while since I updated this thread but I haven't been doing too much to the old truck.
I did replace most of the cooling system and also the valve cover gasket as it was leaking. Mechanically I don't have any issues with the truck. It even filled in for my DD while it was in the shop a few weeks back
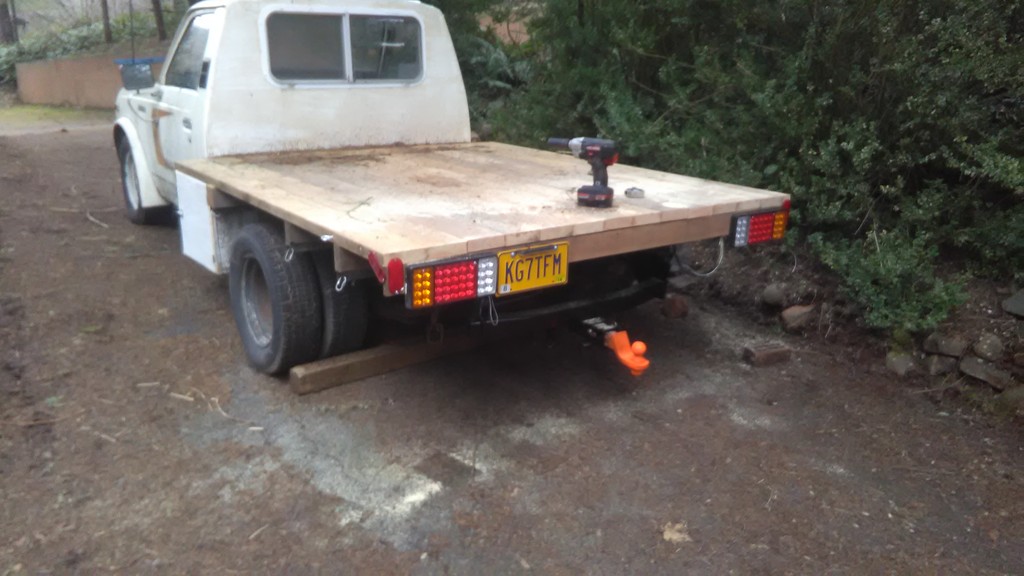
I did add a trailer hitch and modify the bed slightly. I cut it down to only 7'6" long from 8' so the hitch would extend beyond the back. It works much better this way IMO, there is less of the bed behind the last cross support, plus this way I don't have to use a hitch extension. If anybody is curious the hitch is off a 2004 Jeep Liberty and was almost perfect width. I did have to cut off about 3-4" of the hitch part that mounts to the frame as mine only has about 11" behind the leaf spring hangers. Oh and drill the holes in the fame Turned out good I think
The only other project I have slated is an OBA system. I have the compressor and I have an air valve, just need everything else. Hoping for a HF gift card for my birthday to pick up some more components. Other than that I really just need to decide which way to go with the truck. I'd like to do a 4x4 conversion along with bigger tires, etc. but that adds a lot of work. As-is its functional and I get a lot of compliments at the gas station.
I did replace most of the cooling system and also the valve cover gasket as it was leaking. Mechanically I don't have any issues with the truck. It even filled in for my DD while it was in the shop a few weeks back
I did add a trailer hitch and modify the bed slightly. I cut it down to only 7'6" long from 8' so the hitch would extend beyond the back. It works much better this way IMO, there is less of the bed behind the last cross support, plus this way I don't have to use a hitch extension. If anybody is curious the hitch is off a 2004 Jeep Liberty and was almost perfect width. I did have to cut off about 3-4" of the hitch part that mounts to the frame as mine only has about 11" behind the leaf spring hangers. Oh and drill the holes in the fame
Turned out good I think
The only other project I have slated is an OBA system. I have the compressor and I have an air valve, just need everything else. Hoping for a HF gift card for my birthday to pick up some more components. Other than that I really just need to decide which way to go with the truck. I'd like to do a 4x4 conversion along with bigger tires, etc. but that adds a lot of work. As-is its functional and I get a lot of compliments at the gas station.
01-29-2017, 08:55 AM
#7
Registered User
Thread Starter
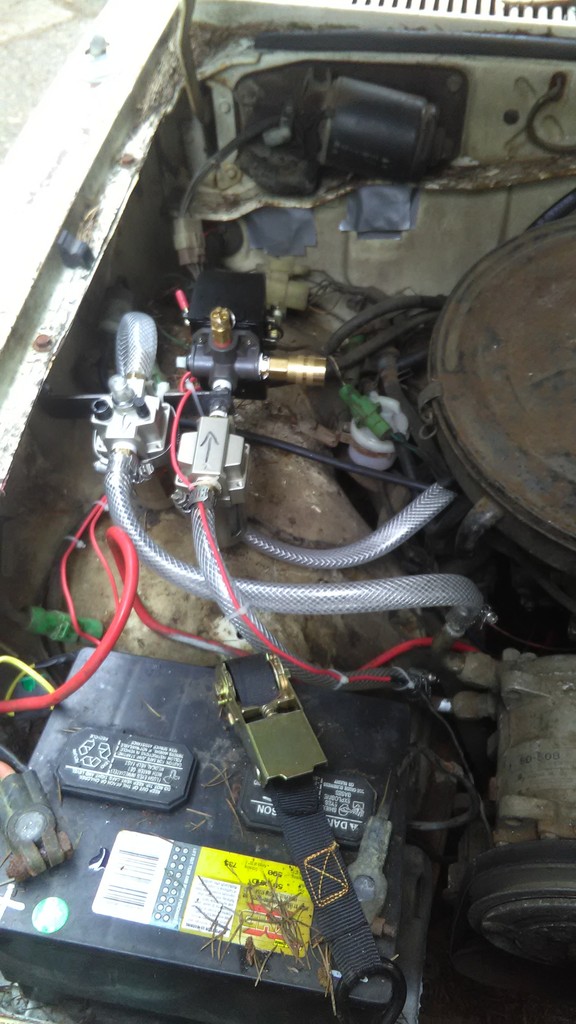
Well completed my on board air setup over the weekend. Went pretty well and worked out good. Here is some of the components I used. I picked up the components primarily from Harbor Freight and Home Depot. The only thing I ordered offline was the air switch which came from ebay. Total cost was around $70.
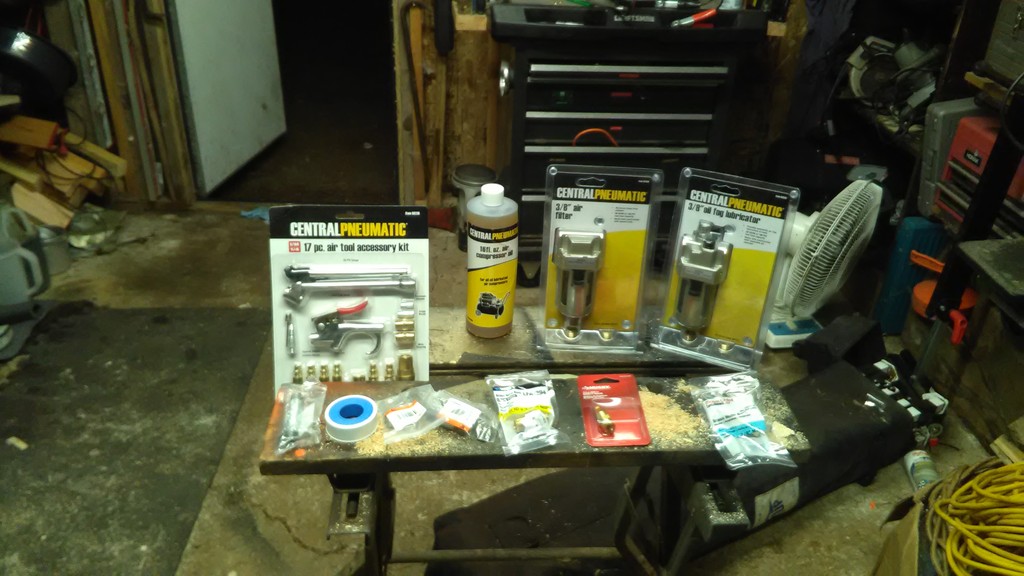
Basically I recycled one of the ports on the air cleaner that was originally for the smog pump. That line runs into the air oiler (far left), which then runs to the compressor. From the compressor it runs to the air filter (to the right of the oiler) and to the air switch (above the filter). I have a safety valve and coupler attached to the air switch. Right now its set for 80 on 125 off which works pretty well, but its adjustable should I need to down the road. I used a piece of flat bar to mount everything to and then attached the flat bar to the truck with some sheet metal screws.
Not pictured is a 20' coil air hose and several air tools I keep in the truck. The compressor is impressive, it is able to pressurize the system in seconds. At idle the volume is a little low but if you bring the RPM up to about 2k its plenty enough, I was able to run a die grinder and impact without much issue. In the future I would like to upgrade to a better filter so it will get more oil out. All I am really using it for is airing up tires and running air tools so not a big deal. I am also planning on adding a tank at some point, but again, not a big deal for now. Overall I am pleased with how it turned out
I think my next project is going to be painting the truck this spring when it warms up a little bit. Right now I'm thinking of using rustoleum farm/implement paint in Massey Ferguson red.

Basically I recycled one of the ports on the air cleaner that was originally for the smog pump. That line runs into the air oiler (far left), which then runs to the compressor. From the compressor it runs to the air filter (to the right of the oiler) and to the air switch (above the filter). I have a safety valve and coupler attached to the air switch. Right now its set for 80 on 125 off which works pretty well, but its adjustable should I need to down the road. I used a piece of flat bar to mount everything to and then attached the flat bar to the truck with some sheet metal screws.
Not pictured is a 20' coil air hose and several air tools I keep in the truck. The compressor is impressive, it is able to pressurize the system in seconds. At idle the volume is a little low but if you bring the RPM up to about 2k its plenty enough, I was able to run a die grinder and impact without much issue. In the future I would like to upgrade to a better filter so it will get more oil out. All I am really using it for is airing up tires and running air tools so not a big deal. I am also planning on adding a tank at some point, but again, not a big deal for now. Overall I am pleased with how it turned out

I think my next project is going to be painting the truck this spring when it warms up a little bit. Right now I'm thinking of using rustoleum farm/implement paint in Massey Ferguson red.
Last edited by rowdy235; 01-29-2017 at 08:58 AM.
Trending Topics
02-26-2017, 04:51 PM
#9
Registered User
Thread Starter
Heres a quick video I made of the OBA system in action

 01-15-2018, 05:21 PM
#12
Registered User
Thread Starter
Been a while since I updated this thread but I have been slowly working on the old flatbed.
I added a 10 gallon tank for the OBA. I thought it would fit under the bed opposite of the gas tank, but turns out my eyes are not the best measurement tool So it had to go under the rear of the bed, which is alright, but takes up room I would have liked to put other things (like a spare tire, lol)
Here is how I routed the hose, and a shot of where the tank ended up. I always say work smarter not harder
I added a 10 gallon tank for the OBA. I thought it would fit under the bed opposite of the gas tank, but turns out my eyes are not the best measurement tool
So it had to go under the rear of the bed, which is alright, but takes up room I would have liked to put other things (like a spare tire, lol)Here is how I routed the hose, and a shot of where the tank ended up. I always say work smarter not harder
01-15-2018, 05:24 PM
#13
Registered User
Thread Starter
Once it dried out a little I did another couple projects- staining/sealing the flatbed and new brakes on the front. You can also see where the air tank sits a little better.
01-15-2018, 05:27 PM
#14
Registered User
Thread Starter
Alright and just one last update- finally got tired of the broken down ranger seat so got a couple of seats (for free) out of a 2000 honda accord. They weren't too bad to put in, and they are comfy. My only complaint is the seats are a little "big". Even all the way back it can be tricky getting in and out, and I don't think anybody taller than me (5'8") could drive comfortably. Of course, nobody else drives it anyway lol.
I've got some gauges on order so that will be the next project. This summer I'm thinking about giving it a coat of paint. I'm also looking for a smaller steering wheel to help the aforementioned seating issue.
I've got some gauges on order so that will be the next project. This summer I'm thinking about giving it a coat of paint. I'm also looking for a smaller steering wheel to help the aforementioned seating issue.
01-17-2018, 11:52 AM
#15
Seats look good, glad to see this truck is still going strong.
I've been keeping an eye out for some buckets for my truck too. Had the same issue on my old Datsun, where all the new bucket seats are too "thick" and reduce your leg room, definitely don't want to do that again, lol. Only thing I can think of are some of the compact cars these days seem to have some "thin" seats which may work, but people want a small fortune for used seats it seems
I've been keeping an eye out for some buckets for my truck too. Had the same issue on my old Datsun, where all the new bucket seats are too "thick" and reduce your leg room, definitely don't want to do that again, lol. Only thing I can think of are some of the compact cars these days seem to have some "thin" seats which may work, but people want a small fortune for used seats it seems
01-17-2018, 04:51 PM
#16
Registered User
Thread Starter
Thanks!
I believe honda civic or acura integra seats from the early 90's are a good seat. They're almost a direct bolt in too IIRC.
You ain't kidding about the seat prices, in my neck of the woods I was looking at 150-200 for a set of decent seats. When these popped up for free, I couldn't resist, even if they are a little big.
If you've got power steering, an aftermarket smaller wheel (grant gt comes to mind) would probably go a long ways too
01-18-2018, 03:30 PM
#18
Registered User
Thread Starter

I was simply stating if you had power steering and needed more room, could get a smaller steering wheel. But with manual steering, the big wheel helps
01-27-2018, 05:33 PM
#19
Registered User
Thread Starter
Another project completed today- Gauges.
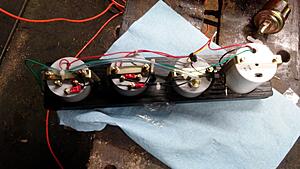
After pricing out some of the common brand of gauges, I was shocked at the prices. $30-40 for each gauge. I found some decent looking chinese knock offs for sale on ebay and decided to give them a try. I got a tachometer, vacuum gauge, volt gauge, and oil pressure gauge. After pricing out the adapter to attach the gauge (and retain the stock idiot light circuit / needed for electric fuel pump) at nearly 30 dollars, I decided to use the oil pressure gauge for my OBA system instead.
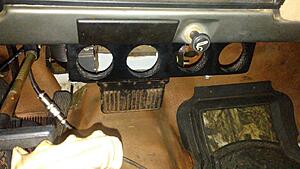
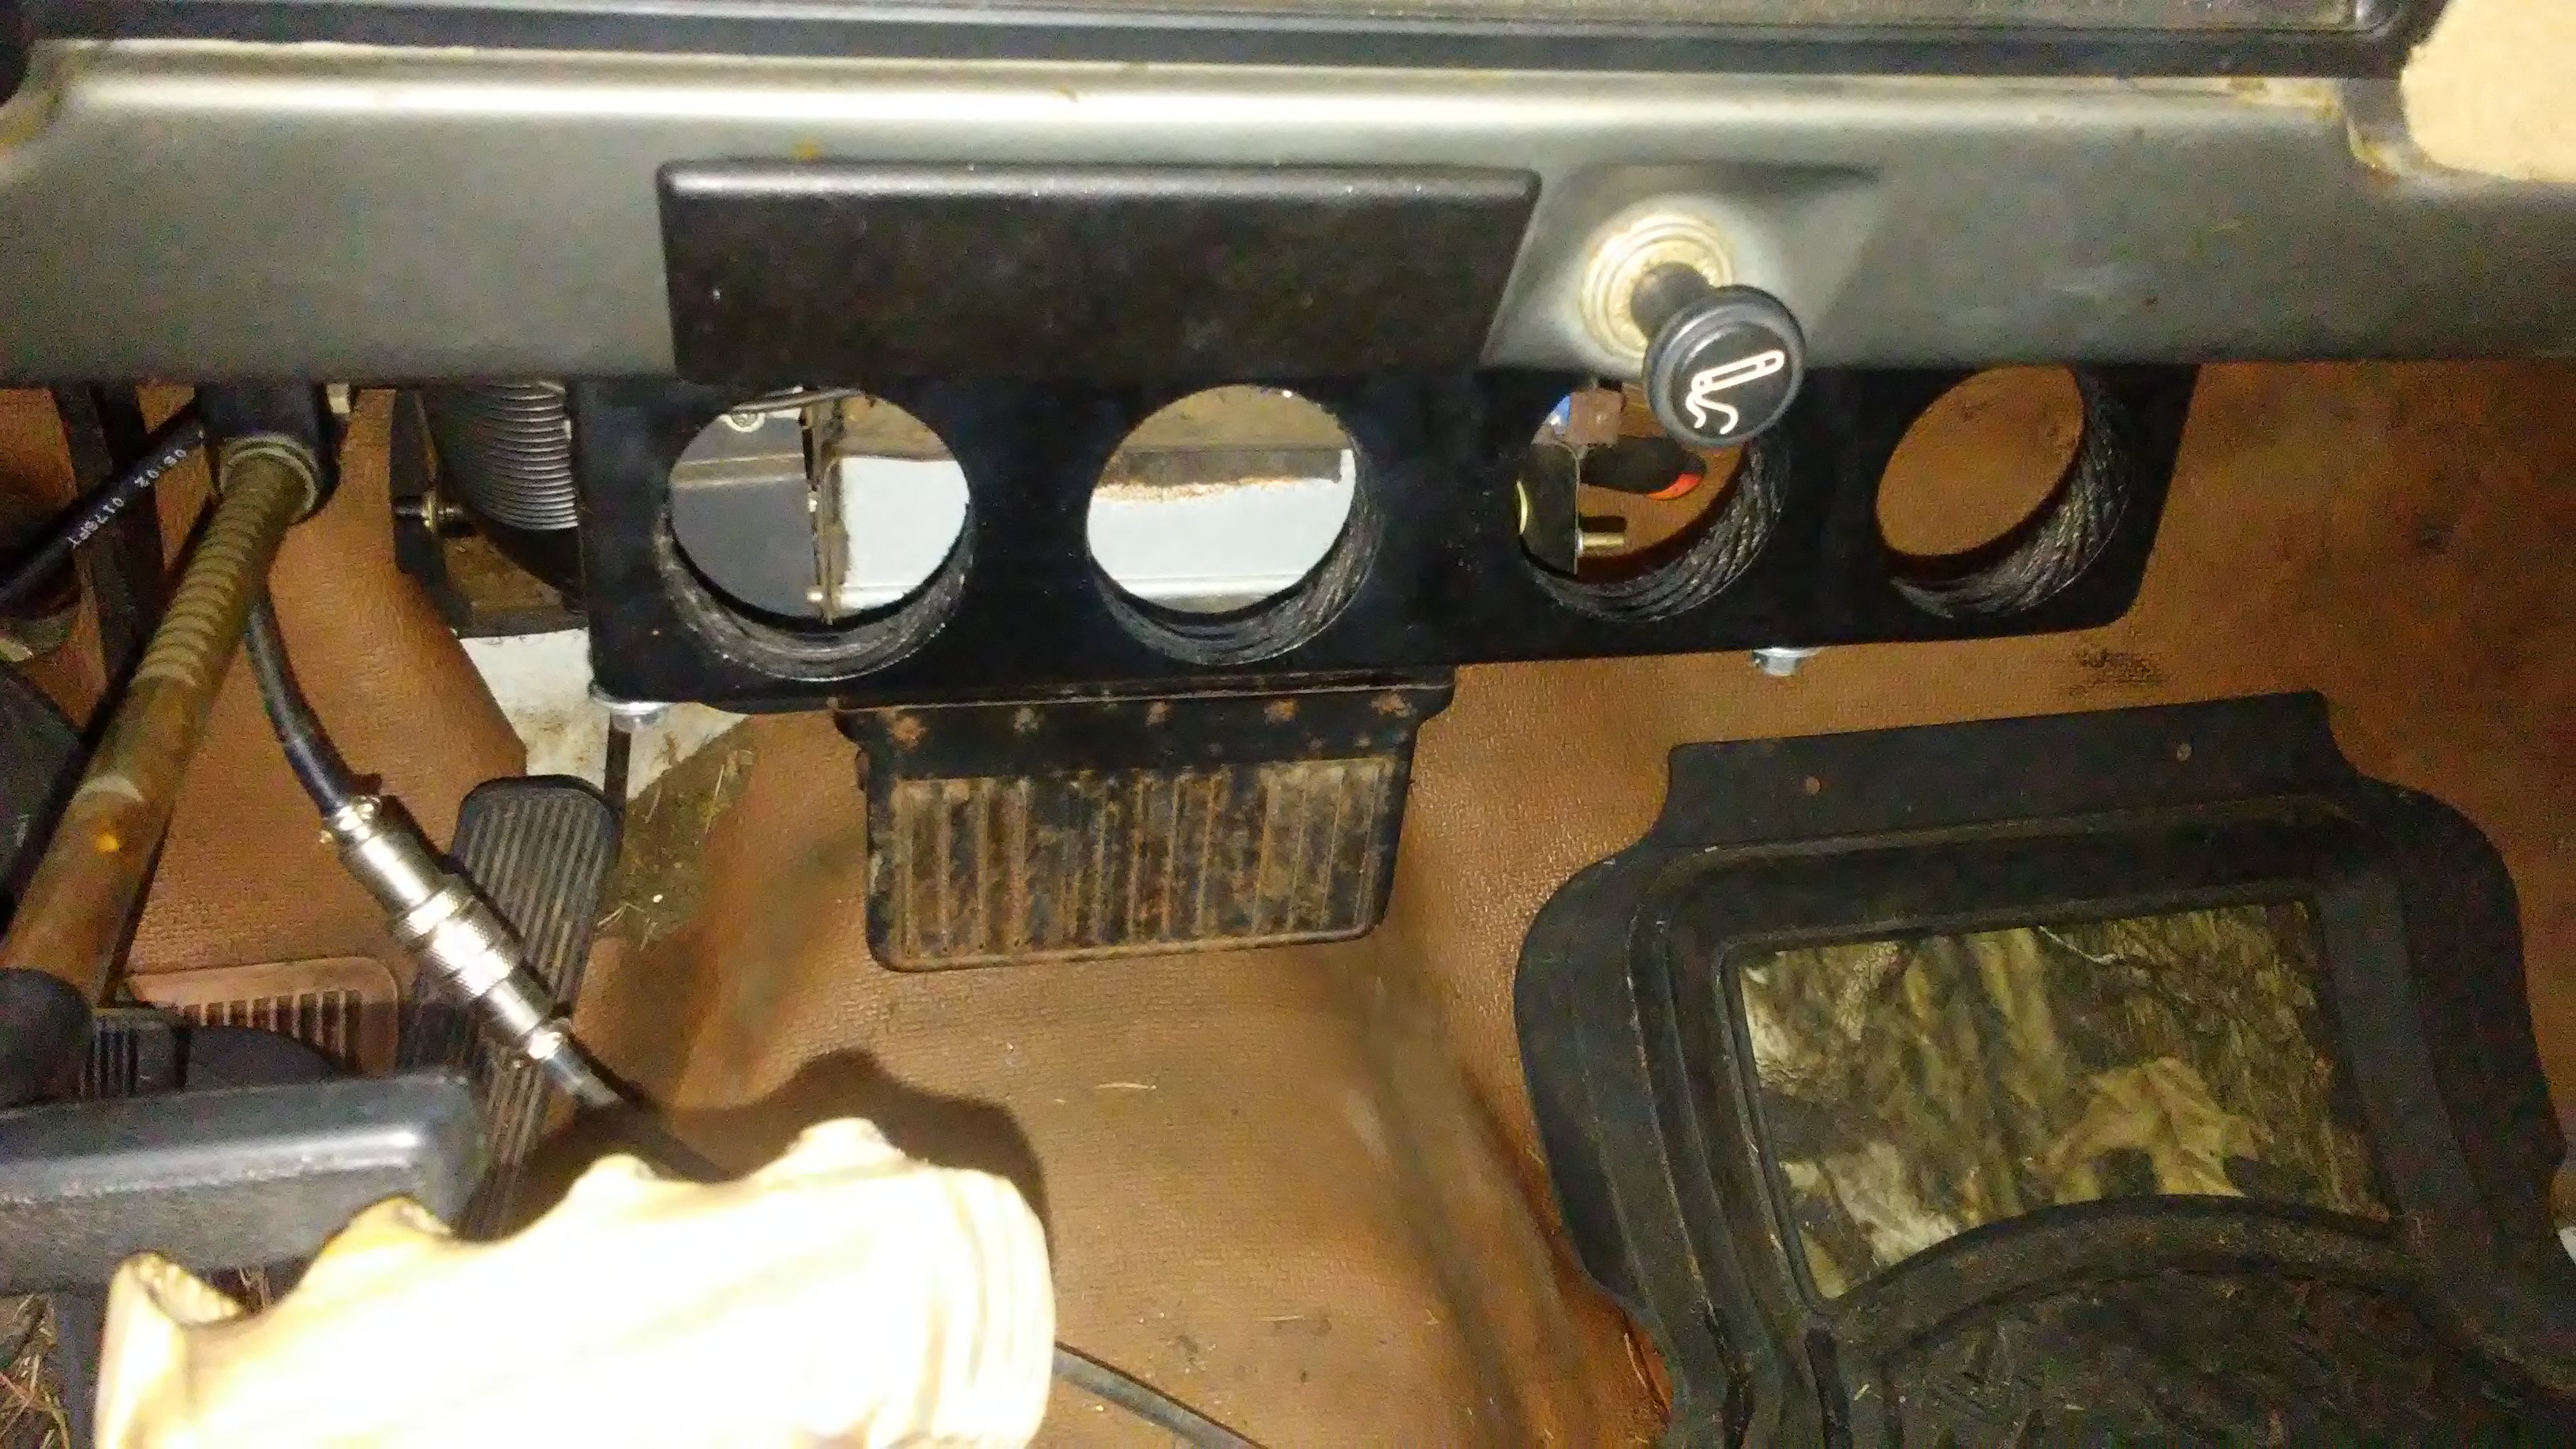
Built a bezel out of some 1x3. Sanded/painted and attached to the under side of the dash with some sheet metal screws. Turned out nice I think, best place for gauges IMO as they are out of the way but still easy to see.
Here's the gauges all wired up in the bezel, all-in-all the connections I had were +, -, hose for vacuum, air pressure sender, and - side of coil for tach
And, the gauges installed. (Ignore the air pressure gauge in the second pic, it was taken before I connected the sender)
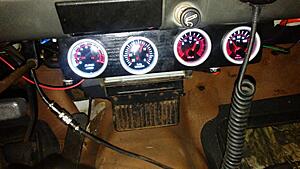
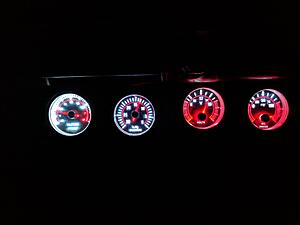
Overall I am pretty impressed with the gauges, especially for the price point. Most of them appear to be fairly accurate (the truck was just started and cold when picture taken hence the higher rpm / lower vacuum readings). One thing I do plan to change is the power source. I tapped onto the "gauge" circuit (seemed logical for gauges, lol), but then discovered the heater is also ran off that circuit. The only downside is when heater is on full blast I feel my voltage gauge is not giving an entirely accurate reading. I am likely going to either do a relay with a straight to battery source or switch over to the accessories circuit, which has less power draw (stereo and CB).
I also installed a lighted toggle switch for the OBA (previously was just attached to battery and used switch on the pressure switch to turn on/off), but no picture.
After pricing out some of the common brand of gauges, I was shocked at the prices. $30-40 for each gauge. I found some decent looking chinese knock offs for sale on ebay and decided to give them a try. I got a tachometer, vacuum gauge, volt gauge, and oil pressure gauge. After pricing out the adapter to attach the gauge (and retain the stock idiot light circuit / needed for electric fuel pump) at nearly 30 dollars, I decided to use the oil pressure gauge for my OBA system instead.
Built a bezel out of some 1x3. Sanded/painted and attached to the under side of the dash with some sheet metal screws. Turned out nice I think, best place for gauges IMO as they are out of the way but still easy to see.
Here's the gauges all wired up in the bezel, all-in-all the connections I had were +, -, hose for vacuum, air pressure sender, and - side of coil for tach

And, the gauges installed. (Ignore the air pressure gauge in the second pic, it was taken before I connected the sender)


Overall I am pretty impressed with the gauges, especially for the price point. Most of them appear to be fairly accurate (the truck was just started and cold when picture taken hence the higher rpm / lower vacuum readings). One thing I do plan to change is the power source. I tapped onto the "gauge" circuit (seemed logical for gauges, lol), but then discovered the heater is also ran off that circuit. The only downside is when heater is on full blast I feel my voltage gauge is not giving an entirely accurate reading. I am likely going to either do a relay with a straight to battery source or switch over to the accessories circuit, which has less power draw (stereo and CB).
I also installed a lighted toggle switch for the OBA (previously was just attached to battery and used switch on the pressure switch to turn on/off), but no picture.
Last edited by rowdy235; 01-27-2018 at 05:41 PM.

Thread
Thread Starter
Forum
Replies
Last Post
desertcamper67
84-85 Trucks & 4Runners
20
10-20-2009 08:39 PM


