The Chuckbox
 09-04-2010, 05:23 PM
#1
The Chuckbox
Chuck is made out of wood, does this make Chuck a woodchuck 

When I was in Boy Scouts eons ago, our scoutmaster had a chuckbox for camping.
We mostly backpacked, but occasionally we car camped at a dedicated site somewhere, and out came the chuckbox to prepare meals.
I soon forgot though about those old chuckboxes from long ago until they started appearing before my eyes on forums where I saw trip reports and researched them more from a few online places that make them like:
Blue Sky Kitchen
Drifta Camping Kitchens
Kanz Outdoors
The three above are all very nice units, with the first two having several models.
If one has the tools and the skills, Blue Sky Kitchen has plans available and many videos on his site showing the construction of them.
Before I got interested in them much though I had already bought a Cabelas Instant Cooking Station that I have used for the past few years.
It works great, but between the two plastic drawers and the kitchen itself, it takes a lot of room in my rig.
I saw a design by Chad (JJBigg's on Expedition Portal site) that was built around the same stove I have, the Camp Chef Denali, and I took a liking to it immediately.
His 3D modeling threads he posts up are incredible to look at.
I got the plans from Chad for the chuckbox and I had talked to a local crate builder who supplies Boeing with customized crates for shipping parts, and a salesman there saw the plans and said they could build it for me.
I was getting ready to call them up a month later to give them the go ahead when a member on a few forums I am on (Titanpat57) contacted me after he saw I was interested in them and said he could build one for me, so I emailed him the plans and he looked it over.
He modified it a bit as I measured out the two right side shelves so one could hold my 8" Lodge cast iron skillet, and my 8" Lodge Dutch oven, and the other shelf for my French Press coffee maker and plates.
The two left side shelves would be for the utensil tray and miscellaneous stuff.
I have a Cabelas Deluxe Roll-Top table I bought a few years back and it hardly takes up any room when stored in the rig.
It will be used to support the chuckbox, and it will have plenty of room to hold other stuff on top when preparing meals, much more room than the old setup.
While the Cabelas Kitchen setup was very nice I have used for the past few years, there is something about the chuckboxes that seems much more nostalgic to me.
Something like this can be passed on down the line too when I get to old to get out
The chuckbox arrived just a few hours ago via FedEx.
It had a long journey from New York to Washington state, and the way Pat packed it, it arrived unscathed.
It was packed with foam core and taped all around, and heavy cardboard on the outside, very nice.
When I opened it up outside a few neighbors were eyeballing it, and they commented on how it looked like fine furniture.
The pictures do not do it justice, it looks great!
The finish on it lets you see the lines in the wood through it too.
Pat did an incredible job on the box from us just communicating via email back and forth.
Hats off to Pat for offering to build this for me, I am very impressed with it.
Below are some pictures of the chuckbox unloaded and then loaded up with all the stuff I had in the other setup.
I still need to figure out something to hold a roll of paper towels like the Cabelas kitchen had on it.
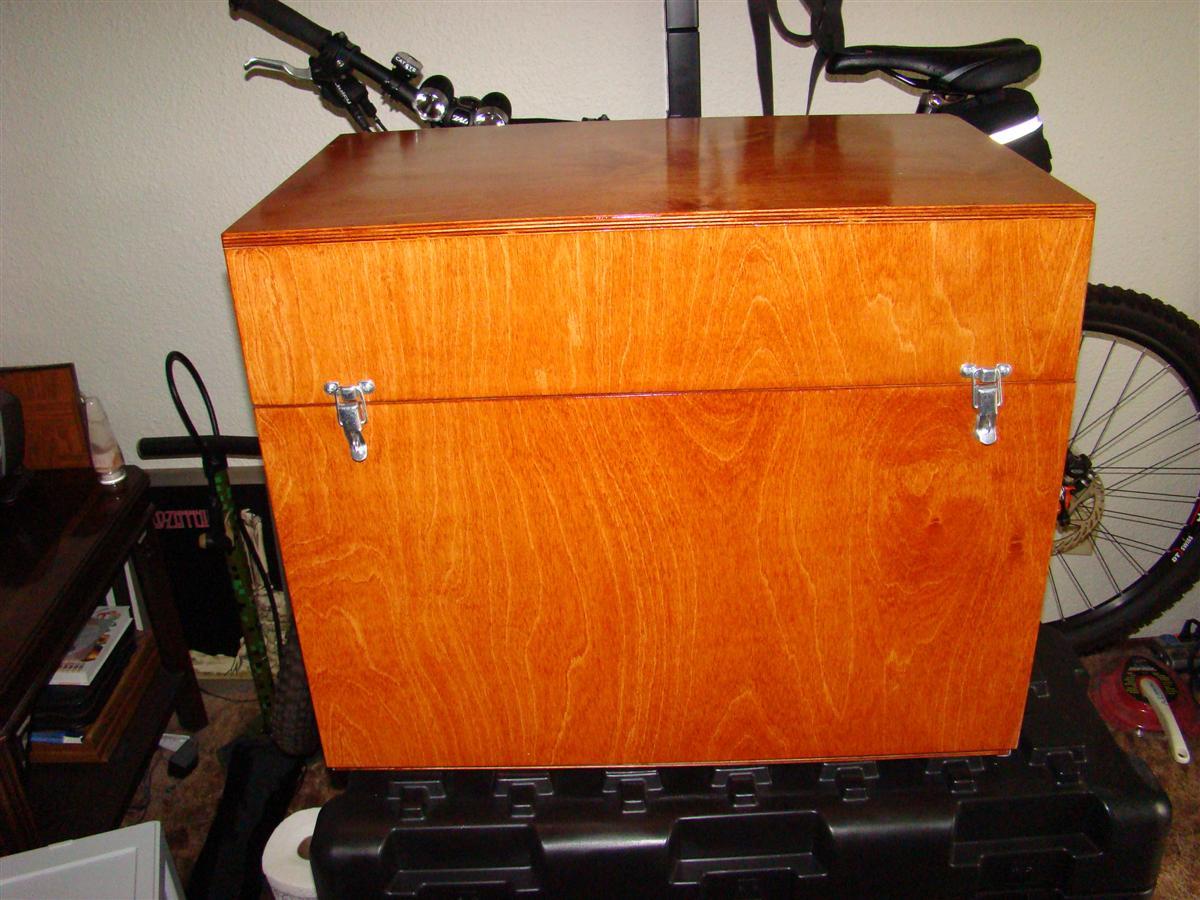
Box unpacked and set up on top of my ECS cargo cases
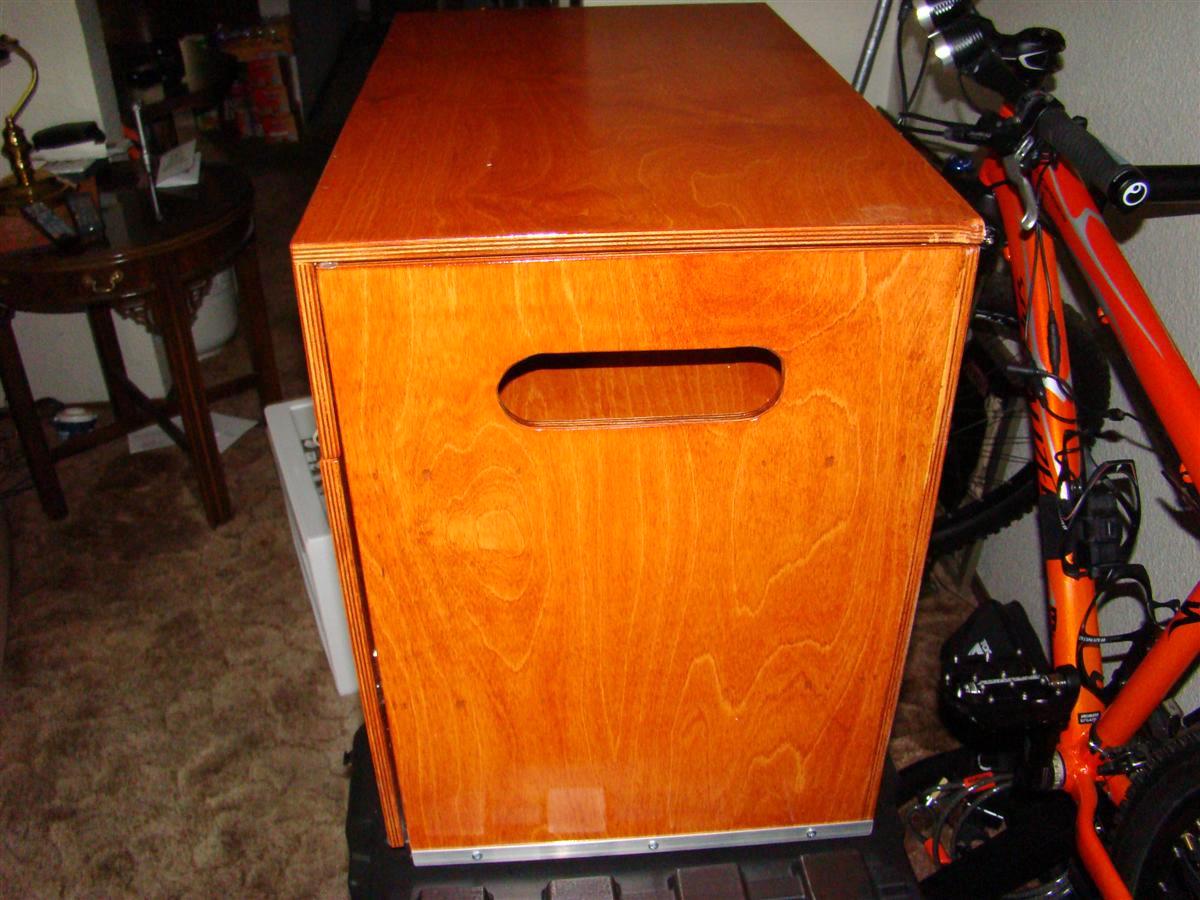
Side view showing the holes that are the carry handles and also the exit for the propane hose and assembly
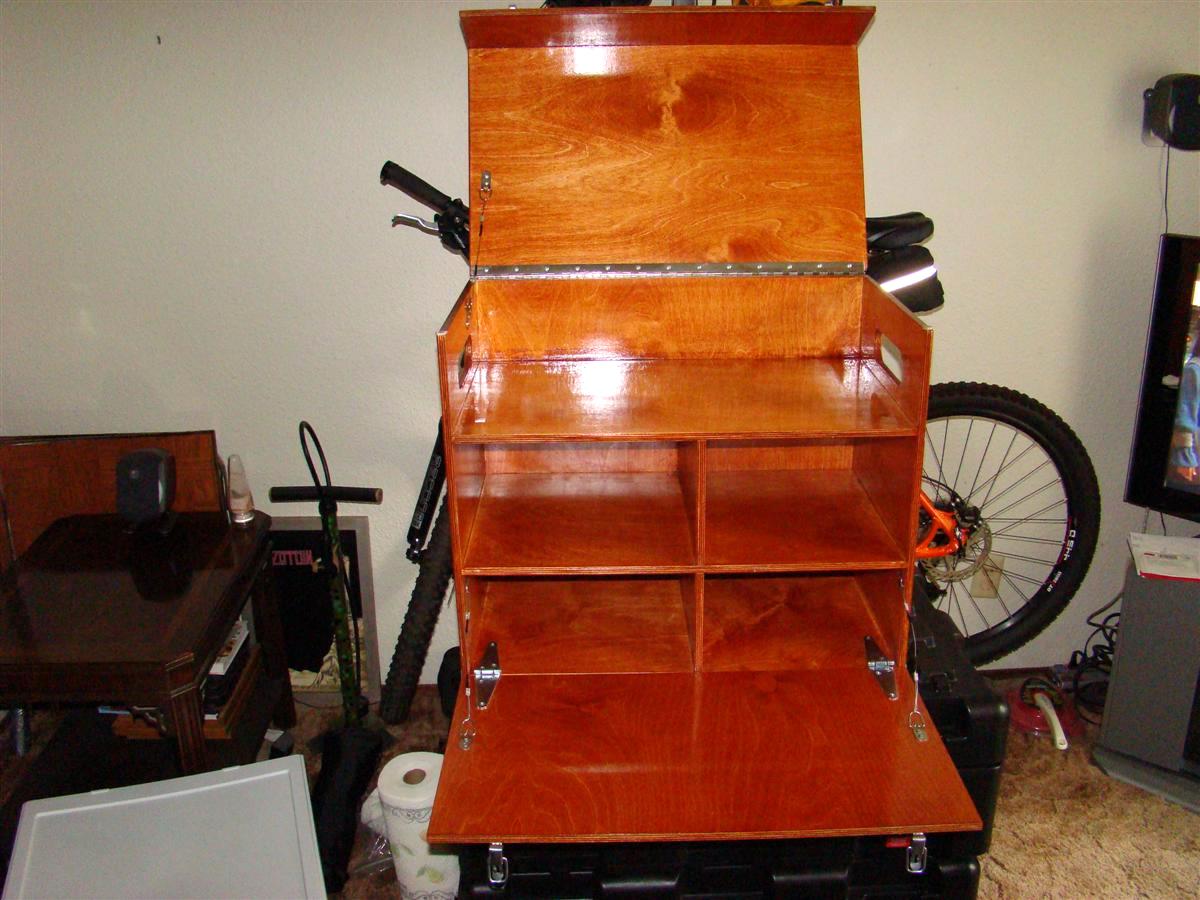
Undo the two front latches and the top goes up, and the front comes down like a draw bridge
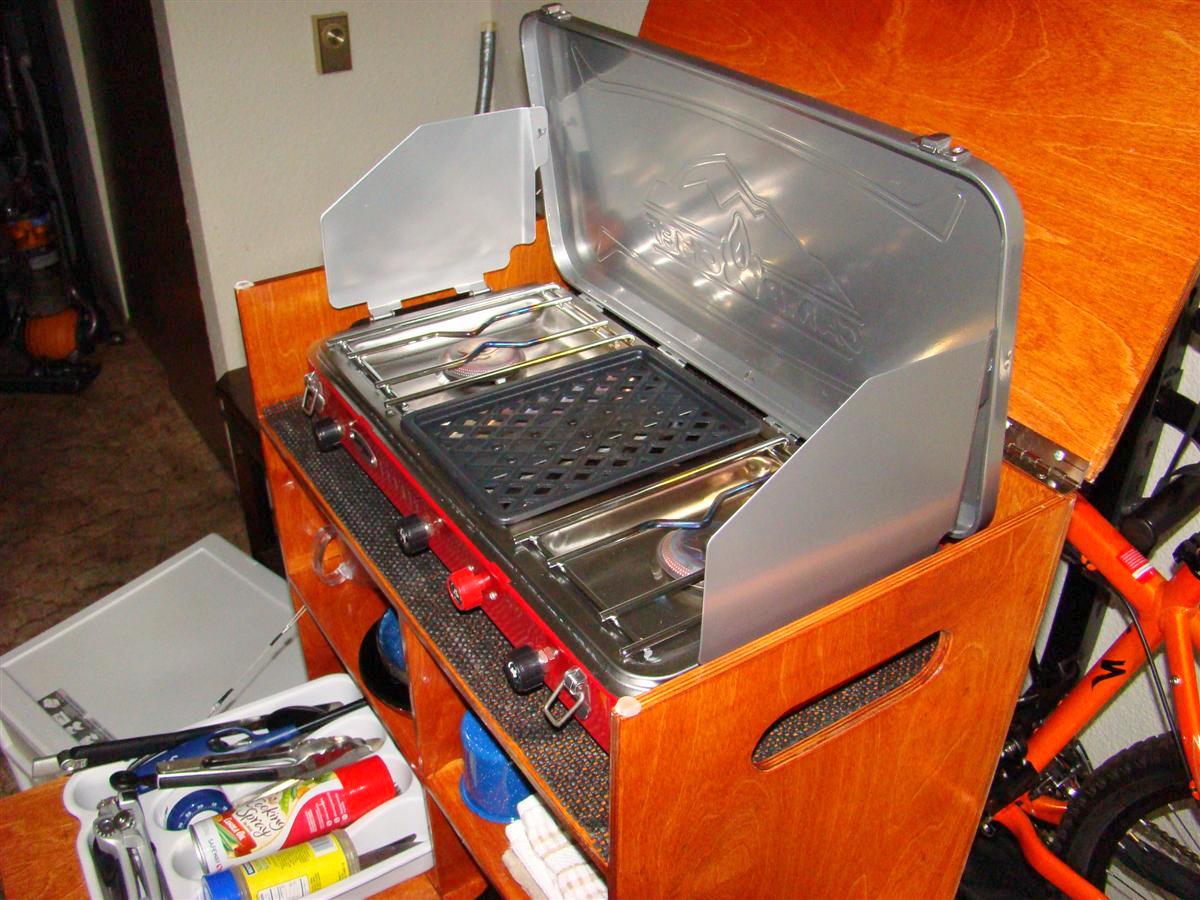
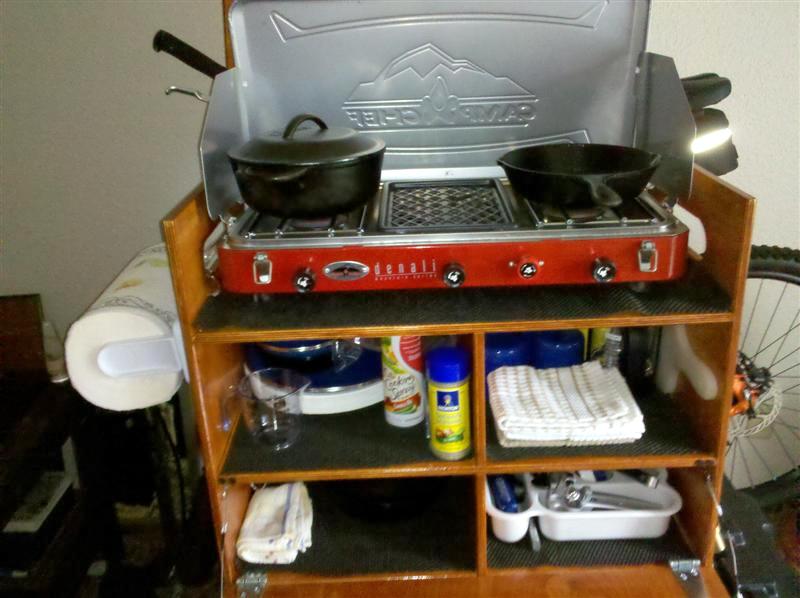
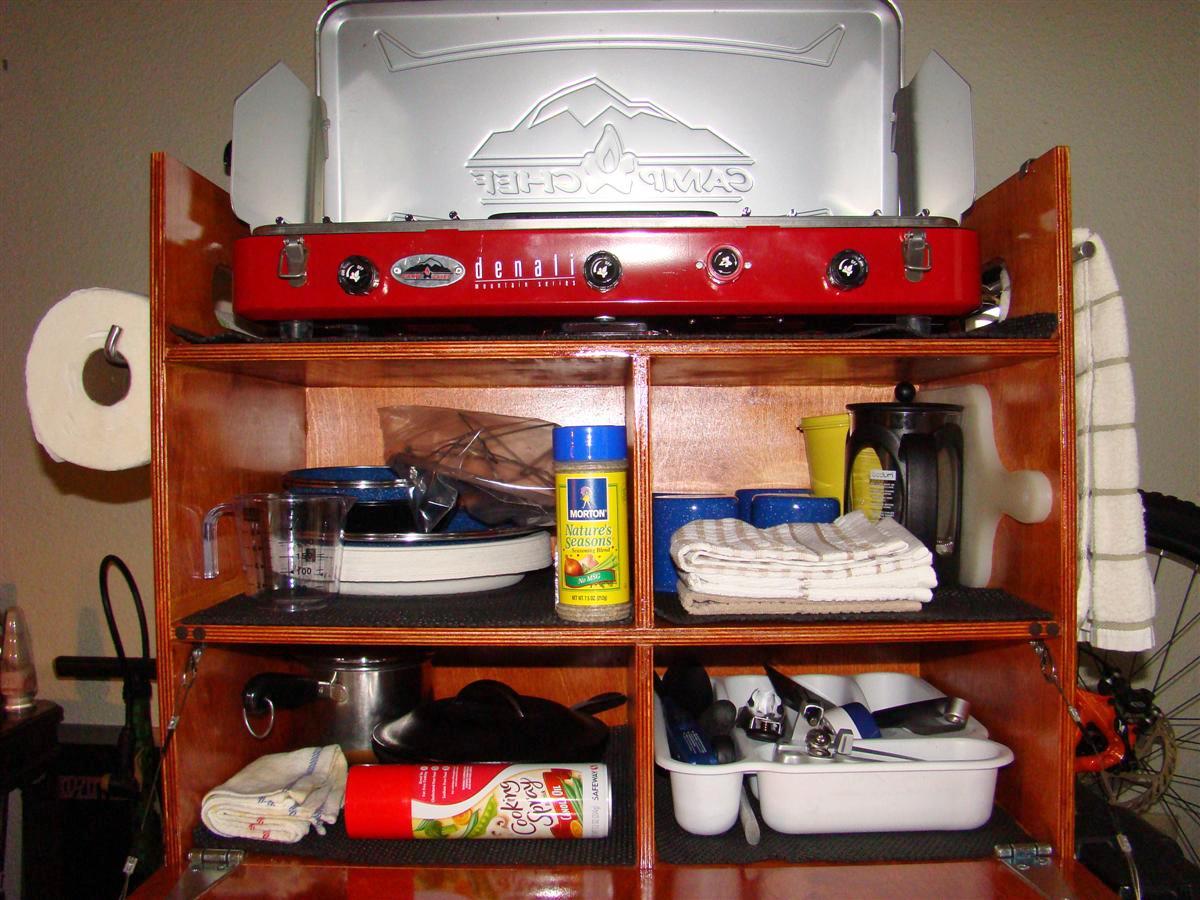
Loaded up with everything to prepare a meal except the food
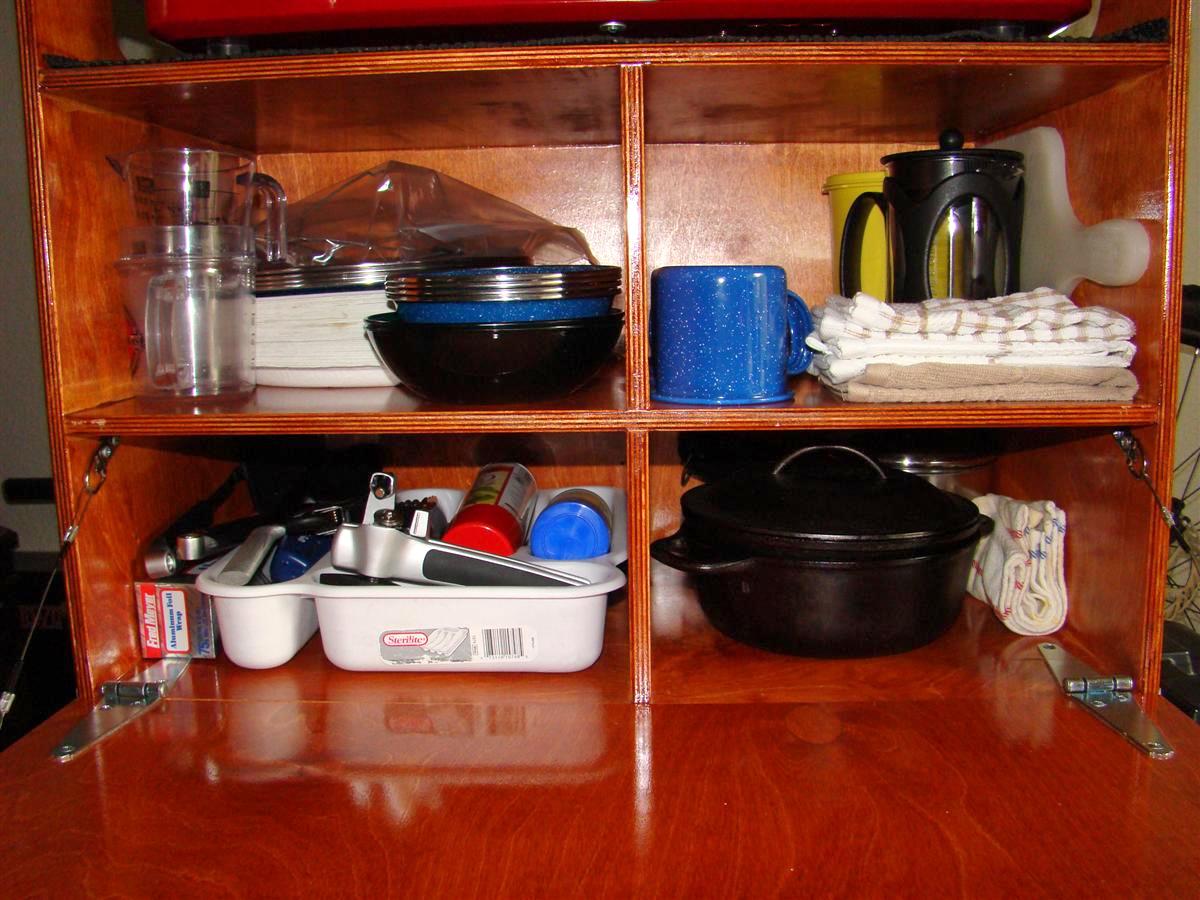
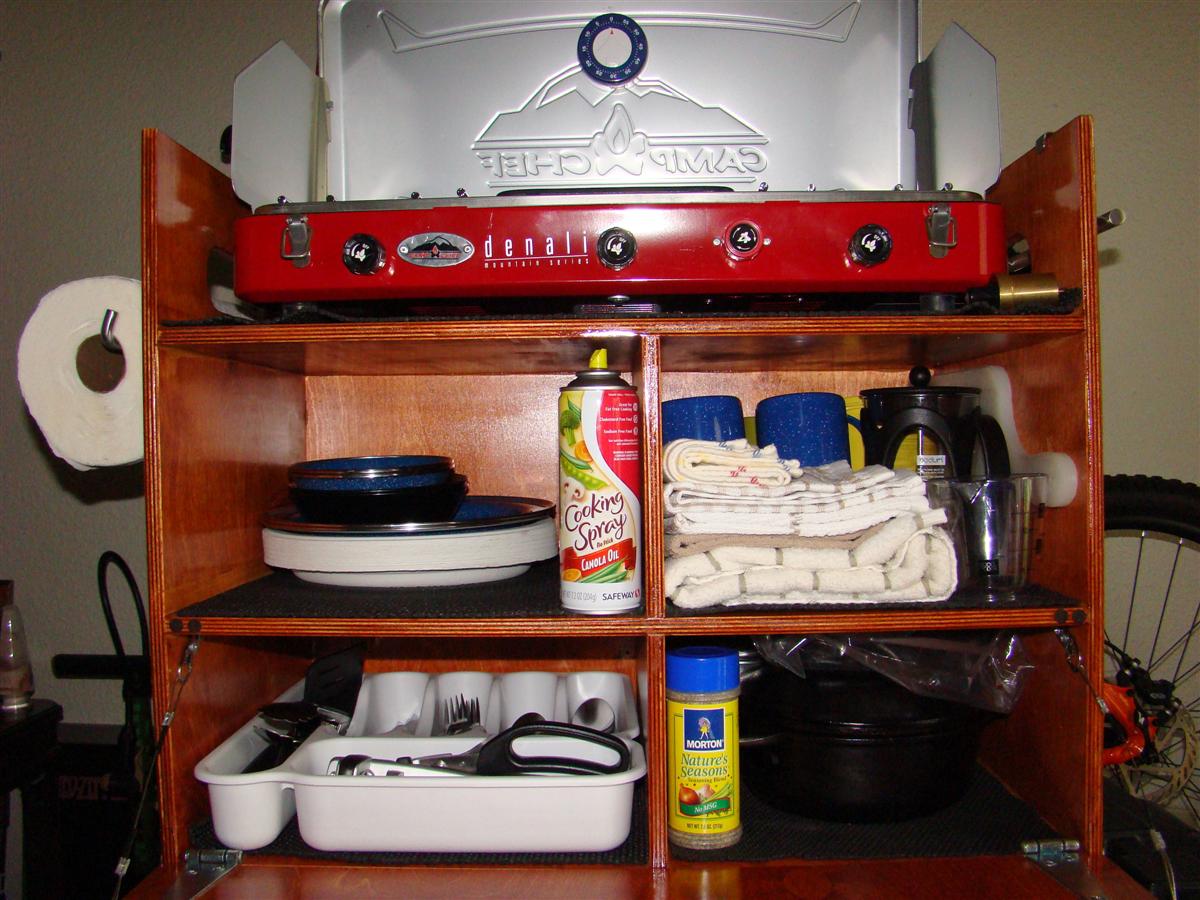
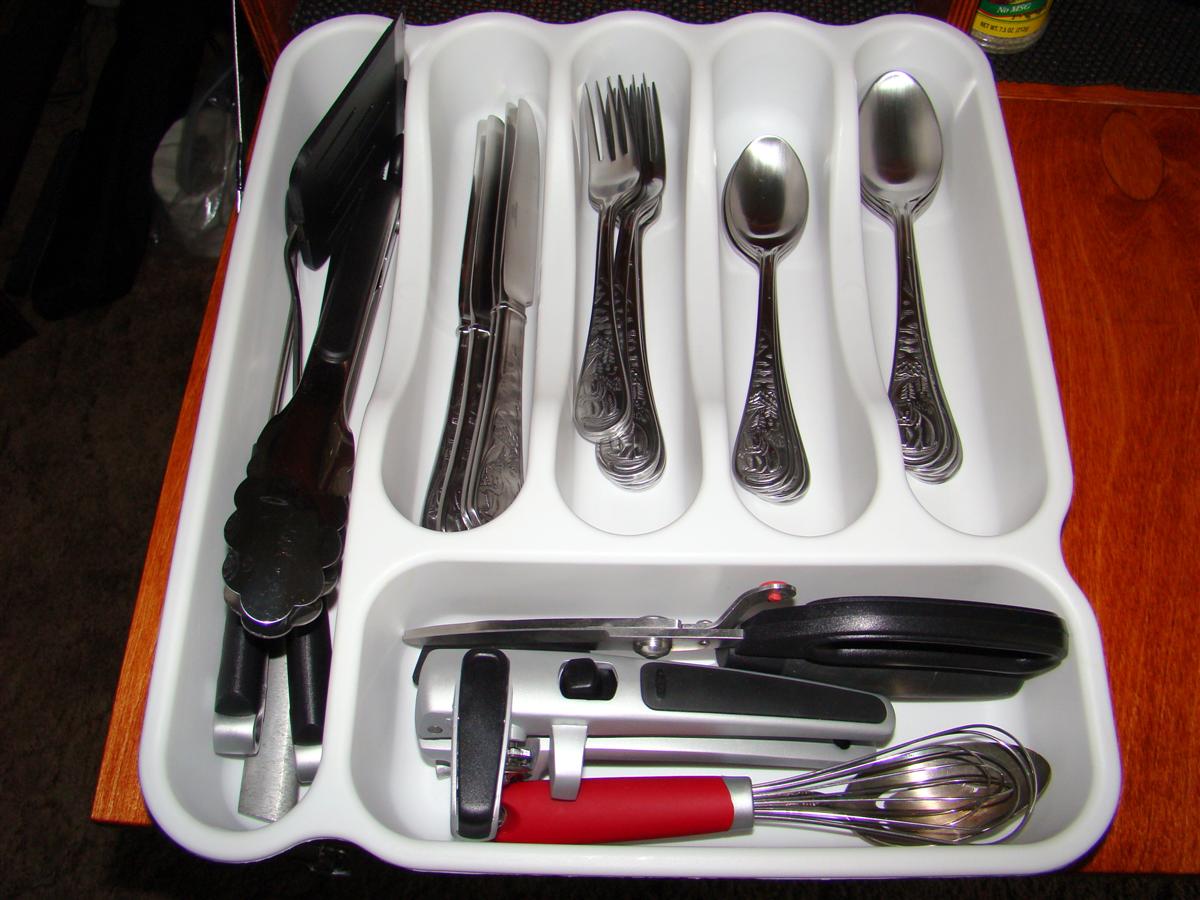
Left side bottom is for the utensil tray and foil.
Left top is for the blue enameled plates, paper plates, bowls, toaster, measuring cups, ect.
Right side bottom is for the cast iron skillet and Dutch oven with the former nestled inside of it, and a stainless pot for heating water behind them.
Right top is for the French Press, blue enameled coffee cups, cutting board, towels, ect.
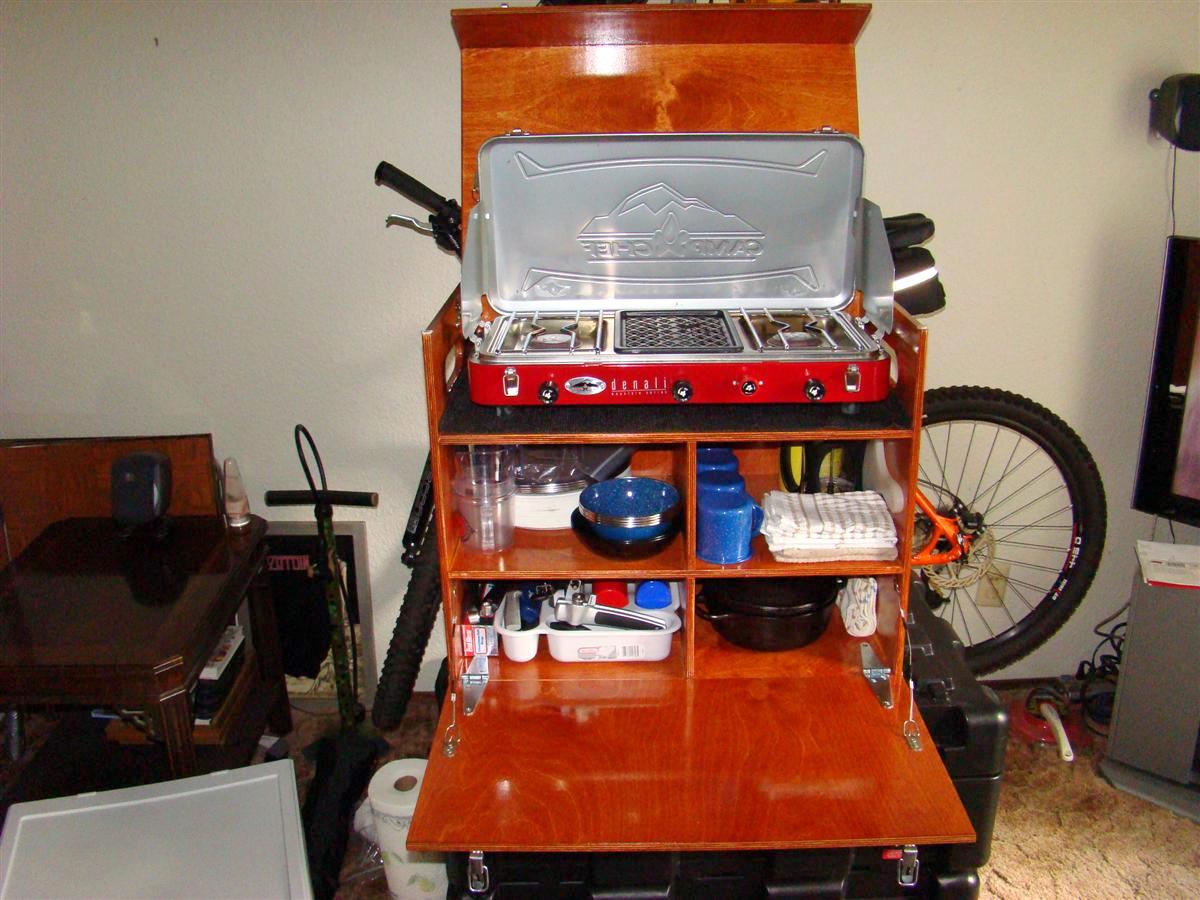
Upper part that holds the Camp Chef Denali propane stove
I have the non slip toolbox liner stuff below it that I buy from Griots Garage.
I use that stuff in my toolboxes at home, and also in my cargobox in my rig to prevent tools from rolling around.
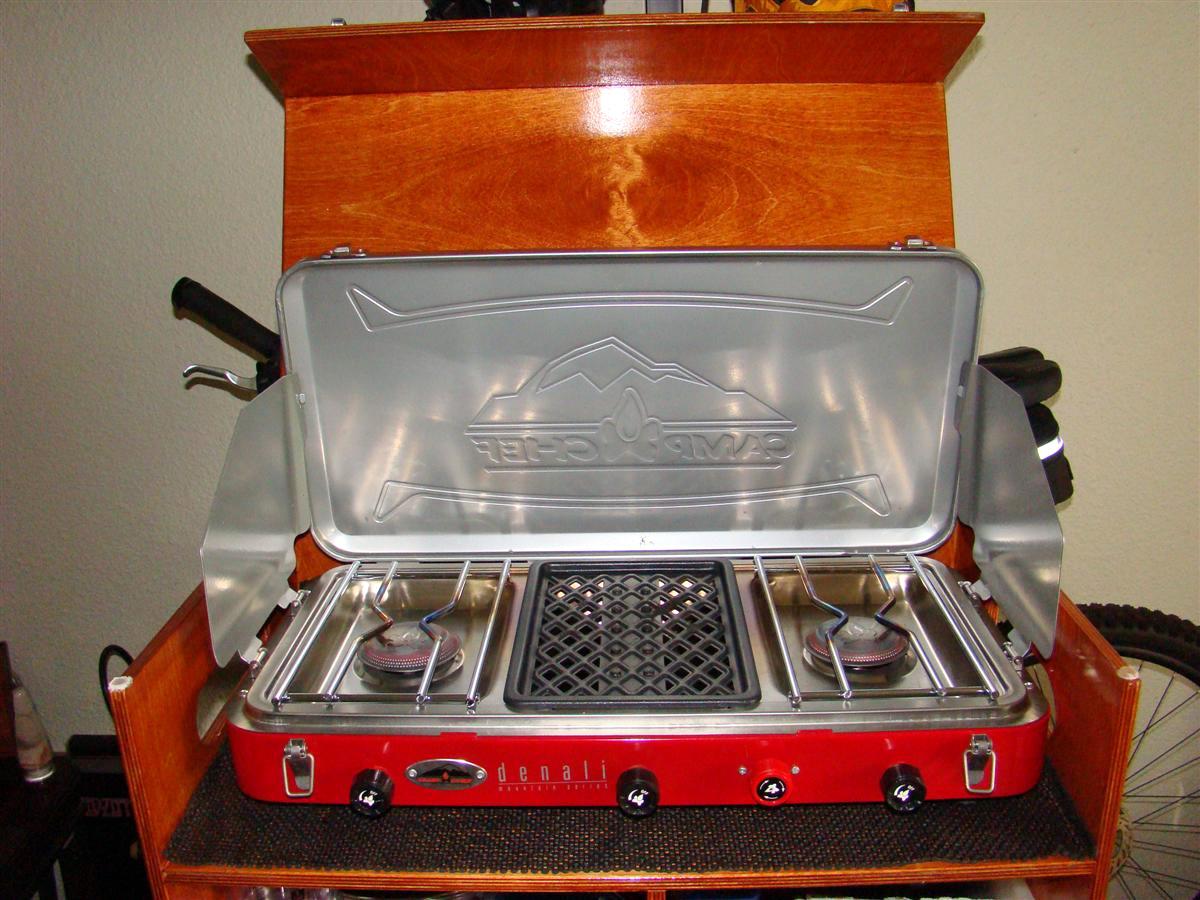
Front closeup view showing the goods
Look at the reflection in the wood, nice finish!
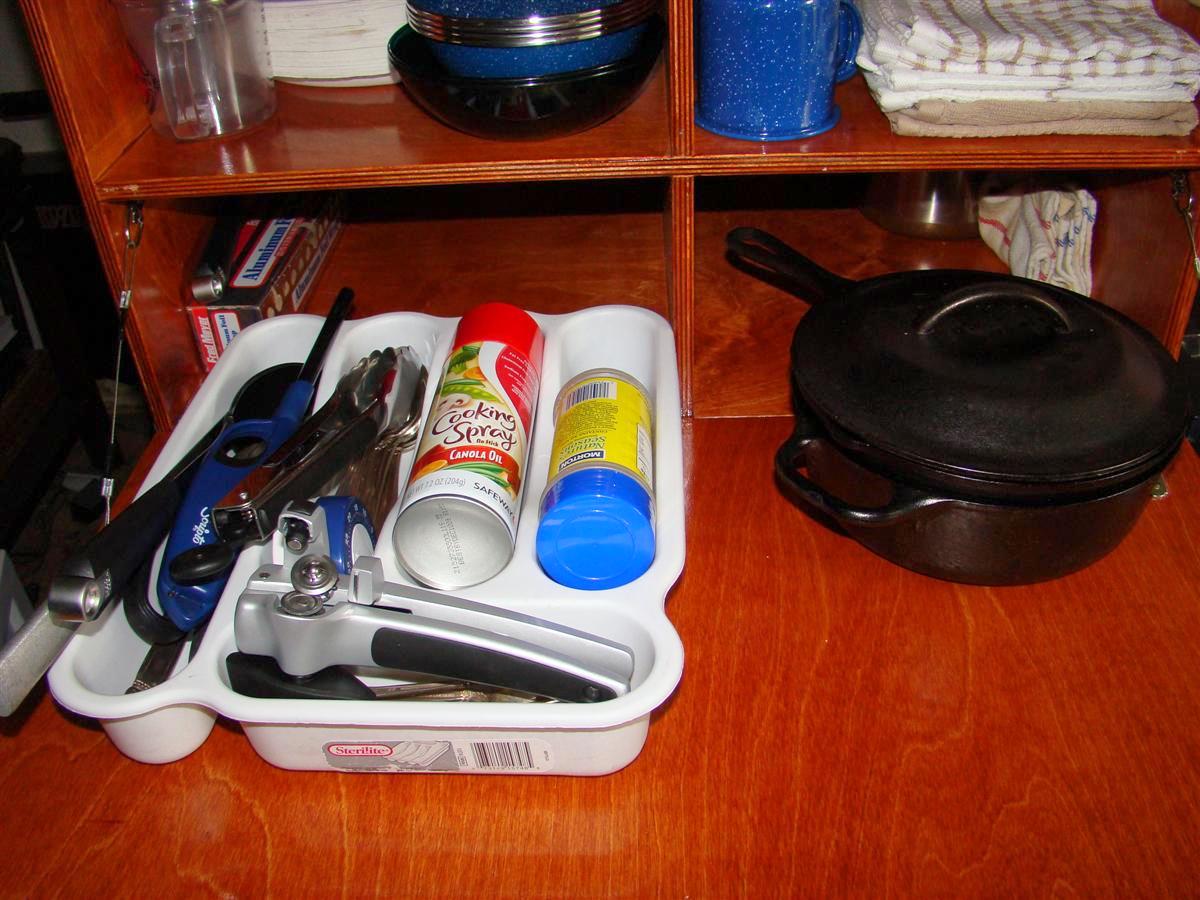
Another shot showing the utensil tray and cast iron cookware pulled out
View from top
I take cooking very seriously when camping.
I was the head chef, well the only chef when I took my two young sons at the time many years ago camping after a divorce.
We ate generally better camping than at home.
I am a firm believer in that food tastes better when when camping and fresh air if prepared correctly, so I tend to cook better too.
The chuckbox will allow me to keep my items better organized and give a certain ambiance to the preparation of meals.
Easier access too to the items than my previous setup.
Please note the cast iron too, I feel there is nothing better to cook on both at home and outdoors, and well worth the extra weight to have a set for camping too.
I have tried many non stick pans at home and camping over the past several decades, and I always end up buying more non stick stuff to only throw it away after awhile.
Since I got into cooking with cast iron recently this year at home first, I could never go back to non cast iron again.
Food does not stick to the cast iron like it has for previous cookware.
Cast iron is also easier to take care of if you take the time to read up on it.
The food literally slides out of the skillet, and all I do for cleanup is wipe it out with a paper towel and spray some oil in it, then wipe it around, then store the pan for next use.
I do not even have to wash out with water and a scrub brush like I did at first when I got them.
They get better each time with use as they season more.
So far all I need in the setup for camping is the skillet and Dutch oven.
I still carry one Paul Revere stainless steel sauce pan, that is for heating up water only for the French Press.
Heating up water with a Dutch oven would put oil from me wiping the pans out after cleaning into the coffee, yuck.
When I was in Boy Scouts eons ago, our scoutmaster had a chuckbox for camping.
We mostly backpacked, but occasionally we car camped at a dedicated site somewhere, and out came the chuckbox to prepare meals.
I soon forgot though about those old chuckboxes from long ago until they started appearing before my eyes on forums where I saw trip reports and researched them more from a few online places that make them like:
Blue Sky Kitchen
Drifta Camping Kitchens
Kanz Outdoors
The three above are all very nice units, with the first two having several models.
If one has the tools and the skills, Blue Sky Kitchen has plans available and many videos on his site showing the construction of them.
Before I got interested in them much though I had already bought a Cabelas Instant Cooking Station that I have used for the past few years.
It works great, but between the two plastic drawers and the kitchen itself, it takes a lot of room in my rig.
I saw a design by Chad (JJBigg's on Expedition Portal site) that was built around the same stove I have, the Camp Chef Denali, and I took a liking to it immediately.
His 3D modeling threads he posts up are incredible to look at.
I got the plans from Chad for the chuckbox and I had talked to a local crate builder who supplies Boeing with customized crates for shipping parts, and a salesman there saw the plans and said they could build it for me.
I was getting ready to call them up a month later to give them the go ahead when a member on a few forums I am on (Titanpat57) contacted me after he saw I was interested in them and said he could build one for me, so I emailed him the plans and he looked it over.
He modified it a bit as I measured out the two right side shelves so one could hold my 8" Lodge cast iron skillet, and my 8" Lodge Dutch oven, and the other shelf for my French Press coffee maker and plates.
The two left side shelves would be for the utensil tray and miscellaneous stuff.
I have a Cabelas Deluxe Roll-Top table I bought a few years back and it hardly takes up any room when stored in the rig.
It will be used to support the chuckbox, and it will have plenty of room to hold other stuff on top when preparing meals, much more room than the old setup.
While the Cabelas Kitchen setup was very nice I have used for the past few years, there is something about the chuckboxes that seems much more nostalgic to me.
Something like this can be passed on down the line too when I get to old to get out
The chuckbox arrived just a few hours ago via FedEx.
It had a long journey from New York to Washington state, and the way Pat packed it, it arrived unscathed.
It was packed with foam core and taped all around, and heavy cardboard on the outside, very nice.
When I opened it up outside a few neighbors were eyeballing it, and they commented on how it looked like fine furniture.
The pictures do not do it justice, it looks great!
The finish on it lets you see the lines in the wood through it too.
Pat did an incredible job on the box from us just communicating via email back and forth.
Hats off to Pat for offering to build this for me, I am very impressed with it.
Below are some pictures of the chuckbox unloaded and then loaded up with all the stuff I had in the other setup.
I still need to figure out something to hold a roll of paper towels like the Cabelas kitchen had on it.
Box unpacked and set up on top of my ECS cargo cases
Side view showing the holes that are the carry handles and also the exit for the propane hose and assembly
Undo the two front latches and the top goes up, and the front comes down like a draw bridge
Loaded up with everything to prepare a meal except the food
Left side bottom is for the utensil tray and foil.
Left top is for the blue enameled plates, paper plates, bowls, toaster, measuring cups, ect.
Right side bottom is for the cast iron skillet and Dutch oven with the former nestled inside of it, and a stainless pot for heating water behind them.
Right top is for the French Press, blue enameled coffee cups, cutting board, towels, ect.
Upper part that holds the Camp Chef Denali propane stove
I have the non slip toolbox liner stuff below it that I buy from Griots Garage.
I use that stuff in my toolboxes at home, and also in my cargobox in my rig to prevent tools from rolling around.
Front closeup view showing the goods
Look at the reflection in the wood, nice finish!
Another shot showing the utensil tray and cast iron cookware pulled out
View from top
I take cooking very seriously when camping.
I was the head chef, well the only chef when I took my two young sons at the time many years ago camping after a divorce.
We ate generally better camping than at home.
I am a firm believer in that food tastes better when when camping and fresh air if prepared correctly, so I tend to cook better too.
The chuckbox will allow me to keep my items better organized and give a certain ambiance to the preparation of meals.
Easier access too to the items than my previous setup.
Please note the cast iron too, I feel there is nothing better to cook on both at home and outdoors, and well worth the extra weight to have a set for camping too.
I have tried many non stick pans at home and camping over the past several decades, and I always end up buying more non stick stuff to only throw it away after awhile.
Since I got into cooking with cast iron recently this year at home first, I could never go back to non cast iron again.
Food does not stick to the cast iron like it has for previous cookware.
Cast iron is also easier to take care of if you take the time to read up on it.
The food literally slides out of the skillet, and all I do for cleanup is wipe it out with a paper towel and spray some oil in it, then wipe it around, then store the pan for next use.
I do not even have to wash out with water and a scrub brush like I did at first when I got them.
They get better each time with use as they season more.
So far all I need in the setup for camping is the skillet and Dutch oven.
I still carry one Paul Revere stainless steel sauce pan, that is for heating up water only for the French Press.
Heating up water with a Dutch oven would put oil from me wiping the pans out after cleaning into the coffee, yuck.
 09-04-2010, 05:44 PM
#3
Registered User
Join Date: Sep 2008
Location: Beacon, NY
Posts: 51
Likes: 0
Received 0 Likes
on
0 Posts
I'm glad you like it Corey...seems like all of it fits?!
The one thing I do want to say is...
THANK YOU COREY!
Corey always goes out of his way to post up equipment testing, is always willing to help someone out, and is the true spirit of what helping out is all about. He offers sound advice based on years of experience...all on his own personal time...not too many people do that anymore.
When I was looking at FJ's Corey helped me out, and although I eventually ended up with the 4Runner Trail...his input was invaluable, and very well trusted!
Best wishes, most of all happy camping and I hope it brings you good service, and makes those trips in the wild just a bit more civilized.
Pat
09-05-2010, 02:21 PM
#5
I'm glad you like it Corey...seems like all of it fits?!
The one thing I do want to say is...
THANK YOU COREY!
Corey always goes out of his way to post up equipment testing, is always willing to help someone out, and is the true spirit of what helping out is all about. He offers sound advice based on years of experience...all on his own personal time...not too many people do that anymore.
When I was looking at FJ's Corey helped me out, and although I eventually ended up with the 4Runner Trail...his input was invaluable, and very well trusted!
Best wishes, most of all happy camping and I hope it brings you good service, and makes those trips in the wild just a bit more civilized.
Pat
The one thing I do want to say is...
THANK YOU COREY!
Corey always goes out of his way to post up equipment testing, is always willing to help someone out, and is the true spirit of what helping out is all about. He offers sound advice based on years of experience...all on his own personal time...not too many people do that anymore.
When I was looking at FJ's Corey helped me out, and although I eventually ended up with the 4Runner Trail...his input was invaluable, and very well trusted!
Best wishes, most of all happy camping and I hope it brings you good service, and makes those trips in the wild just a bit more civilized.
Pat
Still messing around with the box today, and I lined each shelf with that drawer liner to prevent anything from sliding inside.
 09-12-2010, 09:26 AM
#6
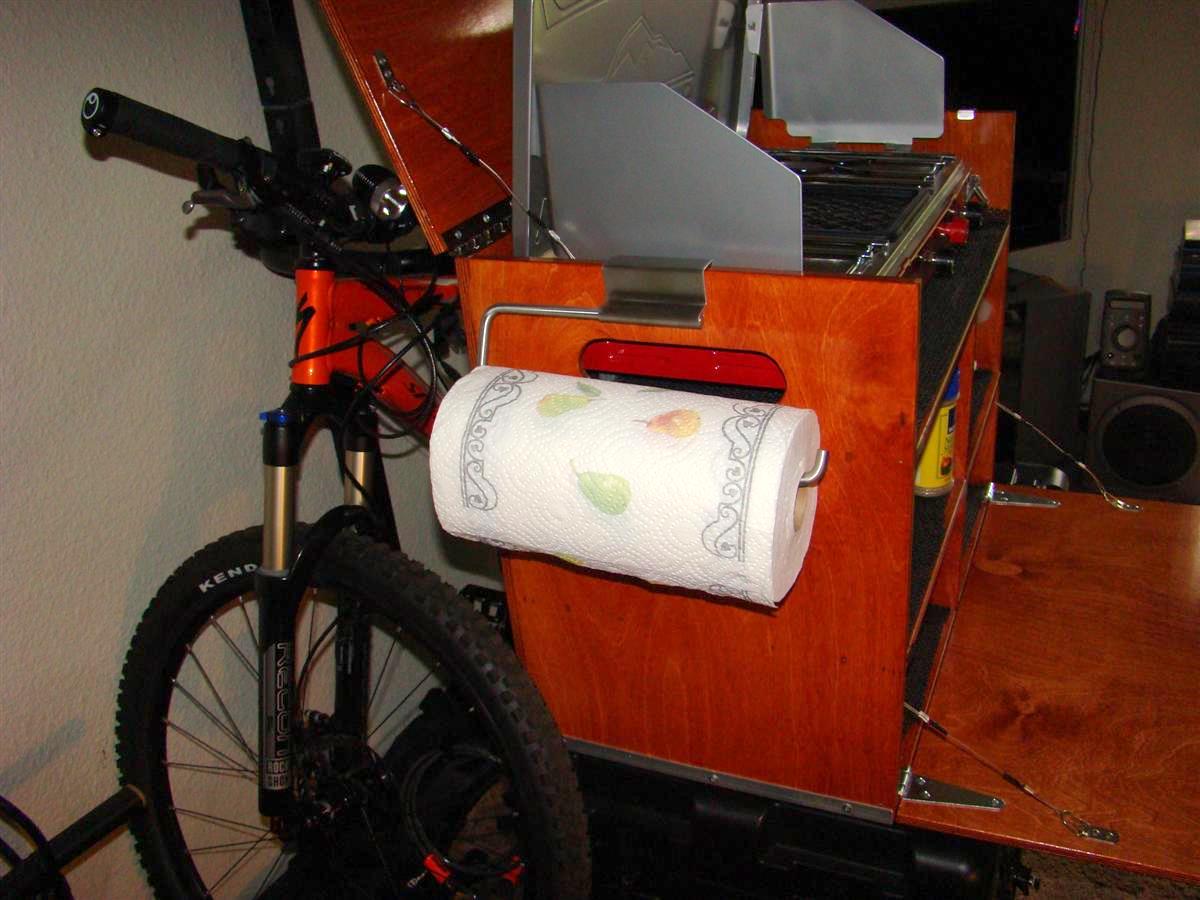
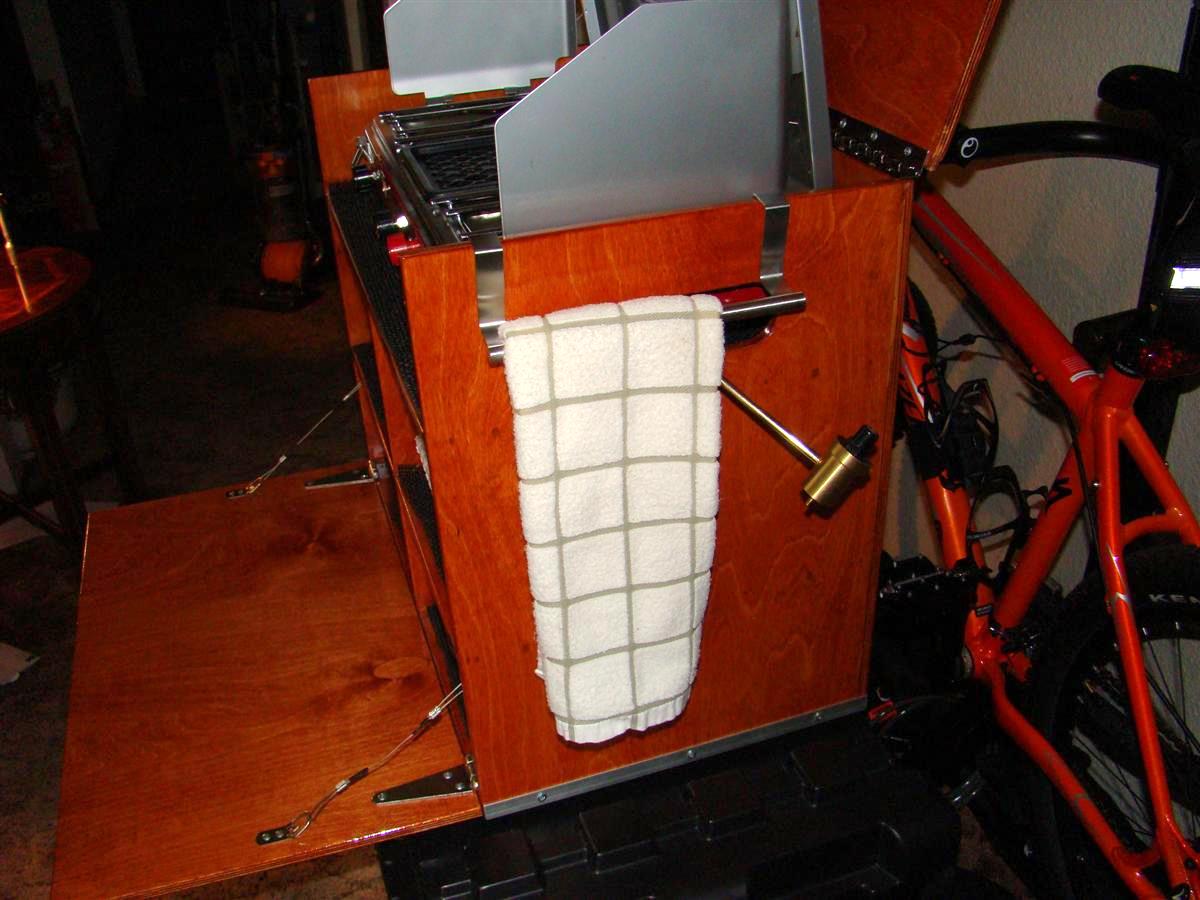
I have been wondering how I was going to attach a paper towel holder to the chuckbox without drilling any holes into the box.
The box is made out of nine ply apple core cabinet grade 1/2" (measures out to around 1/2") which is very nice wood, and I would rather not drill into it.
I bought a cheap plastic paper towel holder for $2.99 and used some shower curtain hooks, but it looked very funky not sitting flush, and if I got some sheet metal and bent up brackets for it to hang over the edge of the wood, there was no real good way to attach them to the holder.
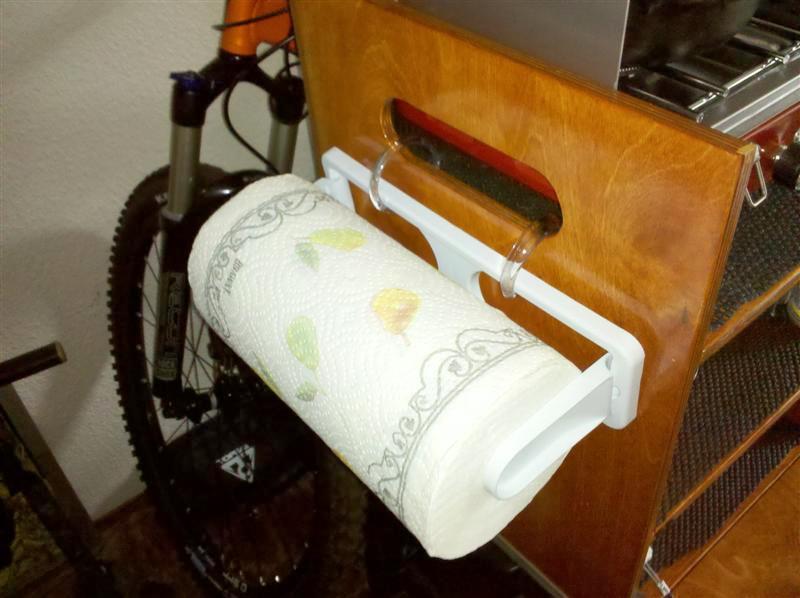
A member over on Expo showed me an over the cabinet holder design that would work perfectly after seeing the above pictures (he said the plastic one gave the otherwise nice box a cheap look and I agree), I had never seen the over the cabinet ones before.
I checked on Amazon yesterday and placed an order for one, and also saw they make towel holders too which would be perfect for a hand towel on the other side of the box.
Went to Lowe's this morning to look for the hand towel one, and only saw a cheap plastic one.
Fred Meyers which is just across the street where I had bought the cheap paper towel holder at.
I stopped on my way back home, and they had both of the InterDesign holders.
I bought both and came home and canceled my order for the paper towel one I placed yesterday with Amazon.
InterDesign over cabinet towel holder
part number 29450
http://www.amazon.com/Home-Essential...4308969&sr=1-1
Amazon $4.06
Fred Meyer $7.99
InterDesign over cabinet paper towel holder
part number 29750
http://www.amazon.com/gp/product/B00...ef=oss_product
Amazon $13.30
Fred Meyer $9.99
The hand towel holder was cheaper from Amazon, but since I Was at Fred Meyer to get the paper towel holder, I got it too.
There is a gap in the fit as they are made to fit wood up to 3/4" thick.
I will fix the gap for both holders later by gluing in some rubber strips.
Both holders have rubber lining already on the metal to prevent scratching which is great.
Here are three pictures showing the two new holders which will work out nicely.
I usually keep both a hand towel and a dish drying towel on a clothesline on the awning, having the dish drying towel on the chuckbox and close to the dish drying rack will be better.
The box is made out of nine ply apple core cabinet grade 1/2" (measures out to around 1/2") which is very nice wood, and I would rather not drill into it.
I bought a cheap plastic paper towel holder for $2.99 and used some shower curtain hooks, but it looked very funky not sitting flush, and if I got some sheet metal and bent up brackets for it to hang over the edge of the wood, there was no real good way to attach them to the holder.
A member over on Expo showed me an over the cabinet holder design that would work perfectly after seeing the above pictures (he said the plastic one gave the otherwise nice box a cheap look and I agree), I had never seen the over the cabinet ones before.
I checked on Amazon yesterday and placed an order for one, and also saw they make towel holders too which would be perfect for a hand towel on the other side of the box.
Went to Lowe's this morning to look for the hand towel one, and only saw a cheap plastic one.
Fred Meyers which is just across the street where I had bought the cheap paper towel holder at.
I stopped on my way back home, and they had both of the InterDesign holders.
I bought both and came home and canceled my order for the paper towel one I placed yesterday with Amazon.
InterDesign over cabinet towel holder
part number 29450
http://www.amazon.com/Home-Essential...4308969&sr=1-1
Amazon $4.06
Fred Meyer $7.99
InterDesign over cabinet paper towel holder
part number 29750
http://www.amazon.com/gp/product/B00...ef=oss_product
Amazon $13.30
Fred Meyer $9.99
The hand towel holder was cheaper from Amazon, but since I Was at Fred Meyer to get the paper towel holder, I got it too.
There is a gap in the fit as they are made to fit wood up to 3/4" thick.
I will fix the gap for both holders later by gluing in some rubber strips.
Both holders have rubber lining already on the metal to prevent scratching which is great.
Here are three pictures showing the two new holders which will work out nicely.
I usually keep both a hand towel and a dish drying towel on a clothesline on the awning, having the dish drying towel on the chuckbox and close to the dish drying rack will be better.
09-12-2010, 10:05 AM
#7
Wow, that's very impressive! Thanks for the GREAT write up, Corey! I have a different set up, and seeing that I have the first Gen, I have to make the most of the space i have..... But I'd really like to have something like this, mainly because, where I go, there are lots of bears, and while they don't attack, they're BOLD, and they WILL drag your "whatever it is" up the road, IF they can't just open and eat it right there, lol. My dad had one, and it was solely used to lock up the food.
When I go up the coast to Carpenteria, CA, Santa Cruz, CA, etc..... Many of those sites have Heavy Duty Bear-Proof Chuck Boxes right next to the Cast Iron Tables..... They're on the end, locked up, and with pad locks for the door so you can 'lock up yer goodies', haha.
LOVE the idea, ...>I'll be thinking this out again,
Thanks, Corey,
Mark
EDIT: PS> I recently got a Cargo Hitch Carrier, pretty good size, that will allow me to carry a BIT MORE STUFF! lol.
When I go up the coast to Carpenteria, CA, Santa Cruz, CA, etc..... Many of those sites have Heavy Duty Bear-Proof Chuck Boxes right next to the Cast Iron Tables..... They're on the end, locked up, and with pad locks for the door so you can 'lock up yer goodies', haha.
LOVE the idea, ...>I'll be thinking this out again,
Thanks, Corey,
Mark
EDIT: PS> I recently got a Cargo Hitch Carrier, pretty good size, that will allow me to carry a BIT MORE STUFF!
lol.
Last edited by ChefYota4x4; 09-12-2010 at 10:09 AM.
Trending Topics
09-12-2010, 10:15 AM
#8
Registered User
Join Date: Oct 2008
Location: Sacramento, Crawlifonia
Posts: 1,621
Likes: 0
Received 7 Likes
on
4 Posts
its a nice set up. I miss woodworking and finishing.
what finish is it? looks like poly, conversion varnish or resin. if the finish is something hard like one of those, it will last nearly forever.
what finish is it? looks like poly, conversion varnish or resin. if the finish is something hard like one of those, it will last nearly forever.
09-12-2010, 10:17 AM
#9
You are welcome Mark.
I still keep my dry food in an Action Packer which gets put into the rig at night.
We were told to keep food in the rig up at Mt. Rainier when I was up there, and they even had signs taped to all of the picnic tables stating a problem bear was roaming around close by.
I think they need to install the bear proof boxes up there since that is bear country.
I saw a few of them up there, but they were only at a few campsites like for the firewood guy who stays up there the whole time during the White River campgrounds short season.
His daughter and him stay there the whole time it it open.
I am going to enjoy this much more than the Cabelas Instant Cooking Station I have used for the past few years.
I may need to get theft insurance on it
09-12-2010, 10:22 AM
#10
Thanks Dark, you posted as I was submitting the reply above.
Pat used Minwax Gunstock #231
And a polyurethane finish on top of it.
Not sure what brand he used, maybe he will see this and post it.
Pat used Minwax Gunstock #231
And a polyurethane finish on top of it.
Not sure what brand he used, maybe he will see this and post it.
09-12-2010, 01:27 PM
#11
Registered User
Join Date: Sep 2008
Location: Beacon, NY
Posts: 51
Likes: 0
Received 0 Likes
on
0 Posts
It was Minwax Sanding Sealer two coats (sand with 300-320) between, wipe with tack cloth.
Final finish was Minwax Gloss Poly, 2 wet coats (meaning the second coat was sprayed prior to final drying of the first...promotes good adhesion.
The conversion stuff is really nice, but I found you need optimium conditions to apply.
As usual Corey has ideas that just rock!
Pat
Final finish was Minwax Gloss Poly, 2 wet coats (meaning the second coat was sprayed prior to final drying of the first...promotes good adhesion.
The conversion stuff is really nice, but I found you need optimium conditions to apply.
As usual Corey has ideas that just rock!
Pat
Last edited by titanpat57; 09-12-2010 at 01:31 PM.
09-12-2010, 06:05 PM
#13
Registered User
Join Date: Sep 2008
Location: Beacon, NY
Posts: 51
Likes: 0
Received 0 Likes
on
0 Posts
Internal LED's?!
You're out of control.....

did you do a test fit in the Rig yet?
09-19-2010, 10:21 AM
#15
A little reorganizing of the interior.
I was using a small silverware tray that I have had for awhile, but it did not have a compartment for my long slicing knife I use to slice tomatoes and other foods with.
Also the spatula and big plastic spoon used to stir soup, stir the coffee up in the French Press, ect...did not fit either.
The long knife I had to stuff off to the side.
This morning while at Fred Meyers I saw the same brand of silverware tray only a little longer and wider than the old one.
It is like Pat knew I was going to buy the new one, as the tray fits perfectly both width and lengthwise, it fills the whole space on the left lower side.
I am now able to have the items inside of the tray and not rattle around.
I only wish I could find a shorter can of the spray oils, as the can will not fit in upright with the lid on it.
I will not be transporting the can upright like that in case something hits the spray nozzle and discharges oil all over inside.
I will have to lay it on its side with the cap back on it.
I think these are the shortest cans you can get.
Much better organized now.
That is the new silverware with the bear pattern that arrived Friday from Cabelas.
Very heavy duty, this is good quality stuff.
Cabela's 20-Piece Flatware Set
Also seen is a new can opener I saw on Expo in a thread on what else, can openers for camping
Oxo Good Grips Magnetic Locking Can Opener
What I like about it is it locks onto the can and will not come off when cutting the lid until you unlock the handle.
The lid also stays hooked to the unit via magnet until you push a release button over your trash, so you never have to touch a messy lid.
09-25-2010, 09:33 AM
#16
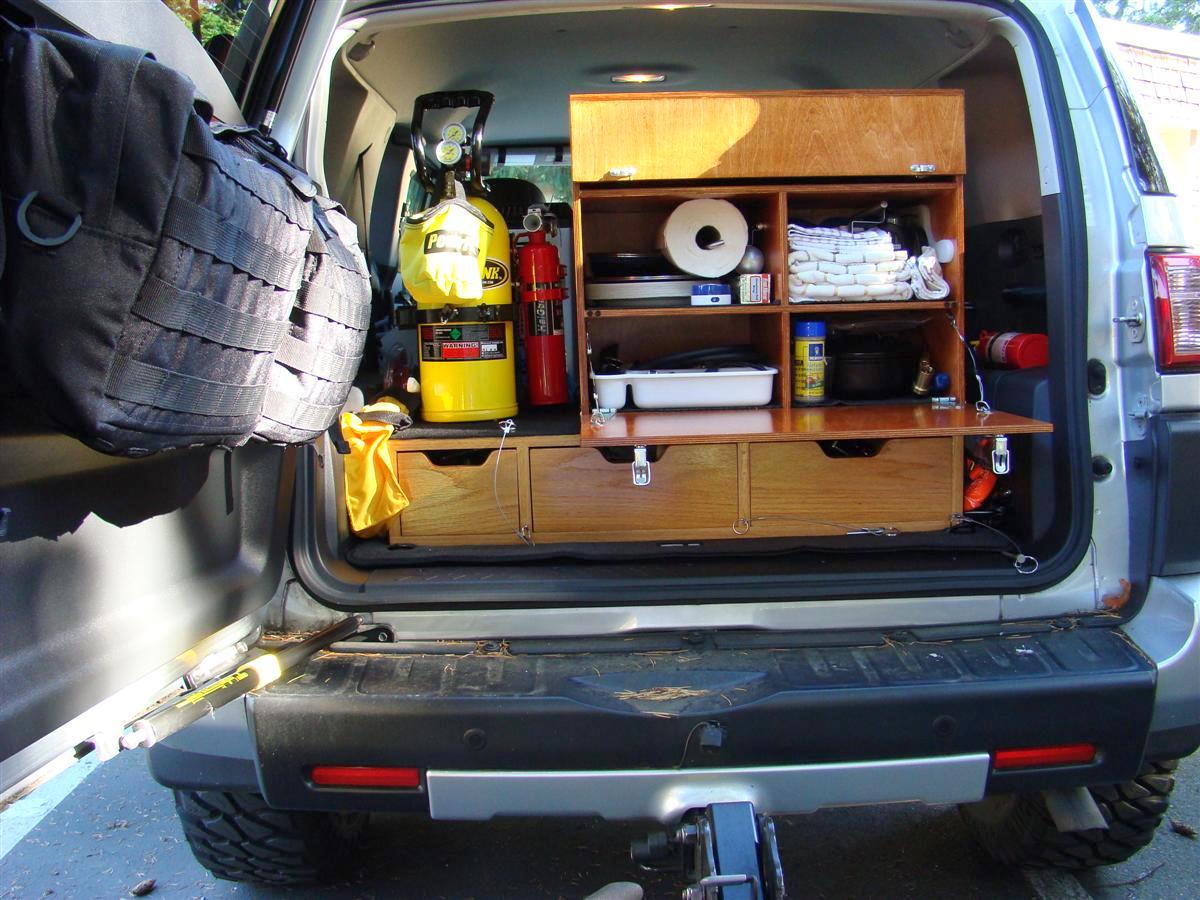
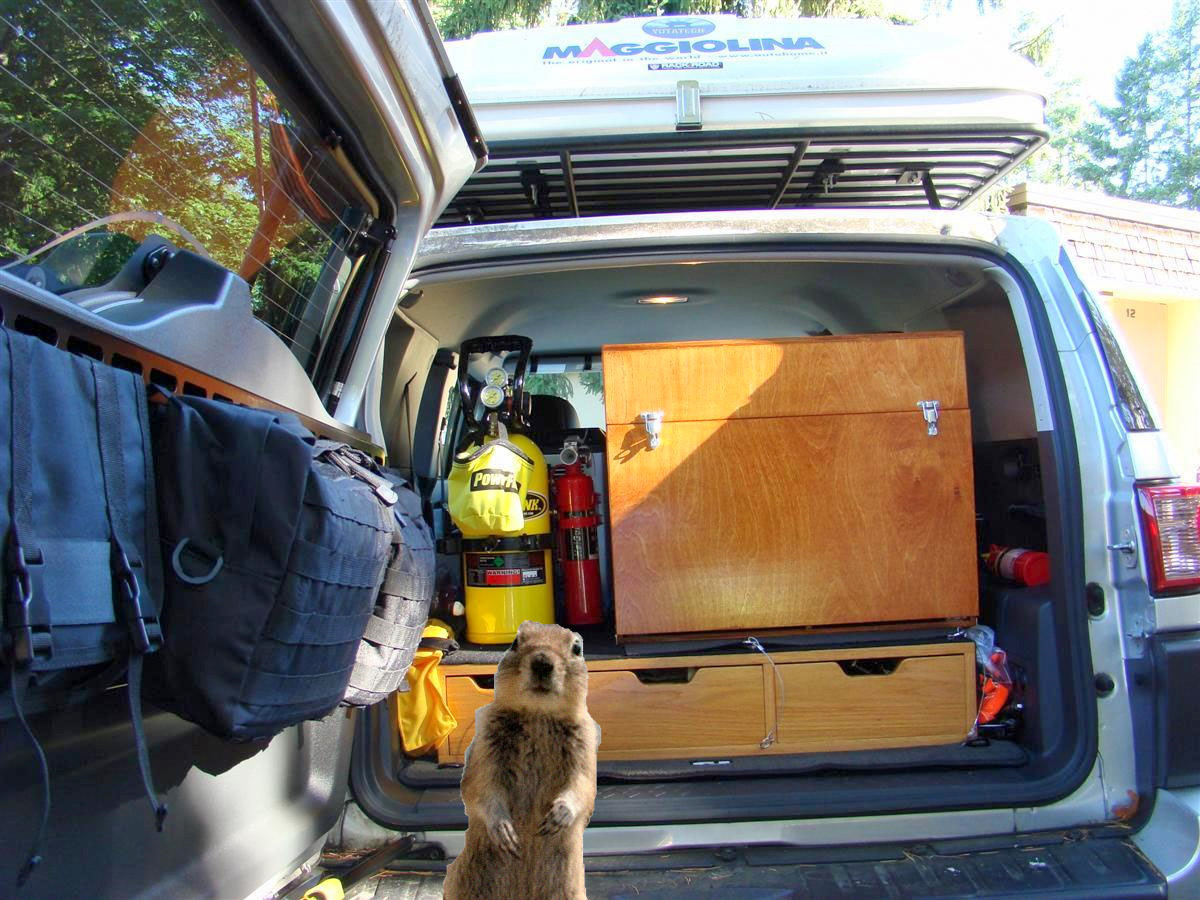
Updated pics of chuckbox in the rig.
It sits in the same place the ARB fridge use to a few years back.
When the rig was full before with camping gear, I could not really use the rearview mirror, but not a big deal, as I use my side mirrors mostly anyways.
All the over the road work vehicles I drive at work have no rearview mirrors.
There is room at the top though so I can see out the rear window some with the rearview mirror.
I have the drawer/shelf liner down on top of the cargobox, and with the chuckbox sitting on top, it does not slide around one bit.
However for safety issues, it will be ratchet strapped in.
I need to get some foam to go under the straps to protect that fine finish on the chuckbox though
I am going to take the box into work this coming week and put it on the scale.
I am guessing around 80+ as cast iron cookware is not light weight, but oh so well worth its weight in gold when it comes to cooking with it.

Thread
Thread Starter
Forum
Replies
Last Post


