OM617 into 1987 4Runner SR5
 11-29-2015, 08:11 PM
#41
Registered User
Thread Starter
millball- dang, thank you!! Really enjoying reading your comment, it brought a huge smile to my face!
Forums are so invaluable to me, and I wish there was a better way to give credit to all the ideas I've stolen, because I wouldn't be able to do it like this (or this fast) without others' contributions here and elsewhere. I guess detailing my own build is how I can give back, which is why I like to give updates so often. Or maybe I talk too much
rw- Oops, I forgot to take the radiator to the pressure washer when I did the motor. I am gonna try a good clean before giving up on it just yet (probably has less than 4,000 miles). It sat collecting dust for almost a year, still very much new
After I mounted the water system, I started wrapping my head around the wiring a little bit. There is a really good video
that describes the wiring and operation of the glow plug relay, which is probably the most complicated thing to hook up to get the motor running. I went ahead and mounted it where the ignition coil and igniter used to sit (comes close to the stock location on the 300sd). As for battery location, I decided for now to keep it driver side so I can box off an area behind the passenger side headlight for a really nicely placed cold air intake. Is it a bad idea to make an intake out of mild steel? No go because of rust in the intake?
I still hadn't put the oil pickup and pan on, so I jacked the motor out just enough to get everything on (steering linkage makes for too tight a fit with the extended oil pickup). Geez, oil pan: seems like an easy thing to deal with, but holy crap is it frustrating to get all those bolts in laying on your back with engine crane legs in your way! Dropped it back into place, and unfortunately the steering linkage pins/bushings contact the sides of the oil pan when the wheel is turned (doesn't reach full lock). 'Doh. So that means I gotta pull the pan off again and re-notch some more on the sides. That will be a tomorrow thing. I already had my fill of oil pan bolts tonight!
On top of that, I am gonna drop the driveshafts off at a shop in the valley tomorrow (Cannon) and should have em back Tues or Wed if everything goes as planned. Then beyond that, it should just be a few more trips to the auto store for misc stuff.
Forums are so invaluable to me, and I wish there was a better way to give credit to all the ideas I've stolen, because I wouldn't be able to do it like this (or this fast) without others' contributions here and elsewhere. I guess detailing my own build is how I can give back, which is why I like to give updates so often. Or maybe I talk too much
rw- Oops, I forgot to take the radiator to the pressure washer when I did the motor. I am gonna try a good clean before giving up on it just yet (probably has less than 4,000 miles). It sat collecting dust for almost a year, still very much new
After I mounted the water system, I started wrapping my head around the wiring a little bit. There is a really good video
I still hadn't put the oil pickup and pan on, so I jacked the motor out just enough to get everything on (steering linkage makes for too tight a fit with the extended oil pickup). Geez, oil pan: seems like an easy thing to deal with, but holy crap is it frustrating to get all those bolts in laying on your back with engine crane legs in your way! Dropped it back into place, and unfortunately the steering linkage pins/bushings contact the sides of the oil pan when the wheel is turned (doesn't reach full lock). 'Doh. So that means I gotta pull the pan off again and re-notch some more on the sides. That will be a tomorrow thing. I already had my fill of oil pan bolts tonight!
On top of that, I am gonna drop the driveshafts off at a shop in the valley tomorrow (Cannon) and should have em back Tues or Wed if everything goes as planned. Then beyond that, it should just be a few more trips to the auto store for misc stuff.
Last edited by Terrys87; 11-30-2015 at 04:56 AM.

 excellent on the radiator.
11-30-2015, 05:02 AM
excellent on the radiator.
11-30-2015, 05:02 AM
#44
Super Moderator
Staff
iTrader: (1)
Join Date: Aug 2008
Location: Anderson Missouri
Posts: 11,788
Likes: 0
Received 21 Likes
on
19 Posts
I went back to see when you started your swap and it was on the 17th. You have been getting things done. 13 days is quick and having to chase down parts will hold you on some of the steps. Great job. Been enjoying following your build.
11-30-2015, 07:57 PM
#45
Registered User
Thread Starter
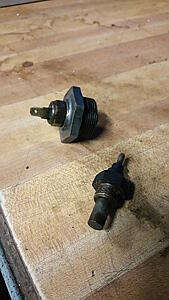
I am staying away from modifying the block at all, and on that note the om617 has a plug that holds the water temp gauge sensor. It sits driver side in the middle of the valve cover by the injectors. I removed it and tapped the port for 16mm 1.5 which is the threading for the 22re's water temp gauge sensor.
The toyota water temp gauge sensor adapted into the merc plug
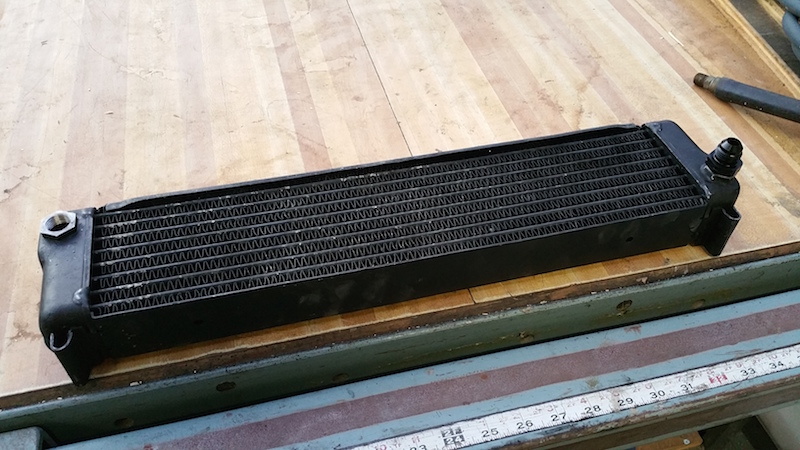
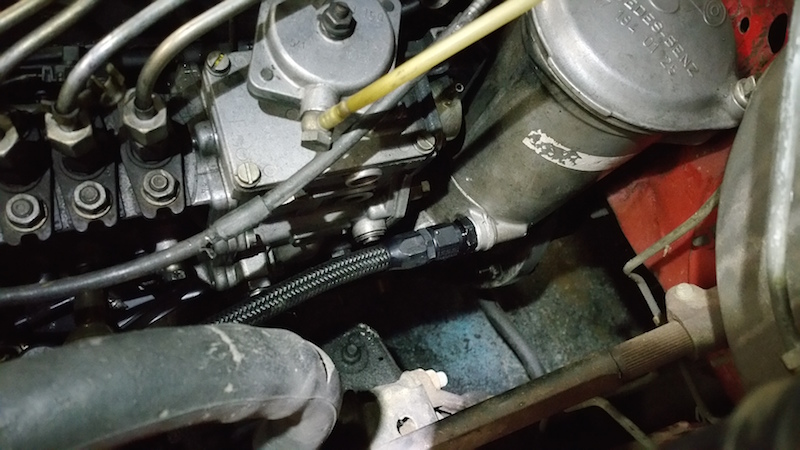
Some pics of the oil cooler install:
Nipples cut off and threaded for 18mm 1.5, showing one of the 18mm 1.5 -> -8AN fittings
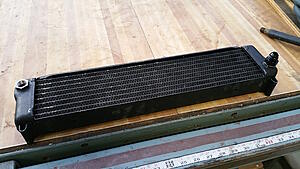
The same fittings on the oil filter housing (threads already match 18mm 1.5). Showing with the -8AN hose attached. Thanks Earl!

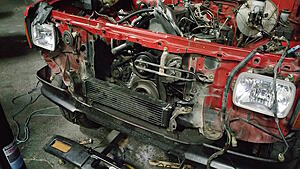
Oil cooler installed. "Lower" hose runs through the front bumper crossmember thingy. Had to cut a small hole to get it to fit. Same for the "upper"

Feeling pretty good about today, I'm pooped. Tomorrow have to re-notch the oil pan, make the transmission mount adapter (been putting that one off), and get this thing STARTED!
The toyota water temp gauge sensor adapted into the merc plug

Some pics of the oil cooler install:
Nipples cut off and threaded for 18mm 1.5, showing one of the 18mm 1.5 -> -8AN fittings
The same fittings on the oil filter housing (threads already match 18mm 1.5). Showing with the -8AN hose attached. Thanks Earl!
Oil cooler installed. "Lower" hose runs through the front bumper crossmember thingy. Had to cut a small hole to get it to fit. Same for the "upper"


Feeling pretty good about today, I'm pooped. Tomorrow have to re-notch the oil pan, make the transmission mount adapter (been putting that one off), and get this thing STARTED!
12-02-2015, 04:14 AM
#46
Registered User
Thread Starter
+ throttle linkage adjusted for stops (manual shutoff still works)
+ oil pan remodified and fits
+ power steering done
Driveshafts should be ready for pickup tomorrow.
Remaining to get the motor started:
� transmission mount adapter
� heater hoses
� fuel pickup
� electrical to batt/starter/alt/glow plugs
� a couple of vacuum lines
� fill it with fluids
Other stuff to do before road ready
� parking brake housing mount (oil filter sits right in the way of stock location)
� shifter set-back
� breather routing
� stock gauges (oil pressure + water temp + tach)
� brake booster to vacuum pump
� intake & exhaust
Always more stuff than it seems
Even though I know I still have a lot of little things left, it feels like I am on the home stretch.
12-02-2015, 04:26 AM
#47
Registered User
^^^ The last 10% of a project always seems to take longer then the first 90%... atleast it always does to me.
Keep it up, you'll be on your first shake down run before you know it.
Keep it up, you'll be on your first shake down run before you know it.
12-02-2015, 04:57 PM
#48
Registered User
Join Date: May 2012
Location: Beaufort SC
Posts: 23
Likes: 0
Received 0 Likes
on
0 Posts
Build wiring
Awesome rig Jenny!
I was wondering though, since I'm starting this same build after the holidays, did you consider using the wiring harness out of the donor MB. Instead of leaving the Toyota harness.
I was wondering though, since I'm starting this same build after the holidays, did you consider using the wiring harness out of the donor MB. Instead of leaving the Toyota harness.
12-03-2015, 02:32 AM
#49
Registered User
Thread Starter
Thanks!
I tried to reuse as much as I could for electrical
From the mb, I grabbed
� glow plug relay & relay control pigtail (kept glow plug harness attached to the motor during swap)
� starter and alt harness (fits toyota starter and mb alt incredibly well)
� the power distribution brick that connects to the starter/alt harness
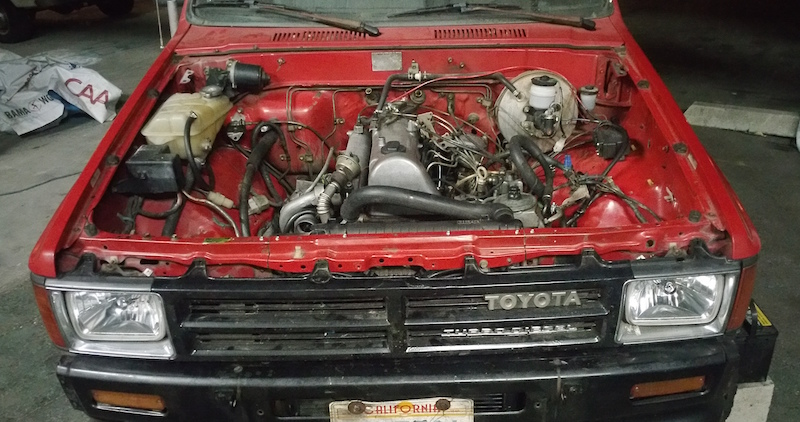
I am combining the mercedes power lines to work with the toyota harness. Never have I gone in this far with the electrical on any vehicle. Just so thankful that part is demystified. I still have lots of little detail work to do, including wire tuck and wrapping the new harness.
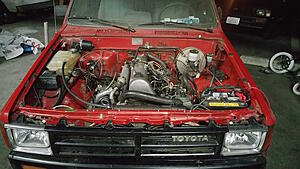
The gangly mess back above the starter is the where the mb power dist brick is located (just hanging out there for now). It's a ring terminal type, which is saving me time because it hooks up the starter and mb alt perfectly. Two wires from the glow plug relay are also attached to it and just need to be reconnected.
It hooks up pretty easy, but what threw me for a loop was actually locating a key on +12v to utilize that was close-by (used a wire from the downsized toyota harness). I also didn't know how to read the FSM wiring diagrams until tonight. That helped immensely. I saved a good deal of the toyota harness, taking out the parts that go to the FI system only. There is a lot of it.
Kept these things harnessed in, mostly stuff for gauges:
� all body electrical
� coolant temp wiring & connector (for gauge)
� oil pressure sender wiring & connector (for gauge)
� tach wires
I tried to reuse as much as I could for electrical
From the mb, I grabbed
� glow plug relay & relay control pigtail (kept glow plug harness attached to the motor during swap)
� starter and alt harness (fits toyota starter and mb alt incredibly well)
� the power distribution brick that connects to the starter/alt harness
I am combining the mercedes power lines to work with the toyota harness. Never have I gone in this far with the electrical on any vehicle. Just so thankful that part is demystified. I still have lots of little detail work to do, including wire tuck and wrapping the new harness.

The gangly mess back above the starter is the where the mb power dist brick is located (just hanging out there for now). It's a ring terminal type, which is saving me time because it hooks up the starter and mb alt perfectly. Two wires from the glow plug relay are also attached to it and just need to be reconnected.
It hooks up pretty easy, but what threw me for a loop was actually locating a key on +12v to utilize that was close-by (used a wire from the downsized toyota harness). I also didn't know how to read the FSM wiring diagrams until tonight. That helped immensely. I saved a good deal of the toyota harness, taking out the parts that go to the FI system only. There is a lot of it.
Kept these things harnessed in, mostly stuff for gauges:
� all body electrical
� coolant temp wiring & connector (for gauge)
� oil pressure sender wiring & connector (for gauge)
� tach wires
12-03-2015, 04:44 PM
#50
Registered User
Join Date: May 2012
Location: Beaufort SC
Posts: 23
Likes: 0
Received 0 Likes
on
0 Posts
Thanks for the info! I was really hoping I could combine the two instead of building separate circuits. I apologize I'm advance but I'm probably going to have a ton a questions for you.
12-04-2015, 01:03 AM
#51
Registered User
Thread Starter
 12-04-2015, 09:50 AM
#55
Registered User
Thread Starter
Thanks fellas!
Just have a few things left before my runner is on the road again (after long hiatus). As I geared up for this project, the truck sat for nearly 4-5 months with engine pulled- accruing a host of black and brown widows. SO many spiders and egg sacs, in fact, that I have had to repeatedly break out the torch fearing my life. It makes working underneath the truck at night a little bit questionable... Last night I counted four 1.5-2" leg-span brown widows hanging from the undercarriage along with countless smaller ones. Time to find a new home, jerks!
Just have a few things left before my runner is on the road again (after long hiatus). As I geared up for this project, the truck sat for nearly 4-5 months with engine pulled- accruing a host of black and brown widows. SO many spiders and egg sacs, in fact, that I have had to repeatedly break out the torch fearing my life. It makes working underneath the truck at night a little bit questionable... Last night I counted four 1.5-2" leg-span brown widows hanging from the undercarriage along with countless smaller ones. Time to find a new home, jerks!
12-04-2015, 09:57 AM
#56
Registered User
I had to look up Brown widow...never heard of them before. But atleast they aren't as venomous as the Black Widow.
What are you going to do about CA smog refs? Is your runner registered in LA?
What are you going to do about CA smog refs? Is your runner registered in LA?
12-04-2015, 10:55 AM
#57
Registered User
Thread Starter
They have taken over most of the black widow population in LA, you see them everywhere. I guess they are a little more hardy and less afraid to be out of sight. I hardly ever see black widows anymore.
For smog, I need to get confirmation on this but this is where things are at now... My buddy told me it will be easy, that I will take my car and fill out some paperwork saying that I did a diesel motor swap. They will inspect it, find that it is indeed diesel, and check me off as exempt- never to have to smog again. This is according to my buddy I still need to confirm it.
Hopefully I can skip the DMV and do it all at AAA.
Time to put the modified driveshafts back on
For smog, I need to get confirmation on this but this is where things are at now... My buddy told me it will be easy, that I will take my car and fill out some paperwork saying that I did a diesel motor swap. They will inspect it, find that it is indeed diesel, and check me off as exempt- never to have to smog again. This is according to my buddy
I still need to confirm it. Hopefully I can skip the DMV and do it all at AAA.
Time to put the modified driveshafts back on
Last edited by jennygirl; 12-04-2015 at 10:57 AM.
12-04-2015, 03:24 PM
#58
Registered User
Thread Starter
Transmission mounted, driveshafts and shifters in, IT MOVES
Feels like such a different animal than the 22re!!
Still some things I gotta do before I feel comfy taking it on the road- like wire tuck, pusher fan hookup, intake, and exhaust. Already made some serious headway today!
Feels like such a different animal than the 22re!!
Still some things I gotta do before I feel comfy taking it on the road- like wire tuck, pusher fan hookup, intake, and exhaust. Already made some serious headway today!
12-05-2015, 12:53 AM
#60
Registered User
Thread Starter
Still getting past electrical
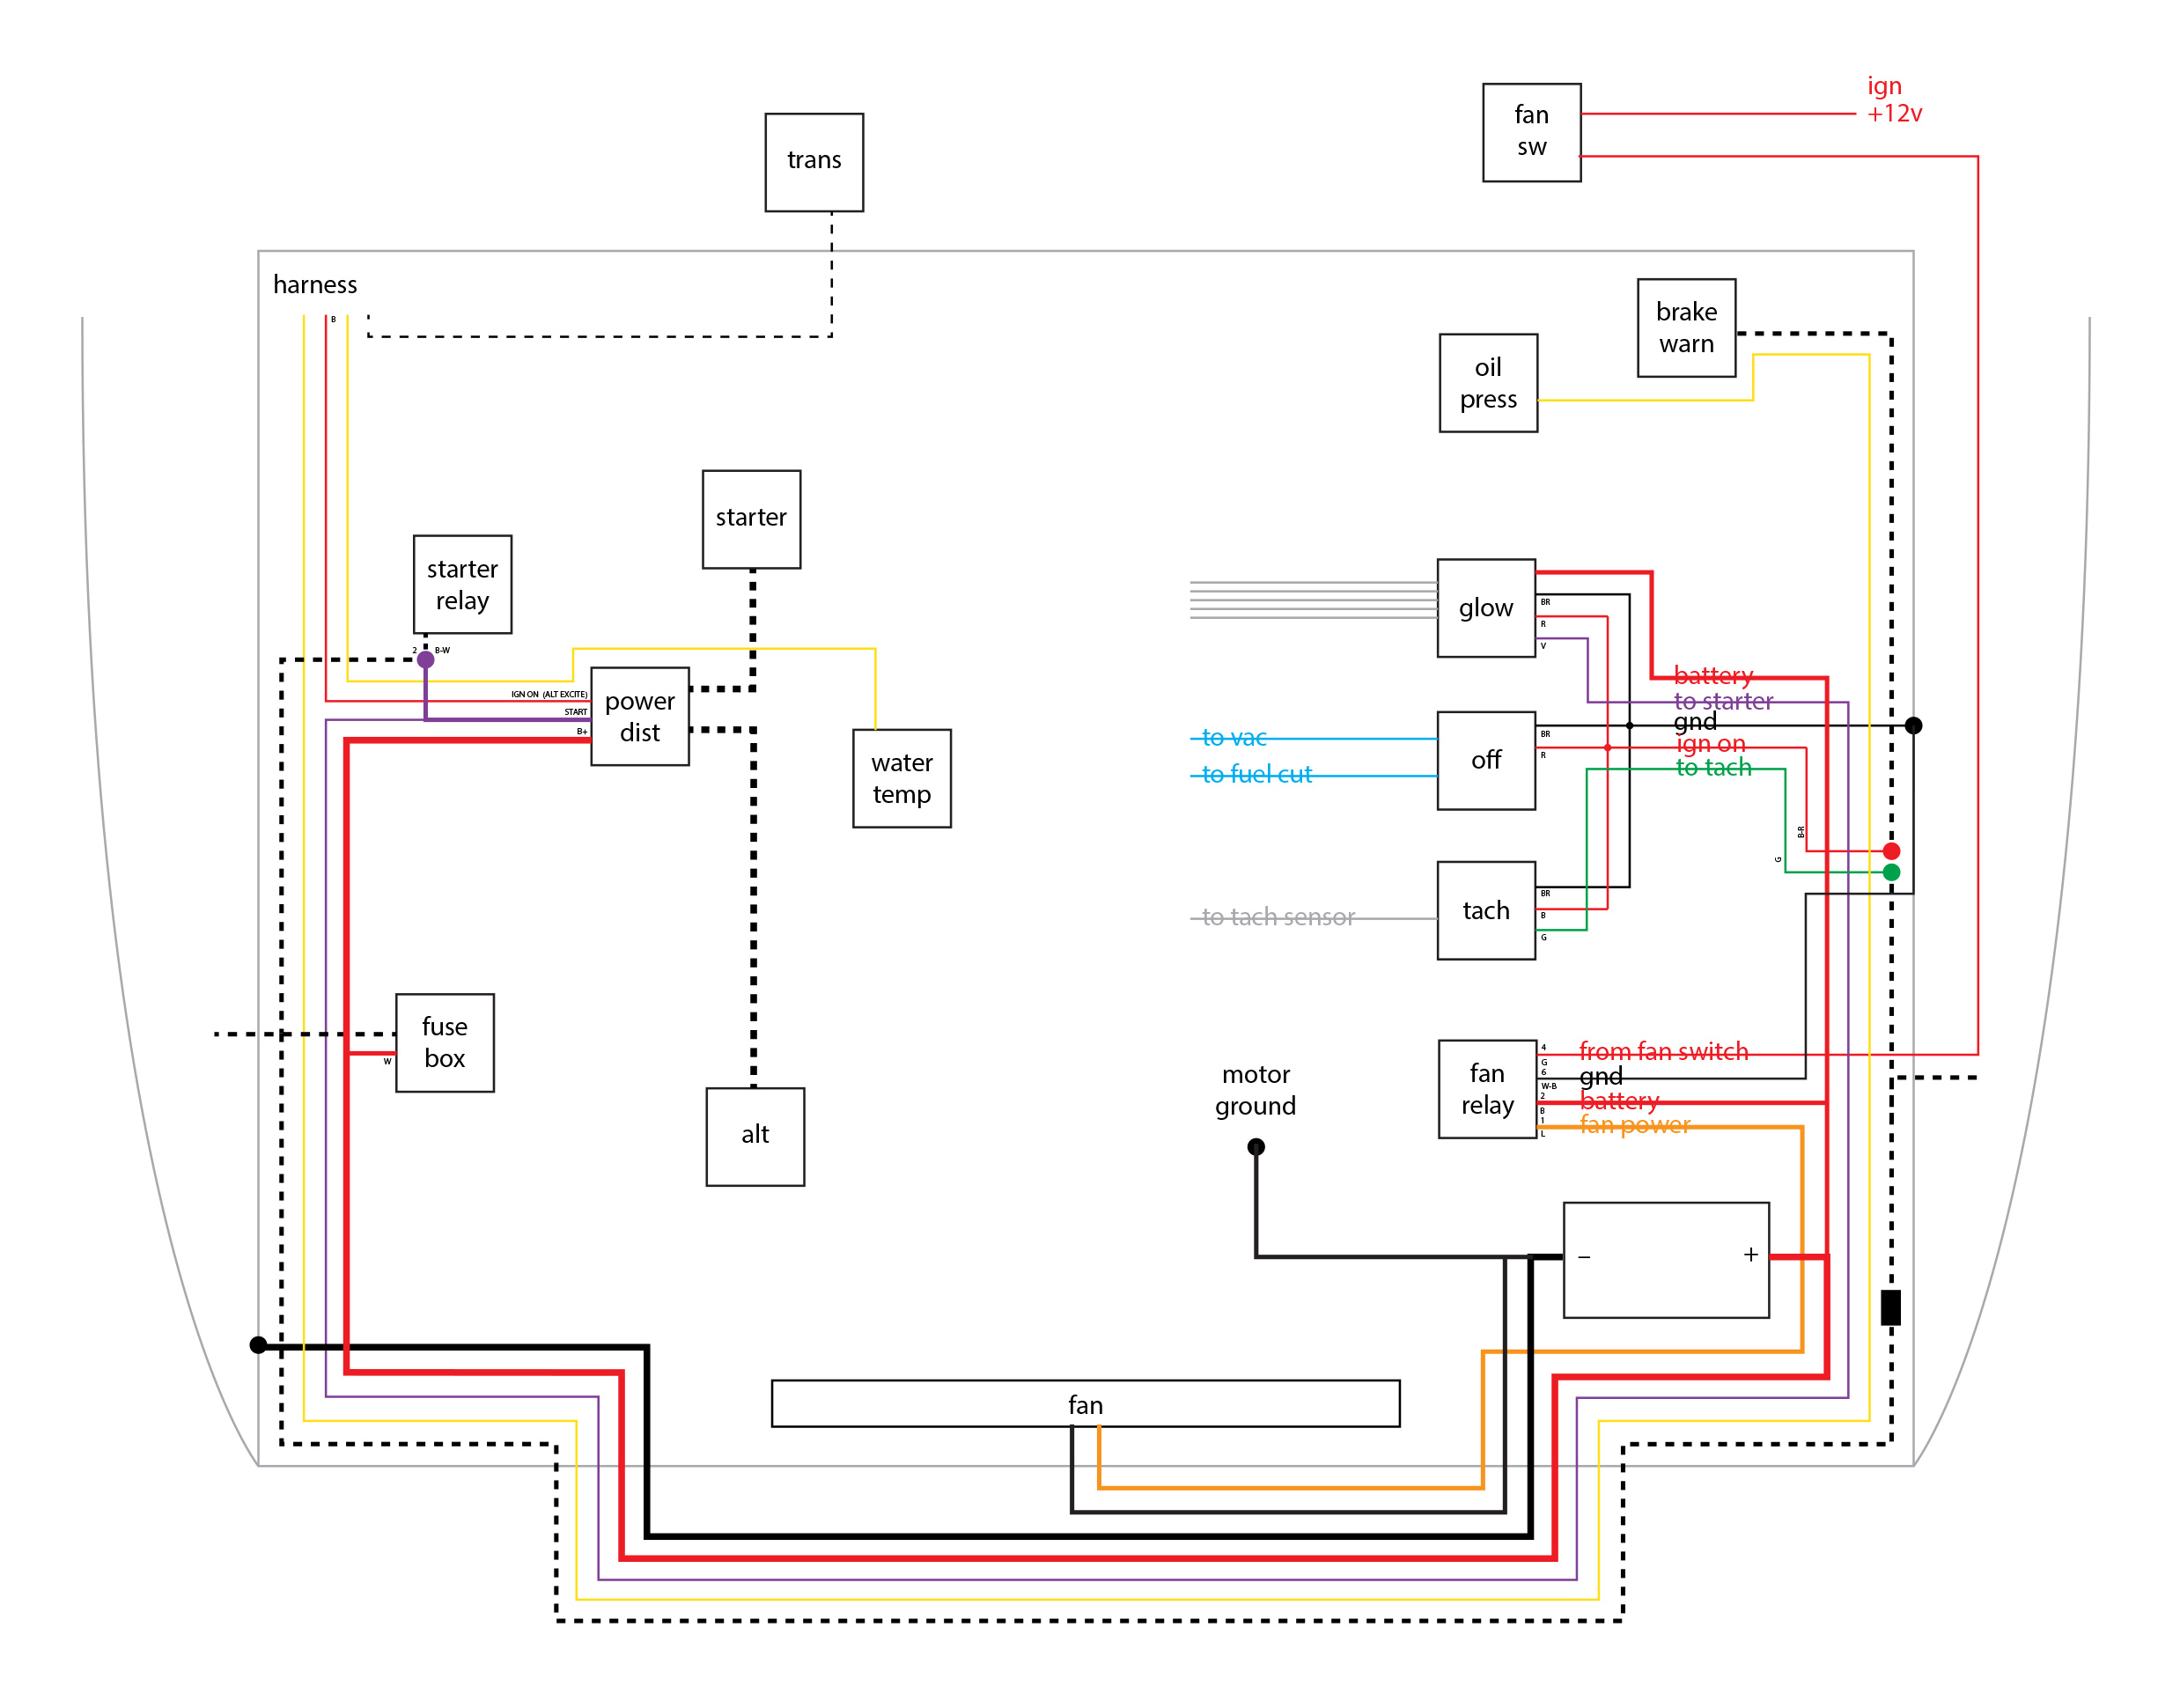
This is my wiring diagram, mostly tested

EDIT: updated high res
Black dotted line = existing harness/wire bundles
Using the stock harness for
• starter relay +12v switched
• ignition +12v switched
• water temp
• oil pressure
• tach wire (MB tach amplifier for signal)
I needed a relay for the pusher fans, so I'm using the Circuit Opening Relay since I don't have an external fuel pump anymore. I am opening the relay via Fc, which used to be for the AFM fuel cut switch. Through the coil I am running +12v switched ignition, which can be interrupted by a switch I had mounted near the parking brake. That serves as a manual fan shutoff so I can turn the fans off while cruising. Otherwise they will be on anytime ignition is on. I do plan to add a thermo switch later as another interrupt. Still need to test this.
Not pictured in the diagram, I also wanna drive a small relay with the glow plug warning lamp +12v to close the ground to the check engine light... meaning the CEL will appear while glow plugs are charging. The violet wire in the ecu harness is for CEL. If you ground it, CEL comes on.
By using the stock toyota water temp sender and oil pressure sender, the stock gauges work in the cluster. Plus that means I don't have to do any wiring back there. Gauge signals are patched in near where the ecu was, I believe it's the end of the combination meter harness.
EDIT: forgot to mention. The "off" in the diagram is the alda vacuum solenoid pulled off of the merc near the driver side fender in the engine bay. Give it +12v switched and it closes its vacuum ports. I split a small vacuum line off of the brake booster line, which goes through the solenoid and then to the fuel shutoff through the other port. Key off = no +12v to the solenoid = solenoid opens = vacuum gets to the fuel shutoff = truck turns off with key off. Tested and works
Might as well also explain the glow plug relay wires from its pigtail. Brown is ground (black in diagram), red is +12v switched, blue is idiot light (not in diagram), and violet is starter relay +12v. Then there is a big red power wire for actually supplying the power to the plugs. With big red to B+ and brown to ground, you can turn the glow plugs on by running +12v through the smaller red wire. This tells them to start heating. When you apply and remove +12v via the starter line (violet), it turns off the glow plugs after a start. Got the info from the video earlier, very helpful.
Anybody know how much current the Circuit Opening Relay is rated for? Can't find any info. The part number is Denso 85910. Need it to drive about 12A (6A each pusher fan)
This is my wiring diagram, mostly tested
EDIT: updated high res
Black dotted line = existing harness/wire bundles
Using the stock harness for
• starter relay +12v switched
• ignition +12v switched
• water temp
• oil pressure
• tach wire (MB tach amplifier for signal)
I needed a relay for the pusher fans, so I'm using the Circuit Opening Relay since I don't have an external fuel pump anymore. I am opening the relay via Fc, which used to be for the AFM fuel cut switch. Through the coil I am running +12v switched ignition, which can be interrupted by a switch I had mounted near the parking brake. That serves as a manual fan shutoff so I can turn the fans off while cruising. Otherwise they will be on anytime ignition is on. I do plan to add a thermo switch later as another interrupt. Still need to test this.
Not pictured in the diagram, I also wanna drive a small relay with the glow plug warning lamp +12v to close the ground to the check engine light... meaning the CEL will appear while glow plugs are charging. The violet wire in the ecu harness is for CEL. If you ground it, CEL comes on.
By using the stock toyota water temp sender and oil pressure sender, the stock gauges work in the cluster. Plus that means I don't have to do any wiring back there. Gauge signals are patched in near where the ecu was, I believe it's the end of the combination meter harness.
EDIT: forgot to mention. The "off" in the diagram is the alda vacuum solenoid pulled off of the merc near the driver side fender in the engine bay. Give it +12v switched and it closes its vacuum ports. I split a small vacuum line off of the brake booster line, which goes through the solenoid and then to the fuel shutoff through the other port. Key off = no +12v to the solenoid = solenoid opens = vacuum gets to the fuel shutoff = truck turns off with key off. Tested and works
Might as well also explain the glow plug relay wires from its pigtail. Brown is ground (black in diagram), red is +12v switched, blue is idiot light (not in diagram), and violet is starter relay +12v. Then there is a big red power wire for actually supplying the power to the plugs. With big red to B+ and brown to ground, you can turn the glow plugs on by running +12v through the smaller red wire. This tells them to start heating. When you apply and remove +12v via the starter line (violet), it turns off the glow plugs after a start. Got the info from the video earlier, very helpful.
Anybody know how much current the Circuit Opening Relay is rated for? Can't find any info. The part number is Denso 85910. Need it to drive about 12A (6A each pusher fan)
Last edited by jennygirl; 12-05-2015 at 05:19 AM.


