When you click on links to various merchants on this site and make a purchase, this can result in this site earning a commission. Affiliate programs and affiliations include, but are not limited to, the eBay Partner Network.
This swap has been documented several times, but I figured I'd add my take to help those along the way.
I bought a 1981 Mercedes 300SD about a year ago - I liked the engine so much I bought another 617 locally to install in my Pickup. The truck is much more tame than most of the true trail rigs on here. It's my DD and sees use shuttling mountain bikes, firewood, etc, and some light off-roading. The goal for this swap is increased drive-ability due to more torque available earlier in the rpm range and better fuel economy, and as I mentioned I just like the engine.
Here it is, 248k miles, R150F trans, rust free.
Initially, I had decided to go with a TD-swaps kit. This was not a smart idea. If you have the means to do fabrication yourself - do it. You will save time and money. After many issues with TDswaps I ended up buying an adapter and hardware from Luke @ 4x4 Labs.
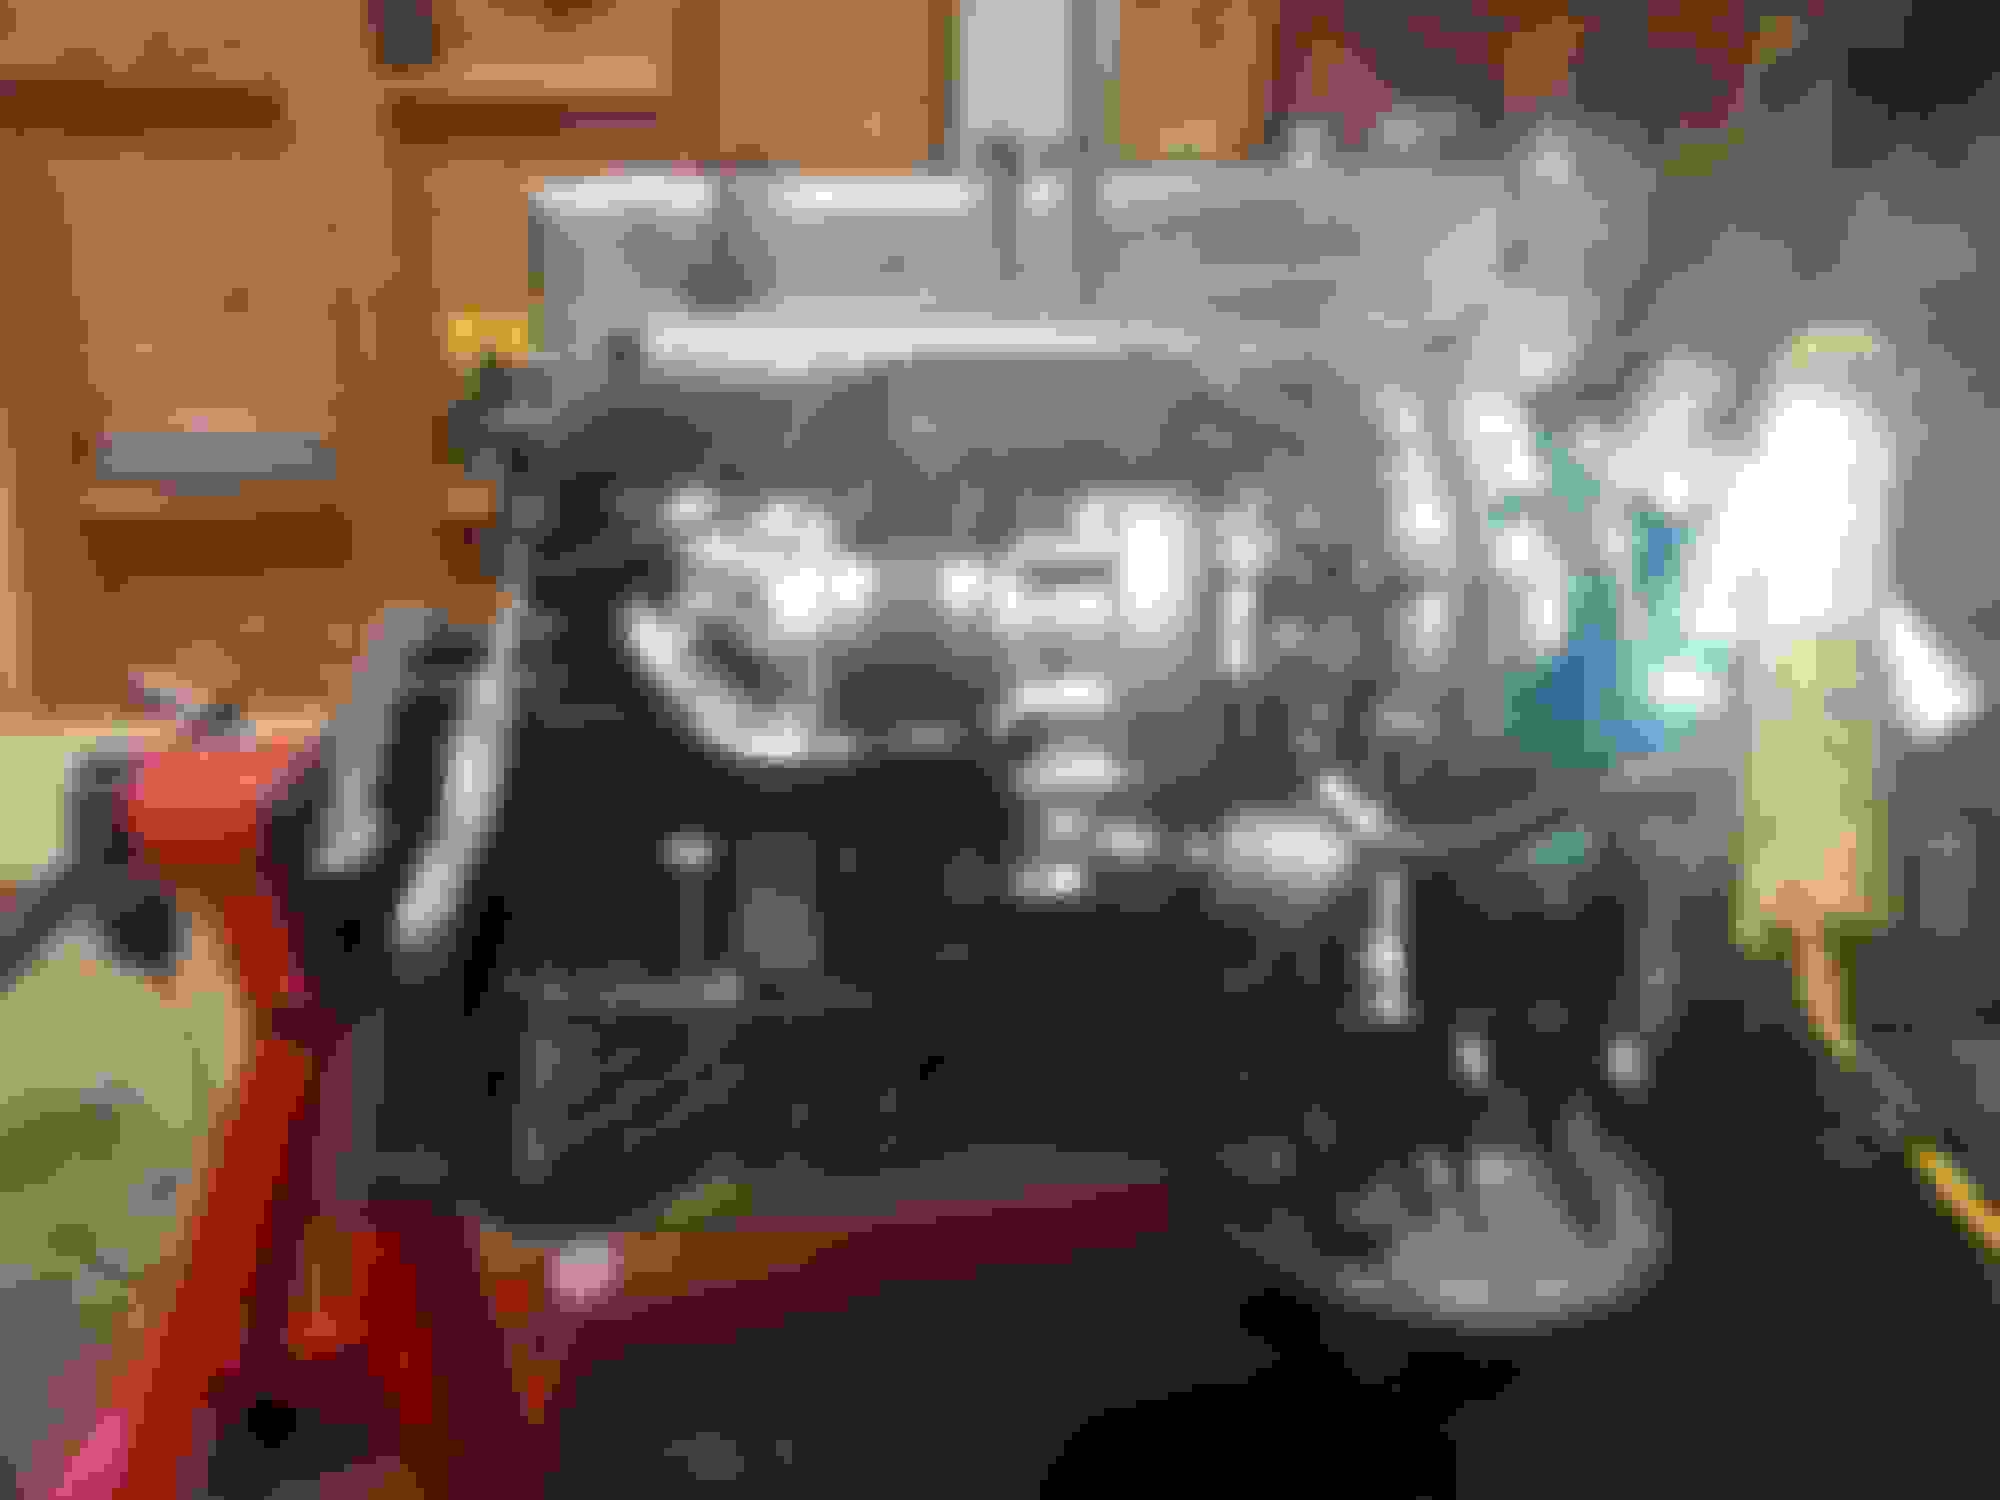
Here is the 3.0 V6 removed. It ran decently, but had a miss at idle and a clattering around 3200 rpm, as well as terrible fuel consumption. Compared to the 22RE, the V6 seems to have a maze of vacuum lines and sensors. Glad to be rid of that.
I wanted the truck to look stock after this project. Because I am keeping the A/C, and because this truck has the R150F trans which is longer than the W56 it was necessary to move the transmission back 4.5" to retain the radiators in stock location. This is the most I could move it back without firewall modifications.
While I was away at work, I had a local shop fab a transfer case mount extension onto the stock crossmember.
Now a bit about the donor motor. It came from a 1978 300SD. I had the seller do a compression check before I bought it, which checked out. If these motors have good compression, there is not a whole lot else to go wrong.
I immediately set about cleaning up the motor (lots of Gunk!).
I spent some time doing a proper tune - cleaned exhaust turbine, overhauled and balanced injectors to +/- 50 psi with new Monarch nozzles from Germany, adjusted valve lash, checked timing chain for wear, replaced fuel lines, and replaced front crank seal. I also re-sealed the power steering pump. I wanted to eliminate possible oil leaks that tend to pop up with these motors, so I cleaned and resurfaced oil filter housing mount, turbo return line gaskets, supply line gaskets, and surfaced the valve cover.
Contrary to some opinions, the 617 has plenty of power for small trucks and 4runners even with oversize tires IF it is properly tuned and maintained. My 300SD has more than enough get-up and go to pass uphill on the highway at 75 without downshifting, and weighs about the same as the truck. Most Mercedes I have dealt with whose owner's complained of low power were simply out of adjustment in some way. The good news is they are very easy to work on. A proper tune means balanced injectors, valve lash adjusted properly, timing chain wear within allowable specs, ALDA operating properly and set to compensate for internal pump wear, wastegate set properly, etc.
before
At this point I also installed various small parts I had bought from TDswaps including brackets to allow me to switch AC compressor and alternator, as well as move power steering pump backward. Again, these could be fabricated very easily, but my work schedule forces me to chose money over time often. I also installed a "clearanced" oil pan - more on that later.
I tend to believe that the Mercedes engineers knew what they were doing, so I wanted to keep as much as possible stock. I used the stock oil cooler by using AN10 lines and fittings from Summit Racing. I drilled thru the stock fittings on the oil cooler and tapped threads to use 1/2 npt to AN10 adapters. For the filter side, I used 22mm 1.50 pitch / -AN10 adapters from Summit Racing. You'll notice I also replaced the rack damper bolt - this is responsible for dampening movement of the fuel rack from the engine's vibrations. A weak spring is noted by the engine exhibiting a side to side rocking motion at idle. The original spring was weak to begin with and weakens with age, new gold-colored updated springs are stronger.
Luke's adapter and flywheel fit flawlessly. I'm not entirely confident about the aluminum crank adapter, but it fit perfectly.
My old clutch was fairly worn, not trying to have to repeat this in a year or two so I went with an new OEM clutch. Also replaced the pilot bearing & throwout bearing while I was at it.
Then I had a good window of a few days to drop the motor in and figure out motor mounts. Without cutting the core support, it was a tight squeeze. Thanks to powerstrokejoe, I knew to remove the vacuum pump, water pump pulley and thermostat housing. With a little tilting, it slid right in. I also removed the manifolds - not for clearance, but to make motor mounts easier.
I did not do a body lift, nor did I hammer the firewall. I left the tranny on rollers, mated the engine and tranny with lower bolts then slid the whole assembly forward, installed those pesky top bolts and slid back. It would be nice to have better access to the top bolts, but it did not add much time doing it this way.
I don't have any pictures of making the motor mounts. They are easy to make using the stock toyota rubber mounts. I debated on this, but decided for ease of fabrication to go this route. The engine does vibrate the truck a bit at idle, but not too much at all. In the future I may make new mounts which use Mercedes fluid filled mounts which were used on the w124 chassis 300D and 300SDL.
The mounts are made with 3/8" steel. I cut the bulk of the mount off the Toyota mounting plate where it bolts to the rubber. This is joined by two beams, gussets, and a brace underneath to plates which bolt to the Mercedes motor in stock location.
As far as cooling, I am using the Merc radiator in stock location. There is plenty of clearance to change belts. You'll notice, because my donor engine was from a w116, it had an heavy duty dual diaphragm vacuum pump, so I had to add a 2nd groove onto the power steering pump pulley for belt routing. Working on finding a stock pulley to install, as I'm sure my homemade pulley is off balance.
The two pusher fans are stuffed between the AC condensor (left in stock location) and the bumper. They will be wired to auto controllers and switches in the cab allowing for ON/OFF/AUTO operation.
My final issue with the swap is the "clearanced" oil pan I bought from TDswaps begins to rub the tie rod past about 30 degrees of wheel travel, almost to Toyota steering stops. I have a spare pan I will be modifying similar to how Dmarsh4x4 did his pan, great machining on his part.
Then, I will still need to relocate the steering damper to behind the tie rod but I do not anticipate this being a problem.
I removed the fuel tank, cleaned, and removed the stock toyota electric pump. The pump is not needed, as the diesel has it's own lift pump. I also believe it will limit fuel flow if left in place; the diesel lift pump circulates much more fuel than the injectors actually use. I replaced it if a section of hose and replaced the on-frame filter while I was at it.
Of course, now that the truck is nearly driveable, I have to go back to work. I did get to start it and back out of the garage into the driveway which was rewarding. I love how you need no throttle in 1st/reverse...just let out the clutch lol.
Items left
- replace lower clutch line with 3/16 brake line (uses same fittings) to make exhaust routing easier.
- make up exhaust
- wire electric fans, gauges (VDO boost, oil pressure, water temp, EGT)
- find power steering return hose from junkyard
- figure out oil pan & steering stabilizer
- clean up shifter area in cab from moving transmission.
-shorten rear driveshaft or have new single piece driveshaft made
-route proper air intake to stock location and plumb in oil/air separator from valve cover vent
Anyway, please let me know ya'lls comments and questions! The whole reason for posting is that the write-ups by powerstrokejoe, dmarsh, pyrojoe, waltt and others helped me accomplish this and saved many headaches so it's my hope I can do the same.
Matt
EDIT: forgot to mention glow plugs! I'm using a Ford 80A starter relay in combination with an OMROM H3Y timer relay. A small panel in the cab will have a pushbutton, h3y, and a LED to indicate the main 80a relay is powered. The H3Y is a normally open, timed delay relay which will allow you to set the glow time from 2.5 to 30 seconds. Then you simply push a button once and the GP will power for the duration you set, after which the H3Y will shut the relay off. The LED indicator is to provide visual feedback that the glow circuit is actually on or off. I will use a 5 gang fuse box inline with the plug wires to prevent a single failure from affecting the system.
I wanted to have it this way for winter time starting; the engine will start even well below freezing with just a few seconds of glow time, but keeping the plugs on for a while longer will keep the idle smooth and the smoke down.
While I was poking around in the cab anyway, I decided to upgrade the anemic stock stereo sytem.
I replaced the 4" dash speakers with some nice Polk coaxial speakers. I removed the rear panels and install 6.5" Polk component woofers on a piece of 3/8" ply which I cut to fit in place. The tweeters I mounted on the rear trim piece.
Powering the system is a Planet Audio amplifier. Underneath the amplifier hidden in the storage compartment is a 8" Planet Audio subwoofer. I do not like thumping bass, but it is nice when the sound fills out the interior.
The amp was slated to go into the storage compartment as well, but ended up too big by just an inch or two. I may move it eventually, but for now it's ok no one sits in the back anyway.
Lastly here is a pic of the truck minus upper and lower grill. The hood even closes! About 1/2" clearance between hood and valve cover. You can see the oil cooler mounted below the front core support. I am designing a rock guard to protect from debris while allowing airflow; the 617 turbo has oil-spray cooled pistons and needs at least the stock cooler if not larger to keep oil temperatures down.
Long long term plans for truck involve a quality small suspension lift to allow slightly bigger tires and perhaps a SAS, but for now it's the DD and the checkbook needs time to recover from this swap.
I've been thinking I may move the battery to the left side. This will allow a shorter intake run with just one 90 degree elbow and the filter where the battery currently sits, versus having to run the intake up and over the valve cover. There should be plenty of cold air available on either side even though the factory intake is on the left.
Then I can move the coolant expansion tank to the right side, which would eliminate some squirrely coolant hose routing.
Also, it seems no one can (or won't) shorten my rear driveshaft, being a two piece and it tapers down at the ends. Looks like I'll be buying a one-piece shaft from Tom Woods.
The swap is looking good! As for the aluminum crank adapter, you should be skeptical. It is a giant spring. However, I ran it for 20k miles without a problem. I noticed your oil cooler is mounted low and up front. I would suggest moving it to a safer location. Mine sits along my frame rail and cools just fine (verified on a blistering 115 degree Kansas day). As for a driveshaft, look for a single cab driveshaft. You may have to have it lengthened, but that's not a big deal. Stay away from Dave'z Off-Road. He is a complete and total waste of time/liar/scammer.
I am hoping that because my truck sees mostly on-road and light duty use it will last for a while...we will see! When you say ran in past tense, have you since had an issue with it or removed your 617?
I was planning on making an fairly beefy guard for the cooler which angles up from the bottom towards the bumper, do you think this would be ok or should I still plan on moving it? As mentioned this truck is mostly a road queen.
Thanks for the note on the driveshafts; I priced out a new one piece and WOW haha!
I sold my first kit and switched to my own adapter kit, because I kept having starter engagement issues. I don't know how many times I got stranded and had to have someone come pull-start my truck.
Ok, and you suspect this was due to the aluminum crank adapter? luke sent me a flywheel as well, the two or three starts I have done so far seemed just fine (fingers crossed!)
If I start having issues ill pick up one of yours!
Ok, and you suspect this was due to the aluminum crank adapter? luke sent me a flywheel as well, the two or three starts I have done so far seemed just fine (fingers crossed!)
If I start having issues ill pick up one of yours!
No, the spacing of the starter from the bell housing was incorrect. I'm referring to the flange on the adapter plate itself. It is too thick. I didn't see the problem right away. It started after I broke in the flywheel and rounded the teeth off a bit.
Also, For the oil pressure sending unit I am curious where you came across the line that taps into the filter housing and adapts to the sender. I have the fitting to adapt it, but I don't have the line that comes out so it will clear.
Jrmyers94,
That is the stock sending line that came with the engine; it had a mechanical gauge. I've seen some use a 90 degree elbow out of the filter housing to allow a sending unit to clear.
As for the fuel lines they came in the td swaps kit. You could probably make them out of any 1/4 aluminum tubing just as easily.
 03-31-2015, 09:43 AM