Oregon's Lone Wolf 3.4 swap
 09-01-2013, 04:10 PM
#21
Registered User
Thread Starter
97-00 3.4 5VZ-FE Valve Adjustment Tech Worksheet
97-00 3.4 5VZ-FE Valve Adjustment for Dummies Worksheet: https://skydrive.live.com/?mkt=en-US...24&app=WordPdf
First off, let me give thanks to YotaTech and its members for helping this noob along with his 3.4 swap. For that, I hope to contribute to members with a worksheet and simple instructions for a valve adjustment on the 97-00 5VZ-FE. I designed it to keep things organized and OUT of my brain where stuff gets lost all of the time.
Special thanks to PismoJoe for his tech write up. https://www.yotatech.com/forums/f128...t-tech-226997/ Please read this in conjunction with the following PDF worksheet. His deals with the head OUT of the motor and mine deals with the heads installed. My other source was a Toyota Chilton manual for year 97-00. I am not sure if this procedure is the same for the 3rz, or 2rz as indicated by Joe's write up. I am thinking this will apply to 95 and 96 but just to be safe, I only listed this as this was the year Manual I used as a reference. If someone could chime it that it does apply, I will gladly change the year on this link and the PDF so it is more clear.
For many like me that like to do things right the first time, I strongly recommend that those doing a 3.4 swap perform this along with other maintenance as the motor is OUT of the rig. Many never heard the engine run and don't know if there is a tick. That tick could cause tight clearances that would lead to a burnt valve and you would be bummed!! Chances are good the person who had the donor did not perform this adjustment as a part of the PM due to the cost and many obtained motors that have over 150,000 miles. It took this new kid only 3 hours to fix a known lifter tick. Cost was only $100 for all 12 28mm OEM exhaust shims at the Cylinder Head Supply and valve cover gaskets that most likely need to be changed anyway. http://www.cylinderheadsupply.com/ Shims are $17.00 for pack of 4!! Don't pay stealership prices. Ships in 3 days and they take PayPal
Good luck on your Valve adjustment and enjoy the simplicity of this worksheet. You can either print or edit the info into the doc using the following link. My neighbor down the street is a Yota tech and agrees that .015 exhaust clearance is good. This is what he uses along with Joe's recommendation for the same. Keep in mind that if the shims are under tolerance, subtract this amount from both the difference in tolerance and shim size. If it is greater in tolerance, then ADD the difference to the shim to decrease the gap.
97-00 3.4 5VZ-FE Valve Adjustment For Dummies Worksheet: https://skydrive.live.com/?mkt=en-US...24&app=WordPdf
Last edited by Oregon'sLoneWolf; 09-03-2013 at 12:58 PM.
 09-01-2013, 11:27 PM
#23
Registered User
Thread Starter
One step down, about 125 to go.
Last edited by Oregon'sLoneWolf; 02-07-2015 at 07:57 PM.
 09-02-2013, 08:58 PM
#25
Registered User
Thread Starter
 09-04-2013, 06:08 PM
#26
Registered User
Thread Starter
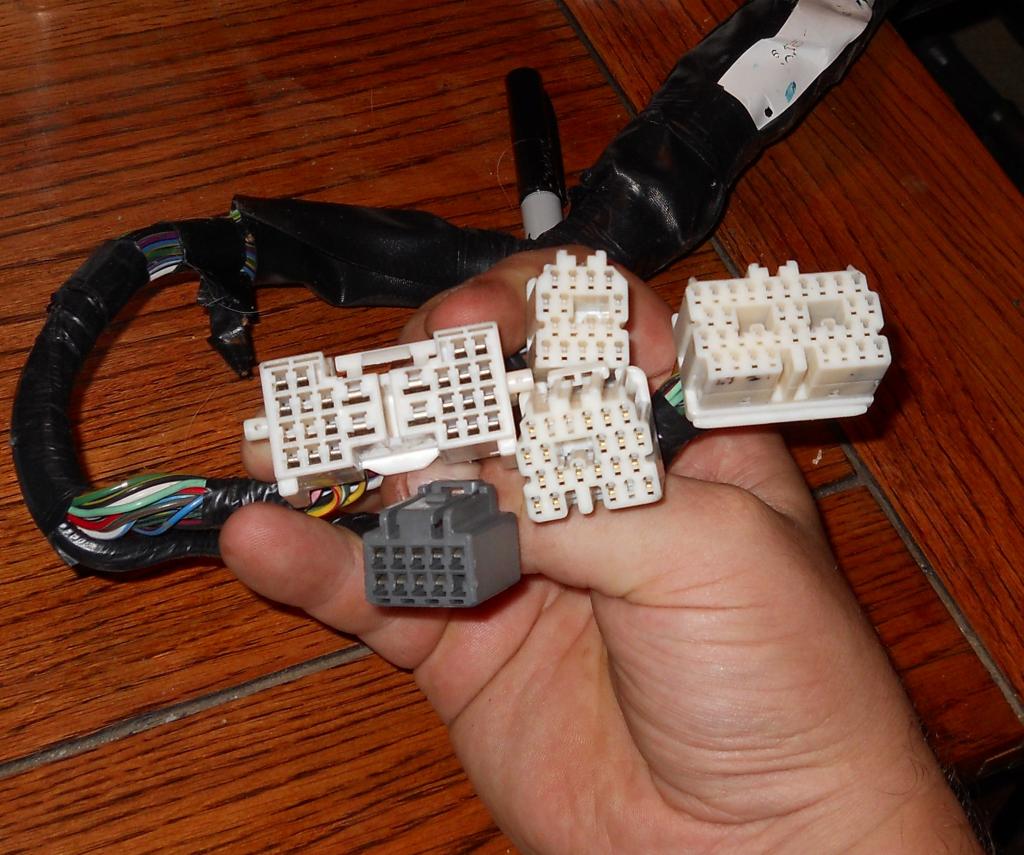
So I decided to take a closer look at the plugs on the alleged 97 4Runner. I am at a loss as it does NOT had an E12 plug. It has the E9 plug, but the other one that should look just like it, the E12 is not anywhere and nothing has been cut.
Since the engine only has 123,000 on the odometer, my only other logical explanation is this engine is in fact as 00 or so as I am looking at when they made the plugs the universal type. I don't know. The only other problem with that is I have another 97 harness from an auto that looks exactly the same.......no E12 plug on the harness or cut wires.
It has the E11, E10, E9, II3 and I think the II1 plug on the harness. If it is the 00 new style harness, am I screwed because I got a 97 MT ECU,.. Insert head bang Emot here!!!!
Any thoughts?


Last edited by Oregon'sLoneWolf; 09-04-2013 at 08:56 PM.
 09-04-2013, 06:30 PM
#28
Registered User
Thread Starter
So you didn't have an E12 plug either huh? wow, this really messes up the game plan if it is the newer style harness, as the wires will be different I am sure...hmmmmm I guess they gave me the wrong vin number which comes back as a 97.
09-04-2013, 09:05 PM
#29
Registered User
So I decided to take a closer look at the plugs on the alleged 97 4Runner. I am at a loss as it does NOT had an E12 plug. It has the E9 plug, but the other one that should look just like it, the E12 is not anywhere and nothing has been cut.
Since the engine only has 123,000 on the odometer, my only other logical explanation is this engine is in fact as 00 or so as I am looking at when they made the plugs the universal type. I don't know. The only other problem with that is I have another 97 harness from an auto that looks exactly the same.......no E12 plug on the harness or cut wires.
It has the E11, E10, E9, II3 and I think the II1 plug on the harness. If it is the 00 new style harness, am I screwed because I got a 97 MT ECU,.. Insert head bang Emot here!!!!
Any thoughts?

Since the engine only has 123,000 on the odometer, my only other logical explanation is this engine is in fact as 00 or so as I am looking at when they made the plugs the universal type. I don't know. The only other problem with that is I have another 97 harness from an auto that looks exactly the same.......no E12 plug on the harness or cut wires.
It has the E11, E10, E9, II3 and I think the II1 plug on the harness. If it is the 00 new style harness, am I screwed because I got a 97 MT ECU,.. Insert head bang Emot here!!!!
Any thoughts?
E12 (and E8 for that matter) are NOT included in the engine harness, they're in the DASH harness. If you look at the functions of the various connections in those connectors (E8 and E12) they pass signals between the engine/transmission/transfer case and the rest of the vehicle; such as +B (switched 12V), BATT (always on 12V), BK (brake signal), 4WD (to tell the ECU its in 4WD and light the dash light), STA (starter trigger wire...even though its actually on E9 for the A/T), W (check engine light), SP1 (speed sensor signal), and the OBD-II connections.
When you convert the A/T harness to M/T with the M/T plugs, there will be a number of wires left over and a couple that (if memory serves me correct) were connected strangely for the A/T. I was actually able to completely remove II1 from my conversion harness and I believe there was one ABS signal I wanted to keep, so I moved it to an unused pin on II3.
09-05-2013, 01:33 PM
#30
Registered User
Thread Starter
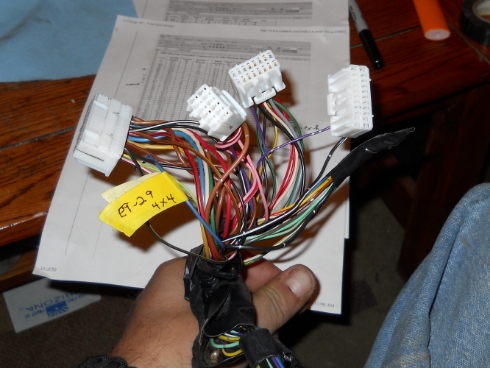
That definitely looks like the engine harness off my 96/97 4Runner A/T donor, so at this point it looks like you have the right harness.
E12 (and E8 for that matter) are NOT included in the engine harness, they're in the DASH harness. If you look at the functions of the various connections in those connectors (E8 and E12) they pass signals between the engine/transmission/transfer case and the rest of the vehicle; such as +B (switched 12V), BATT (always on 12V), BK (brake signal), 4WD (to tell the ECU its in 4WD and light the dash light), STA (starter trigger wire...even though its actually on E9 for the A/T), W (check engine light), SP1 (speed sensor signal), and the OBD-II connections.
When you convert the A/T harness to M/T with the M/T plugs, there will be a number of wires left over and a couple that (if memory serves me correct) were connected strangely for the A/T. I was actually able to completely remove II1 from my conversion harness and I believe there was one ABS signal I wanted to keep, so I moved it to an unused pin on II3.

Last edited by Oregon'sLoneWolf; 09-05-2013 at 01:40 PM.
09-05-2013, 03:02 PM
#31
Registered User
Glad to help; a lot of this stuff really isn't that complicated but until you truly get your head wrapped around it, some of the simplest of things can seem mind-bogglingly complicated.
09-05-2013, 03:40 PM
#32
Registered User
Thread Starter
 09-05-2013, 10:36 PM
#33
Registered User
Thread Starter
Well, what do you know, I got the engine harness part wired up to the MT 97 ecu plugs. Just two wires go to the E8 plug and the other wires from the dash will go into this plug I guess. I guess the wire 29 from the E9 will get soldered to a wire in the dash part of the harness. 60% done, the 40% I will have to research further. I recall reading about the 2nd gen dash harness and the plugs needed I just have to find it again.......I think it is buried on a thread somewhere. Does 6 wires left over sound about right?
Just two wires go to the E8 plug and the other wires from the dash will go into this plug I guess. I guess the wire 29 from the E9 will get soldered to a wire in the dash part of the harness. 60% done, the 40% I will have to research further. I recall reading about the 2nd gen dash harness and the plugs needed I just have to find it again.......I think it is buried on a thread somewhere. Does 6 wires left over sound about right?
Last edited by Oregon'sLoneWolf; 09-07-2013 at 11:32 PM.
12-23-2014, 02:38 PM
#34
Registered User
Thread Starter
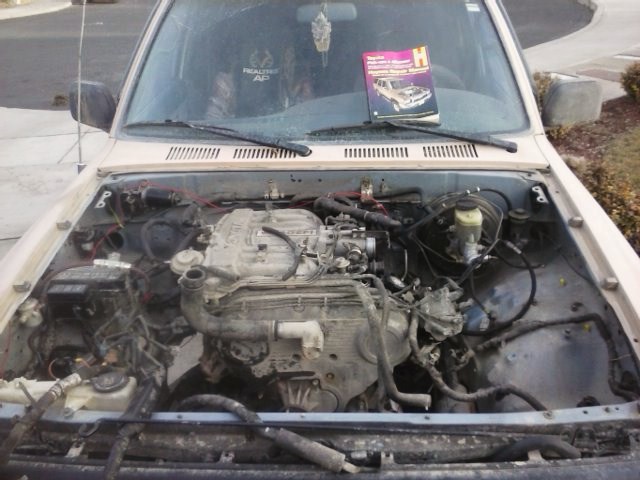
Let the true swap begin!!!
Well, as you all can see I have put this project off as my engine ran and I wanted to just drive it until she was dead. I managed to get 21 more year out of her for a total of 225,000 miles and 12 years of problem free driving. I sure hope that luck continues.
Her demise came out in the woods on a coyote hunt and a shooting trip after a hard rain and a little snow. I could have sworn that puddle was only a foot deep that I rushed trough. Yup, it hydrolocked up and bent the connecting rod due to heavy compression. I pulled the plugs and cranked it to blow the water and a clanking she went.
NOTE:::: If you have done that Air Box mod for more air flow, stay away from water that is more than 2 feet deep and don't SPLASH through it. GRRR
So, let the actual swap begin!! This is a very detailed "how to" install I will be following from ORS. There are other links to the write up that are dead from other people's swaps. I found this one which is pretty much step by step. http://www.offroadsolutions.com/tech...onversion-kit/Disconnected everything and ready to pull after I lower the tranny a bit and get the trans bolts out. Then, off to scrub the bay and paint black........let the work begin!!
I sure hope people are around still.........all of the posts look very old..... Back to reading as a heat stroke in the Marines cooked my brain and I have a serious case of CRS! lol
Her demise came out in the woods on a coyote hunt and a shooting trip after a hard rain and a little snow. I could have sworn that puddle was only a foot deep that I rushed trough.
Yup, it hydrolocked up and bent the connecting rod due to heavy compression. I pulled the plugs and cranked it to blow the water and a clanking she went. NOTE:::: If you have done that Air Box mod for more air flow, stay away from water that is more than 2 feet deep and don't SPLASH through it. GRRR
So, let the actual swap begin!! This is a very detailed "how to" install I will be following from ORS. There are other links to the write up that are dead from other people's swaps. I found this one which is pretty much step by step. http://www.offroadsolutions.com/tech...onversion-kit/Disconnected everything and ready to pull after I lower the tranny a bit and get the trans bolts out. Then, off to scrub the bay and paint black........let the work begin!!

I sure hope people are around still.........all of the posts look very old..... Back to reading as a heat stroke in the Marines cooked my brain and I have a serious case of CRS! lol
Last edited by Oregon'sLoneWolf; 02-08-2015 at 07:50 PM.
 01-19-2015, 06:51 PM
#38
Registered User
Thread Starter
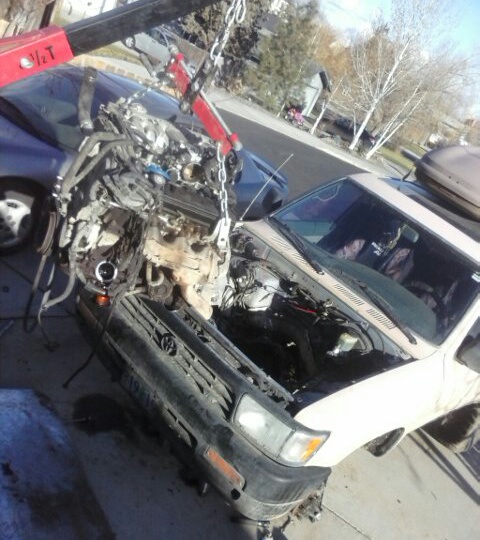
Thanks for the vote of confidence guys. Well, I pulled the engine today as we finally had a clear in the cold and wet weather. Yup, lowering the transmission is the way to go to get the damn top transmission bolt out on the drivers side. Other than that it came out without a hitch.
Tomorrow I clean the engine bay and paint it, move the engine mounts, the oil pan and swap the clutch out as I will just be using all the parts from the 3.0. If the flywheel is ok then cool......if not, I'll take it down to have it turned. I'm thinking maybe I should replace the clutch while I am in there.........hmmmm. Sure will be a pain to get to it again. I'll know more when I tear into it and check for wear.
Baby steps.......

 01-19-2015, 07:15 PM
#40
Registered User
Thread Starter
For those that like damage pictures..Here ya go. This is what happens when you have done the air box mod and hydrolock your engine then attempt to start it without FIRST pulling the plugs to release the water upon cranking.
You just might find this in your oil pan.
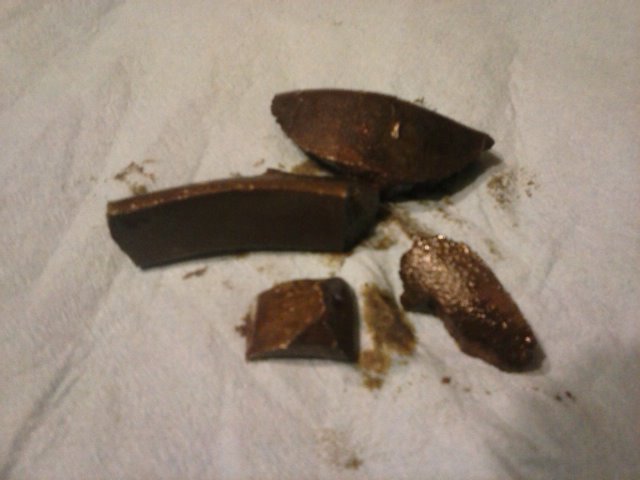
You just might find this in your oil pan.

Last edited by Oregon'sLoneWolf; 01-19-2015 at 07:17 PM.


