When you click on links to various merchants on this site and make a purchase, this can result in this site earning a commission. Affiliate programs and affiliations include, but are not limited to, the eBay Partner Network.
Everything is working great. No issues other than the oil pressure.
I replaced the pump and filter while I was in there and now the oil pressure will jump to the highest point on the stock gauge. I never did that before.
This happens when downshifting coming up to a stoplight, making a turn , etc.
This cant be correct but I am not sure what to do with it.
I am now thinking that the pressure relief valve in the oil pump is stuck or defective. I am going to have to pull the oil pan off AGAIN and take a look.
Hopefully it is something that can be unstuck or lubed up. I didn't take it apart and put oil in it or anything because the FSM didnt mention to do that.
oh man, it's never done eh?
I wasn't getting any reading for the oil pressure at first. It turned out that the connector was too short meaning that it didn't reach the tip of the sender side. I end up adding some wires in there to complete the circuit.
Pulled the pan and was hoping to find the relief valve stuck or hard to move. It wasnt. It fell right out. I lube it all up and put it all back together and started it and there is now ZERO cotton candy oil pressure on the gauge. Nothing. Nada. No damn movement whatsoever. Ya, I remembered to put oil in it.
I am now thinking that I have a bad sending unit. I ground the wire and the gauge takes off so that tells me that the wire is good.
I just got back from the the local Oreillys and picked up a mechanical Auto Meter gauge and will install that tomorrow with some copper line. Been meaning to anyway and this just forces my hand. What another $90??!!
now I just got to figure out where to mount it at.
Cross your fingers!
LOL!! It seems vital edited some language.
Last edited by dntsdad; 07-18-2012 at 06:30 PM.
Reason: Language
I have an extra sending unit I'll mail ya for the cost of postage if it helps. It may be good, or it may not be. I've tried 2 different sending units in mine and my oil pressure gauge is stuck on "low" with no movement at all. I think (hope) my dash gauge is bad. You may not have time to mess with one that may or may not work, but thought I'd offer.
I have an extra sending unit I'll mail ya for the cost of postage if it helps. It may be good, or it may not be. I've tried 2 different sending units in mine and my oil pressure gauge is stuck on "low" with no movement at all. I think (hope) my dash gauge is bad. You may not have time to mess with one that may or may not work, but thought I'd offer.
Thanks for the offer but like I said, this is something that I have been wanting to do anyway.
Besides I believe there are like three different sender for these oil gauges and none of them inter change. I have 3 sitting here and only one of them would work my gauge.
This oil pressure gauge and sender have been strange. It worked fine before the swap and the exact sender went into the 3.4 and it didn't work after the swap. Replaced the gauge itself and everything worked. Gauge went bad during the swap I guess
Then I was doing something minor and the sender went bad. Replaced worked again.
Change timing belt and shows high.
Then today nothing.
I'll be happy to slam that female dog on the concrete tomorrow and smash it with my 5lb. Sledgehammer.
Hopefully this will be resolved tomorrow.
Anyone know the pressure norms under various rpms? Couldn't find it in the fsm but I may have overlooked it.
EDIT**
Found this in the FSM:
LUBRICATION (5VZ-FE)
SERVICE DATA
Oil pressure At idle speed (normal operating temperature) 29 kPa (0.3 kgf/cm2, 4.3 psi) or more
At 3,000 rpm (normal operating temperature) 245 - 520 kPa (2.5 - 5.3 kgf/cm2, 36 - 75 psi)
Could this be more meaningless though. Very vague.
Lesson learned, next time test before a tear down. You always want to isolate the problem before just ripping things apart. Otherwise you may not know why or where something failed.
Yeah those oil pressure readings are all over the place. I was running plain dino before and it showed low on the gauge at idle almost not reading at all. Then I started to use synthetic and it reads at idle and pressure went up over the board. Also if your fan clutch is wearing out, it lets the oil heat up and thin out giving you low readings at idle.
Got the gauge in and everything seems to be working fine.
Cold start produces about 75psi and then slowly falls as the motor cools to settle at about 14-18 psi at idle.
Pressure rise when it should and falls when it should.
Thought I would do i little mini write up in case anyone is thinking of doing the same thing. Like I have said, this is something that I have been wanting to do for a long time now and this situation forced my hand. I am glad it done now and that I can monitor the oil pressure rather than rely on the factory "gauge".
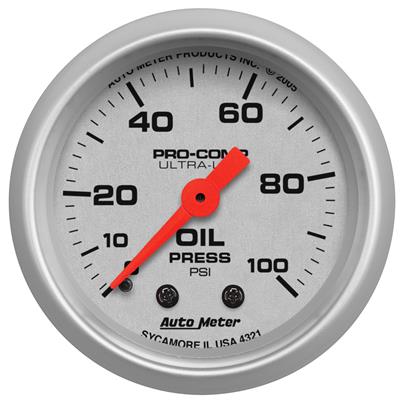
I used an Auto Meter 2" mechanical gauge. For those of you that do not know the difference, a mechanical gauge uses the actual element that it is measuring for information rather than an electronic conversion via a sending unit.
I went with a mechanical gauge for two reasons.
First, they are said to be more accurate than the electronic ones. Saying that however, unless you are running a ultra high dollar motor and need things to be absolutely perfect, for most of us the electronic gauge would suffice.
Secondly was the sweep of the gauge itself. The mechanical gauge has a 270 degree sweep so the numbers are spread further apart and making a more meaning full read of the gauge as seen here.
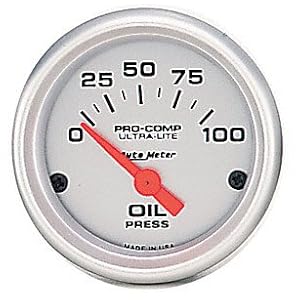
Its electronic counterpart, has a sweep of only about 150 degrees and thus the gauge isn't as fine in its readings.
The good is that its more accurate and there is less to go wrong with it. However, the bad is that you have an actual oil line coming into the cab that could leak one day and its harder to run the line that a simple wire.
Lets get to it.
I decided the leave the stock sender in place just to plug the hole and use the port beneath it instead shown here. The port next to it, in the aluminum oil pump housing, is rumored to be a passage that will not accurately read oil pressure. I can't confirm that but I read a post about it somewhere (I forget where). If you were hooking up a gauge to read oil temperature, I am sure that would be fine to use.
You will need an 8mm allen to get it off. A socket would be best but you can do it with the regular style wrenches. Its just awkward because it so deep in there the wrench doesn't have much room to travel.
The gauge comes with just about everything you need. You will need to source a 3/8NPT to whatever your fitting is that comes with the gauge. Mine was 1/8" so I picked up a 3/8NPT to 1/8 BPT adapter. Make sure you wrap everything up with Teflon tape to keep it all sealed.........especially since its going into the cab. I read lots of posts of guys using an adapter from Napa part number 701-1550 and if you search Google for "Napa 701-1550" you will see them. However, I am fortunate to have the Napa warehouse for the west coast about 2 miles from me and its also a retail store. They didn't have it and there was zero availability on it so it must be discontinued. At least that's that the guy there told me who is pretty knowledgeable. Maybe he was wrong though.
This was taken before I realized that I needed the adapter but you get the idea.
Now to mounting the gauge. I looked for hours on forums to get ideas for gauge placement. I saw the pods (which I am on the fence about), under the radio, on the dash, etc. I never really saw anything that I liked. I was about it put it by the dimmer switch here.
Then I started thinking that one day I would like to add a temperature gauge and a voltage gauge. By putting it here, I would be left with a single gauge here and other elsewhere, or have to replace the panel to move the oil pressure gauge. I didn't like either option so I opted to move it to the cover under the radio bezel above the shifter onto this piece.
Removing the screws that help the pocket thing into place left me with this.
This looked good and seemed like a good idea so I now moved to cutting the hole. I used a 2" hole saw and it worked very well. I tested the hole size on a spare kick panel cover that I had leftover from the Runner that I bought as a donor for the motor. The gauge fit perfectly.......a bit too perfectly. It was TIGHT. I used a bit of sandpaper to slightly enlarge the hole to make the gauge slide in a bit better.
Now to cut for real.
It fit perfect after a few minutes with some 220 sandpaper. I tried to cut to take out a couple of the leftover holes from the pocket, but as you can see, there are still a few left. A Marlin sticker, or some future gauge will take care of those at another time.
As I said, the gauge comes with everything that you need to install it less the adapter. That means that is comes with the fluid line to run into the cab, but the line they include is vinyl so i decided to upgrade to the copper line instead to prevent leaks. This is 10 times more difficult to work with but when done will be a better way to have hot oil at 80psi coming into the cab. I used Auto Meter part number 3224. Here is a shot of what came in the package. The black plug in the foreground is the stock 3/8 plug I removed with the 8mm head.
I started at the motor side and ran the line first since this was the part that I was not looking forward to. I actually wasn't that bad at all however. The small, copper line bends really easy so there is no need for a tubing bender (although I had taken mine out). Just slight hand pressure would make it curve easily. Just make sure your bends are sweeping rather than tight to keep the flow rate up.
I came up from the port and followed my T100 dipstick tube, turned toward the firewall at the alternator bracket, went through the anchor point thing that supports the auto transmission kickdown cable, and then through the firewall. This gave me a lot of place to zip tie the line to and keep it secure.
I didn't take any pictures I guess but I then pushed some new vacuum line over the the entire length of the copper line to clean it up some, but also to protect it as well. So now it looks line a black, vacuum line rather than stick out like a sore thumb. I also then took some 3/8 hose and put that over the vacuum line where it passes through the anchor mount and zip tied it in place so that it wont rub through the copper line over the years. I'll update pictures when I take some more.
Getting through the firewall was not on my fun list either. I didn't want to pass through too far away from where the gauge was and have that copper line running all over under the dash so I looked for a place to come through closer to the center of the firewall. This is always hard because you have to find a place that a drill will fit. I only have cordless drills and they are fairly small but they are both 18V DeWalts so not too small.
I don't have the E brake on there anymore because of the swap to the Trail Gear rear housing and disc brakes so I could have used the stock hole for the cable. However, I plan to add a transfer case brake soon and I would have to do this over again and I don't want to do that so i would have to make my own hole.
There are two bolts that hold the stock E Brake handle on. One threads into the cab, the other threads into the motor compartment. Right above the hole coming into the motor compartment, there is a nice, flat spot to place a grommet. You can get a drill on it from the INSIDE by taking the bottom dash panel off and the little horseshoe air duct. Its tricky but a drill will fit. The line coming through into the cab doesn't not interfere with the throttle linkage or the cable. It just has to be bent a little.
Now its just a matter of connecting the mine to the gauge and the port in the motor.
Ha ha......I forgot to take a picture of the gauge all installed!!
I'll update this later. I like the gauge there BUT it does sit at a slight angle pointing downward toward the floor. I can still read it but it is a little annoying. I may address this with a fiberglass buildup when I install the other gauges but who knows when that will be.
One thing that has been in the back of my mind since the swap was its first normal smog inspection. No referee; just the regular trip to the corner inspection place.
Turns out the guy passed it........barely. I guess the CO2 level was just about over. Maybe a new CAT is in the works before the next one.
After changing the crossover, I have been worried about this passing, but it did so I am legal.....at least for two more years.....
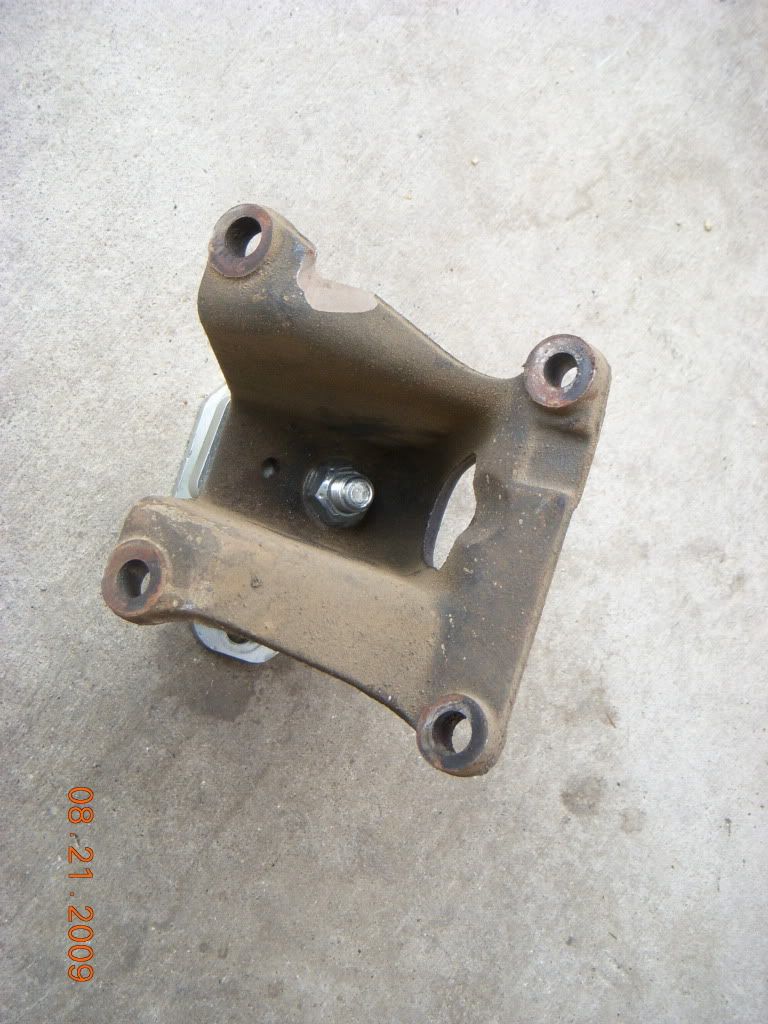
I dunno if you got the answer to this one in a pm from someone or somethin, but I had the drain plug/motor mount interference issue. Here was my solution:
Note the grinding on the top of the bracket. It didn't take much.
Also, I don't know if you've inspected a swapped rig in person, but I'll be in Fresno area by the end of the week, I believe, and if you'd like I'll let ya look at whatever and see it all in person. Not much help for your exhaust/tranny issues, though...I did mine Oregon legal and haven't smogged it in Cali yet.
I keep reading about people modifying the 3.0 mounts like this to work.... why not use the 3.4 mounts? I haven't finished my swap yet but I have the motor in and mounted using the 3. mounts, am I missing something?
3.4 mounts are a totally different geometry. Since the 3.4 and 3.0 are the same block physically, the 3.0 mounts are needed to keep the motor where it should be as far as height is concerned.
 07-16-2012, 06:18 AM