88 V6 xtracab to 2000 3.4 5speed
 10-30-2014, 06:58 AM
#21
Registered User
Thread Starter

I ended up cutting down the stock heat shield and attaching it to the crossover. I think it came out decent and should certainly help. Headers are not in the budget right now.


I modified the alternator bracket (cut and rewelded) to maintain the tensioner, flipped the fuel line, and also shaved some metal off one of the mounts on AC bracket as the 3.0 motor mounts are about twice as thick as the 3.4s. Then I took the engine out of the stand and installed the 3.4 flywheel after having it resurfaced and put a new Aisin clutch on - swapped the pilot and throwout bearings as well.
I decided to go for the motor install solo and it went relatively smooth. I did end up removing the heat shield that is bolted to the frame on the drivers side to get my crossover plate to clear, might be able to re-install now that the engine is in - we'll see. A shot of the 3.4 in its new home. Definitely need a hood scoop. I'm thinking this one which others have used: http://www.racecomposites.com/mustangbolt.htm

Now it is time to connect everything up and mount the airbox, evap, and battery as well as tackle the wiring. I've been working on a spreadsheet to map out the wiring and have it almost mapped out.
I modified the alternator bracket (cut and rewelded) to maintain the tensioner, flipped the fuel line, and also shaved some metal off one of the mounts on AC bracket as the 3.0 motor mounts are about twice as thick as the 3.4s. Then I took the engine out of the stand and installed the 3.4 flywheel after having it resurfaced and put a new Aisin clutch on - swapped the pilot and throwout bearings as well.
I decided to go for the motor install solo and it went relatively smooth. I did end up removing the heat shield that is bolted to the frame on the drivers side to get my crossover plate to clear, might be able to re-install now that the engine is in - we'll see. A shot of the 3.4 in its new home. Definitely need a hood scoop. I'm thinking this one which others have used: http://www.racecomposites.com/mustangbolt.htm
Now it is time to connect everything up and mount the airbox, evap, and battery as well as tackle the wiring. I've been working on a spreadsheet to map out the wiring and have it almost mapped out.
Last edited by scheefdog; 10-30-2014 at 07:01 AM.
 11-02-2014, 05:54 PM
#22
Registered User
Thread Starter
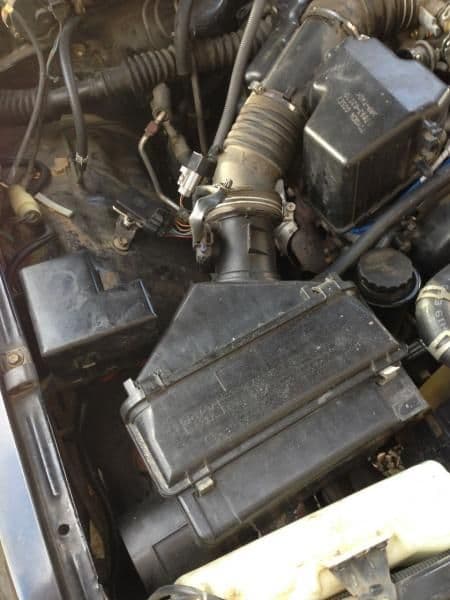
I made more progress over the weekend. Connected the heater hoses which was a pain - but was able to use the 3.0 hoses. I noticed there is some sort of outlet for a ?vacuum? line or something right in front of and below the heater hoses. See the pic below - can anyone tell me what this is and if it should have a hose connected to it?

I connected the fuel line up to my existing since I did the flip before dropping it in. I modified the existing clutch bracket to mount on the 3.4 (had to cut part of it off). My power steering pump hose connected up after I cut the tab off - I used the 3.0 bolt because it is the right length.
I cut and soldered the 3.4 alternator plug into my 3.0 wiring. Then stripped down the 3.4 battery harness to the necessities based on the 101 sticky.
I'm waiting on a battery tray to be delivered - I also broke down and ordered the T100 dipstick and tube for a clean install. I think I'm going to mount the evap box to the battery tray because my cruise control is in the way to mount it back by the brake booster.
I have the wiring figured out and mapped out in a spreadsheet that I'm going to share in the hope that one of the wiring gurus might look it over for me before I start splicing. I have an 88 xtracab 3.0 and my existing wiring is exactly the same as theMonch who did a nice wiring writeup that is stickied.
My donor is a 2000 4runner 5speed - the plugs are labeled on my spreadsheet. Basically two plugs, E12 and E14 that go from the ECU to the body and a single engine to body plug II3. See the image of my spreadsheet below. Any feedback would be greatly appreciated.
 88_to_00_wiring_final by tscheef, on Flickr
I connected the fuel line up to my existing since I did the flip before dropping it in. I modified the existing clutch bracket to mount on the 3.4 (had to cut part of it off). My power steering pump hose connected up after I cut the tab off - I used the 3.0 bolt because it is the right length.
I cut and soldered the 3.4 alternator plug into my 3.0 wiring. Then stripped down the 3.4 battery harness to the necessities based on the 101 sticky.
I'm waiting on a battery tray to be delivered - I also broke down and ordered the T100 dipstick and tube for a clean install. I think I'm going to mount the evap box to the battery tray because my cruise control is in the way to mount it back by the brake booster.
I have the wiring figured out and mapped out in a spreadsheet that I'm going to share in the hope that one of the wiring gurus might look it over for me before I start splicing. I have an 88 xtracab 3.0 and my existing wiring is exactly the same as theMonch who did a nice wiring writeup that is stickied.
My donor is a 2000 4runner 5speed - the plugs are labeled on my spreadsheet. Basically two plugs, E12 and E14 that go from the ECU to the body and a single engine to body plug II3. See the image of my spreadsheet below. Any feedback would be greatly appreciated.
88_to_00_wiring_final by tscheef, on Flickr
Last edited by scheefdog; 11-04-2014 at 04:45 PM.
11-03-2014, 01:36 PM
#23
Registered User
I made more progress over the weekend. Connected the heater hoses which was a pain - but was able to use the 3.0 hoses. I noticed there is some sort of outlet for a ?vacuum? line or something right in front of and below the heater hoses. See the pic below - can anyone tell me what this is and if it should have a hose connected to it?
11-04-2014, 05:11 PM
#24
Registered User
Thread Starter
After some google image searching I'm fairly certain it should be connected to the air assist port underneath the throttle body (IAC). Looks like there are two coolant lines with clamps as well, but those are intact on my throttle body.
11-24-2014, 06:44 PM
#25
Registered User
Thread Starter
I've been meaning to update. Confirmed that the mystery port needed to be connected to the air assist port underneath the throttle body.
Tackled the wiring - ended up using crimp and heat shrink connectors (adhesive lined). I ended up just cutting the main body plug off the 3.4 harness and connecting the wires to the 88 plugs. A picture of the wiring in process.

Mounted the factory airbox - might upgrade to a cone style filter later, but for now the stock box will do just fine. The fuel line hooked right up since I did the flip on the back of the engine. The original 3.0 power steering hose also hooked up to the 3.4 pump, just had to use the 3.0 banjo bolt and cut a tab off the hose.
Soldered the connections for the 3.4 alternator to work with the stock charging system. Reworked the 3.4 battery harness per the 3.4 Swap 101 instructions. Also, ran an 8ga power supply to the fuse box.
I cut the 3.0 heater hoses to fit the 3.4 outlet and inlet. I used the 3.0 thermostat housing and lower radiator hose. I had to find a new uppper radiator hose at the parts store because I have the original 88 and the outlet does a weird bend (otherwise the 3.4 hose would have worked).
I mounted the battery on the drivers side and fabbed a bracket that is part of the battery tray to mount the evap box. My cruise control was in the way of the typical mounting next to the brake booster so I thought this was a good solution. Please ignore the sloppy battery tie-down solution, I still need to fab a permanent one.
Figured out where all the lines went and made a couple of trips to the parts store to make everything hook up. Once everything was connected I had to see if it would start. First, I bolted up the factory downpipe (complete with cat) and installed the first O2 sensor. Was amazed by how quick it fired up and how smooth it runs! A few pics.


Tackled the wiring - ended up using crimp and heat shrink connectors (adhesive lined). I ended up just cutting the main body plug off the 3.4 harness and connecting the wires to the 88 plugs. A picture of the wiring in process.
Mounted the factory airbox - might upgrade to a cone style filter later, but for now the stock box will do just fine. The fuel line hooked right up since I did the flip on the back of the engine. The original 3.0 power steering hose also hooked up to the 3.4 pump, just had to use the 3.0 banjo bolt and cut a tab off the hose.
Soldered the connections for the 3.4 alternator to work with the stock charging system. Reworked the 3.4 battery harness per the 3.4 Swap 101 instructions. Also, ran an 8ga power supply to the fuse box.
I cut the 3.0 heater hoses to fit the 3.4 outlet and inlet. I used the 3.0 thermostat housing and lower radiator hose. I had to find a new uppper radiator hose at the parts store because I have the original 88 and the outlet does a weird bend (otherwise the 3.4 hose would have worked).
I mounted the battery on the drivers side and fabbed a bracket that is part of the battery tray to mount the evap box. My cruise control was in the way of the typical mounting next to the brake booster so I thought this was a good solution. Please ignore the sloppy battery tie-down solution, I still need to fab a permanent one.
Figured out where all the lines went and made a couple of trips to the parts store to make everything hook up. Once everything was connected I had to see if it would start. First, I bolted up the factory downpipe (complete with cat) and installed the first O2 sensor. Was amazed by how quick it fired up and how smooth it runs! A few pics.
11-25-2014, 08:49 AM
#26
Registered User
Congrats on getting it going!
I like the location of the EVAP canister and being able to retain the cruise control.
One thing I would recommend would be to ditch that radiator fan, I've heard that the outer ring likes to grenade under the hood when they get old and brittle; I replaced mine with a fan from a 94-95 4Runner 3VZ-E without the outer ring, Toyota part number 16361-65020.
11-25-2014, 04:36 PM
#27
Registered User
Yea, I used a 3.0 fan without the outer ring, and shroud, and a 3.4 fan clutch.
I used the stock evap can with the 3.4 vsv's on the driver's side fender well. More room under hood...
Lookin good!
I used the stock evap can with the 3.4 vsv's on the driver's side fender well. More room under hood...
Lookin good!
Last edited by donomite49; 11-25-2014 at 04:39 PM.
12-02-2014, 05:49 AM
#29
Registered User
Thread Starter
Thanks for the recommendations on the fan - I'll keep my eyes open for a later model one to replace.
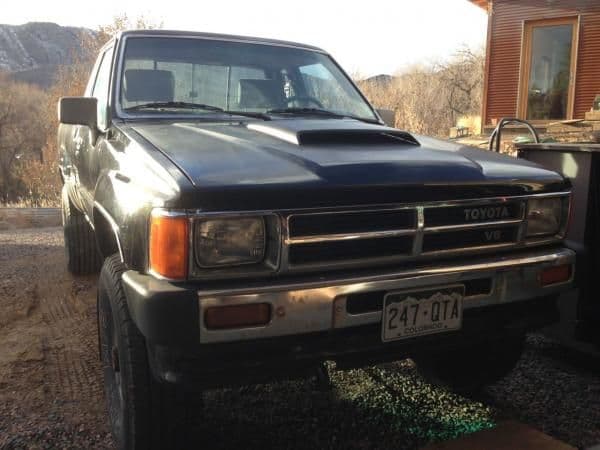
I had to cut a fairly big hole in the hood for the engine. I kind of like the look with the intake sticking through the hood.
Test fitting the fiberglass hood scoop before actually bolting it down - I think it looks pretty good.
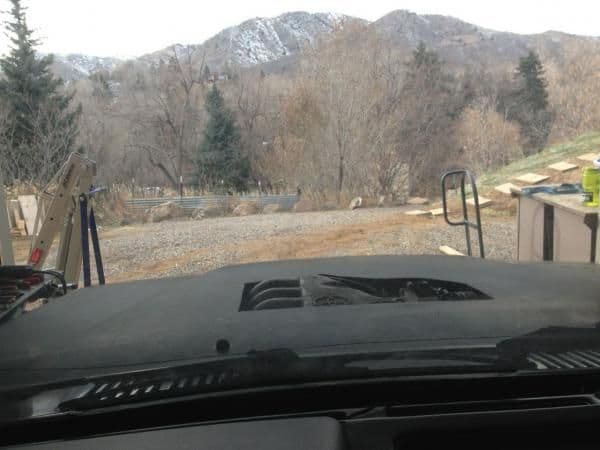
I've been driving the truck a little and it is running great. The 3.4 is great, lots of torque. I owned a 99 tacoma for awhile, but I think this motor is in better health. Excited to actually get it out on the highway and see how it cruises.
There are a lot of little "wrap up" items with this swap and I've been checking those off. After all, I don't want any of my wiring or hoses to melt down. I took the truck to a muffler shop and had them connect up the 3.4 cat to my existing 3.0 exhaust and add a second 02 sensor. Do I need to fab a bracket to support the crossover to down pipe connecting that is supported off the bellhousing? I know the 3.4 had this, but haven't read about anyone doing so for their swap.
I only have one pending mystery and that is the temperature gauge. As soon as I turn the truck on, the needle jumps up to almost the middle of the temp range - then it just stays there as the truck warms all the way up to normal temp. Sometimes it drops down to cold, but there is no real rhyme or reason. I'm reading the temp with OBDII scanner so I can see exactly where it is at. Anyone else had this problem?
I have Y-GR on the 88 body plug connected to Y-R on the 3.4 harness so I believe the wiring is correct.
I had to cut a fairly big hole in the hood for the engine. I kind of like the look with the intake sticking through the hood.
Test fitting the fiberglass hood scoop before actually bolting it down - I think it looks pretty good.
I've been driving the truck a little and it is running great. The 3.4 is great, lots of torque. I owned a 99 tacoma for awhile, but I think this motor is in better health. Excited to actually get it out on the highway and see how it cruises.
There are a lot of little "wrap up" items with this swap and I've been checking those off. After all, I don't want any of my wiring or hoses to melt down. I took the truck to a muffler shop and had them connect up the 3.4 cat to my existing 3.0 exhaust and add a second 02 sensor. Do I need to fab a bracket to support the crossover to down pipe connecting that is supported off the bellhousing? I know the 3.4 had this, but haven't read about anyone doing so for their swap.
I only have one pending mystery and that is the temperature gauge. As soon as I turn the truck on, the needle jumps up to almost the middle of the temp range - then it just stays there as the truck warms all the way up to normal temp. Sometimes it drops down to cold, but there is no real rhyme or reason. I'm reading the temp with OBDII scanner so I can see exactly where it is at. Anyone else had this problem?
I have Y-GR on the 88 body plug connected to Y-R on the 3.4 harness so I believe the wiring is correct.
12-06-2014, 03:43 PM
#30
Registered User
Thread Starter
I think I "solved" the temp gauge problem. I drove the truck about 40 miles to work and back and the check engine light came on for the IAC valve - P0505. That made me think there might still be air in the cooling system. So yesterday I bleed the air out of the radiator again and the temp gauge appears to be working now!
The power on the motor is great and makes this truck so fun to drive!
The power on the motor is great and makes this truck so fun to drive!

Thread
Thread Starter
Forum
Replies
Last Post
indawire
Looking For A Mechanic/Fabricator/Shop
1
11-29-2015 05:05 AM
potatopants
95.5-2004 Tacomas & 96-2002 4Runners
4
09-15-2015 06:26 AM
dlaiben
3.4 Swaps
0
09-03-2015 09:57 AM


