3.4 swap while keeping the a340h
 07-24-2011, 06:50 PM
#1
Registered User
Thread Starter
Join Date: Apr 2011
Location: Dearborn, MI
Posts: 47
Likes: 0
Received 0 Likes
on
0 Posts
3.4 swap while keeping the a340h
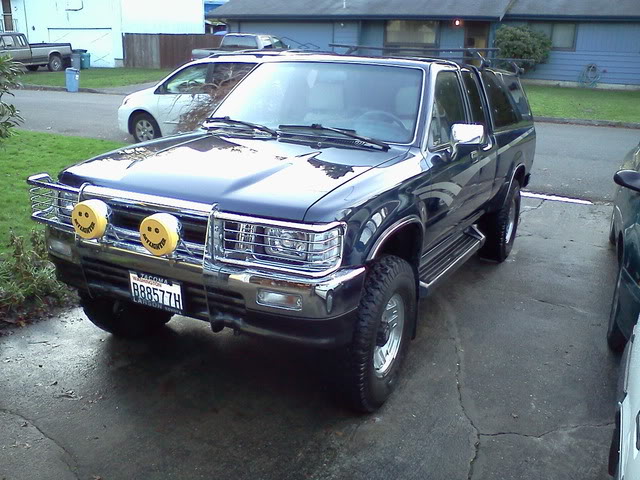
Alright so I'm a little over halfway done with my swap and figured I'd get a swap thread going on it before I forget everything I've done. My goal is to keep the a340h so I'm using an ECU from a T100 to control the tranny correctly. Anyways here's my 1992 with 196,000 that will be receiving the 3.4
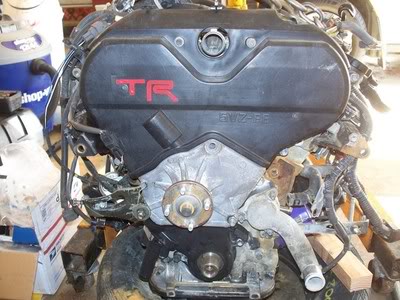
And here's my 3.4 with 79,000 on it
Here's a parts list of what I've used for my particular swap so far.
1992
oil pan, baffle, pickup
alternator
C1,C2 engine harness plugs
Transmission wiring plugs
engine mounts
dipstick plug
thermostat housing
A/C compressor
fan, fan clutch
radiator
1997 T100
ECU
Engine harness
1996 Tacoma
3.4 engine
Random 3.4 parts
MAF
igniter
custom intake tubing
exhaust crossover from Toyonlyswaps
A/C bracket off 3.4
A/C pulley
power steering pump and bracket
probably more I'm forgetting, but I'll add to it when the swaps complete
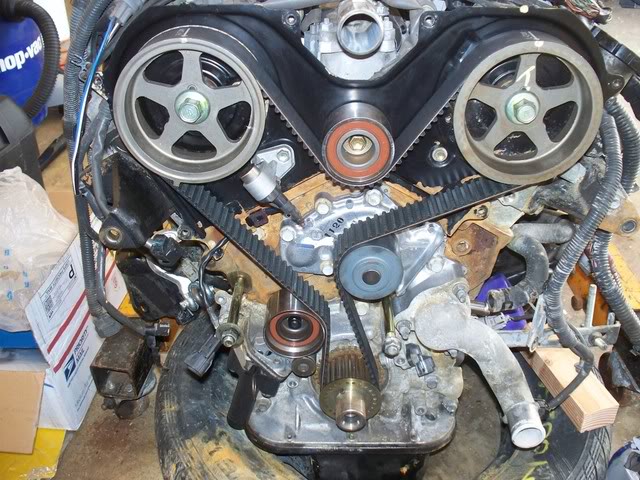
First I did the timing belt, water pump, idlers, etc. which for a newb like me took a while. I actually managed to break my crank pulley trying to get the bolt out, that thing was in there good. Had to take it back to the junkyard and they were kind enough to use there nice impact gun to get it off. Guess I heated that bolt a little too much.
Next i set out to get this guy out
Found a few surprises in the process, like my drivers side engine mount only having one bolt on it, each of my exhaust manifolds missing a bolt where they connect to the crossover and my crossover had one stud snapped off and another bolt completely rounded. So help me if I ever meet the previous owner of this thing
Being this is the first time I've ever pulled an engine I learned a few things like to NOT pull the engine with the torque converter still on it. Tranny fluid everywhere. wish there was an easier way to learn besides breaking stuff and making a mess.
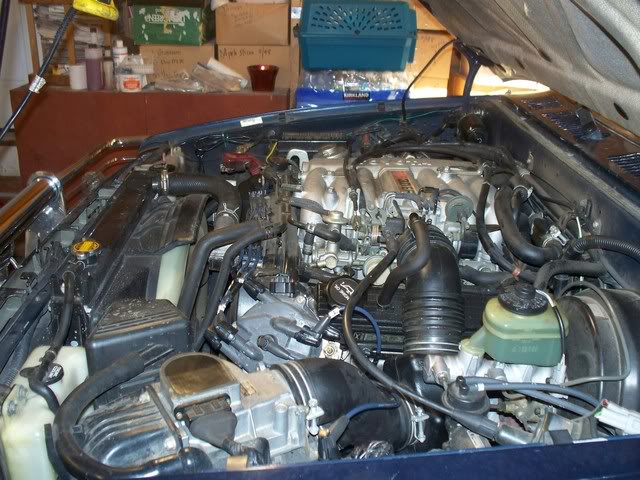
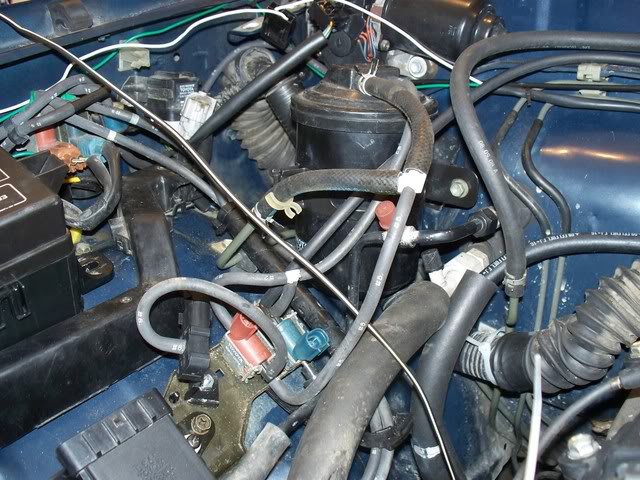
So here's my now empty engine bay
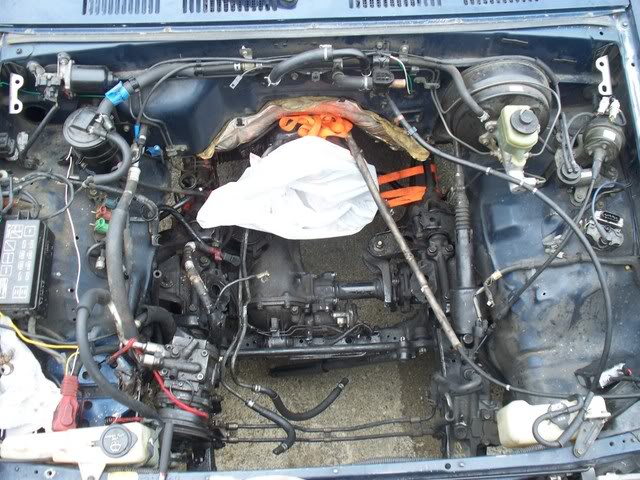
and my now clean engine bay. never knew there was other colors in there besides black.
Next I removed the oil pans and knocked out the plugs to switch oil dipsticks. From what I've read these can be pretty stuck sometimes, but mine came out pretty easy. I broke them loose with some vice grips and then tapped them out from underneath with a 1/4 ratchet extension.
I then took the plug from the 3.4 and put it in the old dipstick location, had to grind it down a bit to get it to fit but tapped it in with some ratchet extensions and it went in. Found out later that I should have cut some of the end of the plug because it ended up hitting the 3.0 baffle. The 3.0 dipstick plug went in no problem. I also put rtv on both them so their sealed up good.
Next i switched the 3.0 oil pan, baffle and pickup tube over to the 3.4. As stated above I ended up drilling a hole in the baffle so the plug would fit, but not really a problem. A hint for those using the 3.0 baffle, don't forget to remove the studs used for the 3.4 baffle, I just so happened to be sitting in such a way that I didn't see them and for the life of me couldn't find out why my pickup tube wouldn't go on. After several minutes of frustration i finally noticed them and took them out and everything bolted right up.
I'm using my 3.0 alt on the 3.4 brackets, the lower bracket took some bending to line up right but wasn't too hard. I'm also using the 3.0 thermostat housing as it takes up a lot less room than the 3.4's.
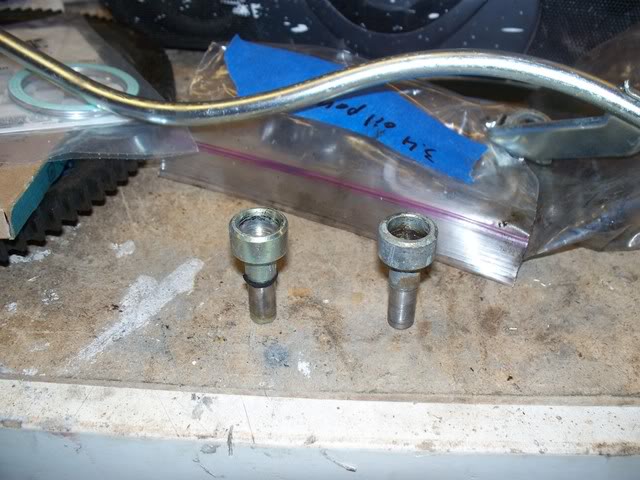
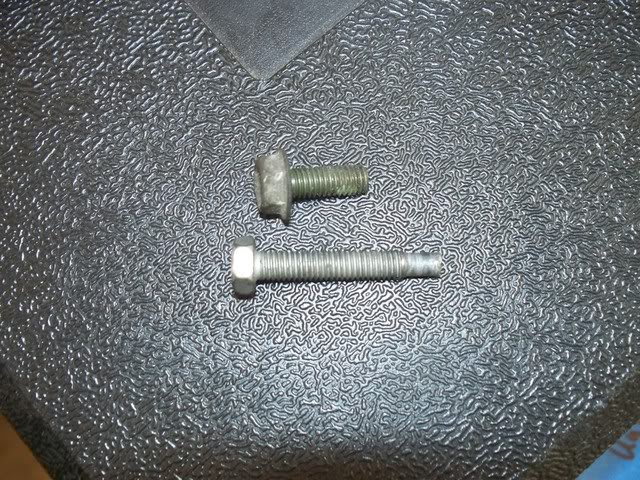
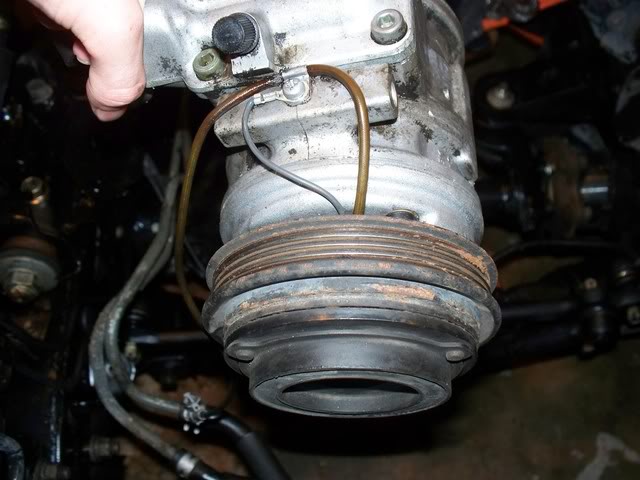
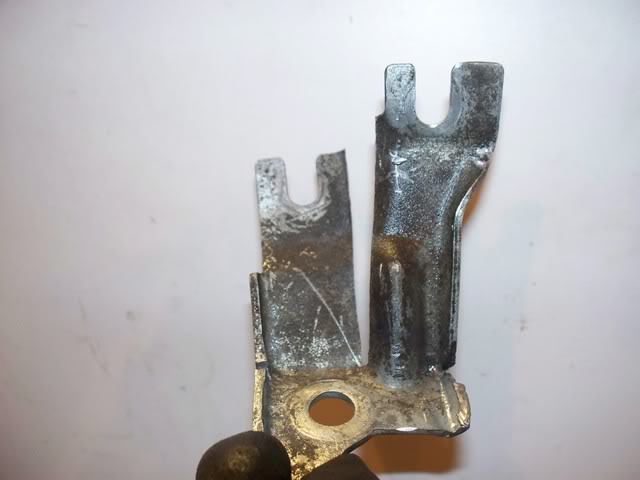
I'm keeping the A/C from the 3.0 so yesterday I took of the pulley, used a bolt off one of the 3.0's heater hose clamps to remove the top plate, worked perfectly. Hers the stock bolt and the heater hose bolt
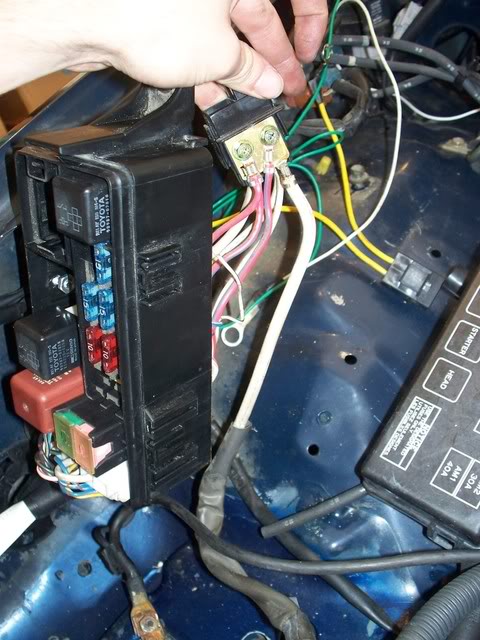
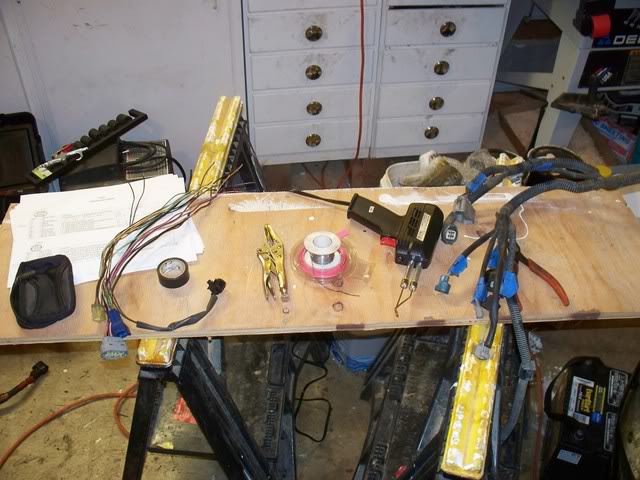
Next I disconnected the battery harness from the fuse box getting ready to install a new harness.
My crossover should be here this week and then I can get the 3.4 in. Until then I'm working on finalizing my wiring which has been a pain. The wiring for a manual swap really wouldn't be that bad once you get into it, but for auto's it makes my head spin. I read through themonch's wiring thread several times before it all made sense and then downloaded everything from TIS. I've spent at least 2 solid weeks figuring it out, but think I've got most of it done now. I'll make sure and post up my pinouts when its all done.
And here's my 3.4 with 79,000 on it
Here's a parts list of what I've used for my particular swap so far.
1992
oil pan, baffle, pickup
alternator
C1,C2 engine harness plugs
Transmission wiring plugs
engine mounts
dipstick plug
thermostat housing
A/C compressor
fan, fan clutch
radiator
1997 T100
ECU
Engine harness
1996 Tacoma
3.4 engine
Random 3.4 parts
MAF
igniter
custom intake tubing
exhaust crossover from Toyonlyswaps
A/C bracket off 3.4
A/C pulley
power steering pump and bracket
probably more I'm forgetting, but I'll add to it when the swaps complete
First I did the timing belt, water pump, idlers, etc. which for a newb like me took a while. I actually managed to break my crank pulley trying to get the bolt out, that thing was in there good. Had to take it back to the junkyard and they were kind enough to use there nice impact gun to get it off. Guess I heated that bolt a little too much.
Next i set out to get this guy out
Found a few surprises in the process, like my drivers side engine mount only having one bolt on it, each of my exhaust manifolds missing a bolt where they connect to the crossover and my crossover had one stud snapped off and another bolt completely rounded. So help me if I ever meet the previous owner of this thing
Being this is the first time I've ever pulled an engine I learned a few things like to NOT pull the engine with the torque converter still on it. Tranny fluid everywhere.
wish there was an easier way to learn besides breaking stuff and making a mess.So here's my now empty engine bay
and my now clean engine bay. never knew there was other colors in there besides black.
Next I removed the oil pans and knocked out the plugs to switch oil dipsticks. From what I've read these can be pretty stuck sometimes, but mine came out pretty easy. I broke them loose with some vice grips and then tapped them out from underneath with a 1/4 ratchet extension.
I then took the plug from the 3.4 and put it in the old dipstick location, had to grind it down a bit to get it to fit but tapped it in with some ratchet extensions and it went in. Found out later that I should have cut some of the end of the plug because it ended up hitting the 3.0 baffle. The 3.0 dipstick plug went in no problem. I also put rtv on both them so their sealed up good.
Next i switched the 3.0 oil pan, baffle and pickup tube over to the 3.4. As stated above I ended up drilling a hole in the baffle so the plug would fit, but not really a problem. A hint for those using the 3.0 baffle, don't forget to remove the studs used for the 3.4 baffle, I just so happened to be sitting in such a way that I didn't see them and for the life of me couldn't find out why my pickup tube wouldn't go on. After several minutes of frustration i finally noticed them and took them out and everything bolted right up.
I'm using my 3.0 alt on the 3.4 brackets, the lower bracket took some bending to line up right but wasn't too hard. I'm also using the 3.0 thermostat housing as it takes up a lot less room than the 3.4's.
I'm keeping the A/C from the 3.0 so yesterday I took of the pulley, used a bolt off one of the 3.0's heater hose clamps to remove the top plate, worked perfectly. Hers the stock bolt and the heater hose bolt
Next I disconnected the battery harness from the fuse box getting ready to install a new harness.
My crossover should be here this week and then I can get the 3.4 in. Until then I'm working on finalizing my wiring which has been a pain. The wiring for a manual swap really wouldn't be that bad once you get into it, but for auto's it makes my head spin.
I read through themonch's wiring thread several times before it all made sense and then downloaded everything from TIS. I've spent at least 2 solid weeks figuring it out, but think I've got most of it done now. I'll make sure and post up my pinouts when its all done.
 07-31-2011, 05:54 PM
#2
Registered User
Thread Starter
Join Date: Apr 2011
Location: Dearborn, MI
Posts: 47
Likes: 0
Received 0 Likes
on
0 Posts
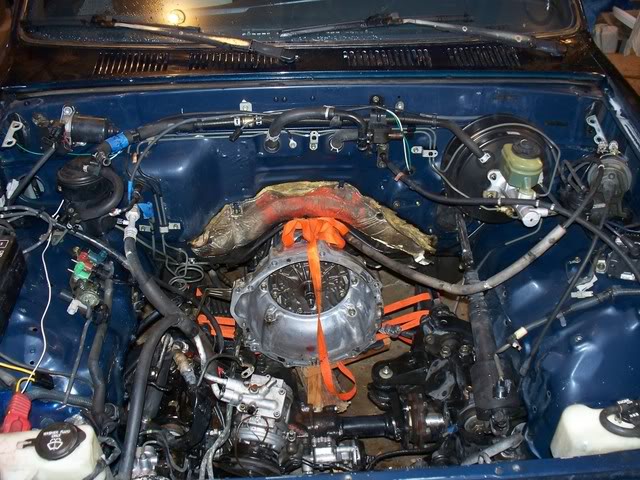
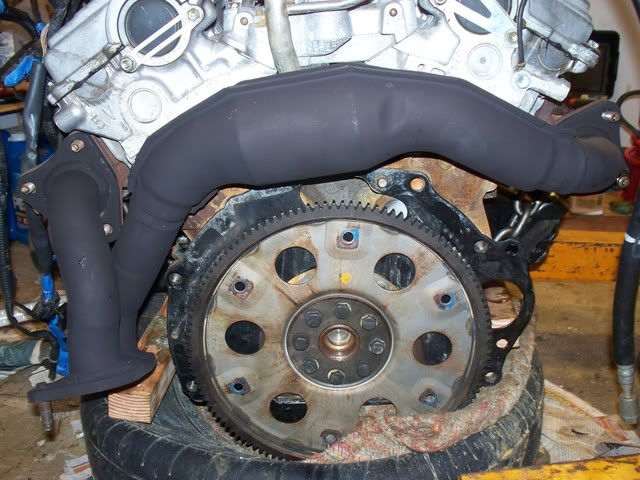
Alright so here's what I've got done this week, first off my crossover from ToyOnlySwaps arrived and the fitment on the block is really good so I expect it to fit just as well in the engine bay
I also finished swapping the 3.4 pulley onto the A/C compressor, here's the 3.0 and 3.4 pulley's
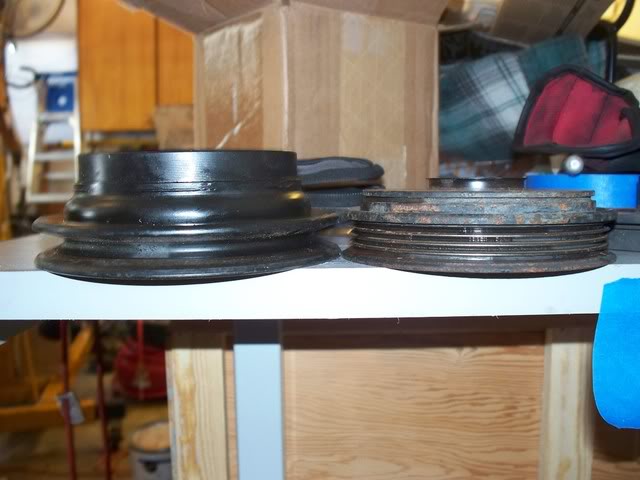
and the finished product, it all bolted right back up without problems
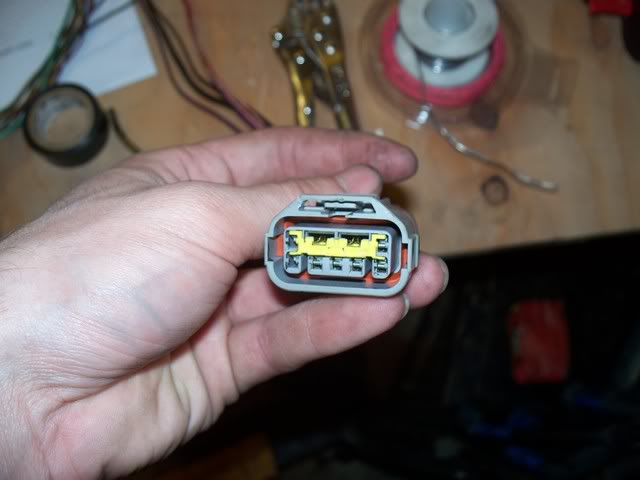
The 3.4's all ready to go in now except for a new oil cooler hose so hopefully tomorrow it goes in. In the mean time I've got some wiring to figure out. Currently I'm working on swapping the A340H plugs onto the T100 harness and ran into a few things I'm not totally sure about. First the T100 harness has this guy
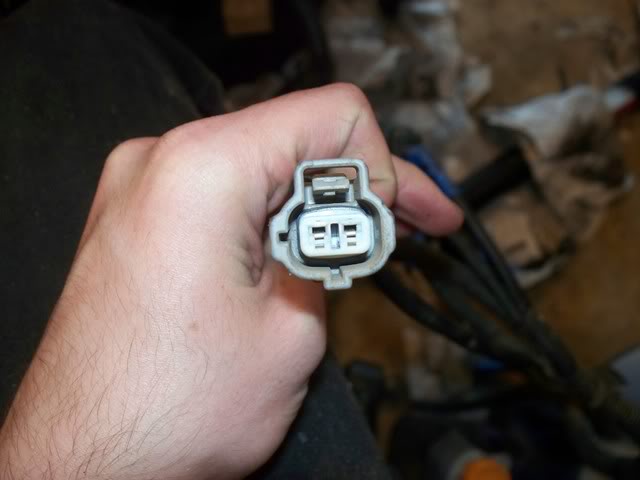
which I have identified to be plug D3 which is used for the transfer neutral position switch, not really sure what the function of that switch is for which is half my problem. The other half of my problem is that my '92 had no such wiring, it shows it in the EWD here:
http://i1097.photobucket.com/albums/...6/4wdat1-2.jpg
But my C1 plug has no wires in pin 17 or 24, so I'm just guessing that this is something I don't need to use and for now it won't be wired up to anything.
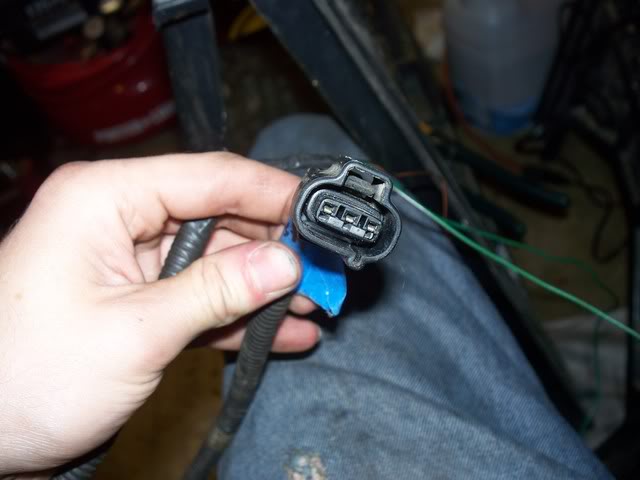
My second wiring problem I've run into with the transmission plugs is on plug E3 for the '92. Pin number 4 is a Brown-Black wire and I can't find what the purpose of it is anywhere. Searched through all my EWD's and found no usage for E3 pin4. So I got out the ohm meter and found that it somehow connects to this pin here:
http://i1097.photobucket.com/albums/...206/ect1-1.jpg
The EWD doesn't show it connecting into that wire so not sure where it goes, the rest of the plug is hooked up to the solenoids and the speed sensor. So for now its going to be left orphaned.
My last issue is also shown in that last link, the speed sensor is shown to be grounded along with all of the solenoids, however in the T100 the speed sensor appears to be grounded a bit differently
http://i1097.photobucket.com/albums/...1ect5972-1.jpg
I don't really think this will be an issue, so the BR wire on plug V1 for the T100 will be left unused as the speed sensor for the A340H is already grounded. If my reasoning seems incorrect to anyone feel free to chime in.
I also finished swapping the 3.4 pulley onto the A/C compressor, here's the 3.0 and 3.4 pulley's
and the finished product, it all bolted right back up without problems
The 3.4's all ready to go in now except for a new oil cooler hose so hopefully tomorrow it goes in. In the mean time I've got some wiring to figure out. Currently I'm working on swapping the A340H plugs onto the T100 harness and ran into a few things I'm not totally sure about. First the T100 harness has this guy
which I have identified to be plug D3 which is used for the transfer neutral position switch, not really sure what the function of that switch is for which is half my problem. The other half of my problem is that my '92 had no such wiring, it shows it in the EWD here:
http://i1097.photobucket.com/albums/...6/4wdat1-2.jpg
But my C1 plug has no wires in pin 17 or 24, so I'm just guessing that this is something I don't need to use and for now it won't be wired up to anything.
My second wiring problem I've run into with the transmission plugs is on plug E3 for the '92. Pin number 4 is a Brown-Black wire and I can't find what the purpose of it is anywhere. Searched through all my EWD's and found no usage for E3 pin4. So I got out the ohm meter and found that it somehow connects to this pin here:
http://i1097.photobucket.com/albums/...206/ect1-1.jpg
The EWD doesn't show it connecting into that wire so not sure where it goes, the rest of the plug is hooked up to the solenoids and the speed sensor. So for now its going to be left orphaned.
My last issue is also shown in that last link, the speed sensor is shown to be grounded along with all of the solenoids, however in the T100 the speed sensor appears to be grounded a bit differently
http://i1097.photobucket.com/albums/...1ect5972-1.jpg
I don't really think this will be an issue, so the BR wire on plug V1 for the T100 will be left unused as the speed sensor for the A340H is already grounded. If my reasoning seems incorrect to anyone feel free to chime in.
07-31-2011, 08:23 PM
#3
Registered User
Join Date: Sep 2010
Location: Southern Utah!!
Posts: 25
Likes: 0
Received 0 Likes
on
0 Posts
Every thing looks good! nice truck! I love 3rd gen trucks. I would highly recommend using the 3.4 t-stat housing vs. 3.0. I know because I am using the 3.0 at the moment (mine was cracked) and the lower hose barley fits between the alt bracket and belt. I will be swapping it out asap. Also for the a/c compressor you can just swap the high/low plate that sits on top of the compressor (4 bolts) this allows you to use a newer compressor and don't have to swap pulleys and your existing high and low lines will go right back in place. good luck with everything I am waiting to see how the auto swap turns out!
08-01-2011, 07:53 AM
#4
Registered User

Join Date: Sep 2006
Location: Junction City, OR
Posts: 421
Likes: 0
Received 0 Likes
on
0 Posts
Nice work! And it appears that you still have the compressor in the truck, so I assume you swapped the pulley's because the system is still charged right?
08-02-2011, 07:13 PM
#5
Registered User
Thread Starter
Join Date: Apr 2011
Location: Dearborn, MI
Posts: 47
Likes: 0
Received 0 Likes
on
0 Posts
Thanks for the tip Sasquatch, I haven't put any of the belts on yet so will definitely have to check clearances on them. I knew I could swap the top plates on the compressor, but since my A/C still blows cold I figured I would just keep it for now. And yep my systems still charged, all I had to do was lift the engine up a bit and that gave me easy access to take the compressor off and bungee cord it to the side. I will definitely switch to a new compressor when this one goes out as it will be a lot cheaper to get recharged. Not too much progress so far this week, waiting for the oil cooler hose that I ended up having to special order from the dealership, looked like it would be a pain to get installed with the engine in so figured I'd just wait for it. Busy double checking my wiring so hopefully it will be done about the same time I get the engine in.
08-04-2011, 04:41 PM
#6
Registered User
Thread Starter
Join Date: Apr 2011
Location: Dearborn, MI
Posts: 47
Likes: 0
Received 0 Likes
on
0 Posts
So yesterday was pretty much the worst day ever, started off by wrecking my dad's old camry on the way to work. Not too bad, but enough that I can't drive it. So was super mad at myself all day so when I got home all i wanted to do was get my engine in cause all of the parts I needed were in and it was ready to go, thought I'd test the clearances of the belts real quick before I put the engine in and what do I find? My engine is seized! The crank won't turn at all with a breaker bar on it, when I did the timing belt it turned fine by hand. All I've done to it since then is install the intake, exhaust manifolds and crossover, drive plate installed, and oil pan/baffle/pickup swapped over. Would any of that cause the engine to appear seized but not actually be? I removed the spark plugs to release pressure and still nothing.
I would guess I haven't moved the crank in about a month since I did the timing belt as I just didn't need to move it. All it had on the exhaust/intake was duct tape when I got it from the junk yard, is it possible enough moisture got in there while waiting to be put together to have it rust into place? I had a VW GTI that I left for at least 6 months in a broken down state while I was at school and it never seized from just sitting. By the way the engine has been kept in the garage the whole time I've had it so I can't see how it could have seized in such a short time. Its under warranty for another week or so. I hope its just something simple, but if not I hope I can return it.
The crank won't turn at all with a breaker bar on it, when I did the timing belt it turned fine by hand. All I've done to it since then is install the intake, exhaust manifolds and crossover, drive plate installed, and oil pan/baffle/pickup swapped over. Would any of that cause the engine to appear seized but not actually be? I removed the spark plugs to release pressure and still nothing. I would guess I haven't moved the crank in about a month since I did the timing belt as I just didn't need to move it. All it had on the exhaust/intake was duct tape when I got it from the junk yard, is it possible enough moisture got in there while waiting to be put together to have it rust into place? I had a VW GTI that I left for at least 6 months in a broken down state while I was at school and it never seized from just sitting. By the way the engine has been kept in the garage the whole time I've had it so I can't see how it could have seized in such a short time. Its under warranty for another week or so. I hope its just something simple, but if not I hope I can return it.
08-05-2011, 08:55 PM
#7
Registered User
Thread Starter
Join Date: Apr 2011
Location: Dearborn, MI
Posts: 47
Likes: 0
Received 0 Likes
on
0 Posts
Crisis averted!  So thanks to the guys at the junkyard I got it figured out. It turns out it was the drive plate. My donor engine was from a manual truck and I just used the bolts from it to install the drive plate as I figured they were newer and it would be better to use them, WRONG! The bolts for a manual are just enough longer that they hit the bearing and won't let the engine turn. So to all those out there using a manual as a donor for an auto swap make sure and use the bolts from the automatic.
So thanks to the guys at the junkyard I got it figured out. It turns out it was the drive plate. My donor engine was from a manual truck and I just used the bolts from it to install the drive plate as I figured they were newer and it would be better to use them, WRONG! The bolts for a manual are just enough longer that they hit the bearing and won't let the engine turn. So to all those out there using a manual as a donor for an auto swap make sure and use the bolts from the automatic.
Trending Topics
08-07-2011, 06:50 PM
#8
Registered User
Thread Starter
Join Date: Apr 2011
Location: Dearborn, MI
Posts: 47
Likes: 0
Received 0 Likes
on
0 Posts
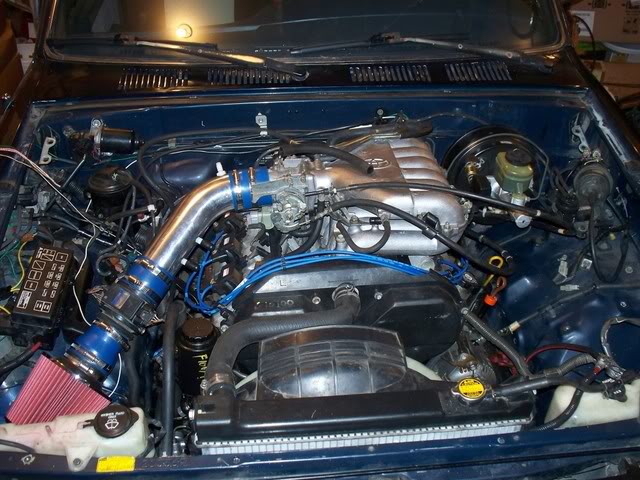
Alright so yesterday the stars finally aligned and I got the 3.4 in! It was my first time installing an engine so it took like 2 hours to get everything lined up right but it was worth it.
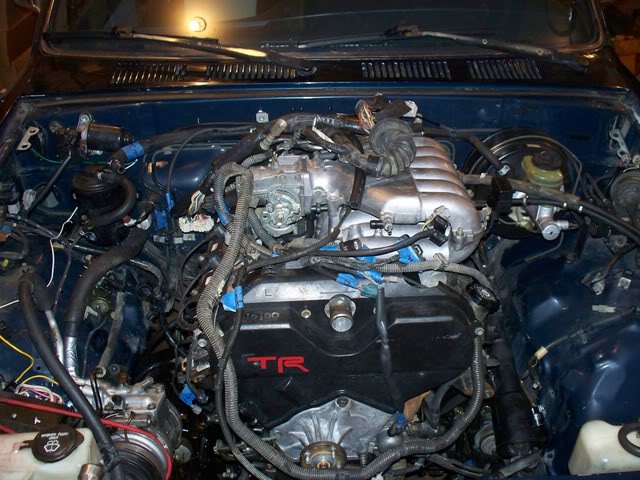
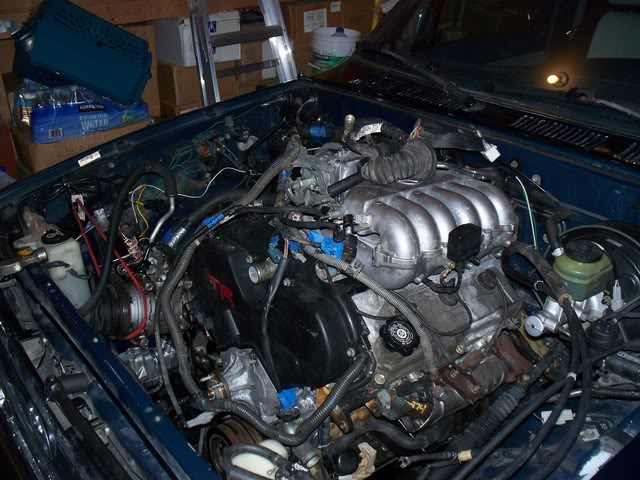
Granted I don't have my intake on yet or any of the accessories, but the engine bay looks so much more open with a 3.4 in there instead of the 3.0. Only hiccup of the install was I went to put my A/C compressor onto the block and the line into the cab from the compressor started leaking, the foam cover thing on it moved and I guess that was all that was keeping about 5-6 pin holes from opening up. Maybe this is a case when oil and grime on everything is a good thing, helps to seal stuff up. So looks like I'll be getting a 3.4 compressor anyways. Wish it could have leaked when I took the 3.0 out, but oh well.
Looks like I'm definitely getting a hood scoop
Just have to finish bolting up the torque converter tomorrow and I can really start to get this thing together. I finalized all of my wiring so just have to solder together my conversion harness now, after I verify it works I'll make sure and post it up.
08-28-2011, 08:09 PM
#9
Registered User
Thread Starter
Join Date: Apr 2011
Location: Dearborn, MI
Posts: 47
Likes: 0
Received 0 Likes
on
0 Posts
First of... IT RUNS!!! Not perfect yet but more on that later.
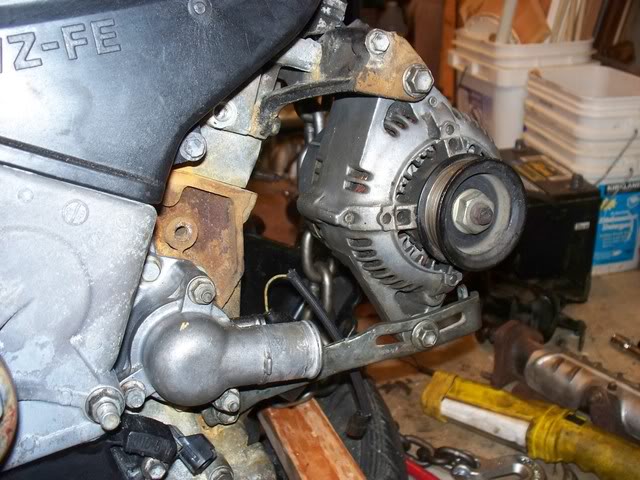
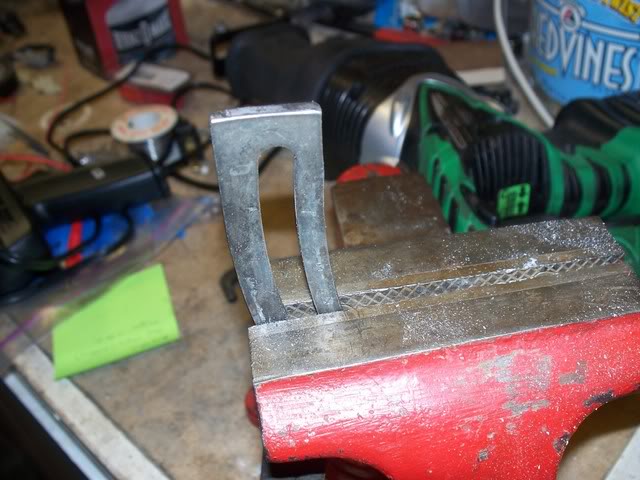
So to start of where i left off. Got the torque converter bolted up to the drive plate and the tranny bolts tightened up. Next I installed all the accessories to the engine. My alternator barely cleared, which is common so I cut the end off of the 3.4 bracket:
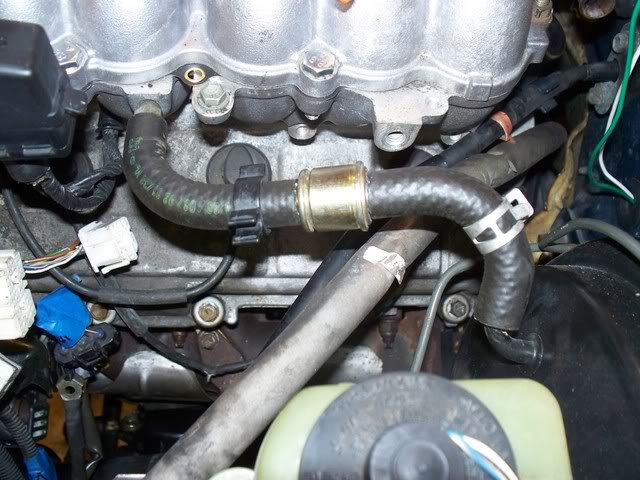
Hooked up the brake booster, just cut the old hose and put the valve in the middle
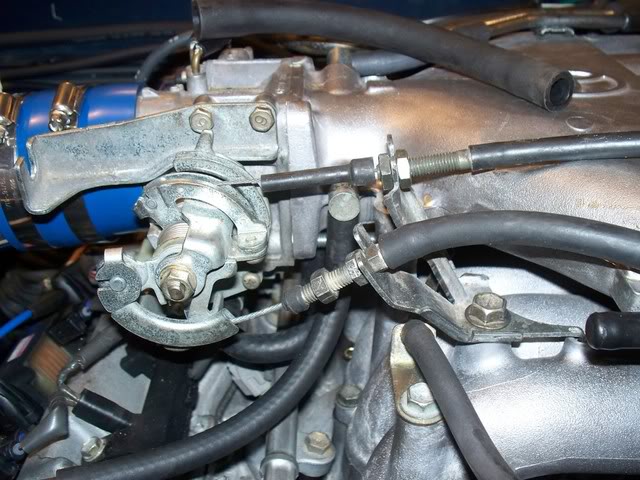
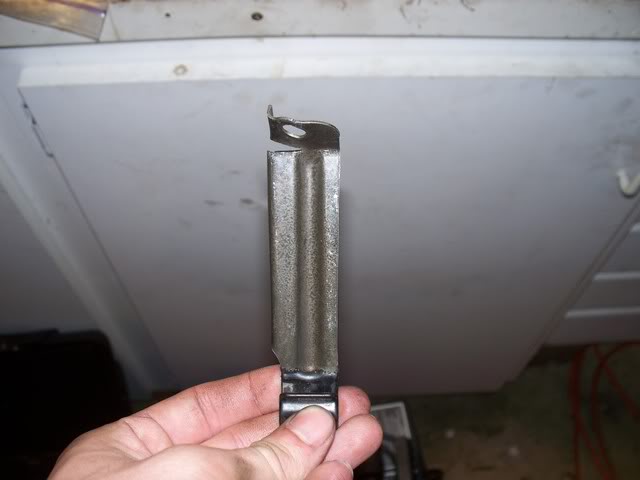
Next I had to cut and modify the throttle cable bracket so the cables would sit right
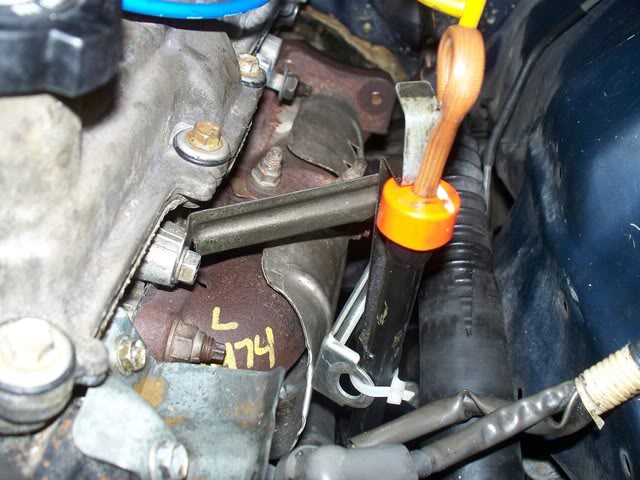
Then I used a bracket from the 3.4 I was no longer using and it worked great as a bracket for the 3.0 dipstick tube
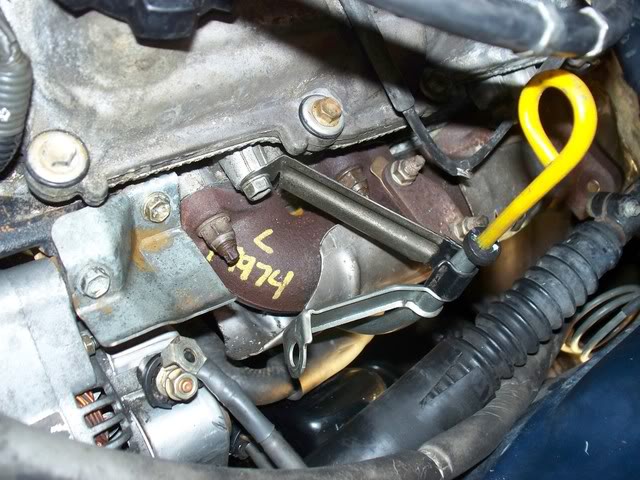
The tranny tube is a tight fit, but didn't need any modification
Then I set up the evap system using the 3.0 canister using the diagram in Evolta's thread
Next I set out to get my tranny wiring done. I found the pinouts the same way as the wiring for the body harness plugs. Some of the wires will no longer be used such as the I6 pins 4 and 5 for transfer fluid temp as the T100 ecu doesn't measure that.
I should note that the plug on the rear of the transfer case (S11) needs to be wired directly to your body harness, plug C2 in my case. This plug is for your speedometer speed sensor.
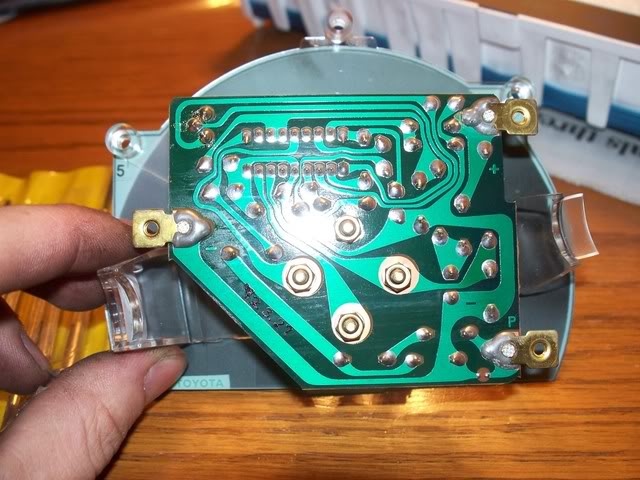
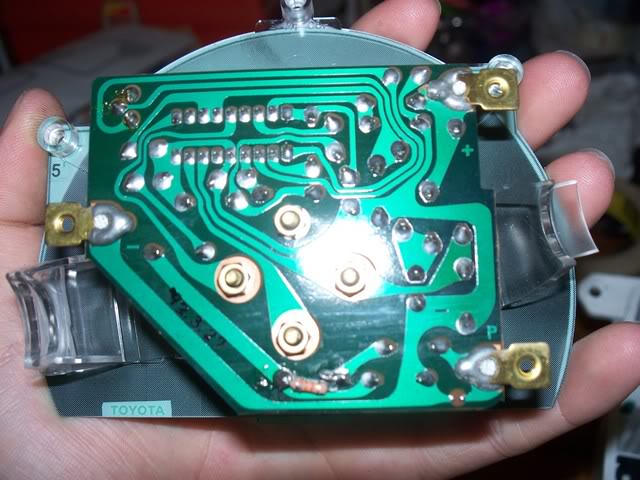
Here's the tach mod using 10k ohm resistor, worked just as I expected
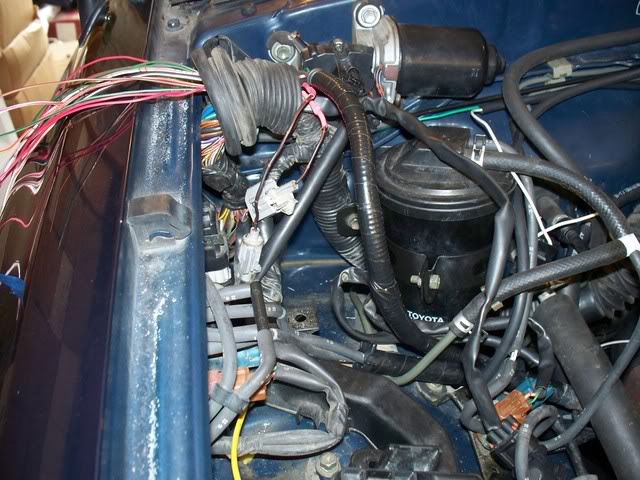
Because I used a T100 engine harness it doesn't have any VSV wiring (located in body harness) so I used the vsv wiring off of the 3.0 and it worked just fine. Heres where I pulled the vsv wiring, speedo speed sensor wiring and starter wiring through the firewall grommet
For my starter relay I had to do some wiring in the fuse box, don't trust the pinouts on the actual relay in the fusebox, pins 1 and 2 were switched on mine so look in your EWD for the correct pins.
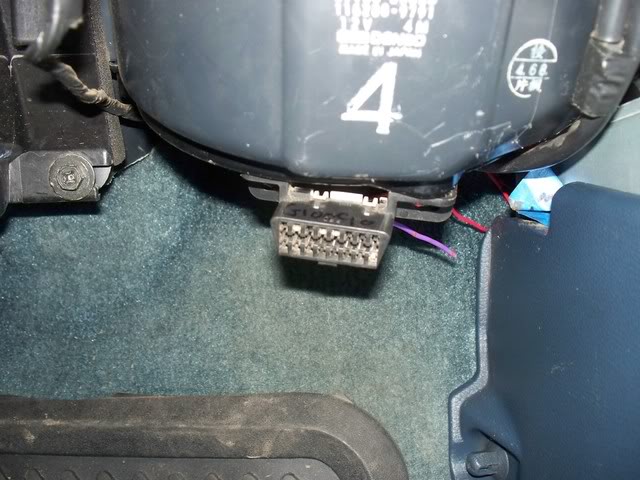
Heres where I installed the OBDII reader below the glove compartment
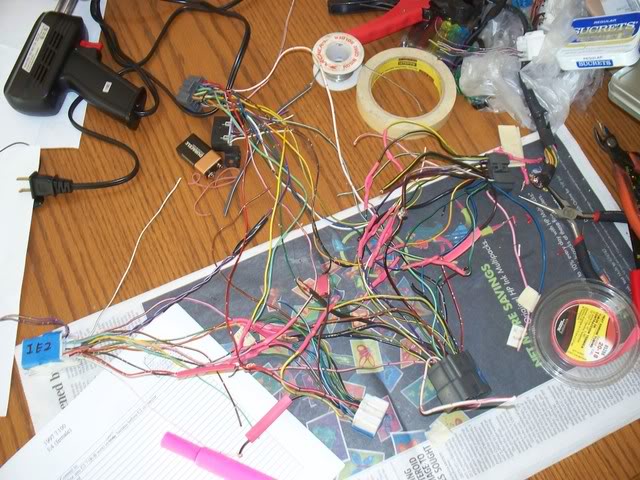
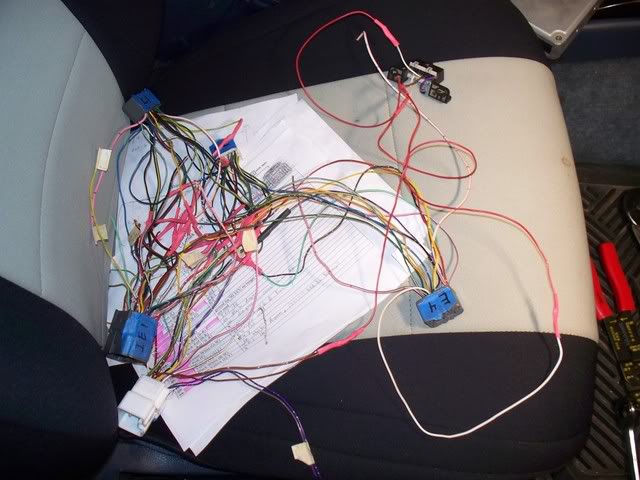
And here's some pictures of the many headed beast known as my conversion harness
And a few pics of my hood scoop. Its for a '79 mustang got it off ebay. Definitely need to do some more work on it to make it look nice but ran out of time.
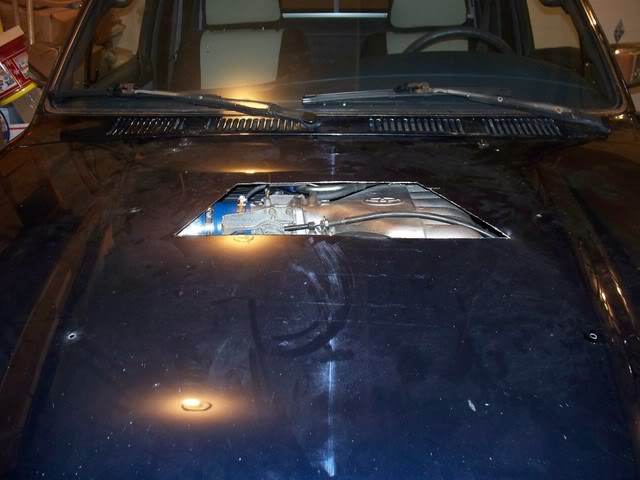
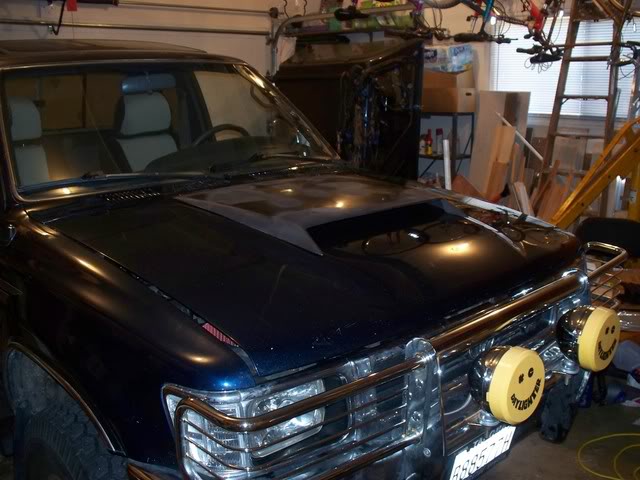
This pic isn't the finished product, but the best one I have at the moment
So it started on the first try which I was stocked about, made all those weeks of wiring worth it. Still have a few things to figured out though. The tranny seems to shift hard when shifting between P-R-N-D but seems to be fine when in drive going down the road. Unfortunately I got it started 2 days before I had to leave for college and had to leave the truck at home as I didn't want to drive it without having the bugs worked out and have all my hard work wasted. I do have a few codes which I'm guessing are for the second O2 sensor which I don't have put in, probably just going to get a simulator. Those are the only problems so far, 4wd appears to work and I did keep ADD, not sure if 4lo is actually engaging as I haven't wired up a relay to the 4th solenoid yet, just didn't have time to test everything as I had to leave. So my dad's going to see what he can figure out on it hopefully when I'm home for Christmas break I'll finally have a truck again.
So to start of where i left off. Got the torque converter bolted up to the drive plate and the tranny bolts tightened up. Next I installed all the accessories to the engine. My alternator barely cleared, which is common so I cut the end off of the 3.4 bracket:
Hooked up the brake booster, just cut the old hose and put the valve in the middle
Next I had to cut and modify the throttle cable bracket so the cables would sit right
Then I used a bracket from the 3.4 I was no longer using and it worked great as a bracket for the 3.0 dipstick tube
The tranny tube is a tight fit, but didn't need any modification
Then I set up the evap system using the 3.0 canister using the diagram in Evolta's thread
Next I set out to get my tranny wiring done. I found the pinouts the same way as the wiring for the body harness plugs. Some of the wires will no longer be used such as the I6 pins 4 and 5 for transfer fluid temp as the T100 ecu doesn't measure that.
I should note that the plug on the rear of the transfer case (S11) needs to be wired directly to your body harness, plug C2 in my case. This plug is for your speedometer speed sensor.
Here's the tach mod using 10k ohm resistor, worked just as I expected
Because I used a T100 engine harness it doesn't have any VSV wiring (located in body harness) so I used the vsv wiring off of the 3.0 and it worked just fine. Heres where I pulled the vsv wiring, speedo speed sensor wiring and starter wiring through the firewall grommet
For my starter relay I had to do some wiring in the fuse box, don't trust the pinouts on the actual relay in the fusebox, pins 1 and 2 were switched on mine so look in your EWD for the correct pins.
Heres where I installed the OBDII reader below the glove compartment
And here's some pictures of the many headed beast known as my conversion harness
And a few pics of my hood scoop. Its for a '79 mustang got it off ebay. Definitely need to do some more work on it to make it look nice but ran out of time.
This pic isn't the finished product, but the best one I have at the moment
So it started on the first try which I was stocked about, made all those weeks of wiring worth it. Still have a few things to figured out though. The tranny seems to shift hard when shifting between P-R-N-D but seems to be fine when in drive going down the road. Unfortunately I got it started 2 days before I had to leave for college and had to leave the truck at home as I didn't want to drive it without having the bugs worked out and have all my hard work wasted. I do have a few codes which I'm guessing are for the second O2 sensor which I don't have put in, probably just going to get a simulator. Those are the only problems so far, 4wd appears to work and I did keep ADD, not sure if 4lo is actually engaging as I haven't wired up a relay to the 4th solenoid yet, just didn't have time to test everything as I had to leave. So my dad's going to see what he can figure out on it hopefully when I'm home for Christmas break I'll finally have a truck again.
02-20-2012, 11:03 AM
#10
Registered User
Thread Starter
Join Date: Apr 2011
Location: Dearborn, MI
Posts: 47
Likes: 0
Received 0 Likes
on
0 Posts
Finally another update on my swap. So to deal with the hard shifting all that had to be done was to adjust the kickdown cable? At least I think that's what its called, goes from the throttle body to the transmission. Over Christmas break I was able to paint and securely mount the hood scoop and I also got a code reader. Turns out the only code I had was for the second O2 sensor. So I ordered a simulator from URD. It worked great for the one trip that I was able to take the truck on over break and threw no codes after the install. I took my truck on a 4 hour drive to the Tri-cities and the transmission overheat light came on, so i pulled over and let it cool off. I then drove back home and the light stayed off for the rest of the trip. So I think a tranny cooler would fix this problem, but I never got to test it out as unfortunately my truck was totaled a few weeks ago . The swap ran great though except for the one instance of the transmission overheating.
So the conclusion that I have come to after completing this swap is that yes it is possible to swap in a 3.4 keeping the 3.0 auto, but in retrospect I would just do a 5-speed swap at the same time. I learned a ton doing this swap and definitely couldn't have done it without the help of those who have done it before.
Here is all of my wiring diagrams that I used for my swap. I take no responsibility for what happens to your truck if you use my wiring, it worked great for me, but if your truck burns down don't blame me.
Main Wiring
https://docs.google.com/open?id=0BxW...RmMjUzZDU1MWQ0
Transmission Wiring
https://docs.google.com/open?id=0BxW...EyMmZkYWU1MzZh
The first part of each document shows the function of each wire, the second part show what i connected each wire to. I hope this helps someone out there, wiring is definitely the hardest part of the swap, but if you do it yourself it is really rewarding to know how it all works.
I would love to do this swap again, but now that I'm in college I don't have the funds or time to do it. So now I'm looking for a cheap 22RE extended cab to drive around until I graduate.
. The swap ran great though except for the one instance of the transmission overheating. So the conclusion that I have come to after completing this swap is that yes it is possible to swap in a 3.4 keeping the 3.0 auto, but in retrospect I would just do a 5-speed swap at the same time. I learned a ton doing this swap and definitely couldn't have done it without the help of those who have done it before.
Here is all of my wiring diagrams that I used for my swap. I take no responsibility for what happens to your truck if you use my wiring, it worked great for me, but if your truck burns down don't blame me.
Main Wiring
https://docs.google.com/open?id=0BxW...RmMjUzZDU1MWQ0
Transmission Wiring
https://docs.google.com/open?id=0BxW...EyMmZkYWU1MzZh
The first part of each document shows the function of each wire, the second part show what i connected each wire to. I hope this helps someone out there, wiring is definitely the hardest part of the swap, but if you do it yourself it is really rewarding to know how it all works.
I would love to do this swap again, but now that I'm in college I don't have the funds or time to do it. So now I'm looking for a cheap 22RE extended cab to drive around until I graduate.
02-21-2012, 04:35 PM
#12
Registered User
Thread Starter
Join Date: Apr 2011
Location: Dearborn, MI
Posts: 47
Likes: 0
Received 0 Likes
on
0 Posts
Yeah it was actually my dad who was in the accident, he felt really bad knowing how much work I put into it, but that's life I guess. I remember reading about that other truck, it really sucks. But got a decent amount from insurance so will be able to by another truck, just got to find the right one.
11-04-2012, 07:28 PM
#13
Registered User

Join Date: Aug 2011
Location: Knoxville, TN
Posts: 2
Likes: 0
Received 0 Likes
on
0 Posts
95 4runner Auto 4x4 3.slow - 3.4 swap keeping A340H
Here's the question, has anyone else done this swap?
Coming home today from work engine started knocking, got home and all the oil was covering the passenger side suspension, no oil up around the head gaskets or the valve cover gaskets. Thinking about swapping to the 3.4 but not sure if this is feasible.
Coming home today from work engine started knocking, got home and all the oil was covering the passenger side suspension, no oil up around the head gaskets or the valve cover gaskets. Thinking about swapping to the 3.4 but not sure if this is feasible.
11-04-2012, 09:10 PM
#14
Registered User

Join Date: Aug 2010
Posts: 177
Likes: 0
Received 0 Likes
on
0 Posts
Yep, actually was driving the 3.4 swapped 4runner when this post came through. You need a T100 preferably a 97 or 98 if you want to keep supercharging in the future on the table, but otherwise yes, very doable.
11-05-2012, 09:37 AM
#15
Registered User
Thread Starter
Join Date: Apr 2011
Location: Dearborn, MI
Posts: 47
Likes: 0
Received 0 Likes
on
0 Posts
Yeah lots of people have swapped in the 3.4, not as many who have done it while keeping the auto though. But there are several other members who have kept the auto and got them to work out fine. When I finally have the funds to get another truck and swap in a 3.4 though I plan on going with a manual, I feel like the auto really sucks away power and mileage.
11-17-2012, 05:46 PM
#16
Registered User
if your going to use an auto trans, use the 3.4 engine,original trans, ecu and wire harness together.
the 3.4 trans is an improved version, better than the 3.0 auto trans.
i used the original gear drive transfer case with a marlin adapter.
the 3.4 trans is an improved version, better than the 3.0 auto trans.
i used the original gear drive transfer case with a marlin adapter.
 12-28-2012, 09:25 AM
#18
Registered User
Thread Starter
Join Date: Apr 2011
Location: Dearborn, MI
Posts: 47
Likes: 0
Received 0 Likes
on
0 Posts
True, that might be a better route if you have the money, but i had a pretty new trans in the truck to begin with so didn't want to add the cost of another new tranny into the swap.
07-04-2015, 10:56 AM
#19
Registered User
Thread Starter
Join Date: Apr 2011
Location: Dearborn, MI
Posts: 47
Likes: 0
Received 0 Likes
on
0 Posts
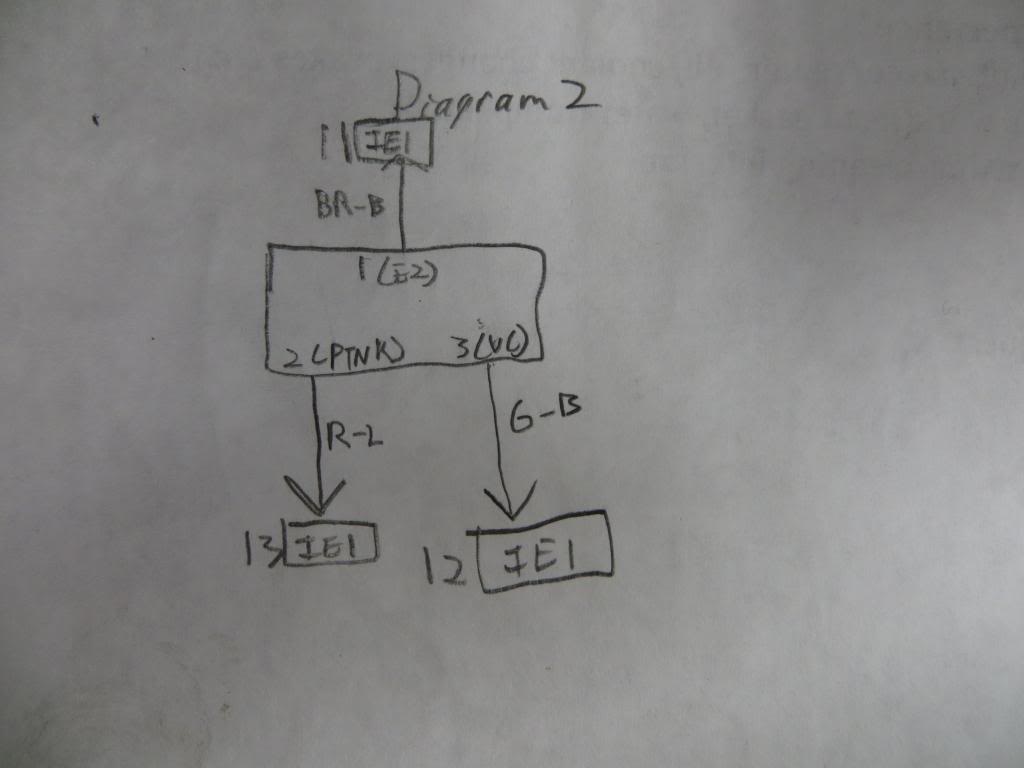
Sorry to revive an ancient thread, but it was brought to my attention that I forgot to put up some of the diagrams I used for my wiring. So here are the diagrams my wiring references.
Diagram 1

Diagram 2
Starter Diagram
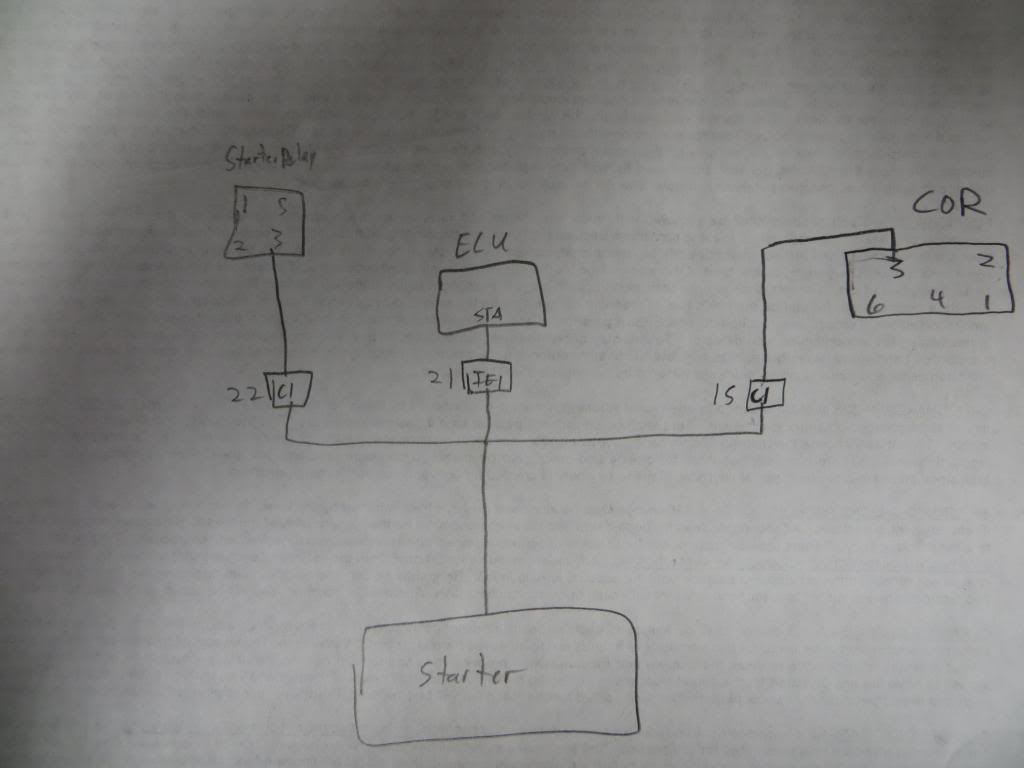
Diagram 1

Diagram 2

Starter Diagram
 12-14-2022, 11:12 AM
#20
Registered User
Thread Starter
Join Date: Apr 2011
Location: Dearborn, MI
Posts: 47
Likes: 0
Received 0 Likes
on
0 Posts
Wiring Swap PDF's
It seems the google links are now dead for the wiring documents, here's PDF copies, glad they are still helpful to those working on their own swaps.

Thread
Thread Starter
Forum
Replies
Last Post
Flying91
86-95 Trucks & 4Runners (Build-Up Section)
45
04-11-2024 04:39 PM
WTB[PacNorWest]: WTB - Tacoma/4runner 3.4 Charcoal canister and igniter
94whiterunner
Items Wanted
0
07-12-2015 07:15 PM


