1st Gen 4runner 3.4L engine swap
 06-25-2013, 10:47 AM
#21
Registered User
Thread Starter

Join Date: May 2010
Location: Fredericksburg, VA
Posts: 56
Likes: 0
Received 0 Likes
on
0 Posts
Front end progress...
So I got the timing covers off and discovered the water pump and thermostat had pretty good leaks. No matter, my intention was to replace everything in the front end (mostly since I can stop saying "while I'm at it").
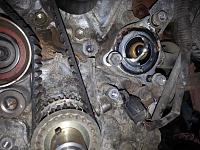
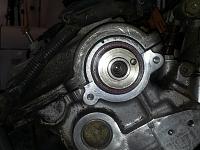
After I got the timing belt, crankshaft sprocket, camshaft sprockets, water pump, thermostat and rear timing cover the survey was pretty nasty.
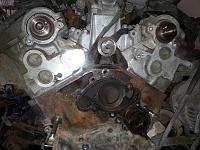
Here's what it looked like after cleaning it all up.

After I got the timing belt, crankshaft sprocket, camshaft sprockets, water pump, thermostat and rear timing cover the survey was pretty nasty.

Here's what it looked like after cleaning it all up.

 06-25-2013, 10:59 AM
#22
Registered User
Thread Starter
Join Date: May 2010
Location: Fredericksburg, VA
Posts: 56
Likes: 0
Received 0 Likes
on
0 Posts
Front end progress, cont.
Duuuudeee.... getting those seals out is a bear. I taped the end of my screwdriver, liked the Haynes manual and the FSM stated, but I kept tearing through the tape. I must have taped the end of my screwdriver about 50 times. The camshaft seals were the worst. The main seal wasn't that hard, but my hand was pretty much wore out by then. Maybe I was just being overly careful (i.e. a pansy) because I afraid of gouging the camshafts and then ending up with an oil leak. As it was, there are very slight scratches on the shaft. They are very minor. I hope I didn't screw this up. If anyone has any experience with this, please alleviate my fears.
I made an SST for the job (thanks to the million threads on the subject). Here's a pic of my Homemade Special Tool (HSST):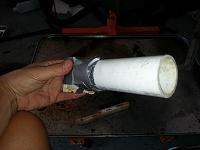
And I got the front main seal in first. I decided to do this one first because I mistakenly ordered two of them, so I figured if I was going to make a mistake I would rather learn when I had a spare.
Tapping the special tool with a hammer drove the seal in too far. By too far I mean, it looked further than it did when comparing to the old one. So I dug it out (by now I was practically a pro.... famous last words... this is foreshadowing) and just tapped the HSST with the palm of my hand (did I mention my hand was already wore out). As it was, I think it is in a hair further than the original was, but it was in square, so I think I'm good to go.
Then I moved on to the Right Camshaft. Much like they were tougher coming out, they didn't go in by just mashing your palm into the HSST. (OUCH!) I moved on to the hammer and got that one in, nice and square and seemingly perfect (like the original in seat depth).
I made an SST for the job (thanks to the million threads on the subject). Here's a pic of my Homemade Special Tool (HSST):

And I got the front main seal in first. I decided to do this one first because I mistakenly ordered two of them, so I figured if I was going to make a mistake I would rather learn when I had a spare.
Tapping the special tool with a hammer drove the seal in too far. By too far I mean, it looked further than it did when comparing to the old one. So I dug it out (by now I was practically a pro.... famous last words... this is foreshadowing) and just tapped the HSST with the palm of my hand (did I mention my hand was already wore out). As it was, I think it is in a hair further than the original was, but it was in square, so I think I'm good to go.

Then I moved on to the Right Camshaft. Much like they were tougher coming out, they didn't go in by just mashing your palm into the HSST. (OUCH!) I moved on to the hammer and got that one in, nice and square and seemingly perfect (like the original in seat depth).
 06-25-2013, 11:06 AM
#23
Registered User
Thread Starter
Join Date: May 2010
Location: Fredericksburg, VA
Posts: 56
Likes: 0
Received 0 Likes
on
0 Posts
Front end progress, cont.
And..... moving on to the left hand camshaft seal. What could go wrong, right? At this point, I've ripped out 4 of these seals, seated three (although one incorrectly) and managed to destroy the heel/palm of my right hand so much so that I won't be able to... nevermind.
I guess starting with the hammer was a mistake, I don't know. I greased each of the seals up the same. Slid them all on slowly and deliberately down the shafts, but on this one, I hit it with a hammer instead of my palm.
Anyway, it wasn't progressing like the last one and then I realized it was canted and the lip was bent over/outwards on one side. Awesome. I admit, I tried to push in the lip with the tip of a screwdriver and then I gave it another whack or so. Thankfully, that didn't work, because if it would have I may have just been happy with that work until it leaked at a later date when I would have been furious at my laziness.
So, now I got the chance to remove yet ANOTHER camshaft seal. Toyota doesn't have one in stock so I'm stuck waiting until tomorrow to put that last one in. FYI: I ordered two.
06-26-2013, 10:34 AM
#24
Registered User
They don't seem like they should be, but those seals can be tricky the first couple times through, both in terms of removing them and installing them.
The first cam seal I installed, I wasn't sure if I should have oiled/greased or not, so I didn't, then decided to oil the rest, so I went back and replaced the first (non-oiled) seal with a new, oiled one.
I don't remember my cam seals being all that difficult to install, but then again I used the same piece of PVC but with a cap on the end and light taps with a hammer; so far no leaks.
The rear main seal was a pain to install just because of the diameter of the thing (its like 4-5") I couldn't find a piece of PVC that would have worked so I used a length of 1x2 wood and with a hammer lightly tapped it in all the way around. But now that's leaking, so don't take my route when you get there.
06-26-2013, 11:26 AM
#25
Registered User
Thread Starter
Join Date: May 2010
Location: Fredericksburg, VA
Posts: 56
Likes: 0
Received 0 Likes
on
0 Posts
They don't seem like they should be, but those seals can be tricky the first couple times through, both in terms of removing them and installing them.
The first cam seal I installed, I wasn't sure if I should have oiled/greased or not, so I didn't, then decided to oil the rest, so I went back and replaced the first (non-oiled) seal with a new, oiled one.
I don't remember my cam seals being all that difficult to install, but then again I used the same piece of PVC but with a cap on the end and light taps with a hammer; so far no leaks.
The rear main seal was a pain to install just because of the diameter of the thing (its like 4-5") I couldn't find a piece of PVC that would have worked so I used a length of 1x2 wood and with a hammer lightly tapped it in all the way around. But now that's leaking, so don't take my route when you get there.
The first cam seal I installed, I wasn't sure if I should have oiled/greased or not, so I didn't, then decided to oil the rest, so I went back and replaced the first (non-oiled) seal with a new, oiled one.
I don't remember my cam seals being all that difficult to install, but then again I used the same piece of PVC but with a cap on the end and light taps with a hammer; so far no leaks.
The rear main seal was a pain to install just because of the diameter of the thing (its like 4-5") I couldn't find a piece of PVC that would have worked so I used a length of 1x2 wood and with a hammer lightly tapped it in all the way around. But now that's leaking, so don't take my route when you get there.
Did u happen to notice ANY knicks/scratches after removed the cam seals?
06-26-2013, 12:31 PM
#26
Registered User
I think so; when I did it, all I did was remove the old seal and install the new one. I didn't remove the pan (had already swapped it) or any type of retainer.
When I pulled the cam seals, I actually drilled a small pilot hole in the bottom then screwed a wood screw into that hole 1-2 threads and used that to pull them out (took a couple tries in a couple holes). The cam itself wasn't scratched at all, there were a couple little "dimples" in the head where the screw hit, but so far no issues.
When I did the timing belt in my Subaru I replaced all the cam/crank seals but didn't have room to get the drill in there so I used a flat head screw driver and even though I was careful I'm pretty sure I scratched either the cam or head slightly, but so far (5k miles) no leaks.
06-26-2013, 04:18 PM
#27
Registered User
Thread Starter
Join Date: May 2010
Location: Fredericksburg, VA
Posts: 56
Likes: 0
Received 0 Likes
on
0 Posts
water pump question
I finally got the cam seal on today. Good thing I got two because I messed it up again on the first try. Wasn't real proud of that, but whatever. It's done now.
Rear timing cover back on, left and right sprockets back on. Thought I was gonna keep on truckin' and finish the reassembly of the front of the engine. But when I looked in the FSM (or maybe it was the Haynes, I don't remember at this point), it told me to clean the area with acetone and add a thin bead of rtv to the seating surface. I understand why the acetone is necessary, but my kit came with a paper seal that has a rubber bead built into it. The manual didn't say anything about that. Is the rtv method the "newer" method, making the gasket obsolete. Or is it vice versa? Or do I maybe use both? How has done it one way and wish they'd done it the other? Regardless, I will probably pick up some acetone on the way home from work tomorrow.
As an aside... is there any kind of spray/brush/cleaner that I can use to remove some of the surface rust I see? On my crankshaft pulley there is some rust in the teeth. I assume it really doesn't matter and when the belts spinning around it will likely "clean" it up, but I was wondering if there is a product I can use to make it look prettier. If no one answers quick enough, I'm not going to sweat it, just thought I could do it "while I'm at it." :-)
Sac-Thanks again. Hearing someone else struggled with these tasks doesn't help them get done but certainly vindicates me a bit.
06-26-2013, 04:30 PM
#28
Contributing Member
Join Date: Nov 2010
Location: Columbia River Gorge, Oregon...east side
Posts: 5,125
Likes: 0
Received 2 Likes
on
2 Posts
The original Toyota design of the 5vz-fe water pumps had a groove for the FIPG/RTV. The updated model eliminated the groove and is supplied with a gasket with a sealant bead already applied. IIRC, the Aisin Toyota WP gasket is not paper, but a thin metal with sealant.
Brake or carb cleaner would work to clean that sealing surface too.
BTW, did you mean cam seals or crank seal? You used the singular seal when referring to the cam of which there is two. Confused, I am.
Brake or carb cleaner would work to clean that sealing surface too.
BTW, did you mean cam seals or crank seal? You used the singular seal when referring to the cam of which there is two. Confused, I am.
Last edited by rworegon; 06-26-2013 at 04:34 PM.
06-26-2013, 04:58 PM
#29
Registered User
Thread Starter
Join Date: May 2010
Location: Fredericksburg, VA
Posts: 56
Likes: 0
Received 0 Likes
on
0 Posts
I meant cam seal... I already had the right one in. Had bent the left one yesterday when I was putting it in. Now main seal and both cam seals have been replaced.
06-29-2013, 02:13 PM
#31
Registered User
Thread Starter
Join Date: May 2010
Location: Fredericksburg, VA
Posts: 56
Likes: 0
Received 0 Likes
on
0 Posts
Timing help please...
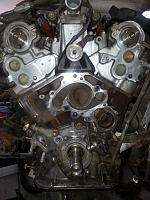
I got the sprockets, water pump, thermostat, idlers on today. I thought I was getting the timing perfect. Once I got it all together, I looked and noticed that the crankshaft sprocket appears to be a "half" of a tooth off... or maybe a quarter of a tooth. Anyway, I could just be paranoid but I thought it best to check with the "collective" experts on here before I went any further. I cranked it around two turns and it ended up back at the same exact place.
Is this ok? If not, I guess I have to pull the belt, turn the crank to the right one hair and then put it all back together. Thanks for the info.
Is this ok? If not, I guess I have to pull the belt, turn the crank to the right one hair and then put it all back together. Thanks for the info.
06-30-2013, 02:17 PM
#32
Registered User
Thread Starter
Join Date: May 2010
Location: Fredericksburg, VA
Posts: 56
Likes: 0
Received 0 Likes
on
0 Posts
Figured out that was fine. Barely bumped the right crankshaft, the bottom was in line perfectly and when I looked at the two cam shaft marks they were still in line too.
07-06-2013, 12:39 PM
#33
Registered User
Thread Starter
Join Date: May 2010
Location: Fredericksburg, VA
Posts: 56
Likes: 0
Received 0 Likes
on
0 Posts
exhaust manifold stud broke off! :-(
Need some advice. Was replacing the exhaust manifolds from ca to federal (long annoying story please dont ask) and I broke off a stud. Drilled it out with a smaller bit cause I was going to run a tap in there but now im thinking either helicoil or just ignore that one nut and put it on with 5. Anyone know what threads these are and/or have any advice? Thanks. A little lost now.
07-06-2013, 03:49 PM
#34
Registered User
Thread Starter
Join Date: May 2010
Location: Fredericksburg, VA
Posts: 56
Likes: 0
Received 0 Likes
on
0 Posts
It must be the day to break studs. Was taking the oil pan off the donor and I broke a stud. Good times. Why in the world are there studs there anyway. On my old 3.0 there were 15 nuts and 4 studs with nuts. They were at either end so I didnt really think anything of it. Then on this one there were two total. Just at wierd or seemingly random places. Anyway, one of them broke so now I have to figure out how to tap that hole and this one makes me more nervous. A slight exhaust manifold leak because I hypothetically didnt do a great job with a tap or helicoil is one thing. But doesnt feel quite the same on my oil pan. Anyway, technical advice is appreciated. Maybe tomorrow I wont break any studs.
07-15-2013, 08:35 AM
#36
Registered User
Thread Starter
Join Date: May 2010
Location: Fredericksburg, VA
Posts: 56
Likes: 0
Received 0 Likes
on
0 Posts
Some decent progress this weekend
Only got to work on Sunday, but had a great helper in the form of my wife and we managed to knock out a bunch of stuff. Got the entire engine bay cleaned up, grinded, repainted... not pretty, but there's rustoleum there now and that's what i care about. Got the new batter compartment painted and mounted. Got the rear main seal/retainer installed. Got a helocoil in where oil pan bolt broke off and got the old oil pan distick location plugged. Got oil pan mounted. Tried to tap the broken exhaust manifold bolt hole. Major fail. Ordered a 10x1.25 helocoil this morning. Also got both engine mounts grinded painted, slapped the new isolators on and installed those. Grinded the back side of the one boss on the A/C bracket and installed the bracket and compressor. What's left before this engine goes in...
- Helocoil kit the one exhaust manifold hole.
- Header wrap the crossover.
- Swap the A/C top with the 3.0 compressor top.
- Install power steering pump.
- Cut the lower alternator bracket (or maybe i will wait to see this as I'm lowering it in)
- Flywheel installation
- Clutch installation
I think that's a weekend... guess we will see. Probably try do some of those nickel and dime things in the evenings after work if i feel up to it. Usually don't after the ~2hr commute, so who knows.
08-12-2013, 06:46 AM
#37
Registered User
Thread Starter
Join Date: May 2010
Location: Fredericksburg, VA
Posts: 56
Likes: 0
Received 0 Likes
on
0 Posts
Need help with heater hoses.
I haven't gotten on in a while, but I've managed to knock out a few items in my spare time. Got fuel supply and return installed, got power steering lines connected, got radiator, fan and clutch, drive belts all on. (This was a bear, be careful of donor's that have been involved in a front end collision... the bearing on the lower timing cover/faux water pump can be slightly pushed in, yet not obvious to the naked eye, making your belt alignment all messed up.) Got emmissions evap done as well.
All I need to do, to move on to the wiring is bleed the clutch (I didn't have a helper), install the air box and figure out the heater hoses. This is where my question comes.
I've been through the 88 service manual to try and figure out how to connnect the truck's heater hoses to the 3.4 engine but I can't find it at all. Does anybody have a diagram or a picture pointing out what does what and goes where?
Thanks!
10-08-2013, 08:43 AM
#38
Registered User
Thread Starter
Join Date: May 2010
Location: Fredericksburg, VA
Posts: 56
Likes: 0
Received 0 Likes
on
0 Posts
It's done and running great!!
I have been negligent in posting my progress, but I have had the truck running now for about a month. There have been little minor things I've been messing with, but it is officially done.
However, I do have one strange "problem." I'm only getting about 16 mpg on the highway and the idle is a little high. The engine idles around 1100-1150 when sitting at a light (after it is warmed up). I did have trouble with my throttle cable (i.e. after the initial install i had ALL the slack out of the cable and the engine was idling around 2500 rpm), but i fixed that by using an ADJUSTER (in other words a BFH) on the bracket the throttle cable mounts to. Now the cable isn't tight at all when the gas pedal is fully released.
Has anyone seen this? Any advice where to start looking. In a possibly related note, about a week ago (during a long trip and when sitting in bumper to bumper traffic), i got a Idle Air Control CEL. I wasn't near home so I used Advance's scanner, cleared the code and it hasn't returned since then... finishing that road trip and driving it multiple other times.
02-20-2015, 08:29 AM
#39
Registered User

Join Date: Jul 2013
Posts: 2
Likes: 0
Received 0 Likes
on
0 Posts
sorry if iv missed it in the thread earlier but i cant seem to find a 100% answer on engine mounts to use for the swap. What ones did you end up using on your swap, i think iv got everything ready to do the swap but i dont want to pull the motor and have to find out the hard way iv gotta hunt some different ones down
02-20-2015, 09:59 AM
#40
Registered User
sorry if iv missed it in the thread earlier but i cant seem to find a 100% answer on engine mounts to use for the swap. What ones did you end up using on your swap, i think iv got everything ready to do the swap but i dont want to pull the motor and have to find out the hard way iv gotta hunt some different ones down

Thread
Thread Starter
Forum
Replies
Last Post
slacker
Vendors Build-Ups (Build-Up Section)
13
09-06-2015 06:14 AM


