87 4runner SAS weekend project
 10-01-2014, 10:12 AM
#1
Registered User
Thread Starter
Join Date: Feb 2014
Location: SUWANEE GEORGIA
Posts: 17
Likes: 0
Received 0 Likes
on
0 Posts
87 4runner SAS weekend project
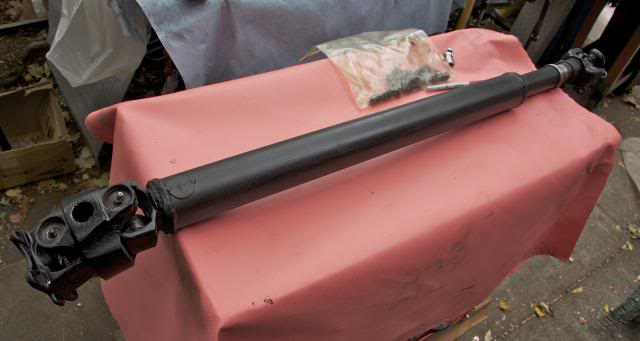
i have owned 2 toyota trucks, 86 pickup ifs. and 95 ifs. both ran 39.5 TSL's. i never had any room for travel.. so i just put this sas on my daily driver.. pretty straight forward.. ill post pics and such as i get them put on my computer.. making front drive shaft now.
want to run some big tires.. not sure of the size yet.
want to run some big tires.. not sure of the size yet.
 10-01-2014, 11:33 AM
#2
Registered User
Thread Starter
Join Date: Feb 2014
Location: SUWANEE GEORGIA
Posts: 17
Likes: 0
Received 0 Likes
on
0 Posts
some before pics
here are a few before pics and the axle when i got it.(its from a 1985 of course) cutting all the brackets off and cleaning it up for the truss and high steer.
10-01-2014, 12:03 PM
#4
Registered User
Thread Starter
Join Date: Feb 2014
Location: SUWANEE GEORGIA
Posts: 17
Likes: 0
Received 0 Likes
on
0 Posts
axle pics
axle build pics. trussed up and high steer added, and i put 87 4runner calipers and rotors on. those 85's warp too bad.
5" skyjacker softrides front and rear.
all other stuff for sas is trail gear.
5" skyjacker softrides front and rear.
all other stuff for sas is trail gear.
 10-02-2014, 05:52 AM
#7
Registered User
Thread Starter
Join Date: Feb 2014
Location: SUWANEE GEORGIA
Posts: 17
Likes: 0
Received 0 Likes
on
0 Posts
thanks, had some computer problems but got them fixed. here are some of the last pictures. i have tons of pics, but just tried to choose the most descriptive one...rides like a champ, needs tires bad.
Trending Topics
10-02-2014, 06:11 AM
#8
Registered User
Thread Starter
Join Date: Feb 2014
Location: SUWANEE GEORGIA
Posts: 17
Likes: 0
Received 0 Likes
on
0 Posts
all finished now.. but only one thing whipped my butt... everything was pretty easy and straight forward, and just when you think you are done.. no brakes! replaced everything from the master cylinder to ALL THE BRAKE COMPONENTS...i would never in a million years guessed what was causing the pedal to build up.. then after a few seconds.. to the floor.. i used two professional bleeding systems, one that pumps from the brakes to the reservoir, and one that pumps from reservoir to the brakes,. i was getting plenty of fluid at the bleeders, no air.. but no brakes.. finally figured out it was the front.. note to self..(and to anyone else who does this)
step 1. remove front calipers.
step 2. press brake petal until all 4 pistons have pretty much came out their full stroke
step 3. break open bleed valve, and depress the pads back to push the pistons back so they will fit around rotor.
step 4. reinstall calipers and they will now work.
i am sure someone will think that that is what they would have done first.. but EVERYTHING was new. and i didnt expect this to be an issue. obviously, the reservoir behind the pistons has to be big enough to build up pressure or it bypasses to the bleed screw.
LESSON LEARNED.
10-02-2014, 08:10 AM
#9
Registered User
Are your bleeder valves on the top of or the bottom of the calipers? Hard to tell from the pictures.
Whats with the mini blocks under the leafs? You only need one on the drivers side to level things out. ( Edit, ment drivers side. )
Otherwise, Looks great! What size tire are you planning on running?
Whats with the mini blocks under the leafs? You only need one on the drivers side to level things out. ( Edit, ment drivers side. )
Otherwise, Looks great! What size tire are you planning on running?
Last edited by rattlewagon; 10-02-2014 at 12:15 PM.
 10-02-2014, 10:05 AM
#11
Registered User
Thread Starter
Join Date: Feb 2014
Location: SUWANEE GEORGIA
Posts: 17
Likes: 0
Received 0 Likes
on
0 Posts
Are your bleeder valves on the top of or the bottom of the calipers? Hard to tell from the pictures.
Whats with the mini blocks under the leafs? You only need one on the pass side to level things out.
Otherwise, Looks great! What size tire are you planning on running?
Whats with the mini blocks under the leafs? You only need one on the pass side to level things out.
Otherwise, Looks great! What size tire are you planning on running?
i only added the one on the driver side.. passenger side had one already.
thanks man.. i plan on a 39.5 but those things are expensive!
might have to run the old tiny tims for a while. my brother has a couple of land cruisers and one has a nice set of 32 tsl's. i might run them till i can afford some meats.
10-02-2014, 10:39 AM
#12
Registered User
iTrader: (1)

Join Date: Mar 2013
Location: Mobile, Alabama
Posts: 2,121
Likes: 0
Received 0 Likes
on
0 Posts
they were on the bottom of the calipers.. i only added the one on the driver side.. passenger side had one already. thanks man.. i plan on a 39.5 but those things are expensive! might have to run the old tiny tims for a while. my brother has a couple of land cruisers and one has a nice set of 32 tsl's. i might run them till i can afford some meats.
10-02-2014, 11:00 AM
#13
Registered User
Thread Starter
Join Date: Feb 2014
Location: SUWANEE GEORGIA
Posts: 17
Likes: 0
Received 0 Likes
on
0 Posts
they were on the bottom of the calipers..
i only added the one on the driver side.. passenger side had one already.
thanks man.. i plan on a 39.5 but those things are expensive!
might have to run the old tiny tims for a while. my brother has a couple of land cruisers and one has a nice set of 32 tsl's. i might run them till i can afford some meats.
just realized what you meant about the small spring pads, some spring manufacturers dont sell left and right springs, so you have to put a 3/8 pad on the drivers side to level them out. if they were factory springs, you are right, only the passenger side gets it..
10-02-2014, 11:20 AM
#14
Registered User
Thread Starter
Join Date: Feb 2014
Location: SUWANEE GEORGIA
Posts: 17
Likes: 0
Received 0 Likes
on
0 Posts
just caught onto that when you said top or bottom..OOPS.. swapping them out now.. haha. easy to do when you got 3 people working on 3 different parts of the truck lol.
that makes mucho sense to have the valve on top.. where the air would be.:great
10-02-2014, 12:09 PM
#15
Registered User
they were on the bottom of the calipers..
i only added the one on the driver side.. passenger side had one already.
thanks man.. i plan on a 39.5 but those things are expensive!
might have to run the old tiny tims for a while. my brother has a couple of land cruisers and one has a nice set of 32 tsl's. i might run them till i can afford some meats.
i only added the one on the driver side.. passenger side had one already.
thanks man.. i plan on a 39.5 but those things are expensive!
might have to run the old tiny tims for a while. my brother has a couple of land cruisers and one has a nice set of 32 tsl's. i might run them till i can afford some meats.
If I read that right, you have the calipers on the wrong side, thats why you were having such a hard time bleeding them. The bleeder valves go on top, air goes up.
For the superlift springs, you should have 1 pad under the drivers side, and thats it.
Last edited by rattlewagon; 10-02-2014 at 12:16 PM.
10-02-2014, 04:57 PM
#16
Registered User
Thread Starter
Join Date: Feb 2014
Location: SUWANEE GEORGIA
Posts: 17
Likes: 0
Received 0 Likes
on
0 Posts
Tires are expensive. Haha. Going to run the stock gears?
If I read that right, you have the calipers on the wrong side, thats why you were having such a hard time bleeding them. The bleeder valves go on top, air goes up.
Close... the drive side is the low one (your right there). So you only need 1 pad, under the drivers side to level them out. Looks like you have 2 on the drivers side and one on the passenger... If they were factory spring, neither side you get the pad because drivers side spring would be 3/8 taller.
For the superlift springs, you should have 1 pad under the drivers side, and thats it.
As for the spring perch pads, since there was one on the passenger side.. I had to add one to the drivers side. Drivers side was dramatically lower. My springs were soft ride 5" and they were the same. Leveled up nice. Almost done with the double u joint driveshaft. I don't do hard wheeling so it should be fine. Only hunting and driving to workl lol
Thanks for the info and comments
I'll add more pics when I add tires.
Got the fiberglass rear fender flares to add also. I'm no body man. I'm a gunsmith so any advice on how and what to do would be appreciated. You can see my rear fender rust from the awesome chrome trim aka rust maker
11-27-2014, 03:45 AM
#18
Registered User
Thread Starter
Join Date: Feb 2014
Location: SUWANEE GEORGIA
Posts: 17
Likes: 0
Received 0 Likes
on
0 Posts
how much lift..
thanks,
not sure exactly, i never measured any before the lift..i think 39.5's would fit, but still need some mods to flex decent. but i got a hell of a lot more up front than the rear,and they were both softride 5" lift springs. i had to do a longer shackle in the rear to level it out. still dont have tires. . but it would look a lot better with tires. i just made up my drive shaft for the front the other week. works great. i just clearanced the CV like most have done. i am glad i went with the soft ride springs though, it rides really firm to the steering wheel, but soft on the bumps. although i love the truck, i think im going to sell it. looks like i need rear pinion bearings now.. got a roar starting in the rear. no biggie. ill slap it out tomorrow.. working on thanksgiving is awesome....lol
not sure exactly, i never measured any before the lift..i think 39.5's would fit, but still need some mods to flex decent. but i got a hell of a lot more up front than the rear,and they were both softride 5" lift springs. i had to do a longer shackle in the rear to level it out. still dont have tires. . but it would look a lot better with tires. i just made up my drive shaft for the front the other week. works great. i just clearanced the CV like most have done. i am glad i went with the soft ride springs though, it rides really firm to the steering wheel, but soft on the bumps. although i love the truck, i think im going to sell it. looks like i need rear pinion bearings now.. got a roar starting in the rear. no biggie. ill slap it out tomorrow.. working on thanksgiving is awesome....lol
 [IMG][IMG]
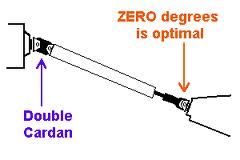 [/IMG][/IMG]
11-28-2014, 06:49 PM
[/IMG][/IMG]
11-28-2014, 06:49 PM
#20
Registered User
Thread Starter
Join Date: Feb 2014
Location: SUWANEE GEORGIA
Posts: 17
Likes: 0
Received 0 Likes
on
0 Posts
Nope... Found u- joint bad. Angle is perfect. I couldn't tell because I only checked axle end u joint.. Upper one was D stroyed... Don't see how I missed it but man was I glad it was a u joint. Thanks though!
 [IMG][IMG]


